A V12 sized gamble
Discussion


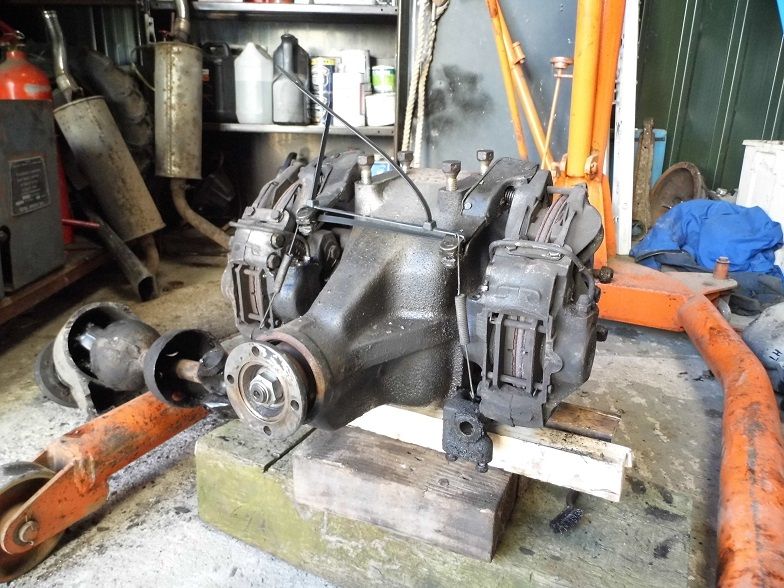
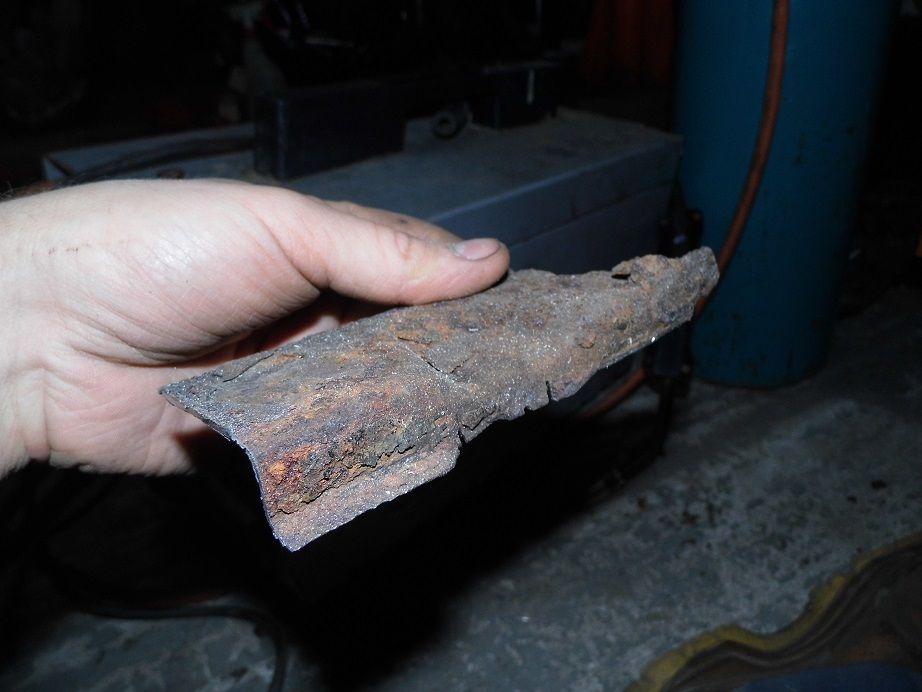
Well, had a few weekends off from cars I'm afraid to say. Definitely know how to spend a Friday night so I got cracking with the suspension/axle stripdown and cut a bit of rot out of the offside rear arch just to survey the situation.
I wasn't best pleased to get poking with a screwdriver and see it go straight through the lower arch piece, I cut a square out with the grinder and thankfully internally it's fairly solid. A bit of welding should see this back to normal, sadly it didn't allow me access to the snapped radius arm bolt as this is the other side, right in the inner sill. The rear arch really is quite crusty and seemed to be keeping most of its integral strength from the waxoyl in there, it was the age old story of rot behind the waxoyl you can't see.
After I build the rear end up it'll be going straight for some bodywork attention, it's a shame it can't be done 'as is' due to everything being more accessible, and I suspect the radius arm will have to be removed again too.
I was a bit apprehensive about stripping the IRS down so I took lots of pictures, marked everything up, then reassembled it when it was off the assembly.
At this point in time the springs are out, the lower arms are off, and tomorrow should have it right back to the differential itself. Through a mate at work I've hopefully managed to secure a hefty discount on all the bits I need, including an exhaust. It's all a bit of a waiting game and really time is not on my side at the moment. I want the car back on the road for May, and I'm away for the best part of a month from March 30th. It's all a bit depressing at the minute!
Thankyou! Still pretty brave and good on you for getting a superbarge, they're the way forward! (if you're looking for financial ruin) 
Dropped the hubs off at a specialists today for reconditioning, I was thinking about having a go myself but chickened out, it's a fairly in depth process to set up the bearings and I'd much rather have someone looking over my shoulder making sure it's done right.
I set myself a deadline that the car would be done by May, but realistically including the bodywork issues that's not going to happen. It needs to be done right, so it's finished when it's finished.
Hopefully get the lower trunnions, cage, etc. cleaned up this weekend, then away for blasting. The callipers are going to be rebuilt and zinc plated, so it should be looking pretty impressive.
Someone said more pictures? A few boring ones to add:

The diff is now completely stripped of discs and callipers, all I was going to do with this is paint it, and get the rear cover beadblasted to bring it up like new again. Yes nobody's ever going to see it, but at least I know it's shiny under there...
Courtesy of work's part cleaner the hubs came up quite well:
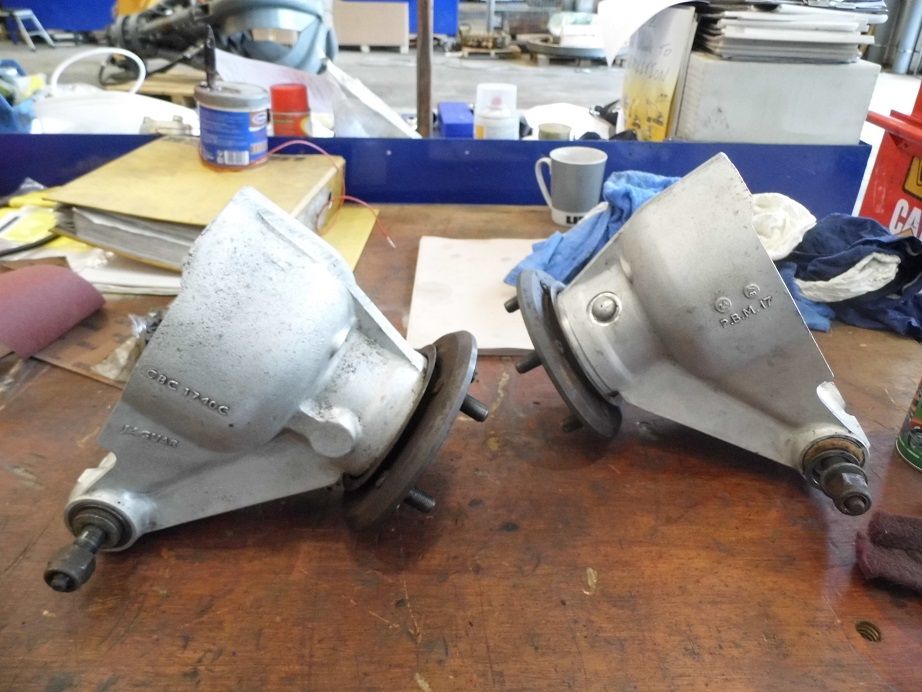
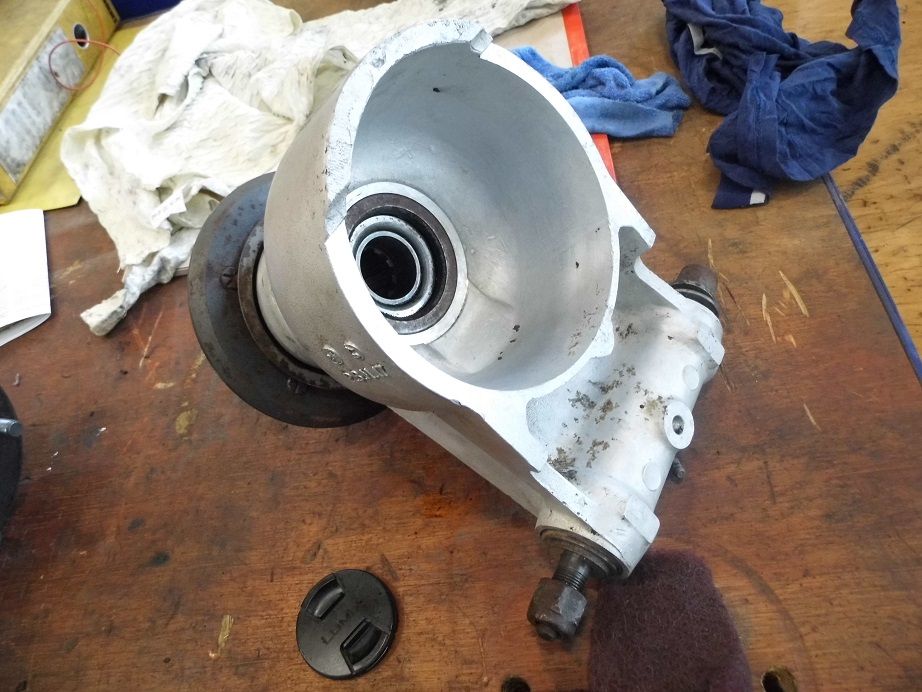
Obviously these are away for recon at the moment so I'm hoping when they come back they should be like new


A man can never have enough variable pressure applicators.  Needed them to drive the roller bearings out from the inner ends of the wishbones.
It is pretty messy but I'm hoping it'll be worth it in the long run. I do have a pint tin of POR 15 I bought specially a couple of months back for this sort of job so I'll have to think about that. The cage I was thinking of spraying for a real mirror finish. Had some great results with smooth Hammerite from spray cans before, just requires lots and lots of very, very thin coats to get it looking nice.
Needed them to drive the roller bearings out from the inner ends of the wishbones. It is pretty messy but I'm hoping it'll be worth it in the long run. I do have a pint tin of POR 15 I bought specially a couple of months back for this sort of job so I'll have to think about that. The cage I was thinking of spraying for a real mirror finish. Had some great results with smooth Hammerite from spray cans before, just requires lots and lots of very, very thin coats to get it looking nice.
Edited by LewG on Thursday 3rd April 09:49
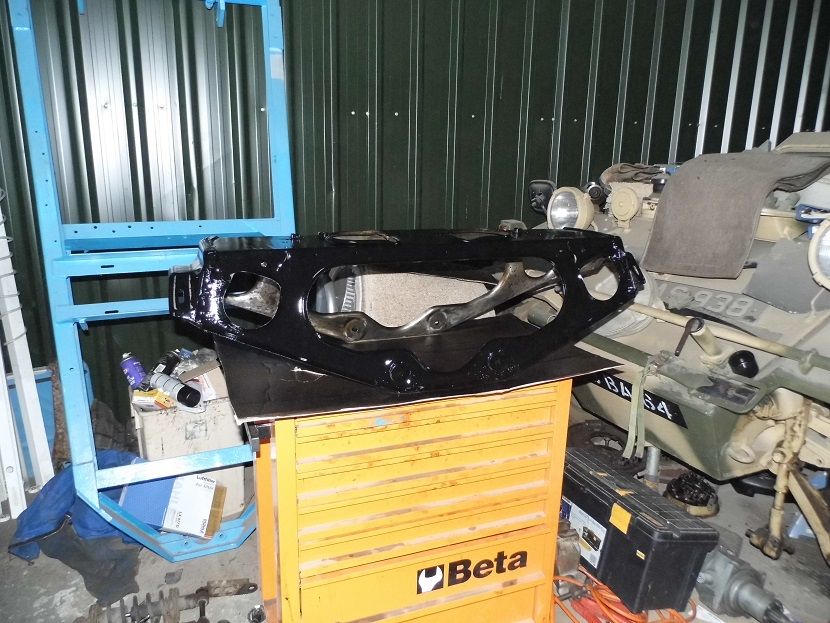
A small update, just a bit of progress on endless wire brushing and trying to make things look shiny.
The outside of the cage has now been painted, just the inside to do. I want to leave the outside to cure completely over the week, then I can start painting the insides.
Diff is stripped and received several hours of soul destroyingly tedious wire brushing today:

Callipers are getting there slowly, they'll received a good clean at work this week ready to be sent off for plating:
There's a lot to do before I can even think about putting it all back together, a good job really as one of the sources for parts is messing me around, it's been about a month since I placed an order and although I keep chasing them I'm not getting very far.
The outside of the cage has now been painted, just the inside to do. I want to leave the outside to cure completely over the week, then I can start painting the insides.


Diff is stripped and received several hours of soul destroyingly tedious wire brushing today:

Callipers are getting there slowly, they'll received a good clean at work this week ready to be sent off for plating:

There's a lot to do before I can even think about putting it all back together, a good job really as one of the sources for parts is messing me around, it's been about a month since I placed an order and although I keep chasing them I'm not getting very far.
Well, as my parts never seemed to materialize I decided to go the whole hog, go out, and buy the Jag some presents.
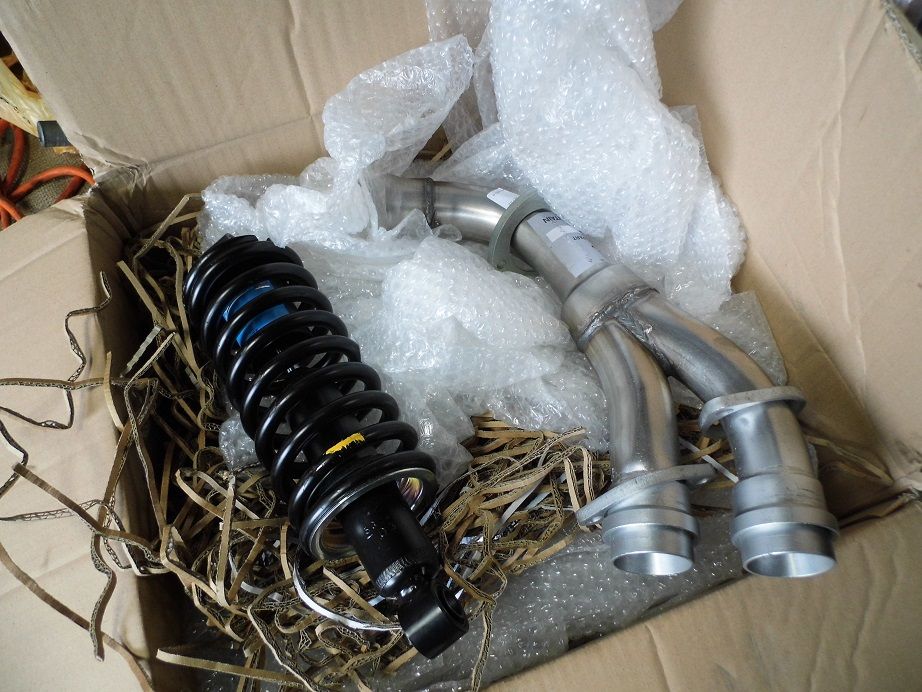
Two stainless front Y pipes, just out of view a full stainless exhaust system, and four Boge shocks and springs. That's a month's wages pretty much decimated in one go, but isn't it great opening a box of shiny car parts?
Today was once again a painting and prepping day really, the other calliper has now been stripped down. I've been doing these completely separately so as not to mix up any of the bits.
Apart from that a bit of pre-MOT maintenance on other toys:
Before fitting the exhaust system I'm aiming to get some stainless clamps and new flange bolts because the old ones are all pretty past it.
I'd be interested to know if anyone has any information on the gearbox mounts on the XJ-S, ever since owning the car in hard right hand corners, roundabouts etc. there has been a tapping noise from the transmission tunnel. I can see where one exhaust has been coming into contact with the gearbox oil pan, and from what I can see one of the body bolts has been coming into contact with the gear shifter rod. I've tried pushing the gearbox up by hand and I can see both engine and gearbox move fairly readily. I know the rear mount is overly complicated and contains a spring but should there really be that much movement?

Two stainless front Y pipes, just out of view a full stainless exhaust system, and four Boge shocks and springs. That's a month's wages pretty much decimated in one go, but isn't it great opening a box of shiny car parts?
Today was once again a painting and prepping day really, the other calliper has now been stripped down. I've been doing these completely separately so as not to mix up any of the bits.
Apart from that a bit of pre-MOT maintenance on other toys:

Before fitting the exhaust system I'm aiming to get some stainless clamps and new flange bolts because the old ones are all pretty past it.
I'd be interested to know if anyone has any information on the gearbox mounts on the XJ-S, ever since owning the car in hard right hand corners, roundabouts etc. there has been a tapping noise from the transmission tunnel. I can see where one exhaust has been coming into contact with the gearbox oil pan, and from what I can see one of the body bolts has been coming into contact with the gear shifter rod. I've tried pushing the gearbox up by hand and I can see both engine and gearbox move fairly readily. I know the rear mount is overly complicated and contains a spring but should there really be that much movement?
Trevor, thanks for the info, haven't had any horrible noises but I think changing them is definitely a good move. I've heard about the poly route as that seems the way to go, do it once and forget about it. After all the engine and box is a mighty big lump with plenty of torque going through it so it has to be right.
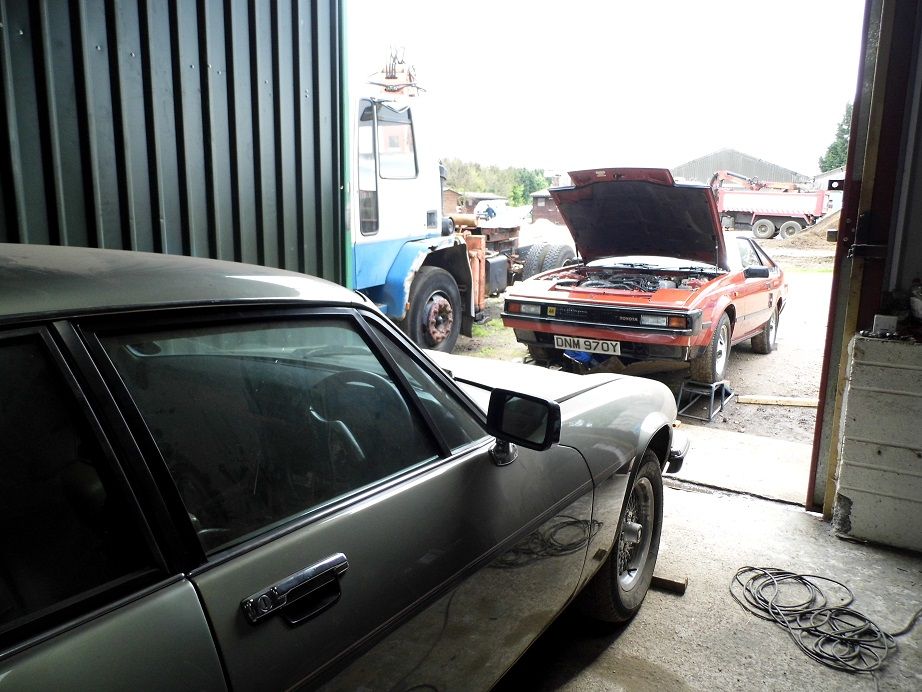
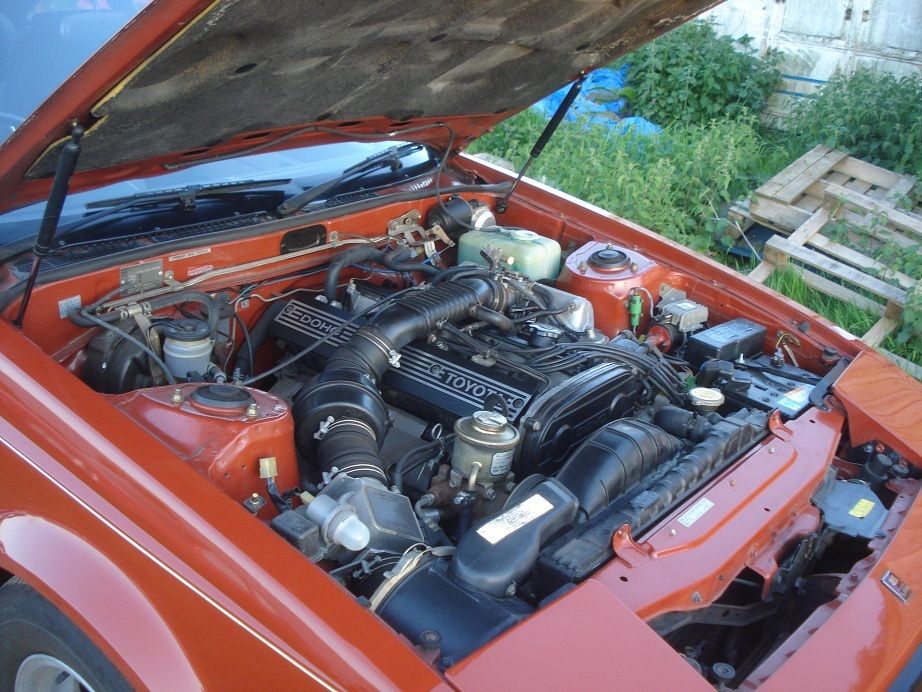
As for the Celica Supra, I'm sure a few more pictures won't do any harm
Fundamentally they're a great car, mechanically strong and ahead of their time back in 1982. Rust is the biggest enemy as you've found out!
This is an early UK spec one so unfortunately it's a narrowbody with the earlier wheels on, that makes it very rare, but not quite as good looking as the later Mk2s.
It's done 60k from new, kept by the original owners in a heated garage until 2011. If anything needed doing it was done, and always by Toyota themselves. I found receipts in the history folder dated 2004 for £400 of insurance, and it covered 11 miles between MOTs that year.
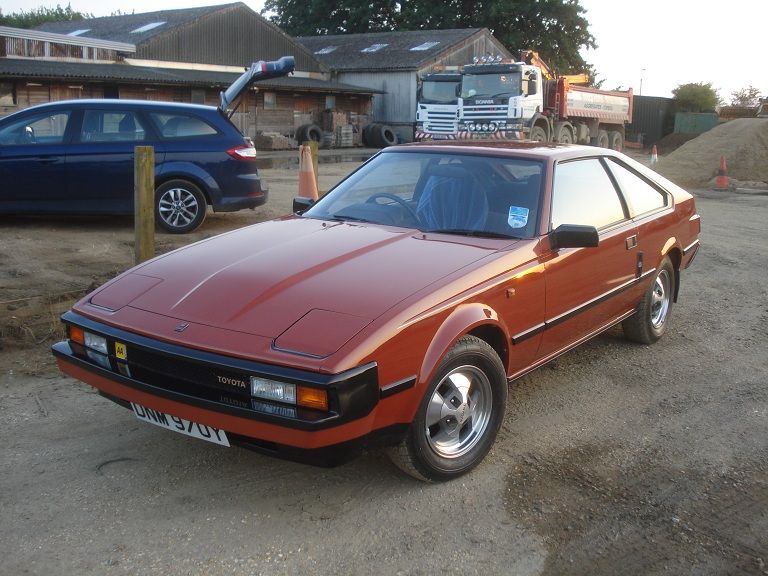

Has a strangely Knight Rider-ish quality to it!
Sold it to dad and made a good profit to fund the Jag purchase, possibly a big mistake!
As for the Celica Supra, I'm sure a few more pictures won't do any harm
Fundamentally they're a great car, mechanically strong and ahead of their time back in 1982. Rust is the biggest enemy as you've found out!
This is an early UK spec one so unfortunately it's a narrowbody with the earlier wheels on, that makes it very rare, but not quite as good looking as the later Mk2s.
It's done 60k from new, kept by the original owners in a heated garage until 2011. If anything needed doing it was done, and always by Toyota themselves. I found receipts in the history folder dated 2004 for £400 of insurance, and it covered 11 miles between MOTs that year.


Has a strangely Knight Rider-ish quality to it!

Sold it to dad and made a good profit to fund the Jag purchase, possibly a big mistake!
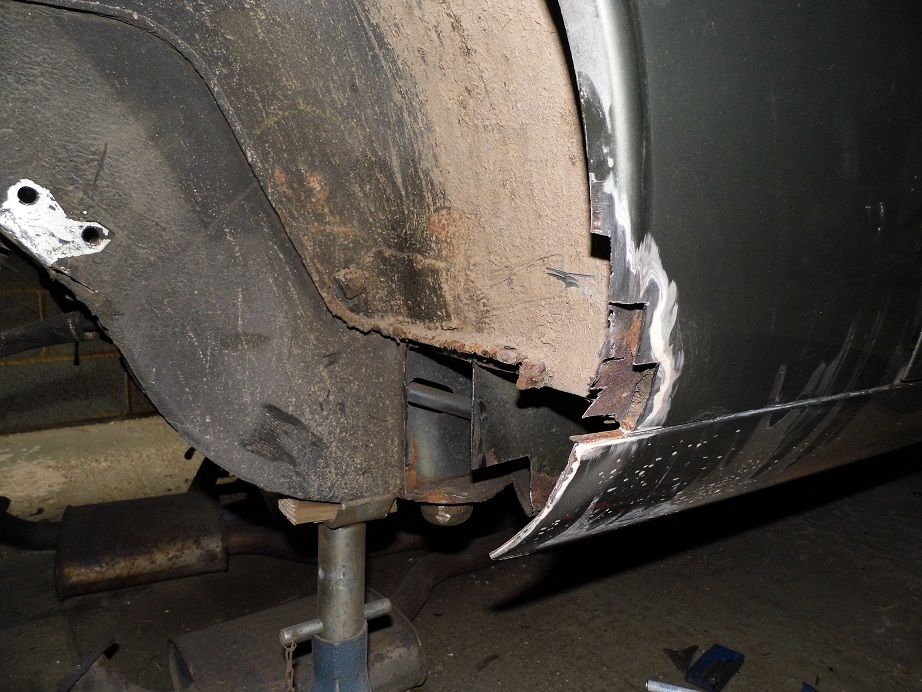
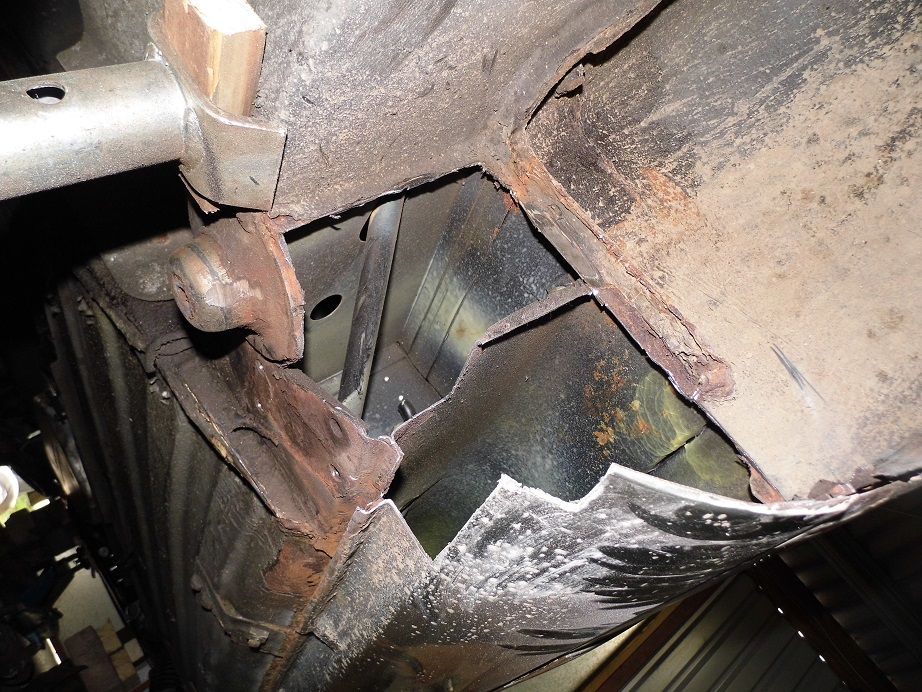
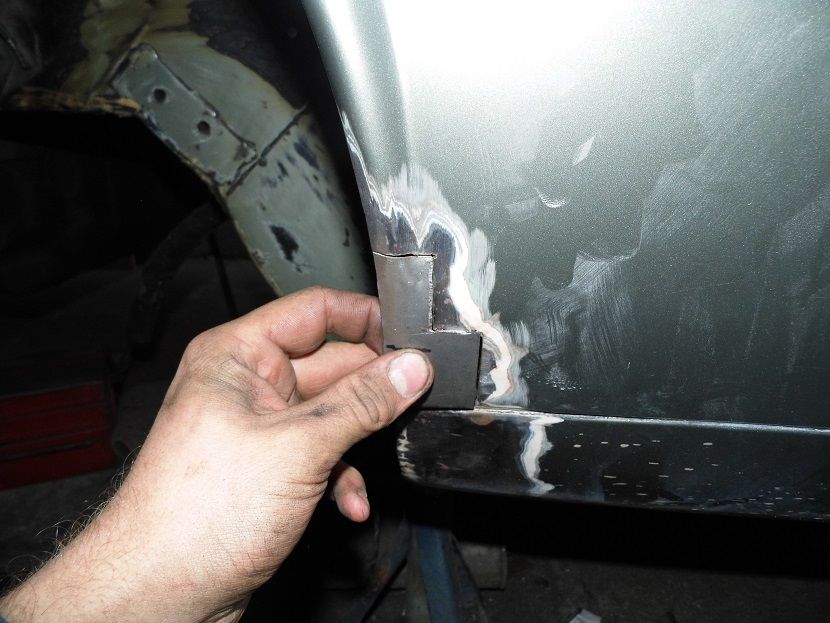
Well here we are gents, I've got stuck into the nasty rust round the rear arch and sill. As you can see I've cut out rather a lot and there's still a bit more to go....
I have to admit bodywork is not really my strong point but I'm willing to give it a shot, I've got a few mates who are pretty good at this sort of thing so there's always a guiding hand where needed.
Jaguar put in fluted drain channels all the way along the sill, it really wasn't the finest idea they've ever had and this is the remains of the rearmost one on mine:
The reconditioned hubs are due to be collected late this week, and the callipers and other bits should be coming back from the platers tomorrow or Tuesday. The end is in sight now, I really can't wait to get back behind the wheel.


I have to admit bodywork is not really my strong point but I'm willing to give it a shot, I've got a few mates who are pretty good at this sort of thing so there's always a guiding hand where needed.
Jaguar put in fluted drain channels all the way along the sill, it really wasn't the finest idea they've ever had and this is the remains of the rearmost one on mine:

The reconditioned hubs are due to be collected late this week, and the callipers and other bits should be coming back from the platers tomorrow or Tuesday. The end is in sight now, I really can't wait to get back behind the wheel.
Thanks V8, I was hoping to get the entire assembly back together this weekend but sadly my callipers etc. are not back from the platers yet.
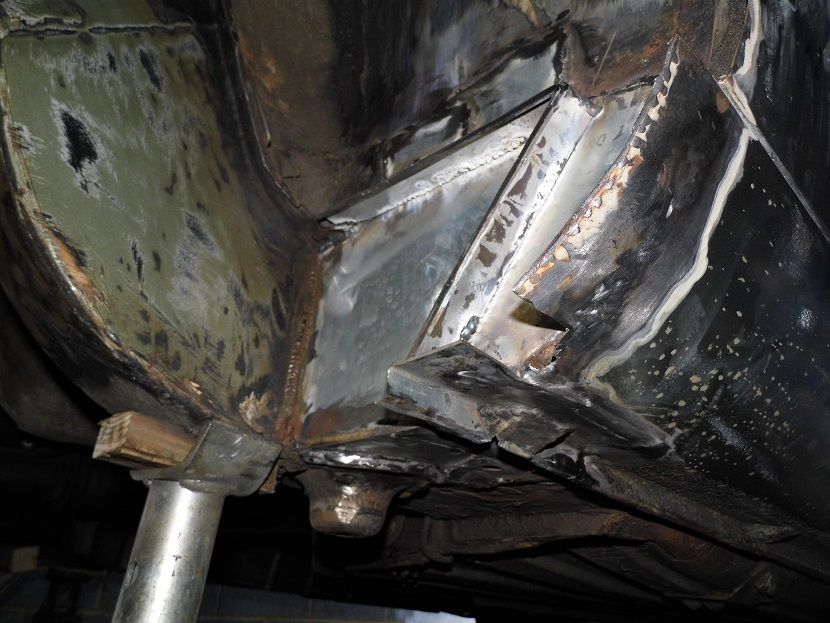
In the meantime I got a couple of repair panels made up today, and made the awkward fluted drain hole panel to be welded back into the bottom of the sill. It doesn't look too bad as it is, and with a bit of cleaning up should look close to the original, not that the picture does it any justice!
Only got one of the stainless front Y pipes fitted, as when I moved onto the other side all the studs had corroded or stripped beyond repair. Ordered four new ones and extracted the old.
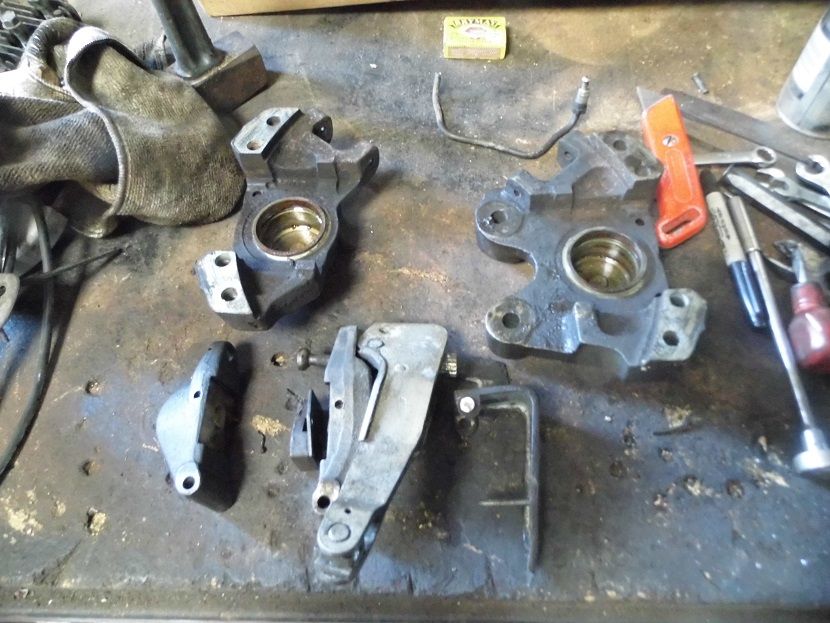
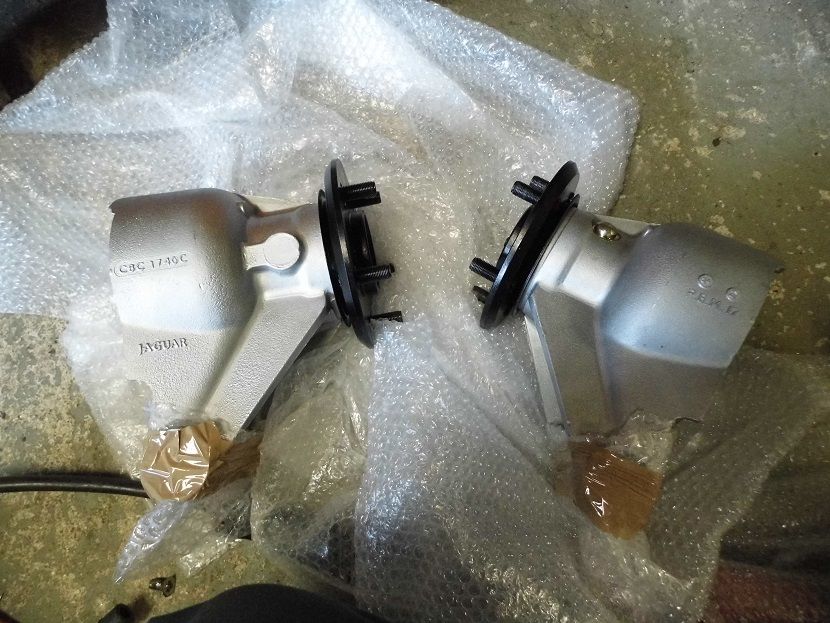
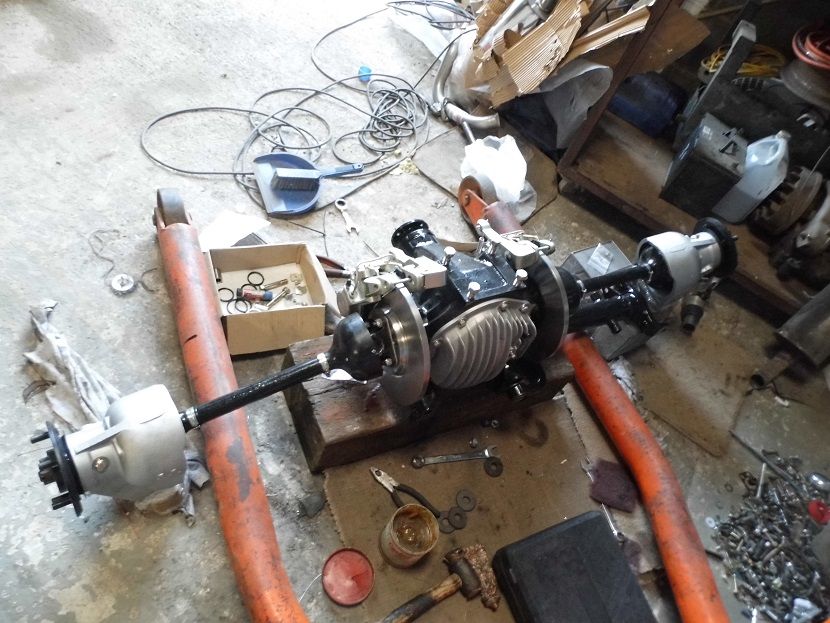
Last but not least yesterday I went to go and pick up the reconditioned hubs, and what a thing of beauty they are:
It was a pretty expensive day yesterday, new bearings for everything and a brake rebuild kit, and then just to punish my pockets further I went out to the daily driver and found the rear window smashed, along with my college bag taken from inside. All college work and bag found in a hedge three doors up, but I'll never get the 85 quid back I've just had to spend on a new glass.
In the meantime I got a couple of repair panels made up today, and made the awkward fluted drain hole panel to be welded back into the bottom of the sill. It doesn't look too bad as it is, and with a bit of cleaning up should look close to the original, not that the picture does it any justice!

Only got one of the stainless front Y pipes fitted, as when I moved onto the other side all the studs had corroded or stripped beyond repair. Ordered four new ones and extracted the old.
Last but not least yesterday I went to go and pick up the reconditioned hubs, and what a thing of beauty they are:

It was a pretty expensive day yesterday, new bearings for everything and a brake rebuild kit, and then just to punish my pockets further I went out to the daily driver and found the rear window smashed, along with my college bag taken from inside. All college work and bag found in a hedge three doors up, but I'll never get the 85 quid back I've just had to spend on a new glass.
http://cars.uk.msn.com/features/celebrity-cars/the...
Looks like you're right soad, from what I've read the car has been sold a couple of times since then
Looks like you're right soad, from what I've read the car has been sold a couple of times since then
Thanks djt, I can only imagine what it was like being seen in such a beast. Definitely an event every time you got behind the wheel though!
A bit more done on it tonight, looks as if I can now win the 'shiniest diff that'll never be seen again' competition:

The body repairs are nearly finished, the rest of the arch needs to be done, and the structural part and sill are welded and just need tidying.
Unfortunately whilst the callipers were away for plating the threaded ferrule on the handbrake calliper covers has come off on both sides which is a bit of a headache.
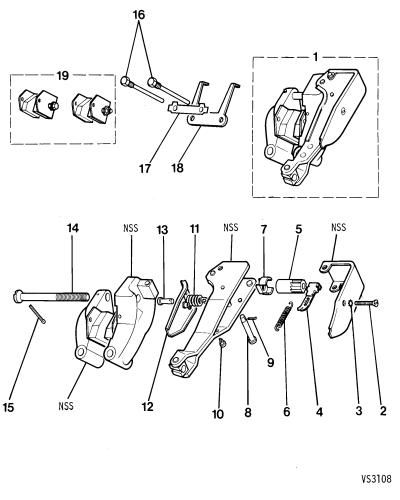
Basically part number 2 goes right through and meets a small threaded insert on part 12. Annoyingly there's now just a hole, no insert. I'm wondering whether the pickle they put it in before plating has eaten the brazing away or whatever held the insert on. Unfortunately the part is no longer available so I'll have to tack a nut on or something. It seems really insignificant but it still puts me back a step.
More progress on the beast today as being lazy, I booked the day off work. Refitted the N/S downpipe and heat shield, got the brake callipers re-sealed and back together and put those and the 'feet' back on the diff.
Greased up the UJs and started to attach the driveshaft 'hats', realising halfway through that I didn't have enough pop rivets. Always the way!
Took a break to fire it up with just the downpipes on, I can safely say my ears are still bleeding from that one.
Also got a repair patch made up for the bottom part of the wing, and a picture of the welding I finished the other night:
Some cleaning up to be done when it comes back from the bodyshop but it's definitely close now. Having just procured the last of the nuts and washers for the suspension trunnions I believe that's all the parts there to build it back up. You never know by the end of this weekend the old bus might be back on its own wheels again !
Greased up the UJs and started to attach the driveshaft 'hats', realising halfway through that I didn't have enough pop rivets. Always the way!
Took a break to fire it up with just the downpipes on, I can safely say my ears are still bleeding from that one.
Also got a repair patch made up for the bottom part of the wing, and a picture of the welding I finished the other night:


Some cleaning up to be done when it comes back from the bodyshop but it's definitely close now. Having just procured the last of the nuts and washers for the suspension trunnions I believe that's all the parts there to build it back up. You never know by the end of this weekend the old bus might be back on its own wheels again !
More progress over the past couple of days, almost ready to put the entire assembly back in.
Got it built up to this stage yesterday
The results of spending an afternoon on it. Getting the inner ends of the suspension arms and their seals/washers etc to stay in place was an absolute nightmare. A lot of swearing and head scratching later we got there!
Got a few minor patches in and the arch lip so that it's more or less ready to go off to the bodyshop too, I'm quite pleased with the results considering I've never done this sort of thing:
Springs to fit tomorrow evening, a few small brackets and radius arms, then it's ready to go back under the car. Before I do that I'd like to remove the heat shield and give it a clean, and re-waxoyl everywhere underneath.

Got it built up to this stage yesterday

The results of spending an afternoon on it. Getting the inner ends of the suspension arms and their seals/washers etc to stay in place was an absolute nightmare. A lot of swearing and head scratching later we got there!

Got a few minor patches in and the arch lip so that it's more or less ready to go off to the bodyshop too, I'm quite pleased with the results considering I've never done this sort of thing:

Springs to fit tomorrow evening, a few small brackets and radius arms, then it's ready to go back under the car. Before I do that I'd like to remove the heat shield and give it a clean, and re-waxoyl everywhere underneath.
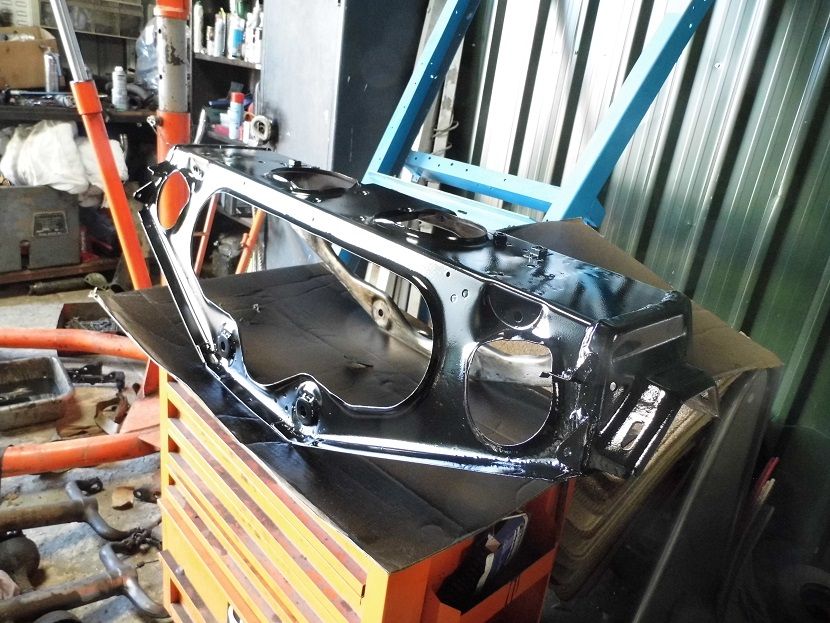
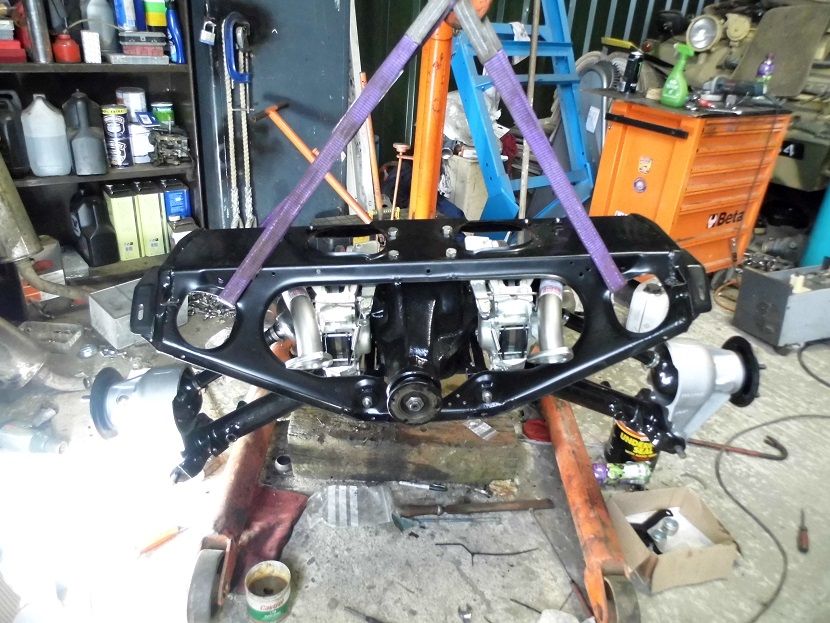
Finished at last:

After a long day it's now back underneath the car:

Just a few things to do before it can be driven out, connect up the exhausts, bleed the brakes, fit radius arms, fill it with oil and connect up the handbrake cable. Unfortunately I'm off to college for a week now so no progress until next weekend.
Well by Saturday afternoon I was able to drive her out!:
Feels absolutely fantastic, lovely and tight, no horrible knocks and bangs, and as you can see it's sitting much better.
The only annoying thing is that Jaguar being Jaguar they used two different sizes of sealing olive on one exhaust pipe, so silly me buys one size thinking that'd fit all. How wrong I was. Had to leave the over-axle olives out just to drive it out and prove it's okay. Some new olives of the correct size should be arriving this week, as per usual I'm staying away from home with college so unfortunately I can't get them fitted till next weekend. That to sort, a few clamps, and put the chrome exhaust tips on. I'd also like to re-bleed the brakes as they feel pretty squidgy. Will check the reservoir when I get back and around all the unions to make sure I don't have a leak.
Naturally I had to give her some boot on the test drive, still pulling as well as ever!
Gassing Station | Readers' Cars | Top of Page | What's New | My Stuff