Jensen Interceptor restoration
Discussion


silverfoxcc said:
And one for te OP, Will you be doing a Wheeler Dealer type costing when it finished, or dosn't the good lady have the full picture?
Great Thread just found it
I have a full costing for all parts and labour from when I started this project and these include everything unlike a wheeler dealer costing. I haven't allowed for my time as this is for fun and not profit as I intend to keep the car for many years . Great Thread just found it
The only other thing not included in my costing is all the new tools I have bought and I started this job off with a reasonable amount of tools but you can never have too many tools and they will come in handy on my next project.
When the car came back from paint I started to record my time spent working on the car and this is now 640 hours in the last 12 months and that doesn't include all the time ordering and collecting parts. I would also think I spent a similar amount of time before the car went for paint as this was about 12 months again.
My wife looks after all the finances and knows exactly what the cost is but has been great not complaining about the cost or the amount of hours I spend working on the car.
I have an agreed insurance valuation which covers me for everything I have spent (less two years of my life) and this was with the car in bits so hopefully it should be worth more than I have spent when completed. I can then justify this as an investment for my retirement and with bank rates so low I'm probably doing better than leaving it in the bank anyway and having all the enjoyment and satisfaction that a project like this brings and in a few months I will be able to own and drive a car that I wouldn't be able to afford if I hadn't done it myself.
Trying some different methods of applying wrinkle finish paint without baking off in an oven because I have some larger pieces to do which will not fit in the oven.
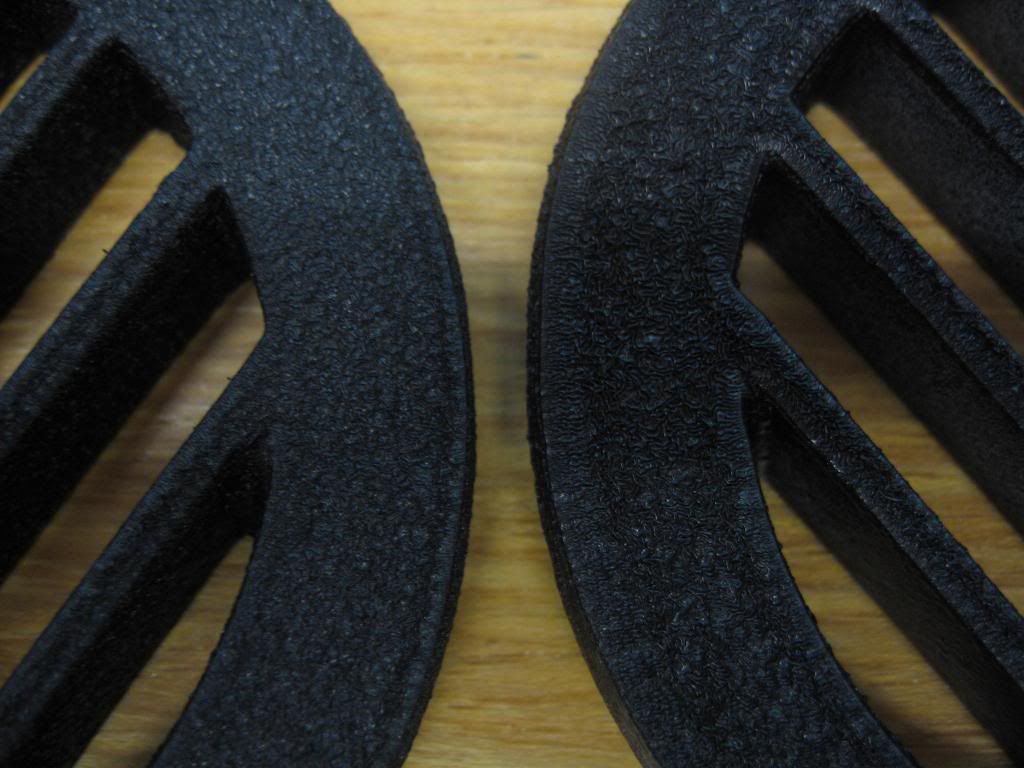
The sample on the left was best when applying less paint than suggested
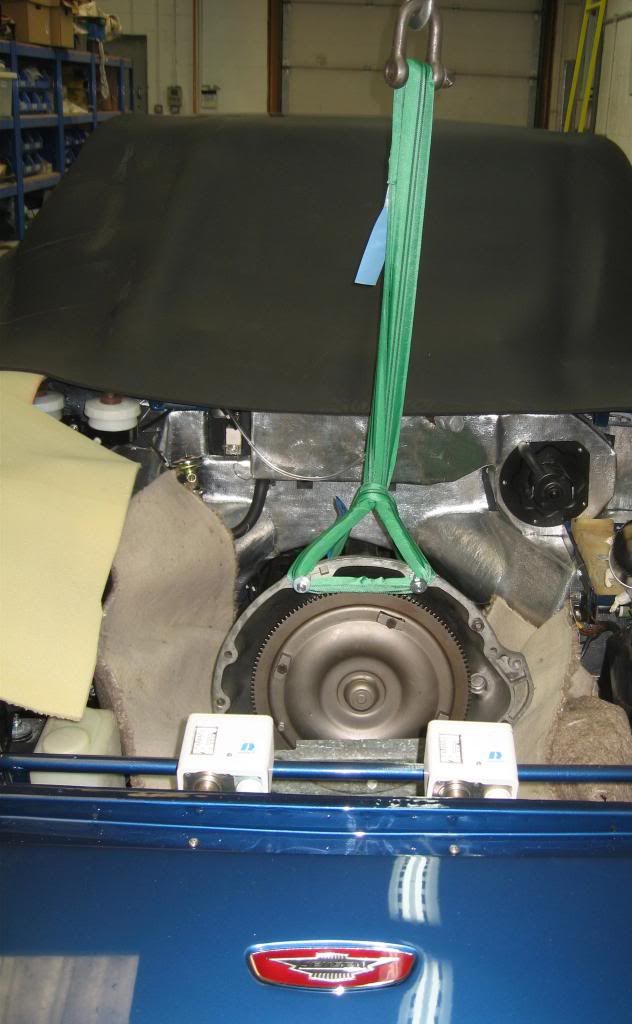
I dropped the gearbox in to give the car a better balance on the lift as it was getting heavy at the rear and because my new crane had arrived. The gearbox and torque convertor have been overhauled by a specialist.
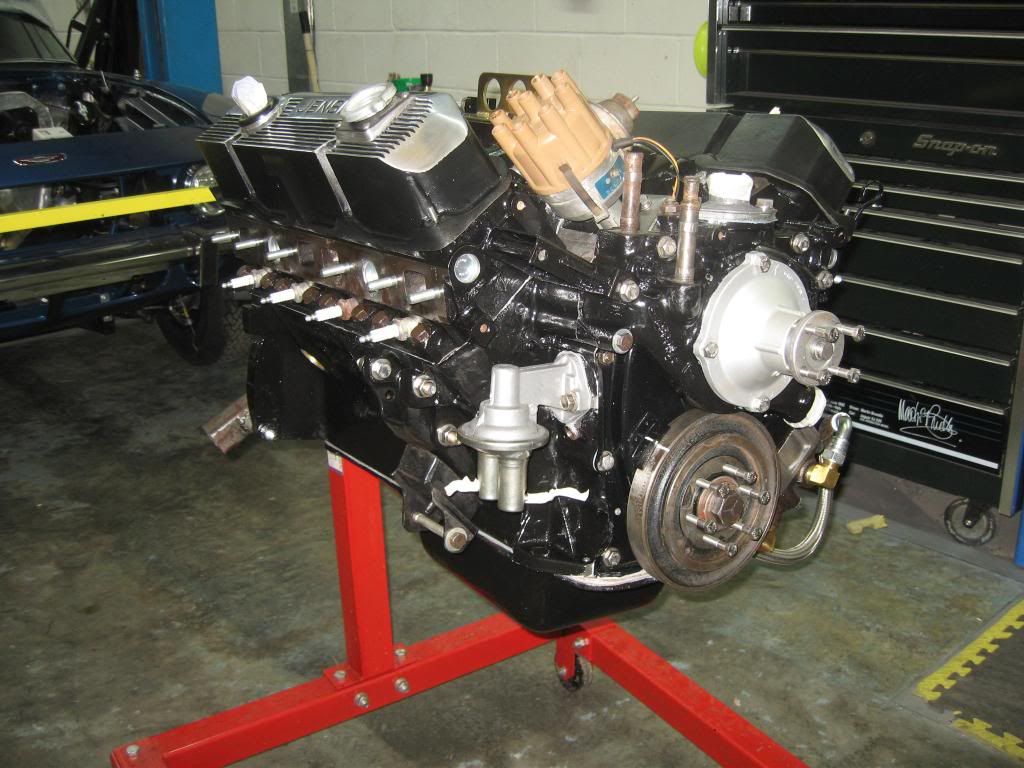
Finally some progress on the engine some months after starting the strip down I have decided what to do with it, I have been busy with other things but also wanted to measure the wear myself as I have built engines before but let the machine shop measure them. The machine shop confirmed my measurements and will polish the crank for new standard size mains and big ends, a rebore to +30, the heads will be converted to unleaded with hardened seats a new cam and lifters will be fitted because they are so cheap and a high volume oil pump.
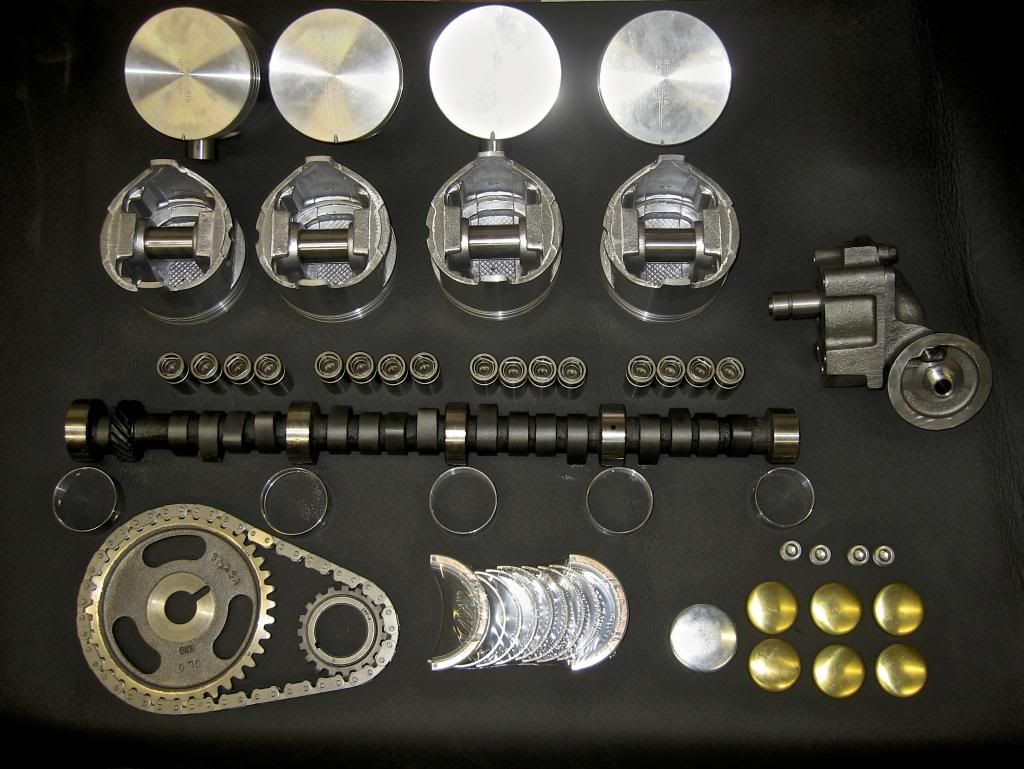
This kit is only $700 from the states and that was with the option of branded components.
The engine had had a timing gear failure a few years before I owned the car and a mechanic had fitted new timing gears and chain but failed to remove the remains of the old gear from the oil pick up, and all the valves had touched the pistons and he refitted bent pushrods.

The sample on the left was best when applying less paint than suggested
I dropped the gearbox in to give the car a better balance on the lift as it was getting heavy at the rear and because my new crane had arrived. The gearbox and torque convertor have been overhauled by a specialist.

Finally some progress on the engine some months after starting the strip down I have decided what to do with it, I have been busy with other things but also wanted to measure the wear myself as I have built engines before but let the machine shop measure them. The machine shop confirmed my measurements and will polish the crank for new standard size mains and big ends, a rebore to +30, the heads will be converted to unleaded with hardened seats a new cam and lifters will be fitted because they are so cheap and a high volume oil pump.

This kit is only $700 from the states and that was with the option of branded components.
The engine had had a timing gear failure a few years before I owned the car and a mechanic had fitted new timing gears and chain but failed to remove the remains of the old gear from the oil pick up, and all the valves had touched the pistons and he refitted bent pushrods.


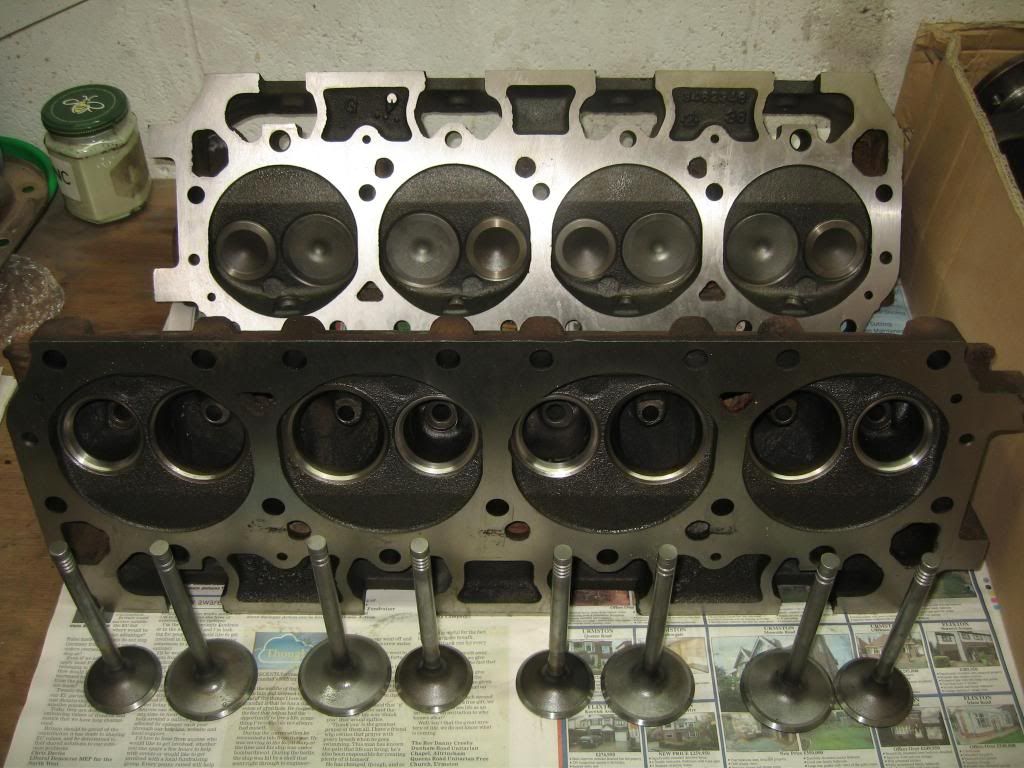
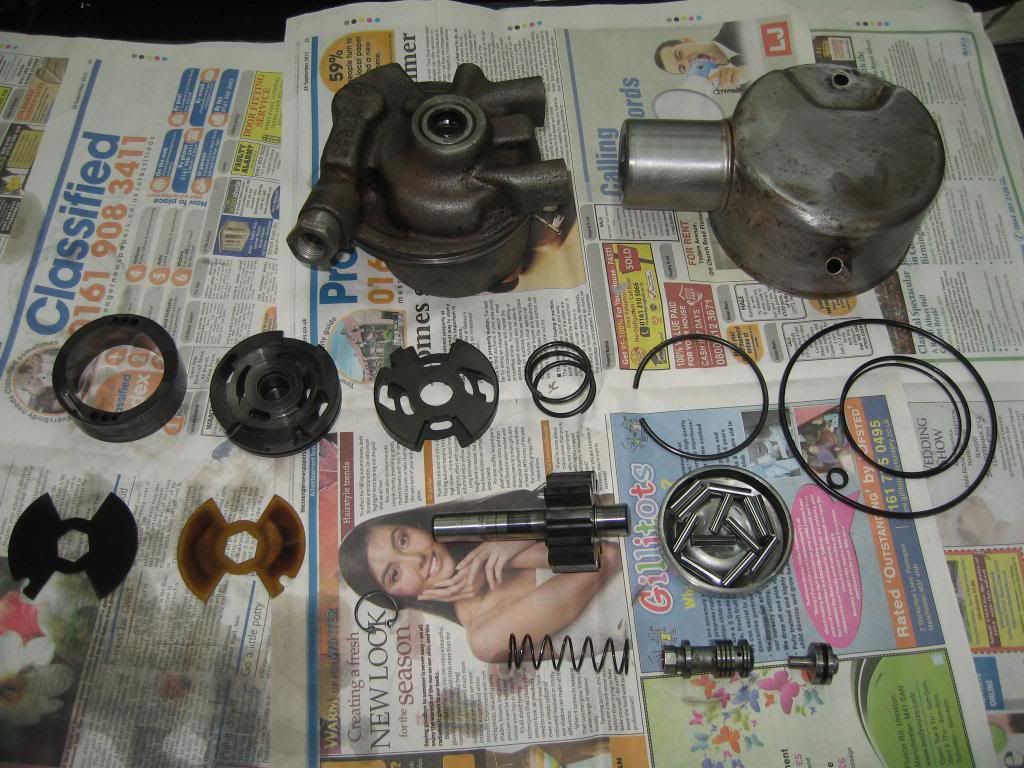
The heads had hardened valve seats fitted for unleaded use and all valves recut here they are awaiting reassembly.
With the heads now assembled the engine could be completed, although im still waiting on the pulleys being replated and some s/s bolts.
I really enjoyed building the engine as my daughter helped me from stripping it down to rebuilding it, she wanted to help with the car but having limited time available I thought it would be better for her to concentrate on one part instead of bits everywhere and at 17 she can say she's rebuilt a V8 engine.

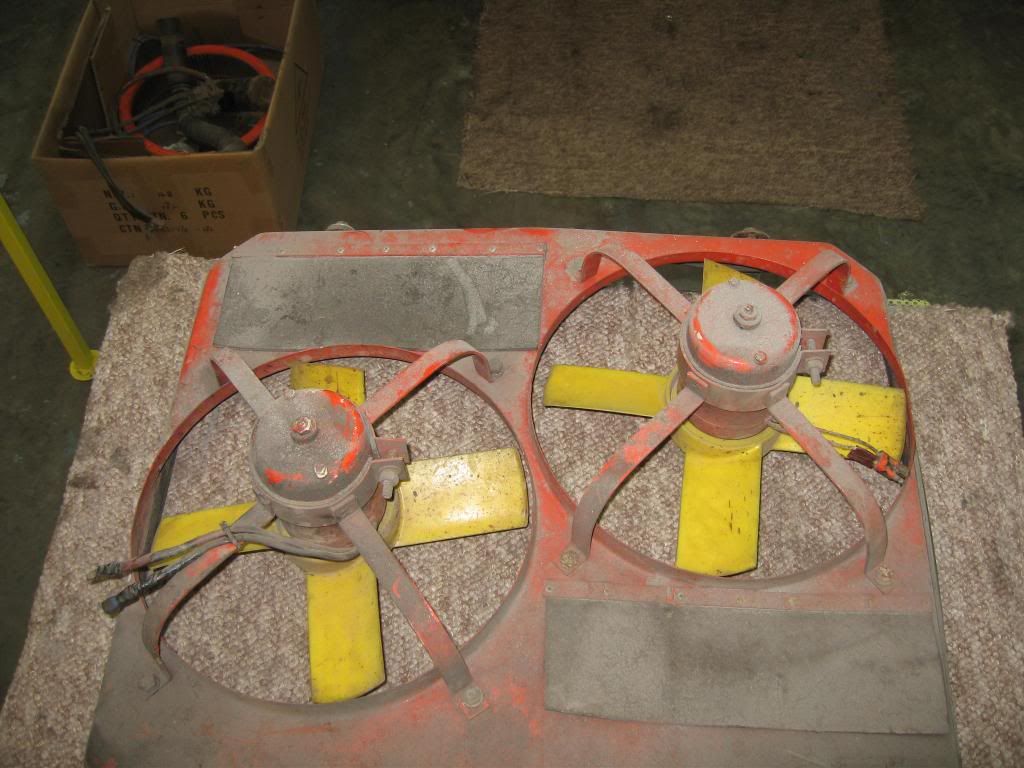
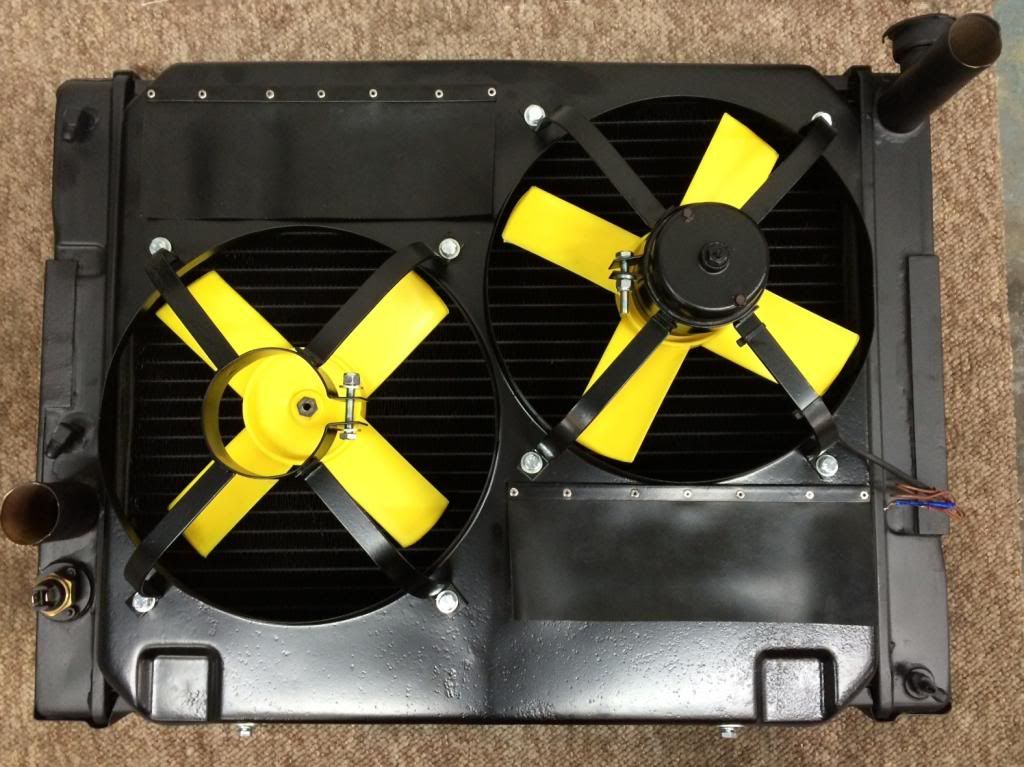
Im not sure why my cooling fans and shroud were orange but thy looked a mess so the shroud and brackets went to be powder coated whilst the fans were stripped, cleaned and repainted.
The radiators are fairly expensive so it was flushed out and I spent a boring couple of hours straightening the fins before Geff the welder made and fitted a new bottom plate as the old one was very rusty and had broken off at one side. This was followed by a couple of hours more prep and some high temp paint.
The result £5 worth of paint, some rubber and new fixings from my stock of bits and £25 powder coating costs, a bit of my time and a favour from my mate the welder.
Its not often I put a big lump back on this car without taking a hit in the wallet so I was very pleased with this.


LordBretSinclair said:
dpp said:
..... and the rebuilt engine is dropped back in,
Was it really that easy Dave??? I take it the plate on the top was used. Did you have to have that made up or is it a standard piece??Superb job BTW

We didn't use the plate fitted on top of the carb I just used this to blank the inlet manifold off, to make things easier I decided to use an load leveller and judging by how easy it went it was money well spent.
The engine does sit quite a way back in these cars and even with the long reach crane it was on its limit at full extension so a sigh of relief when it was bolted in and my shiney paintwork was all intact.
Thanks for the nice comments guys this has been a pretty full on job for me in my spare time for the last 2½ years but the end is in sight and hopefully I will be out in it when the nice weather comes.
I may not have answered everyones questions regarding when things will be done but this thread is still catching up with real time, although only about a couple of months out now.
With the engine safely back where it should be my attention has turned to sorting out the ancillaries so I can fire her up and hear the sweet burble of that V8 again.
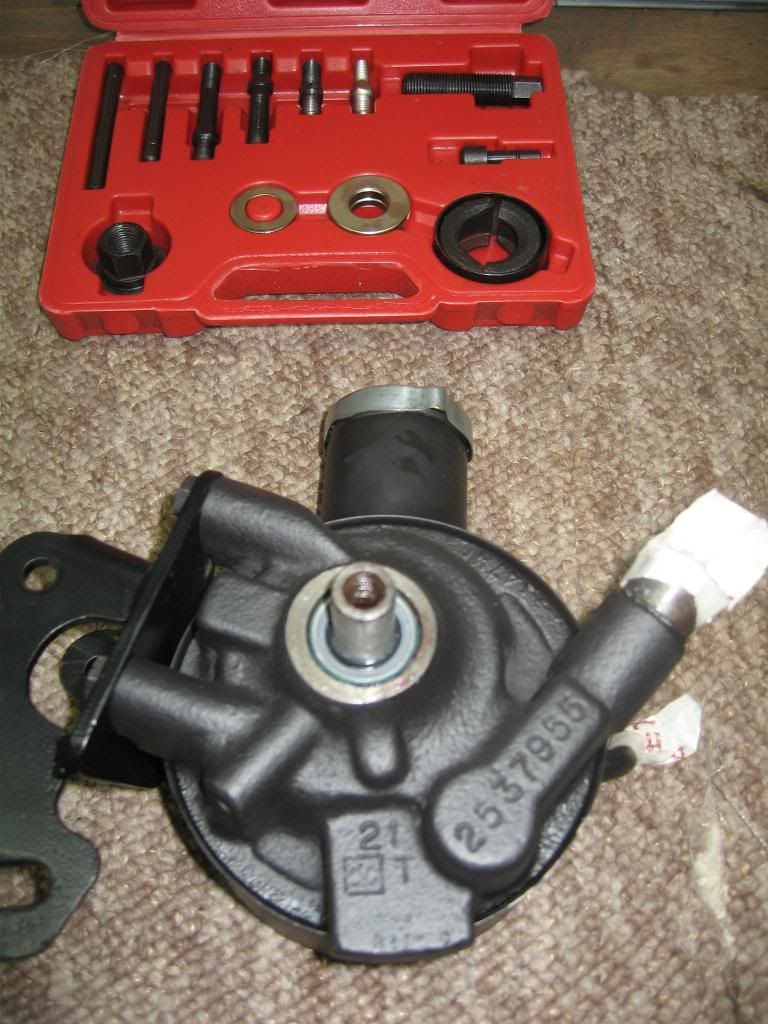
The power steering pump and AC compressor came first and were just as removed a couple of years earlier.
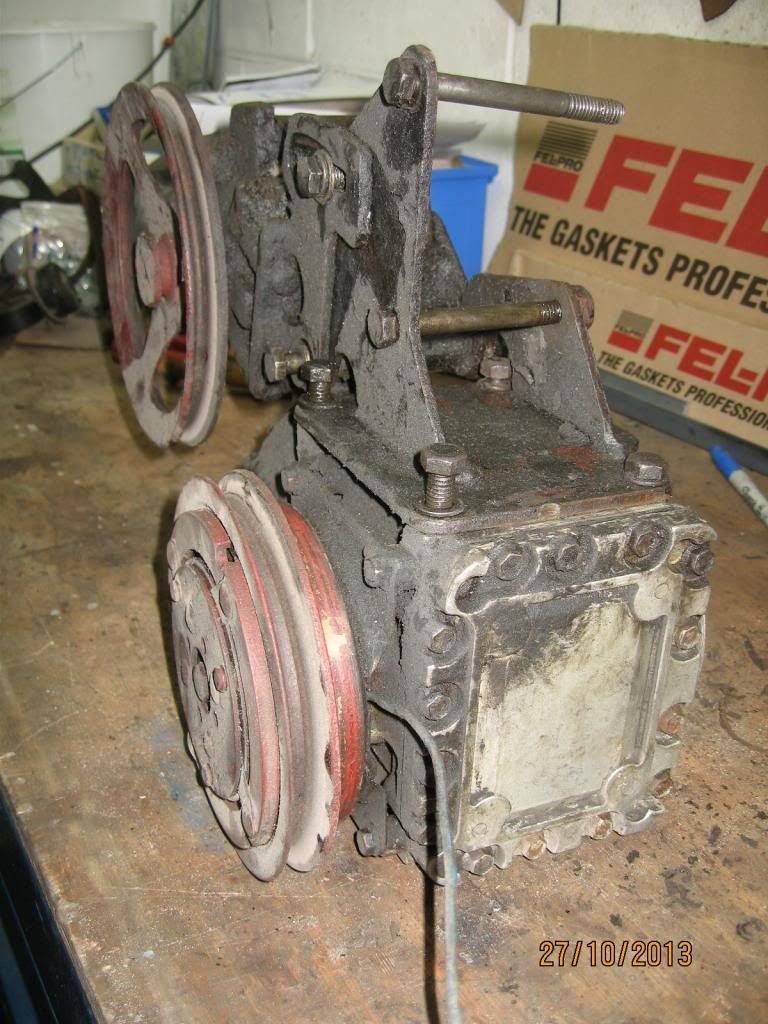
The AC will be my very last job as I am holding off on that bill for a while so the compressor will just get a quick clean up and be refitted so that the belts can go on. The power steering pump was stripped, cleaned and a new seal kit fitted.
This was quite an easy task although I had to buy a puller kit to get the pulley off and refit it but I do like having lots of tools
I may not have answered everyones questions regarding when things will be done but this thread is still catching up with real time, although only about a couple of months out now.
With the engine safely back where it should be my attention has turned to sorting out the ancillaries so I can fire her up and hear the sweet burble of that V8 again.
The power steering pump and AC compressor came first and were just as removed a couple of years earlier.

The AC will be my very last job as I am holding off on that bill for a while so the compressor will just get a quick clean up and be refitted so that the belts can go on. The power steering pump was stripped, cleaned and a new seal kit fitted.

This was quite an easy task although I had to buy a puller kit to get the pulley off and refit it but I do like having lots of tools

Hooli said:
Do they just hang on the holes the carb would bolt too? I'd be worried if they'd take the weight.
They do just bolt on using the carb mounting points on the inlet manifold and I have seen photos of people lifting engine and box using them so although it doesn't look too good it must be okay.The ancillaries are all refitted, I had to buy a new alternator as with my puller and a breaker bar I couldn't get the pulley off the taper shaft and it looked pretty original so I thought after 40 years it had earned a rest.
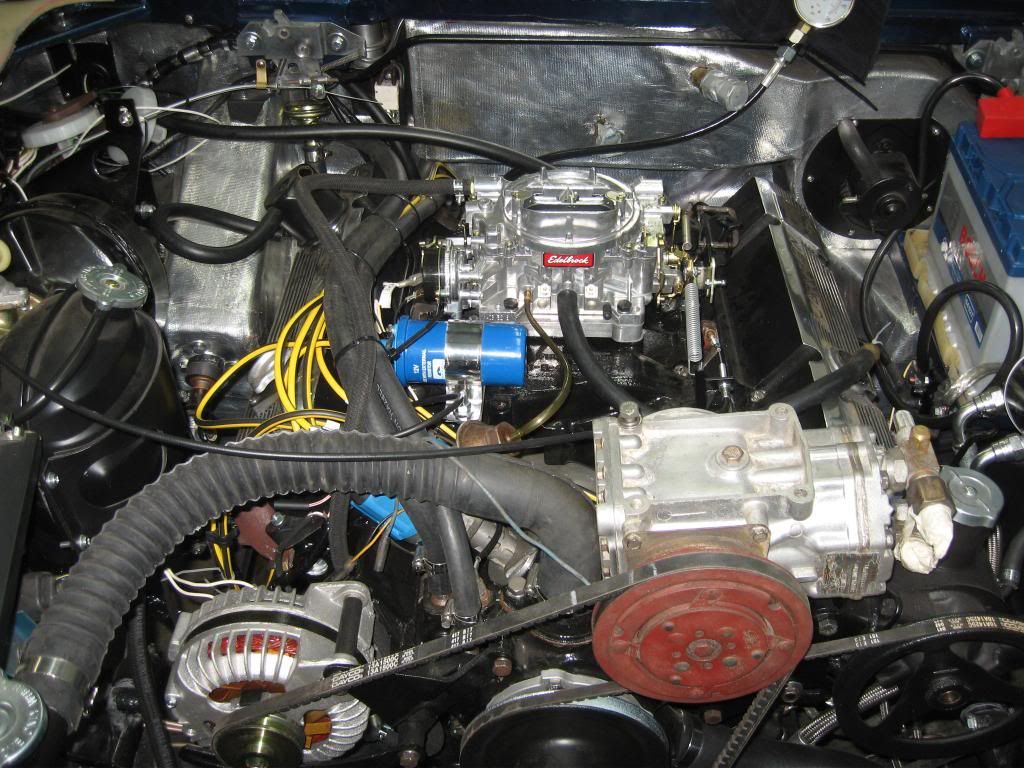
A new coil, leads and rotor arm were fitted to ensure a good spark, I reused the original cast manifolds because I am not building a performance car and because s/s headers and new downpipes would have set me back another grand. The original exhaust looked like scrap metal but on investigation under the crud and underseal was a pair of s/s downpipes and a pair of nice s/s silencers after hours of cleaning and polishing. 2 new s/s pipes to replace those from the silences to the tailpipes which were steel and corroded and new silencer cages were all that were required. Just to get it running I reused the old tatty tailpipes which will be addressed later.
The last of the wiring and hoses were "thrown in" so that I could test run the engine. Being an anorak instead of just turning the key I proceeded to check everything was ok i.e starter sol pulls in and inhibitor switches work, power to the ignition circuit was my next test and I found no ignition feed, I had replaced the engine bay wiring loom section which connects via multi-pin plugs behind the servo and it appeared the wiring was different between the old and new looms so the new loom was untaped the extra wiring added and all was well.
The Holley carb was refitted just as it had been removed as although it was a mess and ran rough it still worked and it was 1 thing less for me to worry about when trying to start it for the first time.
So with the starter motor connected I turned it over with no fuel or spark to get some oil moving around and fill the remote oil filter before rechecking the oil level, then I added some fuel and cranked it over to check the spark whilst the mechanical fuel pump filled the lines and carb and amazingly it fired almost straight away
Unfortunately the Holley had given up and was leaking fuel from the rear fuel bowl so the engine was stopped whilst I looked at this.
I had been previously told that the particular carb fitted to my car was pants and not worth rebuilding so after a few calls decided on an Edelbrock 1406 replacement which meant a lovely shiney object appeared in the post the next day. I don't know why I should get more excited playing with a new carb than any other part but I did so the carb was fitted ready for another test run.
Heres a clip of it firing up from cold
http://www.youtube.com/watch?v=8yJIYCEX9Yk
A new coil, leads and rotor arm were fitted to ensure a good spark, I reused the original cast manifolds because I am not building a performance car and because s/s headers and new downpipes would have set me back another grand. The original exhaust looked like scrap metal but on investigation under the crud and underseal was a pair of s/s downpipes and a pair of nice s/s silencers after hours of cleaning and polishing. 2 new s/s pipes to replace those from the silences to the tailpipes which were steel and corroded and new silencer cages were all that were required. Just to get it running I reused the old tatty tailpipes which will be addressed later.
The last of the wiring and hoses were "thrown in" so that I could test run the engine. Being an anorak instead of just turning the key I proceeded to check everything was ok i.e starter sol pulls in and inhibitor switches work, power to the ignition circuit was my next test and I found no ignition feed, I had replaced the engine bay wiring loom section which connects via multi-pin plugs behind the servo and it appeared the wiring was different between the old and new looms so the new loom was untaped the extra wiring added and all was well.
The Holley carb was refitted just as it had been removed as although it was a mess and ran rough it still worked and it was 1 thing less for me to worry about when trying to start it for the first time.
So with the starter motor connected I turned it over with no fuel or spark to get some oil moving around and fill the remote oil filter before rechecking the oil level, then I added some fuel and cranked it over to check the spark whilst the mechanical fuel pump filled the lines and carb and amazingly it fired almost straight away
Unfortunately the Holley had given up and was leaking fuel from the rear fuel bowl so the engine was stopped whilst I looked at this.
I had been previously told that the particular carb fitted to my car was pants and not worth rebuilding so after a few calls decided on an Edelbrock 1406 replacement which meant a lovely shiney object appeared in the post the next day. I don't know why I should get more excited playing with a new carb than any other part but I did so the carb was fitted ready for another test run.

Heres a clip of it firing up from cold
http://www.youtube.com/watch?v=8yJIYCEX9Yk
Cheers
I was glad to hear it fire up and run smoothly as it was the biggest thing that could stop me getting it out for the summer. Don't worry about anything that doesn't look right the ac is the last thing on my list so that red pulley will be gone, all pipes and wires will be made as neat as possible at a later date but I just needed to hear it run first.
It might sound a bit louder when I fit my new tailpipes as we will make them without baffles to see what it sounds like then fit baffles if we need to, apparently the MK1 and 11s didn't have baffles but the MK111s did and my car has a few MK11 features as it was built near the changeover so who's to say which tailpipes it had on when it left the factory.
Well this will bring you right up to date the engine was fired up on the 4th of Jan and then a few days later on the 8th when the new carb arrived.
Since then I have been finishing off the brakes rebuilding the 2 rear callipers and handbrake assemblies myself and completing the pipework, lots of other small jobs have been done but last weekend was very pleasurable starting to refit the interior.
To me the sumptuous interior is just as much why I decided to restore an Interceptor as the external appearance.
Lots more to do but heres a taste of how it will look.

I refitted my exhausts so that I could test run the engine but the tailpipes looked a mess, so my mate the welder found an offcut os 3" s/s tube which I cut to size then made some end and bought a piece of smaller s/s exhaust tube to finish them off.
Geoff welded them up then after a quick polish I had 2 new tailpipes stronger than the originals and without a seam along the bottom, total cost £13 and a bit of effort
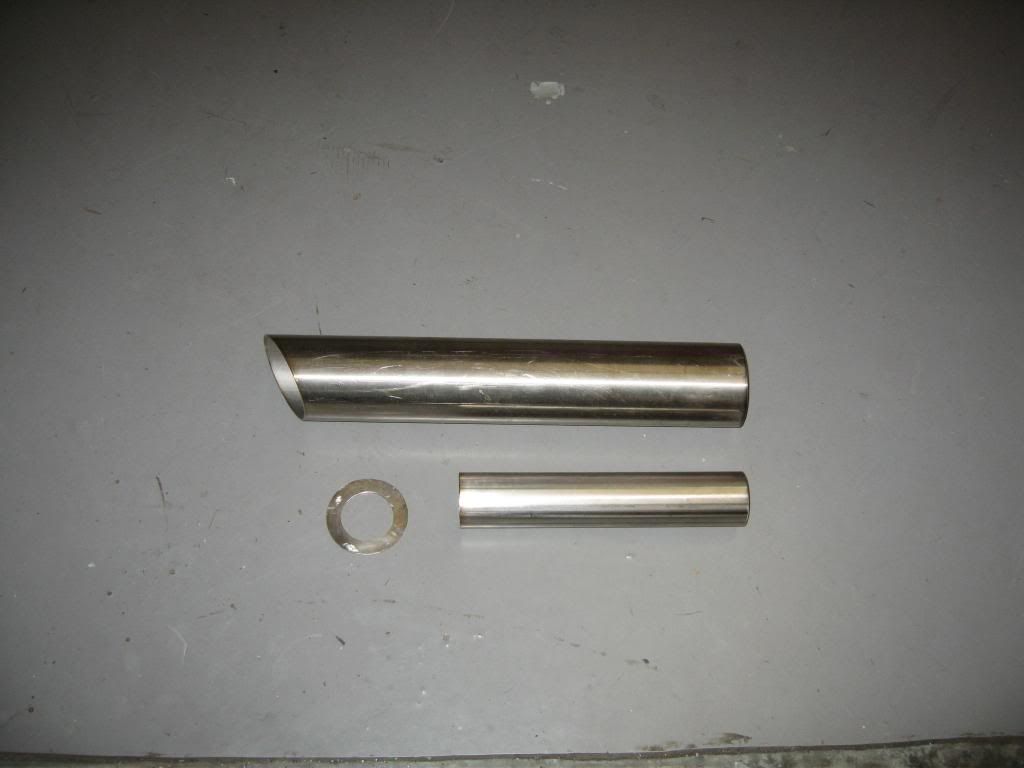
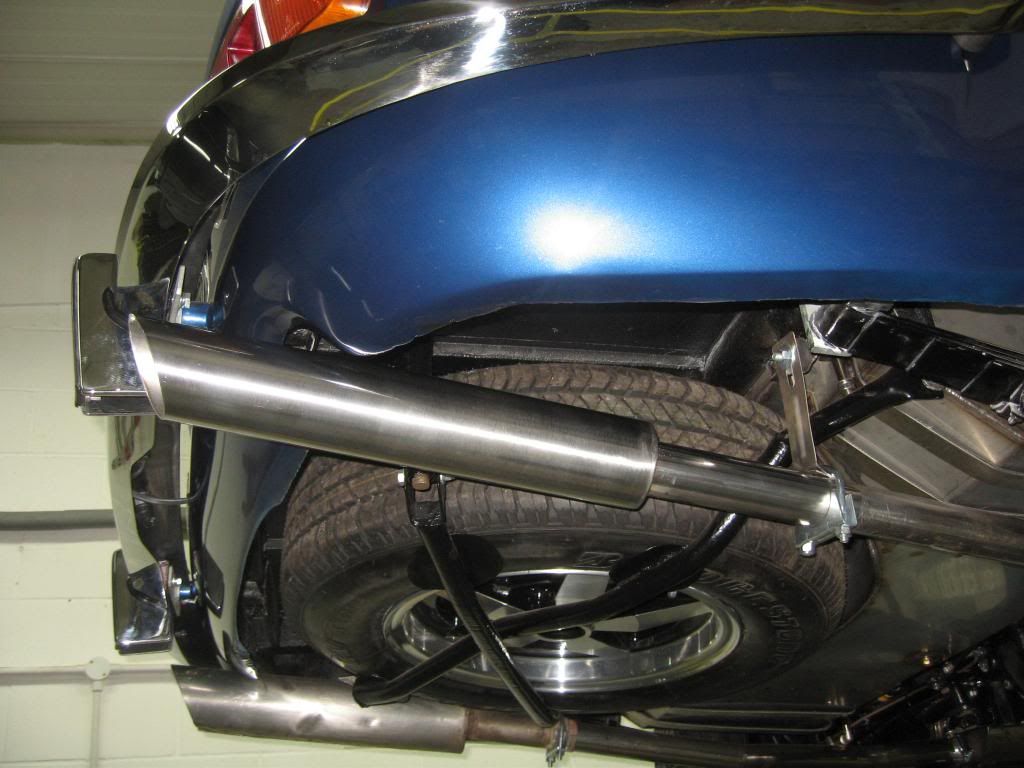
The tailpipe at the far side is the ones fitted to the car when I bought it.
Geoff welded them up then after a quick polish I had 2 new tailpipes stronger than the originals and without a seam along the bottom, total cost £13 and a bit of effort


The tailpipe at the far side is the ones fitted to the car when I bought it.
Made some good progress today after refitting the power steering rack which has been resealed I can now run the engine without leaks. The brakes are all back on so it was time to test drive it round the car park then bed the cam and lifters in.
With the car stood and the engine running for 20 minutes to bed the lifters in it kept good temperature and oil pressure with the fans working perfectly.
A few more jobs to finish and then the doors and bonnet can be fitted so hopefully it won't be long before an MOT is booked.
With the car stood and the engine running for 20 minutes to bed the lifters in it kept good temperature and oil pressure with the fans working perfectly.
A few more jobs to finish and then the doors and bonnet can be fitted so hopefully it won't be long before an MOT is booked.
Thanks but don't be too impressed with my fabrication skills I only made the battery tray and the rest was done by Geoff and Brian at Park Garage Bodies.
The bumper mounts are the same as a MK11 as my car was an early MK111 it still used some earlier components so this can sometimes cause confusion.
If you cut out all the rot you find you will be in for a lot of welding, even if I had the skills to do this I would have been disheartened by it and probably lost interest at that stage.
I was thinking I must update this soon but although I have been working on the car it has been finishing off all the little jobs so there is no real visual progress lately.
Why not start a thread on your car there has been a surge of Jensen threads lately which is nice to see.

I think most of what you are seeing is from using a flash and being low down with the camera. This will be left as is for now but if I feel it's not right after seeing it out in the daylight it will be something that gets addressed over the winter.
My priority is to finish the car and have some fun in it this year.
My priority is to finish the car and have some fun in it this year.
Gassing Station | Readers' Cars | Top of Page | What's New | My Stuff