Caterham 7 rebuild
Discussion


I made a little bit of progress. Not worth posting really but I thought as it was a step, I would. Hope to delve into next weekend although I've been booked one day for a family affair.
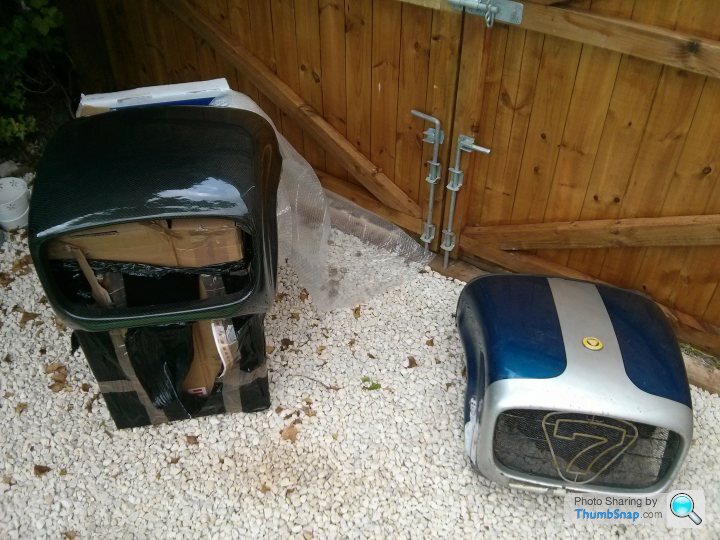
A few things were taken over. A 'cheap' carbon nosecone. 'Cheap' carbon front and rear wings are in the post. Cheap compared to 90% of prices out there anyhow.
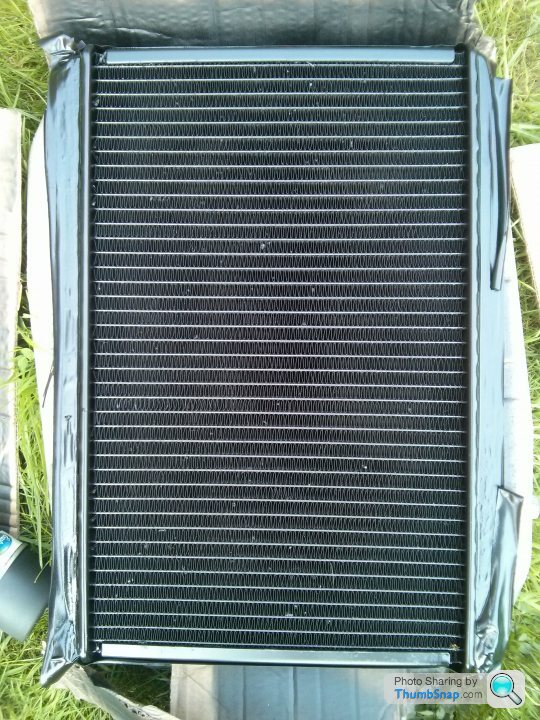
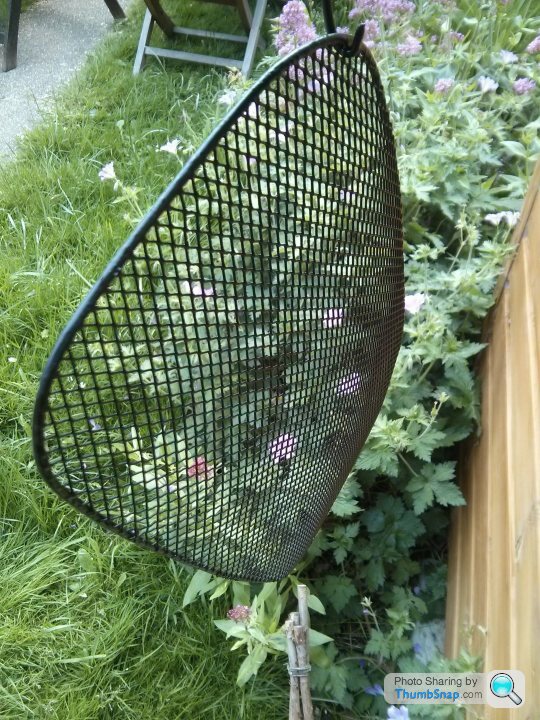
I sprayed the rad to make it disappear from view using special radiator paint. It's meant to be very thin, so doesn't clog the fins. After a few coats, there was no clogging that I could see. Still need to tidy up the rest of it really. I also coated the stone mesh. Not sure how to finish off the new '7' grill. After painting and powder coating the old one, I kept getting stone chips which lead to rust. So I sourced a titanium '7' grill for the front. A bit OTT, but oh well. I could mask as area green to match the car, maybe spray the rest black to hide all but the 7. Not quite sure yet.
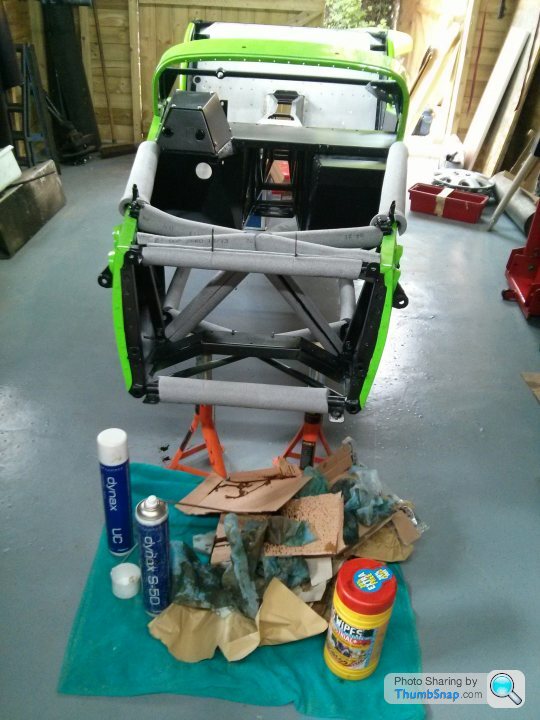
I doused the chassis in Dintol, a Waxoyl alternative. In the tubes where ever I could get it in, and then I went back in other areas that I thought might warrant it. Saying how the car had corrosion issues, I thought it would be rude not to at least make some effort. I had supplied a chemical paste to go between the side skins and chassis to the panellers but they forgot to apply it... I'll finish off with the rollbar when I pick it up and the De Dion tube.
I finished making my best efforts with the rear lights. I read somewhere that it helps with the luminosity of the rear lights as they're pretty naff. I fitted a high level brake light a few years back which improved the brake lights some what. Some replace the rear light assemblies all together, but I'm not sure if I quite like the alternatives. Maybe I'm a bit traditional. I'll see if it's any brighter when I get it back on the road.
I also came across a new fuel filler cap as the original Rover Metro cap looks a bit naff. Well I think so anyhow! So I have a silver one which I'm in the proceeds of making black. I've also enlarged the top hole (all used to be the same smaller size) to enable easier filling after reports of it being a pain in the bum which has later been revised to be more like my modified one. I'll also take the flap out of the fuel filler neck as when filling up the 7, you also have to deal with the pump clicking off often. Taking the fuel nozzle out an inch helps but it's never 100%. Hopefully this'll solve it. But in reality, I'll probably just make matters worse!
I then wrapped the 7 up to protect it while working on it. Knowing me, I'll scratch it or something daft.
The day was meant to be more hands on but it turned into an engagement party instead! Funny how things pan out!
A few things were taken over. A 'cheap' carbon nosecone. 'Cheap' carbon front and rear wings are in the post. Cheap compared to 90% of prices out there anyhow.
I sprayed the rad to make it disappear from view using special radiator paint. It's meant to be very thin, so doesn't clog the fins. After a few coats, there was no clogging that I could see. Still need to tidy up the rest of it really. I also coated the stone mesh. Not sure how to finish off the new '7' grill. After painting and powder coating the old one, I kept getting stone chips which lead to rust. So I sourced a titanium '7' grill for the front. A bit OTT, but oh well. I could mask as area green to match the car, maybe spray the rest black to hide all but the 7. Not quite sure yet.
I doused the chassis in Dintol, a Waxoyl alternative. In the tubes where ever I could get it in, and then I went back in other areas that I thought might warrant it. Saying how the car had corrosion issues, I thought it would be rude not to at least make some effort. I had supplied a chemical paste to go between the side skins and chassis to the panellers but they forgot to apply it... I'll finish off with the rollbar when I pick it up and the De Dion tube.
I finished making my best efforts with the rear lights. I read somewhere that it helps with the luminosity of the rear lights as they're pretty naff. I fitted a high level brake light a few years back which improved the brake lights some what. Some replace the rear light assemblies all together, but I'm not sure if I quite like the alternatives. Maybe I'm a bit traditional. I'll see if it's any brighter when I get it back on the road.
I also came across a new fuel filler cap as the original Rover Metro cap looks a bit naff. Well I think so anyhow! So I have a silver one which I'm in the proceeds of making black. I've also enlarged the top hole (all used to be the same smaller size) to enable easier filling after reports of it being a pain in the bum which has later been revised to be more like my modified one. I'll also take the flap out of the fuel filler neck as when filling up the 7, you also have to deal with the pump clicking off often. Taking the fuel nozzle out an inch helps but it's never 100%. Hopefully this'll solve it. But in reality, I'll probably just make matters worse!
I then wrapped the 7 up to protect it while working on it. Knowing me, I'll scratch it or something daft.
The day was meant to be more hands on but it turned into an engagement party instead! Funny how things pan out!

dave2007bc said:
Great thread, love the new paint.
May I ask how much it cost; I'm tempted to get my 7 resprayed in a more suitable colour as I'm going off the yellow.
I got a few quotes and ball park figures for the respray and everyone was coming out in the same region of £1500 all in.May I ask how much it cost; I'm tempted to get my 7 resprayed in a more suitable colour as I'm going off the yellow.
I managed to get it done by a local chap recommended by a Caterham mech on here. I wasn't left with much change from the £1500.
I managed to get a half day of work in on it! The rear diff is in and the drive shaft. The wiring loom is laying roughly in place throughout the car. The brake lines and fuel lines are laying in place. The steering column is laying in place and the front steering box (?) is in.
We're having to clean a few bits up as we go. When I had the chassis redone I said that I had new Powerflex bushes to go in the car. When I picked it up, they'd pressed the factory bushes into every joint that needed one. They then took a few out when I stated what I originally requested, but it seems a few have been missed so we struggled to get the DeDion bush out and the rear trailing arms (?) still have bushes in them which I need to press out. Finding the time to do it really unfortunately. Didn't come away overly impressed from the company who repaneled it.
We're having to clean a few bits up as we go. When I had the chassis redone I said that I had new Powerflex bushes to go in the car. When I picked it up, they'd pressed the factory bushes into every joint that needed one. They then took a few out when I stated what I originally requested, but it seems a few have been missed so we struggled to get the DeDion bush out and the rear trailing arms (?) still have bushes in them which I need to press out. Finding the time to do it really unfortunately. Didn't come away overly impressed from the company who repaneled it.
Gingerbread Man said:
The Ford 5 speed they use is the type 9 (?) I think. The 6 speed speed like mine is a Caterham item. More of a track box, it sits quite high on the revs.
Depends which diff you have. It was intended for a 3.62 as opposed to the 3.92 in cars with the Ford 5-speeder. 6th is a 1:1 which is the same as 4th in the 5-speeder.
Gingerbread Man said:
I got a few quotes and ball park figures for the respray and everyone was coming out in the same region of £1500 all in.
I managed to get it done by a local chap recommended by a Caterham mech on here. I wasn't left with much change from the £1500.
Thanks, appreciate the figures - probably a bit much then for my car to be honest. I'm tempted to look at wrapping but it'll still mean that all the panels need to come off which will be a pain.I managed to get it done by a local chap recommended by a Caterham mech on here. I wasn't left with much change from the £1500.
dave2007bc said:
Gingerbread Man said:
I got a few quotes and ball park figures for the respray and everyone was coming out in the same region of £1500 all in.
I managed to get it done by a local chap recommended by a Caterham mech on here. I wasn't left with much change from the £1500.
Thanks, appreciate the figures - probably a bit much then for my car to be honest. I'm tempted to look at wrapping but it'll still mean that all the panels need to come off which will be a pain.I managed to get it done by a local chap recommended by a Caterham mech on here. I wasn't left with much change from the £1500.
ecotec said:
great work op, nice to see the project unfold.
Can I ask a stupid question - will those rivets you drilled out not rattle when the car is on the road?
Haha, they do rattle about. I have squirted in a wax like substance to any tube I can get at to hopefully solve this! I'm sure i'll have missed, or won't be able to get access to a tube and it'll rattle. I'll then have to drill out another rivet to get access and gunk it up.Can I ask a stupid question - will those rivets you drilled out not rattle when the car is on the road?
It's unfolding slowly due to having no time.
A few more bits done, a few more problems to overcome.
I popped via Maplin first call and picked up a dremel. I used this to remove the flap in the fuel filler neck which makes filling the car a pain. I'd hope'd it would have made light work of it, but it was still a faff. Hopefully with this now out, you won't get a constant clicking when filling up.


We had hoped to get the engine in. Before doing this I took the original flywheel off in favour for a lightweight (R500 I think!) flywheel. First problem arose when the new flywheel requires m8 bolts over the original smaller (M6?) bolts that I took off. So that path ground to a halt.
When I picked up (well I sent my sibling) the new flywheel, it felt bloody heavy to me! Only when I removed the old item did I see the obvious difference!


I had received a package from Redline who had supplied the new big headed rivets for the steering column. But this was then halted but realising that the rubber/nylon bush for the steering shaft was missing out of the lower dash rail. I guess it had been taken out at Arch, but we only found out we needed a new one yesterday. They pushed every other bush into place even though asked not too! (calm...).


The gearbox went in and is coupled to the drive shaft. A new rubber bush for the gearbox as the other was past it's best. Now awaiting the engine again!
[pic]https://lh5.googleusercontent.com/-vc90gsoXxWk/U7nCqWEblYI/AAAAAAAAFYc/RKcE_HDXyE0/w626-h835-no/IMG_20140706_135552.jpg[pic]
We fitted new brake discs all round. The rear's also required the hub studs swapping out for longer versions. There seems to be discussions on this to if it's worth it as the old studs when holding a wheel and tight wheel nut don't protrude past the nut. Some say a thread or two should protrude out.
Anyhow, due to taking a front wheel off a while back to discover that when the tyres were last fitted, one nut had damaged the thread of one of the studs, I decided to buy a new set of longer studs for the 7. The fronts were done a while back due to the fact I was working in that area and the ease of access.
Yesterday we replaced the rears which meant undoing the mother of all nuts. Made harder by the fact the drive shafts and hubs weren't on the car. Having clamped them in the vice and started trying to undo the nut, we envisaged the workbench flipping over.
An impact driver and all hell breaking loose later, they released and we rebuilt with longer studs. Ball ache over.


Upon trying to fit the rear A frame, we noticed that the new Polybushes seem to not protrude out from the A frame as far as the old ones. So we're sorting some spacers to take up the couple of millimeter expanse either side. It didn't seem right torquing it up and wondering what bit would flex allowing it to all come together...
The fuel tank went in. Lined the area with sticky backed foam and dropped it in. The old retaining stays we buggered, so I made up some new ones from some M8 studding. I lined these with a protective sleeve as looking at the old ones not in situ, they were only threaded at the ends. So not wanting there to be a chance of the fuel tank chaffing away on studding, I thought best to minimise the chances.
I'm now got a thread in the Caterham sub forum to try and work out where all the fuel pipes connect back on to the tank and filler neck! I used to have a charcoal filter, but I have since removed this. My tank has an extra connection over later tanks so I think I can just blank one off, but I'm yet to 100% clarify.


We set about starting to build a front corner. I went trigger happy and bought some second hand Bilstein shocks in supremely better nick (at least cosmetically) than mine. Me being me, I didn't know that they could come in different lengths. Now the back ones play ball but the fronts are slightly longer. Now we thought about cutting down the hex shanked spacer a tad to bring them back in line with my old ones but are currently undecided on this route.
Also, I need to research what springs are best for my applications. Anyone know Caterham springs!?
My old rears are a lovely shade of green and one continuous spring form (?), the new rears have a double aspect spring as it were. Spaced at one end and then tighter coiled at the other.
My old fronts are small items compared to the new ones that seem to have far more travel. Someone has commented on my fronts being more of a trackday spring before now and it might be worth swapping.


I popped via Maplin first call and picked up a dremel. I used this to remove the flap in the fuel filler neck which makes filling the car a pain. I'd hope'd it would have made light work of it, but it was still a faff. Hopefully with this now out, you won't get a constant clicking when filling up.
We had hoped to get the engine in. Before doing this I took the original flywheel off in favour for a lightweight (R500 I think!) flywheel. First problem arose when the new flywheel requires m8 bolts over the original smaller (M6?) bolts that I took off. So that path ground to a halt.
When I picked up (well I sent my sibling) the new flywheel, it felt bloody heavy to me! Only when I removed the old item did I see the obvious difference!
I had received a package from Redline who had supplied the new big headed rivets for the steering column. But this was then halted but realising that the rubber/nylon bush for the steering shaft was missing out of the lower dash rail. I guess it had been taken out at Arch, but we only found out we needed a new one yesterday. They pushed every other bush into place even though asked not too! (calm...).
The gearbox went in and is coupled to the drive shaft. A new rubber bush for the gearbox as the other was past it's best. Now awaiting the engine again!
[pic]https://lh5.googleusercontent.com/-vc90gsoXxWk/U7nCqWEblYI/AAAAAAAAFYc/RKcE_HDXyE0/w626-h835-no/IMG_20140706_135552.jpg[pic]
We fitted new brake discs all round. The rear's also required the hub studs swapping out for longer versions. There seems to be discussions on this to if it's worth it as the old studs when holding a wheel and tight wheel nut don't protrude past the nut. Some say a thread or two should protrude out.
Anyhow, due to taking a front wheel off a while back to discover that when the tyres were last fitted, one nut had damaged the thread of one of the studs, I decided to buy a new set of longer studs for the 7. The fronts were done a while back due to the fact I was working in that area and the ease of access.
Yesterday we replaced the rears which meant undoing the mother of all nuts. Made harder by the fact the drive shafts and hubs weren't on the car. Having clamped them in the vice and started trying to undo the nut, we envisaged the workbench flipping over.
An impact driver and all hell breaking loose later, they released and we rebuilt with longer studs. Ball ache over.
Upon trying to fit the rear A frame, we noticed that the new Polybushes seem to not protrude out from the A frame as far as the old ones. So we're sorting some spacers to take up the couple of millimeter expanse either side. It didn't seem right torquing it up and wondering what bit would flex allowing it to all come together...
The fuel tank went in. Lined the area with sticky backed foam and dropped it in. The old retaining stays we buggered, so I made up some new ones from some M8 studding. I lined these with a protective sleeve as looking at the old ones not in situ, they were only threaded at the ends. So not wanting there to be a chance of the fuel tank chaffing away on studding, I thought best to minimise the chances.
I'm now got a thread in the Caterham sub forum to try and work out where all the fuel pipes connect back on to the tank and filler neck! I used to have a charcoal filter, but I have since removed this. My tank has an extra connection over later tanks so I think I can just blank one off, but I'm yet to 100% clarify.
We set about starting to build a front corner. I went trigger happy and bought some second hand Bilstein shocks in supremely better nick (at least cosmetically) than mine. Me being me, I didn't know that they could come in different lengths. Now the back ones play ball but the fronts are slightly longer. Now we thought about cutting down the hex shanked spacer a tad to bring them back in line with my old ones but are currently undecided on this route.
Also, I need to research what springs are best for my applications. Anyone know Caterham springs!?
My old rears are a lovely shade of green and one continuous spring form (?), the new rears have a double aspect spring as it were. Spaced at one end and then tighter coiled at the other.
My old fronts are small items compared to the new ones that seem to have far more travel. Someone has commented on my fronts being more of a trackday spring before now and it might be worth swapping.
Edited by Gingerbread Man on Monday 7th July 18:50


Engines in today, woo! didn't help by the engine crane still playing up, must need a service. So it entailed dropping the car to the floor again at the front, wheeling the engine over and then lifting the car back up onto the stands! A faff, but it's in.
Started work on the cables. Have had to put the charcoal canister back in for the time being to suit Australian regs. Once it's past them.....it'll come out.

The fuel tank is in 100% now, the roll bar is in, but may need to come out to get the high level brake light cable down, it'll have another play next time and find an alternative idea. Maybe some copper wire.

The back axle is in, A frame, Hubs, Discs, Suspension. New suspension makes way for progressive springs. I think my old suspension setup was more track based, so it'll be an interesting change.


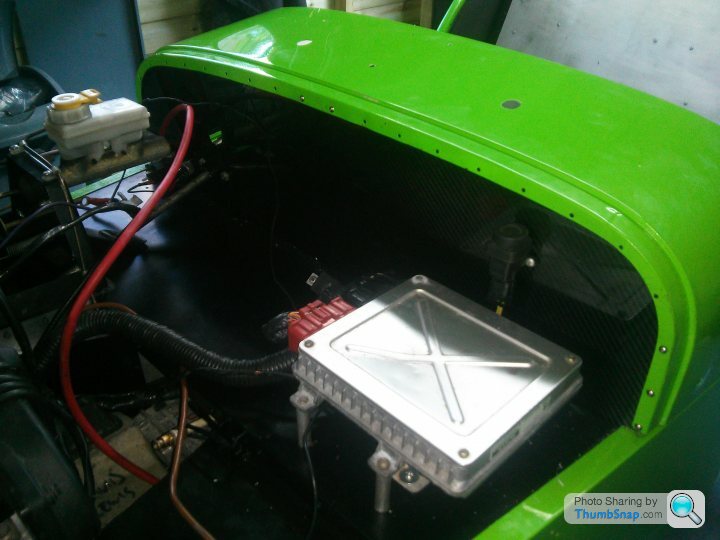
The bulkheads in and I've started putting in the rivnuts (horrid things) for the ECU etc and attaching other things to the bulkhead. Starting to make all the wires go somewhere!
I'm also making the scuttle removable, so all the old rivet holes will be replaced with rivnuts. I've only done a small few so it is held in place. I can get to the other side of the rivnuts, so once they spin, which one day they will, I can still undo them if needed. It's not something I'll often do, but it'll make it an option if I ever need to get behind the gauges.
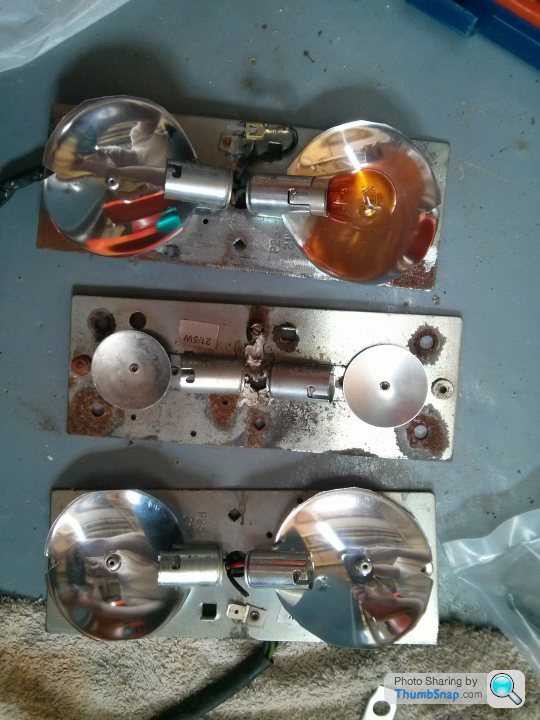
The front lights and indicators are all made up ready to pop onto the front end.
Still a long way to go, think the Europe trip will be canceled...But I still have Spa F1 tickets...!
Started work on the cables. Have had to put the charcoal canister back in for the time being to suit Australian regs. Once it's past them.....it'll come out.
The fuel tank is in 100% now, the roll bar is in, but may need to come out to get the high level brake light cable down, it'll have another play next time and find an alternative idea. Maybe some copper wire.
The back axle is in, A frame, Hubs, Discs, Suspension. New suspension makes way for progressive springs. I think my old suspension setup was more track based, so it'll be an interesting change.
The bulkheads in and I've started putting in the rivnuts (horrid things) for the ECU etc and attaching other things to the bulkhead. Starting to make all the wires go somewhere!
I'm also making the scuttle removable, so all the old rivet holes will be replaced with rivnuts. I've only done a small few so it is held in place. I can get to the other side of the rivnuts, so once they spin, which one day they will, I can still undo them if needed. It's not something I'll often do, but it'll make it an option if I ever need to get behind the gauges.
The front lights and indicators are all made up ready to pop onto the front end.
Still a long way to go, think the Europe trip will be canceled...But I still have Spa F1 tickets...!
You know those shake-proof washers that look like this:

I've heard people put these between the rivnut face and the ali to stop them spinning. It leaves the rivnut face a bit offset from the ali panel though so I didn't like the idea. I did wonder if you could get it to work by putting the washer on the other side though.
I've heard people put these between the rivnut face and the ali to stop them spinning. It leaves the rivnut face a bit offset from the ali panel though so I didn't like the idea. I did wonder if you could get it to work by putting the washer on the other side though.
Watchman said:
You know those shake-proof washers that look like this:
I've heard people put these between the rivnut face and the ali to stop them spinning. It leaves the rivnut face a bit offset from the ali panel though so I didn't like the idea. I did wonder if you could get it to work by putting the washer on the other side though.
Most seemed to spin I think due to corrosion. I've been copper greasing the bolt going into the rivnut. The only ones that I can get to the rear of are for the rear wings, I think there was the odd one on the floor plan for the seats or similar. They just drove me mad.I've heard people put these between the rivnut face and the ali to stop them spinning. It leaves the rivnut face a bit offset from the ali panel though so I didn't like the idea. I did wonder if you could get it to work by putting the washer on the other side though.
Had another stint yesterday. Only me due to the other lad being busy.
I started on the electrics.
Starter motor was installed so that I could tie up a few more of the loose leads.
I also rewired the engine electrical cut off switch. I installed this previously above the drivers right knee, more to stop my battery going flat and to add another level of security. I installed it out the way so I didn't have to worry about someone walking off with the little red key and leaving me stranded.
The repaired dash has gone in, but still needs to be removeable for the steering bushes which I'm still waiting on. You can't noticed the crack/ split all that much that occurred while dismantling the 7.
I also had a rearrange of the buttons as some aren't to be used as much, so they got shunted left.

I drilled for the low oil pressure warning switch light, reinstalled the 12v socket.
Put the wiper motor and arm into a rough position. (The wires tie onto this, so a useful thing to put in for the time being).
I'm going to add an extension to the fuse box for the 12v as it was an inline fuse which had come apart in recent times. I'm toying with adding another 12v somewhere else hidden away.
I'll also put another relay into the fuse box for the new cooling fan override utilising the now redundant heater fan switch.


I went mad with the rivet gun and finished the internal side panels off, installing the carbon sills as I went. I'm really liking the green and black look.


I spent quite a while faffing trying to get the high level brake light cable down the roll bar tube. It would have been easier to do before it was installed, but it got overlooked. It's now tacked in place.

The rear brake flexible hose was replaced with an all stainless version. The two front ones were also laid in place.
The fuel filter became attached while I attached the rear brake hose also.

I started plumbing the engine bay up, modifying the layout from the previous state by going off a Blatchat article. I replaced the remaining rubber tubing with silicone tubing. New Mikalor clamps throughout.

The horns also got put in while I was working on the front end.
I then went home. Think I'm on my tod again next week, so I'll see how I go!
I'll add pictures this evening.
I started on the electrics.
Starter motor was installed so that I could tie up a few more of the loose leads.
I also rewired the engine electrical cut off switch. I installed this previously above the drivers right knee, more to stop my battery going flat and to add another level of security. I installed it out the way so I didn't have to worry about someone walking off with the little red key and leaving me stranded.
The repaired dash has gone in, but still needs to be removeable for the steering bushes which I'm still waiting on. You can't noticed the crack/ split all that much that occurred while dismantling the 7.
I also had a rearrange of the buttons as some aren't to be used as much, so they got shunted left.
I drilled for the low oil pressure warning switch light, reinstalled the 12v socket.
Put the wiper motor and arm into a rough position. (The wires tie onto this, so a useful thing to put in for the time being).
I'm going to add an extension to the fuse box for the 12v as it was an inline fuse which had come apart in recent times. I'm toying with adding another 12v somewhere else hidden away.
I'll also put another relay into the fuse box for the new cooling fan override utilising the now redundant heater fan switch.
I went mad with the rivet gun and finished the internal side panels off, installing the carbon sills as I went. I'm really liking the green and black look.
I spent quite a while faffing trying to get the high level brake light cable down the roll bar tube. It would have been easier to do before it was installed, but it got overlooked. It's now tacked in place.
The rear brake flexible hose was replaced with an all stainless version. The two front ones were also laid in place.
The fuel filter became attached while I attached the rear brake hose also.
I started plumbing the engine bay up, modifying the layout from the previous state by going off a Blatchat article. I replaced the remaining rubber tubing with silicone tubing. New Mikalor clamps throughout.
The horns also got put in while I was working on the front end.
I then went home. Think I'm on my tod again next week, so I'll see how I go!
I'll add pictures this evening.
Edited by Gingerbread Man on Monday 21st July 18:57
Gassing Station | Readers' Cars | Top of Page | What's New | My Stuff