Mini 1275 rebuild
Discussion


I'm welding Mr S, I'm welding ......... infact I'm welding so good, I iz gonna weld you up good and propaaaa boy ! 
Today is a bank holiday and a day off work yaaahhhhhhh, so this morning decided to go to a car/bike show held every year just around the corner from where I live. Unfortunately as per usual for a typical bank holiday it's raining.
Sadly due to the weather it was a poor turn out, so after having a chat and coffee with few friends and getting completely soaked through, decided to call it a day after just a few hours.
So it's left me with a bit of time to sort out and post a few more pics of progress so far.
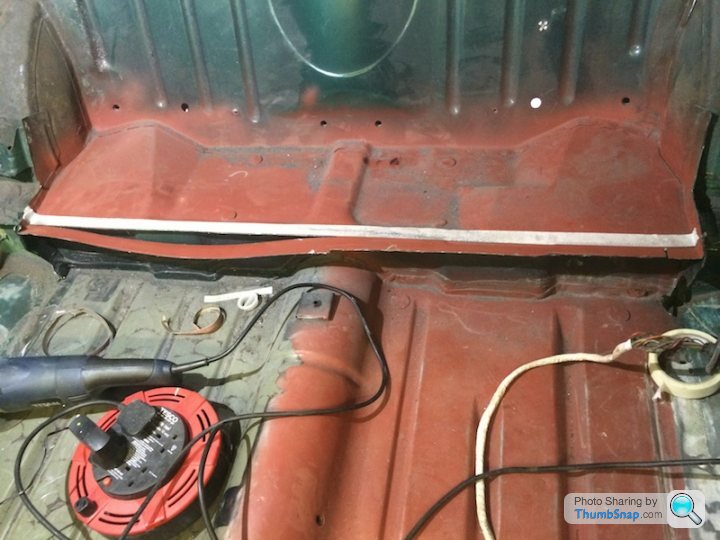
This was probably the worst area of the near side sill which had just been filled straight over. The floor previously had a patch put in but I wasn't happy with the way it was done, so cut it out.
Inside the car with the old patch removed.
New patch tacked in.
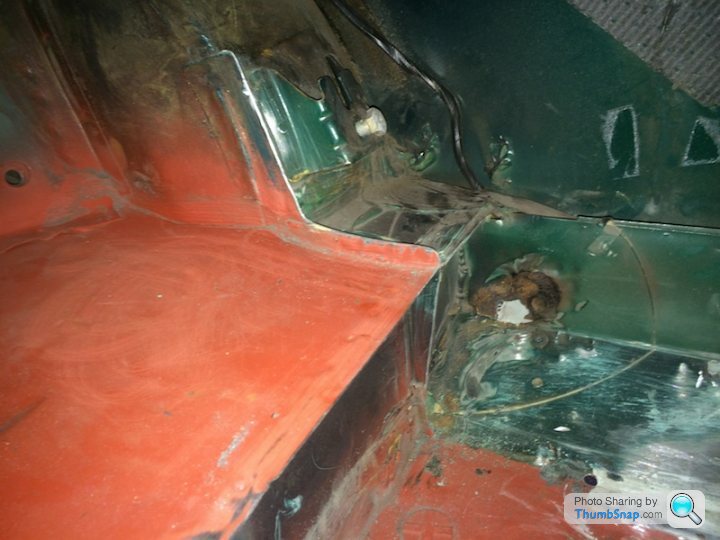
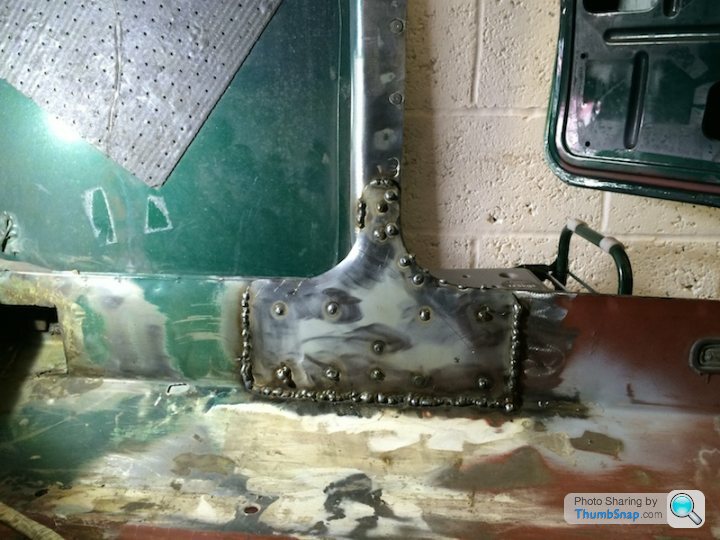
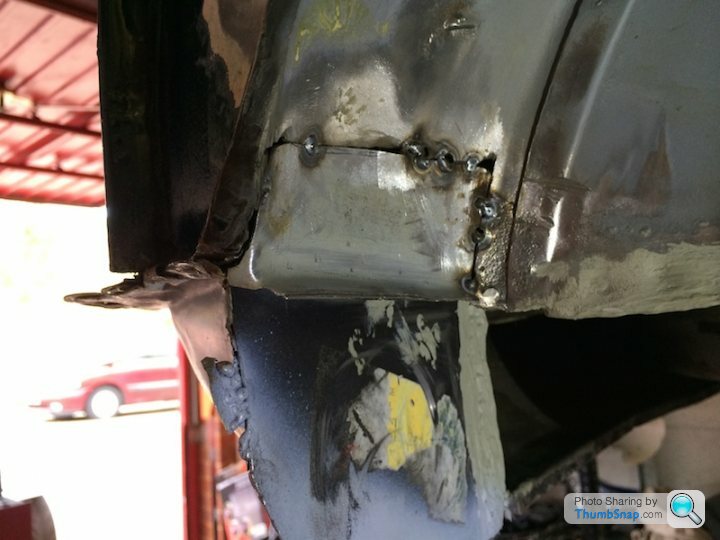
Then it was on to this bit which seemed to take forever and proved pretty awkward for me.
Unfortunately I didn't take many pics at this point so this is the only one I have to show for my efforts.
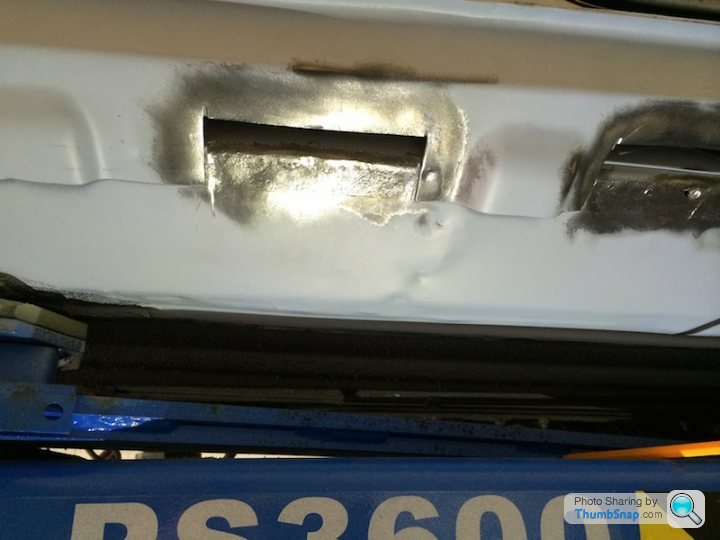
After countless hours of work and a final clean up of all the welds etc, this is what I have ended up with. Am really happy with how it's turned out and doesn't look to bad to be honest, any imperfections should be covered by stone chip and paint.

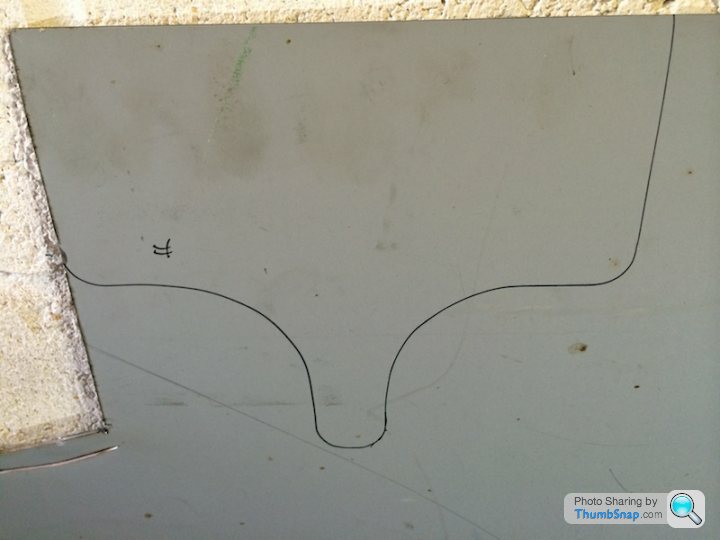
At this point I decided I wanted a rest from rotted out sills, so tackled the rear seat shelf again to get the final shape.

I didn't flush off the lip as there looked to be a spot welded seam, I thought to best leave well alone and just tidied up the edges.
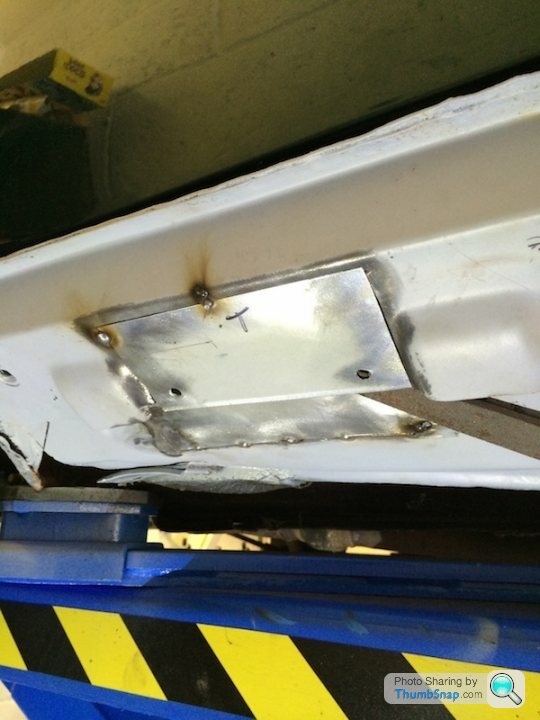
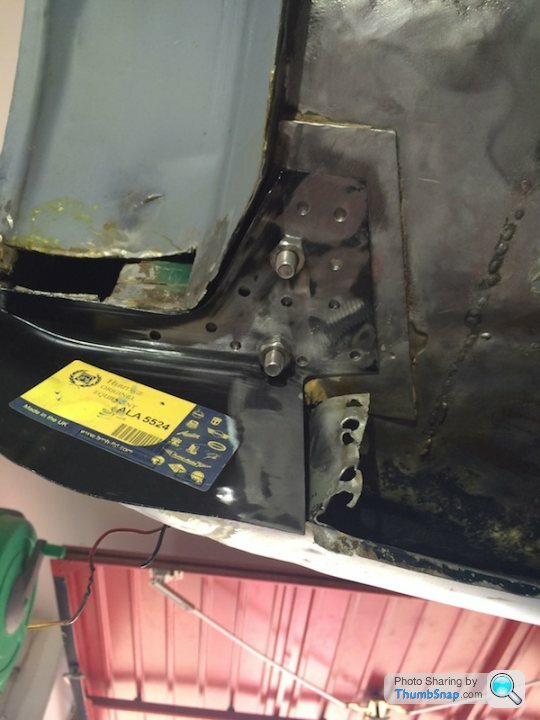
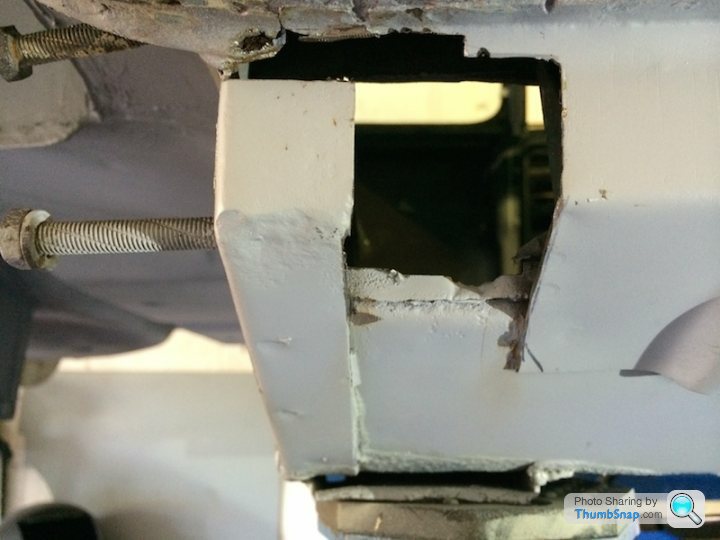
Having removed the rear Storage bins I was left with this area which just looked nasty and unfinished.
So made up a plate to tidy up the area and maybe add a little strength back.

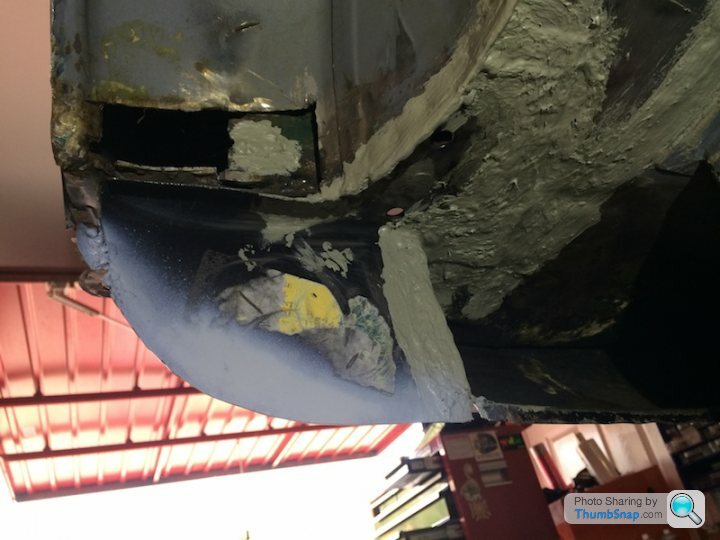
Finished, the rounded off parts do look a bit out of shape in the picture, on the car they are shaped to suit and look fine.......he says in a convincing manner

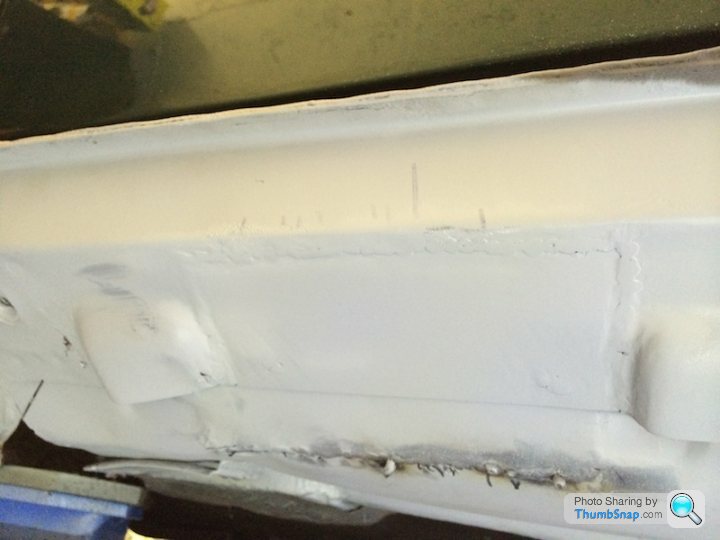
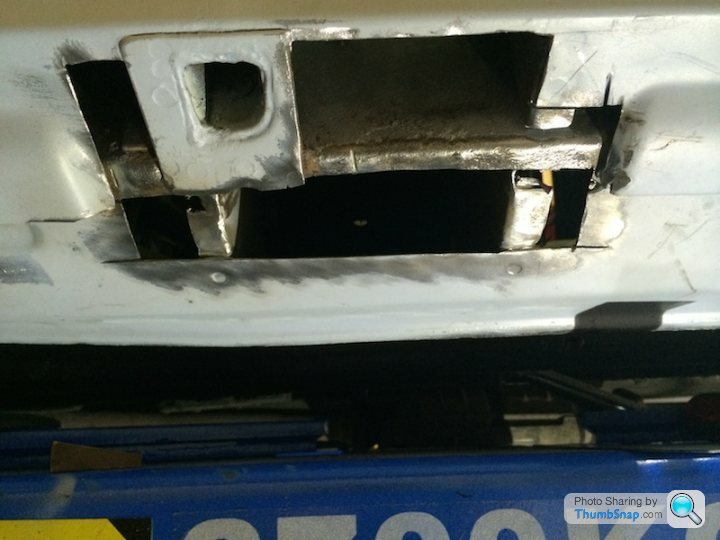
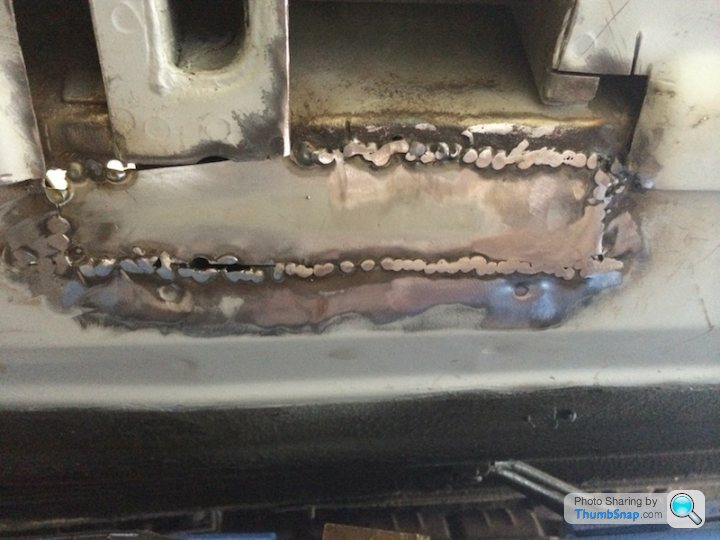
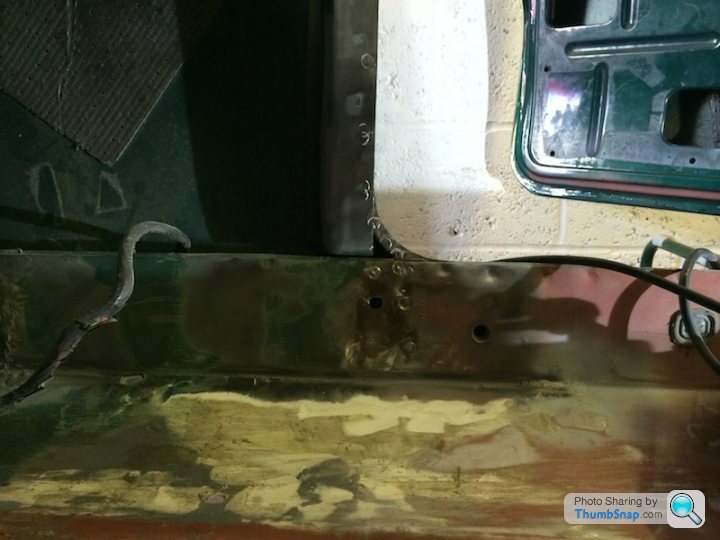
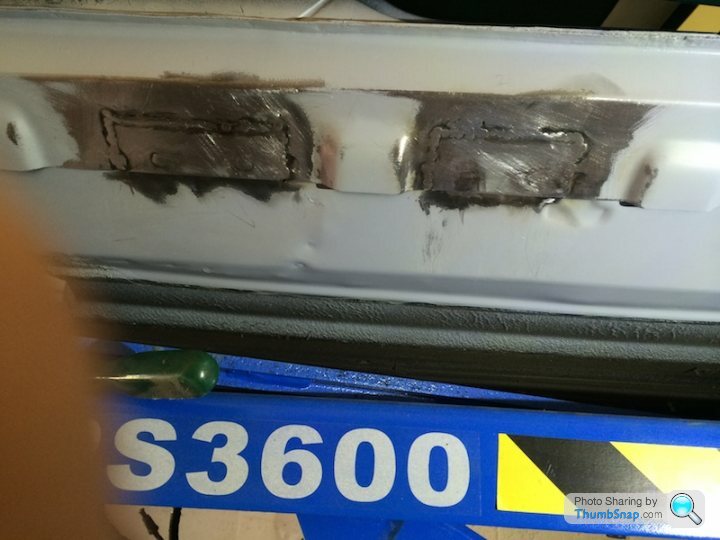
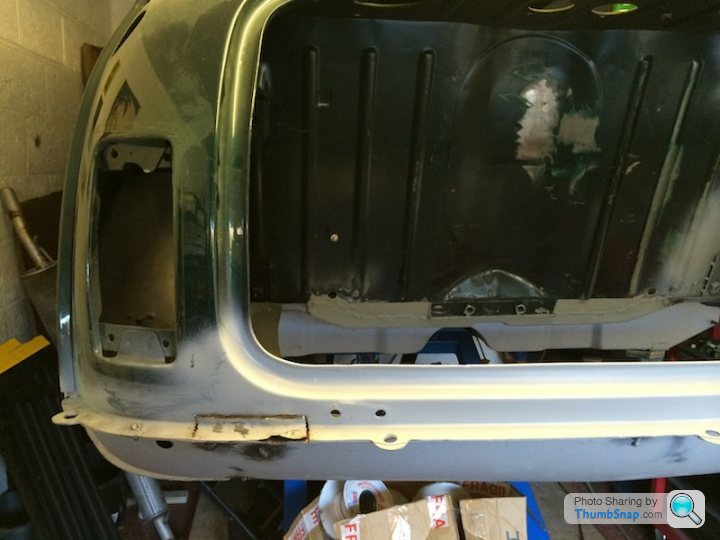
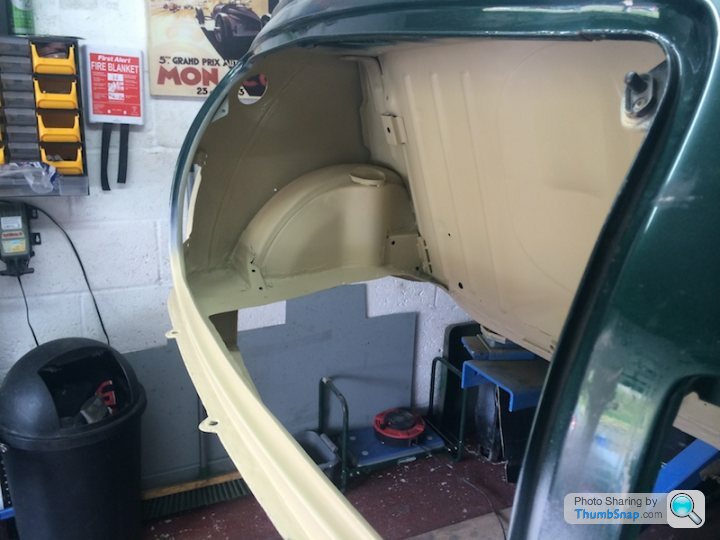
It was then onto the off side rear closing panel (cut out pics shown earlier in the thread)
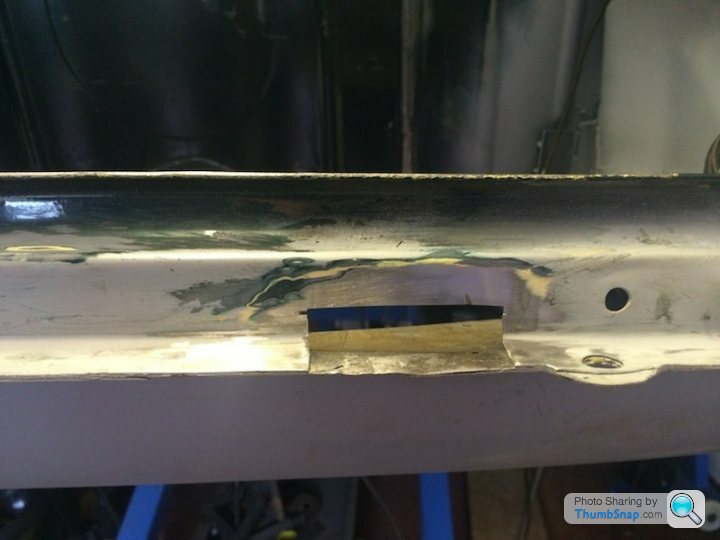
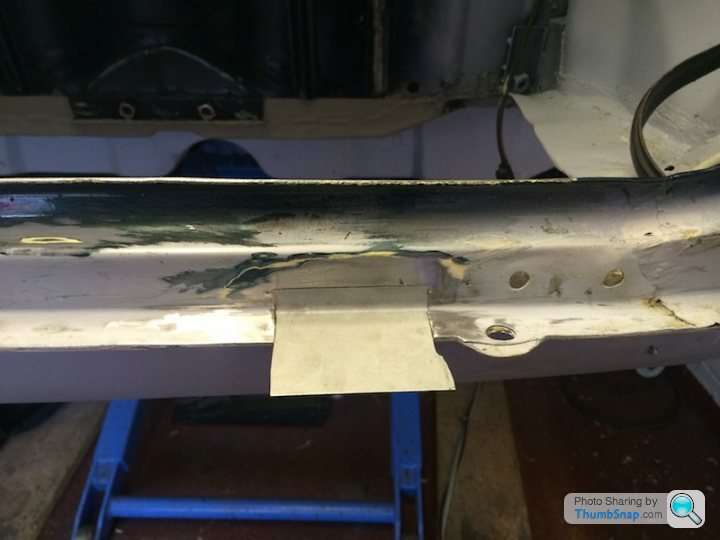
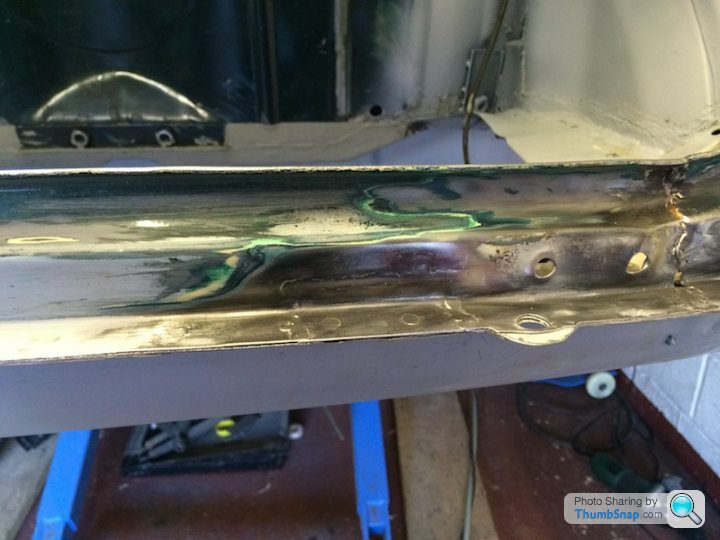
This area is now actually finished but for some reason these four pics are all I can find.
The Drivers side sill for more endless patch work...ho hum.
To be continued..............
Did anybody else make it to the Detling IMM show a few weeks back ?
Went with the ol' man on sunday and had a really enjoyable day out, got loads of ideas what I want to do go with the car now.
Needless to say came back with a van full of goodies including a few carbon bits which I will post up later.
Today is a bank holiday and a day off work yaaahhhhhhh, so this morning decided to go to a car/bike show held every year just around the corner from where I live. Unfortunately as per usual for a typical bank holiday it's raining.
Sadly due to the weather it was a poor turn out, so after having a chat and coffee with few friends and getting completely soaked through, decided to call it a day after just a few hours.
So it's left me with a bit of time to sort out and post a few more pics of progress so far.
This was probably the worst area of the near side sill which had just been filled straight over. The floor previously had a patch put in but I wasn't happy with the way it was done, so cut it out.
Inside the car with the old patch removed.
New patch tacked in.
Then it was on to this bit which seemed to take forever and proved pretty awkward for me.
Unfortunately I didn't take many pics at this point so this is the only one I have to show for my efforts.
After countless hours of work and a final clean up of all the welds etc, this is what I have ended up with. Am really happy with how it's turned out and doesn't look to bad to be honest, any imperfections should be covered by stone chip and paint.
At this point I decided I wanted a rest from rotted out sills, so tackled the rear seat shelf again to get the final shape.
I didn't flush off the lip as there looked to be a spot welded seam, I thought to best leave well alone and just tidied up the edges.
Having removed the rear Storage bins I was left with this area which just looked nasty and unfinished.
So made up a plate to tidy up the area and maybe add a little strength back.
Finished, the rounded off parts do look a bit out of shape in the picture, on the car they are shaped to suit and look fine.......he says in a convincing manner
It was then onto the off side rear closing panel (cut out pics shown earlier in the thread)
This area is now actually finished but for some reason these four pics are all I can find.
The Drivers side sill for more endless patch work...ho hum.
To be continued..............
Did anybody else make it to the Detling IMM show a few weeks back ?
Went with the ol' man on sunday and had a really enjoyable day out, got loads of ideas what I want to do go with the car now.
Needless to say came back with a van full of goodies including a few carbon bits
which I will post up later.Edited by Westy Pre-Lit on Friday 29th August 22:32
The IMM show at Detling proved to be a little damaging to the pocket.
Before the show I had already decided to repair the boot floor with patches and then make good, I had also spent many hours taking the underside of the boot floor back to bare metal so had already invested a lot of time into it, I wasn't really looking at or interested in any other options to be honest.
Anyway, whilst mooching about the show, the ol' man spotted a lovely looking race car. so we went over to take a peek and noticed it had a carbon boot floor fitted. Having spoken to the builder of the car and with a little coaxing, I finally managed to convince myself that installing a flat carbon boot floor ( one just so happened to be sitting next to his car and was for sale ) would eventually be a cheaper, easier and less time consuming route and anyway a circular aluminium fuel tank designed to sit in the wheel well can prove to be double the cost of the more common rectangular ones so would pay for itself over the long run. That's my excuse anyway and I'm sticking to it, the fact I'm sucker for a bit of carbon doesn't come into the equation
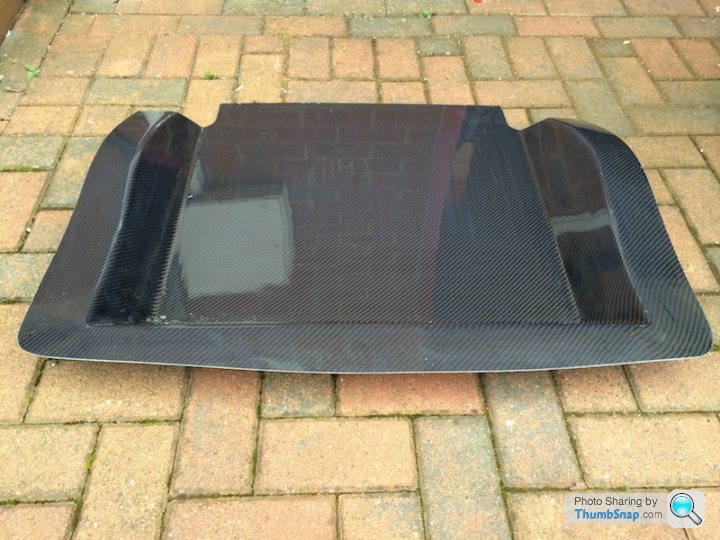
A few more bits of shiny shiny, I now have an incentive to get the subframe sorted.

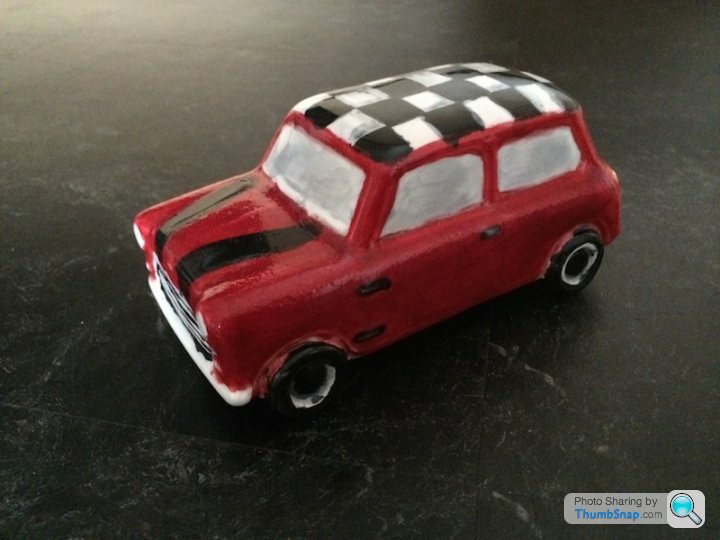
Oh I Nearly forgot to post this.
Whilst at the show last week, we walked past a 'China smash stall' and my friends kids couldn't resist a go at smashing a few plates. As they took aim, I spotted this poor thing placed right in the middle of the stall and was being unfairly targeted by all the nasty kids. I had to walk way with my friends laughing at it's imminent demise, in the end I could take the pain no more and saved it from it's ugly fate.
Before the show I had already decided to repair the boot floor with patches and then make good, I had also spent many hours taking the underside of the boot floor back to bare metal so had already invested a lot of time into it, I wasn't really looking at or interested in any other options to be honest.
Anyway, whilst mooching about the show, the ol' man spotted a lovely looking race car. so we went over to take a peek and noticed it had a carbon boot floor fitted. Having spoken to the builder of the car and with a little coaxing, I finally managed to convince myself that installing a flat carbon boot floor ( one just so happened to be sitting next to his car and was for sale ) would eventually be a cheaper, easier and less time consuming route and anyway a circular aluminium fuel tank designed to sit in the wheel well can prove to be double the cost of the more common rectangular ones so would pay for itself over the long run. That's my excuse anyway and I'm sticking to it, the fact I'm sucker for a bit of carbon doesn't come into the equation
A few more bits of shiny shiny, I now have an incentive to get the subframe sorted.
Oh I Nearly forgot to post this.
Whilst at the show last week, we walked past a 'China smash stall' and my friends kids couldn't resist a go at smashing a few plates. As they took aim, I spotted this poor thing placed right in the middle of the stall and was being unfairly targeted by all the nasty kids. I had to walk way with my friends laughing at it's imminent demise, in the end I could take the pain no more and saved it from it's ugly fate.
Edited by Westy Pre-Lit on Saturday 30th August 09:29
I reckon by my rate it'll probably take about 3 years or so, having to do lot of grinding work at the moment so need to pick my times as I don't want to upset the neighbours. I do say to them to let me know if I annoying them with the noise and so far they have all be very good, hopefully that doesn't change.
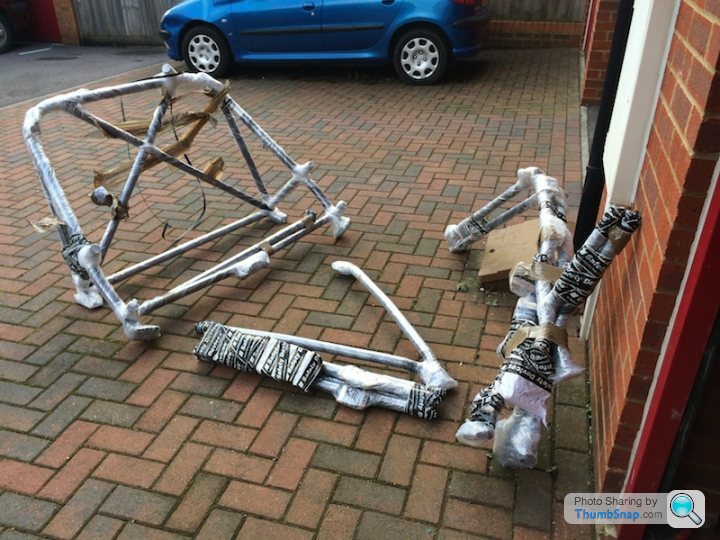
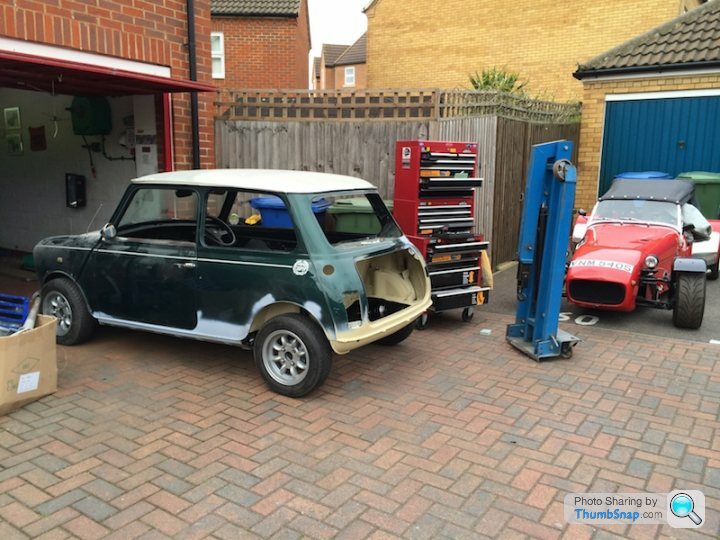
Had few hours free today so went and had a play in the garage again. Wanted to take a break from welding this weekend so decided to unwrap the cage and make sure everything is there........in other words I wanted to see what it looked like.
It's a Safety Devices Cage supplied by Mini Spares and I must say I'm really happy with the way it was delivered and packaged, the overall quality is very good so I'm well pleased with it. Took me about 1.5 hours just to unwrap it all and an hour to do a mock up fit.
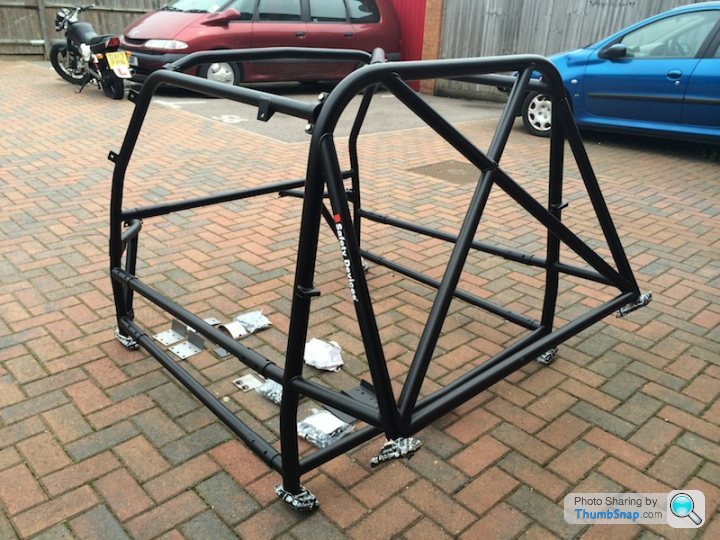
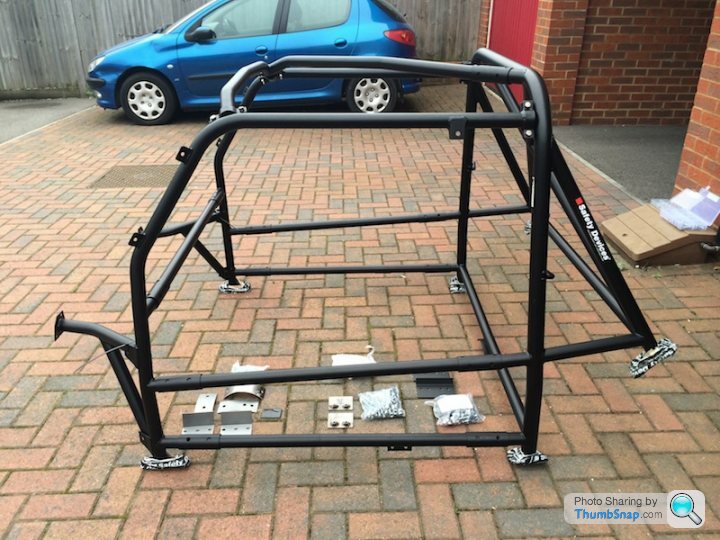
It's a Safety Devices Cage supplied by Mini Spares and I must say I'm really happy with the way it was delivered and packaged, the overall quality is very good so I'm well pleased with it. Took me about 1.5 hours just to unwrap it all and an hour to do a mock up fit.
Edited by Westy Pre-Lit on Saturday 6th September 21:36
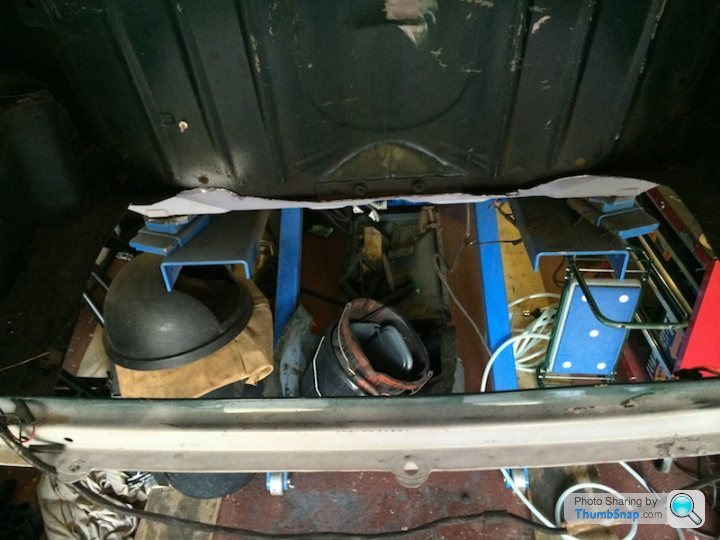
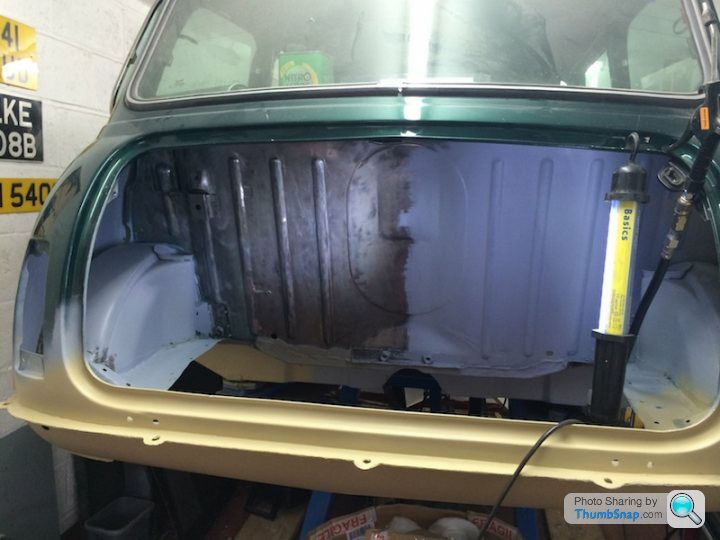
I haven't posted much recently because I been welding the drivers side sill up and the pictures aren't the most exciting things to look at. Seems to have taken an age to to get there as they were somewhat worse than the passenger side. I finally got to a point yesterday though where they can be left for a final finish and fettle so have now been able to start sorting out the boot area. I've so far cut out the boot floor and temporarily fitted new one and started to tidy up the rear Valance, I'll post some more pics later once I've sorted through them
My dad has decided to buy a new car, well an old car, a 1965 MG Midget as a bit of a tinkering toy / investment so you know who's gonna cop all the big jobs don't you....yep silly b
 ks here
  So today jobs are changing oil, changing and bleeding the brakes, adjusting the clutch, changing the coolant and sorting out the brake lights, which decided to play up on the day of collection.
FWDRacer said:
Fitting it in the car will be a proper pain in the balls
I'm not looking forward to it no , it's currently in the lounge at the moment along with all the other bits and pieces waiting to be fitted. Hopefully it won't be too long before I can start putting some of it on the car and claiming some room back.Pixel-Snapper said:
That cage looks amazing I wonder if one would fit in my van!
Treat yourself, you know you wanna Weather is a bit rubbish today so thought I'd have a break from car stuff and post another update.
A while back I decided to bite the bullet and remove the boot floor pan, then have a go at fitting the carbon one bought at the IMM show. I didn't really know where to start so it was a case of trial and error really.

No going back now...
It fits
I haven't bolted it all down yet and it's just resting in the hole but you get the idea.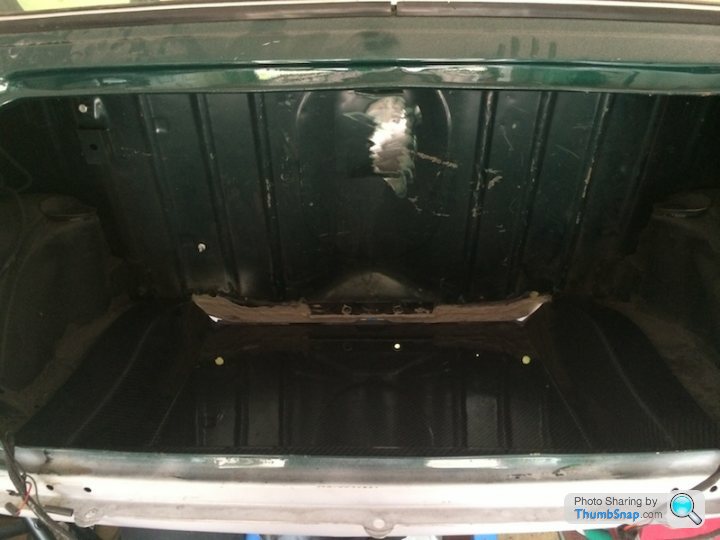
I've now finished both outer sills having cut out all the nasty bits, it has been a long mission but it has taught me a lot when it comes to welding. I'm now not blowing holes the second I try to weld something up, which was the whole point really rather than removing the sills and replacing them with new ones. The rest of the metal was cleaned as much as possible and will be treated to a good spray and wax seal.
Ok it's not perfect but I think I'm starting to get the idea now.
Having finished the sills I've now been able to turn my attention to rear of the car which I started on yesterday. This was the only picture I took, then the battery on the phone run out
. When you start digging around the rear there are a few bits and bobs that are getting thin, hopefully this area won't take so long to sort out.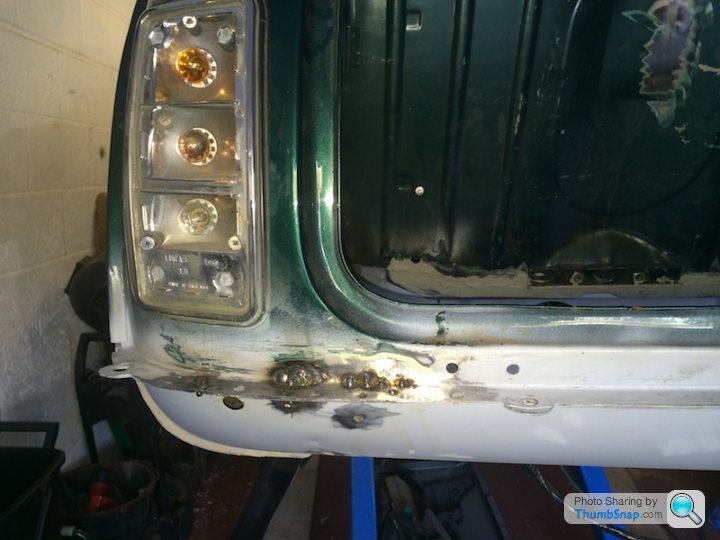
And just below is the offending item keeping me away from the Mini at the moment
 ......... Only joking, I love it really
 It's had a few minor issues and was to be expected really.
1. The brake lights weren't working which turned out to be a small switch.
2. The car seemed to run pretty hot and after a run it would try and chuck all water out of the system. It also had issue causing it to run a bit rough after a while and run on after turning it off. After a good flush through and new thermostat, the problem turned out to be wrongly rated rad cap. Funny how such an insignificant looking item can cause so many big issues, runs sweet now.
3. An oil leak, the oil in the sump was way over the mark and probably to thin. Some new 20/50 and correct levels seemed to have sorted that issue, oil leak has disappeared.
4. Exhaust leaking at the manifold was sorted out with a good clean up.
5. All Filters changed
Next few jobs to do is bleed the clutch and brakes and give it a clean.
Digby said:
How are the folks mate? I must sort a weekend to come over!
They are doing good thanks, hope yours are ok also. Anyway here it is, notice the skirt caught in door....she don't change

Edited by Westy Pre-Lit on Sunday 2nd November 15:49
Well that's three weekends wasted so just a small update for now.
At the beginning of the month I decided to try and make a start repairing the rear subframe. On first glance I thought It would be worth repairing as it didn't look to bad. Apart from a few small scabby patches ( pictured earlier in the thread ) I thought it looked pretty sound.
Today reality finally set in to the extent of the repairs required. I managed to repair the scabby parts that I've shown and was pretty pleased with how they turned out, but today the further I dug in, the rot being revealed has proven to be extensive and mostly in areas that are inaccessible.
Feeling pretty gutted at the moment if I'm being honest but I don't think I could ever really trust it with the amount of repairs required. Hopefully the front one doesn't prove to be the same.
so just a small update for now.At the beginning of the month I decided to try and make a start repairing the rear subframe. On first glance I thought It would be worth repairing as it didn't look to bad. Apart from a few small scabby patches ( pictured earlier in the thread ) I thought it looked pretty sound.
Today reality finally set in to the extent of the repairs required. I managed to repair the scabby parts that I've shown and was pretty pleased with how they turned out, but today the further I dug in, the rot being revealed has proven to be extensive and mostly in areas that are inaccessible.
Feeling pretty gutted at the moment if I'm being honest but I don't think I could ever really trust it with the amount of repairs required. Hopefully the front one doesn't prove to be the same.
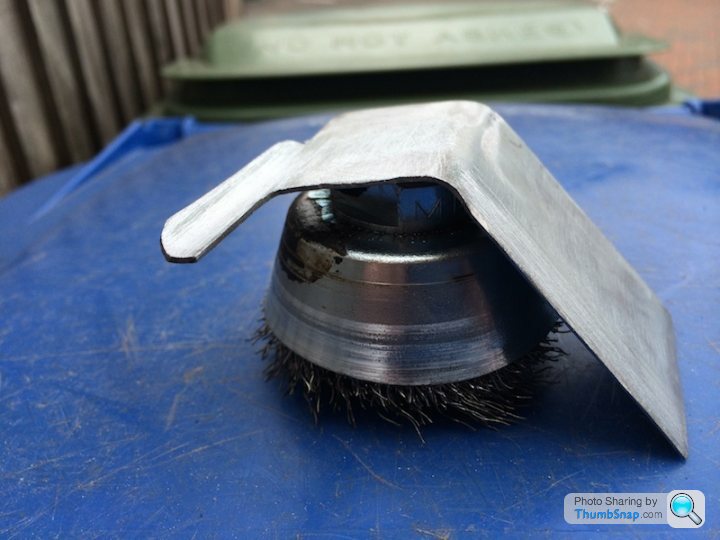
Lesson 1 -
When using a grinder with a wire wheel attached ( infact any wheel attached for that matter, but in this case a big fat ugly ripper wire wheel ), it is wise not to rest the grinder on your leg with the wheel next to you nether regions as you ponder your next move.
Lesson 2 -
When working in the garage doing garagey stuff, Jeans are probably a better attire than worn out old track bottoms.
Lesson 3 -
If you fail to take notice of Lessons 1 & 2 and carry on regardless.......... under no circumstances press the ON button.

Here endeth the lesson for today
When using a grinder with a wire wheel attached ( infact any wheel attached for that matter, but in this case a big fat ugly ripper wire wheel ), it is wise not to rest the grinder on your leg with the wheel next to you nether regions as you ponder your next move.
Lesson 2 -
When working in the garage doing garagey stuff, Jeans are probably a better attire than worn out old track bottoms.
Lesson 3 -
If you fail to take notice of Lessons 1 & 2 and carry on regardless.......... under no circumstances press the ON button.
Here endeth the lesson for today
Edited by Westy Pre-Lit on Tuesday 16th December 07:21
I think lucky is a bit of an understatement Mr S. After it had just happened I sat there for a few seconds waiting for the pain to kick in and nothing, not a flicker. I'm then thinking if there's no pain then it's not gonna be pretty this is going to be bad, really bad. Must admit it did take a while before I took the brave step of moving just hoping everything was still intact, I just sat there for a few minutes in stunned silence contemplating.......you live and learn
Thanks Pixel-Snapper, hope to post another update and a few more pics soon when I get a bit of free time.
Thanks Pixel-Snapper, hope to post another update and a few more pics soon when I get a bit of free time.
Well I'm still going at it and as I'm having a lazy day so its time for another update. When I look back at it, it doesn't look as if I've done much really although I can honestly say that is very far from the truth.
At the end of the last update I had just started on the rear end of the car, to be honest I really wasn't happy with the repair that I had made and was a bit of a bodge really when all said and done. So out came the grinder and drill and the rotted out sections were cut away and replaced with new pieces of metal. The next few pictures are just a couple of sections that I cut away but I think over-all there were about 4 or 5 areas that needed repairing on this panel.
This was one of the sections on the drivers side and although the welds look a little proud in the last picture they have now been ground back and look as if nothing has been replaced.
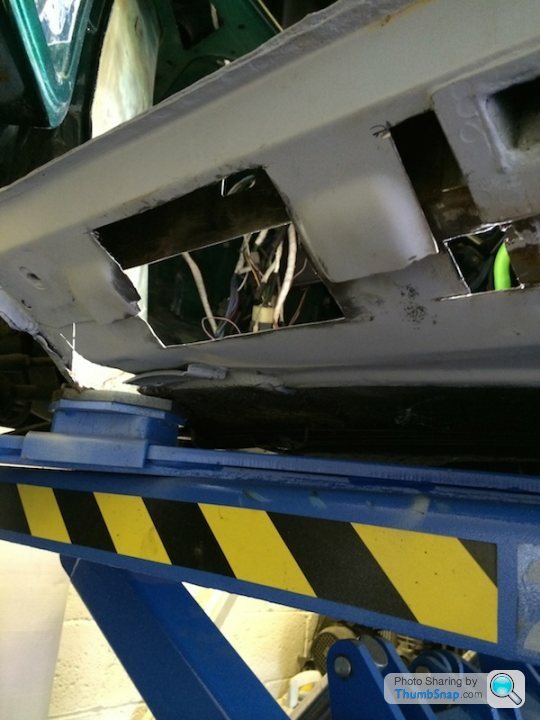
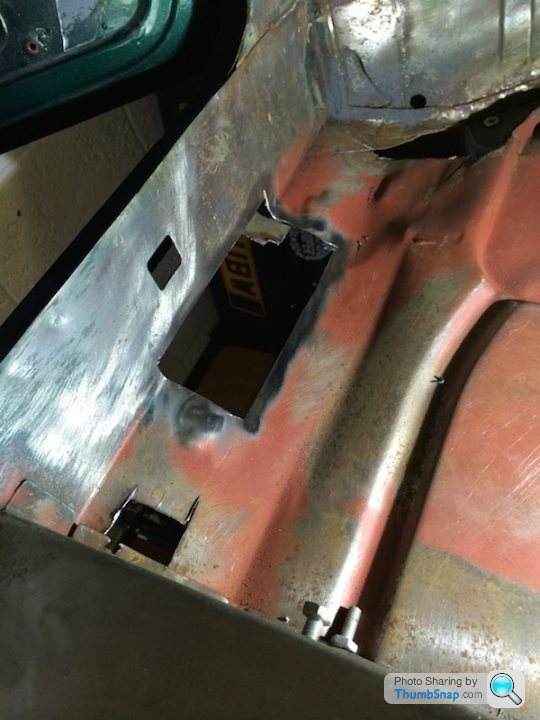
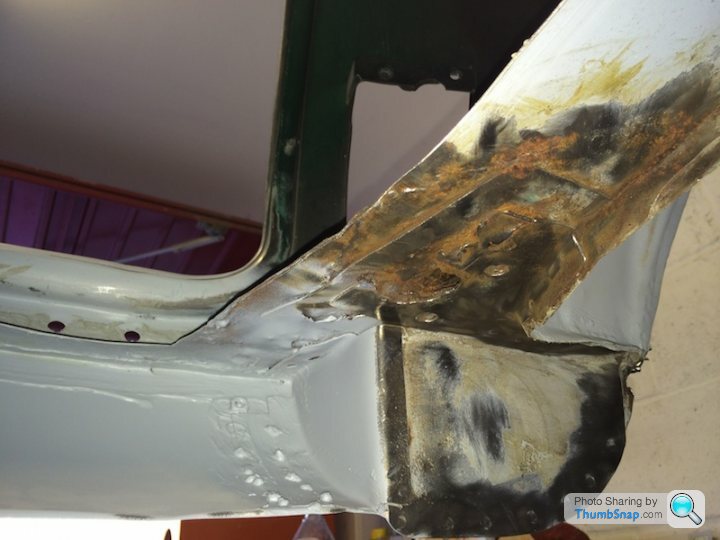
It was then onto the n/s rear valance closing panel which I wasn't looking forward to doing at all. It was one of those jobs that I had kept putting off and putting off as just by looking at it I could tell it was going to be a bit of a nightmare for me. In the end I decided the best way forward was to cut away the whole section and start again as the rot had well and truly set in. Luckily I was able to use the rear subframe hole as a datum point and in the end, when the subframe was finally offered up for fit, everything matched exactly as planned so was well happy with the repair if I say so myself
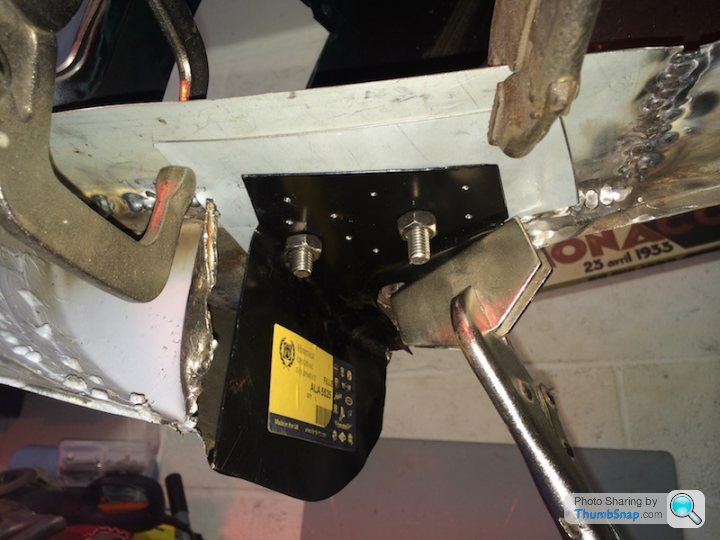
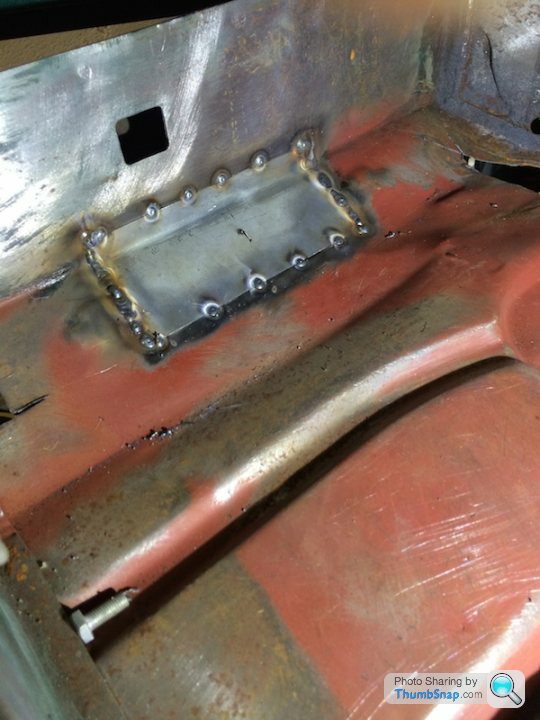
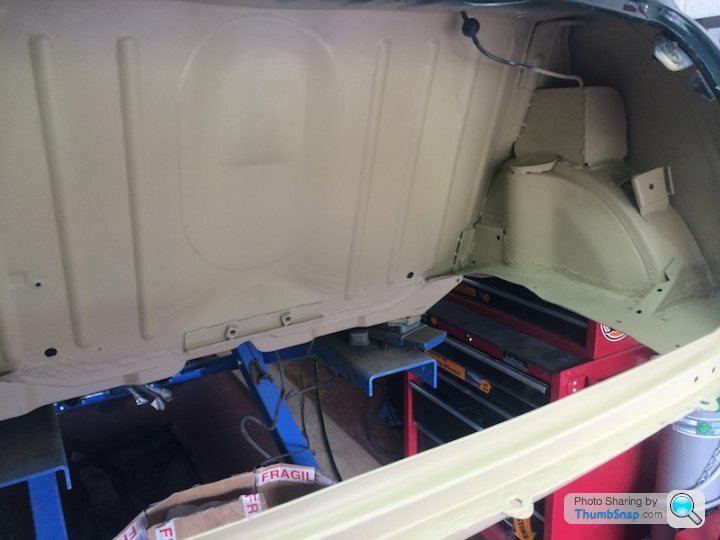
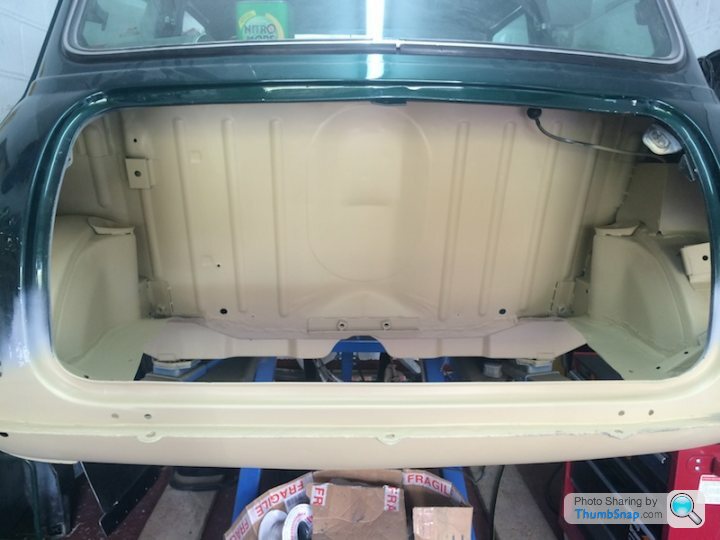
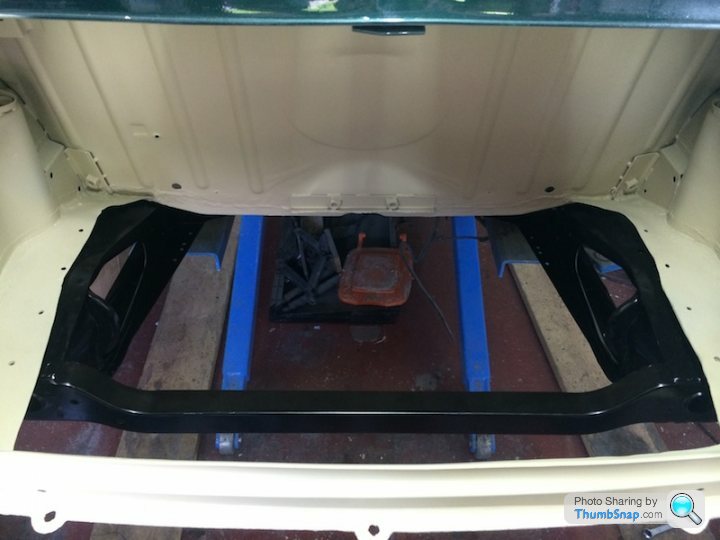
The finished area after a bit of fettling and primer coat, the holes in the floor are for the carbon tray fittings
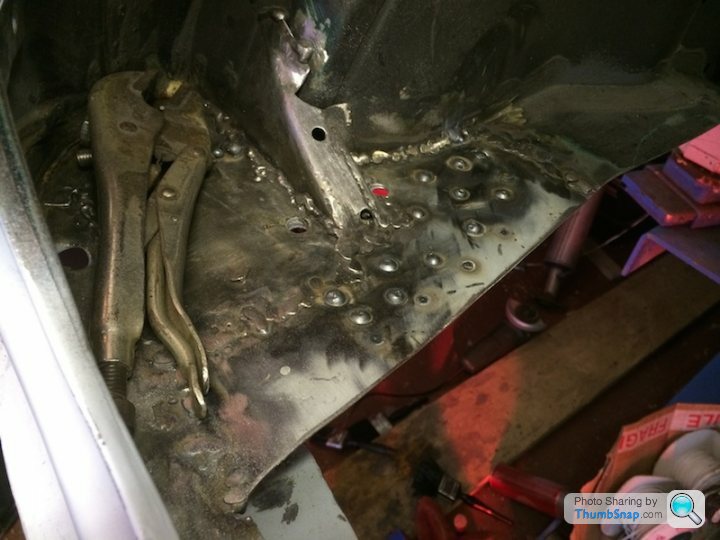
The whole boot was taken back to bare metal, etch primed and them primed for protection.
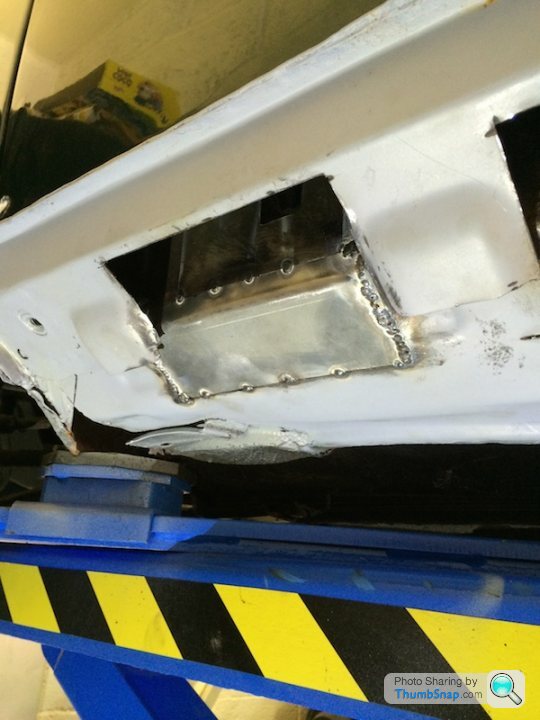
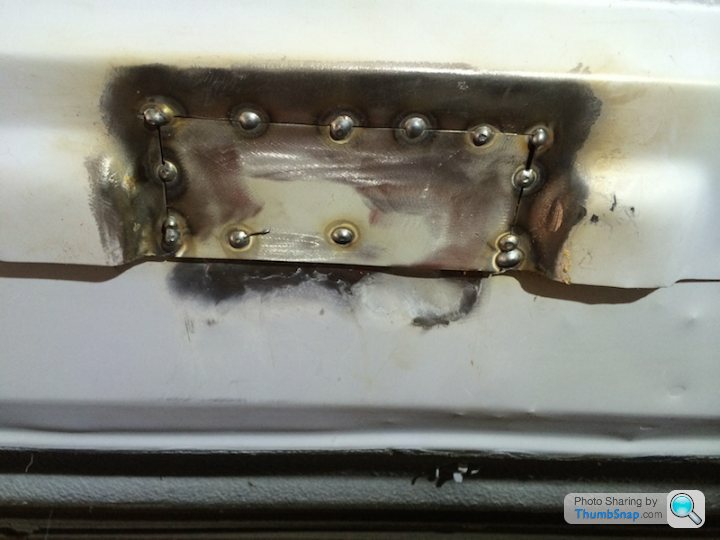
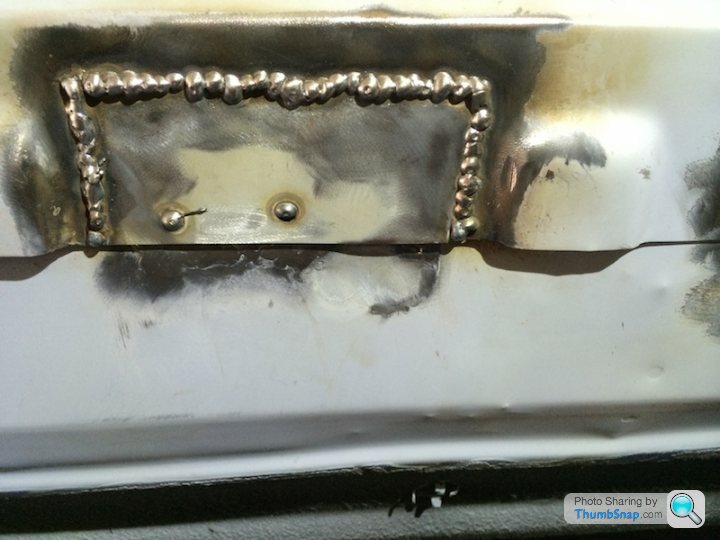
On the top of the o/s rear wheel arch was a repair by a previous owner that although ok wasn't exactly the prettiest of repairs. I really didn't want to go through the hassle of cutting out a section of arch and replacing that as I didn't think I could ever get a good enough match. I also don't think it really warranted a new wheel arch. So in the end I cut out all the scabby bits and made good any rot. I then decided to make up a box which I think for now will eventually be home to a battery cut off switch or something that gives the box a purpose and a reason for being there.
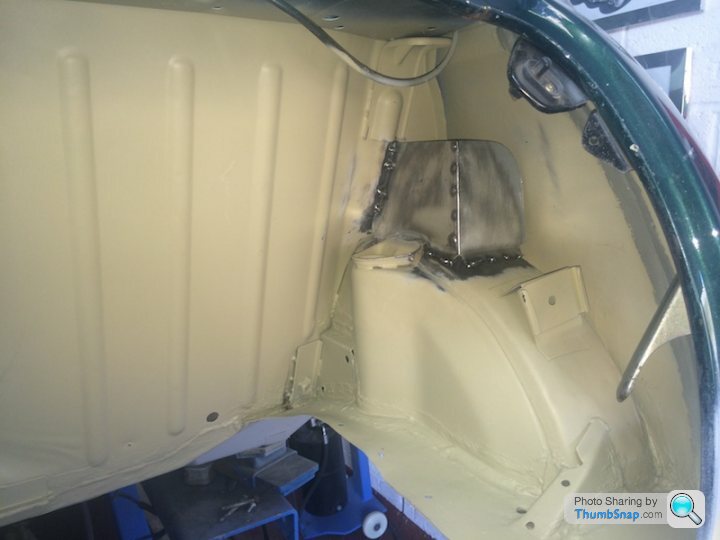
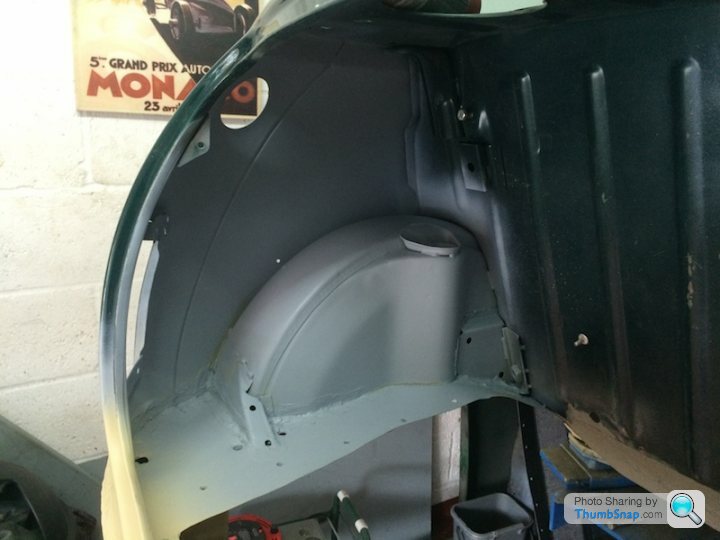
The whole of the area was etched primed and primed for protection.
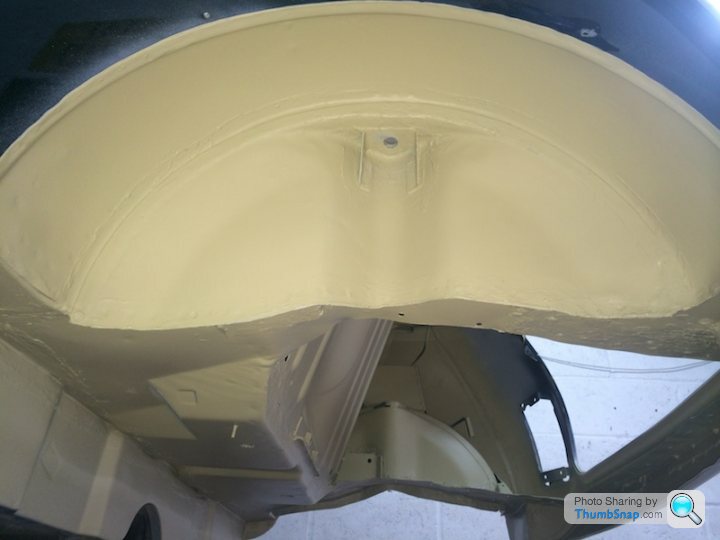
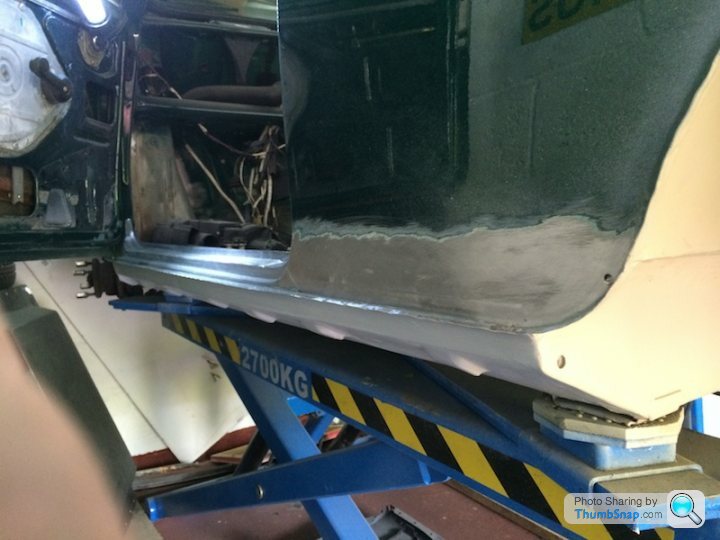
I then worked my way along the sills and although this picture doesn't show it, the drill holes for the after market arches have now been welded up as I think I'm going to go down the arch less route with the 10" wheels. I have also cleaned this area up for now as I'll be spraying some Gravitex stone chip alone these lines at a later point.
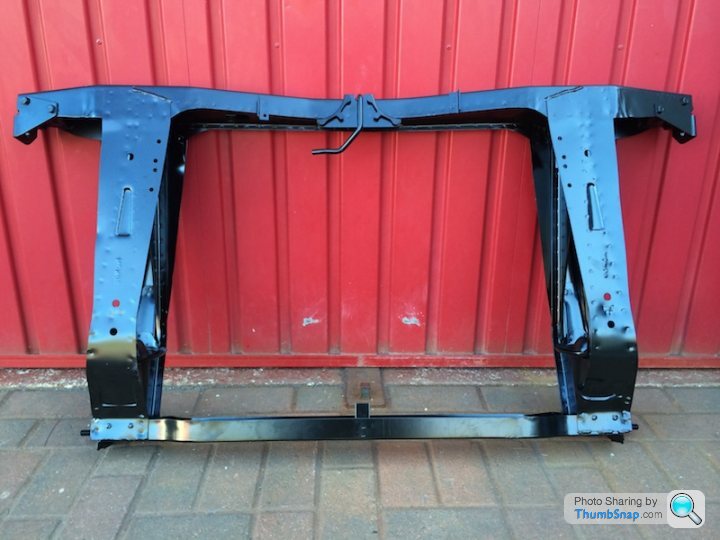
Like i said before after a load of pointless work it finally became apparent that the rear subframe had to go, so a new heritage subframe from Minispares was ordered.
It was then off to the scrappers with my old subframe and my Bread card was loaded up with the grand sum of £4.06, which meant taking the long route home and a Maccy D's was the order of the day for my troubles of being a recycling Greeny.
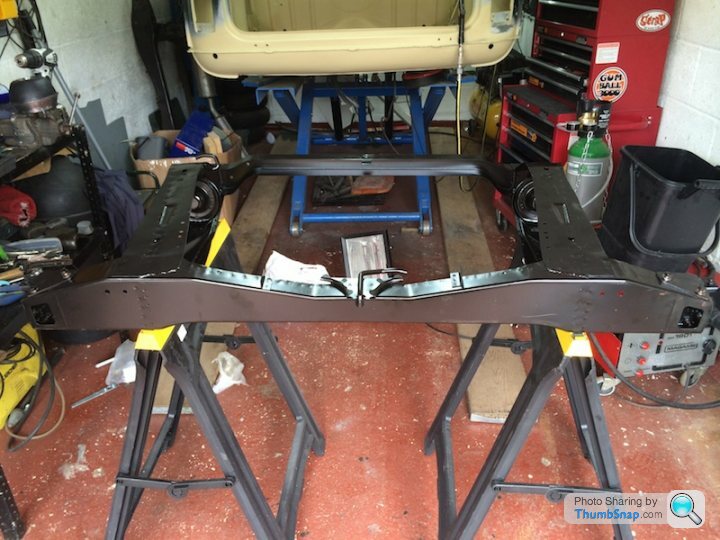
Subframe fitted......the only reason It's being fitted now is because I need to get the car on the floor so I can work out where the locating plates are to be welded in for the roll cage. It's a bit of a pain in the neck to do it this way as It will all need to come back out again for the underside to be stone chipped, but such is life as they say.
Finally the car see's the light of day after about a year of being on the lift and in itself feels like a mile stone has been achieved. It also gave me a good opportunity to clean out the garage and have a good tidy up.
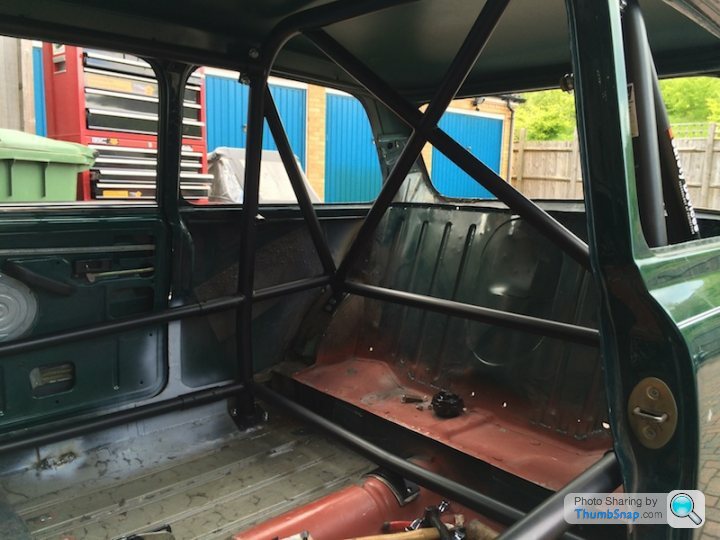
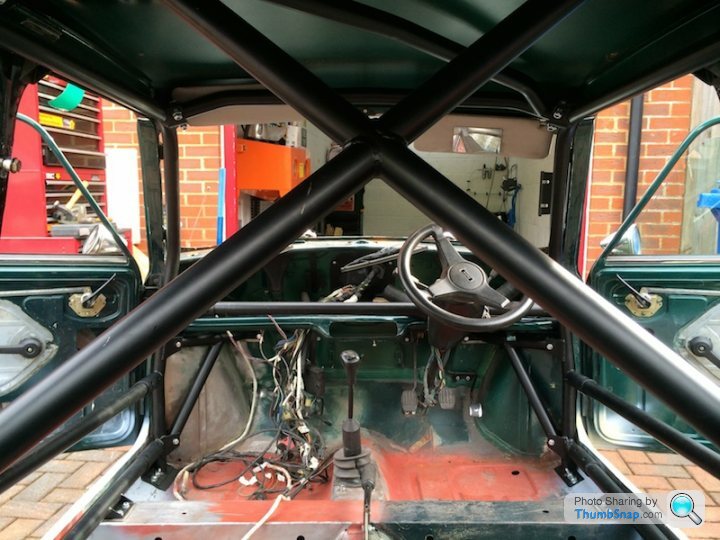
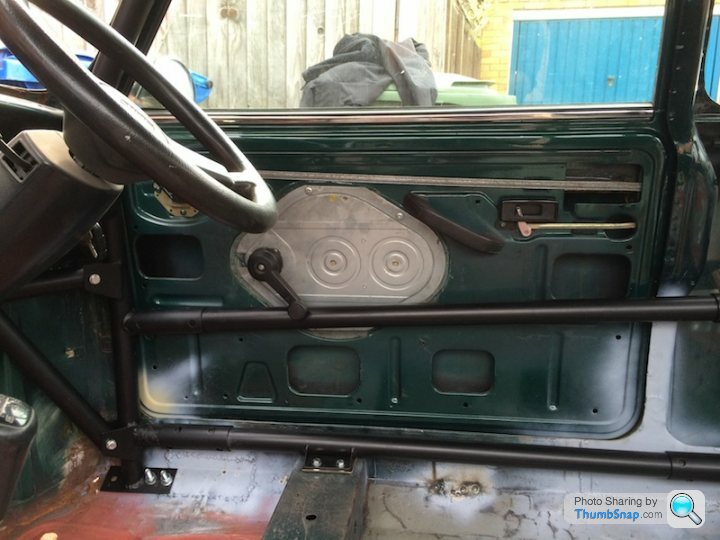
The cage being fitted, to be honest it wasn't that hard getting in when your not bothered about the paint work. Don't know what I'm going to do when It's all painted
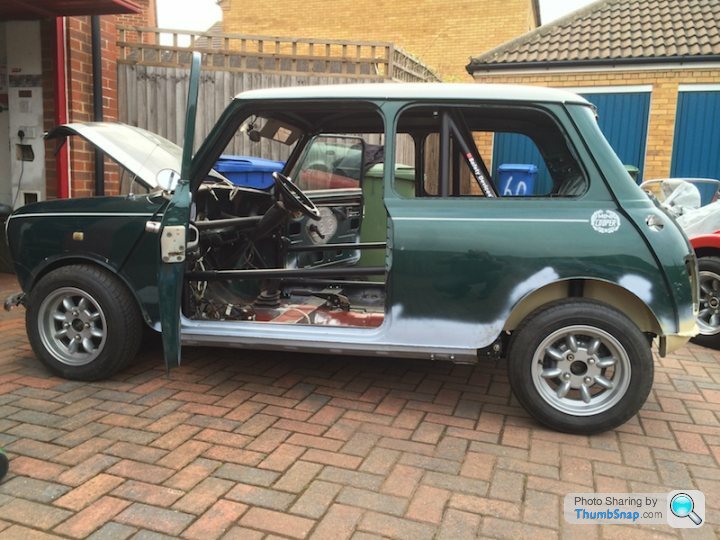
Ooops, think I'm going to have to have a think about the window winders.
At the end of the last update I had just started on the rear end of the car, to be honest I really wasn't happy with the repair that I had made and was a bit of a bodge really when all said and done. So out came the grinder and drill and the rotted out sections were cut away and replaced with new pieces of metal. The next few pictures are just a couple of sections that I cut away but I think over-all there were about 4 or 5 areas that needed repairing on this panel.
This was one of the sections on the drivers side and although the welds look a little proud in the last picture they have now been ground back and look as if nothing has been replaced.
It was then onto the n/s rear valance closing panel which I wasn't looking forward to doing at all. It was one of those jobs that I had kept putting off and putting off as just by looking at it I could tell it was going to be a bit of a nightmare for me. In the end I decided the best way forward was to cut away the whole section and start again as the rot had well and truly set in. Luckily I was able to use the rear subframe hole as a datum point and in the end, when the subframe was finally offered up for fit, everything matched exactly as planned so was well happy with the repair if I say so myself
The finished area after a bit of fettling and primer coat, the holes in the floor are for the carbon tray fittings
The whole boot was taken back to bare metal, etch primed and them primed for protection.
On the top of the o/s rear wheel arch was a repair by a previous owner that although ok wasn't exactly the prettiest of repairs. I really didn't want to go through the hassle of cutting out a section of arch and replacing that as I didn't think I could ever get a good enough match. I also don't think it really warranted a new wheel arch. So in the end I cut out all the scabby bits and made good any rot. I then decided to make up a box which I think for now will eventually be home to a battery cut off switch or something that gives the box a purpose and a reason for being there.
The whole of the area was etched primed and primed for protection.
I then worked my way along the sills and although this picture doesn't show it, the drill holes for the after market arches have now been welded up as I think I'm going to go down the arch less route with the 10" wheels. I have also cleaned this area up for now as I'll be spraying some Gravitex stone chip alone these lines at a later point.
Like i said before after a load of pointless work it finally became apparent that the rear subframe had to go, so a new heritage subframe from Minispares was ordered.
It was then off to the scrappers with my old subframe and my Bread card was loaded up with the grand sum of £4.06, which meant taking the long route home and a Maccy D's was the order of the day for my troubles of being a recycling Greeny.
Subframe fitted......the only reason It's being fitted now is because I need to get the car on the floor so I can work out where the locating plates are to be welded in for the roll cage. It's a bit of a pain in the neck to do it this way as It will all need to come back out again for the underside to be stone chipped, but such is life as they say.
Finally the car see's the light of day after about a year of being on the lift and in itself feels like a mile stone has been achieved. It also gave me a good opportunity to clean out the garage and have a good tidy up.
The cage being fitted, to be honest it wasn't that hard getting in when your not bothered about the paint work. Don't know what I'm going to do when It's all painted
Ooops, think I'm going to have to have a think about the window winders.
Yes,, think i'll look into that idea as hopefully I'm also going to go for the older look.
Another idea was the plastic race windows but can see those becoming a pain. Whatever happens, the windows will need to be changed as these all have a green tint in them.
The main reason I bought the lift was so that I could get both cars in one garage which a builder friend suggested. It was a lot cheaper option than having a load of works carried out on altering the building.
I can honestly say It's been one of the best investments I think I've ever made and wouldn't be without it now. When I sold the Beetle the remaing money I had when I bought the Mini paid for the lift, so in effect didn't cost me anything ( that's what I like to tell myself anyway ), so was a bit of a result. Working around and underneath the front and rear of car is so much easier, although getting to the middle part of the car is very restrictive. At first It was a little worrying, but so long as your not stupid with it i've found it perfectly fine. Removing and replacing the rear subframe and all the suspension has made a nightmare of a job a doddle.
I've had it around a year now and so far no complaints or problems.
This is the one IIRC
http://www.ebay.co.uk/itm/CAR-LIFT-MID-RISE-SCISSO...
Although the guy did come down on price a bit I think I paid a little more, but it was worth it as I found him to be the only really helpful seller who gave me confidence in the product.
Hope that helps
Another idea was the plastic race windows but can see those becoming a pain. Whatever happens, the windows will need to be changed as these all have a green tint in them.
The main reason I bought the lift was so that I could get both cars in one garage which a builder friend suggested. It was a lot cheaper option than having a load of works carried out on altering the building.
I can honestly say It's been one of the best investments I think I've ever made and wouldn't be without it now. When I sold the Beetle the remaing money I had when I bought the Mini paid for the lift, so in effect didn't cost me anything ( that's what I like to tell myself anyway
), so was a bit of a result. Working around and underneath the front and rear of car is so much easier, although getting to the middle part of the car is very restrictive. At first It was a little worrying, but so long as your not stupid with it i've found it perfectly fine. Removing and replacing the rear subframe and all the suspension has made a nightmare of a job a doddle. I've had it around a year now and so far no complaints or problems.
This is the one IIRC
http://www.ebay.co.uk/itm/CAR-LIFT-MID-RISE-SCISSO...
Although the guy did come down on price a bit I think I paid a little more, but it was worth it as I found him to be the only really helpful seller who gave me confidence in the product.
Hope that helps
Gassing Station | Readers' Cars | Top of Page | What's New | My Stuff