Discussion


Captainawesome said:
Lovely car. They do get under your skin. I've spent the day today at evolve having a supersprint lightweight exhaust and their carbon air box fitted. I know it's expensive but I have literally giggled all the way home. THAT BOX!!! THE NOISE!!!!! If you can, save up and buy one. I had mine mapped with them a couple of months ago an gained 13HP, just got another 14 from the box.I can highly recommend it. Makes the car sound like a muscle car.
Mystewart has another great thread on his E46 build. They may be getting on a bit but there are plenty of us out there just starting on our E46 missions.
Thanks mate.Mystewart has another great thread on his E46 build. They may be getting on a bit but there are plenty of us out there just starting on our E46 missions.
Wow I can only imagine how awesome your new setup it. For sure the sound made from aftermarket airbox options for the S54 are truly intoxicating!

I agree, there seems to be no lack of interest in the E46M!
Pig benis said:
OP, I am sure this is the car I have been admiring on a daily basis. By any chance, do you live in Bulkington?
How did you know? ... haha just kiddin, no I'm from Derbyshire. 
Mr.Jimbo said:
This thread isn't helping me as I sorely fancy an M3 at the moment.
I've told myself to only look for an Avus blue one so I don't go off impulse buying one!
Stick to your guns Jimbo - There is a lot of choice out there. As always, buy on condition - service and maintenance. I've told myself to only look for an Avus blue one so I don't go off impulse buying one!
So shortly after the suspension install I had the alignment done. I had the CSL spec alignment done, and took the car for a quick test on some B-roads near me...


Prior to putting on the B6 kit I had some issues during high speed driving (motorway) where the car would feel quite floaty, and I could detect slight bodyroll laterally - Of course anyone who knows these cars would automatically presume RTABS [Rear Trailing Arm Bushes]...
RTABS
However I actively refused to believe they were the cause. My car had Rogue Engineering (BLACK/STREET) RTABs fitted around a year ago (previous owner). The rear 'floaty' symptom had only started a few months ago, in other words these RTABS had 6k on them. I should add here that at the time I just replaced the rear tyres with VREDS which usually need a few hundred miles to scrub in so I didn't want to jump to any conclusions. After a few hundred miles the tyres settled down nicely, but the rear instability was still there.
After installing the B6 kit, the floaty feeling was still there - abit more mild though to be fair. With an upcoming alignment scheduled I decided to bite the bullet and go down the OEM RTAB + Limiter route.
Here's what the RE RTABS looked like:


If you look at the pic you'll see a chamfered edge, this is the same for both pairs. This was done by a previous installer (before my ownership) who decided to cut off some material to make them easier to fit

So I've installed the following kit which I've had on my shelf for a few months:
OEM RTABS + Limiters

The rear is now stable again after fitting these, you can tell it's a touch softer but this has added some comfort too. I'm going to see how I get on with these, so far so good. Many owners opt for polyurethane bushes which is fine, but the OEM + Limiter route provides a nice compromise, OEM comfort with longer life.
More updates on the way, thanks for reading
joema said:
Interesting. My RE RTABs popped straight in. fingers crossed...
Sline said:
Wow what a gorgeous example! These really are starting to stand the test of time and just keep getting better looking imo.
Are the wheels genuine csl items? Also what size spacers are you running as that sits perfect
Cheers - 20mm spacers all round, these are CSL reps that came with the car. I sold them last week and will be searching for an OEM CSL set later in the year. The reps were really good in that the rear concavity was deep, like it should be. Other reps tend to not emulate this and by doing so look a little off.Are the wheels genuine csl items? Also what size spacers are you running as that sits perfect
95 fiesta si said:
The E46 are getting on abit now but look how good they still look. I have an E90 but still find myself looking at the E46's
Very nice car mate
Very nice car mate
Funk said:
Very, very nice. E46 M3 is the car I want next. Few years away from it yet though sadly.
Thanks - The 46m certainly has character, both good and bad at times. Sometimes in the morning the car 'feels' like a grumpy teenager (moody), but after 5-10 mins of warm-up it becomes fully awake 
mwstewart said:
Out of interest, just how much difference in NVH was there between the Poly RTABS and your new OEM items? Do you know what grade of poly the RE versions are?
I've gone for Turner limiters and the later type OEM RTABs in mine.
That's a tough one. I had RE Street (Black Compound) and I had HSD suspension at the time, so it's hard to distinguish NVH solely on the RE RTABS (Because I changed my suspension). Since my car is used for daily driving it was important to me that civility wasn't compromised too much - as I'm sure you know OEM + Limiters has recently become the 'defacto' choice for such needs. I've gone for Turner limiters and the later type OEM RTABs in mine.
Diablo85 said:
That's a tough one. I had RE Street (Black Compound) and I had HSD suspension at the time, so it's hard to distinguish NVH solely on the RE RTABS (Because I changed my suspension). Since my car is used for daily driving it was important to me that civility wasn't compromised too much - as I'm sure you know OEM + Limiters has recently become the 'defacto' choice for such needs.
Thank you. I was umming and ahhing but went OEM in the end. I think I'm going to run poly in the subframe and around the ARBs, but that's it for now.MAF Sensor Debacle

A few months after installing the RTABS I started the car one morning and noticed the engine felt a little rough and sounded sick.
Although there were no error codes on the diagnostic software (GT1/DIS), I had a strong suspicion it was the MAF.
An Autologic scan revealed that my old MAF was already on its way out, thus no amount of cleaning would ever revive it. The MAF cleaning process is based on maintenance, that is... cleaning it once a year (or service interval) rather than when it appears to be dying.
I ordered a brand new genuine BOSCH replacement MAF for £100!. Once installed (adaptations reset) the car immediately sounded healthy and normal performance returned.

Moral here is, if you feel something in the engine isn't quite right, and you have no fault codes, get it checked via an AutoLogic tool to be sure.
Parts List
[BOSCH] 0280218062 - BOSCH MAF Airflow Sensor [Lucas FDM898]

Ignition Coils / Spark Plugs Replacement
In the middle of the MAF issues I also decided to replace all ignition coils and spark plugs.
E46 M3's are fitted with BREMI coils from the factory. Uprated BOSCH coil replacements are considered better quality along with NGK spark plugs. The BREMI coils are known to fail prematurely, and when one does it won't be too long before others do, thus I replaced all of mine for preventative maintenance.
I found on various forums that ignition coils do not just stop working. They can actually degrade too, thus a warning may never be raised.
Having ran the GT1 Misfire Live Screen I saw no misfires reported before so they seemed ok, I will hold onto them as short term spares - the sparks however I'm glad I changed for a new set.
As I opened the bonnet to start work I noticed some of the rubber seals were looking a tad dry, you'll see in a few moments how to fix it.

Next up are the parts I ordered from Euro Car Parts, new Bosch Ignition Coils (6) and some NGK Spark Plugs (6).

Old BREMI coils and spark plugs


...all replaced with new BOSCH coils and NGK spark plugs


Gummi Pflege Stift - This is one of my favourite products. I discovered it on a forum a few years ago. The member said it was very popular in Germany for keeping door seals healthy and nourished. Today there are other products out there too, for me GPS is a bit like the trusty shoe polish in your cupboard, always there when you need it. I can only ever seem to find this on ebay!

Here is the finished job, you can see GPS rejuvenates rubber seals beautifully. I consider this essential maintenance throughout the year, more so in Winter.

I replaced the microfilter with a new part since the current one was a year old.

All done! - The whole job probably took me around 2-3 hours at my own pace. My engine bay isn't the cleanest out there, I'll make plans for an engine bay detail next year.

Parts List:
[BOSCH] 0221504464 x6
[NGK] DCPR8EKP (Laser Platinum) x6
[BMW] 64319257504 (Microfilter)
Soon after that I met up with some friends in Derbyshire. One of my friends was driving from London to Skipton on business with a short stopover in the Midlands... shortly after we went for a good drive around the peaks


That's all for now, thanks for reading
A few months after installing the RTABS I started the car one morning and noticed the engine felt a little rough and sounded sick.
Although there were no error codes on the diagnostic software (GT1/DIS), I had a strong suspicion it was the MAF.
An Autologic scan revealed that my old MAF was already on its way out, thus no amount of cleaning would ever revive it. The MAF cleaning process is based on maintenance, that is... cleaning it once a year (or service interval) rather than when it appears to be dying.
I ordered a brand new genuine BOSCH replacement MAF for £100!. Once installed (adaptations reset) the car immediately sounded healthy and normal performance returned.
Moral here is, if you feel something in the engine isn't quite right, and you have no fault codes, get it checked via an AutoLogic tool to be sure.
Parts List
[BOSCH] 0280218062 - BOSCH MAF Airflow Sensor [Lucas FDM898]
Ignition Coils / Spark Plugs Replacement
In the middle of the MAF issues I also decided to replace all ignition coils and spark plugs.
E46 M3's are fitted with BREMI coils from the factory. Uprated BOSCH coil replacements are considered better quality along with NGK spark plugs. The BREMI coils are known to fail prematurely, and when one does it won't be too long before others do, thus I replaced all of mine for preventative maintenance.
I found on various forums that ignition coils do not just stop working. They can actually degrade too, thus a warning may never be raised.
Having ran the GT1 Misfire Live Screen I saw no misfires reported before so they seemed ok, I will hold onto them as short term spares - the sparks however I'm glad I changed for a new set.
As I opened the bonnet to start work I noticed some of the rubber seals were looking a tad dry, you'll see in a few moments how to fix it.
Next up are the parts I ordered from Euro Car Parts, new Bosch Ignition Coils (6) and some NGK Spark Plugs (6).
Old BREMI coils and spark plugs
...all replaced with new BOSCH coils and NGK spark plugs
Gummi Pflege Stift - This is one of my favourite products. I discovered it on a forum a few years ago. The member said it was very popular in Germany for keeping door seals healthy and nourished. Today there are other products out there too, for me GPS is a bit like the trusty shoe polish in your cupboard, always there when you need it. I can only ever seem to find this on ebay!
Here is the finished job, you can see GPS rejuvenates rubber seals beautifully. I consider this essential maintenance throughout the year, more so in Winter.
I replaced the microfilter with a new part since the current one was a year old.
All done! - The whole job probably took me around 2-3 hours at my own pace. My engine bay isn't the cleanest out there, I'll make plans for an engine bay detail next year.
Parts List:
[BOSCH] 0221504464 x6
[NGK] DCPR8EKP (Laser Platinum) x6
[BMW] 64319257504 (Microfilter)
Soon after that I met up with some friends in Derbyshire. One of my friends was driving from London to Skipton on business with a short stopover in the Midlands... shortly after we went for a good drive around the peaks
That's all for now, thanks for reading
Funk said:
Absolutely stunning.
If you ever come to sell, please PM me so I can tell you I can't afford it.
If you ever come to sell, please PM me so I can tell you I can't afford it.
0836whimper said:
Looking good there. Indicators I would keep original though.
Thanks for the Gummi Pflege Stift tip
lol, thanks chaps Thanks for the Gummi Pflege Stift tip
Bit of a large post this one, you may of heard about the so called mysterious 'VANOS' issues that plague some BMW engines. I spent six months researching the VANOS and wrote up a guide to help others owners...
VANOS Lockdown - Part 1
VANOS issues are probably the biggest concern for most us with M3s. There is a lot of information out there which explains exactly what the issues are and most importantly.... solutions!
I am no expert on the VANOS system but once you understand 'exactly' what the problems are, you can start buying parts/kits to bullet proof the system. I'll include links for further reading at the end.
My journey into refurbishing the VANOS all began a few months ago when I performed the VANOS test in GT1. The diagnosis reported that I had an inlet leak somewhere in the system - essentially a loss of pressure in the system which means variable valve timing won't be spot on, thus a reduction in performance.
How VANOS works
https://www.youtube.com/watch?v=8WK6zilY0RM
This video is by no means comprehensive, however it does highlight in simple terms the VANOS system. Note that the S54 is a double VANOS, so it has variable valve timing for the intake and exhaust, whereas the video only shows the intake.
VANOS Issues
+ Solenoid coil pack failure - Badly soldered joints from factory and a combination of engine vibration causes cracks within the circuit board.
+ Sticking solenoid valves - Oil can clog the solenoid valves prohibiting movement, meaning oil pressure is not fluctuated properly.
+ Deteriorating solenoid sealing plate seals - will cause a leak meaning oil pressure isn't regulated. Remember seals deteriorate with age, not necessarily mileage!
+ Loose intake cam mounting bolts - appears to be common, lethal damage to engine if they break off.
+ Broken Hub Tab (Oil driver from exhaust sprocket) - Excess play between the tab and oil pump driver holes causes fatigue and if unlucky the tab may break and get caught in the timing chain - appears to be mileage independent (can happen to any M3).
The issues to worry about are the last two. If you are unlucky they can cause serious damage to the engine, especially if parts get chewed up within the timing chain.
I will tackle those in part 2, for now I'll go through the first three issues. Although these are all different parts they are all part of the vanos solenoid system - any failure within each part will cause issues with the variable valve timing.
Solutions
When it comes to VANOS solutions, there are a handful of companies/services that I am aware of:
+ Dr Vanos - Full turnkey solutions, buy uprated VANOS parts, buy a new VANOS - long time in the business.
+ Mr Vanos (UK) - full solution (fitting) quite popular with members, positive reviews - can be hard to get hold of though
+ Beisan Systems - Mechanical Engineers based in the USA, have a loyal dedicated following amongst M3 owners, they only sell parts tho.
Why I chose Beisan Systems
My reasons for choosing BS is all down to personal preference. 'Rajaie Qubain' is a mechanical engineer who runs BS in the USA. He is a prominent contributor on M3Forum.net for VANOS issues. He 'always' replies to customers and non-customers, very knowledgeable chap when it comes to the VANOS. During my rebuild I asked him many questions through email and he always replied with helpful comments.
Beisan Systems also openly shares a lot of knowledge about the VANOS with the community - their DIY guides are incredibly detailed!
With a plethora of positive reviews on other forums regarding his VANOS parts it just made sense for me to go through the BS route.
Beisan Solenoid Coil Pack / Seals Walkthrough
This isn't a pure DIY, I'll post links for that at the end


The parts highlighted in the diagram are related to the solenoid function. The large bolt towards the right is the VANOS pressure valve, it is screwed into the solenoid valve body.
I managed to get this job done in around 4 hours, can be done much quicker but I took my time.


Shortly after the procedure I took the car out for a quick test. I immediatley noticed the car felt much more 'punchy'. By this I mean whenever I firmly hit the accelerator the engine responded instantaneously compared to before. Upon reflection I am pretty sure my old seals were shot.
Note: The seals for the VANOS pressure valve only come with the BS solenoid pack OR full seal kit (see below).
Seeing the deteriorated seals was enough to make me invest in the full Beisan VANOS seals kit - these are seals for the internal parts of the VANOS. Since the VANOS would be completely open during this installation it made sense to purchase the Beisan oil pump disc as well to protect against 'broken tabs'. Add in new cam/sprocket bolts along with the above and the VANOS is pretty much bullet proof. See Part 2 :thumbsup:
DIY: Always use the beisan DIY to ensure you have the latest information!
http://www.beisansystems.com/
http://www.beisansystems.com/procedures/s54_vanos_... [Vanos Solenoid DIY]
Part List:
Beisan:
- BS023 x1 - Beisan S54 Rebuilt Vanos Solenoid Coil Pack ($150 refund when you ship your old one)
11367831906 x1 - OEM Sealing Plate (Optional, but good to have should you need to revert).
07129905554 x3 - VANOS uprated Torx bolts [long]
07129905537 x2 - VANOS uprated Torx bolts [short]
11361401971 x1 - VANOS filter cartridge
VANOS Lockdown - Part 2
In this part, we tackle the more serious issues...
VANOS Issues (Internal)
+ Loose cam/sprocket mounting bolts
+ Broken Hub Tab (Oil driver from exhaust hub)
Loose cam mounting bolts

(these are public images)
These factory bolts are known to work their way loose/snap off and get caught in the timing chain with disastrous consequences. Luckily BMW updated the bolts with stronger versions - see end of post for part numbers.
Broken Hub Tab (Oil driver from exhaust hub)


According to Raj at Beisan Systems, when the hub tabs are mounted into the oil pump disc holes there is excessive play. In other words the holes are too big, this means due to the extra space the tabs hit the sides of the holes in the oil pump disc at a much higher force. It only gets worse if indentations occur within the holes as this will technically increase the amount of travel meaning more forceful lashes. This wasn't so much an issue on other BMW engines because the 'play' wasn't as big. It is believed BMW deliberately made the holes larger on the S54 to make it easier to install the hub/oil pump disc during construction.
The consequences....


Note: these are public images I have annotated - not my VANOS.
If god is on your side, then at the very least a broken tab will stay trapped within the oil disc pump hole until you remove it - worse case scenario the tab drops into the timing chain causing major damage. I've read enough stories to conclude that mileage really has no part in this, you'll either experience it or you wont, there are no tell tale signs before the event either
The Solutions (to prevent broken tabs)
There are two solutions, option 1 is to purchase a Beisan Systems re-engineered oil pump disc which contains smaller holes to reduce travel.
... Option 2 is buy a re-engineered hub turbotoy/Dr VANOS exhaust hub, these are pretty strong and the tabs are thicker, so in effect they reduce travel too.
At this moment in time there really isn't a comparison between the two - they are both decent options. I went with the re-engineered Oil Pump Disc from BS.
The Parts


Note: OEM hole 'play' is a full 1.00mm, Beisan hole 'play' is 0.10mm


Engine Timing

Important - When removing the cam bolts the engine timing will be disturbed. This is almost impossible to avoid due to the movement of many parts. The BS guide covers how to re-time the engine correctly using special tools (bridge alignment, locking pin).
However, things can still go wrong if you don't know what you are doing here. Having never re-timed the S54 this wasn't something I wasn't prepared to do myself despite Beisans excellent instructions.
My indy has good experience working with the VANOS (replacing seals), and have used some Beisan parts before. They offered to install the entire kit, perform valve clearances and re-time the engine. They had the exact same BMW bridge alignment tool as featured on Beisan DIY... for me it was a total no brainer!
The Install
The downside to having them (my indy) do the work meant I couldn't take any pictures of the process. I would of done this install myself if it wasn't for the engine timing procedure.
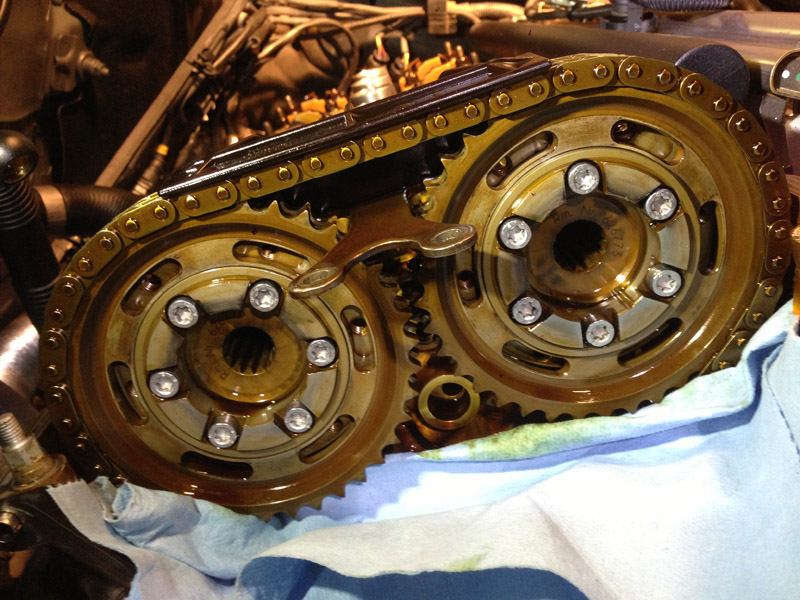
I found these pictures of the process on the Internet, this is pretty much how my VANOS installation would of appeared when my indy was carrying out the work....
Credit for these images goes to Kaiv - a M3Forum.net member.


Here is an example of how the BS oil pump disc reduces the 'play':
https://www.youtube.com/watch?v=5X4vNZu8wiU
Parts List
Beisan:
11127832034 x1 - Valve Cover Gasket
11367831938 x1 - VANOS Gasket Plate
07129905536 x12 - Uprated Cam Bolts
07119913589 x12 - Sprocket Bolts (These are optional)
11121437395 x2 - Valve Cover Grommet
07119963072 x2 - Crush Washer
07119963129 x2 - Crush Washer (smaller)
[COLOR="DarkRed"]11367833218 x2 - S62 VANOS Diaphragm Spring Set (Read Below!)[/COLOR]
S62 VANOS Diaphragm Spring Set
I haven't discussed this component so far because I wasn't able to get it. It isn't stocked by BMW UK, so a back order had to be placed... 2 weeks later BMW Germany couldn't provide an ETA! I even tried to salvage one from an E39 M5 engine breaker on ebay... they never replied - these diaphragm springs from the S62 (E39 M5) are thicker and better made, they help reduce the VANOS noise. The Beisan guides will refer to using this part but it is by no means a show stopper. This part seems like gold dust right now - if you can't get hold of it just use your existing diaphragm springs
Links / DIY:
http://beisansystems.com/procedures/s54_vanos_proc... - VANOS overhaul using BS parts, its a long read but contains lots of valuable information!
My Review (After Installation)


Having recently picked up my car from my Indy, I am overwhelmed by the difference these parts have made to the car. As my Indy gave me the keys he wanted me to start the car in front of him (I guess he wanted to see my reaction).
The transformation on my M3 is stunning. The engine fired up really smooth - I've never heard it run this good at idle before. You can really tell by the exhaust note too, its super smooth but not '330' smooth. By that I mean there is still some rawness to it all... you know its an ///M engine basically.
By this point I hadn't even driven off yet and I was already very happy lol.
I opened the bonnet, and sure enough there was no nasty rattle - to be fair I never really had the "marbles in a can" sound anyway, it was just a low-mild rattle that is typical of many S54 engines.
Return trip was around 90 miles, so it was the perfect drive to test everything. First thing I noticed as I drove off was how much better the car pulls. I always thought the car lacked some lower end torque and that it was normal, but clearly that was wrong, now its perfect. You'll really notice it at roundabouts, when your ready to go the car will already be there
I went through some twisty A-roads and the M1, the car just felt amazing. For the first time I'm hearing fantastic exhaust notes that I've never picked up on before, so much more crisper.
On faster roads I was able test out the whole rev range, as I said before its just pulls and pulls harder than before, no hesitation, no delay.
One observation I noticed was that when I first drove the car the engine felt quite 'tight'... tough to explain, its one of those BMW quirks where you (think?) can feel the car. After 30 miles or so the engine opened up and it really felt alive - now I think this might be down to seals which need a certain amount of mileage before their performance reaches optimum (after install - one time only).
Much of what I experienced was with the sport button off, turn that on and.... damn
This job is probably one of the best things I've done to my M3 so far. Reading up about the S54 Vanos issues, solutions was one hell of a journey but I'm glad I did as its paid off big time. Icing on the cake is that its pretty much bulletproof now (vanos).
I was given the VANOS report by Autologic, all values are now within tolerance, no leaks present
Closing thoughts
I certainly recommend getting a VANOS TEST performed, even then you may wish to change your seals anyway as they deteriorate with age (rather than mileage). Just remember that BMW acknowledge some of the faults listed here with the S54 VANOS but are/have not improved on the design much, apart from cam bolts. So if you decide to buy a new VANOS directly from BMW it will still use the same inferior seals.
I have deliberately kept some of the information about the VANOS components primitive so its easy to understand - you probably have a lot of questions about how things work (eg. oil pump disk, coil pack), you can find detailed information on those on the DIY link above (Beisan Systems Procedure), they do an excellent job at explaining everything.
I hope this guide is of some use to you 46M owners, at the very least it should make you aware of the exact VANOS issues on the S54 and how they can be fixed.
Cheers!
In this part, we tackle the more serious issues...
VANOS Issues (Internal)
+ Loose cam/sprocket mounting bolts
+ Broken Hub Tab (Oil driver from exhaust hub)
Loose cam mounting bolts
(these are public images)
These factory bolts are known to work their way loose/snap off and get caught in the timing chain with disastrous consequences. Luckily BMW updated the bolts with stronger versions - see end of post for part numbers.
Broken Hub Tab (Oil driver from exhaust hub)
According to Raj at Beisan Systems, when the hub tabs are mounted into the oil pump disc holes there is excessive play. In other words the holes are too big, this means due to the extra space the tabs hit the sides of the holes in the oil pump disc at a much higher force. It only gets worse if indentations occur within the holes as this will technically increase the amount of travel meaning more forceful lashes. This wasn't so much an issue on other BMW engines because the 'play' wasn't as big. It is believed BMW deliberately made the holes larger on the S54 to make it easier to install the hub/oil pump disc during construction.
The consequences....
Note: these are public images I have annotated - not my VANOS.
If god is on your side, then at the very least a broken tab will stay trapped within the oil disc pump hole until you remove it - worse case scenario the tab drops into the timing chain causing major damage. I've read enough stories to conclude that mileage really has no part in this, you'll either experience it or you wont, there are no tell tale signs before the event either
The Solutions (to prevent broken tabs)
There are two solutions, option 1 is to purchase a Beisan Systems re-engineered oil pump disc which contains smaller holes to reduce travel.
... Option 2 is buy a re-engineered hub turbotoy/Dr VANOS exhaust hub, these are pretty strong and the tabs are thicker, so in effect they reduce travel too.
At this moment in time there really isn't a comparison between the two - they are both decent options. I went with the re-engineered Oil Pump Disc from BS.
The Parts
Note: OEM hole 'play' is a full 1.00mm, Beisan hole 'play' is 0.10mm
Engine Timing
Important - When removing the cam bolts the engine timing will be disturbed. This is almost impossible to avoid due to the movement of many parts. The BS guide covers how to re-time the engine correctly using special tools (bridge alignment, locking pin).
However, things can still go wrong if you don't know what you are doing here. Having never re-timed the S54 this wasn't something I wasn't prepared to do myself despite Beisans excellent instructions.
My indy has good experience working with the VANOS (replacing seals), and have used some Beisan parts before. They offered to install the entire kit, perform valve clearances and re-time the engine. They had the exact same BMW bridge alignment tool as featured on Beisan DIY... for me it was a total no brainer!
The Install
The downside to having them (my indy) do the work meant I couldn't take any pictures of the process. I would of done this install myself if it wasn't for the engine timing procedure.
I found these pictures of the process on the Internet, this is pretty much how my VANOS installation would of appeared when my indy was carrying out the work....
Credit for these images goes to Kaiv - a M3Forum.net member.
Here is an example of how the BS oil pump disc reduces the 'play':
https://www.youtube.com/watch?v=5X4vNZu8wiU
Parts List
Beisan:
- BS021 x1 - S54 Vanos Seals Repair Kit
- BS022 x1 - S54 Anti-Rattle Repair Kit
- BS095 x1 - S54 Anti-Rattle Helper Tools
- BS025 x1 - S54 Re-engineered Oil Pump Disc (core refund available)
11127832034 x1 - Valve Cover Gasket
11367831938 x1 - VANOS Gasket Plate
07129905536 x12 - Uprated Cam Bolts
07119913589 x12 - Sprocket Bolts (These are optional)
11121437395 x2 - Valve Cover Grommet
07119963072 x2 - Crush Washer
07119963129 x2 - Crush Washer (smaller)
[COLOR="DarkRed"]11367833218 x2 - S62 VANOS Diaphragm Spring Set (Read Below!)[/COLOR]
S62 VANOS Diaphragm Spring Set
I haven't discussed this component so far because I wasn't able to get it. It isn't stocked by BMW UK, so a back order had to be placed... 2 weeks later BMW Germany couldn't provide an ETA! I even tried to salvage one from an E39 M5 engine breaker on ebay... they never replied
- these diaphragm springs from the S62 (E39 M5) are thicker and better made, they help reduce the VANOS noise. The Beisan guides will refer to using this part but it is by no means a show stopper. This part seems like gold dust right now - if you can't get hold of it just use your existing diaphragm springs Links / DIY:
http://beisansystems.com/procedures/s54_vanos_proc... - VANOS overhaul using BS parts, its a long read but contains lots of valuable information!
My Review (After Installation)
Having recently picked up my car from my Indy, I am overwhelmed by the difference these parts have made to the car. As my Indy gave me the keys he wanted me to start the car in front of him (I guess he wanted to see my reaction).
The transformation on my M3 is stunning. The engine fired up really smooth - I've never heard it run this good at idle before. You can really tell by the exhaust note too, its super smooth but not '330' smooth. By that I mean there is still some rawness to it all... you know its an ///M engine basically.
By this point I hadn't even driven off yet and I was already very happy lol.
I opened the bonnet, and sure enough there was no nasty rattle - to be fair I never really had the "marbles in a can" sound anyway, it was just a low-mild rattle that is typical of many S54 engines.
Return trip was around 90 miles, so it was the perfect drive to test everything. First thing I noticed as I drove off was how much better the car pulls. I always thought the car lacked some lower end torque and that it was normal, but clearly that was wrong, now its perfect. You'll really notice it at roundabouts, when your ready to go the car will already be there
I went through some twisty A-roads and the M1, the car just felt amazing. For the first time I'm hearing fantastic exhaust notes that I've never picked up on before, so much more crisper.
On faster roads I was able test out the whole rev range, as I said before its just pulls and pulls harder than before, no hesitation, no delay.
One observation I noticed was that when I first drove the car the engine felt quite 'tight'... tough to explain, its one of those BMW quirks where you (think?) can feel the car. After 30 miles or so the engine opened up and it really felt alive - now I think this might be down to seals which need a certain amount of mileage before their performance reaches optimum (after install - one time only).
Much of what I experienced was with the sport button off, turn that on and.... damn
This job is probably one of the best things I've done to my M3 so far. Reading up about the S54 Vanos issues, solutions was one hell of a journey but I'm glad I did as its paid off big time. Icing on the cake is that its pretty much bulletproof now (vanos).
I was given the VANOS report by Autologic, all values are now within tolerance, no leaks present
Closing thoughts
I certainly recommend getting a VANOS TEST performed, even then you may wish to change your seals anyway as they deteriorate with age (rather than mileage). Just remember that BMW acknowledge some of the faults listed here with the S54 VANOS but are/have not improved on the design much, apart from cam bolts. So if you decide to buy a new VANOS directly from BMW it will still use the same inferior seals.
I have deliberately kept some of the information about the VANOS components primitive so its easy to understand - you probably have a lot of questions about how things work (eg. oil pump disk, coil pack), you can find detailed information on those on the DIY link above (Beisan Systems Procedure), they do an excellent job at explaining everything.
I hope this guide is of some use to you 46M owners, at the very least it should make you aware of the exact VANOS issues on the S54 and how they can be fixed.
Cheers!
bozzy101 said:
Very jealous of this car, I'd love an e46 M3! Good write up too.
Thanks mate, plenty out there at the mo Ok, so with all of the important maintenance out of the way, I could finally start on an upgrade I've wanted since owning my previous E46 325ci...
FX-R 3.0 Projector Retrofit/Upgrade
The E46 M3 is an aging platform, but one that is doing so gracefully in my opinion. The E46M is iconic and still attracts attention from even the non enthusiast crowd.
One thing that lets the car down though, are the projector headlights. Put simply, they suck in comparison to the advanced lighting systems we see on modern cars today, particularly on Audi's and Mercedes models. When I say suck, I'm talking about the way the light is spread, it's average at best. Also the light tends to turn a dull yellow - even changing bulbs doesn't always cure it.
The yellowing, is down to the chrome projector bowls being made out of plastic. Over the years the light burns through the chrome, thus affecting the light output and colour.
Lightwerkz

http://www.lightwerkz.net/
Thankfully, we don't have to put up with such things thanks to companies like Lightwerkz. If you think of headlights as eyes then Lightwerkz are the surgeons who operate on them. Put simply, Lightwerkz retrofit uprated projectors into existing headlight units which provide incredible light spread over the OEM projector... pretty much bringing the headlights up to modern day standards, if not exceeding them.
To be clear, this is not some cheap trixy mod like a pair of £5 HID bulbs off ebay... it's expensive but soo worth it in my opinion. A lot of work is required when retrofitting an uprated projector such as cutting and fixings - not to mention the meticulous level of precision required to make sure everything is perfectly straight as we are dealing with optics.
Morimoto FX-R 3.0 Projector

The FX-R is a retrofitters delight, it comes with a clear lens which as you'll see later vastly improves over the E46 BMW OEM (BOSCH-AL/ZKW) projector. What makes the FX-R special is that it is an aftermarket projector aimed at retrofitters.
Osram 66420 CBI D2S Bulbs

The majority of owners use their FX-R projectors with their existing Phillips 85122+ Bulbs (stock) and report great results. Whilst I am a fan of 'higher temperature' lights I am also a man of practicality. As is standard knowledge, the higher the light temperature the less lumens your lights will output.
These Osram bulbs defy that rule however. They've caused quite a storm in the industry. The bulbs produce a lovely 'white light' at 5000k without any reduction in lumens. Infact some tests indicate they can produce ever so slightly more lumens than the standard 4300k bulbs (est 3500 lumens). Now that really is having your cake and eating it!
Installation
I had to buy a spare set of headlights to send to Lightwerkz since I need the current lights on my M3 as its my DD. I found a great pair of OEM headlights on ebay - even Caesar commented on how great the condition was.
I sent off the headlights and within 2 weeks the whole retrofitting was complete. The headlights were returned on time:

Whilst the box looks a little tired, the lights are securely wrapped in $hit loads of bubble wrap and foam - this was the original box I sent the headlights in, its travelled a complete distance of 7000 miles

So here's how my previous projectors appeared:

^ A pic before the installation to serve as a reference to the old OEM projectors. Those who have been paying attention throughout my build may of noticed the Angel Eyes are missing. I took them off a few weeks ago to be installed into the new Lightwerkz units.

Installing the new FX-R headlights...


Results
Before:

After:


^ Although the headlights are not fully aligned in those pics, you can see a big difference. Notice how sharp the beam pattern is? Also if you look towards the lower right on the last picture you can see the colour band effect
As much as I like the 'demon' eyes shown in these pics, in reality the headlights look much 'cleaner' to the naked eye exactly like the image below...

After Alignment:
- Headlights were aligned at an MOT testing station using a Hella Beamsetter device:


I think the pics say it all to be honest. The output is 10x better than before, cutoff is very sharp. All this enhanced illumination with the benefit it is 100% legal and safe for other drivers.
I've had some hilarious situations most notably in traffic; the FX-Rs lights up the road up to three car lengths. In traffic I've seen drivers scratching their heads wondering where this light is coming from.
In some pictures the headlights 'look' dazzling but in reality this is not the case - you can see the light components clearly just as shown in the headlight close-up pics. As mentioned before, the everything is road legal, projectors were aligned on a MOT Beamsetter machine.
The colour flicker is very addictive even from the inside - the way the light reflects off the car bumper in-front etc. People just stare at them in awe, I think its down to the pattern being so sharp - I can't remember the last time I saw anything like it in person? Hands-down it is one of the best mods you can do to your E46M!
Well, if you made it this far thank you for reading, maintenance isn't always the most 'fun' thing to write about, so I think you'll agree this FX-R write up is a welcome addition.
Until next time chaps!
Gassing Station | Readers' Cars | Top of Page | What's New | My Stuff