2007 Nissan 350Z 313GT
Discussion


The Zed has been roused from its winter slumber and it ready for another 6 months of noisy shenanigans.
I found time this afternoon to finally carry out a job that I had intended to complete prior to putting the car away, however due to Nissan initially supplying the wrong part (doh) it has been delayed until now.
The weather strip rubbers perish over time which lets water to enter the cabin after heavy rain and car washes. The nearside was replaced a couple of years ago, and now the offside was due. Fortunately, the water hadn’t made its way under the carpet, but was instead evident at the bottom of the door frame under the kickplate. On the nearside this had caused a small patch of rust to form in the standing water trapped in the rubber on the lower portion of the A-pillar, which has been treated, and I was keen to avoid similar on the other side.
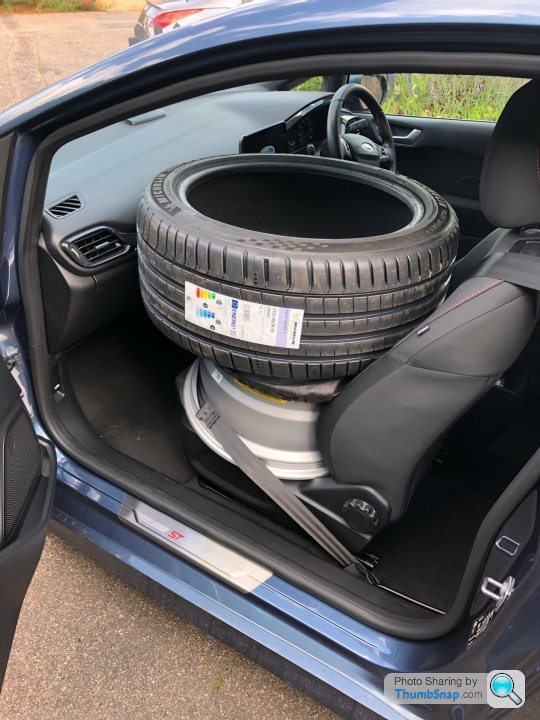
The job itself is simple and fairly quick, the time taken spent mostly on removing old crap and glue. An element of danger is injected into the job by the one-shot nature of its application as well as the small matter of each side costing … *steadies self on sideboard* … £267.00.
That’s right, £267.00 for this:

Not something I want to f k up too many times! The above image is of the old item, with the state of the thing clearly evident.
First off, remove the B-pillar trim to gain access. This pops off quite easily. Next the weather strip is peeled back slightly to reveal a stainless runner that traverses the top of the frame from B- to A-pillar. This is held on by 8 screws, and the rubber has two plastic tabs that slide in and lock to the runner. Some people remove the plastic trim that runs along the roofline, however it isn't necessary, or indeed advised, due to its propensity for snapping and the subsequent cost involved of buying a new one and having it painted. With the tabs slid out and the runner removed, the old rubber can be peeled back and taken off the car to allow the old glue residue to be cleaned providing a good surface for the new item to adhere to. All cleaned up:

The runner is then re-attached. The new rubber can then be applied to the car carefully and methodically, removing only as much protective strip from the adhesive as necessary to stop it sticking to places you don’t want it to:

After working the new rubber into place, carefully pushing it home against the runner, you can stand back and revel in the glory of a newly watertight door frame and all for the low, low price of having your pants pulled down.

Still, needs must and this needed doing.
Not a very interesting post I’m afraid, however with any luck there’ll be some more interesting stuff to come in the coming months, assuming we haven’t all died from the flu by then.
Until then,
I found time this afternoon to finally carry out a job that I had intended to complete prior to putting the car away, however due to Nissan initially supplying the wrong part (doh) it has been delayed until now.
The weather strip rubbers perish over time which lets water to enter the cabin after heavy rain and car washes. The nearside was replaced a couple of years ago, and now the offside was due. Fortunately, the water hadn’t made its way under the carpet, but was instead evident at the bottom of the door frame under the kickplate. On the nearside this had caused a small patch of rust to form in the standing water trapped in the rubber on the lower portion of the A-pillar, which has been treated, and I was keen to avoid similar on the other side.
The job itself is simple and fairly quick, the time taken spent mostly on removing old crap and glue. An element of danger is injected into the job by the one-shot nature of its application as well as the small matter of each side costing … *steadies self on sideboard* … £267.00.
That’s right, £267.00 for this:
Not something I want to f
k up too many times! The above image is of the old item, with the state of the thing clearly evident. First off, remove the B-pillar trim to gain access. This pops off quite easily. Next the weather strip is peeled back slightly to reveal a stainless runner that traverses the top of the frame from B- to A-pillar. This is held on by 8 screws, and the rubber has two plastic tabs that slide in and lock to the runner. Some people remove the plastic trim that runs along the roofline, however it isn't necessary, or indeed advised, due to its propensity for snapping and the subsequent cost involved of buying a new one and having it painted. With the tabs slid out and the runner removed, the old rubber can be peeled back and taken off the car to allow the old glue residue to be cleaned providing a good surface for the new item to adhere to. All cleaned up:
The runner is then re-attached. The new rubber can then be applied to the car carefully and methodically, removing only as much protective strip from the adhesive as necessary to stop it sticking to places you don’t want it to:
After working the new rubber into place, carefully pushing it home against the runner, you can stand back and revel in the glory of a newly watertight door frame and all for the low, low price of having your pants pulled down.
Still, needs must and this needed doing.
Not a very interesting post I’m afraid, however with any luck there’ll be some more interesting stuff to come in the coming months, assuming we haven’t all died from the flu by then.
Until then,
I just about  found the time recently to tackle a couple of jobs I'd been meaning to do.
Job Number One
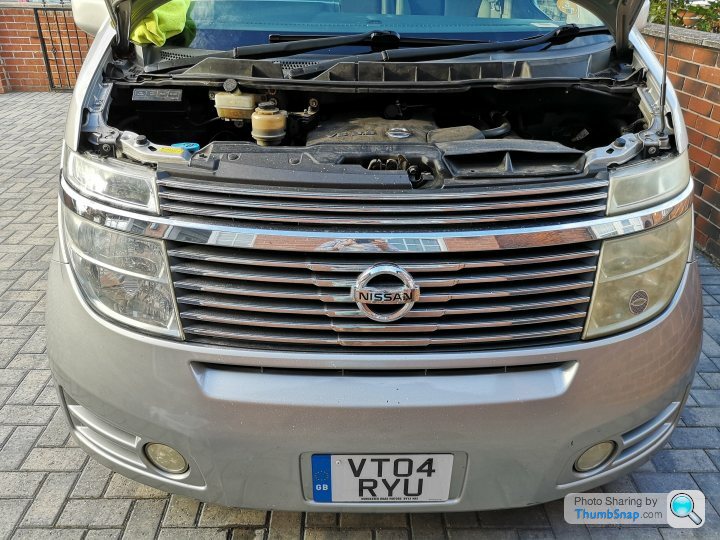
First up was cleaning the engine bay. A dreary job under most circumstances, it was in fact a welcome relief to Furlough Fatigue, Lockdown Listlessness, Covid Continuum...
The engine bay was actually in not too bad a state of cleanliness, but it was a bit dusty and had a few greasy bits here and there so off came the trim, and out came the soapy water. Some parts would've benefited from some degreaser, and it has just struck upon me as I type that I have a large container of said degreaser left over from last years activities in the loft, which would have helped me a lot
Anywho, a before shot (the cross-member always looks a bit murky, such is its composition):


The various bits and pieces were sequestered tout suite to the back garden for a scrub with a toothbrush.

A good thing I did too, as the foam seal around the inlet to the airboxes was shot to pieces. Such was its decrepitness it more or less disintegrated at a light touch.

Fortunately the remains of this had fallen away from the airbox and I didn't have to pick bits of foam out of the air filter's pleats, which were in good order.
A quick search upstairs yielded a roll of adhesive backed foam that was just the right size for replacing the seals.

Lovely job.
Back inside the belly of the beast, I gave the bulkhead and scuttle a good going over, removing 13 years of accumulated detritus and other assorted crap. Unfortunately, my attention didn't stretch quite far enough to include the brake servo which is still dusty and was duly noted only upon viewing the photos... It seems my Furlough Fatigue as worse than feared, however nobody will see it and it serves no functional purpose being less dusty so no harm, no foul.
Once all back together it looked marginally better. If you look real close.

No, closer than that!

After all that graft, I took the old girl out for an essential trip to the 'supermarket'.**

I hope you'll agree that the Zed wears its 81,000 miles well.
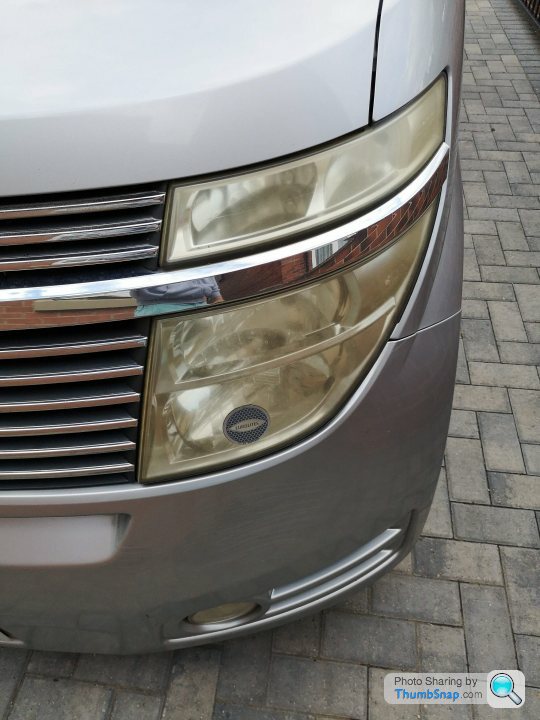
The headlights have been steadily getting more hazed since their last buff up, so I enlisted once more on the assistance of Mr Meguiar and his Marvellous Mechanisms.

The last time I used this I stuck with using the PlastX polish and 'patented' bit of wool stuck to a spinning disk. That yielded fair results, however this time the haze and oxidisation was slightly more advanced, particularly on the offside by some degree.


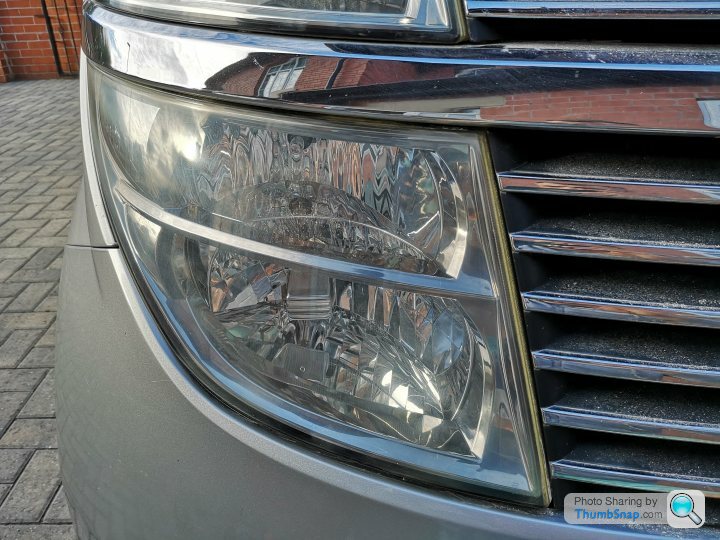
This time required the use of the included wet and dry cutting pads, in 1200, 2400, 3600 and 4000 grit flavours. The instructions called for alternating up/down, side-to-side motions on each successive grade going from a milky finish to less milky by the last stage.


The final stage required the use of the PlastX polish, wool pad, and Bosch multi-action drill (sold separately). After a little while, and some quizzical looks from the neighbours, the results were pleasantly surprising with a fair amount of clarity restored.


A professional outfit would no doubt achieve better results, however for the sake of a bit of my time and whatever the Meguiar's kit cost it was a worthwhile undertaking. I haven't used the car at night since so no idea if the lights have a bit more reach, but the lights on these are a little candle-esque so I doubt there'll be a great deal of improvement.
Bonus Round: Job Number Three
I lied about doing two jobs, though the third is fairly dull. There are photos but they're mostly close ups of suspension components and small patches of surface rust so I'll leave that to your imagination.
After having completed the rust proofing of the rear arches last year, my attention turned to the fronts. They are in both cases very solid. Just a couple of spot welds that have lost paint over the years require any sort of treatment and the inner arches, covered as they are with liners, are pristine. Seeing a lot of other owners having trouble with rust on the front quarters makes me wonder what on earth they do with their cars. A photo I took last year surveying similar shows zero progression of the surface rust spots, which is good. The car is only used in the dry, so it is likely thanks to that.
However, there is an annoying squeak coming from the NSF every time the suspension is called into action which could be any number of things. While the car was in the air I took the liberty of inspecting the bushings on both sides, giving various bits a good tug (quiet in the back), which showed no movement of any degree - either that or I hadn't had my Weetabix. The bushings look OK. Nonetheless, its in the plans to do a complete suspension/bracing refresh, including the following:
Rebush upper control arm, front
Rebush lower control arm, front
Rebush compression arm, front
Rebush anti-roll bar, front
Rebush upper control arm, rear
Rebush lower control arm, rear
Rebush spring bucket arm, rear
Rebush trailing arm
Rebush anti-roll bar, rear
Replace dampers, Bilstein B8
Replace springs, Tein S-Tech
Replace 'kidney brackets'
Replace/refurbish 'W' chassis brace
Enkei RPF1 (maybe)
Longer term:
Rebush sub-frame, rear,
Rebush differential mounting points
Replace engine and gearbox mounts
Replace standard 3.538 final drive for 3.9 final drive (maybe, practical benefit is probably negligible)
This little lot is going to be expensive. The near term items, even without Enkei RPF1s, will run into thousands. I had budgeted for all of this until Coronavirus came along and threw a massive 'fk you' into the works. This year was to be the year I move house, but given the uncertainty surrounding house values and job security this has been put off, and with it any substantial outlay on the Nissan (particularly when compounded by the ongoing fk uppery that is the 'B' word). The money is best kept until the waters unmuddy slightly.
I will probably still tackle the surface rust on the front at some point seeing as I already have leftover goodies for that from last year, but for now I will suffer the squeaking suspension and drown it out with the glorious V6 warble.
As always, thanks for reading
found the time recently to tackle a couple of jobs I'd been meaning to do. Job Number One
First up was cleaning the engine bay. A dreary job under most circumstances, it was in fact a welcome relief to Furlough Fatigue, Lockdown Listlessness, Covid Continuum...
The engine bay was actually in not too bad a state of cleanliness, but it was a bit dusty and had a few greasy bits here and there so off came the trim, and out came the soapy water. Some parts would've benefited from some degreaser, and it has just struck upon me as I type that I have a large container of said degreaser left over from last years activities in the loft, which would have helped me a lot
Anywho, a before shot (the cross-member always looks a bit murky, such is its composition):
The various bits and pieces were sequestered tout suite to the back garden for a scrub with a toothbrush.
A good thing I did too, as the foam seal around the inlet to the airboxes was shot to pieces. Such was its decrepitness it more or less disintegrated at a light touch.
Fortunately the remains of this had fallen away from the airbox and I didn't have to pick bits of foam out of the air filter's pleats, which were in good order.
A quick search upstairs yielded a roll of adhesive backed foam that was just the right size for replacing the seals.
Lovely job.
Back inside the belly of the beast, I gave the bulkhead and scuttle a good going over, removing 13 years of accumulated detritus and other assorted crap. Unfortunately, my attention didn't stretch quite far enough to include the brake servo which is still dusty and was duly noted only upon viewing the photos...
It seems my Furlough Fatigue as worse than feared, however nobody will see it and it serves no functional purpose being less dusty so no harm, no foul. Once all back together it looked marginally better. If you look real close.
No, closer than that!
After all that graft, I took the old girl out for an essential trip to the 'supermarket'.**
I hope you'll agree that the Zed wears its 81,000 miles well.
- Before anyone pops a hernia at the thought of someone taking an unnecessary trip, this was on the way back from the shops, albeit the long way back.
The headlights have been steadily getting more hazed since their last buff up, so I enlisted once more on the assistance of Mr Meguiar and his Marvellous Mechanisms.
The last time I used this I stuck with using the PlastX polish and 'patented' bit of wool stuck to a spinning disk. That yielded fair results, however this time the haze and oxidisation was slightly more advanced, particularly on the offside by some degree.
This time required the use of the included wet and dry cutting pads, in 1200, 2400, 3600 and 4000 grit flavours. The instructions called for alternating up/down, side-to-side motions on each successive grade going from a milky finish to less milky by the last stage.
The final stage required the use of the PlastX polish, wool pad, and Bosch multi-action drill (sold separately). After a little while, and some quizzical looks from the neighbours, the results were pleasantly surprising with a fair amount of clarity restored.
A professional outfit would no doubt achieve better results, however for the sake of a bit of my time and whatever the Meguiar's kit cost it was a worthwhile undertaking. I haven't used the car at night since so no idea if the lights have a bit more reach, but the lights on these are a little candle-esque so I doubt there'll be a great deal of improvement.
Bonus Round: Job Number Three
I lied about doing two jobs, though the third is fairly dull. There are photos but they're mostly close ups of suspension components and small patches of surface rust so I'll leave that to your imagination.
After having completed the rust proofing of the rear arches last year, my attention turned to the fronts. They are in both cases very solid. Just a couple of spot welds that have lost paint over the years require any sort of treatment and the inner arches, covered as they are with liners, are pristine. Seeing a lot of other owners having trouble with rust on the front quarters makes me wonder what on earth they do with their cars. A photo I took last year surveying similar shows zero progression of the surface rust spots, which is good. The car is only used in the dry, so it is likely thanks to that.
However, there is an annoying squeak coming from the NSF every time the suspension is called into action which could be any number of things. While the car was in the air I took the liberty of inspecting the bushings on both sides, giving various bits a good tug (quiet in the back), which showed no movement of any degree - either that or I hadn't had my Weetabix. The bushings look OK. Nonetheless, its in the plans to do a complete suspension/bracing refresh, including the following:
Rebush upper control arm, front
Rebush lower control arm, front
Rebush compression arm, front
Rebush anti-roll bar, front
Rebush upper control arm, rear
Rebush lower control arm, rear
Rebush spring bucket arm, rear
Rebush trailing arm
Rebush anti-roll bar, rear
Replace dampers, Bilstein B8
Replace springs, Tein S-Tech
Replace 'kidney brackets'
Replace/refurbish 'W' chassis brace
Enkei RPF1 (maybe)
Longer term:
Rebush sub-frame, rear,
Rebush differential mounting points
Replace engine and gearbox mounts
Replace standard 3.538 final drive for 3.9 final drive (maybe, practical benefit is probably negligible)
This little lot is going to be expensive. The near term items, even without Enkei RPF1s, will run into thousands. I had budgeted for all of this until Coronavirus came along and threw a massive 'f
k you' into the works. This year was to be the year I move house, but given the uncertainty surrounding house values and job security this has been put off, and with it any substantial outlay on the Nissan (particularly when compounded by the ongoing fk uppery that is the 'B' word). The money is best kept until the waters unmuddy slightly. I will probably still tackle the surface rust on the front at some point seeing as I already have leftover goodies for that from last year, but for now I will suffer the squeaking suspension and drown it out with the glorious V6 warble.
As always, thanks for reading
Autoglym Super Resin Polish also has a degree of U.V. protection, how much or how well it lasts after application I don't know.
The first time I ever used a headlamp restoration kit was on my 350Z some years ago.
After the first phase of wet & dry I thought, well, that's those ruined, but it works out ok!
Great work you're doing to a lovely car, I always enjoy your updates, even if I don't respond to them.
The first time I ever used a headlamp restoration kit was on my 350Z some years ago.
After the first phase of wet & dry I thought, well, that's those ruined, but it works out ok!
Great work you're doing to a lovely car, I always enjoy your updates, even if I don't respond to them.
shalmaneser said:
Looking good. I nearly bought a 350Z a few years ago, they're cool cars!
WRT to the lights, to prevent further oxidation you can spray them with U-pol UV resistant top coat (and then buff that if you're feeling fancy). Should last for ages without yellowing then!
Yeah, do that...they do start to yellow up again within about 12 months so a cost of the above or some clear coat is supposed to help.WRT to the lights, to prevent further oxidation you can spray them with U-pol UV resistant top coat (and then buff that if you're feeling fancy). Should last for ages without yellowing then!
I’ll take a look at that too! I’m going to get some Gtechniq G4 plastic restorer so I’ll probably do both the headlights and the trim together. A popular replacement option in the Zed community are the DEPO headlights which are for all intents and purposes facelift headlights with the inners painted black. At £500 a corner I think I’ll stick to restoring the originals!
cerb4.5lee said:
I thought of you earlier because the headlights look like a bag of st on my 370Z! I was wishing that mine looked as good as yours for sure! 
Grab a headlight resto kit and give it a go! Probably took an hour or so to do both sides. Worth a crack, and if it’s still not up to much then any detailing outfit would be able to bring them back up to scratch, so to speak. t on my 370Z! I was wishing that mine looked as good as yours for sure! Alias218 said:
Grab a headlight resto kit and give it a go! Probably took an hour or so to do both sides. Worth a crack, and if it’s still not up to much then any detailing outfit would be able to bring them back up to scratch, so to speak.
Yes and I think that I'm definitely going to have a crack at it after seeing the great results with yours. I've always felt a little nervous about doing it for some daft reason, but if I did balls it up then I can get someone else to sort it for me as you say.
dave_s13 said:
They are pretty decent and worth the effort.
That’s a great result! Always worth a go with these things. dave_s13 said:
Our cars share very similar engines, slightly different utility though!
What state of tune is yours? A cursory search would suggest 200-240PS depending on whether you have the VQ25DE or VQ35DE. The VQ series of engines was put in all manner of cars across the Renault/Nissan line up. They even did a hybrid VQ powertrain, which would have been interesting in a Zed!Hi, they’re holding up very well. As you saw, my attempt using the Halfords stuff didn’t last long at all, however since they were recoated professionally over 2 years ago they have been spot on. I just give them a wipe down when I wash the car and they’re good as new. Far better than OE quality finish.
The company I used is called Wicked Coatings (https://www.wickedcoatings.eu/contact).
I can’t recall the exact product they used (I’ll check my invoice when I get home - away at the mo) but it was a satin black undercoat with the soft touch lacquer.
FYI, they were £150 to coat the pair, and send back, plus whatever the outbound postage was. Though quite a lot, I’m sure you appreciate the relief in finally having a robust finish on these parts given the poor quality of the factory applied coating (I assume you have a Zed).
I’m sure if you get in touch they will be helpful.
I hope this helps.
Edited by Alias218 on Sunday 9th August 23:10
I only discovered this thread today and found it a great read, so thanks to the OP.
A 350Z was on my short-list in 2014, but after a first test drive in another Z I just fell in love with a BMW Z4 Coupe. So much so that I'm on my 3rd now, but this one is an M.
They do seem to be have been aimed at the same potential buyers, and I do wonder how things might have turned out if I had driven a 350Z.
Anyway I hope this one is still thriving and getting plenty of TLC.
Hi guys, sorry I didn't reply sooner - I didn't realise someone had posted on here!
If you want a good example of a 350Z, I would jump on now as prices for low mileage examples, particularly the VQ35HR engine'd ones (like mine), are creeping up. There are a lot of bad examples out there. These cars are pretty prone to rust, and a significant portion of posts on the Facebook groups now are about tackling rust. Many have had rubbish kits and mods fitted, and many more not looked after as they have been in the doldrums, picked up for peanuts and not maintained. Be extremely careful when buying, if you do, as if you don't know where to look you can be caught out. There are still some excellent cars out there, but most I would say aren't worth a second glance.
It's still very much alive, though, and getting a few tentative drives at the moment. A little earlier than usual, but as I moved house in January the cover had to come off to move it, so it stayed off. I made it about 5 miles a few weeks back, saw tons of fresh salt and thought "fk that", turned around and washed the arches down when I got back 
As alluded to above, I have a list as long as my arms for things I want to do - bushings, new suspension components (Tein and Bilstein, not eBay special rubbish *shudders*), treat the entire underside, remove front end fittings and refresh those, Enkei RPF1s, seat re-trims, etc. it goes on. However, time and, now thanks to the new house, money are not forthcoming enough to be able to do this stuff. The good news is I now have a garage, so plenty of space to keep tools, a work bench, rooms for car bits etc. in the future!
Don't expect to see any interesting updates this year, but I have no intentions of selling up so they'll come in due course
Jlss1999 said:
Hello,
Found your thread very informative. How the arches holding up from last year? Might embark on this journey myself, very much want my 350z to be a pristine example.
James
Thanks! The arches are still in good condition - they were done in July 2019 so coming on 2 years now. I still mean to drop the rear-end off and treat the whole underside, but time constraints have prevented that so far. Found your thread very informative. How the arches holding up from last year? Might embark on this journey myself, very much want my 350z to be a pristine example.
James
If you want a good example of a 350Z, I would jump on now as prices for low mileage examples, particularly the VQ35HR engine'd ones (like mine), are creeping up. There are a lot of bad examples out there. These cars are pretty prone to rust, and a significant portion of posts on the Facebook groups now are about tackling rust. Many have had rubbish kits and mods fitted, and many more not looked after as they have been in the doldrums, picked up for peanuts and not maintained. Be extremely careful when buying, if you do, as if you don't know where to look you can be caught out. There are still some excellent cars out there, but most I would say aren't worth a second glance.
Mr Tidy said:
I only discovered this thread today and found it a great read, so thanks to the OP.
A 350Z was on my short-list in 2014, but after a first test drive in another Z I just fell in love with a BMW Z4 Coupe. So much so that I'm on my 3rd now, but this one is an M.
They do seem to be have been aimed at the same potential buyers, and I do wonder how things might have turned out if I had driven a 350Z.
Anyway I hope this one is still thriving and getting plenty of TLC.
Thanks for the comment! A Z4M is a great car. Probably a step up from the 350Z to be honest. Having not driven a Z4 of any type I can say how they compare, but I would wager the Nissan is probably less refined, though still a very comfortable and capable mile-muncher. Very reliable too! I've covered 50,000 of the 83,000 miles on mine and it has never, not once, had a mechanical failure. Even the clutch, which are usually prone to going after 40,000 miles or so, is still OK after 55,000 miles. A 350Z was on my short-list in 2014, but after a first test drive in another Z I just fell in love with a BMW Z4 Coupe. So much so that I'm on my 3rd now, but this one is an M.
They do seem to be have been aimed at the same potential buyers, and I do wonder how things might have turned out if I had driven a 350Z.
Anyway I hope this one is still thriving and getting plenty of TLC.
It's still very much alive, though, and getting a few tentative drives at the moment. A little earlier than usual, but as I moved house in January the cover had to come off to move it, so it stayed off. I made it about 5 miles a few weeks back, saw tons of fresh salt and thought "f
k that", turned around and washed the arches down when I got back As alluded to above, I have a list as long as my arms for things I want to do - bushings, new suspension components (Tein and Bilstein, not eBay special rubbish *shudders*), treat the entire underside, remove front end fittings and refresh those, Enkei RPF1s, seat re-trims, etc. it goes on. However, time and, now thanks to the new house, money are not forthcoming enough to be able to do this stuff. The good news is I now have a garage, so plenty of space to keep tools, a work bench, rooms for car bits etc. in the future!
Don't expect to see any interesting updates this year, but I have no intentions of selling up so they'll come in due course
Edited by Alias218 on Saturday 13th March 20:51
Long time no update!
And still no update
I'm after recommendations for bodyshops in Essex that are adept in metalwork, e.g. cutting out and replacing with proper sealing and treatment.
Unfortunately, on the NSR where the inner and outer arch skins meet rust has taken hold and the only remedy will be new metal. This was just starting when I tackled the arches a few years back but the best I managed was to slow it down a little. It still hasn't perforated the metal so you wouldn't know it without looking closely, but this needs nipping in the bud ASAP now.
I know of a couple of bodyshops around the Chelmsford area, but they seem more attuned to accident repairs than car surgery.
Any recommendations gladly received
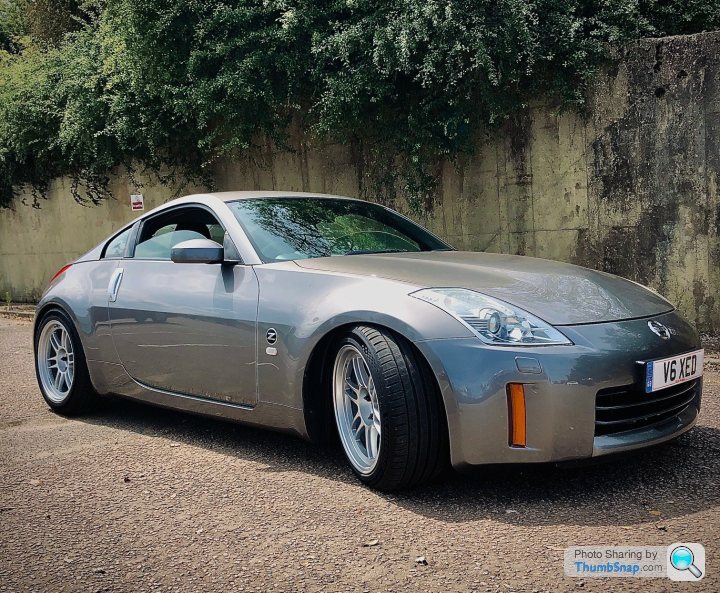
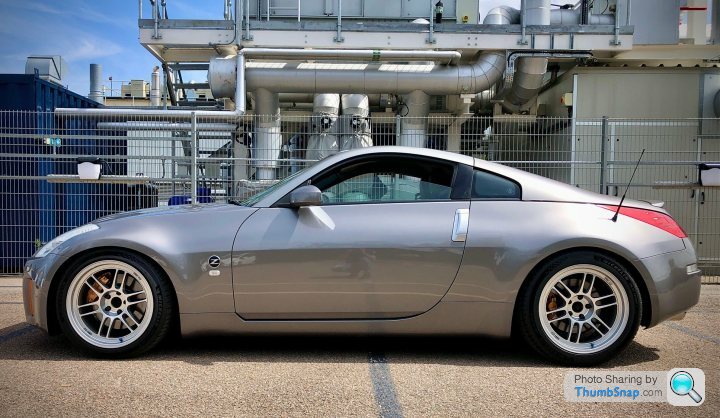
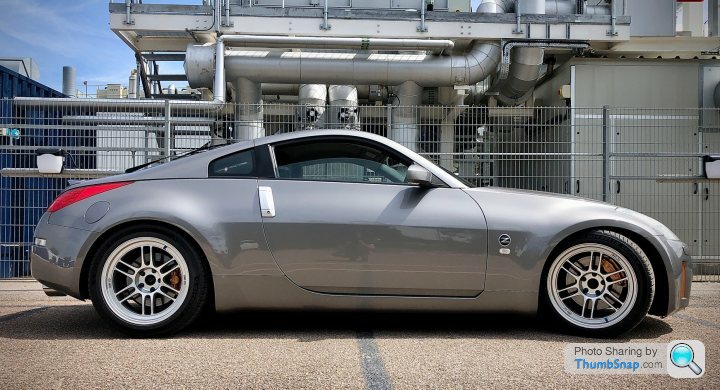
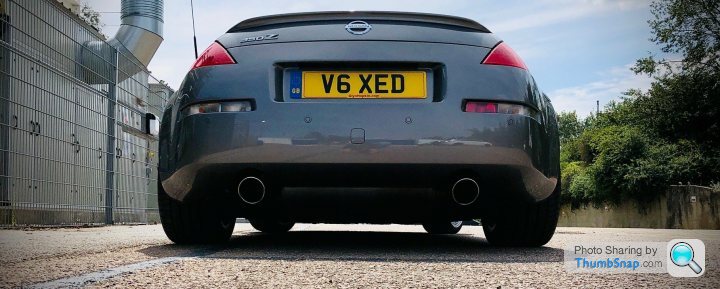
It's time for an annual (ish) update! I have something to share for once, so brace yourselves for some below average photography.
First things first:
Ooh, intrigue!
So, if you look back through the annuls of this thread, you'll see many references to my future plans for this car that usually reference something from Enkei, and something from Bilstein. As is often the case with these things, life gets in the way and in my case this was a house move, then lots of redecorating / unfking past owner's DIY (still ongoing), then new bathrooms, then wedding... it was just one thing after another. All positive, but it left little time or money for my poor old Zed.
But fret no more! During one of my semi-annual browsings of all thing aftermarket I was once again looking at the price of bits. Now, it has to be mentioned that my hope for ever buying these bits was diminishing by the year. Naturally, things kept getting more expensive. What was going to cost quite a lot of money, was now going to cost an awful lot of money. Until, that is, the wheels I'd been lusting after for nearly 10 years were on sale! In the size I wanted! It was at this point that the "fk it" threshold was reached and four 18" x 9.5j RPF1s were hastily added to the basket of the vendor (Torque GT) and duly bought before the sensible part of my brain figured out what was going on. One jiffy later, and an invoice had wended its way into my inbox.
It was at this point that I had bought the wheels and nothing else. The nothing else in question unfortunately was not on sale, and was still an awful lot of money. But, in for a penny, in for a pound!
It had been my plan to buy Bilstein B8 dampers married to Tein S-Tech springs. A tried and tested marriage resulting in a good fixed rate, fixed height fast road suspension setup. Unfortunately, Nissan had other ideas. The problem with using the Bilstein / Tein combo was that the other accoutrements that make up a suspension strut were not part of the deal. I could either buy new top mounts, bushes, nuts, bolts etc. or strip down the struts already on the car and re-use those parts. The issue with this was of course that these parts are 16 years old. It's seemed to me to be counter-intuitive to re-use these parts, so I toddled off to Nissan with a list of part numbers for new items.
"Hello", I said, "can I have a quote for these part numbers?"
"Of course", replied the Nissan service guy who duly disappeared to fetch a price for me.
Some time passed, and I wondered if the fellow had hopped onto a plane to Yokohama to ask in person. But, return he eventually did.
"Yeah," he began. I wasn't filled with hope. "So, this is cost per item - times two for each side. Many of these parts are also on a three month lead from Japan."
I looked down. I looked up. I chuckled. I walked out (having thanked the Nissan guy for his time).
£1,100 for new consumables. It wasn't a terribly long list, neither were the parts particularly complex in nature. Bear in mind, this £1,100 was additional to the cost of the Bilsteins and the Teins and I would have to build the buggers.
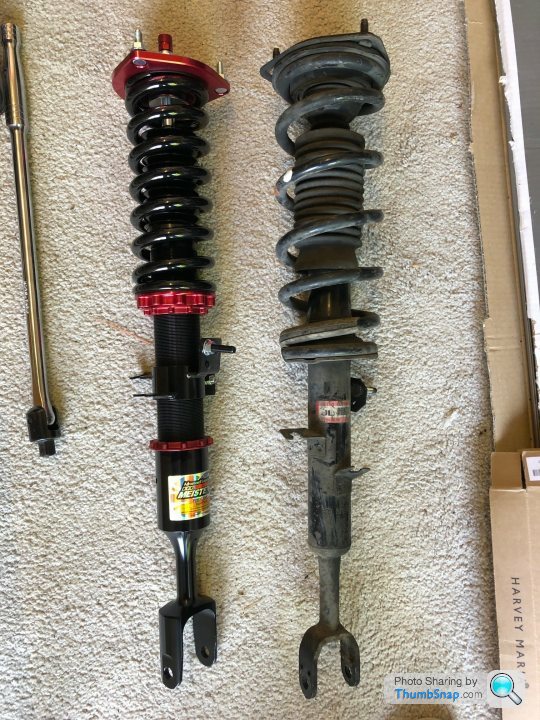
I got back onto the proverbial blower to Torque GT and enquired about a good set of coilovers to compliment the 350Z. They suggested some MeisterR Zeta CRDs. A good mid-range option suited to fast road driving. The "fk it" threshold having long since been crossed, another invoice soon landed in my inbox.
Next: tyres. I was hoping to get some Toyo R888s. I don't do many miles in the Zed these days so the soft compound of these didn't matter too much. But no. The sizes I wanted, 255/40 front and 275/40 rear, I couldn't get together. I could only find the 275/40s. I mulled over buying the OE fit Bridgestone RE050A tyres that I had always used. However, I couldn't find these either and they're old and a bit crap anyway. What was available that was new and not crap? Michelin Pilot Sport 5s. Good reviews, released last year and available in the sizes I wanted! Smashing!
How much?! Oh for goodness sake.
Something about sunk cost fallacies crossed my mind, but it was swiftly suppressed as once more the "fk it" button was pressed. I was all set.
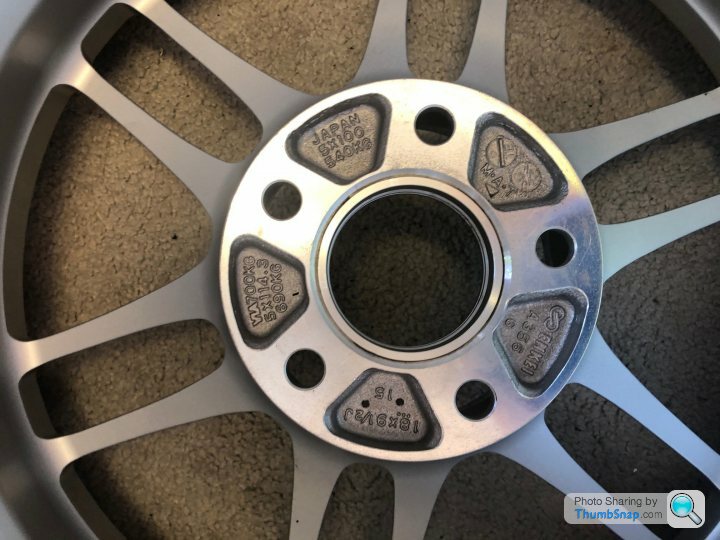
First to arrive (after some less than stellar performance by Parcelforce), the hitherto teased Enkeis:
Oh my. I'd be lying if I said I didn't look at them more than is healthy for a man to look at some aluminium cylinders. But these were Enkei RPF1s, the wheel I had wanted for what was at this point approaching a third of my life. And they were gorgeous. The ideal wheel for the 350Z. There are other wheels that suit the venerable Zed, but none quite like the RPF1.
Next, the tyres. Now these were stored for a short while in my dining room. It was at the time that we had our warm weather in June. The residual release compound Michelin use to release the tyres from their moulds became soft and imparted themselves onto my nice wood floor. So now, forevermore I shall have "Michelin" stained in mirror text beneath my dining table.
Ah well. It's on the replace list anyway.
It was at this point that a I was struck by a quandary. I had four wide wheels, and four even wider tyres to shift to my local tyre place. Aside from the 350Z (not a chance) I also own a Fiesta. It was like the car was made for the job!
The place I use, Tyre Smart in Witham, have always treated their customers cars with care and professionalism and this time was no different. In fact, the wheels caused something of a minor stir as some employees enquired about them and their final destination. As always, after a short wait the wheels were shod in rubber and there was nary a mark on them. Ace service as always.
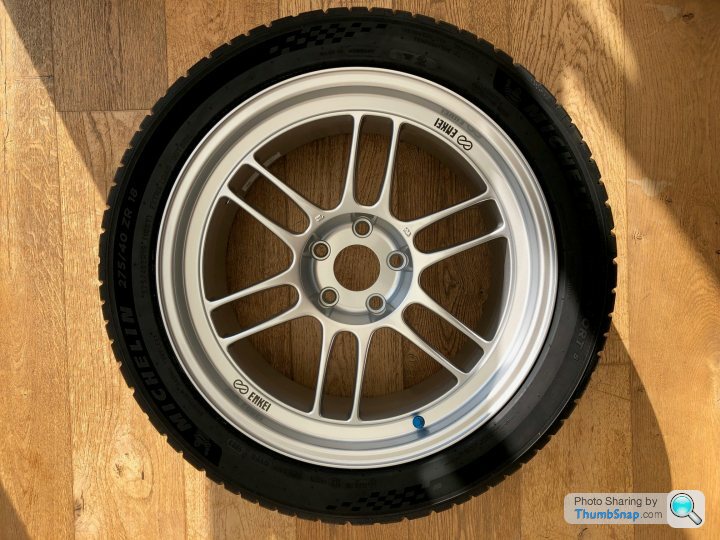
Plenty of rubber on these - no rubber bands to be seen here.
A week or so later, up turned the suspension. I opened the box and was greeted by the prettiest looking suspension components I had ever seen! Forget the blue and yellow of Bilstein, the anodised red on black made quite the impression. So far, so good. MeisterR are not long established, so I have to say I went out on a bit of a limb in buying them.
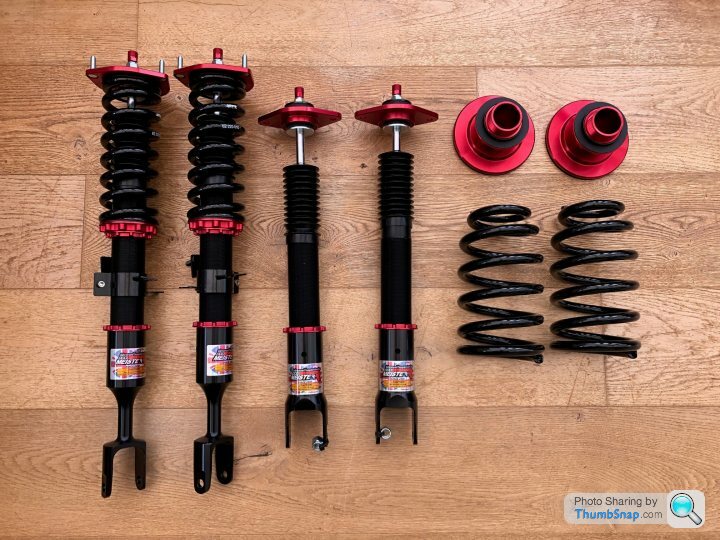
If nothing else, they do look nice. 2mm pre-load, 32 way adjustable damper compression and rebound, adjustable height. Knowing nothing about suspension setup I popped the dampers to 16 (middle ground seems sensible, right?) and left it at that for the time being.
At my next convenience, I began the task of swapping everything over. Now, this isn't a massive job however the car had been buttoned up 16 years prior in Kaminokawa, Tochigi prefecture and not touched since. It was also on the driveway, which with the best will in the world is a colossal pain the in the arse to work on. However, I have to say that the car had impeccable manners and through up no real drama. The worst of it was removing part of the brake line from the OE strut. The bracket to which this part was fastened yielded before the nut so I couldn't apply any real torque to it without the bracket starting to twist. A pair of adjustables to hold it still later, and off it came. Smooth sailing from here on out.
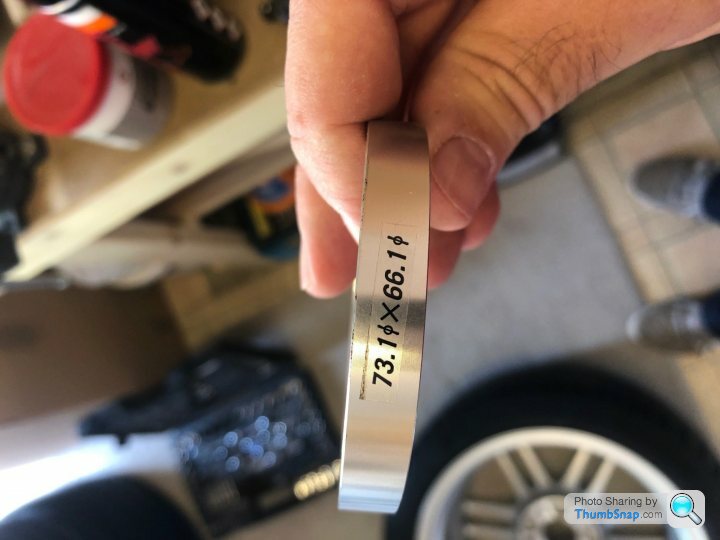
First job, fit some spigot rings. Now, the standard hub spigot on the 350Z is 66mm. The RPF1s, being made for all manner of vehicles, were 73.1mm i.e., too big. A lesser man might have thought "fk it" and slapped the wheels on anyway in the hope the studs would centralise it sufficiently. Well, I had expended all the laissez-faire attitude I had to give, and now was time for some control. Fortunately, RAYS do some nice turned aluminium spigots rings to step down the bore of the wheels, so these were fitted (with a dab of copper slip should I wish to remove them in future). I was expecting some drama fitting them but they went in with no more than some well applied thumb action.
Fronts first, up went the car onto my trusty Halfords axle stands on wooden blocks (since replaced with rubber blocks as they started to crack over the duration of this job!) and I surveyed my foe - an old strut.
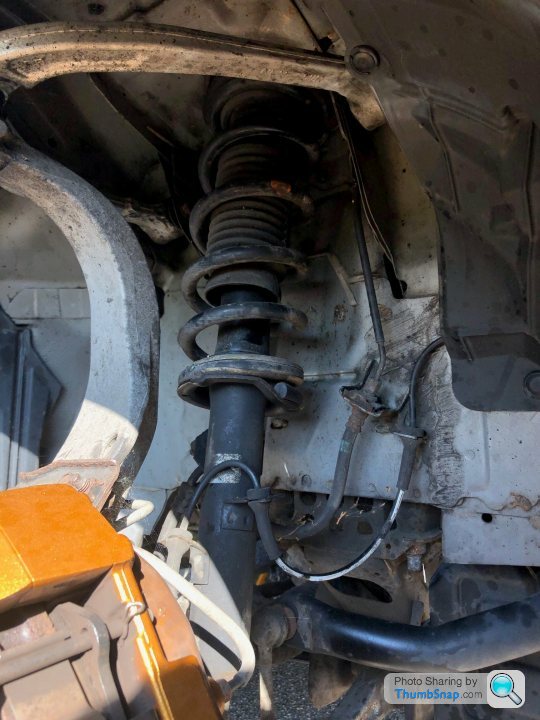
The part I had been dreading most was the released of the upper ball joint. The strut won't come away without the upper arm being freed to make space. I had borrowed a friend's ball joint splitter for this task. I was tooled up. Except it didn't fit. Bugger. However, quelle surprise when after having loaded the suspension up to remove the nut the ball joint practically fell away of its own accord once the pressure was relieved from the hub. All it required was the daintiest of love taps and out it popped. Marvellous!
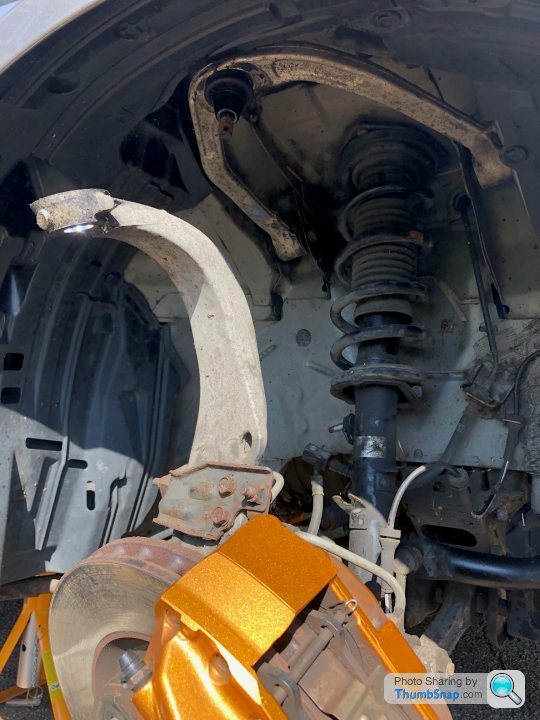
Out came the strut and that was that.
In went the new one, job jobbed! Naturally, everything was torqued to spec. There was none of this FT nonsense here.
Rinses and repeat on the other side and I was halfway there.
The rear was jacked up, the sketchy looking wooden blocks re-employed and I cracked on. The rear would be easier, not that the fronts posed any challenge. I had a pair of spring compressors to remove the old items and install the new ones. Aforementioned trusty friend had loaned them, so I knew I was in good hands despite the previous hiccup with the non-fitting ball joint splitter.
The bds didn't fit.
Oh well. Under went the jack to take the load, the spring bucket bolt was removed and the bucket lowered. Out popped the springs with some persuasive manoeuvres and in went the new ones. Jack the spring bucket back up and button it all up again.
Lovely job. Rinse and repeat again and I was nearly there!
I should add that at each corner I had measured prior to the removal of the old strut the distance from hub centre to arch apex. I used this as a basis for setting the ride height on the new suspension aiming for a 15-20mm drop. With the new wheels on the car, I have to say it was pretty damn close and I not made any further adjustments to ride height since having it back on the road. There is some minor scraping on the front when the car goes over some larger dips so I am toying with the idea of lifting the front a smidge and turn the damper knob up a few stages to firm things up just a tad. I'd probably do the same to the rears (turn the stiffness up a little that is), however I can't get to the dials on the rear dampers hidden as they are within the body work. I'd have to remove the dampers again to get to them. Not a big job, just a pain. You can drill holes to reach the knobs if you are so inclined, and indeed extensions were supplied for just this purpose however I am not pre-disposed to drilling holes in my car so won't be doing this. The fit and forget element of the Bilsteins is what sold me the idea of fixed rate everything but I am where I am with the coilovers so I'll just have to find some time to adjust.
Anyway, I am reasonably happy with the car as it sits and minor scrapage aside it drives very nicely. It took it back to my guys at Trye Smart for a four wheel alignment on their Hunter to bring the car back in line with OE where possible. The standard arms provide very little in the way of adjustment so I have what I have to some extent, but it's not too wild with 0 degs steer ahead, -1.5degs camber at the front, and -2.25degs camber at the rear. Rear toe is out of spec by 6 minutes offside, and 2 minutes near side. Not sure why and there is no adjustment for rear toe. We're talking less than a mm (0.8mm) out of true for 6 minutes and 0.2mm for 2 minutes so it's not the end of the world but it's annoying to have it out of spec.
With this done, the next up task is in October where I have the car booked in for some surgery (see my previous [and unanswered ] post). The rust on the NSR arch requires chopping out, and fingers crossed it hasn't progressed to far from what is visible. Best case, the rust can be cut out and a patch welded in. Worst case, the rear quarter will need to come off and be replaced after repairing the inner arch. Fingers crossed it is the former. It will also be having the roof repainted due to a stone chip that has caught the red peril. Longer term (hopefully not 10 years this time) I hope to have a full underside resto. How far I go with this will be price dependant, but I have seen a place that does wonderful work albeit for considerable cost. We'll see. Between now and then, I have some UV protection for the headlight lenses to apply (having given them a good resto again last week), and some Gtechniq C4 to bring back the lustre in the wing mirror bases.
Special shout out to Torque GT who supplied the wheels and suspension. Not wanting to anger the mods, I do want to call out their impeccable customer service throughout. The guy at the other end of the email was superb and answered all questions promptly and thoroughly. Really, in this age of the zero fk approach to customer service, it was really refreshing to deal with a company and individual who valued their customer. I wouldn't go anywhere else now for all things Japanese.
I hope this has been of some interest, and I imagine the next update will follow on from the rust repairs. Until then,
First things first:
Ooh, intrigue!
So, if you look back through the annuls of this thread, you'll see many references to my future plans for this car that usually reference something from Enkei, and something from Bilstein. As is often the case with these things, life gets in the way and in my case this was a house move, then lots of redecorating / unf
king past owner's DIY (still ongoing), then new bathrooms, then wedding... it was just one thing after another. All positive, but it left little time or money for my poor old Zed. But fret no more! During one of my semi-annual browsings of all thing aftermarket I was once again looking at the price of bits. Now, it has to be mentioned that my hope for ever buying these bits was diminishing by the year. Naturally, things kept getting more expensive. What was going to cost quite a lot of money, was now going to cost an awful lot of money. Until, that is, the wheels I'd been lusting after for nearly 10 years were on sale! In the size I wanted! It was at this point that the "f
k it" threshold was reached and four 18" x 9.5j RPF1s were hastily added to the basket of the vendor (Torque GT) and duly bought before the sensible part of my brain figured out what was going on. One jiffy later, and an invoice had wended its way into my inbox. It was at this point that I had bought the wheels and nothing else. The nothing else in question unfortunately was not on sale, and was still an awful lot of money. But, in for a penny, in for a pound!
It had been my plan to buy Bilstein B8 dampers married to Tein S-Tech springs. A tried and tested marriage resulting in a good fixed rate, fixed height fast road suspension setup. Unfortunately, Nissan had other ideas. The problem with using the Bilstein / Tein combo was that the other accoutrements that make up a suspension strut were not part of the deal. I could either buy new top mounts, bushes, nuts, bolts etc. or strip down the struts already on the car and re-use those parts. The issue with this was of course that these parts are 16 years old. It's seemed to me to be counter-intuitive to re-use these parts, so I toddled off to Nissan with a list of part numbers for new items.
"Hello", I said, "can I have a quote for these part numbers?"
"Of course", replied the Nissan service guy who duly disappeared to fetch a price for me.
Some time passed, and I wondered if the fellow had hopped onto a plane to Yokohama to ask in person. But, return he eventually did.
"Yeah," he began. I wasn't filled with hope. "So, this is cost per item - times two for each side. Many of these parts are also on a three month lead from Japan."
I looked down. I looked up. I chuckled. I walked out (having thanked the Nissan guy for his time).
£1,100 for new consumables. It wasn't a terribly long list, neither were the parts particularly complex in nature. Bear in mind, this £1,100 was additional to the cost of the Bilsteins and the Teins and I would have to build the buggers.
I got back onto the proverbial blower to Torque GT and enquired about a good set of coilovers to compliment the 350Z. They suggested some MeisterR Zeta CRDs. A good mid-range option suited to fast road driving. The "f
k it" threshold having long since been crossed, another invoice soon landed in my inbox. Next: tyres. I was hoping to get some Toyo R888s. I don't do many miles in the Zed these days so the soft compound of these didn't matter too much. But no. The sizes I wanted, 255/40 front and 275/40 rear, I couldn't get together. I could only find the 275/40s. I mulled over buying the OE fit Bridgestone RE050A tyres that I had always used. However, I couldn't find these either and they're old and a bit crap anyway. What was available that was new and not crap? Michelin Pilot Sport 5s. Good reviews, released last year and available in the sizes I wanted! Smashing!
How much?! Oh for goodness sake.
Something about sunk cost fallacies crossed my mind, but it was swiftly suppressed as once more the "f
k it" button was pressed. I was all set. First to arrive (after some less than stellar performance by Parcelforce), the hitherto teased Enkeis:
Oh my. I'd be lying if I said I didn't look at them more than is healthy for a man to look at some aluminium cylinders. But these were Enkei RPF1s, the wheel I had wanted for what was at this point approaching a third of my life. And they were gorgeous. The ideal wheel for the 350Z. There are other wheels that suit the venerable Zed, but none quite like the RPF1.
Next, the tyres. Now these were stored for a short while in my dining room. It was at the time that we had our warm weather in June. The residual release compound Michelin use to release the tyres from their moulds became soft and imparted themselves onto my nice wood floor. So now, forevermore I shall have "Michelin" stained in mirror text beneath my dining table.
Ah well. It's on the replace list anyway.
It was at this point that a I was struck by a quandary. I had four wide wheels, and four even wider tyres to shift to my local tyre place. Aside from the 350Z (not a chance) I also own a Fiesta. It was like the car was made for the job!
The place I use, Tyre Smart in Witham, have always treated their customers cars with care and professionalism and this time was no different. In fact, the wheels caused something of a minor stir as some employees enquired about them and their final destination. As always, after a short wait the wheels were shod in rubber and there was nary a mark on them. Ace service as always.
Plenty of rubber on these - no rubber bands to be seen here.
A week or so later, up turned the suspension. I opened the box and was greeted by the prettiest looking suspension components I had ever seen! Forget the blue and yellow of Bilstein, the anodised red on black made quite the impression. So far, so good. MeisterR are not long established, so I have to say I went out on a bit of a limb in buying them.
If nothing else, they do look nice. 2mm pre-load, 32 way adjustable damper compression and rebound, adjustable height. Knowing nothing about suspension setup I popped the dampers to 16 (middle ground seems sensible, right?) and left it at that for the time being.
At my next convenience, I began the task of swapping everything over. Now, this isn't a massive job however the car had been buttoned up 16 years prior in Kaminokawa, Tochigi prefecture and not touched since. It was also on the driveway, which with the best will in the world is a colossal pain the in the arse to work on. However, I have to say that the car had impeccable manners and through up no real drama. The worst of it was removing part of the brake line from the OE strut. The bracket to which this part was fastened yielded before the nut so I couldn't apply any real torque to it without the bracket starting to twist. A pair of adjustables to hold it still later, and off it came. Smooth sailing from here on out.
First job, fit some spigot rings. Now, the standard hub spigot on the 350Z is 66mm. The RPF1s, being made for all manner of vehicles, were 73.1mm i.e., too big. A lesser man might have thought "f
k it" and slapped the wheels on anyway in the hope the studs would centralise it sufficiently. Well, I had expended all the laissez-faire attitude I had to give, and now was time for some control. Fortunately, RAYS do some nice turned aluminium spigots rings to step down the bore of the wheels, so these were fitted (with a dab of copper slip should I wish to remove them in future). I was expecting some drama fitting them but they went in with no more than some well applied thumb action. Fronts first, up went the car onto my trusty Halfords axle stands on wooden blocks (since replaced with rubber blocks as they started to crack over the duration of this job!) and I surveyed my foe - an old strut.
The part I had been dreading most was the released of the upper ball joint. The strut won't come away without the upper arm being freed to make space. I had borrowed a friend's ball joint splitter for this task. I was tooled up. Except it didn't fit. Bugger. However, quelle surprise when after having loaded the suspension up to remove the nut the ball joint practically fell away of its own accord once the pressure was relieved from the hub. All it required was the daintiest of love taps and out it popped. Marvellous!
Out came the strut and that was that.
In went the new one, job jobbed! Naturally, everything was torqued to spec. There was none of this FT nonsense here.
Rinses and repeat on the other side and I was halfway there.
The rear was jacked up, the sketchy looking wooden blocks re-employed and I cracked on. The rear would be easier, not that the fronts posed any challenge. I had a pair of spring compressors to remove the old items and install the new ones. Aforementioned trusty friend had loaned them, so I knew I was in good hands despite the previous hiccup with the non-fitting ball joint splitter.
The b
ds didn't fit. Oh well. Under went the jack to take the load, the spring bucket bolt was removed and the bucket lowered. Out popped the springs with some persuasive manoeuvres and in went the new ones. Jack the spring bucket back up and button it all up again.
Lovely job. Rinse and repeat again and I was nearly there!
I should add that at each corner I had measured prior to the removal of the old strut the distance from hub centre to arch apex. I used this as a basis for setting the ride height on the new suspension aiming for a 15-20mm drop. With the new wheels on the car, I have to say it was pretty damn close and I not made any further adjustments to ride height since having it back on the road. There is some minor scraping on the front when the car goes over some larger dips so I am toying with the idea of lifting the front a smidge and turn the damper knob up a few stages to firm things up just a tad. I'd probably do the same to the rears (turn the stiffness up a little that is), however I can't get to the dials on the rear dampers hidden as they are within the body work. I'd have to remove the dampers again to get to them. Not a big job, just a pain. You can drill holes to reach the knobs if you are so inclined, and indeed extensions were supplied for just this purpose however I am not pre-disposed to drilling holes in my car so won't be doing this. The fit and forget element of the Bilsteins is what sold me the idea of fixed rate everything but I am where I am with the coilovers so I'll just have to find some time to adjust.
Anyway, I am reasonably happy with the car as it sits and minor scrapage aside it drives very nicely. It took it back to my guys at Trye Smart for a four wheel alignment on their Hunter to bring the car back in line with OE where possible. The standard arms provide very little in the way of adjustment so I have what I have to some extent, but it's not too wild with 0 degs steer ahead, -1.5degs camber at the front, and -2.25degs camber at the rear. Rear toe is out of spec by 6 minutes offside, and 2 minutes near side. Not sure why and there is no adjustment for rear toe. We're talking less than a mm (0.8mm) out of true for 6 minutes and 0.2mm for 2 minutes so it's not the end of the world but it's annoying to have it out of spec.
With this done, the next up task is in October where I have the car booked in for some surgery (see my previous [and unanswered
] post). The rust on the NSR arch requires chopping out, and fingers crossed it hasn't progressed to far from what is visible. Best case, the rust can be cut out and a patch welded in. Worst case, the rear quarter will need to come off and be replaced after repairing the inner arch. Fingers crossed it is the former. It will also be having the roof repainted due to a stone chip that has caught the red peril. Longer term (hopefully not 10 years this time) I hope to have a full underside resto. How far I go with this will be price dependant, but I have seen a place that does wonderful work albeit for considerable cost. We'll see. Between now and then, I have some UV protection for the headlight lenses to apply (having given them a good resto again last week), and some Gtechniq C4 to bring back the lustre in the wing mirror bases.Special shout out to Torque GT who supplied the wheels and suspension. Not wanting to anger the mods, I do want to call out their impeccable customer service throughout. The guy at the other end of the email was superb and answered all questions promptly and thoroughly. Really, in this age of the zero f
k approach to customer service, it was really refreshing to deal with a company and individual who valued their customer. I wouldn't go anywhere else now for all things Japanese. I hope this has been of some interest, and I imagine the next update will follow on from the rust repairs. Until then,
Gassing Station | Readers' Cars | Top of Page | What's New | My Stuff