Ferrari F430 Spider
Discussion


599/Scuderia steering wheel, and paddles continued
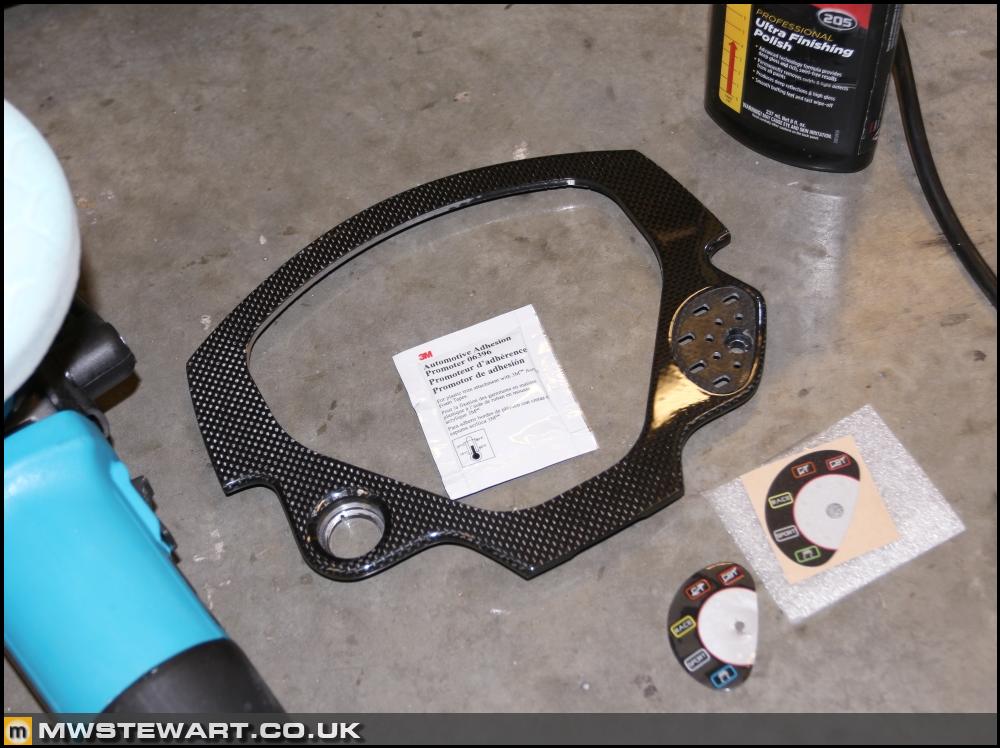
I've lacquered the 599 GTO carbon surround to match the rest of the interior. I had to reduce a 3/8" AF socket to remove the Manettino – a very odd fastening with minimal clearance given everything else is standard metric!
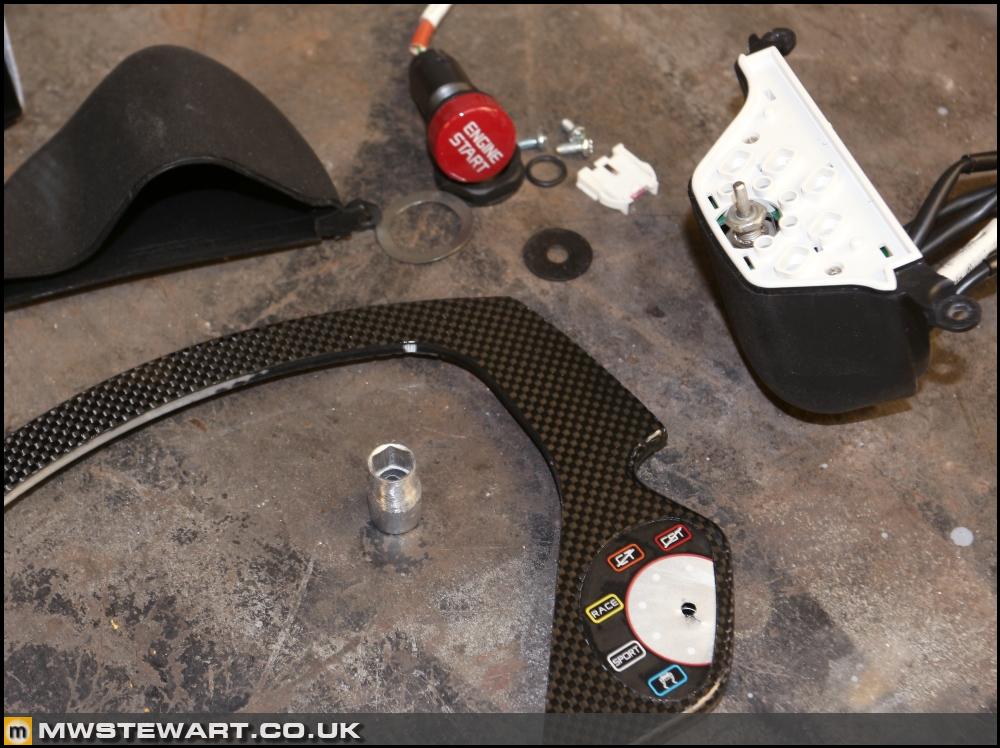
I machined polished it to a nice shine: much better than OEM. I also applied a new MA Carbon Manettino sticker.
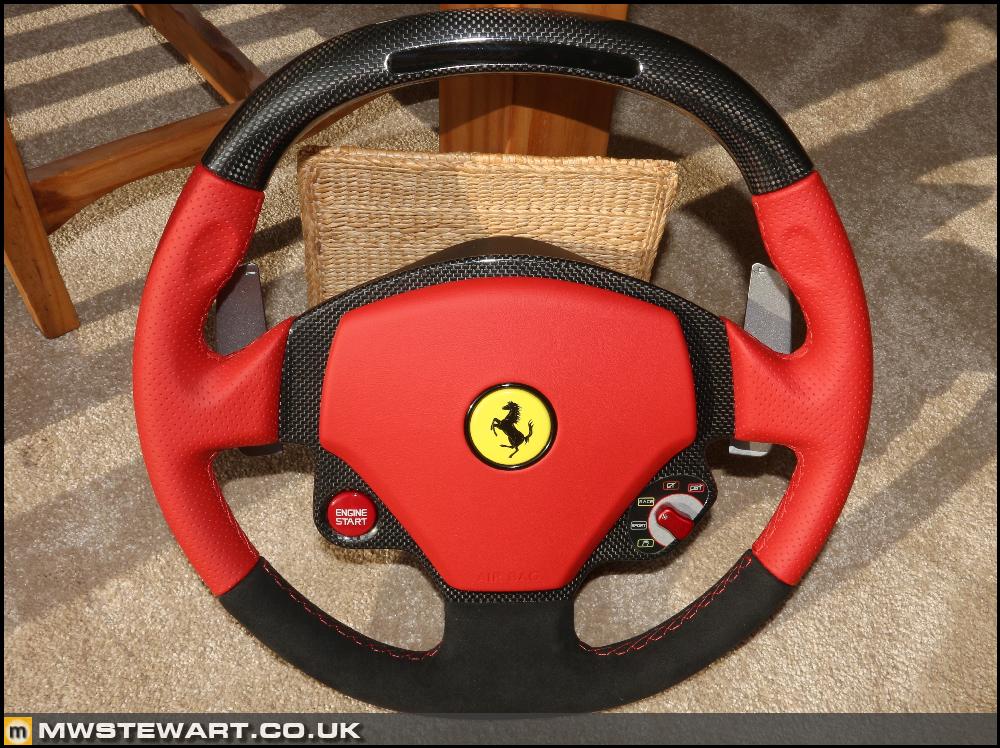
The airbag trimmed with 'AIRBAG' embossing.

The complete steering wheel. I'm over the moon with it; my favourite steering wheel to date.
F430 Challenge CCM discs
I bought a set of F430 Challenge CCMs (398mm/350mm) from 360 owner Gary who also sold the Capristo system to me last summer. I will continue to work on the Speciale brake conversion in the background but for now I want the car back together and to Christian Lewis to finish the gearbox setup, so I have a couple of months contingency ahead of the summer to wrap up this phase of the project.
The rear discs are around 40% and the fronts 90%. I only need the fronts which I have stripped to recondition.
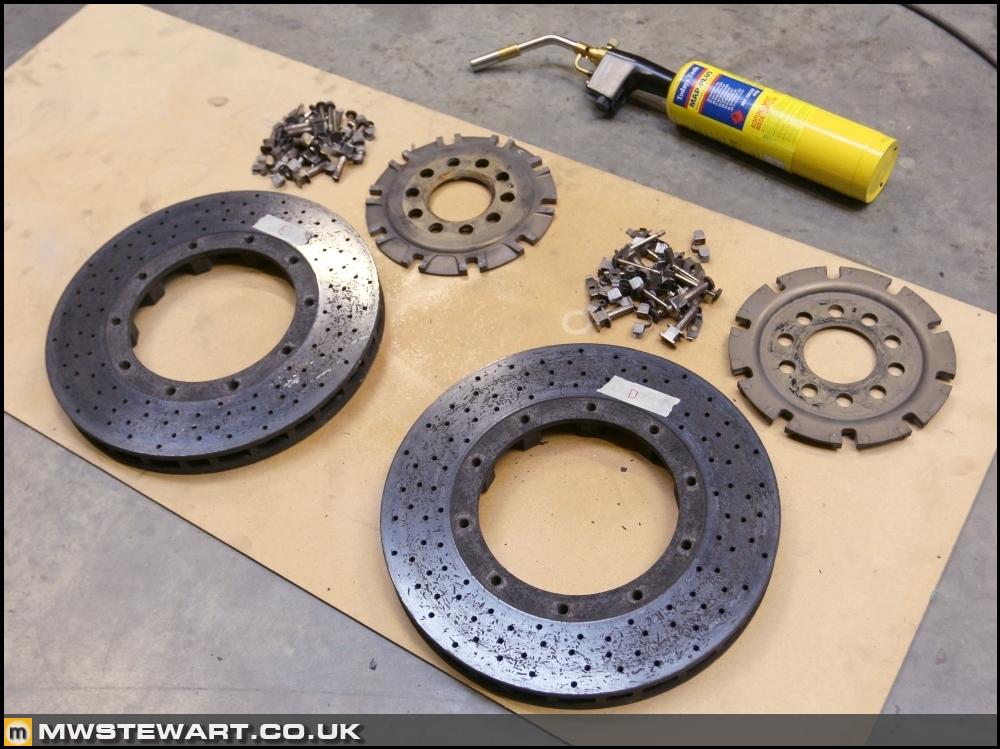
The Challenge bells do not fit road car hubs due to a different centre bore diameter, which is well known, but I am still interested in them because I discovered a full set is nearly 1/2kg lighter than even the lighter aluminium road car bells that were fitted to my car. The bells themselves are a completely machining and part of the weight saving comes from additional cooling pockets machined into the rear face.
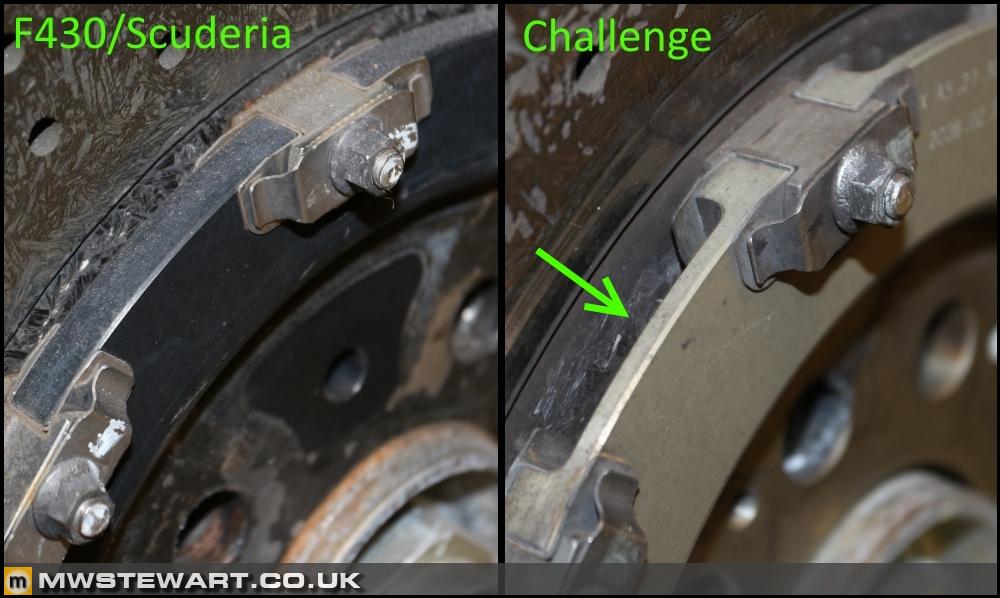
There is also greater clearance between the hub mounting face and disc edge to allow cooling air to flow outwards and across the outside face of the disc via the machined pockets. This was a feature Ferrari carried over into later CCMs.
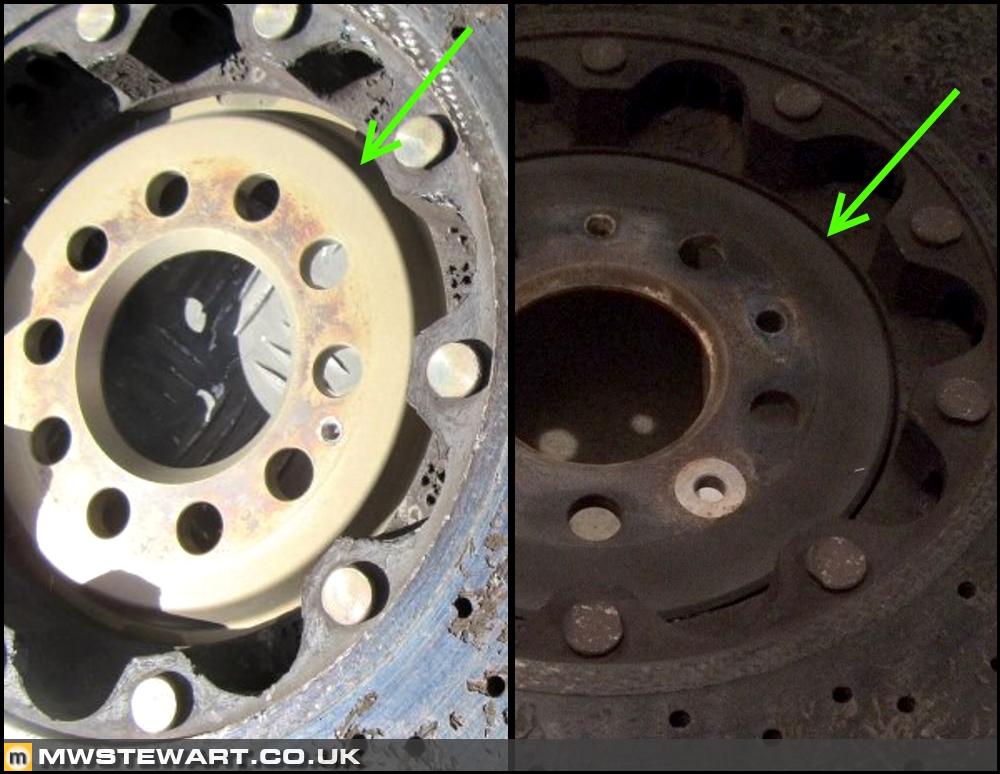
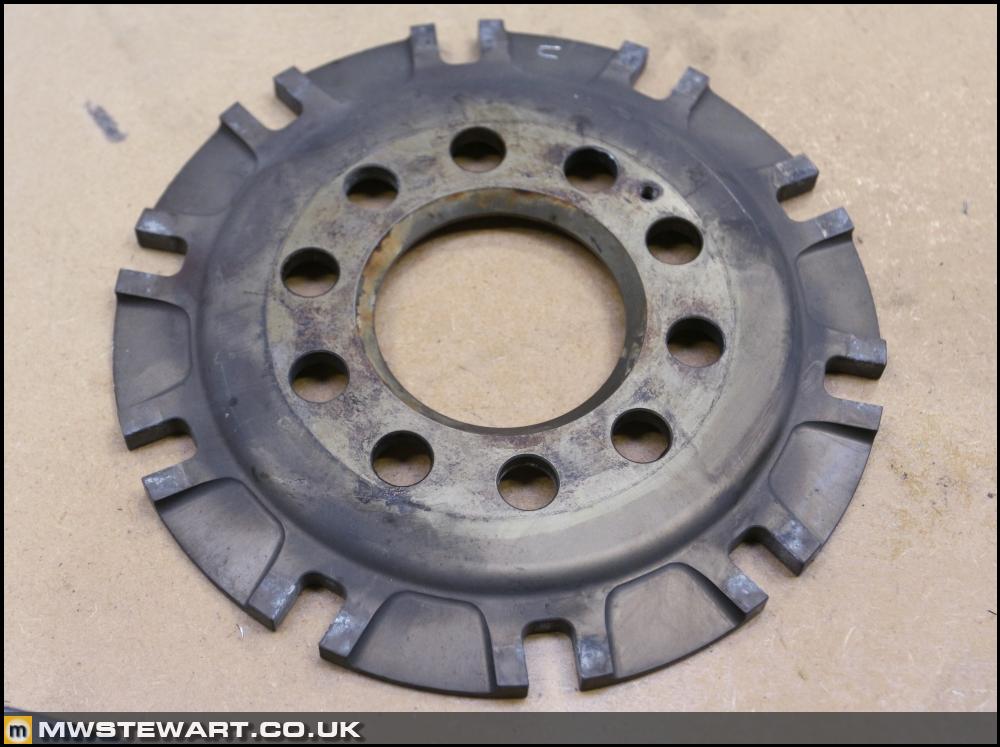
Photo to show the rear of the CCM bell with its cooling pockets.
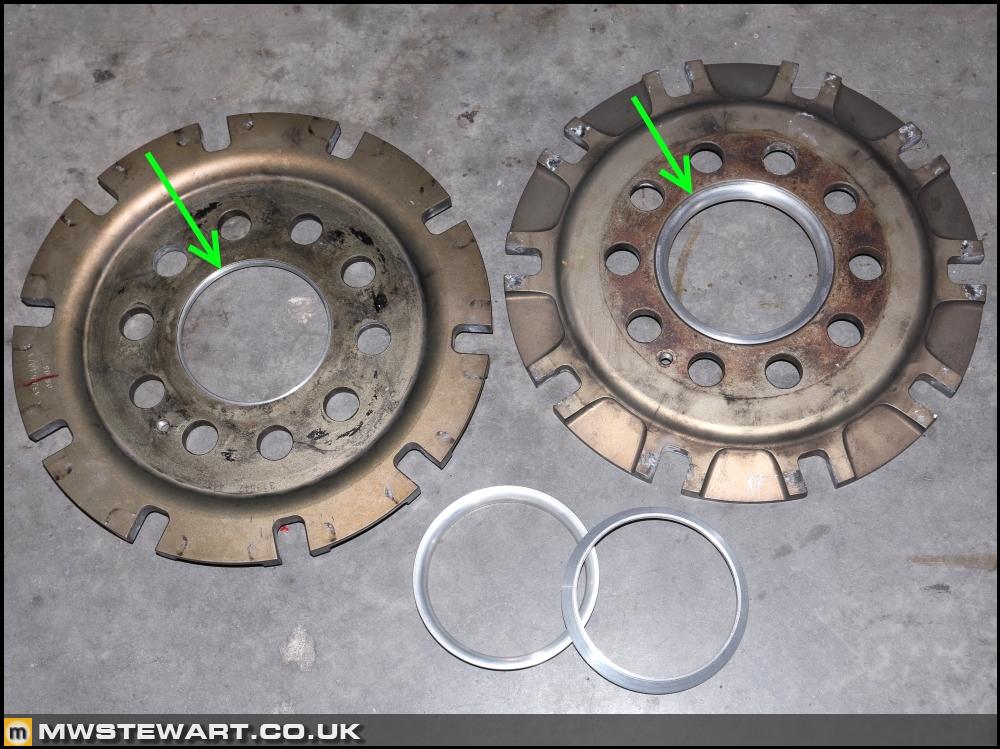
The Challenge hubs are centrelock with ten locating dowels on the same PCD as the five road car wheel bolts, so to mount the Challenge CCMs to the road car it is possible to use turned down countersunk cap screws in two of the holes to centralise them on the road car hub using the original disc securing bolt holes, but because the disc securing bolts on the road car were never designed to centre the disc - which they aren't on any car; it's the job of the hub boss - the threaded holes in the wheel hub are offset and thus do not fully centralise the disc. I tried this approach and found too much runout in the disc to be comfortable with, so I had aluminium spigot rings machined to tighter tolerances than the original road car discs to perfectly centralise the discs.
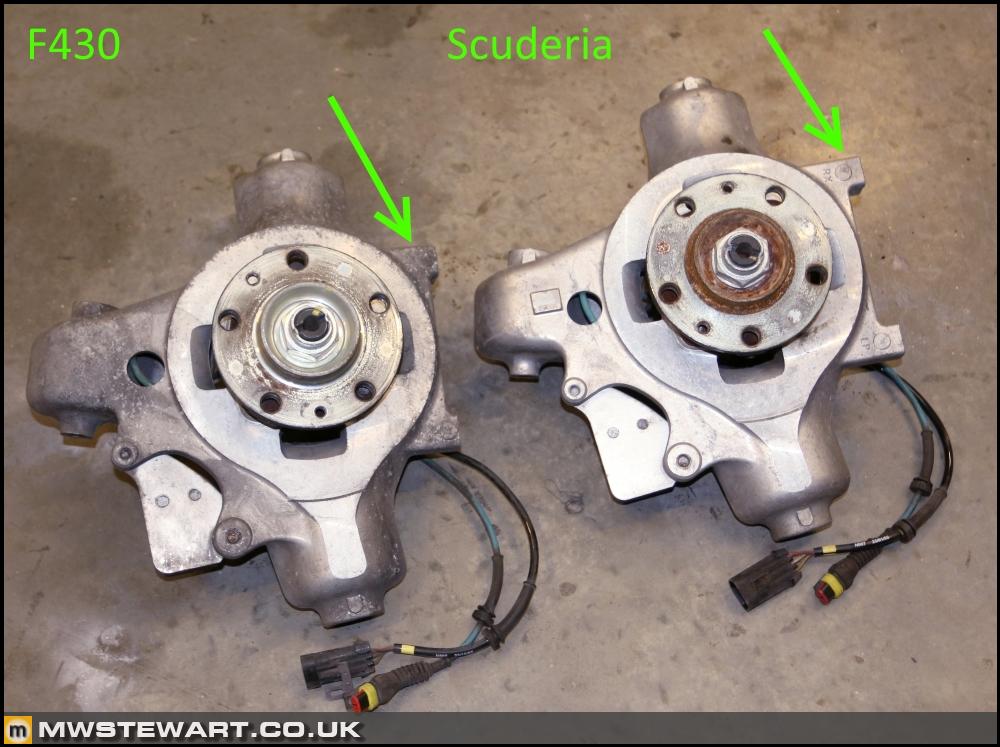
Scuderia front uprights
Time to fit the Scuderia uprights to suit the 398mm braking system. The caliper lugs are 9mm longer to suit the 18mm larger discs. The Challenge just used studs with a spacer boss which is fine on a race car, but on a road car it can lead to additional vibration under braking. It's not a massive consideration of mine for this car given how focused it is but given there was a better option available I took it.
The hub mounting face had the same offset as the F430 but I did not check if there were other dimensional differences.
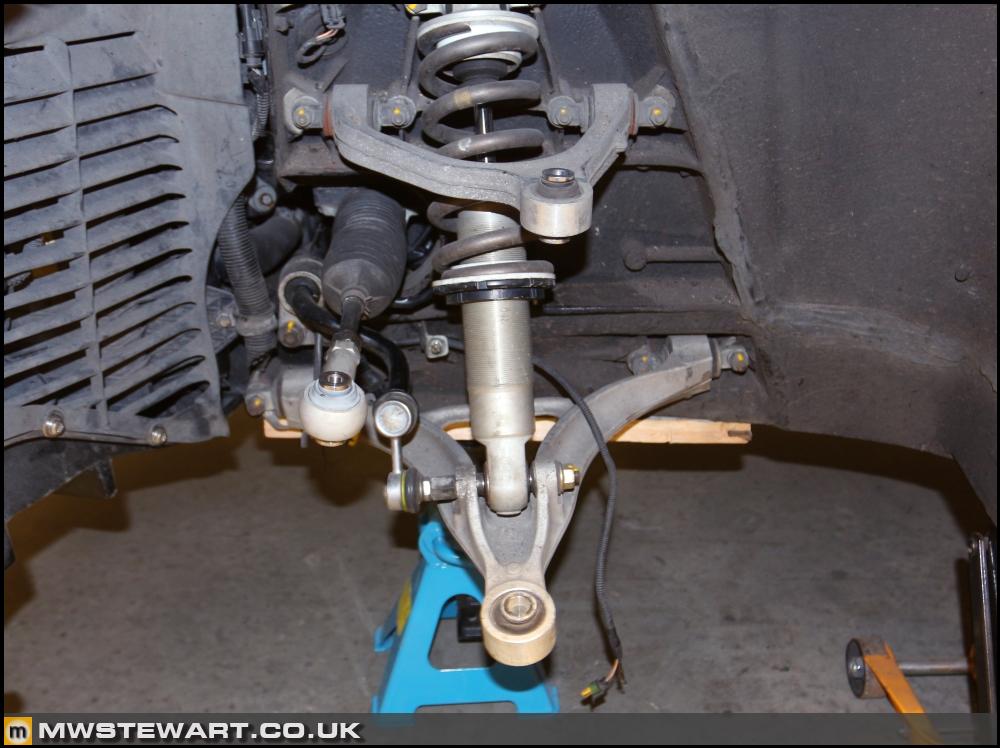
I'm happy with the condition of my suspension but the low deflection 'flambloc' joints are showing signs of corrosion and degradation of the rubber so I am planning a replacement solution for next winter.
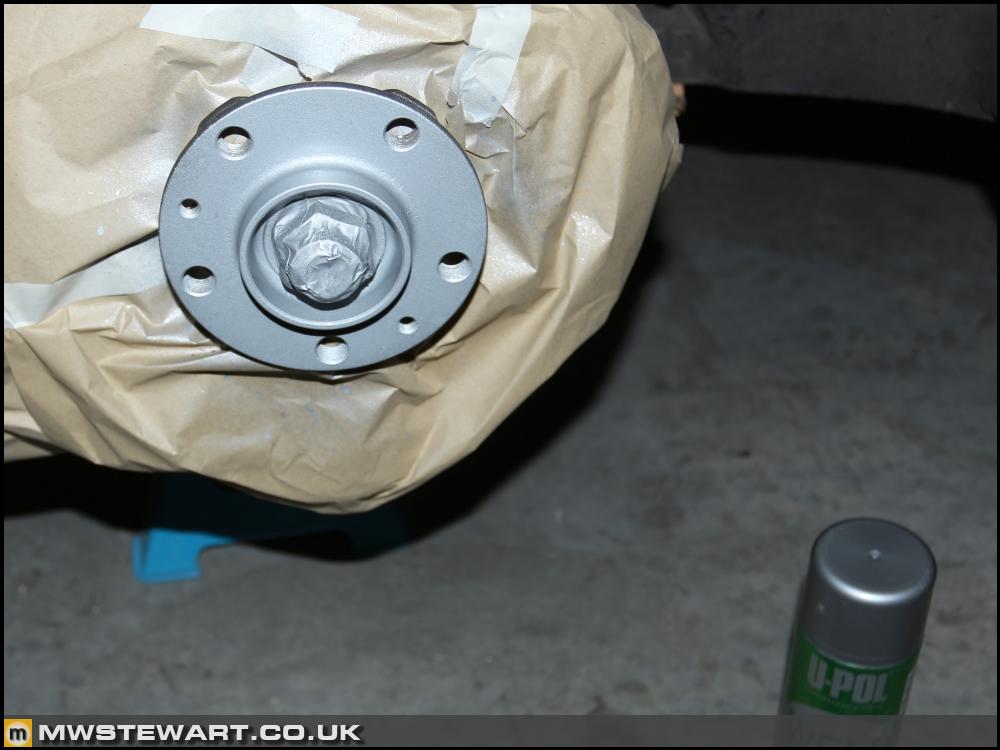
Despite being very low mileage the Scuderia hub bosses were a bit rusty. Dad kindly prepared them and masked off the central nut then I sprayed them in silver zinc.
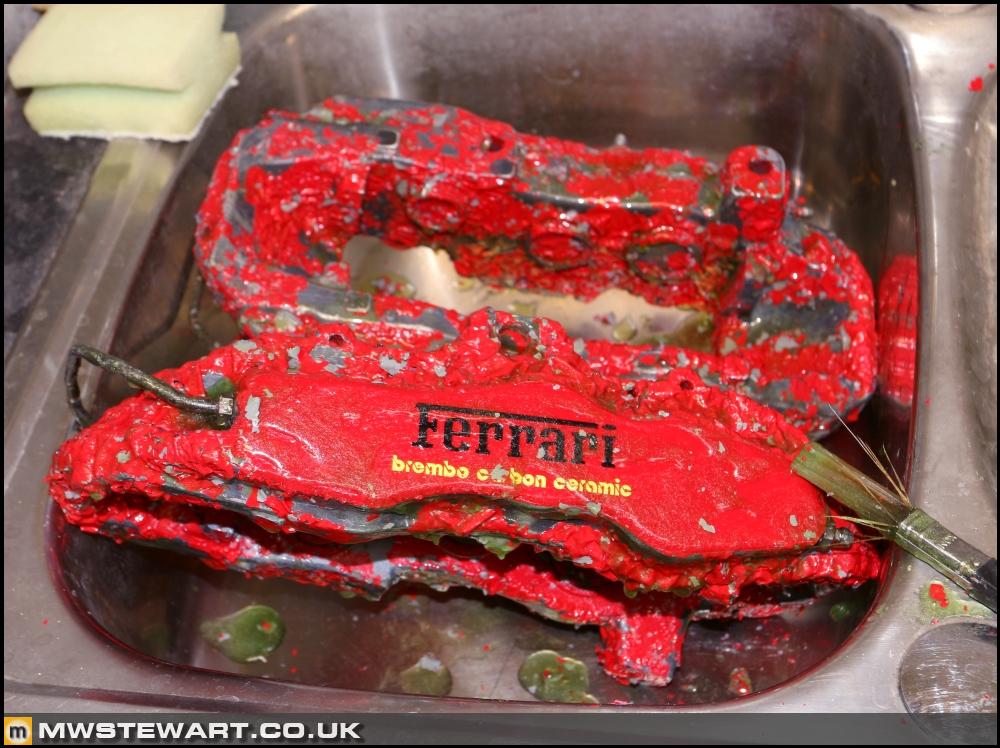
Scuderia front caliper rebuild
Dad also kindly stripped the red 398mm front calipers back to the original anodising, then I stripped off all removable parts.
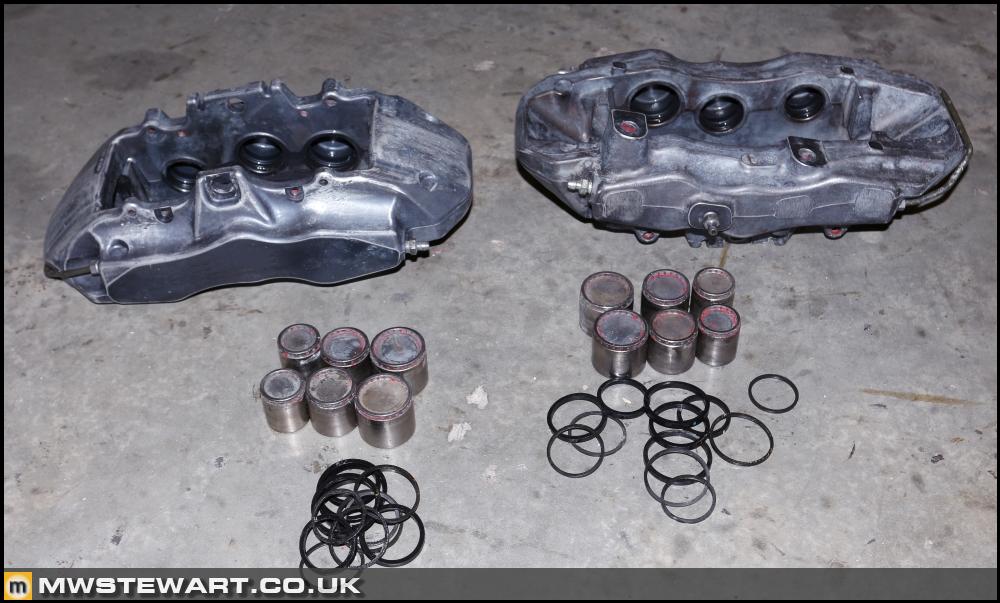
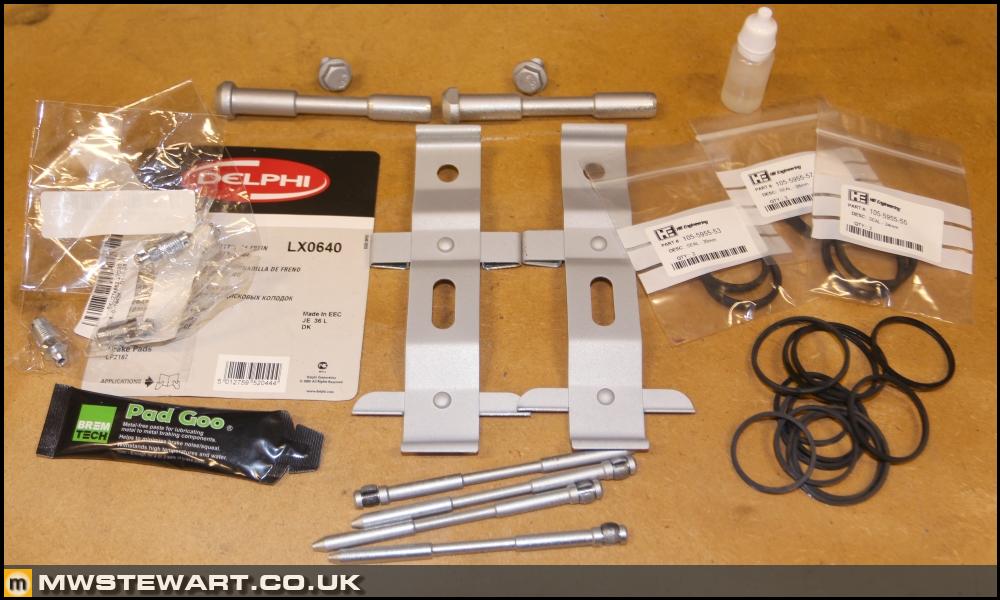
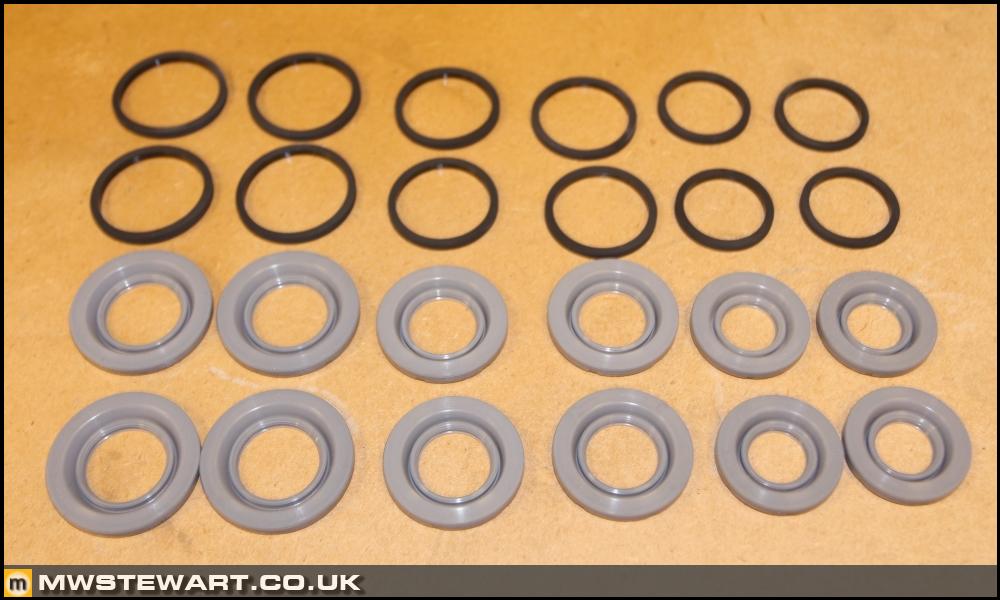
I bought new bleed nipples, seals, decals etc. I decided a 2009> L320 Range Rover Sport pad fitting kit would work – and it does. I had a set of Hill Engineering seals in stock already but when stripping down the caliper I found the fluid and dual lip internal type dust seals were pretty standard and readily available elsewhere for considerably less. The pistons cleaned up to live another day; I didn't want stainless pistons because of the weight penalty.
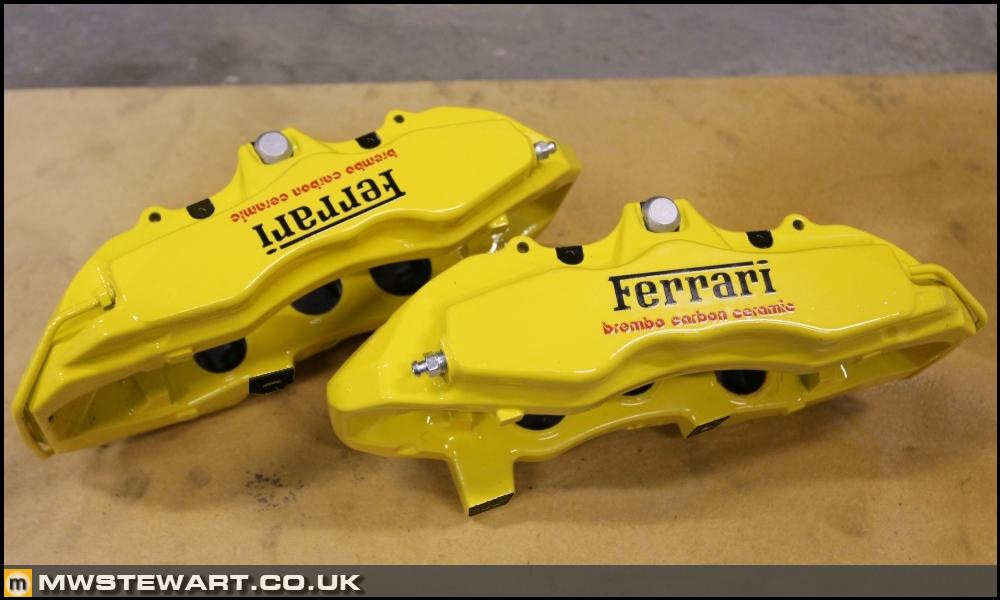
Calipers painted. To prevent corrosion I've packed the seal lands with red rubber grease which is a trick that works well on motorbikes with a similar seal arrangement. It is worth pointing out that this type of caliper is a high performance type with internal dust seals for high heat resistance, and is not maintenance free even with stainless pistons. Internal dust seal calipers should be stripped and inspected every few years to keep an eye on bore condition. Incidentally, Ferrari fitted boot type seals to the Speciale and La Ferrari calipers - I can only imagine because the caliper was destined for the road 488 - and whilst that type works well on a moderately driven road car, they overheat and break down on track.
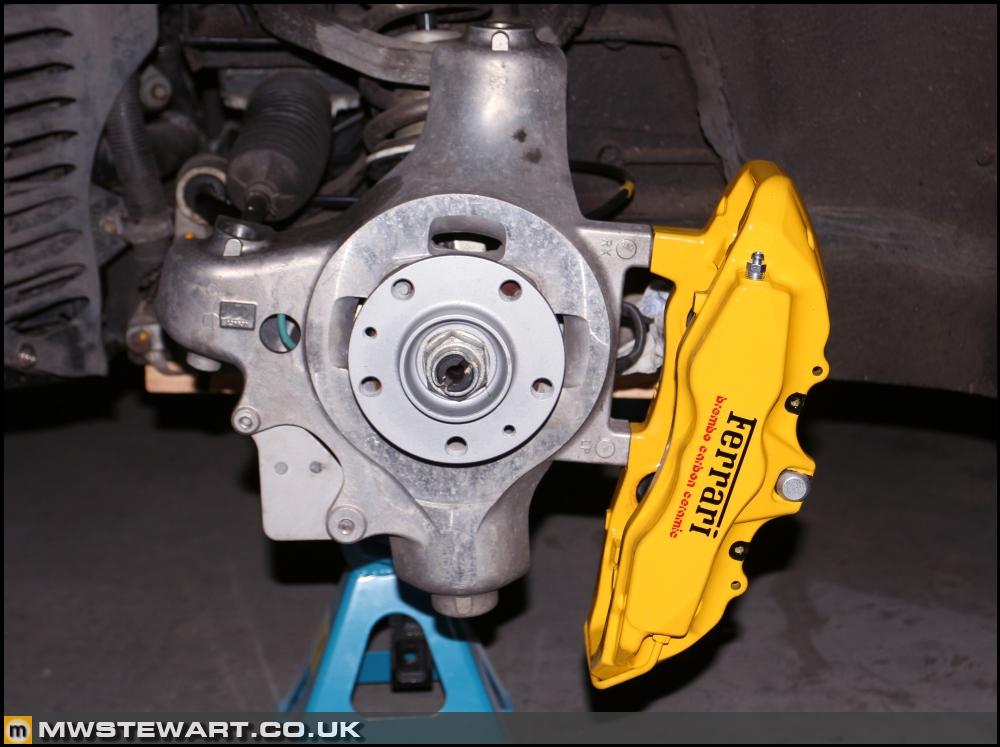
Hubs in place and calipers temporarily bolted up.
I now have a set of fluid and boot type dust seals for the Speciale calipers which I will refurbish in due course.
Misc
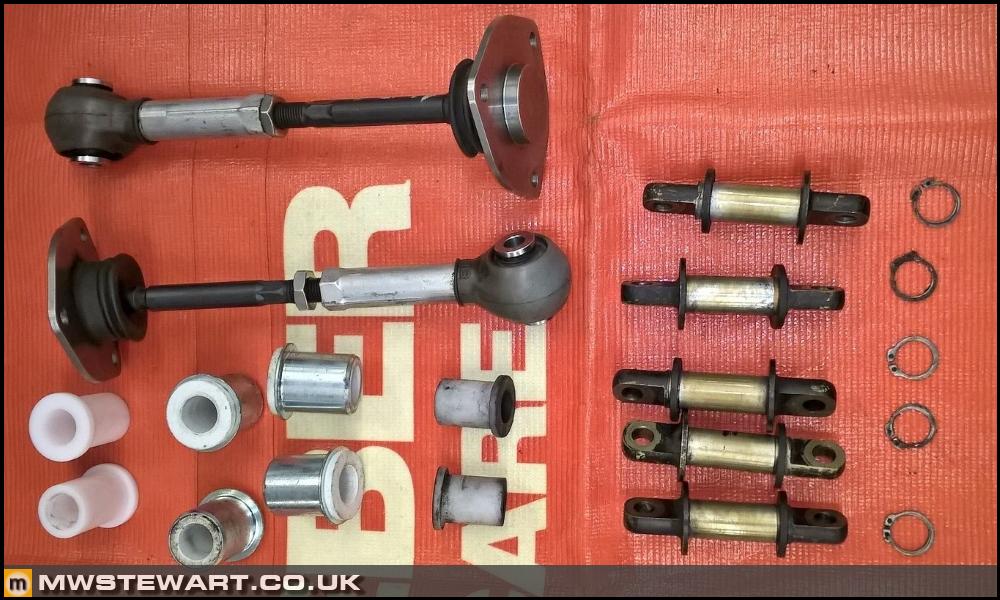
I've purchased some good suspension parts from a race team including the derlin inserts which are fitted in lieu rubber on the road car. I'm going to use these parts to develop a replacement set of flamblocs for my car.
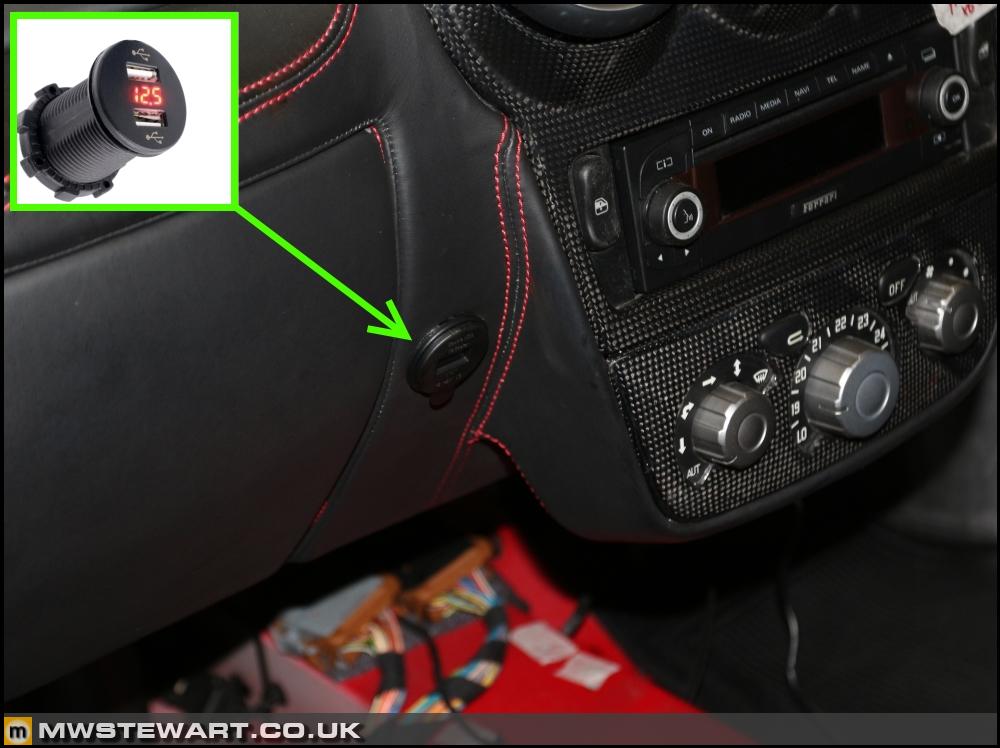
I had a void in my dashboard where the glovebox open switch one was so rather than a blank I decided to fit something that is always used on our road trips: a USB charging point, only this one incorporates a voltage display - something really useful on these cars given how sensitive the electronics are to supply voltage.
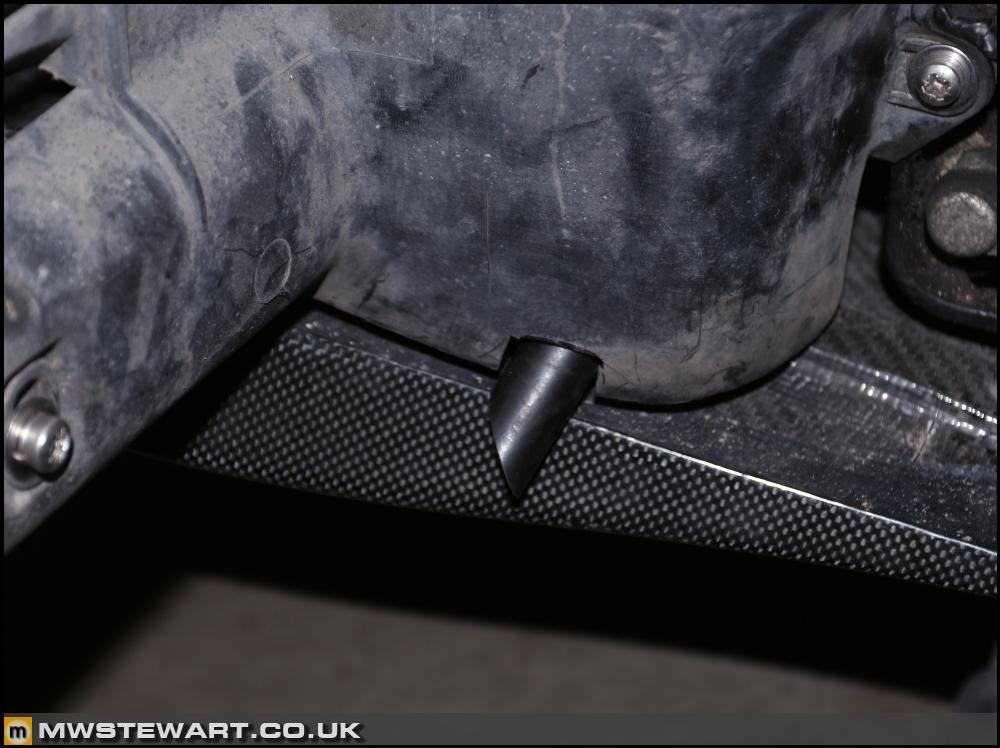
I decided to cut a reveal in the R/H rear wheel arch liner to allow the F1 reservoir drain to route to ground. This will prevent the diffuser and engine under tray being filled with oil in the event of an F1 issue. I bunged the end with a piece of foam to prevent dirt ingress.
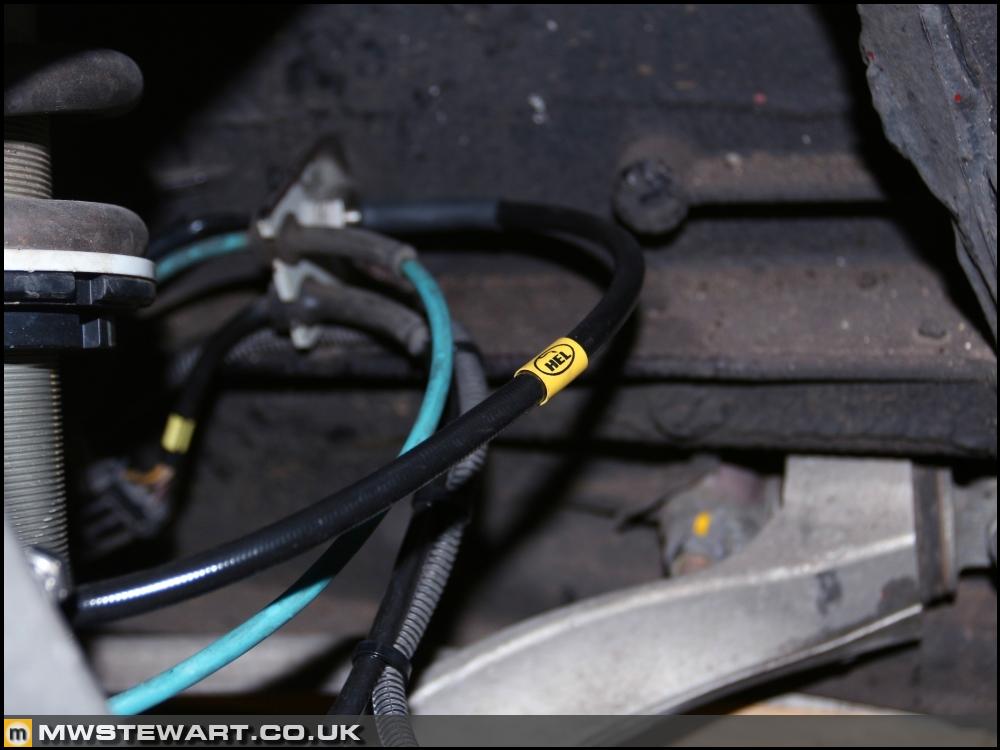
HEL brake lines fitted.
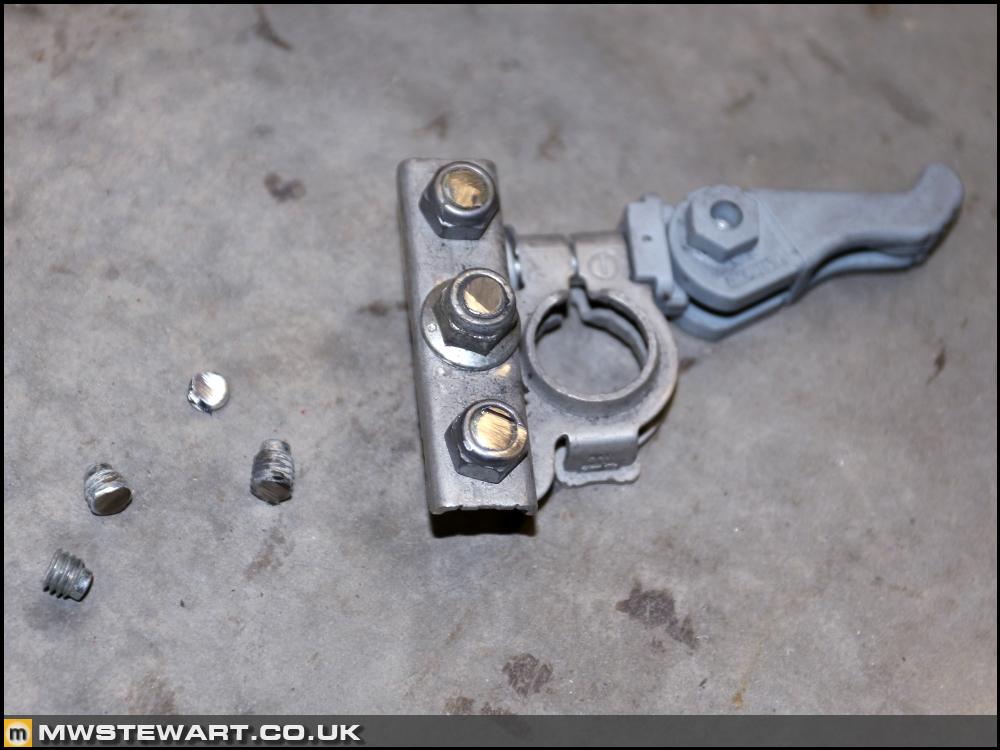
My car has an auxiliary front fuse panel which Ferrari strategically located directly above the battery terminals. At best the lack of clearance between it and the terminals slightly hampers battery removal, and at worst it can allow a short between the negative terminal and earth which bypasses the battery master switch. To prevent this I've trimmed the battery terminals flush to increase clearance by 5mm, thus solving the issue.
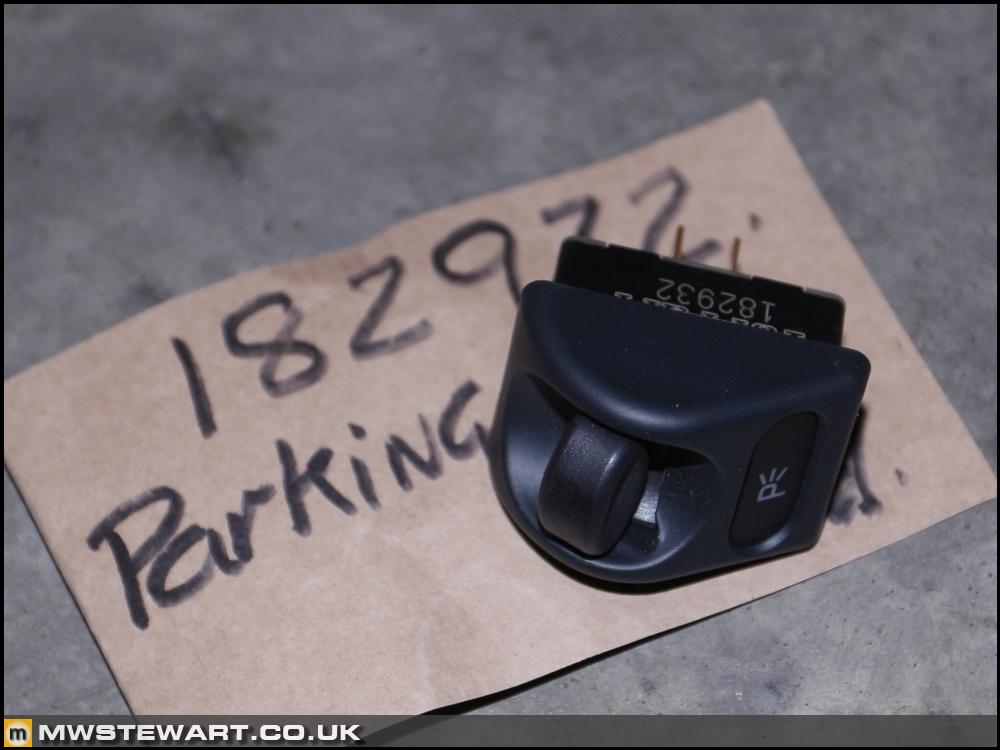
Scuderia parking light switch fitted. This is a latch type switch rather than momentary.
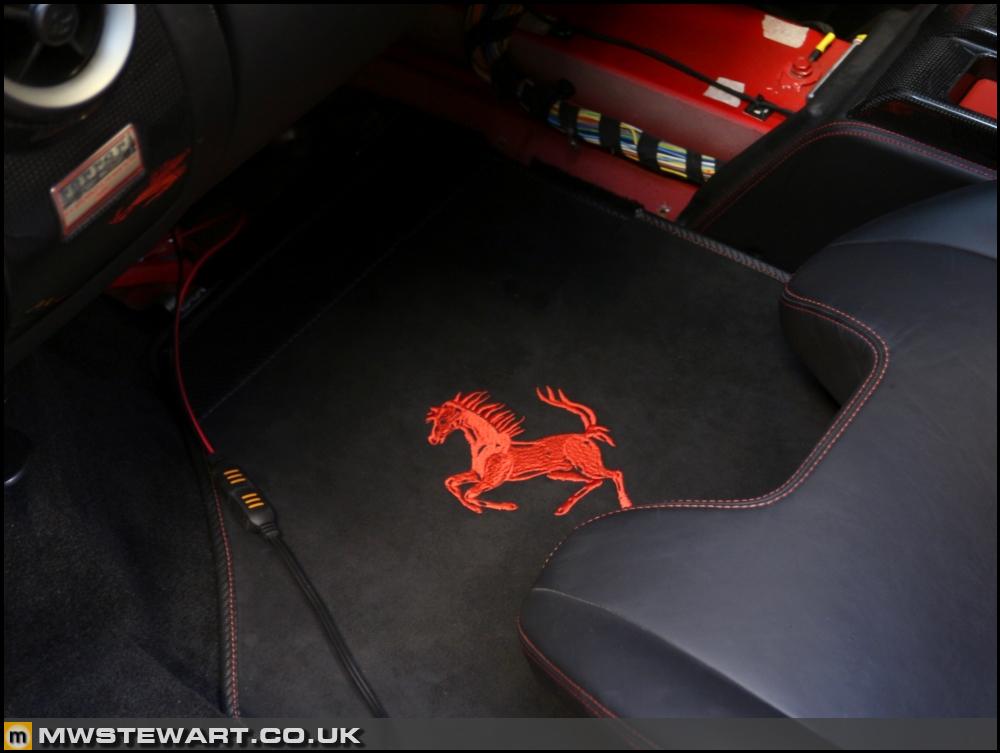
I picked up a nice set of used Andrew/Exoticare Alcantara mats. They are lovely mats but have a red cavallino which is a bit much given I have yellow cavallino's on my seats, so I've purchased some dye stripper with the intent of re-dying yellow, but I may go black if the interior starts to look too 'busy'.
I've lacquered the 599 GTO carbon surround to match the rest of the interior. I had to reduce a 3/8" AF socket to remove the Manettino – a very odd fastening with minimal clearance given everything else is standard metric!
I machined polished it to a nice shine: much better than OEM. I also applied a new MA Carbon Manettino sticker.
The airbag trimmed with 'AIRBAG' embossing.
The complete steering wheel. I'm over the moon with it; my favourite steering wheel to date.
F430 Challenge CCM discs
I bought a set of F430 Challenge CCMs (398mm/350mm) from 360 owner Gary who also sold the Capristo system to me last summer. I will continue to work on the Speciale brake conversion in the background but for now I want the car back together and to Christian Lewis to finish the gearbox setup, so I have a couple of months contingency ahead of the summer to wrap up this phase of the project.
The rear discs are around 40% and the fronts 90%. I only need the fronts which I have stripped to recondition.
The Challenge bells do not fit road car hubs due to a different centre bore diameter, which is well known, but I am still interested in them because I discovered a full set is nearly 1/2kg lighter than even the lighter aluminium road car bells that were fitted to my car. The bells themselves are a completely machining and part of the weight saving comes from additional cooling pockets machined into the rear face.
There is also greater clearance between the hub mounting face and disc edge to allow cooling air to flow outwards and across the outside face of the disc via the machined pockets. This was a feature Ferrari carried over into later CCMs.
Photo to show the rear of the CCM bell with its cooling pockets.
The Challenge hubs are centrelock with ten locating dowels on the same PCD as the five road car wheel bolts, so to mount the Challenge CCMs to the road car it is possible to use turned down countersunk cap screws in two of the holes to centralise them on the road car hub using the original disc securing bolt holes, but because the disc securing bolts on the road car were never designed to centre the disc - which they aren't on any car; it's the job of the hub boss - the threaded holes in the wheel hub are offset and thus do not fully centralise the disc. I tried this approach and found too much runout in the disc to be comfortable with, so I had aluminium spigot rings machined to tighter tolerances than the original road car discs to perfectly centralise the discs.
Scuderia front uprights
Time to fit the Scuderia uprights to suit the 398mm braking system. The caliper lugs are 9mm longer to suit the 18mm larger discs. The Challenge just used studs with a spacer boss which is fine on a race car, but on a road car it can lead to additional vibration under braking. It's not a massive consideration of mine for this car given how focused it is but given there was a better option available I took it.
The hub mounting face had the same offset as the F430 but I did not check if there were other dimensional differences.
I'm happy with the condition of my suspension but the low deflection 'flambloc' joints are showing signs of corrosion and degradation of the rubber so I am planning a replacement solution for next winter.
Despite being very low mileage the Scuderia hub bosses were a bit rusty. Dad kindly prepared them and masked off the central nut then I sprayed them in silver zinc.
Scuderia front caliper rebuild
Dad also kindly stripped the red 398mm front calipers back to the original anodising, then I stripped off all removable parts.
I bought new bleed nipples, seals, decals etc. I decided a 2009> L320 Range Rover Sport pad fitting kit would work – and it does. I had a set of Hill Engineering seals in stock already but when stripping down the caliper I found the fluid and dual lip internal type dust seals were pretty standard and readily available elsewhere for considerably less. The pistons cleaned up to live another day; I didn't want stainless pistons because of the weight penalty.
Calipers painted. To prevent corrosion I've packed the seal lands with red rubber grease which is a trick that works well on motorbikes with a similar seal arrangement. It is worth pointing out that this type of caliper is a high performance type with internal dust seals for high heat resistance, and is not maintenance free even with stainless pistons. Internal dust seal calipers should be stripped and inspected every few years to keep an eye on bore condition. Incidentally, Ferrari fitted boot type seals to the Speciale and La Ferrari calipers - I can only imagine because the caliper was destined for the road 488 - and whilst that type works well on a moderately driven road car, they overheat and break down on track.
Hubs in place and calipers temporarily bolted up.
I now have a set of fluid and boot type dust seals for the Speciale calipers which I will refurbish in due course.
Misc
I've purchased some good suspension parts from a race team including the derlin inserts which are fitted in lieu rubber on the road car. I'm going to use these parts to develop a replacement set of flamblocs for my car.
I had a void in my dashboard where the glovebox open switch one was so rather than a blank I decided to fit something that is always used on our road trips: a USB charging point, only this one incorporates a voltage display - something really useful on these cars given how sensitive the electronics are to supply voltage.
I decided to cut a reveal in the R/H rear wheel arch liner to allow the F1 reservoir drain to route to ground. This will prevent the diffuser and engine under tray being filled with oil in the event of an F1 issue. I bunged the end with a piece of foam to prevent dirt ingress.
HEL brake lines fitted.
My car has an auxiliary front fuse panel which Ferrari strategically located directly above the battery terminals. At best the lack of clearance between it and the terminals slightly hampers battery removal, and at worst it can allow a short between the negative terminal and earth which bypasses the battery master switch. To prevent this I've trimmed the battery terminals flush to increase clearance by 5mm, thus solving the issue.
Scuderia parking light switch fitted. This is a latch type switch rather than momentary.
I picked up a nice set of used Andrew/Exoticare Alcantara mats. They are lovely mats but have a red cavallino which is a bit much given I have yellow cavallino's on my seats, so I've purchased some dye stripper with the intent of re-dying yellow, but I may go black if the interior starts to look too 'busy'.


Thanks all!
I use two pack products to paint and prime with acid etch.
Ferrari don't supply the pad fitting kit so you are left with spending £1k+ on a set of pads if something happens to the pins or anti-rattle clip. I just wanted to replace the pins as a matter of course so I started looking at commercially available Brembo pad fitting kits. It soon became obvious that Brembo standardise a lot of their pad fitting components despite offering hundreds of caliper types, so based on photos alone I identified the RR Sport kit would work. It was only £12.95 from eBay, delivered!
I only noticed Ti bleed nipples after I'd ordered the stainless ones. I may yet cave in!
GreatGranny said:
...When is it due to go in for the gearbox?
I will book it in today or tomorrow so hopefully within the next couple of weeks.Jakg said:
Could you put up some more information on the caliper refurb please, and the painting approach you've gone for?
How'd you identify you could use the range rover fitting kit?
Not gone for titanium bleed nipples?
I use compressed air and an adapter hose to remove the pistons and if some are sticky in their bore I use the full 10 bar my compressor can supply. I stick a piece of wood in place of the disc to prevent them flying out but make sure to wear a full face shield! How'd you identify you could use the range rover fitting kit?
Not gone for titanium bleed nipples?
I use two pack products to paint and prime with acid etch.
Ferrari don't supply the pad fitting kit so you are left with spending £1k+ on a set of pads if something happens to the pins or anti-rattle clip. I just wanted to replace the pins as a matter of course so I started looking at commercially available Brembo pad fitting kits. It soon became obvious that Brembo standardise a lot of their pad fitting components despite offering hundreds of caliper types, so based on photos alone I identified the RR Sport kit would work. It was only £12.95 from eBay, delivered!
I only noticed Ti bleed nipples after I'd ordered the stainless ones. I may yet cave in!
leglessAlex said:
Fascinating stuff as always Mark.
I imagine a huge amount of satisfaction will be had purely from knowing that this car is very much exactly as you'd like it and with no corners cut, and that's putting the driving experience aside which will presumably be epic.
Thanks. Yes - that's exactly it. I still get a lot of pleasure from the Golf 3 years and 30k miles after performing all of the upgrades, from both the customisation and performance improvement aspects.I imagine a huge amount of satisfaction will be had purely from knowing that this car is very much exactly as you'd like it and with no corners cut, and that's putting the driving experience aside which will presumably be epic.
I was just reading a thread in the Supercars regarding the (very?) high cost of options in the Mclaren range.
Given your skill set, would you be able to offer performance car owners options upgrades/installations at a fraction of the manufacturer's prices?
In addition, would you be able to offer owners upgrades which aren't on the list?
Maybe there's a market for this - from owners who have bought cars close to base spec because that's what they've worked out they can afford to buy and run.
Perhaps over their intended ownership period they can afford to put more into the spec on an ongoing basis.
And maybe owners of older supercars would like some of today's tech options.
Unfortunately I've got neither a base spec Mclaren or an old supercar for you to upgrade, so can't help with your market research...
Isn't it a bit iffy to allow the F1 drain to drain out of the car? I can understand why you wouldn't want the undertrays filling with oil if the F1 system had an issue, but surely that type of setup is there to catch it before it hits the road, possibly leading to an accident?
I may have the wrong end of the stick here, but to me it looks like circumventing a safety feature?
I may have the wrong end of the stick here, but to me it looks like circumventing a safety feature?
ReaderScars said:
I was just reading a thread in the Supercars regarding the (very?) high cost of options in the Mclaren range.
Given your skill set, would you be able to offer performance car owners options upgrades/installations at a fraction of the manufacturer's prices?
In addition, would you be able to offer owners upgrades which aren't on the list?
Maybe there's a market for this - from owners who have bought cars close to base spec because that's what they've worked out they can afford to buy and run.
Perhaps over their intended ownership period they can afford to put more into the spec on an ongoing basis.
And maybe owners of older supercars would like some of today's tech options.
Unfortunately I've got neither a base spec Mclaren or an old supercar for you to upgrade, so can't help with your market research...
Thank you. There are some serious margins in supercar options. Yes, I certainly could and I have contacts now who provide quality manufacturing services.Given your skill set, would you be able to offer performance car owners options upgrades/installations at a fraction of the manufacturer's prices?
In addition, would you be able to offer owners upgrades which aren't on the list?
Maybe there's a market for this - from owners who have bought cars close to base spec because that's what they've worked out they can afford to buy and run.
Perhaps over their intended ownership period they can afford to put more into the spec on an ongoing basis.
And maybe owners of older supercars would like some of today's tech options.
Unfortunately I've got neither a base spec Mclaren or an old supercar for you to upgrade, so can't help with your market research...
Davie said:
Outstanding work, attention to detail is incredible.
Apologies in advance but the USB port with the display, been looking for such a thing for age and no end of Googling has revealed that sort of design.
Have you got a link?
Thanks
Thank you. Sure: http://www.ebay.co.uk/itm/222243379534?_trksid=p20...Apologies in advance but the USB port with the display, been looking for such a thing for age and no end of Googling has revealed that sort of design.
Have you got a link?
Thanks
Mr Happy said:
Isn't it a bit iffy to allow the F1 drain to drain out of the car? I can understand why you wouldn't want the undertrays filling with oil if the F1 system had an issue, but surely that type of setup is there to catch it before it hits the road, possibly leading to an accident?
I may have the wrong end of the stick here, but to me it looks like circumventing a safety feature?
Ahh, it ends up on the road anyway, only first it runs down the diffuser before existing to the ground via the gap between diffuser and undertray. I first noticed the F1 issue last year by the pool of oil on the workshop floor.I may have the wrong end of the stick here, but to me it looks like circumventing a safety feature?
Steering wheel paddles completed
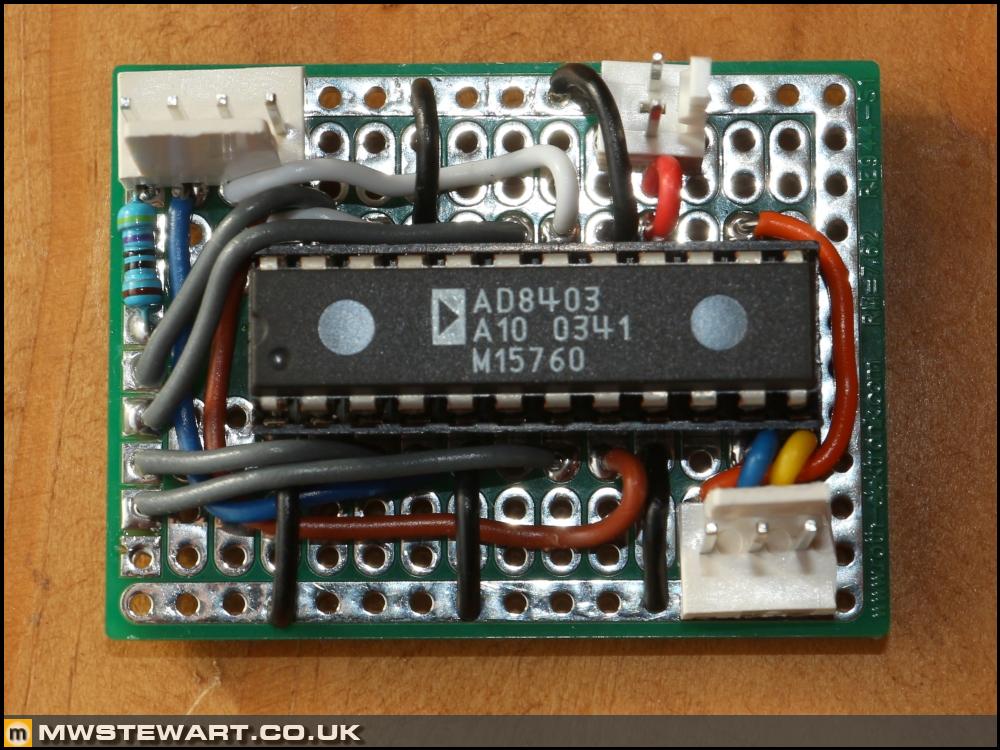
I was happy with the Arduino code and tested as much as I could using a digital simulation so the next step was to build the actuation element of the circuit: this is the part that varies the resistance of the circuit based on paddle position, and it is controlled by my Arduino code. The first prototype is complete and tested and shown below.
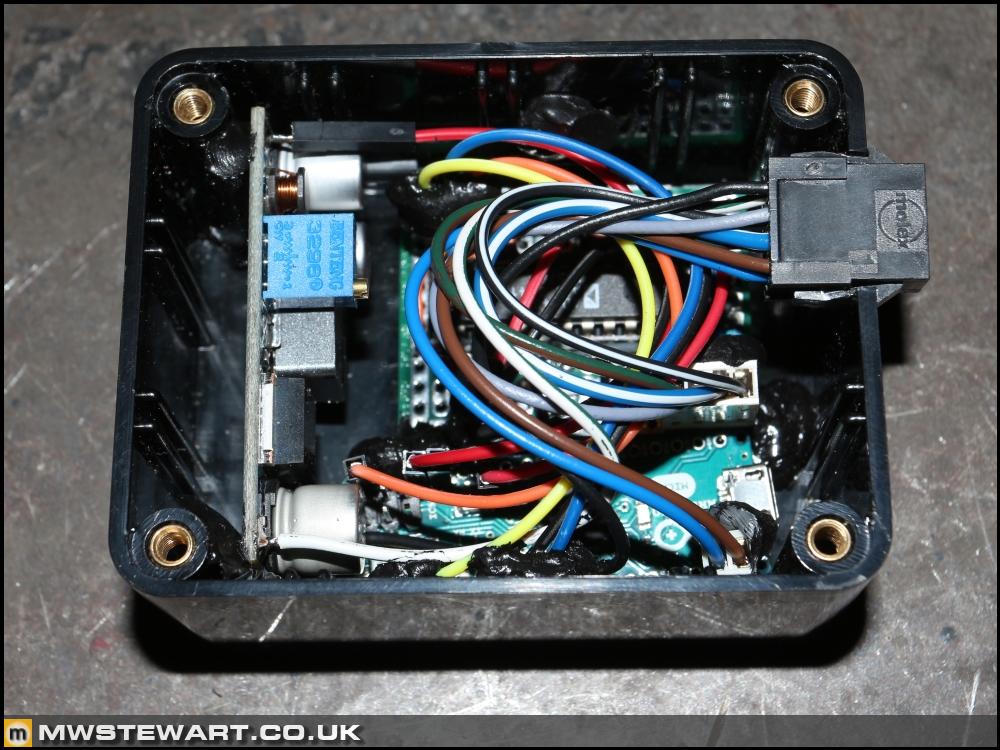
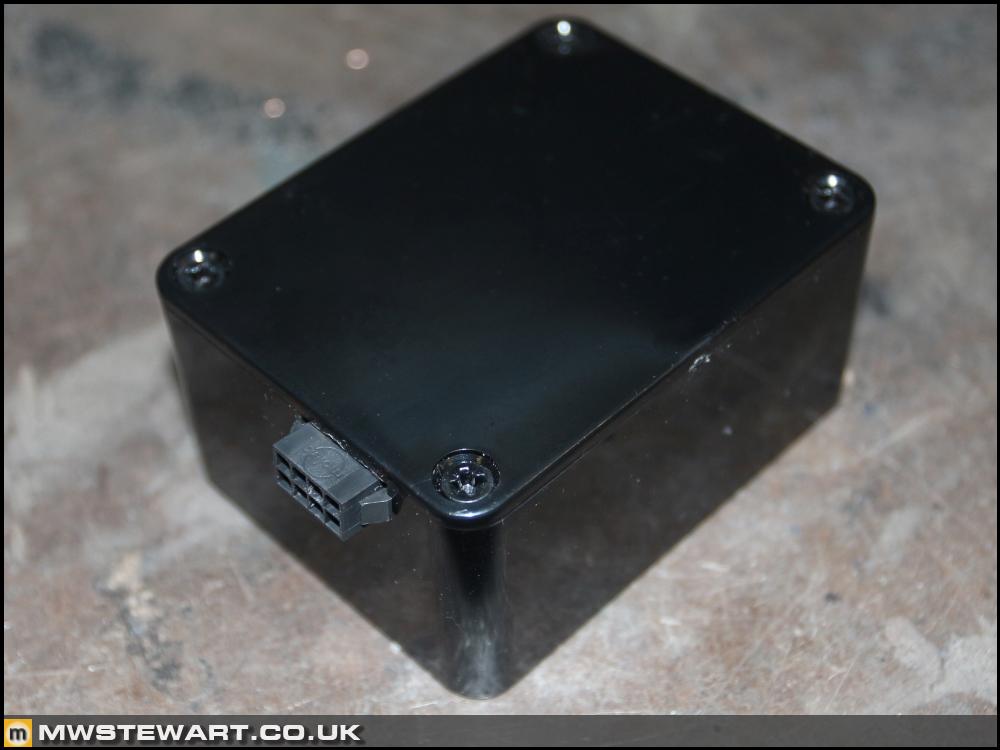
I've housed the three elements; Arduino, power regulation & protection, and the actuation circuit within a plastic box. I've used a panel mount Molex connector to join to the car wiring loom. Internally I've used locking DuPont connectors, but for added reliability and vibration resistance I've sealed the locking tabs with butyl. I have matched the OEM colours where I'm interfacing with existing wiring.
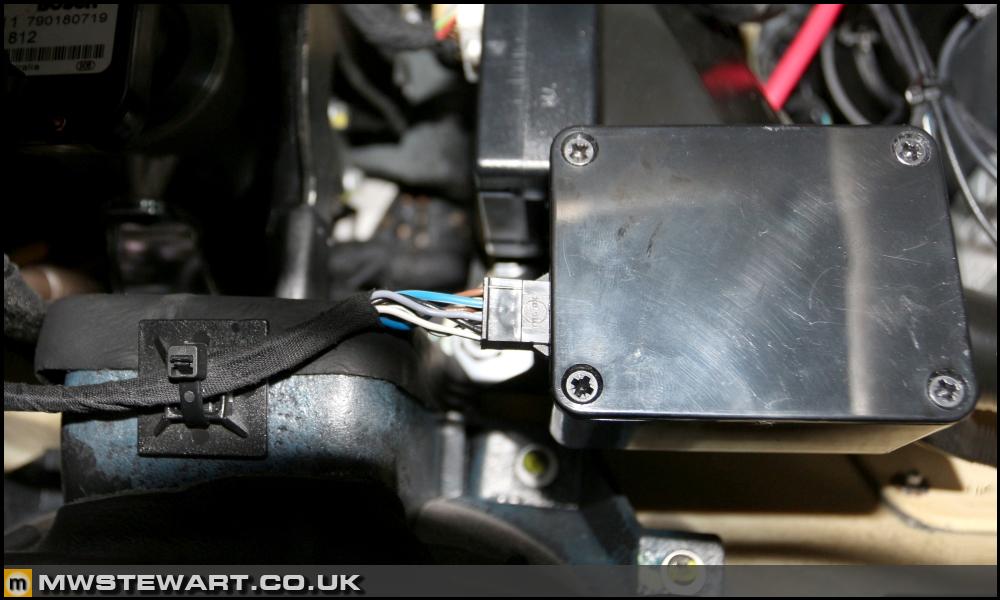
I found a nice space behind the steering module next to the OE timer module. I've secured my module with Velcro.
Next I turned to the Maserati clock spring. To recap, it is a dual stage airbag version of the single stage airbag F430 clock spring, and I'm re-purposing one of the airbag stages for my paddle wires. I found I had to attach the F430 plugs because the Maserati uses a different type with inbuilt wire wound resistor.
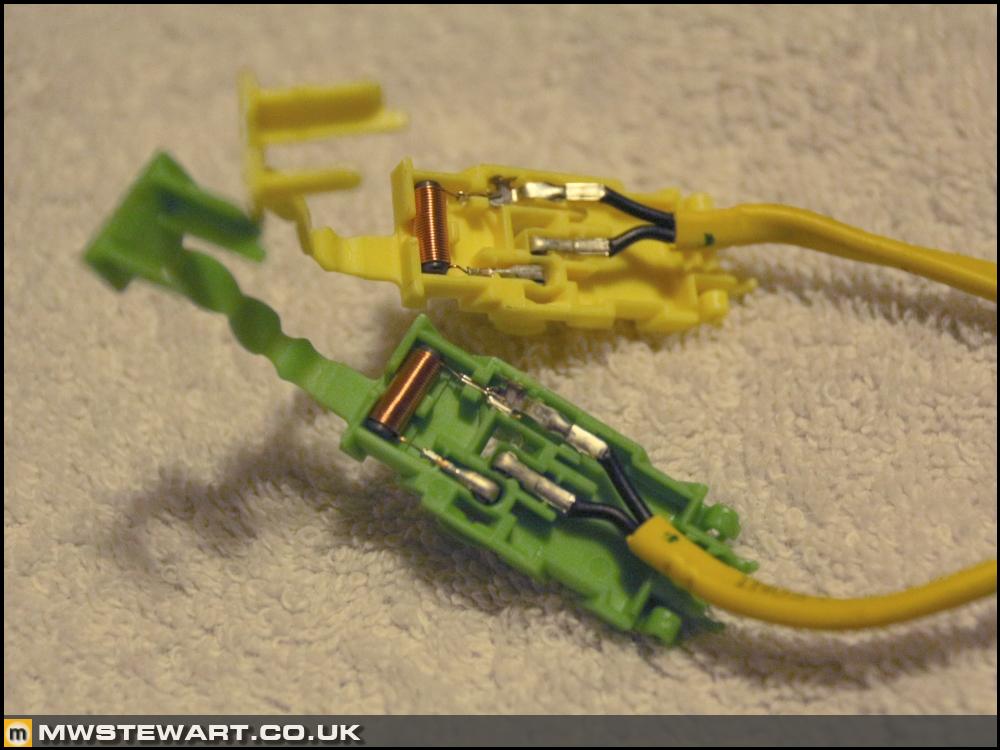
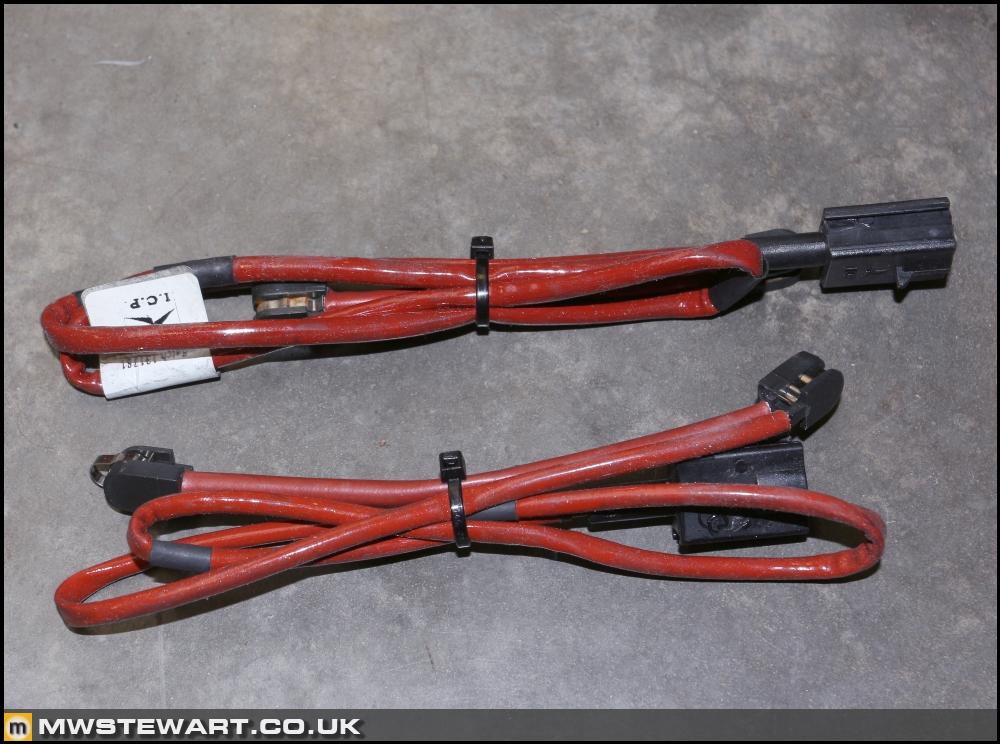
Here's my clock spring mounted with the F430 airbag connector and two additional paddle connectors that I wired in.
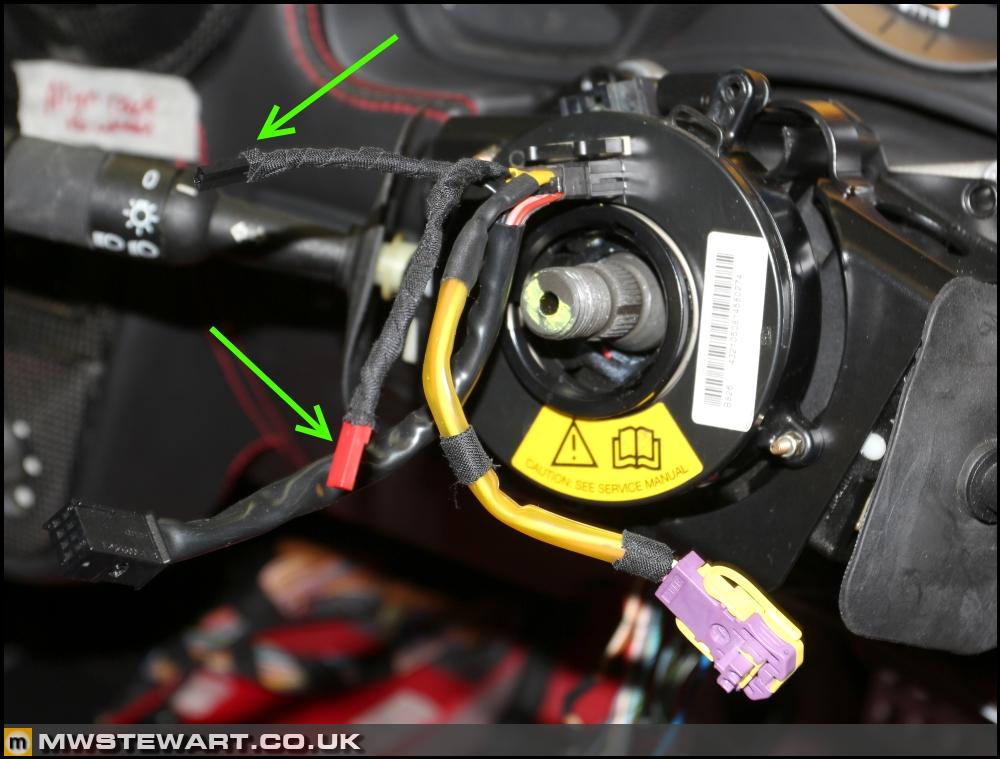
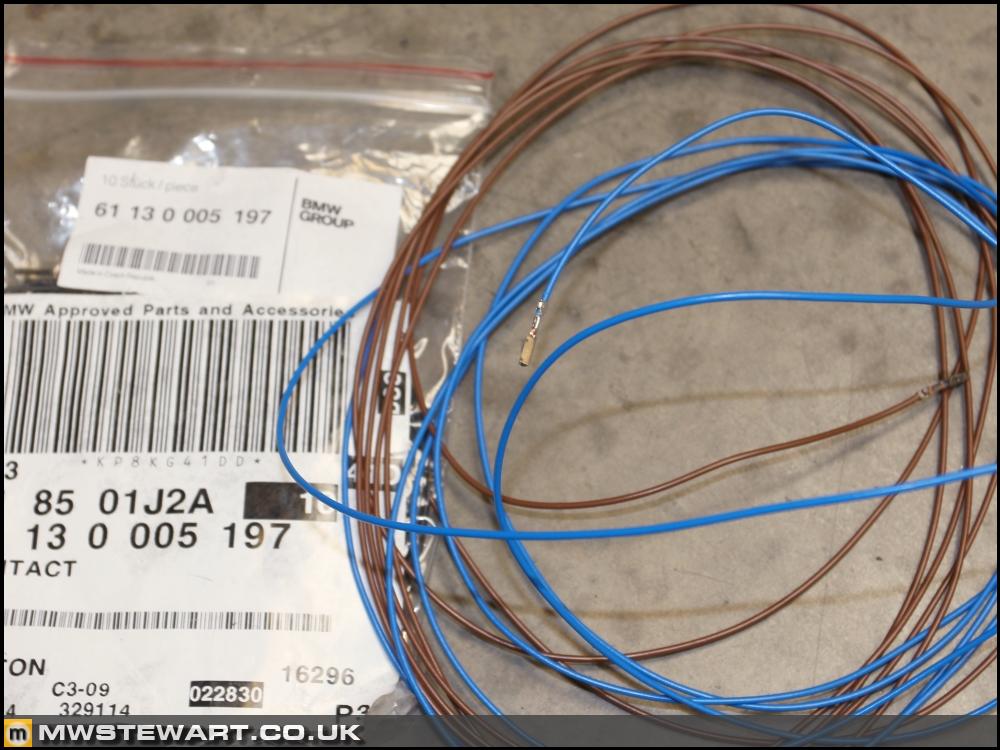
On the column side of the steering wheel I had to add some pins to the clock spring connector. They are fairly generic Tyco pins of which I had some in stock from a BMW project. I added the pins and ran a power and earth (same earth as the paddles) to my new module behind the dashboard. I also extended a second set of wires from the existing F1 paddle plug to my module rather than cutting off the OE plug and relocating the wires; one of my design requirements was to ensure the entire conversion was reversible if required - if my module is disconnected the OE paddles will still plug in and function without any further changes.
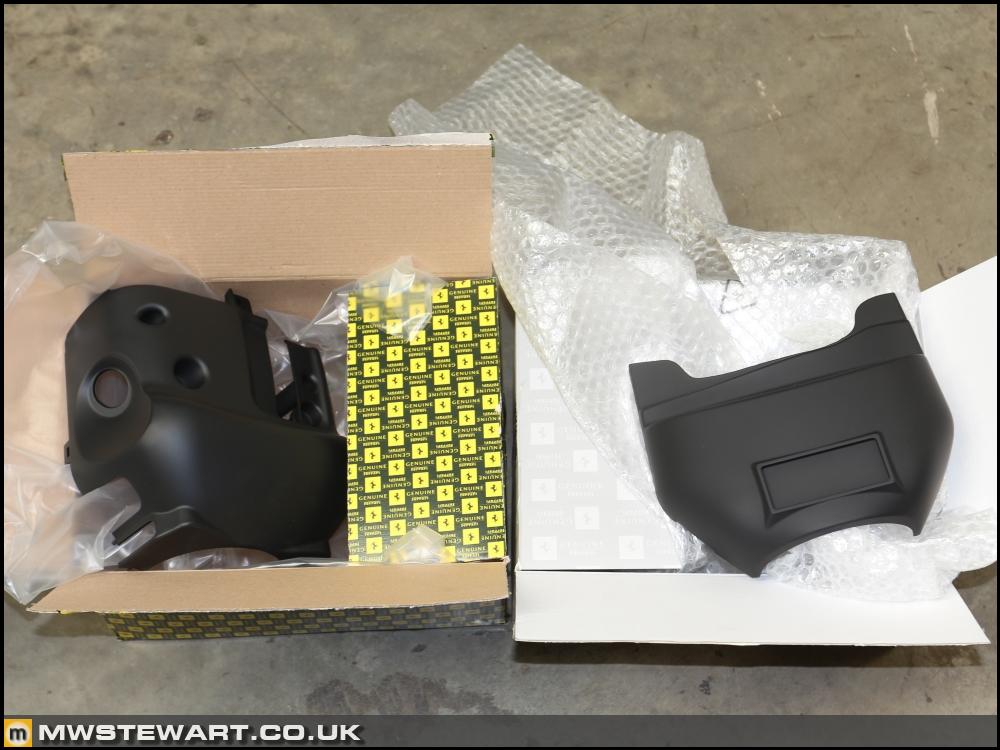
Manual gearbox steering column trims - no cut outs for the OE column mount paddles.
Wheel and airbag mounted.

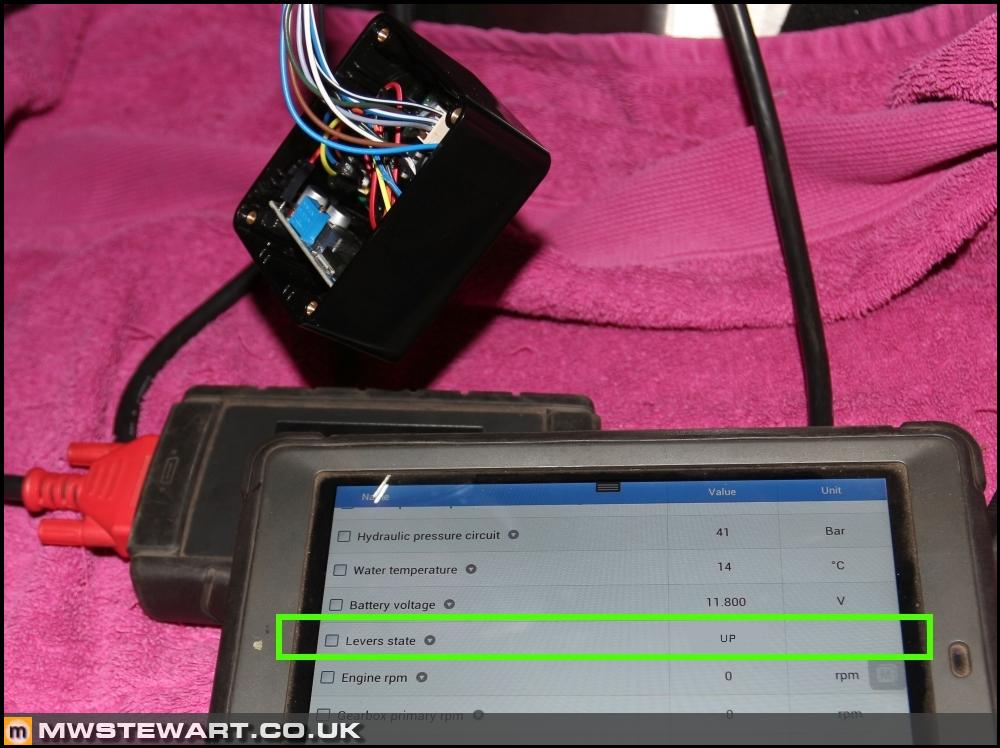
Of course, the proof is in the pudding. I used the Autel to first check the OE paddles were working and the Autel was recording their status - it was. I next checked what errors to expect if the OE paddle assembly was disconnected: the TCU reports error for up, down, and neutral (nothing pressed). I then cleared codes and plugged in my module: it worked first time. I am quite proud of that because despite the conversion appearing to be a simple change, in the end it actually wasn't.
I'll trial the system over the coming months and make any programming or paddle position adjustments if necessary.
Carbon mirrors
I've been waiting a while now for a good set of OE mirrors to come up for sale and now I have some.
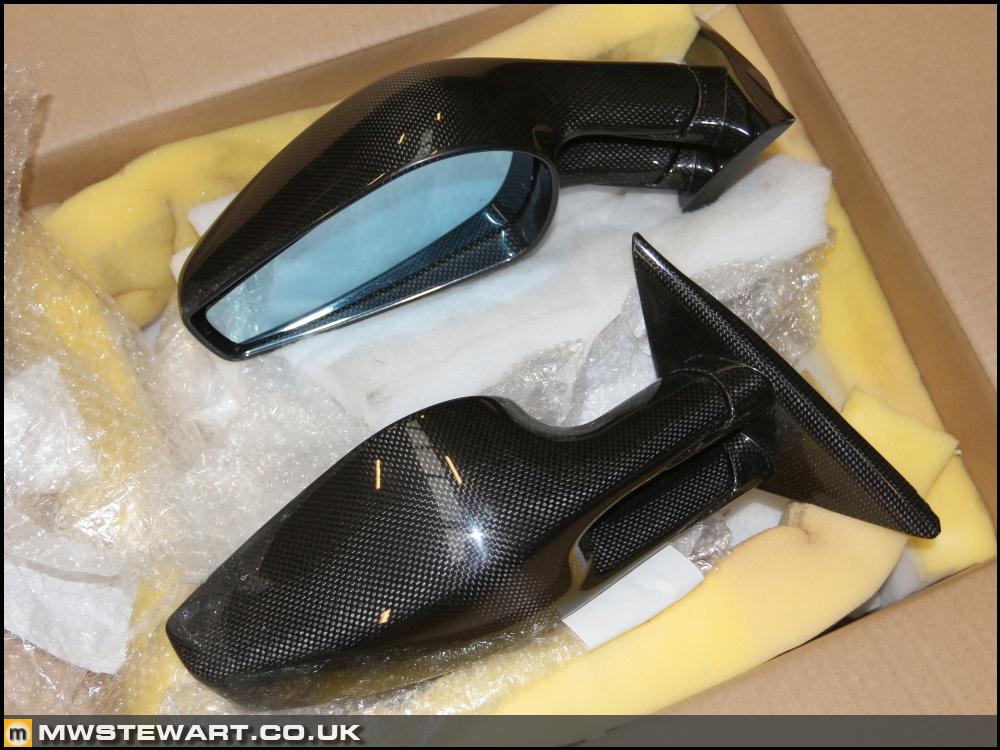
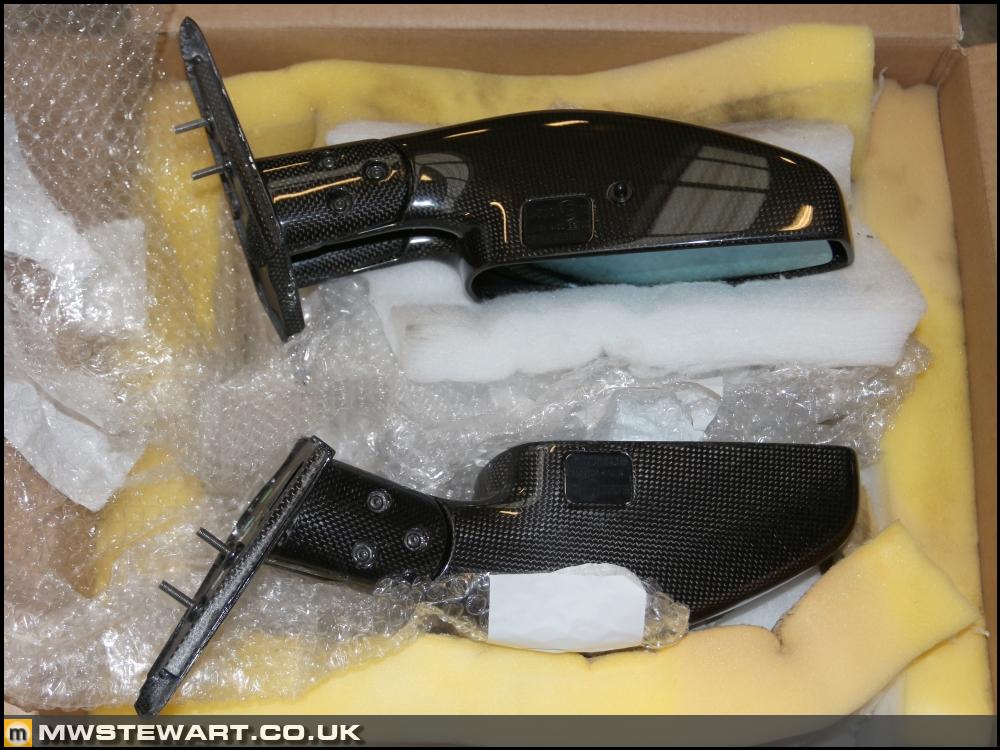
A RHD set is next to impossible to find so I settled for LHD. On the F430 it is the mirror base which determines this - the mirror cases themselves are identical between LHD/RHD.
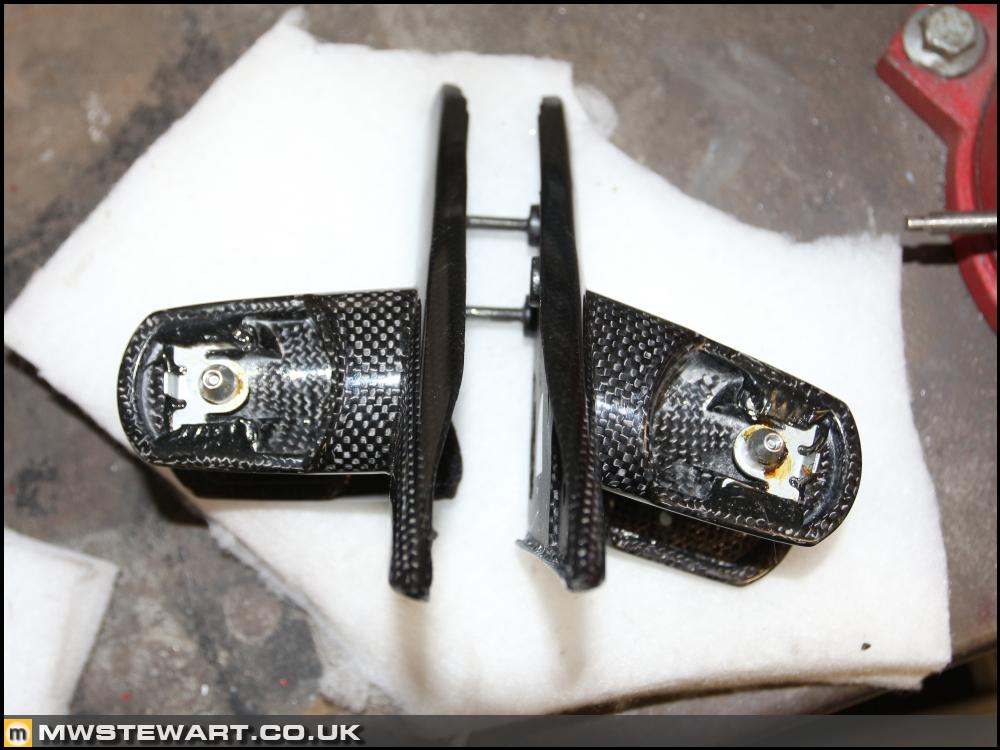
For now I have reassembled my mirrors using the carbon casings, and I'm going to send off the carbon bases to be modified for RHD. Total weight saved by the mirrors is 0.679kg.
Front brakes
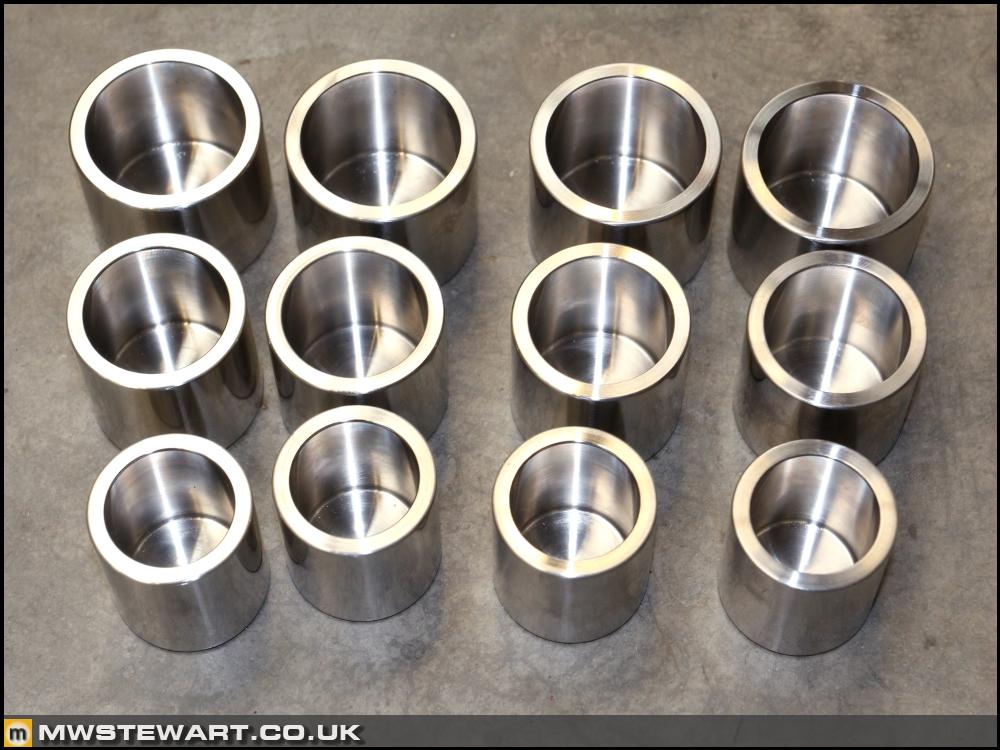
In the end I decided I would fit stainless pistons to the Scuderia calipers, because they are temporary until I finish the Speciale conversion and new stainless pistons would make them a more attractive proposition for others at sale time. I commissioned a set of new pistons to my spec including some spares, for £100. The complete set is 351 grammes heavier than the original pistons, but they are lighter than other stainless pistons available commercially.
I've used 458 pad wear sensors because they monitor both pads in each caliper.
Complete
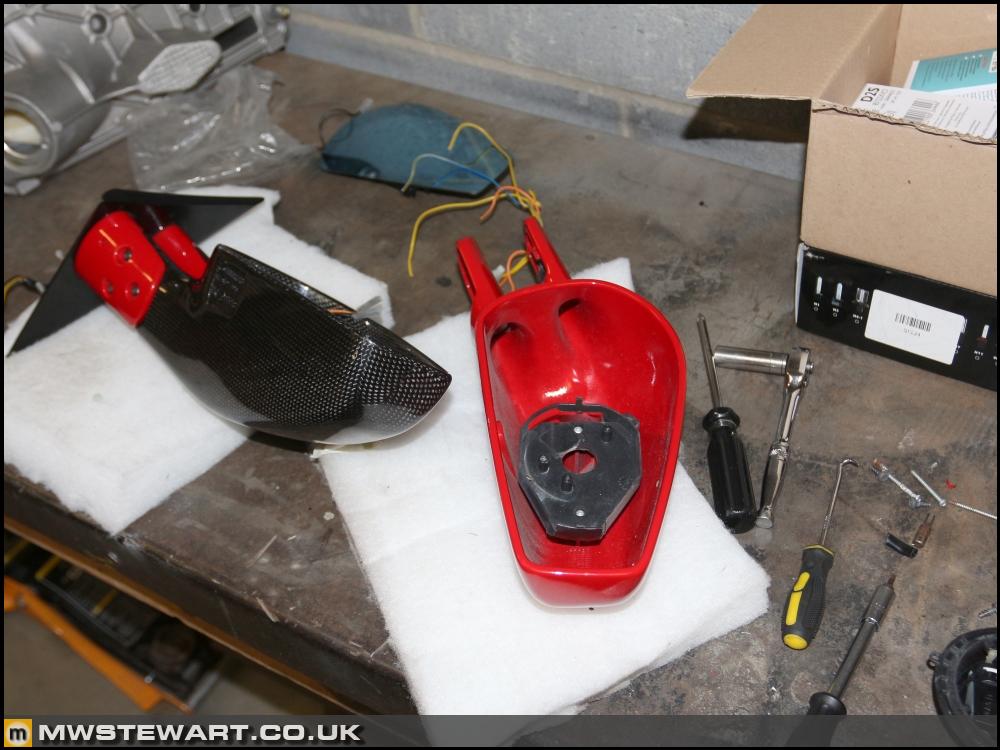
I took a shot of the Scud Ing Swiss Ultimate DRLs in the new carbon headlight housings. Very pleased with both!

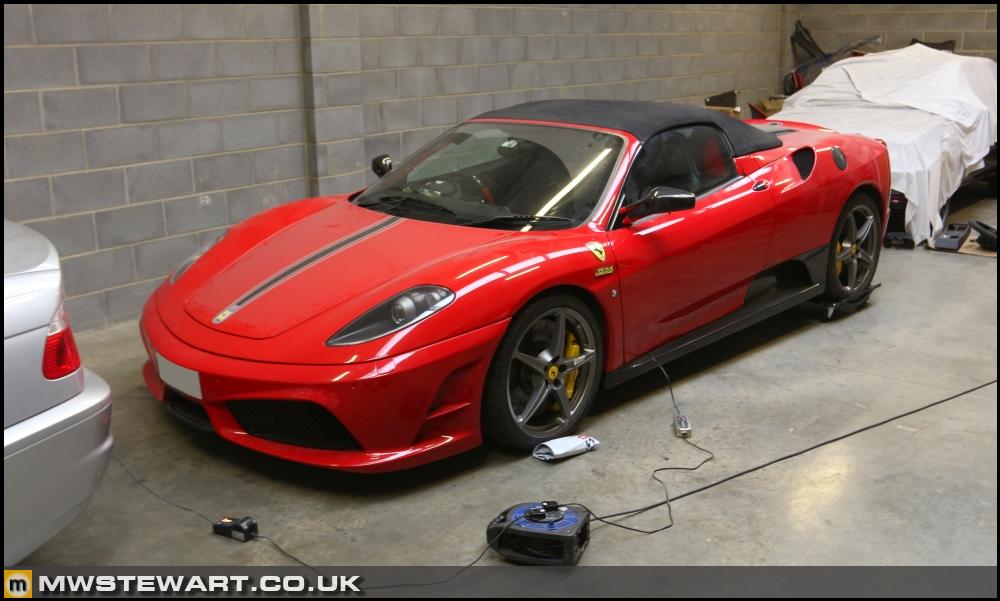
The car is not totally complete because I'm still waiting for some of the interior parts to be re-trimmed, but I'm at a stage where it can go back to Christian Lewis for another shot at the gearbox setup.
I was happy with the Arduino code and tested as much as I could using a digital simulation so the next step was to build the actuation element of the circuit: this is the part that varies the resistance of the circuit based on paddle position, and it is controlled by my Arduino code. The first prototype is complete and tested and shown below.
I've housed the three elements; Arduino, power regulation & protection, and the actuation circuit within a plastic box. I've used a panel mount Molex connector to join to the car wiring loom. Internally I've used locking DuPont connectors, but for added reliability and vibration resistance I've sealed the locking tabs with butyl. I have matched the OEM colours where I'm interfacing with existing wiring.
I found a nice space behind the steering module next to the OE timer module. I've secured my module with Velcro.
Next I turned to the Maserati clock spring. To recap, it is a dual stage airbag version of the single stage airbag F430 clock spring, and I'm re-purposing one of the airbag stages for my paddle wires. I found I had to attach the F430 plugs because the Maserati uses a different type with inbuilt wire wound resistor.
Here's my clock spring mounted with the F430 airbag connector and two additional paddle connectors that I wired in.
On the column side of the steering wheel I had to add some pins to the clock spring connector. They are fairly generic Tyco pins of which I had some in stock from a BMW project. I added the pins and ran a power and earth (same earth as the paddles) to my new module behind the dashboard. I also extended a second set of wires from the existing F1 paddle plug to my module rather than cutting off the OE plug and relocating the wires; one of my design requirements was to ensure the entire conversion was reversible if required - if my module is disconnected the OE paddles will still plug in and function without any further changes.
Manual gearbox steering column trims - no cut outs for the OE column mount paddles.
Wheel and airbag mounted.
Of course, the proof is in the pudding. I used the Autel to first check the OE paddles were working and the Autel was recording their status - it was. I next checked what errors to expect if the OE paddle assembly was disconnected: the TCU reports error for up, down, and neutral (nothing pressed). I then cleared codes and plugged in my module: it worked first time. I am quite proud of that because despite the conversion appearing to be a simple change, in the end it actually wasn't.
I'll trial the system over the coming months and make any programming or paddle position adjustments if necessary.
Carbon mirrors
I've been waiting a while now for a good set of OE mirrors to come up for sale and now I have some.
A RHD set is next to impossible to find so I settled for LHD. On the F430 it is the mirror base which determines this - the mirror cases themselves are identical between LHD/RHD.
For now I have reassembled my mirrors using the carbon casings, and I'm going to send off the carbon bases to be modified for RHD. Total weight saved by the mirrors is 0.679kg.
Front brakes
In the end I decided I would fit stainless pistons to the Scuderia calipers, because they are temporary until I finish the Speciale conversion and new stainless pistons would make them a more attractive proposition for others at sale time. I commissioned a set of new pistons to my spec including some spares, for £100. The complete set is 351 grammes heavier than the original pistons, but they are lighter than other stainless pistons available commercially.
I've used 458 pad wear sensors because they monitor both pads in each caliper.
Complete
I took a shot of the Scud Ing Swiss Ultimate DRLs in the new carbon headlight housings. Very pleased with both!
The car is not totally complete because I'm still waiting for some of the interior parts to be re-trimmed, but I'm at a stage where it can go back to Christian Lewis for another shot at the gearbox setup.
Gassing Station | Readers' Cars | Top of Page | What's New | My Stuff