Ferrari F430 Spider
Discussion


clubracing said:
Fascinating thread and great workmanship.
What is the reasoning for fitting an X-pipe in the exhaust? It was my understanding that a flat-plane crank engine didn't need one, as it doesn't have the irregular firing order of a 'traditional' V8.
Thank you. The X pipe makes it sound like: https://youtu.be/sHq9Xj-b1Q0What is the reasoning for fitting an X-pipe in the exhaust? It was my understanding that a flat-plane crank engine didn't need one, as it doesn't have the irregular firing order of a 'traditional' V8.
Weight saving update. Amongst other things I've added in the change from M10 to M8 bolts when fitting the Scuderia seats.
Sprung weight saved: 48.38 kg
Unsprung weight saved: 23.29 kg
Total weight saved: 71.67 kg
| Original Part | Fitted Quantity | Original Part (kg) | Replacement Part (kg) | Sprung Saving (kg) | Unsprung Saving (kg) | Replacement Part |
|---|---|---|---|---|---|---|
| Brake disc, front - iron | 2 | 8.3 | 6.77 | - | 3.06 | CCM - 380mm (alloy bell) |
| Brake disc, rear - iron | 2 | 8.3 | 4.61 | - | 7.38 | CCM (alloy bell) |
| Brake caliper & pads, front - iron | 2 | 4.9 | 5.94 | - | -2.08 | CCM - 380mm |
| Brake caliper & pads, rear - iron | 2 | 4.9 | 4.72 | - | 0.36 | CCM |
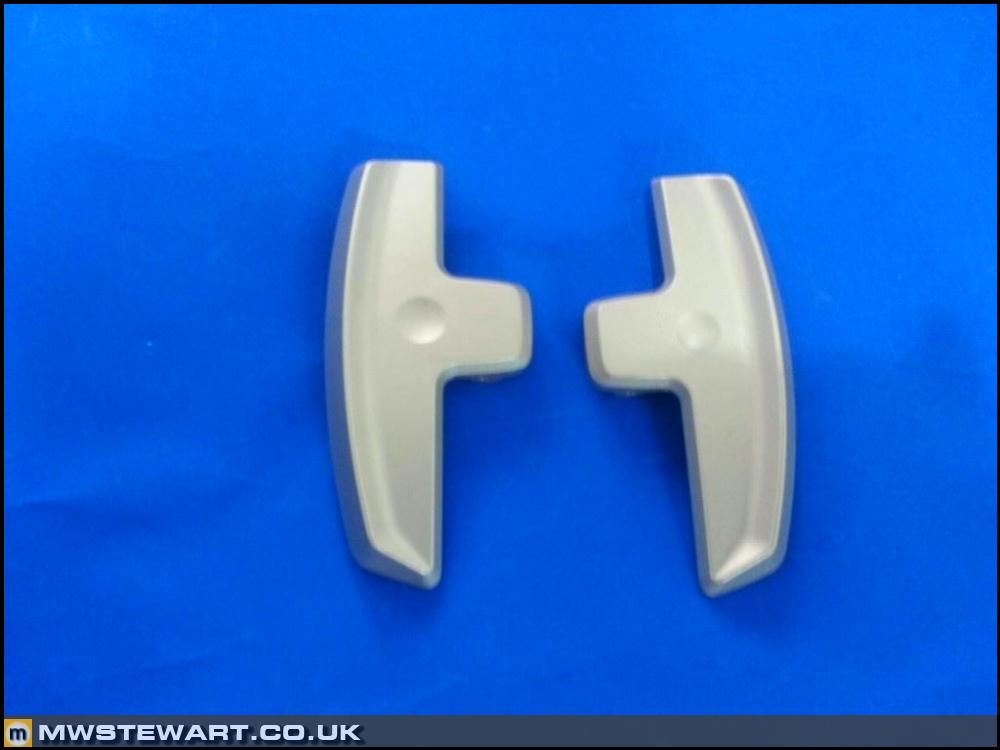
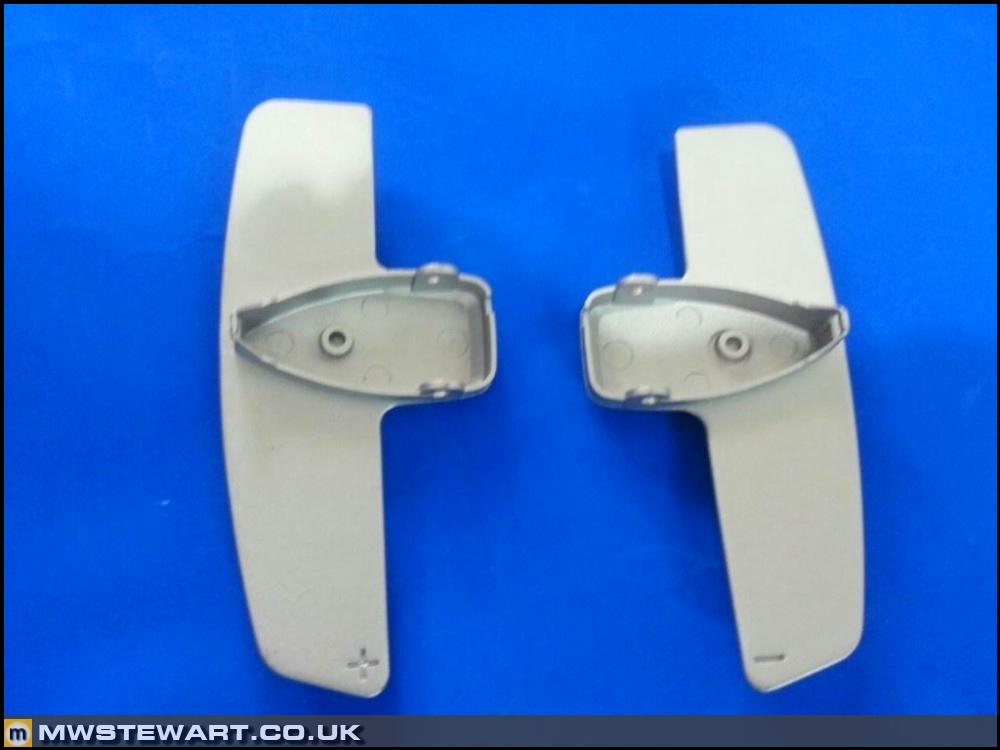
| Door handles, exterior | 2 | 0.065 | - | 0.02 | 0.09 | Carbon |
| PAS reservoir cap | 1 | 0 | 0.065 | -0.065 | - | Alloy cover |
| Fuel Flap | 1 | 0.143 | 0.128 | 0.015 | - | Carbon |
| Seats - standard, electric, heated | 2 | 28.2 | 17.9 | 20.6 | - | 16M/Scuderia carbon |
| Seats - mounting bolts and washers - M10 | 8 | 0.028 | 0.017 | 0.088 | - | 16M/Scuderia - M8 |
| Strut & spring, front | 2 | 4.74 | 3.8 | - | 1.88 | 16M/Scuderia Mk2 |
| Strut & spring, rear | 2 | 5.37 | 4.59 | - | 1.56 | 16M/Scuderia Mk2 |
| Anti roll bar, front (19mm) | 1 | 3.04 | 2.73 | 0.21 | 0.1 | 16M/Scuderia |
| Side skirts - standard | 2 | 4.62 | 2.9 | 3.44 | - | 16/Scuderia carbon |
| Kick plates - standard | 2 | 0.841 | 0.163 | 1.356 | - | 16M/Scuderia (carbon) |
| Wheels, front - standard | 2 | 12.9 | 10.5 | - | 4.8 | 16M - optional 5 spoke |
| Tyres, 225/35/19 Pirelli P Zero Rosso (new) | 2 | 10.7 | 10.23 | - | 0.94 | 235/35/19 MPSS (new) |
| Wheels, rear - standard | 2 | 13.7 | 12.3 | - | 2.8 | 16M - optional 5 spoke |
| Tyres, 285/35/19 Pirelli P Zero Rosso (new) | 2 | 13.61 | 13.92 | - | -0.62 | 285/35/19 MPSS (new) |
| Wheel bolts - standard | 20 | 0.128 | 0.065 | - | 1.26 | Titanium |
| Engine lid grilles - standard | 2 | 0.677 | 0.219 | 0.916 | - | 16M (mesh) |
| Engine lid grille brackets | 2 | 0.354 | 0.216 | 0.276 | - | Modified to 16M spec |
| Engine lid grille screws - M6x20 | 14 | 0.007 | 0.002 | 0.07 | - | M5x8 |
| 16M badges, side | 2 | 0 | 0.073 | -0.146 | - | - |
| Anti roll bar, rear - 20mm | 1 | 3.008 | 1.839 | 0.858 | 0.311 | 16M specific (22mm hollow) |
| Air inlet ducts/resonators - Mk2 | 2 | 1.131 | 1.225 | -0.188 | - | Mk1 (single piece) |
| Plenum chamber | 1 | 5.063 | 3.19 | 1.873 | - | Challenge/16M/Scuderia (carbon) |
| Plenum chamber bolts | 1 | 0.176 | 0.1 | 0.076 | - | Titanium |
| Cross member exhaust modifications | 1 | 0 | 0.65 | -0.65 | - | Modified to 16M/Scuderia spec |
| Exhaust tailpipes | 2 | 6.5 | 0.343 | 12.314 | - | 16M/Scuderia - optional titanium |
| Bumper, rear - challenge grille, PDC | 1 | 13 | 9 | 4 | - | 16M/Scuderia - PDC added |
| Challenge grille air deflectors | 1 | 0.329 | 0 | 0.329 | - | Not fitted to 16M/Scuderia |
| Coil/plug water guards | 2 | 0 | 0.276 | -0.552 | - | Fitted to some 08> Spiders |
| Luggage compartment trim, base - Scuderia | 1 | 1.235 | 0.821 | 0.414 | - | MY08 carpet |
| Luggage compartment trim, bulkhead - Scuderia | 1 | 2.251 | 2.042 | 0.209 | - | MY08 carpet |
| Luggage compartment trim, LH - Scuderia | 1 | 0.855 | 0.572 | 0.283 | - | MY08 carpet |
| Luggage compartment trim, RH - Scuderia | 1 | 1.041 | 0.702 | 0.339 | - | MY08 carpet |
| Luggage compartment trim, front - Scuderia | 1 | 0.156 | 0.127 | 0.029 | - | MY08 carpet |
| CD changer | 1 | 1.5 | 0 | 1.5 | - | Removed |
| Exhaust heat shields - rear wheelhouse | 2 | 0.401 | 0.151 | 0.499 | Bespoke carbon version |
Sprung weight saved: 48.38 kg
Unsprung weight saved: 23.29 kg
Total weight saved: 71.67 kg
mwstewart said:
Sprung weight saved: 48.38 kg
Unsprung weight saved: 23.29 kg
Total weight saved: 71.67 kg
Seriously impressive stuff.Unsprung weight saved: 23.29 kg
Total weight saved: 71.67 kg
Isn't the ratio regarded as 3:1? That's a seriously good saving.
Slightly disappointed you didn't identify rotational / static unsprung mass

Edited by Podie on Sunday 12th June 10:03
Podie said:
Seriously impressive stuff.
Isn't the ratio regarded as 3:1? That's a seriously good saving.
Slightly disappointed you didn't identify rotational / static unsprung mass
I should do really!Isn't the ratio regarded as 3:1? That's a seriously good saving.
Slightly disappointed you didn't identify rotational / static unsprung mass
Edited by Podie on Sunday 12th June 10:03
I will have the car corner weighted when done and see where it's at. Ferrari weights tend to be all over the shop so I don't rely on their published figures.
Vitorio said:
Impressive stuff, but i cant help but snigger at replacing the fuel flap with a carbon one for a whole 15 grams saved, makes me wonder if you weigh your clothes and pick out the lightest ones for a day out with the Fezza 
Lovely work though, if i jest, it is only out of jealousy
Ha! Yes, I realised at the time how it would come across. The fuel cap is a purely cosmetic change, but it would have been unscientific of me not to weigh it Lovely work though, if i jest, it is only out of jealousy

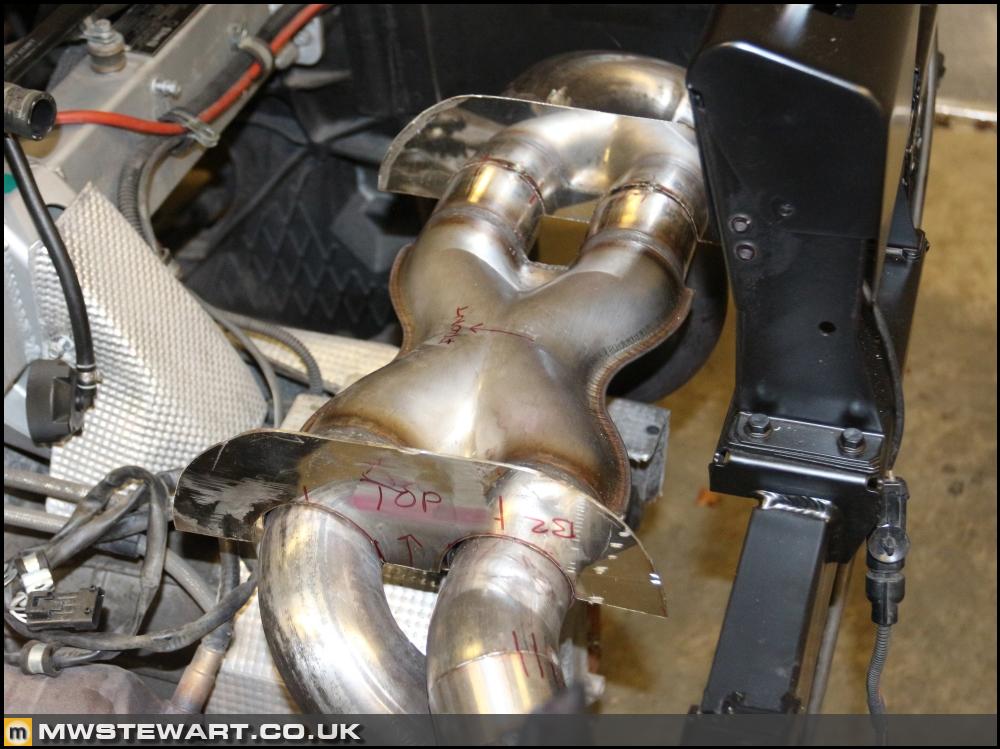
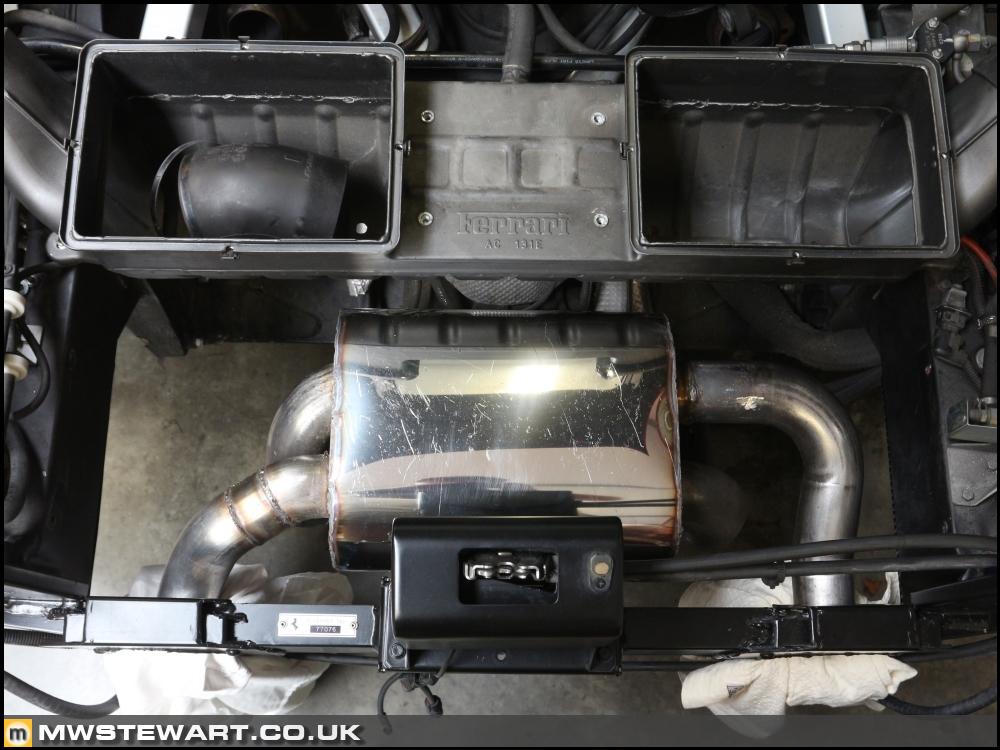
Exhaust cont.
I've finished fabrication on the silencer so it's just welding to go, but sod's law the valve on my pure argon cylinder has leaked and I've run out, so no TIG today, just some MIG tack welds to hold everything in the right position.
Tailpipe alignment is spot on. I'm happy.
I've already fabricated the silencer end plates, and the next step is to weld those on and pack with ceramic fibre, then weld on the cover.
Wheel mounted paddles
I've mentioned before that I don't get column mounted paddles.
1) From a usability perspective I find them suboptimal.
2) Paddles are the interface to the gear system and like a manual gear linkage, a good paddle system makes all the difference. Column mounted paddles mean the fulcrum point of the switch is very far away from the fingertips and this effectively desensitises the micro switches. It's like a long-throw manual gear linkage. I don't like it one bit.
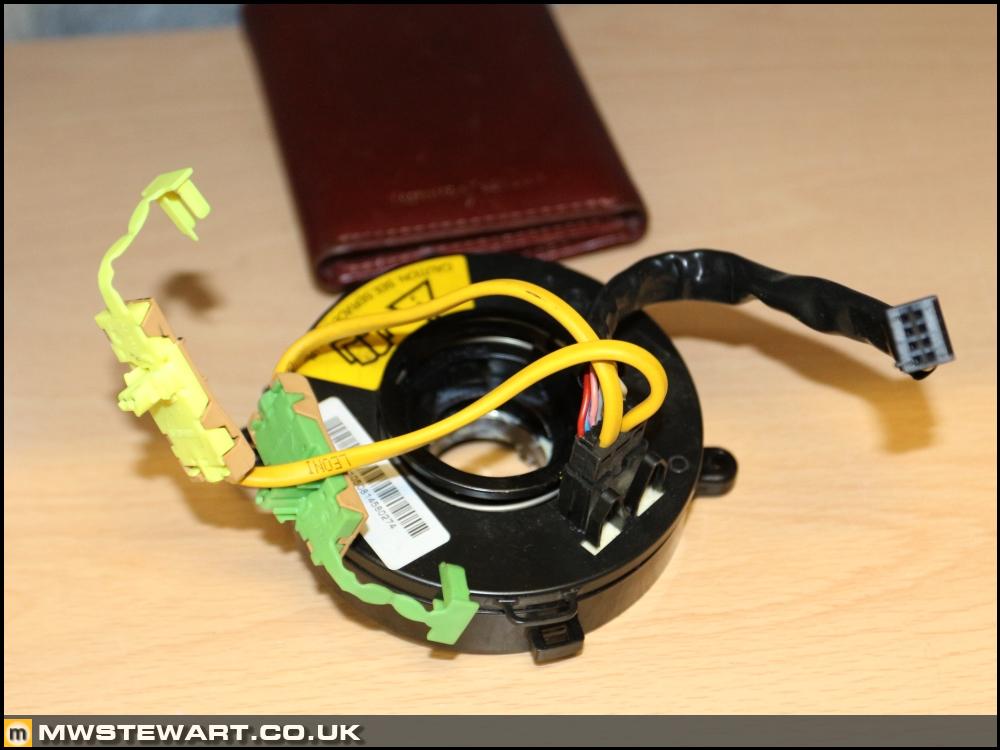
The first challenge on the F430 is getting three wires into the steering column area. I checked out the wiring diagram and for the standard F430 there are actually three spare/unused wires on the wheel node (connector ref D072) meaning three unused clock spring contacts that could be purposed for the F1 paddle switches. Unfortunately the Scuderia makes use of one of those spare terminals for the traction control off wire (CT off setting on the Manettino), so given I am converting to Scuderia electronics I needed to find another way.
I started looking at clock springs from other Ferrari and Maserati models, and I soon realised some of the Maserati’s had the same clock spring as the F430 but were fitted with a dual stage airbag. This is ideal because I can repurpose those two wires for the F1 system (the yellow sheath will be removed).
Here's the Maserati clock spring I purchased.
I've also ordered some paddles: late Mercedes non-AMG. The AMG version has larger paddles but also a larger base which looks a bit ungainly.
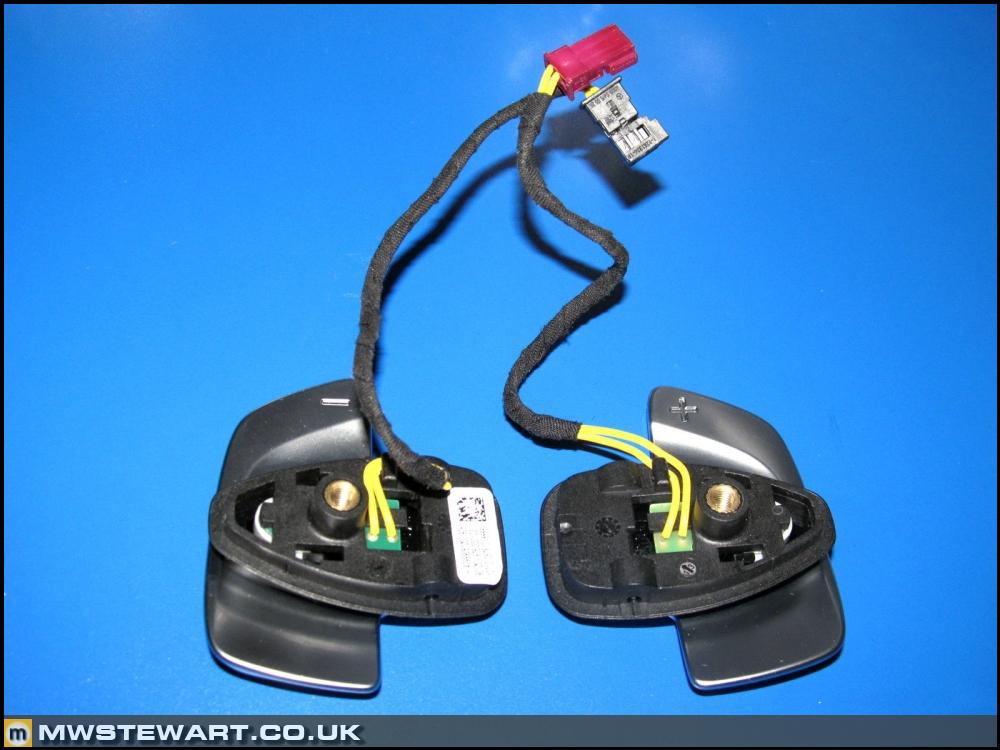
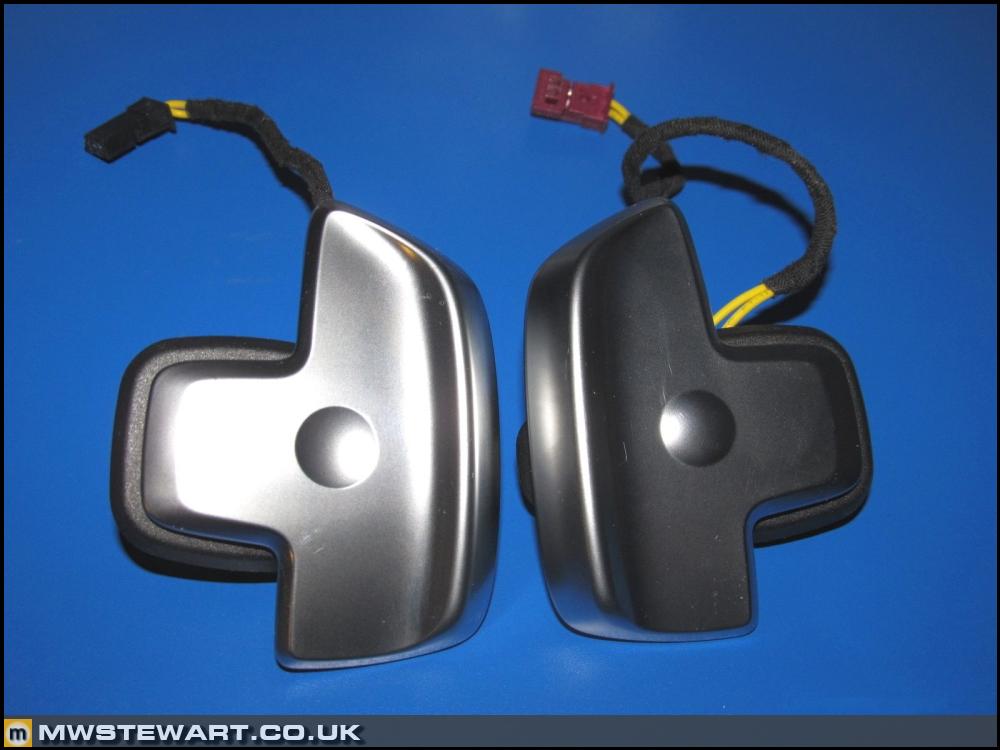
To get the best of both worlds I've tracked down some billet aluminium extended paddles for the non-AMG paddle switches. I am going to have these sprayed in the same grey as my newly painted F1 control panel. I did deliberate over carbon paddles but with a carbon instrument cluster and steering wheel they just get lost.
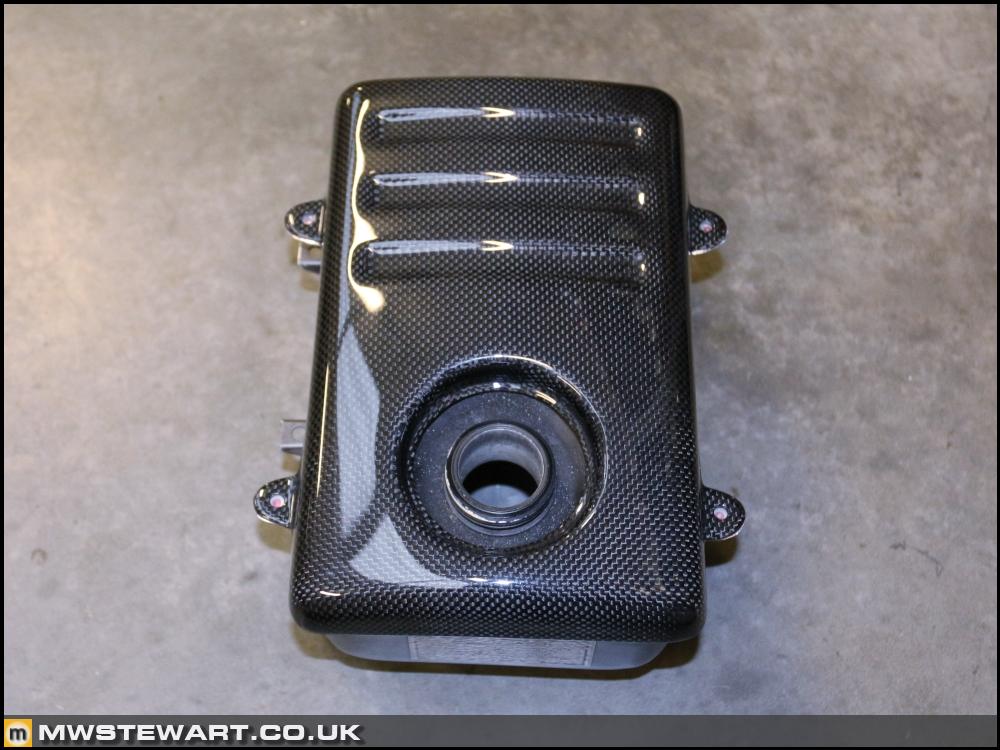
Header tank prep
There are aftermarket bracket mounting systems available to mount the carbon fibre header tank cover, but I don't like those. I have added tabs to my header tank which I will drill and insert M5 rivnuts.
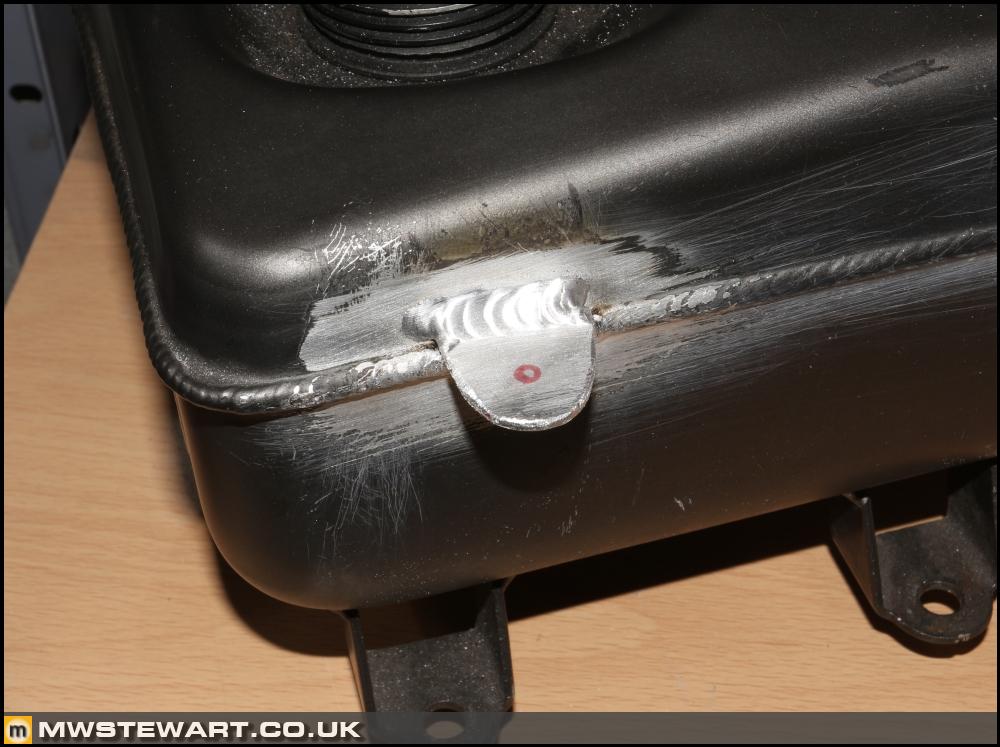
Carbon cover test fit.
I've finished fabrication on the silencer so it's just welding to go, but sod's law the valve on my pure argon cylinder has leaked and I've run out, so no TIG today, just some MIG tack welds to hold everything in the right position.
Tailpipe alignment is spot on. I'm happy.
I've already fabricated the silencer end plates, and the next step is to weld those on and pack with ceramic fibre, then weld on the cover.
Wheel mounted paddles
I've mentioned before that I don't get column mounted paddles.
1) From a usability perspective I find them suboptimal.
2) Paddles are the interface to the gear system and like a manual gear linkage, a good paddle system makes all the difference. Column mounted paddles mean the fulcrum point of the switch is very far away from the fingertips and this effectively desensitises the micro switches. It's like a long-throw manual gear linkage. I don't like it one bit.
The first challenge on the F430 is getting three wires into the steering column area. I checked out the wiring diagram and for the standard F430 there are actually three spare/unused wires on the wheel node (connector ref D072) meaning three unused clock spring contacts that could be purposed for the F1 paddle switches. Unfortunately the Scuderia makes use of one of those spare terminals for the traction control off wire (CT off setting on the Manettino), so given I am converting to Scuderia electronics I needed to find another way.
I started looking at clock springs from other Ferrari and Maserati models, and I soon realised some of the Maserati’s had the same clock spring as the F430 but were fitted with a dual stage airbag. This is ideal because I can repurpose those two wires for the F1 system (the yellow sheath will be removed).
Here's the Maserati clock spring I purchased.
I've also ordered some paddles: late Mercedes non-AMG. The AMG version has larger paddles but also a larger base which looks a bit ungainly.
To get the best of both worlds I've tracked down some billet aluminium extended paddles for the non-AMG paddle switches. I am going to have these sprayed in the same grey as my newly painted F1 control panel. I did deliberate over carbon paddles but with a carbon instrument cluster and steering wheel they just get lost.
Header tank prep
There are aftermarket bracket mounting systems available to mount the carbon fibre header tank cover, but I don't like those. I have added tabs to my header tank which I will drill and insert M5 rivnuts.
Carbon cover test fit.
Fair play - I've been following this thread for a while and it's pretty inspiring stuff. While I don't have the skills to go quite as far, it's made me realise that I can incrementally improve my Caterham, simply by making each bit I touch as good as I can, so in the spirit of this thread, I shall not just repack my exhaust, but since it's off the car, tidy up the mounts, give them a lick of paint and replace the old looking rubber bobbins and fasteners with nice new ones. Only a few pounds, but will look nicer. If I'm really feeling flash, I'll get the silencer polished up too! I may have to resist the temptation to replace everything with titanium though - it's not ideal having to eat only baked beans until payday!
Simply stunning - what a super-special car deserves and more in terms of care and and attention. We need a PH salute smiley 

I always marvel at how much enthusiasm translates into such great projects and enthralling reads - I can't imagine the satisfaction in doing this work and driving the car given that I'm grinning like an idiot just reading and ogling the pictures
I always marvel at how much enthusiasm translates into such great projects and enthralling reads - I can't imagine the satisfaction in doing this work and driving the car given that I'm grinning like an idiot just reading and ogling the pictures
S10GTA said:
This is incredible. Have just read from start to finish. Finally a Ferrari topic worth reading!
Have you driven it yet?
Thank you. I drove it from the dealer to my workshop Have you driven it yet?
Smitters said:
Fair play - I've been following this thread for a while and it's pretty inspiring stuff. While I don't have the skills to go quite as far, it's made me realise that I can incrementally improve my Caterham, simply by making each bit I touch as good as I can, so in the spirit of this thread, I shall not just repack my exhaust, but since it's off the car, tidy up the mounts, give them a lick of paint and replace the old looking rubber bobbins and fasteners with nice new ones. Only a few pounds, but will look nicer. If I'm really feeling flash, I'll get the silencer polished up too! I may have to resist the temptation to replace everything with titanium though - it's not ideal having to eat only baked beans until payday!
Glad it is inspiring! I bet you'll find the exhaust job rewarding, and making sure it's all tip-top pays dividends in the long run.Diesel Meister said:
Simply stunning - what a super-special car deserves and more in terms of care and and attention. We need a PH salute smiley
I always marvel at how much enthusiasm translates into such great projects and enthralling reads - I can't imagine the satisfaction in doing this work and driving the car given that I'm grinning like an idiot just reading and ogling the pictures
Cheers I always marvel at how much enthusiasm translates into such great projects and enthralling reads - I can't imagine the satisfaction in doing this work and driving the car given that I'm grinning like an idiot just reading and ogling the pictures

An update I didn't get chance to finish at the weekend.
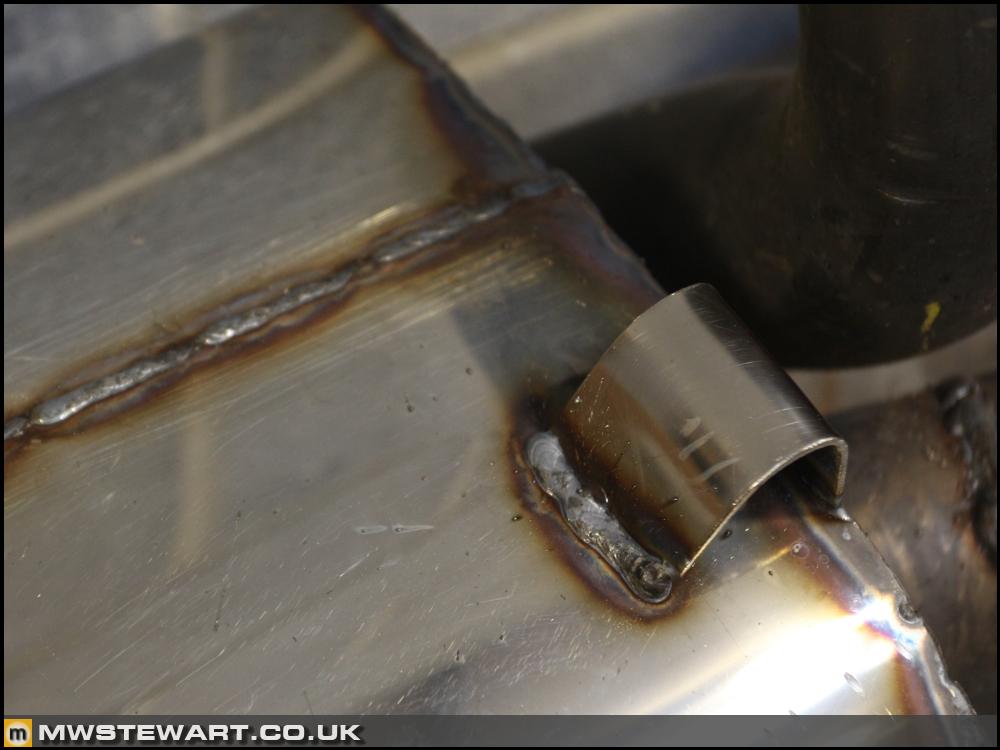
Silencer fabrication complete
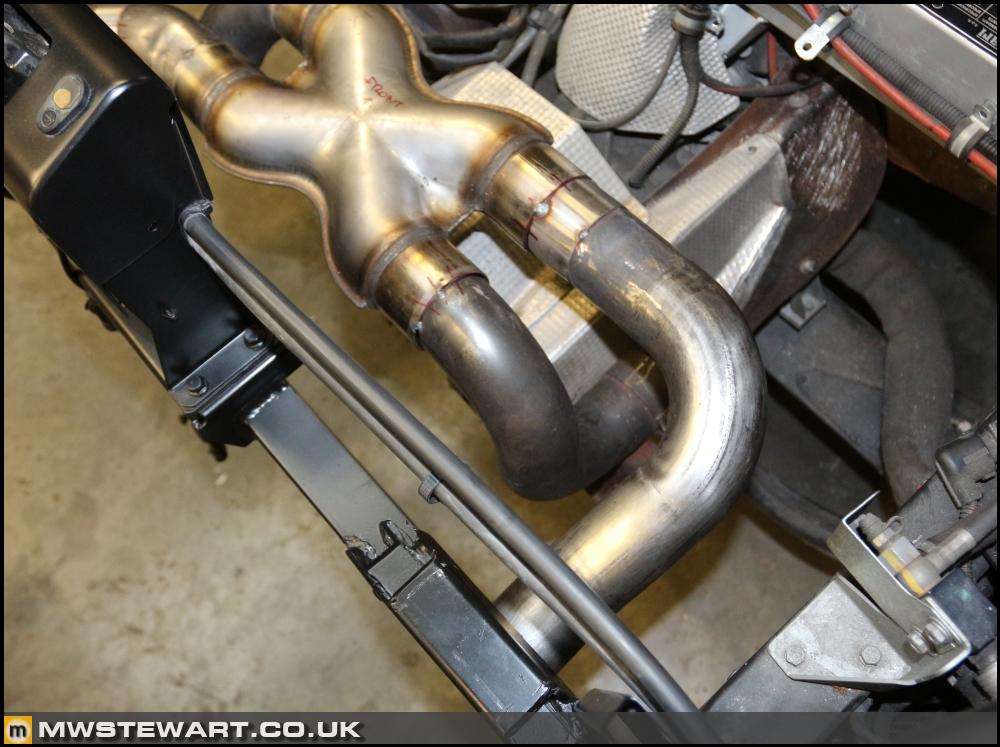
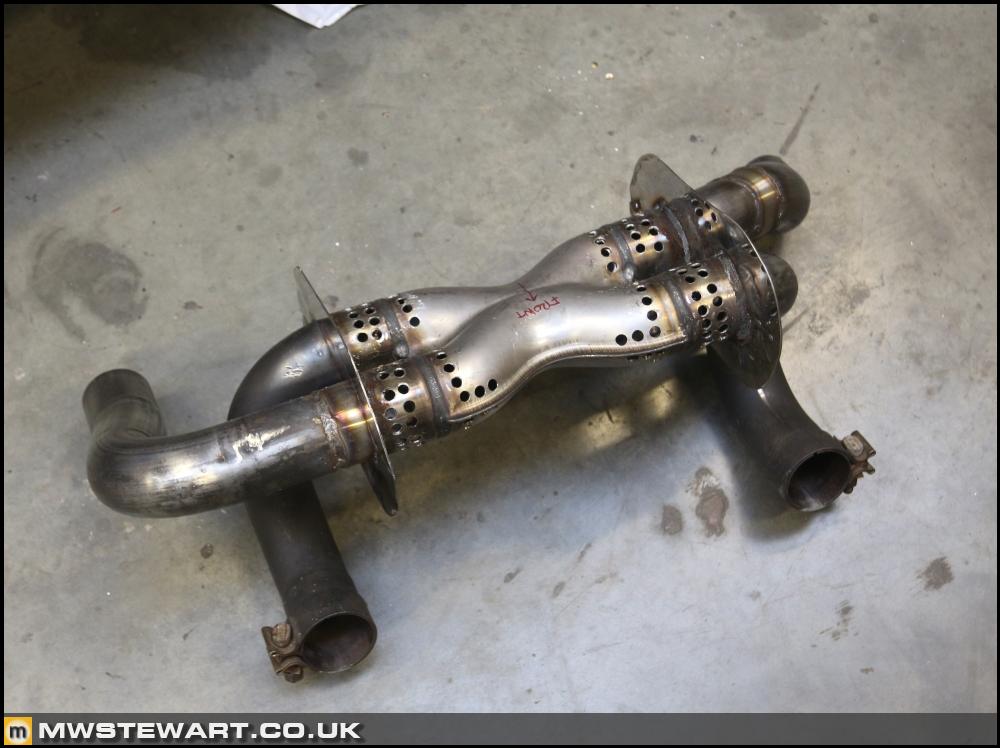
Silencer internals drilled. I didn't want to drill the X pipe transitions, the rationale being to interfere with the gas mixing as little as possible. I have to thank my Dad for drilling which took an absolute age (1.5mm stainless).
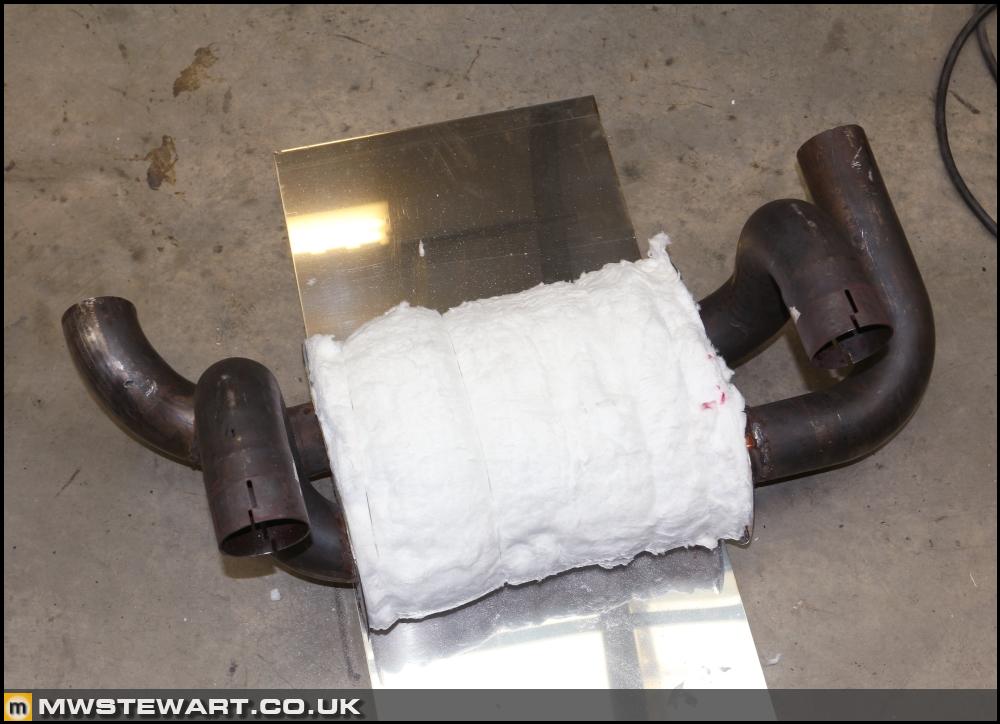
Packed with ceramic fibre and stainless wire.
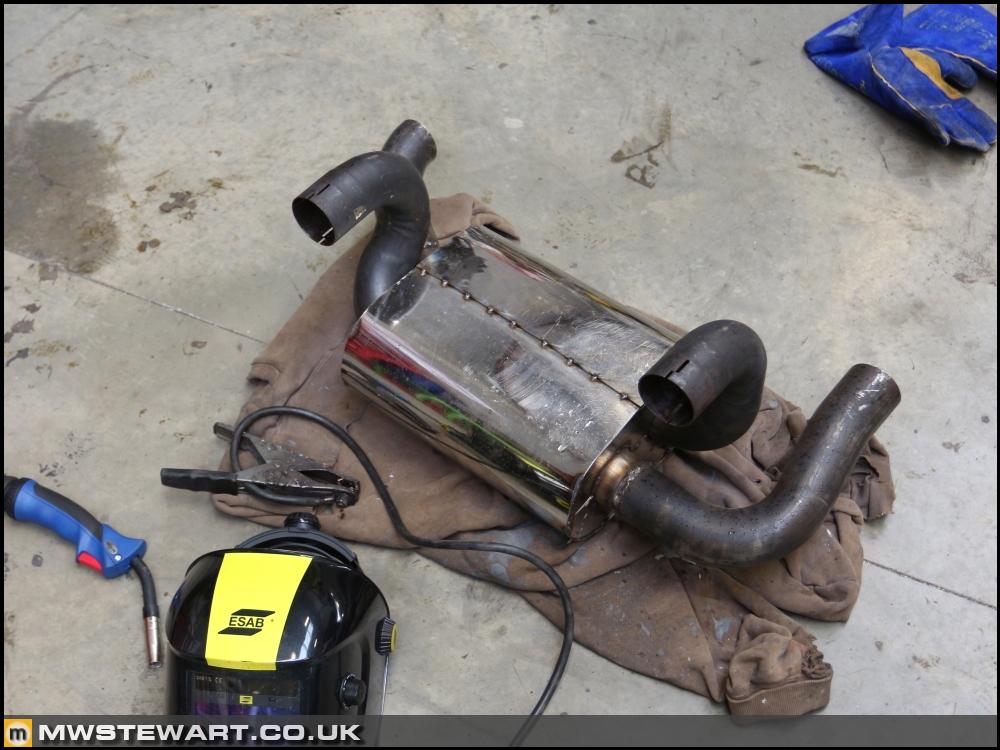
Cover tacked in place. Dad helped with this; it was a two person job because I've used 1.5mm thick stainless as per the Challenger silencer, and it's about on the limit of what can be bent by hand. I could have used 1mm but I've built in some durability at the expense of weight.
Complete. I'm fairly happy with it. The welding isn't a work of art like some of the aftermarket stuff available, but it's certainly with OEM!
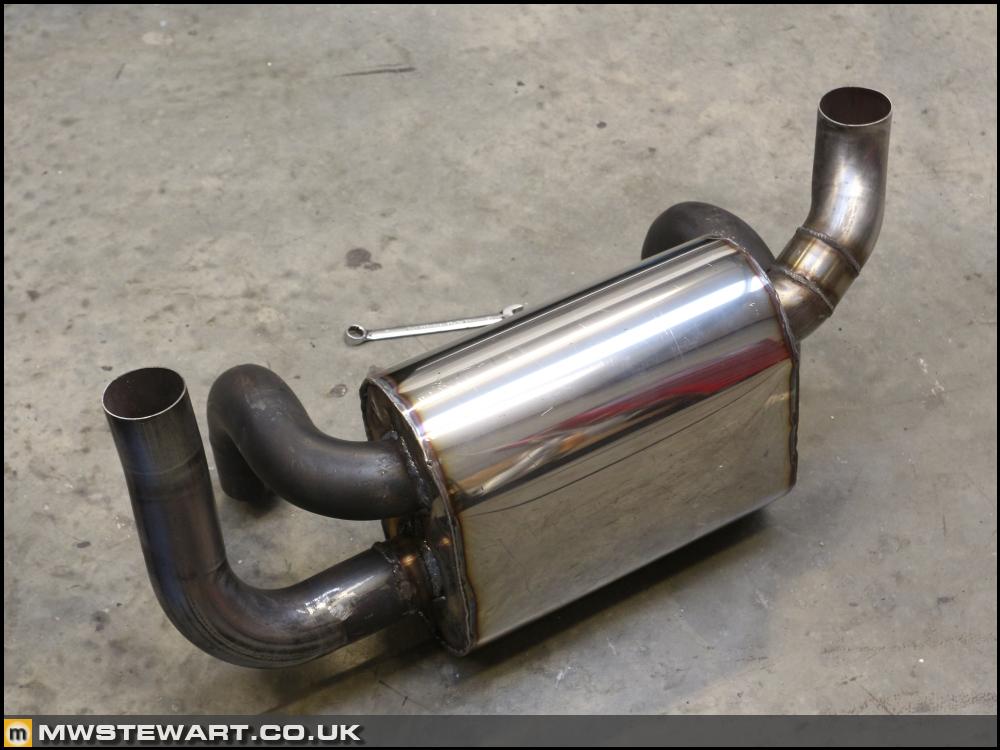
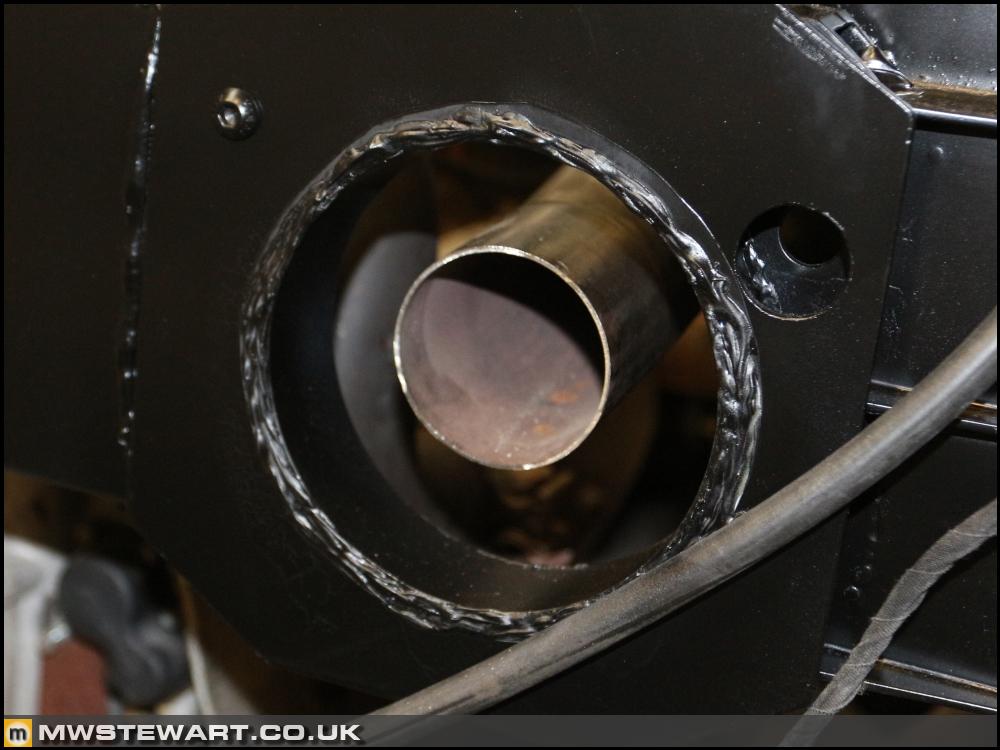
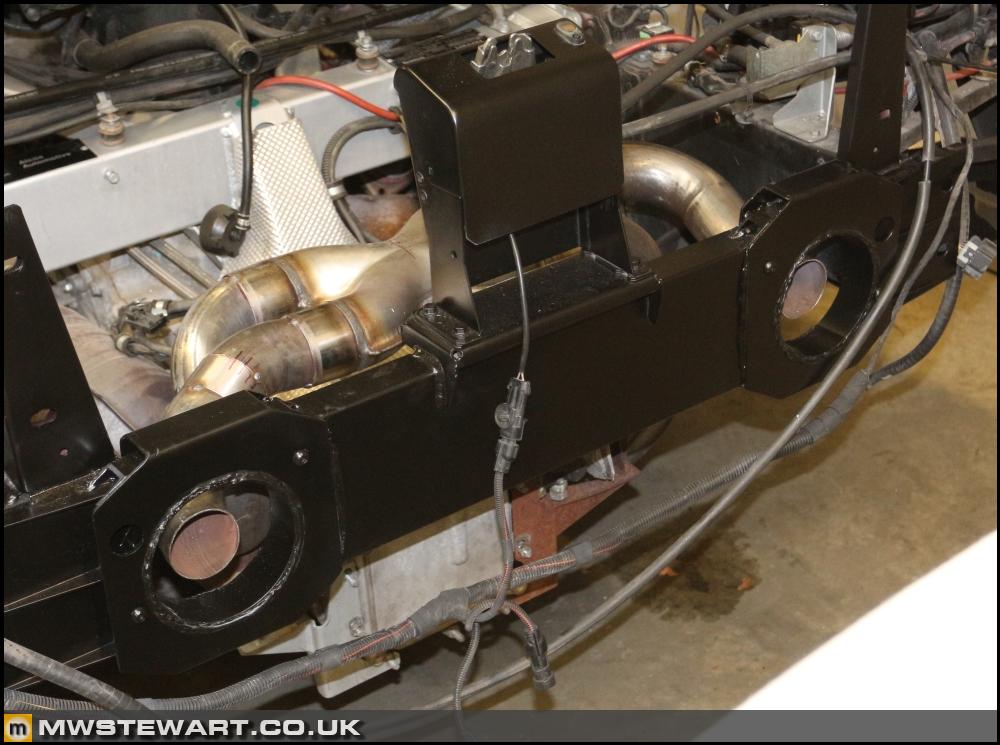
Test fit and all is well.
I've added a tab on each side ready for the mounting system, which I've yet to fabricate.
Something else I’m considering for the new exhaust is a neat shield. The outer cover on the OEM silencer is just thin stainless case to hold heat insulation material against the main silencer body. I had an idea to use some of it on my new exhaust.
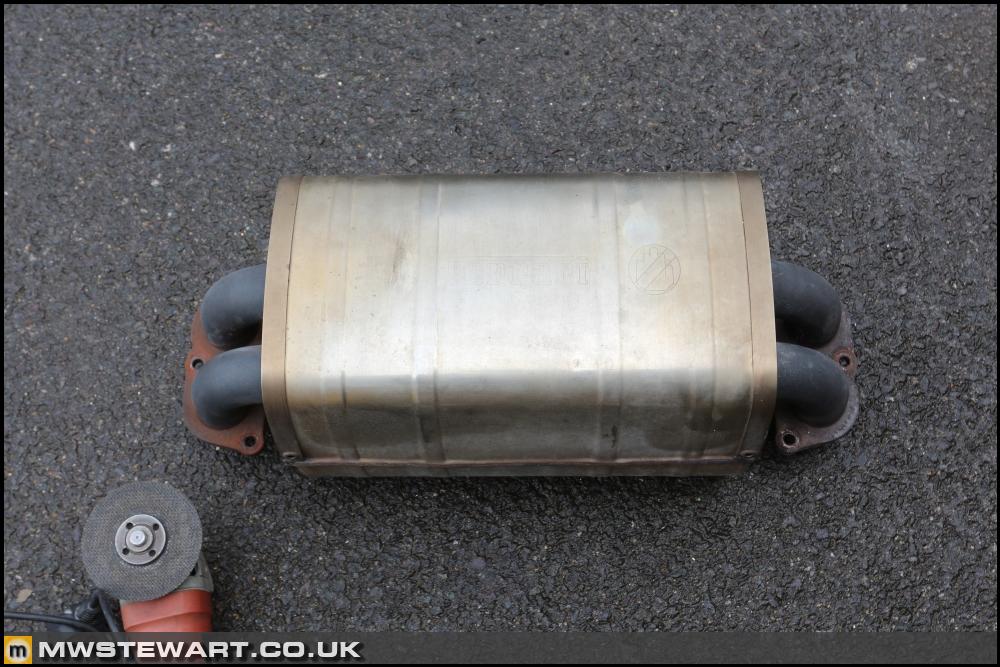
I cut up the standard silencer to liberate the top section of outer case. I plan to weld stainless long nuts to the top of my new exhaust and modify the original silencer case to function as an upper heat shield.

Still undecided on it - going to have some more thinking time.
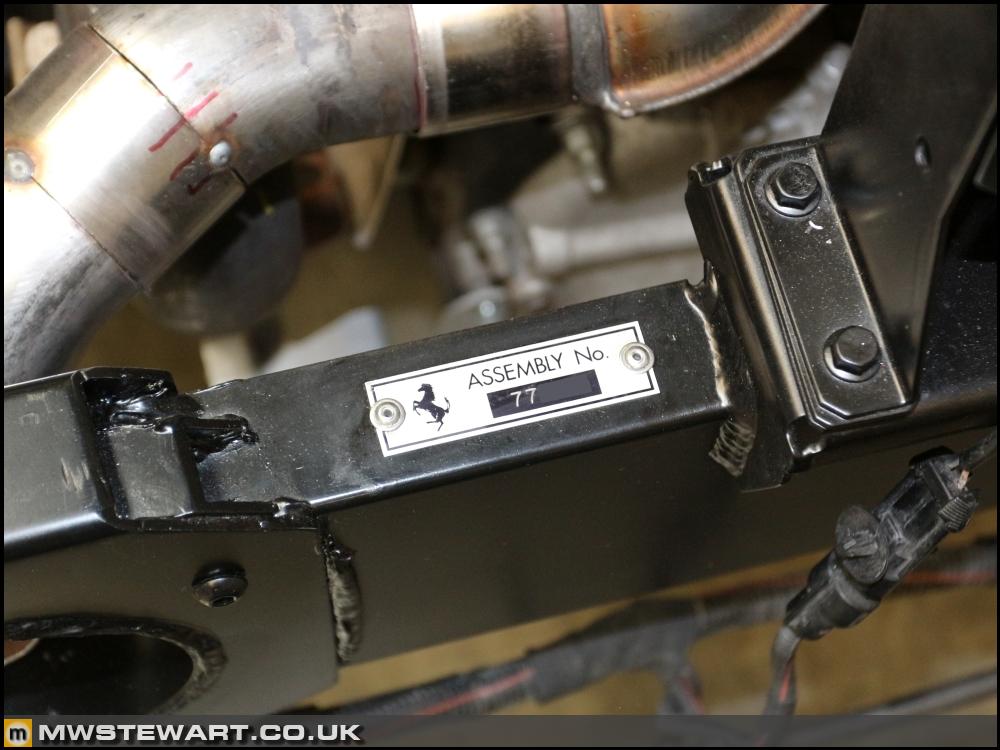
Fastenings/misc.
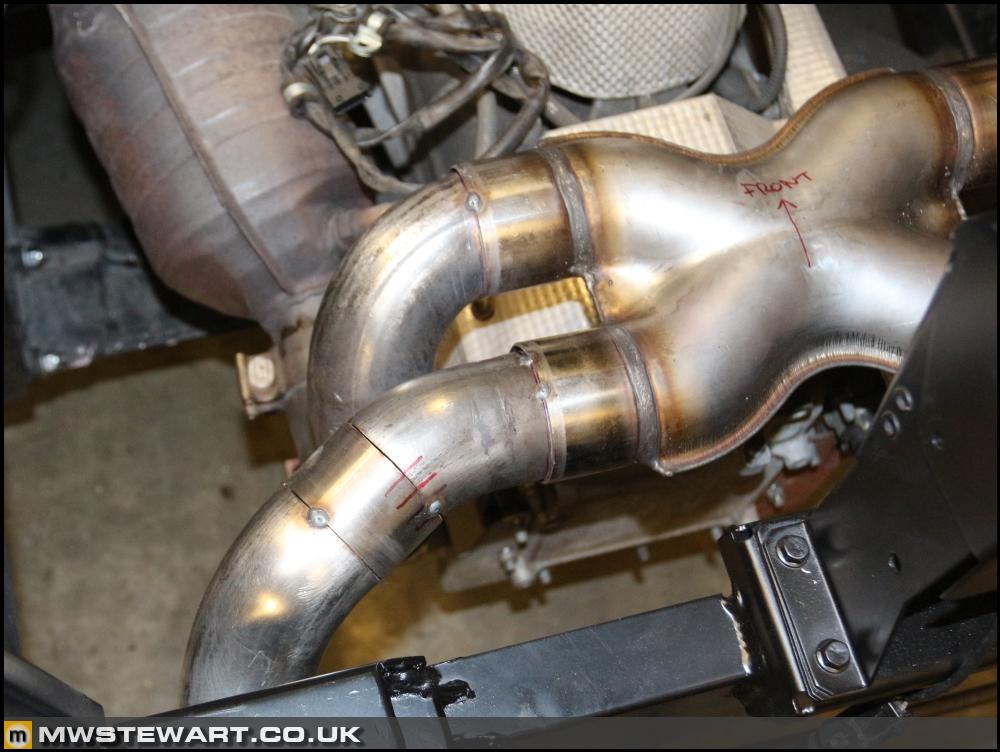
One of the finishing touches on the Scuderia spec cross member is to reattach the assembly number plaque; the F430 position was directly above where the new LH tailpipe area is.
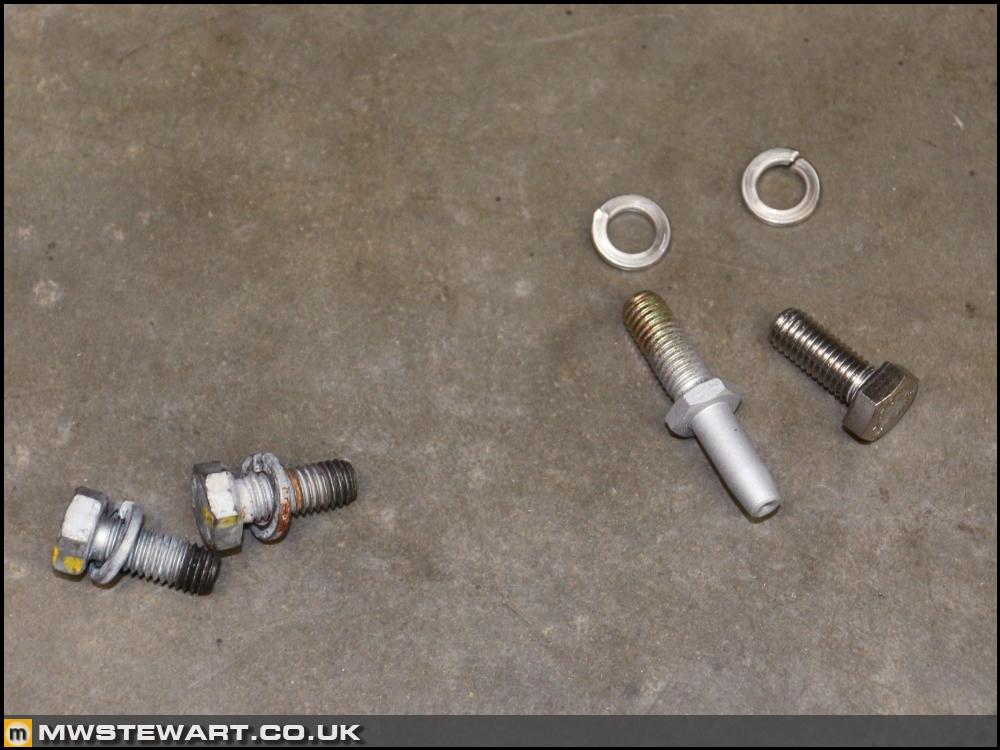
I've replaced the disc securing fastenings. One of them is an odd cone shape that Ferrari have been using for years. I can only imagine that on one of the older models it served as a wheel locater - it doesn't on the F430. The other fastening is an M8 that I've replaced with a stainless version.
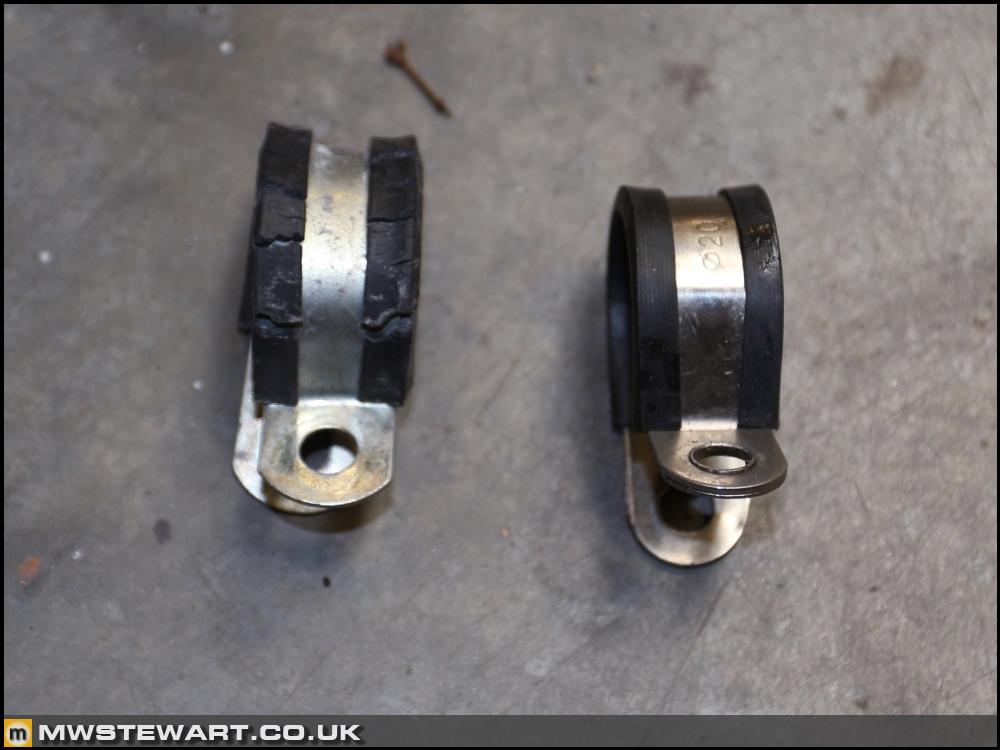
I noticed that the rubber on a few P clips around the car had deteriorated and cracked, so I’ve replaced them with stainless clamps (Ferrari use BZP).
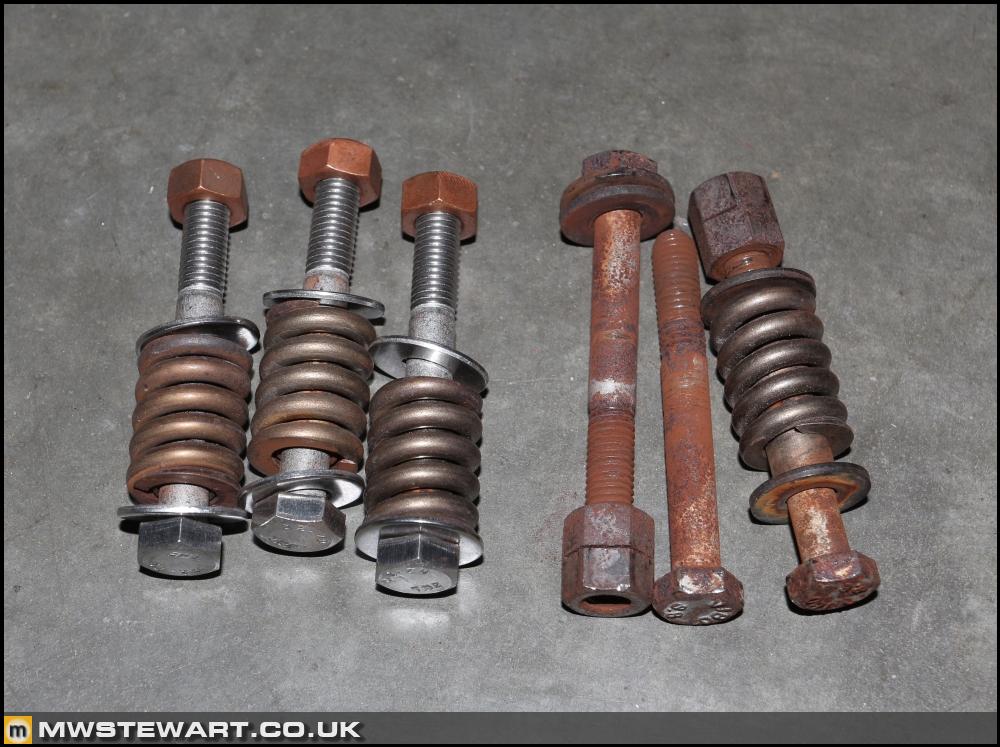
The cat to manifold mounting bolts stood out to me as being well past their best (I had to cut two of them off) so I've replaced them with stainless.
Silencer fabrication complete
Silencer internals drilled. I didn't want to drill the X pipe transitions, the rationale being to interfere with the gas mixing as little as possible. I have to thank my Dad for drilling which took an absolute age (1.5mm stainless).
Packed with ceramic fibre and stainless wire.
Cover tacked in place. Dad helped with this; it was a two person job because I've used 1.5mm thick stainless as per the Challenger silencer, and it's about on the limit of what can be bent by hand. I could have used 1mm but I've built in some durability at the expense of weight.
Complete. I'm fairly happy with it. The welding isn't a work of art like some of the aftermarket stuff available, but it's certainly with OEM!
Test fit and all is well.
I've added a tab on each side ready for the mounting system, which I've yet to fabricate.
Something else I’m considering for the new exhaust is a neat shield. The outer cover on the OEM silencer is just thin stainless case to hold heat insulation material against the main silencer body. I had an idea to use some of it on my new exhaust.
I cut up the standard silencer to liberate the top section of outer case. I plan to weld stainless long nuts to the top of my new exhaust and modify the original silencer case to function as an upper heat shield.
Still undecided on it - going to have some more thinking time.
Fastenings/misc.
One of the finishing touches on the Scuderia spec cross member is to reattach the assembly number plaque; the F430 position was directly above where the new LH tailpipe area is.
I've replaced the disc securing fastenings. One of them is an odd cone shape that Ferrari have been using for years. I can only imagine that on one of the older models it served as a wheel locater - it doesn't on the F430. The other fastening is an M8 that I've replaced with a stainless version.
I noticed that the rubber on a few P clips around the car had deteriorated and cracked, so I’ve replaced them with stainless clamps (Ferrari use BZP).
The cat to manifold mounting bolts stood out to me as being well past their best (I had to cut two of them off) so I've replaced them with stainless.
purpleliability said:
I'm loving this project, fantastic work!
Have you thought about having the exhaust ceramic coated to help with heat? I would think that it's the lightest option too.
Thank you. Yes, actually within a few minutes of being finished the exhaust, air filter box, and modified header tank were boxed up ready to be sent to Camcoat. I'm going for their 'Race spec' coating on the exterior of all parts - it's a triple layer system finished in satin black. The OEM heat cover would be in addition to it,but you're right, there is a weight consideration.Have you thought about having the exhaust ceramic coated to help with heat? I would think that it's the lightest option too.
helix402 said:
Those disc bolts are Fiat parts. Random fact of the day.
Ahh, interesting. Most of the switchgear is too.A couple more weight saving parts.
Luggage compartment bulkhead trim
I'm already using the lightest luggage bulkhead trim at 2.042kg (Scuderia 2.042kg) which is heavy given its function, so I knew there was scope for further reduction in that area. My goal for this project is to improve performance by saving weight but without reducing the civility to the point where the car becomes a chore to drive for more than a quick blast, so although the car is pretty raw to begin with, I will not embark upon thoughtless weight reduction.
The luggage bulkhead separates the luggage compartment from a void between the cabin bulkhead that holds the rack, brake servo, and other things. This void is open to the wheel arches on both sides and on the bottom separated from the road by the thin front under tray, so really the mass of the luggage compartment trim is going to have little-to-no bearing on cabin noise. Given this, I’m happy to reduce its mass.
I estimated there’s 1.5kg to be saved whilst still maintaining a part strong enough to confine luggage, so I obtained some quotes for a bespoke carbon replica of the OEM moulded bulkhead. I then discovered the 360 and F430 Challenge cars had a dry carbon fibre panel, so I checked the price and as I’m finding with most Challenge parts it’s actually really cheap - £87.93 inc. VAT cheap. It’s now on order.
There’s a photo of the part below – for some reason in photos all of the Challenge carbon looks like a yellowy grey fibreglass.

After it arrives I’ll remove the carpet from my original trim and use it to retrim the Challenge part.
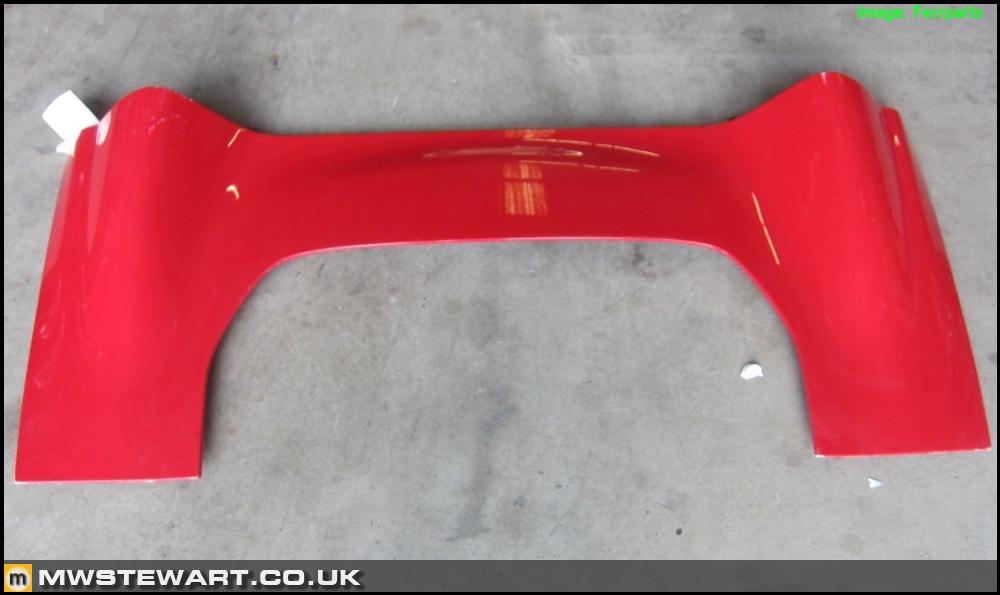
Spider roof tray exterior panel
I discovered when working on my cars that the external body panel covering the roof tray is made from thick fibreglass and weighs 12kg. It doesn’t serve any noise suppression function so is fair game for weight removal.
Stoian at Parts3000 has quoted for a carbon replica, and his team estimate a finished weight of between 3-4kg (the part needs to be sufficiently strong to maintain integrity at high speed). For the surface finish I’m going for a gloss finish 1x1/plain weave to match the OEM carbon, and I’m going to see how it looks exposed. I will have it painted in Rosso if I don’t like it.

I am on the way to saving 100kg. That's notciably more acceleration, better braking, and better handling.
Luggage compartment bulkhead trim
I'm already using the lightest luggage bulkhead trim at 2.042kg (Scuderia 2.042kg) which is heavy given its function, so I knew there was scope for further reduction in that area. My goal for this project is to improve performance by saving weight but without reducing the civility to the point where the car becomes a chore to drive for more than a quick blast, so although the car is pretty raw to begin with, I will not embark upon thoughtless weight reduction.
The luggage bulkhead separates the luggage compartment from a void between the cabin bulkhead that holds the rack, brake servo, and other things. This void is open to the wheel arches on both sides and on the bottom separated from the road by the thin front under tray, so really the mass of the luggage compartment trim is going to have little-to-no bearing on cabin noise. Given this, I’m happy to reduce its mass.
I estimated there’s 1.5kg to be saved whilst still maintaining a part strong enough to confine luggage, so I obtained some quotes for a bespoke carbon replica of the OEM moulded bulkhead. I then discovered the 360 and F430 Challenge cars had a dry carbon fibre panel, so I checked the price and as I’m finding with most Challenge parts it’s actually really cheap - £87.93 inc. VAT cheap. It’s now on order.
There’s a photo of the part below – for some reason in photos all of the Challenge carbon looks like a yellowy grey fibreglass.
After it arrives I’ll remove the carpet from my original trim and use it to retrim the Challenge part.
Spider roof tray exterior panel
I discovered when working on my cars that the external body panel covering the roof tray is made from thick fibreglass and weighs 12kg. It doesn’t serve any noise suppression function so is fair game for weight removal.
Stoian at Parts3000 has quoted for a carbon replica, and his team estimate a finished weight of between 3-4kg (the part needs to be sufficiently strong to maintain integrity at high speed). For the surface finish I’m going for a gloss finish 1x1/plain weave to match the OEM carbon, and I’m going to see how it looks exposed. I will have it painted in Rosso if I don’t like it.
I am on the way to saving 100kg. That's notciably more acceleration, better braking, and better handling.
Gassing Station | Readers' Cars | Top of Page | What's New | My Stuff