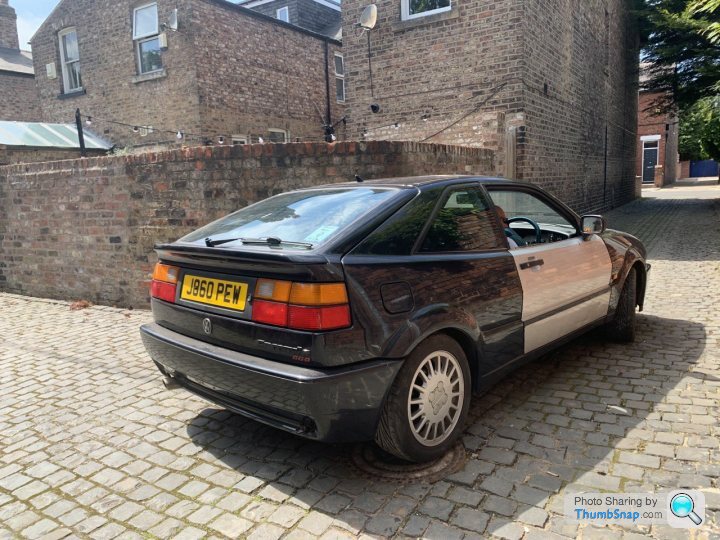
Volkswagen Corrado G60
Discussion


aka_kerrly said:
That's amazing. I saw the Corrado in thornbury as it's just down the road from me and was going to pick it up for the sake of it.
Then I saw your post and tried to find it again on Facebook and it has gone.
So glad that the doors an hopefully you got some other bits as there was so much good stuff still on that shell
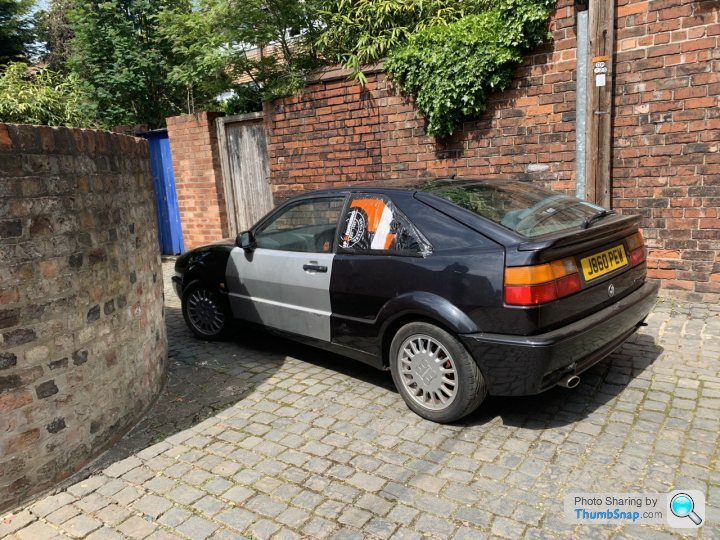
He's still got other bits of the shell, but it really was a good straight car with no rot. Seems a shame in some ways, but it will keep the G60 on the road. Eventually.Then I saw your post and tried to find it again on Facebook and it has gone.
So glad that the doors an hopefully you got some other bits as there was so much good stuff still on that shell
The insurance company are paying out cash in lieu of repairs, as they won't fix it at the dealer or write it off. So, I now need to try and transfer the door mechanism internals over, then get it repaired and sprayed.
This is having to take a back seat, as we still don't have a working 4 wheeled vehicle. The V5 loan car developed a lambda sensor fault (which it turns out its had for a while), but then bust a CV joint resulting in a severe shimmy. We fixed that, so it dropped one of the coil packs and started running on 4 cylinders. That's on order, so then the central locking unit has packed up (possibly the CCM).
There is currently no engine or gearbox in the AX, so we're on a loan Passat from the awesome chap at the garage.
Hopefully some positive progress soon!
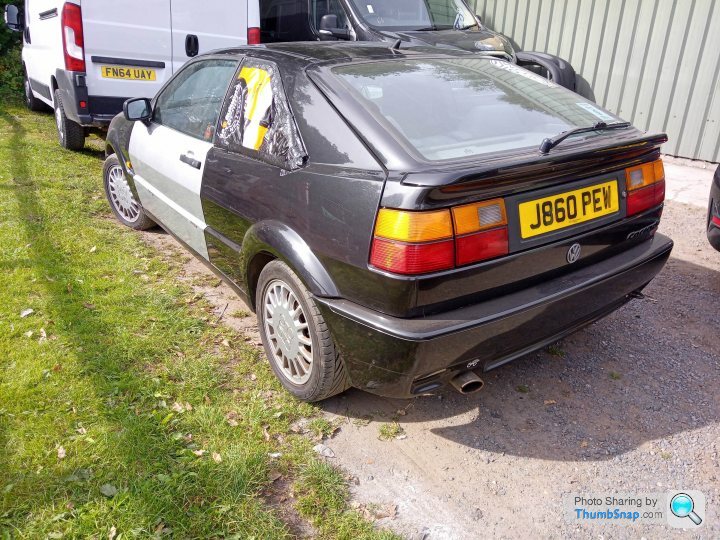
The insurance company have paid out, and while we're a long way from getting fixed, I thought I'd make some progress on the Corrado.
If I can get the doors swapped over and the window bonded in, I can at least drive it again regardless of paint. This is in no way related to the fact the the V5 seemed to break something else every time I touched it.... 3 duff coil packs and a possible CCM failure! At least the ZZR passed its MOT!
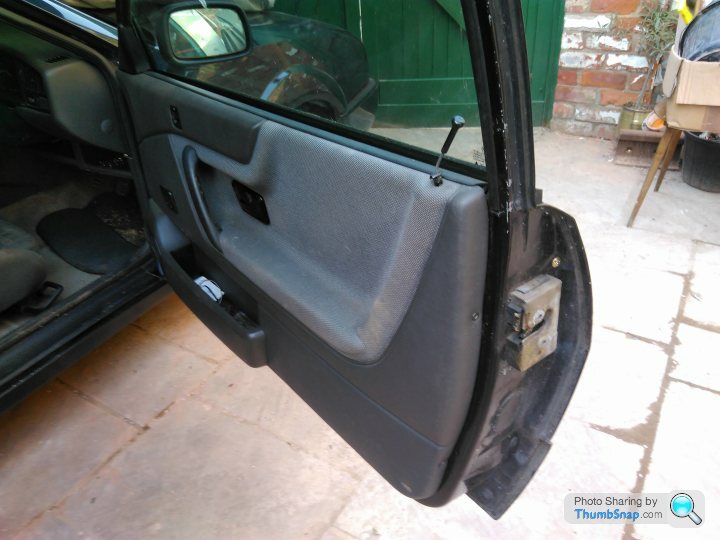
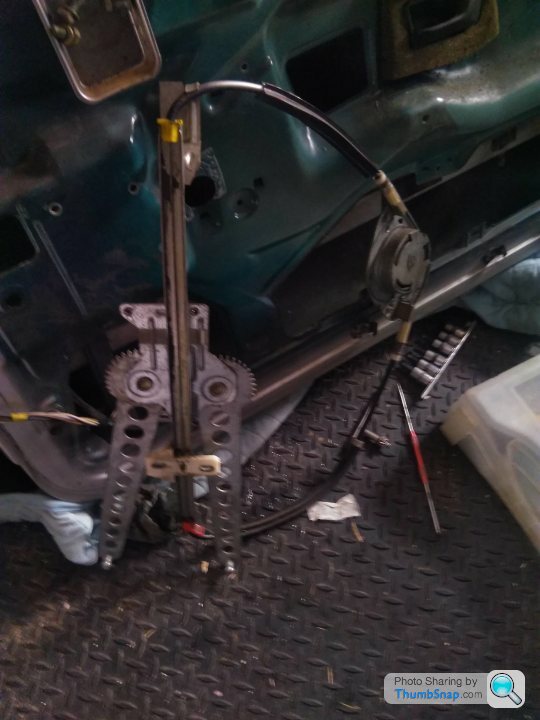
So, door card off and the good news is that the doors and looms are internally the same, just the replacement has a manual window mechanism :
As far as I can tell, it's *just* a matter of drilling out the rivets on both mechanisms and swapping them over. While fighting with the door glass etc! Luckily, the glass and lifting mechanism seem to same, it's just what powers it! I will no doubt be proved wrong, but will hopefully make some more progress over the weekend.
If I can get the doors swapped over and the window bonded in, I can at least drive it again regardless of paint. This is in no way related to the fact the the V5 seemed to break something else every time I touched it.... 3 duff coil packs and a possible CCM failure! At least the ZZR passed its MOT!
So, door card off and the good news is that the doors and looms are internally the same, just the replacement has a manual window mechanism :
As far as I can tell, it's *just* a matter of drilling out the rivets on both mechanisms and swapping them over. While fighting with the door glass etc! Luckily, the glass and lifting mechanism seem to same, it's just what powers it! I will no doubt be proved wrong, but will hopefully make some more progress over the weekend.
Thanks @eddiecatflap, I agree, there are some arse holes out there.... Unfortunately my major worry is that I get it back on the road.... then it happens again.
However, the first step of that, is getting it on the road - some small progress there today (after fighting with a ZZR1100C that REALLY didn't want to give up its filter).
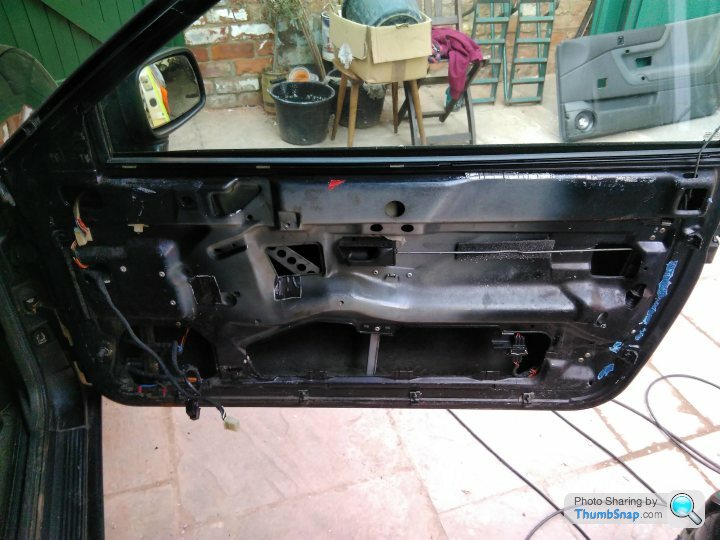
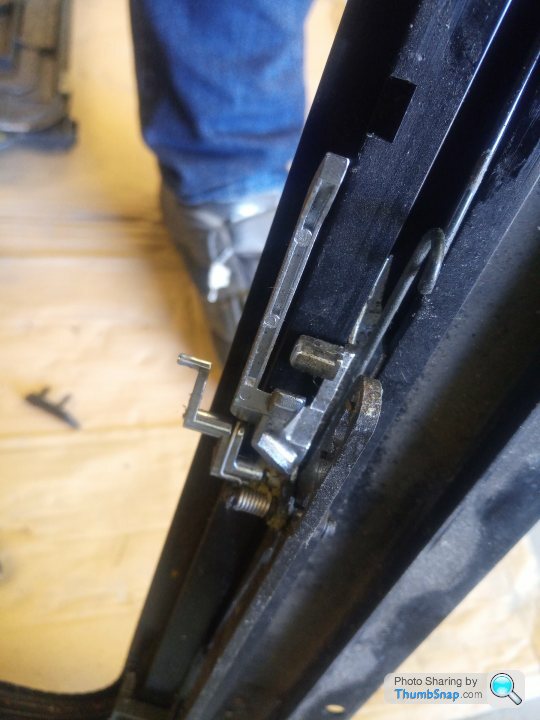
Undo 2 10mm bolts to separate the window glass and mounting from the mechanism (having lowered the window using mole grips in my case) :
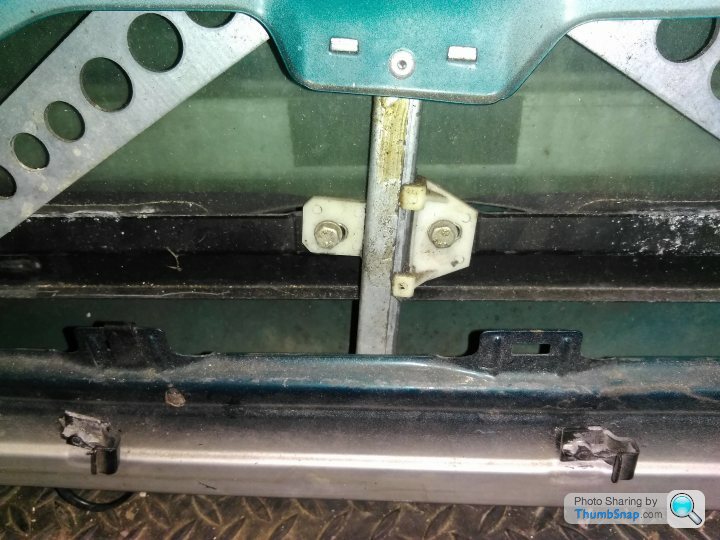
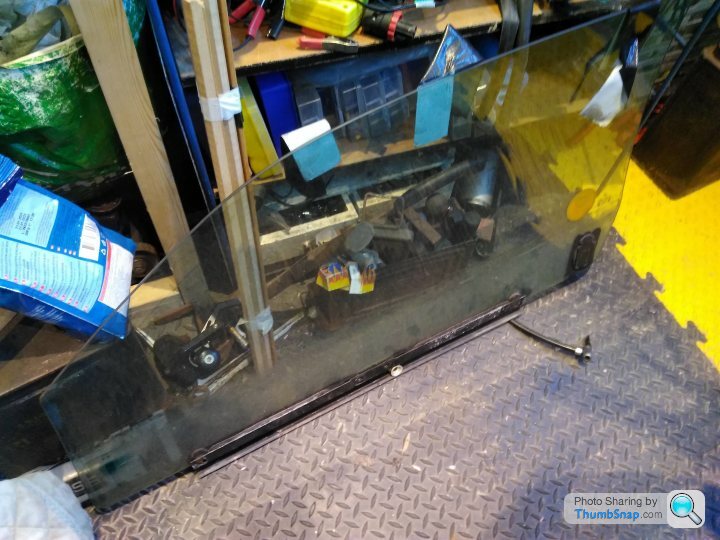
Then, if the door has no internal rubbing strips (or you've removed them), once you've popped the lifting arms from the plastic rollers, you can lift the glass out - largest end first.
Alternatively, if you didn't have a manual (or had it but didn't read it), you can leave the rubbing strips in place, tape the glass up and struggle with it. See page 5 for details....
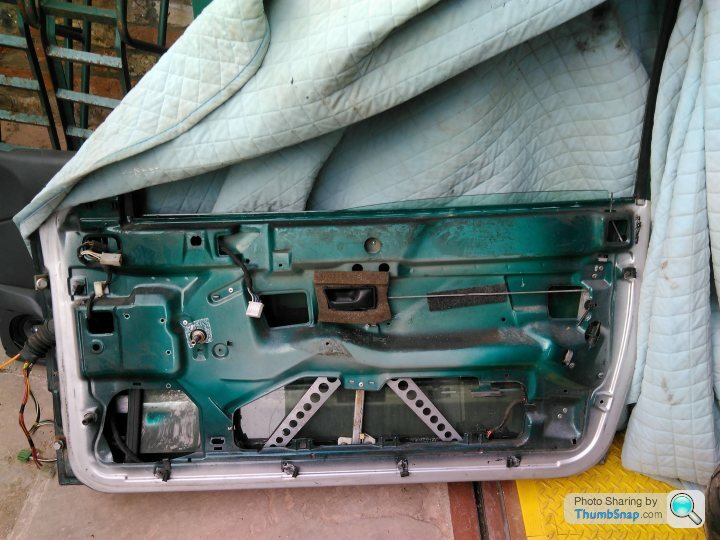
After that, it's 3 rivets to drill out for the winding mechanism and 2 for the vertical strip that holds the lifting bar in place. All use a 5mm drill bit - careful not to let that hit the outer skin of the door when the rivet gives up
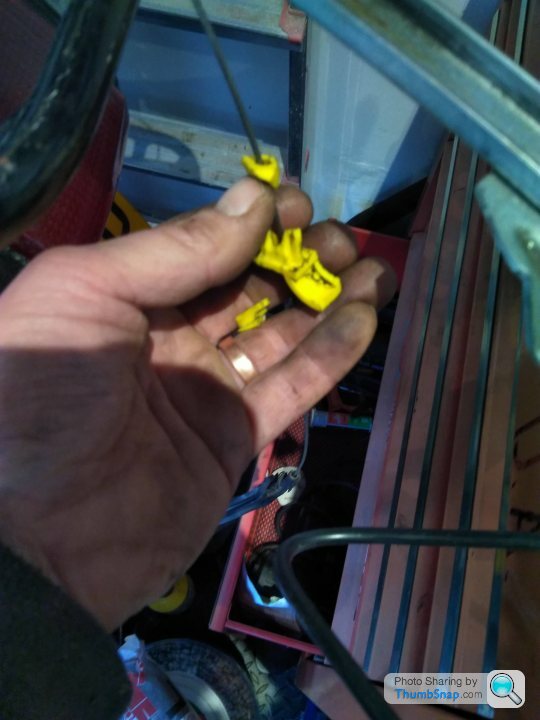
In my case, or was 2 for the mechanism and 1 and a 3mm hex for the vertical bar. I suspect that when this door was green, it had electric windows and was converted to manual when someone changed its colour.

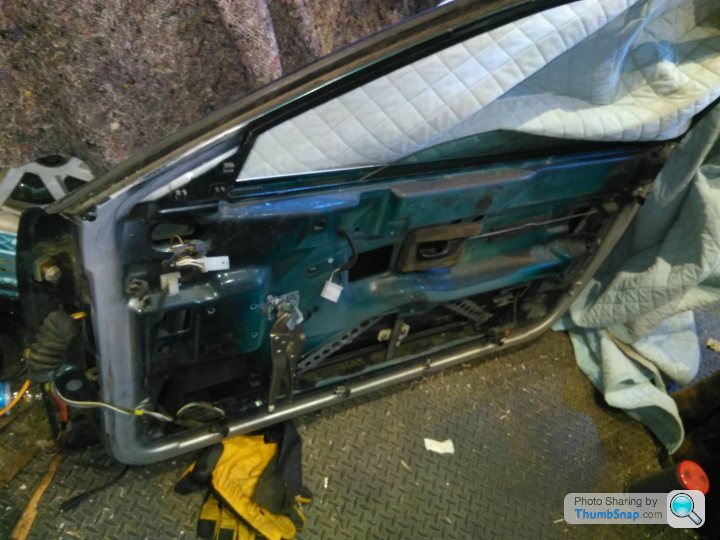
Then fold up the arms and remove the mechanism.
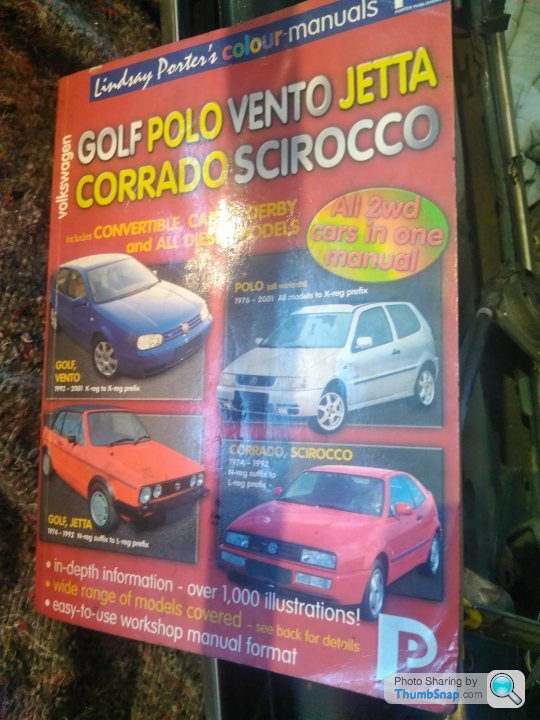
All credit to the Lindsay Porter manual for this, there's a how-to section. Previously I've found the manual difficult to use in places, but the tip about the glass was spot on.
Right, having been fettling cars and bikes for most of the long weekend it's time for a rest.
Ah well, back to fettling bridges instead in lieu of that!
However, the first step of that, is getting it on the road - some small progress there today (after fighting with a ZZR1100C that REALLY didn't want to give up its filter).
Undo 2 10mm bolts to separate the window glass and mounting from the mechanism (having lowered the window using mole grips in my case) :
Then, if the door has no internal rubbing strips (or you've removed them), once you've popped the lifting arms from the plastic rollers, you can lift the glass out - largest end first.
Alternatively, if you didn't have a manual (or had it but didn't read it), you can leave the rubbing strips in place, tape the glass up and struggle with it. See page 5 for details....
After that, it's 3 rivets to drill out for the winding mechanism and 2 for the vertical strip that holds the lifting bar in place. All use a 5mm drill bit - careful not to let that hit the outer skin of the door when the rivet gives up
In my case, or was 2 for the mechanism and 1 and a 3mm hex for the vertical bar. I suspect that when this door was green, it had electric windows and was converted to manual when someone changed its colour.
Then fold up the arms and remove the mechanism.
All credit to the Lindsay Porter manual for this, there's a how-to section. Previously I've found the manual difficult to use in places, but the tip about the glass was spot on.
Right, having been fettling cars and bikes for most of the long weekend it's time for a rest.
Ah well, back to fettling bridges instead in lieu of that!
Edited by darkyoung1000 on Monday 5th April 19:16

bristolbaron said:
That it is! Your looks tidy (nice backdrop too) - your username rings a bell from the Corrado forum many years ago if I recall correctly?
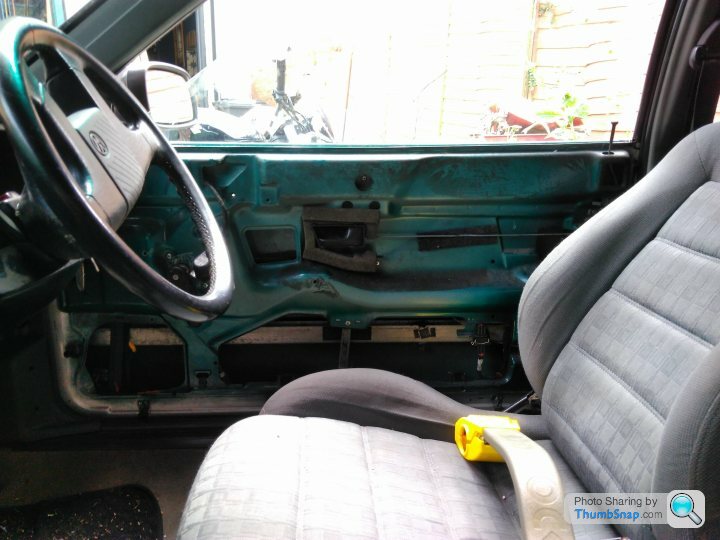
Right, buoyed by the assistance of all on here, I might have a crack at getting one of the doors off tonight.
A productive few hours...
I supported the base of the door using axle stands, and getting the bolts out would be the easy part.. .15mm for the main door bolts, and a 10mm & 13mm for the restraint bar.
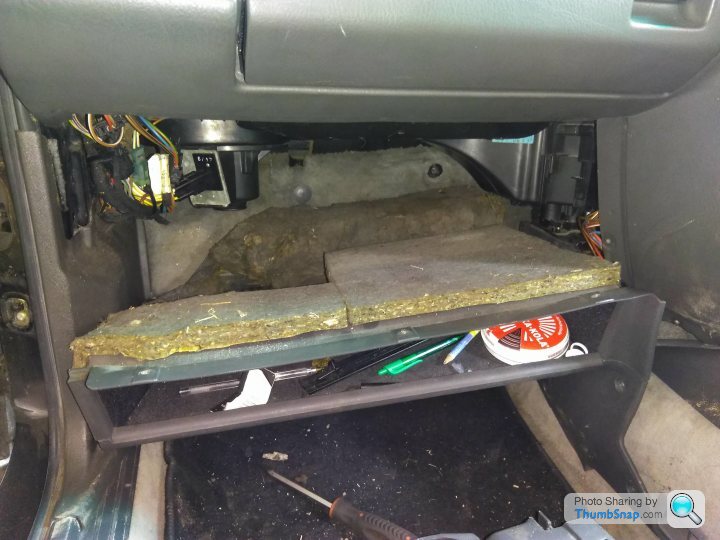
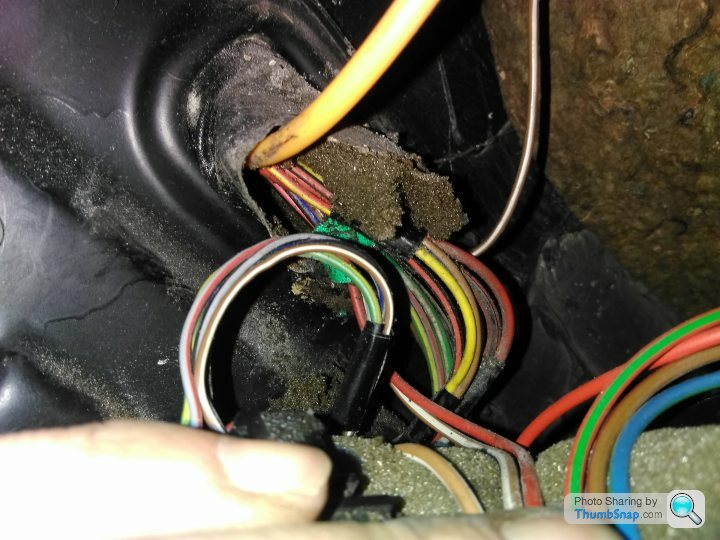
The tricky part is finding, tracing and removing the wiring....
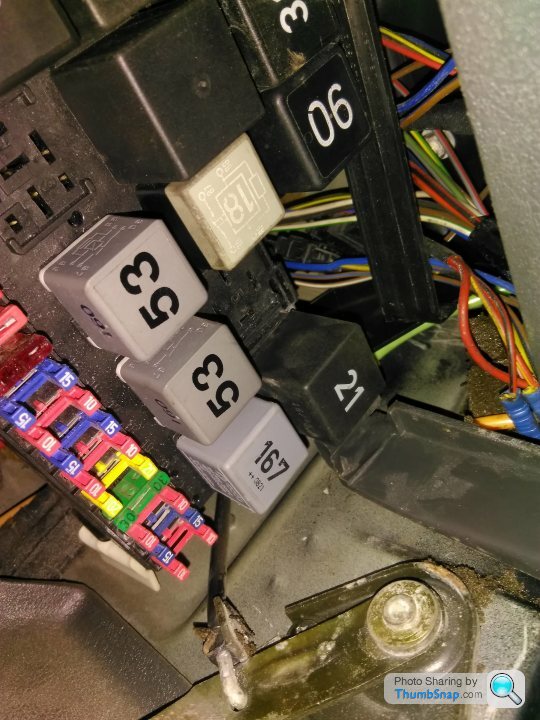
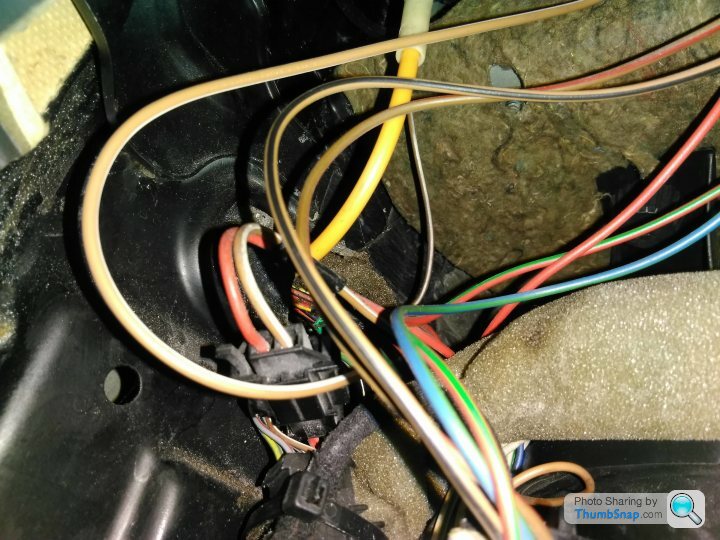
The connectors are above the fuse box for the driver's door, and access is a lot easier if you remove a load of trim and unhook the box from its mountings:
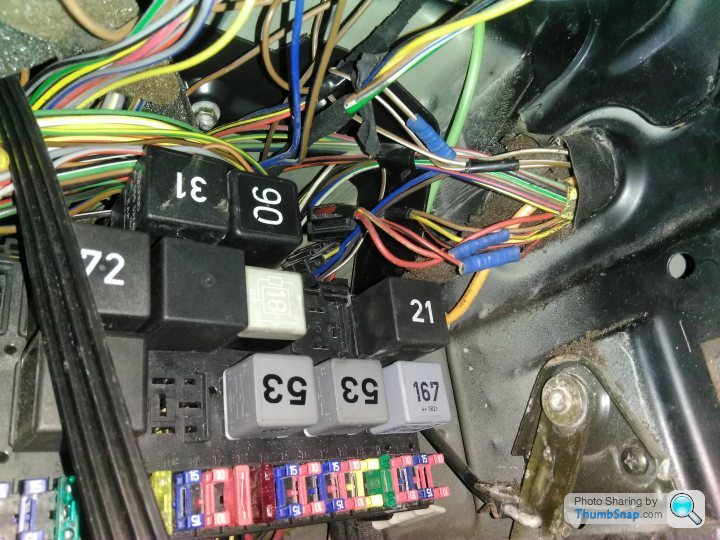
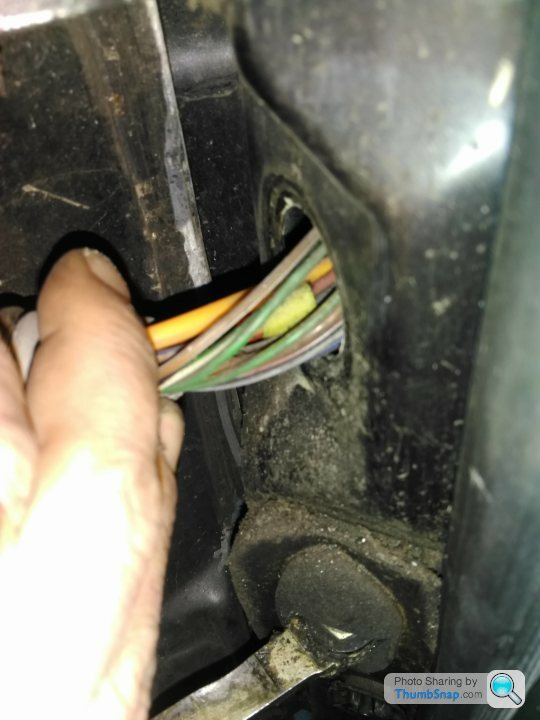
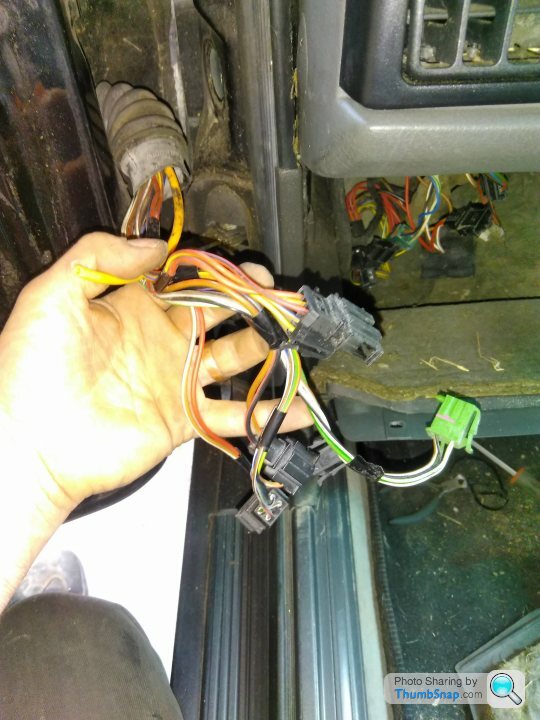
Once you have access to the connectors, you can label them up, unplug them and feed them back through the a pillar. Tempting add it might be to yank on the central locking hose, I decided that was a bad idea....
With that done, you can unbolt it and move it next to its replacement. Then realise that the two looms are different, and add swapping them over to the list of things to do.
I supported the base of the door using axle stands, and getting the bolts out would be the easy part.. .15mm for the main door bolts, and a 10mm & 13mm for the restraint bar.
The tricky part is finding, tracing and removing the wiring....
The connectors are above the fuse box for the driver's door, and access is a lot easier if you remove a load of trim and unhook the box from its mountings:
Once you have access to the connectors, you can label them up, unplug them and feed them back through the a pillar. Tempting add it might be to yank on the central locking hose, I decided that was a bad idea....
With that done, you can unbolt it and move it next to its replacement. Then realise that the two looms are different, and add swapping them over to the list of things to do.
The Citroen has been taking up most of my time at weekends, so little progress on the Corrado of late.
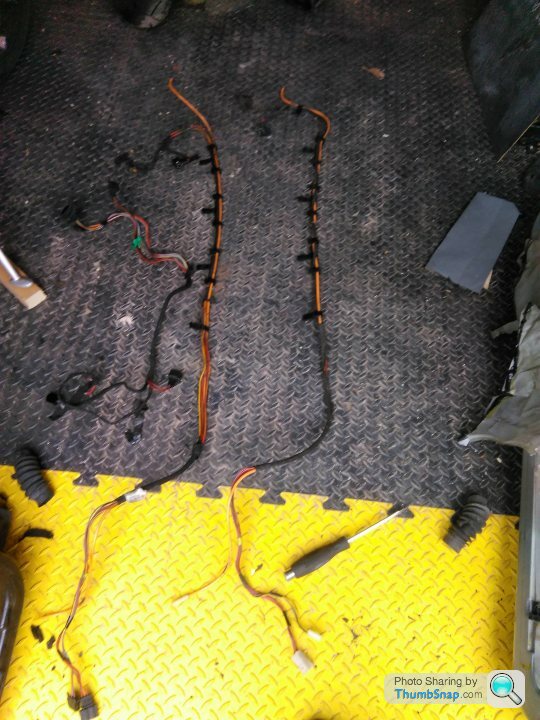
However, I've managed to take the loom out of the old door and add the relevant parts to the replacement door.
Drill out the rivets holding in the manual window mechanism and remove it, then do the same for the electric one.... and realise that it had been damaged in the past, possibly by the attempted theft.
I successfully plastic welded the three pieces back together, then realised that the rest of the mechanism required attention. This took many hours, and has so for proved fruitless. If I can get the cable back in the correct place, I'm still going to need a repair kit, as one of the outer cable sheaths has snapped. Then of course, I need to find one the correct length.

I can get a replacement mechanism for it, but essentially am baulking at the cost and the fact that any delay in getting it back on the road, is to be avoided. I've therefore decided after a lot of internal umming and ahhing to keep the manual windows (the winding mechanism comes out in the same place as the window switch), live with the door cards for now, and take my time fixing the electric mechanism at a later date.
this may or may not happen of course....
However, I have a set of proper manual lifters which were substantially cheaper than an entire electric mechanism, and have spent this evening reinstalling the manual one that I'd previously removed.
Plenty of grease prior to installation.
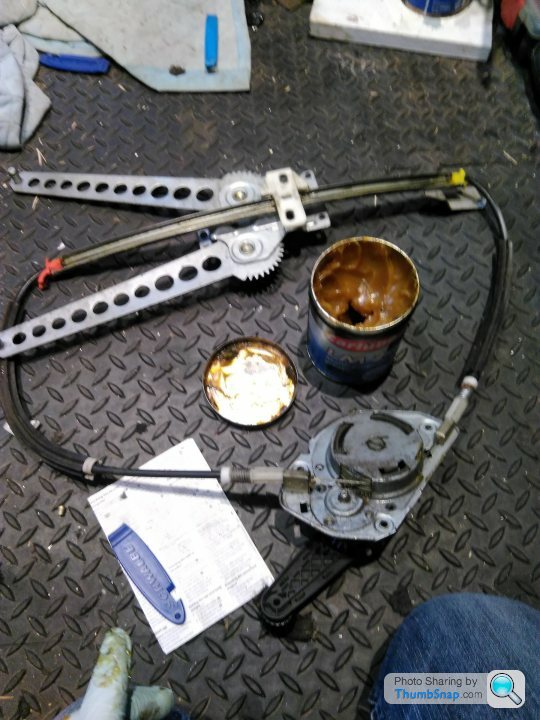
Then riveted in place:
The trickiest part of it, removing the window scraper seals like they were made of toxin infused fine blown glass! £600 for a NOS pair is not a place I want to find myself....
Of course, I'd already taken them off once and installed them on the replacement door before realising that the painter would have to take them off anyway.... To anyone doing this by the way, a set of bicycle tyre levers (plastic ones) will do the trick. It's a lot easier without the mechanism in there if course, you can just lift your arm up the inside of the door and gently pry the aluminium strip from the door, working your way along until enough of it is lifted up to allow more manipulation.
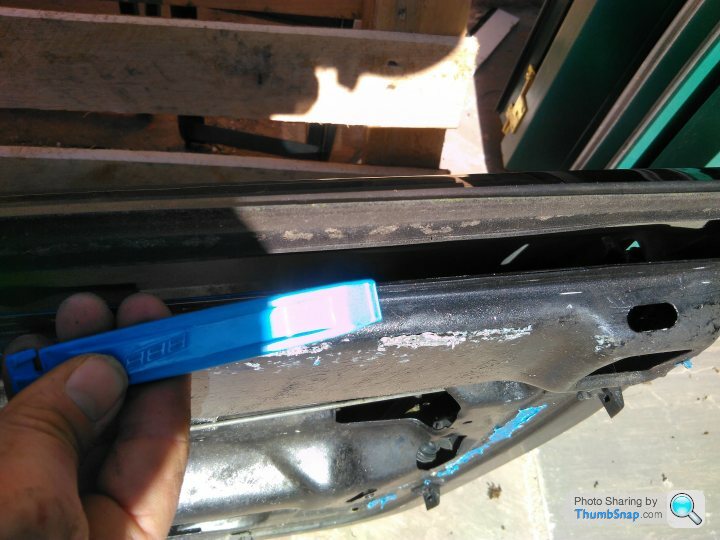
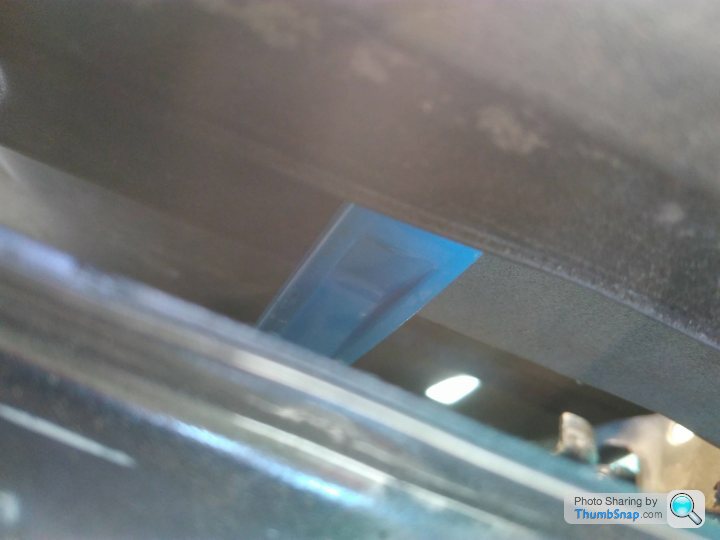
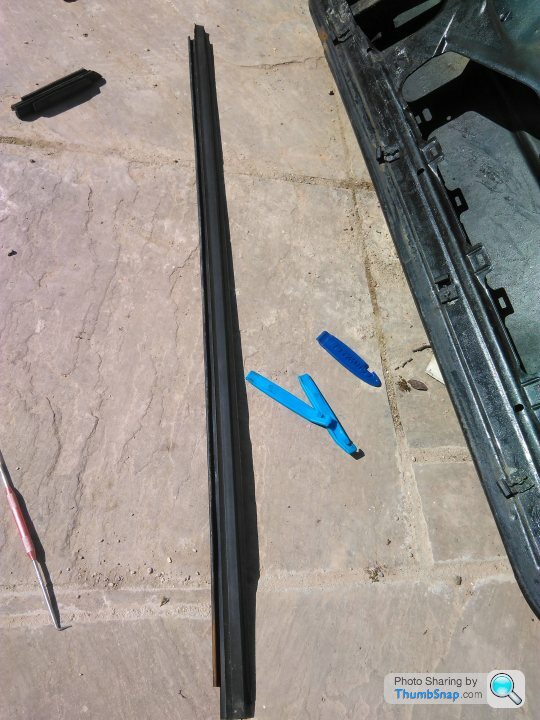
Reinstalling is just a matter of gently reattaching it, ask me how I know!
However, I've managed to take the loom out of the old door and add the relevant parts to the replacement door.
Drill out the rivets holding in the manual window mechanism and remove it, then do the same for the electric one.... and realise that it had been damaged in the past, possibly by the attempted theft.
I successfully plastic welded the three pieces back together, then realised that the rest of the mechanism required attention. This took many hours, and has so for proved fruitless. If I can get the cable back in the correct place, I'm still going to need a repair kit, as one of the outer cable sheaths has snapped. Then of course, I need to find one the correct length.
I can get a replacement mechanism for it, but essentially am baulking at the cost and the fact that any delay in getting it back on the road, is to be avoided. I've therefore decided after a lot of internal umming and ahhing to keep the manual windows (the winding mechanism comes out in the same place as the window switch), live with the door cards for now, and take my time fixing the electric mechanism at a later date.
this may or may not happen of course....
However, I have a set of proper manual lifters which were substantially cheaper than an entire electric mechanism, and have spent this evening reinstalling the manual one that I'd previously removed.
Plenty of grease prior to installation.
Then riveted in place:
The trickiest part of it, removing the window scraper seals like they were made of toxin infused fine blown glass! £600 for a NOS pair is not a place I want to find myself....
Of course, I'd already taken them off once and installed them on the replacement door before realising that the painter would have to take them off anyway.... To anyone doing this by the way, a set of bicycle tyre levers (plastic ones) will do the trick. It's a lot easier without the mechanism in there if course, you can just lift your arm up the inside of the door and gently pry the aluminium strip from the door, working your way along until enough of it is lifted up to allow more manipulation.
Reinstalling is just a matter of gently reattaching it, ask me how I know!
Twinbeltg60 said:
Hi,
Glad to see you were not deterred by the few low life's who unfortunately also inhabit this planet with us, hope you can get the doors sorted out, not an easy task, will you replace the hinges / pins at same time whilst the doors are off?
i have a question about your unfortunate forced stop on page-13, where the Fuel pump relay failed, you mentioned replacing the failed relay with Meyle 1008009009, but I am confused as I looked at my own G60 , the Fuel Pump relay which is located in fusebox Relay position 12, the OEM relay is labelled "80",(Part Nr:191906383) , and comparing that against the Meyle 1008009009, the pin out appears to be reversed, from my investigation I believe the replacement for the G60 relay 191906383 should be a Meyle:100 906 0001, which has the correct pin orientation, am I missing something?
My own G60 is a 1992 year, been off road for 10 years, but I hope to have it back on soon, f.y.i, I used your fuel pump replacement article as a guide to replace my original Pierburg in tank pump (as when I last had the car on the road it hesitated under full load acceleration sometimes) , luckily I had a original type VDO unit supplied by VW that I had bought 10+ years ago.
Hi Twinbeltg60, apologies for the delay in replying, glad the fuel pump replacement guide was useful! Glad to see you were not deterred by the few low life's who unfortunately also inhabit this planet with us, hope you can get the doors sorted out, not an easy task, will you replace the hinges / pins at same time whilst the doors are off?
i have a question about your unfortunate forced stop on page-13, where the Fuel pump relay failed, you mentioned replacing the failed relay with Meyle 1008009009, but I am confused as I looked at my own G60 , the Fuel Pump relay which is located in fusebox Relay position 12, the OEM relay is labelled "80",(Part Nr:191906383) , and comparing that against the Meyle 1008009009, the pin out appears to be reversed, from my investigation I believe the replacement for the G60 relay 191906383 should be a Meyle:100 906 0001, which has the correct pin orientation, am I missing something?
My own G60 is a 1992 year, been off road for 10 years, but I hope to have it back on soon, f.y.i, I used your fuel pump replacement article as a guide to replace my original Pierburg in tank pump (as when I last had the car on the road it hesitated under full load acceleration sometimes) , luckily I had a original type VDO unit supplied by VW that I had bought 10+ years ago.
Have you got a thread going on yours yet? Always good to see more G60s back on the road.
I may well have got the part number wrong, I'll double check next time I'm in the fuse box (sometime this week I hope).
I want going to do the door pins... but having fitted the replacement today, and felt it drop., I may well change my mind.
Still, the door is on, so I'm going to say that's progress on a wet Bank Holiday.
Not at all, it’s always good to see pictures of other Corrados, especially ones getting work done on them!
Nice underside shots too, is that a new rear beam?
My updates on this thread are largely to remind myself what I’ve done (I write it down as well, but in case the book goes missing)....
Also, I’ve referred back to it on a number of occasions for the ‘now, what did that look like before I took it apart?’ moments!
I’m over on the Corrado Forum as well (an absolute wealth of knowledge).
Twinbeltg60 said:
Glad to see you are making progress on the doors, and re my question about changing the door hinge pins, I have not done mine yet, but there are one or 2 threads around, this one on Corrado.net, maybe you have seen it ?, brave man. : https://the-corrado.net/topic/56146-door-hinge-pin...
Thanks for sending the link across - I followed it, read it, looked again at the pins and decided to go down the shim route instead.....aka_kerrly said:
Good work on the door, that can't have been much fun. You did well with the top rail an window scraper trim bits as they are so dam fragile & easy to damage. Does the central locking work & window still go up when you hold the key in the lock position? mega bonus if it does!!!!
I've switched to manual windows for now to get it mobile.....so no! If I install the electric windows again, then that's something to try, thanks - I didn't know they did that._Mja_ said:
I'm not looking forward to changing the door on my green one but your notes will be invaluable to look back on. Will you be getting the door painted whilst on the car? That would be good if I could do that to save all the faff.
Sadly my mk4 golf blew it's turbo last weekend so that's taking my time at the moment.
Sorry to hear about the Golf, good luck with getting it sorted. Having spoken to the paint shop, they will take the door off to paint it in order to do a proper job, which is good in many ways, but did mean that I wish I hadn't spent a load of time carefully rewiring it back in!Sadly my mk4 golf blew it's turbo last weekend so that's taking my time at the moment.
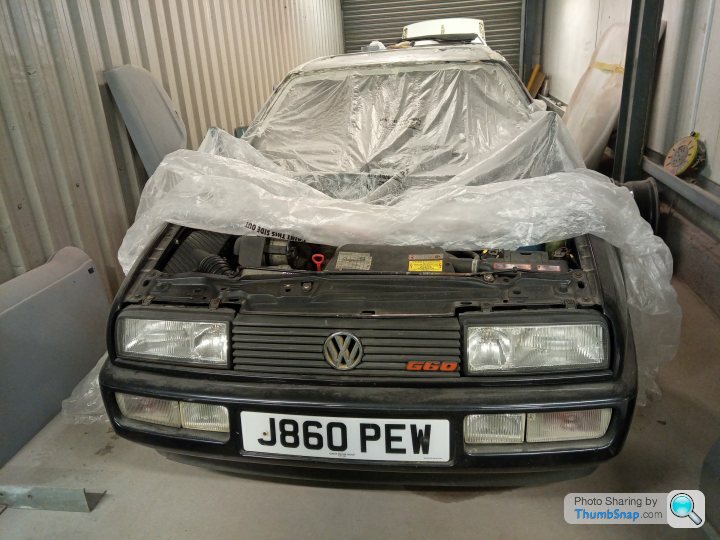
Anyway, to bring this up to date, it's been a busy month (work - it's ALWAYS a busy month), but progress has been made (despite sloping off for a trackday at Cadwell on the bike....)
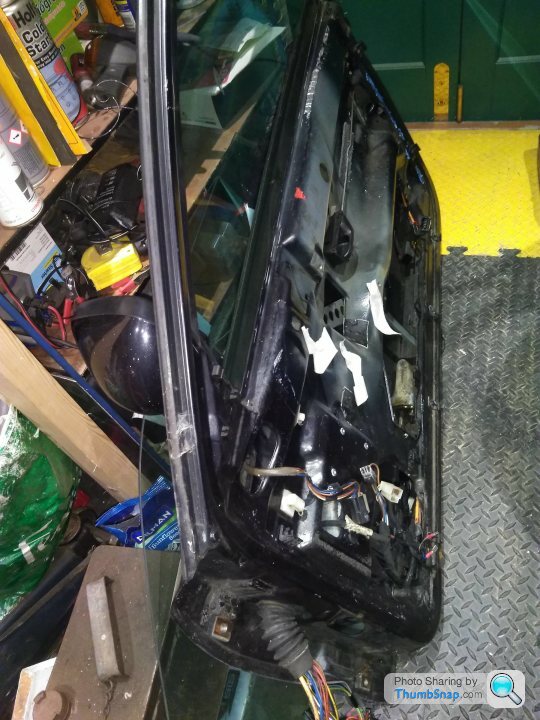
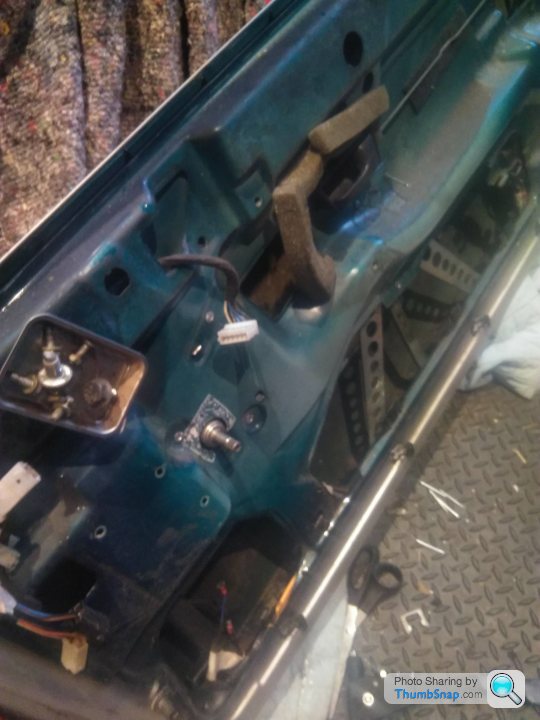
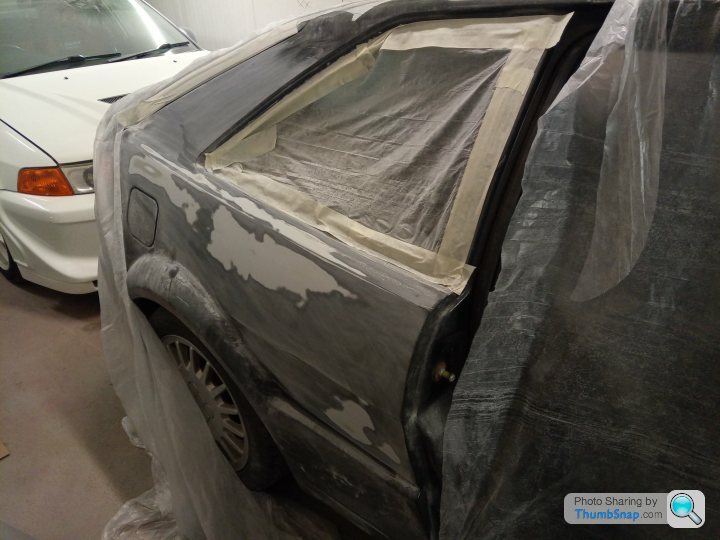
The inside of the driver's door remains bare, as the paint shop will be taking it off again (hopefully to do a better job of the last person that painted it from green to silver). However, all of the loom for the electrics is in there in case I choose to go back to electric windows (and can find a drivers' side regulator).
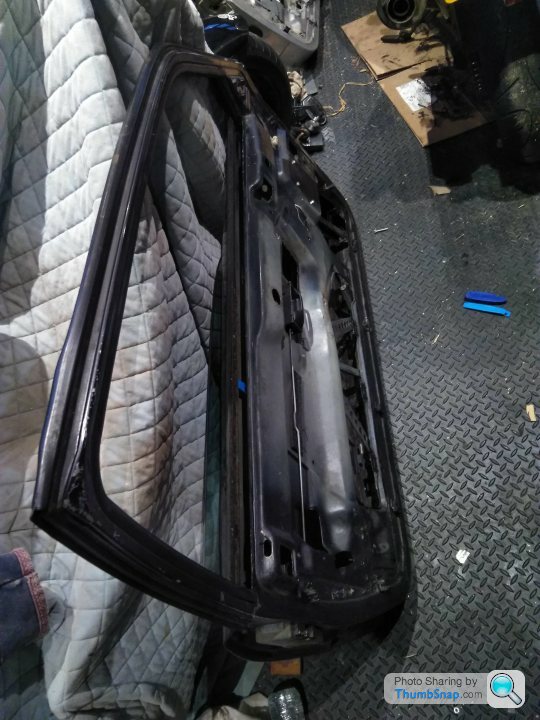
Time to get the passenger one off then.... Unbolting the door is the easy bit, it's 2 15mm bolts holding the door on and a 10mm one for the retaining strap. The main issue is carefully disentangling the loom without damaging it - start by removing a load of the plastic underneath the glove compartment:
Unplug all of the wiring connectors - labelling as you go if you want to be thorough, although to be honest, there's not that much scope for getting the connectors wrong. Then you can see what bridges between the door and the shell and wiggle the connectors out:
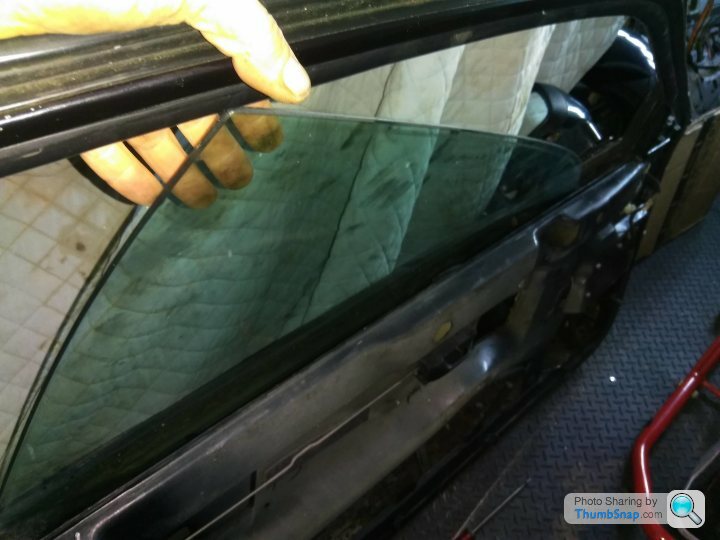
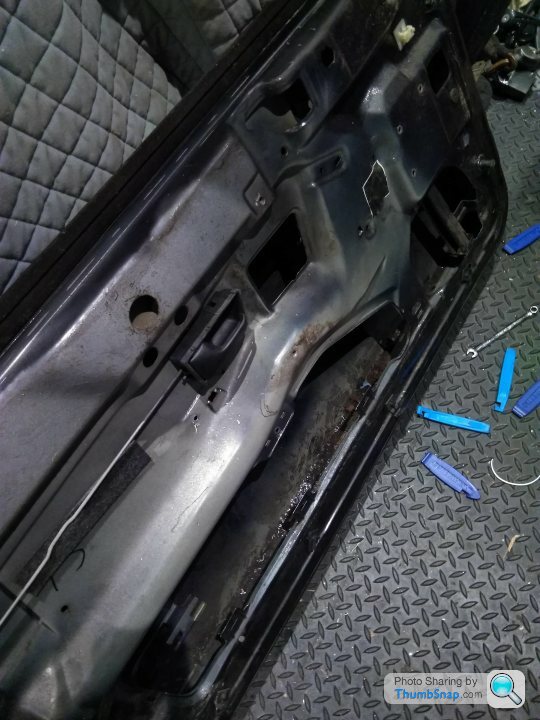
Having extracted this, you can unbolt the door and pull the loom out (some of the connectors are different). This is the difference between an electric and non-electric loom:
While I was leaving the manual mechanism in place on the passenger door (rather than changing my mind halfway through), I still needed to extract the ancillaries from the old door for transfer - mirror, handle, window scraper seals etc. Trust me, if you're doing this, remove the glass - it just makes things easier.
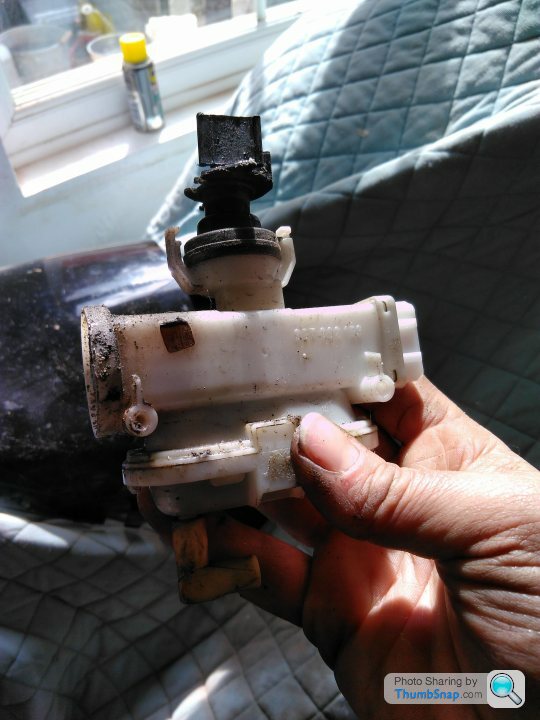
I also pulled the old central locking vacuum mechanism out of the door, as the one in the other door didn't want to take the vacuum tube.
Then onto the potentially most expensive bit - the scraper seal. Not sure if it was because I'd already done one, or it was ready to come off, but this one put up less of a fight. Bicycle tyre levers are the way forward!

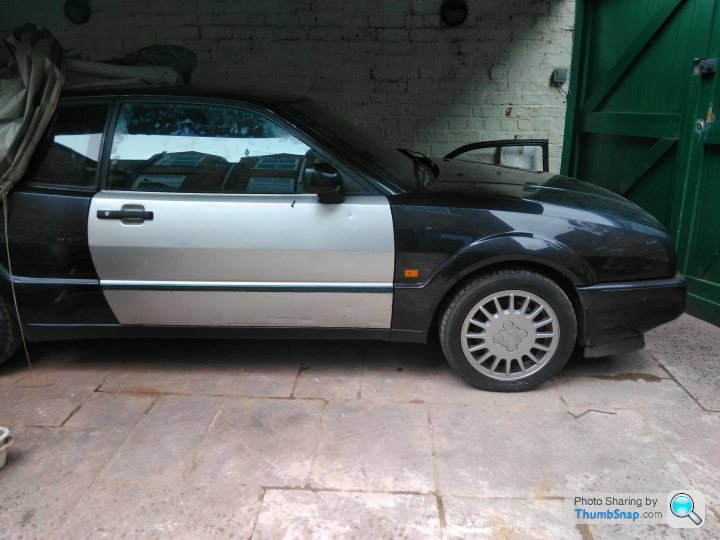
All ancillaries extracted from the old door, I put the replacement one on, and it lines up nicely. Doesn't drop like the drivers' one either fortunately! I then covered the broken window with a cardboard template wrapped in plastic and gaffer taped in place and headed off to the spray shop. The chap who's taking a look at it likes older cars (has a Mk1 Golf), and comes recommended by a mate.
There's no rush, so he's going to have a good look around it, and come up with some prices. The MOT run out tomorrow, the timing belt, thermostat, housing and water pump all need doing, but it's a step forward. The AX also has a test, and I've managed to get the Morris in the back yard so I can work out what the issue is with that..... Progress!
I went to have a further chat and agree the scope of works with the paint shop yesterday.
I'm probably going to sell up once the work has been completed, but seeing it yesterday really tested my resolve!
Regardless of its future ownership, I'm not getting a quick fix done on the paint (gulp). The remaining rear window and sunroof are coming out, and everything except the boot and rear bumper are getting sprayed.
This is to remove the micro blisters in the roof and bonnet, as well as deal with some scuffs and scratches.
It's going to be excellent when it's done (I'm not helping myself am I), and to keep the cost down, I'll take the headlining and sunroof out and remove the front bumper before it gets painted.
More progress at the end of the month I hope.
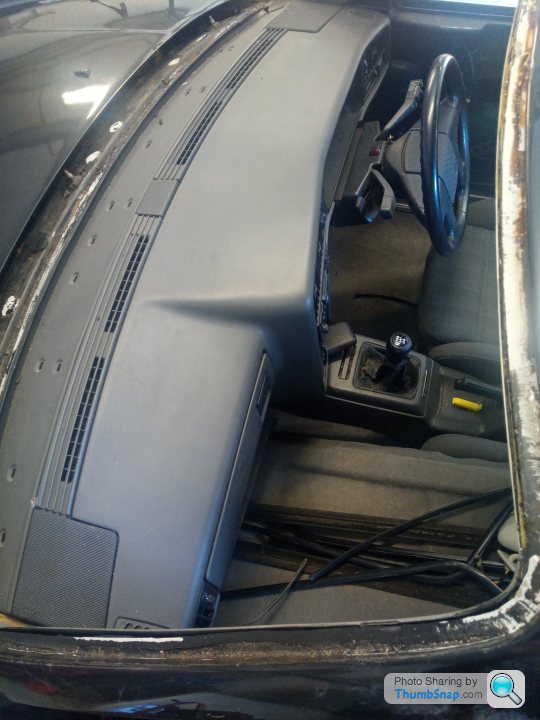
During a week off last week, I went to visit the Corrado at the spray shop to do some of the prep work.
As I didn’t want a quick blow over given the rust around the top of the windscreen (and the fact that the whole car is getting a respray), the sunroof had to come out to reveal the roof aperture – while technically possible with the sunroof cassette in situ, the sunroof wasn’t in the best of health, and I had a spare panel. Time to take the headlining out…..
There’s an excellent guide on the VW Vortex site that I used, and I’m not going to recreate here, but I confess, some of the elements of the removal are easier when someone has already taken the windscreen out and piled some of the trim in the passenger seat….
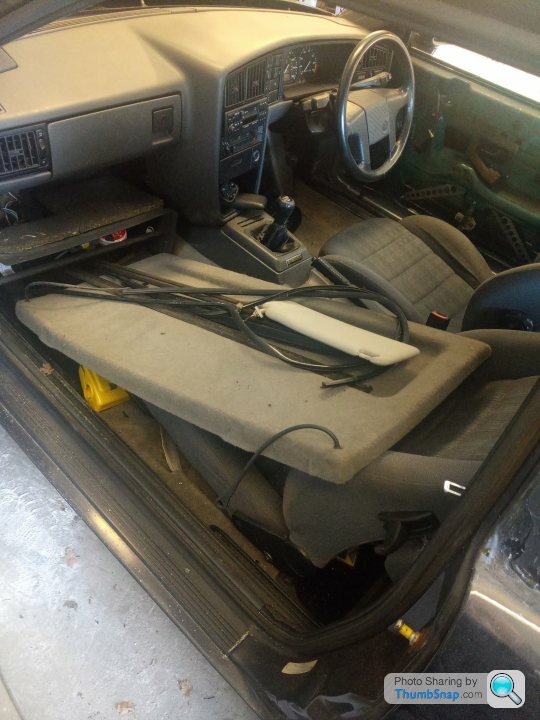
There’s still quite a lot of broken glass in the back seat which I managed to not embed too much of in my skin – a reminder of the little toe rags. I’ll do more vacuuming when I get the car back.
The headlining came out without a fight thanks to the guide – and gave me access to the sunroof.


A few bolts later and the cassette and panel were all out.
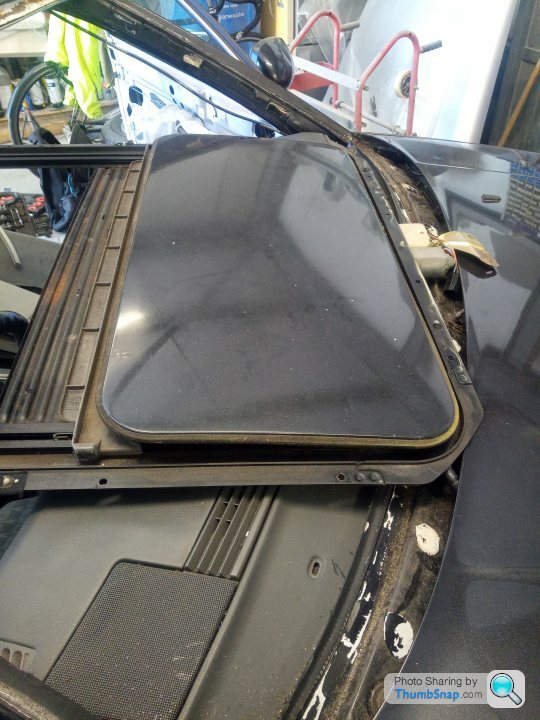
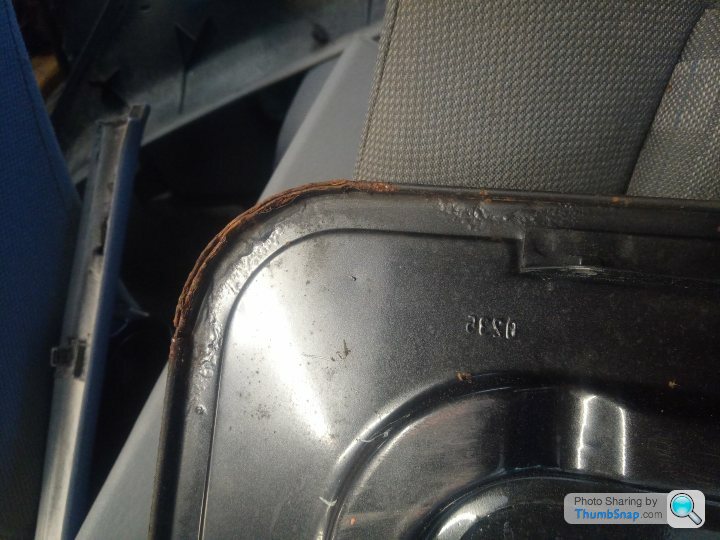
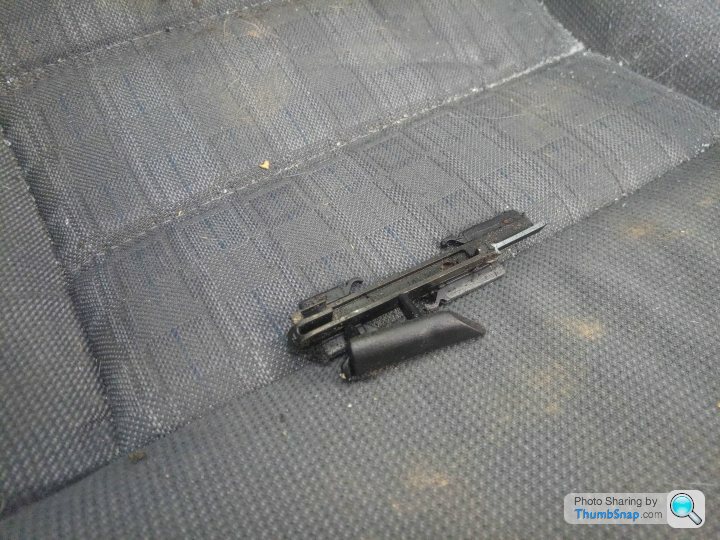
Some random bits fell out – never a good sign, and sure enough upon closer inspection of the sunroof mechanism, some parts had sheared off. As there’s no point in putting back in a broken sunroof a trip to eBay was in order – hellfire! When did Corrado sunroofs get so pricey? I managed to find one in reasonable condition (it seems) for a not unreasonable price and am waiting for it to be delivered. I did consider a moonroof conversion but will leave that for now. Looking at the condition of the panel, it seems to have had water trapped against it:

I'll get the replacement (non-crusty) panel sprayed up to match the rest of the car, and then put it all back in with new windscreen seals. That is providing that the replacement sunroof and cassette are in good condition! If not, then it's back to the drawing board!
As I didn’t want a quick blow over given the rust around the top of the windscreen (and the fact that the whole car is getting a respray), the sunroof had to come out to reveal the roof aperture – while technically possible with the sunroof cassette in situ, the sunroof wasn’t in the best of health, and I had a spare panel. Time to take the headlining out…..
There’s an excellent guide on the VW Vortex site that I used, and I’m not going to recreate here, but I confess, some of the elements of the removal are easier when someone has already taken the windscreen out and piled some of the trim in the passenger seat….
There’s still quite a lot of broken glass in the back seat which I managed to not embed too much of in my skin – a reminder of the little toe rags. I’ll do more vacuuming when I get the car back.
The headlining came out without a fight thanks to the guide – and gave me access to the sunroof.
A few bolts later and the cassette and panel were all out.
Some random bits fell out – never a good sign, and sure enough upon closer inspection of the sunroof mechanism, some parts had sheared off. As there’s no point in putting back in a broken sunroof a trip to eBay was in order – hellfire! When did Corrado sunroofs get so pricey? I managed to find one in reasonable condition (it seems) for a not unreasonable price and am waiting for it to be delivered. I did consider a moonroof conversion but will leave that for now. Looking at the condition of the panel, it seems to have had water trapped against it:
I'll get the replacement (non-crusty) panel sprayed up to match the rest of the car, and then put it all back in with new windscreen seals. That is providing that the replacement sunroof and cassette are in good condition! If not, then it's back to the drawing board!
Twinbeltg60 said:
Sorry,
My included link to PBCM isn't working...but if anyone is interested just google "PBCM , welding, Hampshire", then on their list of prior work vehicles go to Volkswagen, and Corrado G60.
They look like a good firm to use given their testimonials, a little far from me perhaps though My included link to PBCM isn't working...but if anyone is interested just google "PBCM , welding, Hampshire", then on their list of prior work vehicles go to Volkswagen, and Corrado G60.

The tyre pattern in the photos looks familiar, Toyo T1Rs….? Possibly whatever they copied of course!
I have had a replacement sunroof turn up in the post, I’ve not opened it yet, but hope to drop it off to the body shop next week on a day off (if I’m not acting as a motorcycle courier….)
A belated Merry Christmas all. The family have left, so I can get back to browsing PH
I’m going to give the paint shop a nudge in the new year to see how long they expect it to take, although I’m hoping they will do it in January/February. Would be nice for it to only be off the road of a year!
I’m going to give the paint shop a nudge in the new year to see how long they expect it to take, although I’m hoping they will do it in January/February. Would be nice for it to only be off the road of a year!

macp said:
From an old dub fan thanks OP. I once owned a G60 (see below) but in LHD Golf form. It was genuinely very special to drive.

A very nice Golf it is too! I do love my Mk2s....An update from the body shop, all panels are off ready for painting, with the exception of the front bumper, which I'm going to drop by and remove next week. I might use the opportunity to look at how easy the timing belt and water pump will be to do with most of the engine bay accessible!
Spinakerr said:
Ah the classic scope creep - good luck wiht the prep work - fortunately all timing and other engine consumables are all still readily available I hope.
Yes, timing belt kits are still available fortunately, although we're a way off that all I think. Thanks @mercedeslimos, it doesn't look too bad to do, and I have the Mk2 Golf Haynes manual when the time comes. Today however, was doing a little more prep for the upcoming paint work. This is how it sits currently:
The micro-blisters in the paint on the roof was as a result of a previous repair and paint job (there was filler....)
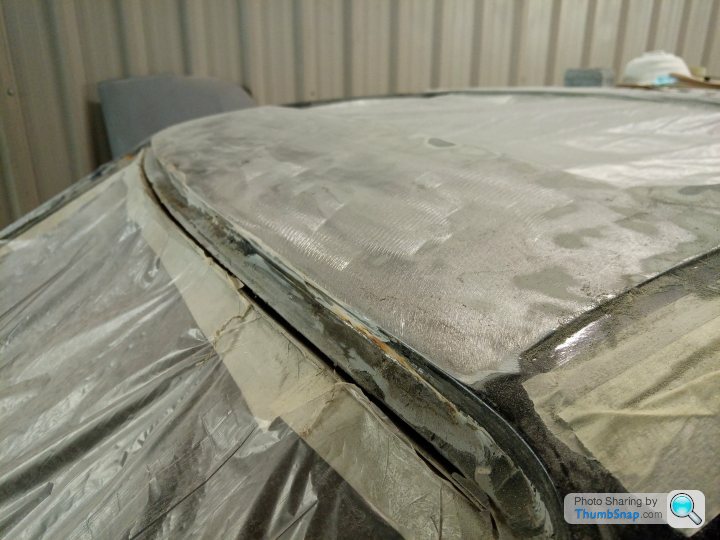
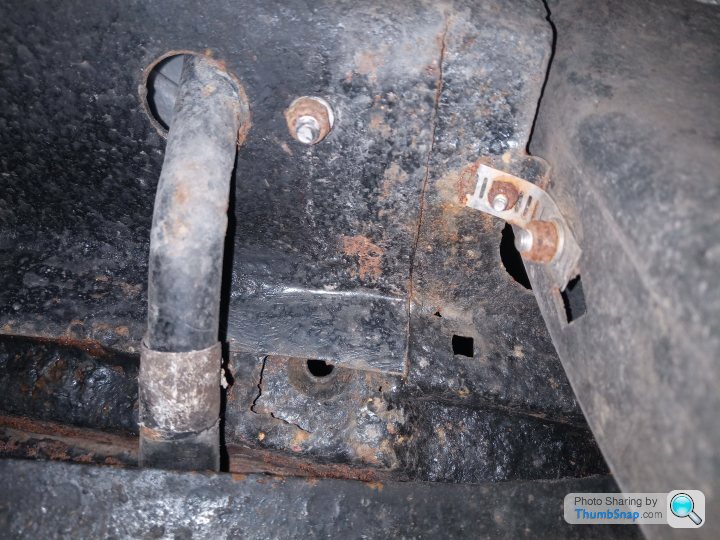
There's a patch of corrosion to the windscreen surround that will be sorted as part of this
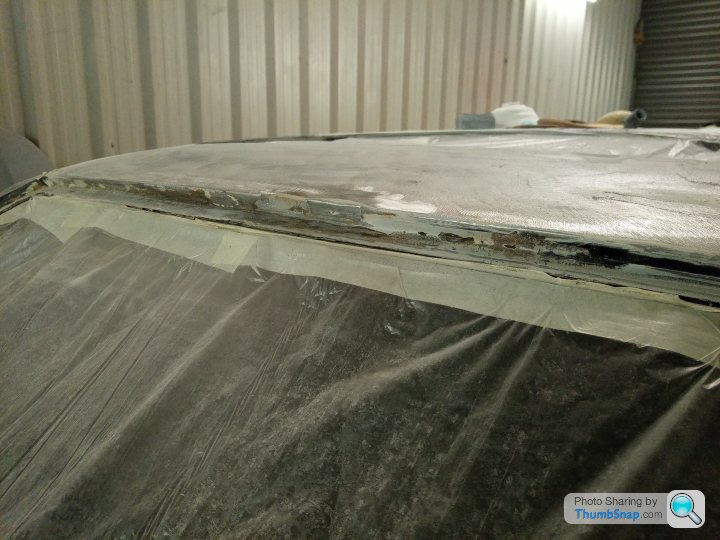
Work has also started on the OSR quarter
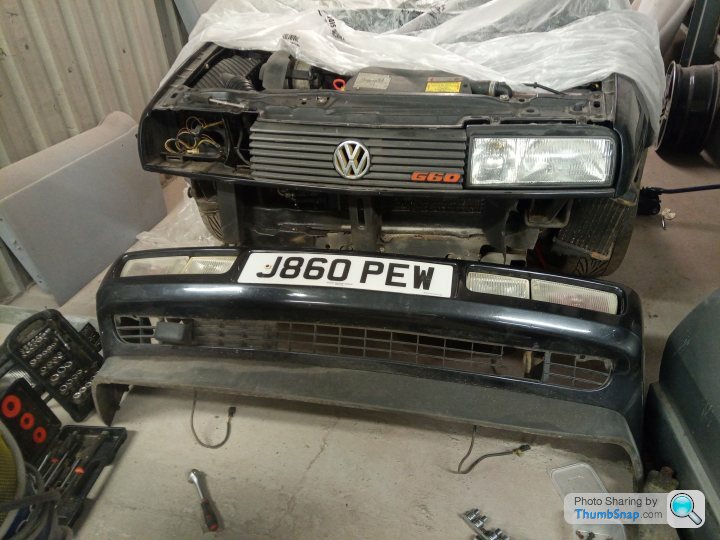
My job today however was to remove the front bumper. I know this is 4 no. 17mm headed bolts, as I put them in there with sping washers and plenty of copper slip. First though I had to get to them which involved all the shenanigans I'd conveniently forgotten about....
Brake cooling duct on the NS first which some idiot had will secured last time with a stainless hex. Guess which tool I'd forgotten to take to the body shop....
A borrow later, and the cooling duct was disconnected. Then followed the indicator and fog light wiring (which means removing the OS headlight) with pulling the arch liners out being the final piece of the puzzle
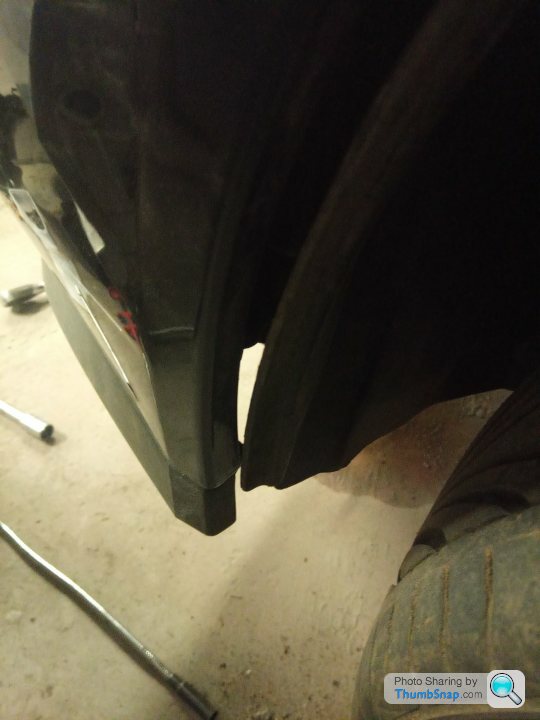
Et voila
I then thought I'd finish stripping the bumper of ancillaries as it's going to be painted, and every job I do, reduces the hours I'm paying someone else for...
Indicators? Easy, prize out with a screwdriver and pop out. Fog lights, well, they should have been straightforward, but one put up a fight....
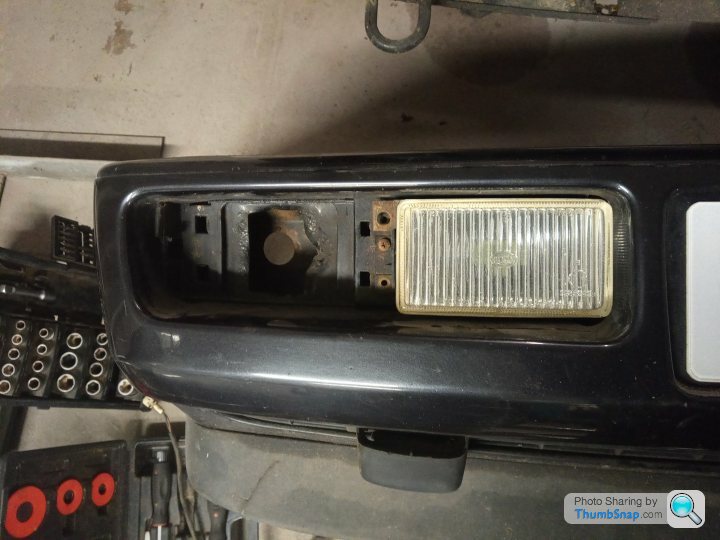
The screws pass through the plastic of the bumper and are held in by a metal clip. After 30 years of exposure though, it gave up and snapped leaving the screw to spin freely. There was a lot of prying, levering, cajoling, but it just wouldn't get purchase, and the plastic of the bumper was starting to deform.
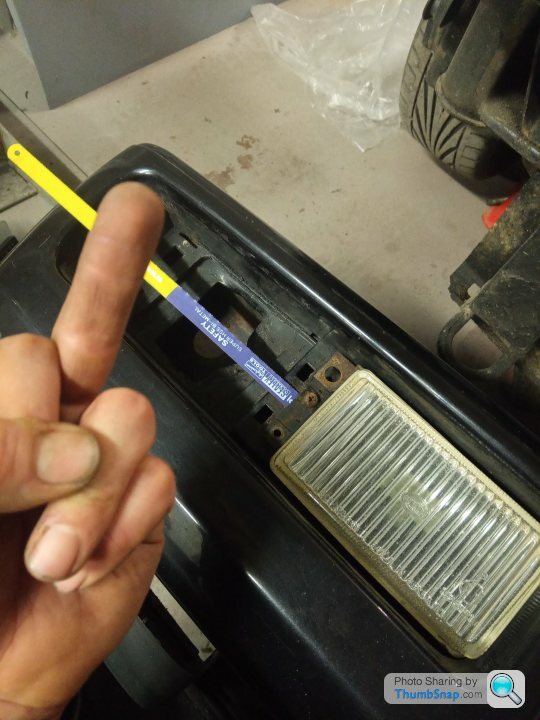
The traditional solution and photo...
However, it's off, stripped, and the car is a step closer to seeing the road again in 2022!
_Mja_ said:
Great work and good you've got to the bottom of the blisters by going back to metal. Expensive game this bodywork malarky - mines having to go back (elsewhere this time - a proper resto bodyshop with an 18mth wait) as could have done with going back to metal on the arches and I am not happy with the fuel filler door patch repair (bought a new 3/4 from classics just in case).
The front rad support is hard to find in good condition. Might be worth getting some paint on it to protect it whilst exposed.
Pleased to see the progress.
Cheers, yes I'm pleased with the body shop - they're fitting me round other things too keep the cost down, but came recommended by a mate who had his 911 done there. The front rad support is hard to find in good condition. Might be worth getting some paint on it to protect it whilst exposed.
Pleased to see the progress.
Good idea about the radiator support too, I've already had to weld a patch on it before, so more to keep the remainder in good nick is sensible.
Good luck with yours!
Twinbeltg60 said:
Hi,
A bit late in the thread to ask...but do you have a late style bonnet fitted even though yours is a pre-facelift car, or do my eye's deceive me ?
Sharp eyes! It does have a later bonnet fitted, from Corrado Forum memories, there were some of the later G60s that came with them, as 1992 was the changeover year. I confess In not sure if this one is original to the car though as I've never investigated.A bit late in the thread to ask...but do you have a late style bonnet fitted even though yours is a pre-facelift car, or do my eye's deceive me ?
I meant to update the thread to say the body shop have been in touch, and I'm nearing the front of the queue. Exciting times!
VeeReihenmotor6 said:
How is the Corrado going? I sold mine but am tempted by another, pref early spec like yours I looked at Bordeux Red one local to me which was a honest thing looking thing and the owner kindly put it up on the ramp for me however it had 20 dents down both sides and the paint was not good on the front or rear 3/4. Lost the history too.
Let me know if you're still thinking about selling.
Sorry for the late reply, no change in Corrado world unfortunately, but your post makes me face up to certain uncomfortable truths. The chap running the body shop has gone quiet following the news that he wasn't well towards the end of last year. I need to chase it up, but have some slight concerns over what the outcome might be.... Out of sight, out of mind right...? I looked at Bordeux Red one local to me which was a honest thing looking thing and the owner kindly put it up on the ramp for me however it had 20 dents down both sides and the paint was not good on the front or rear 3/4. Lost the history too. Let me know if you're still thinking about selling.
It's now been a couple of years since the attempted theft, and it's no further on. Let's hope for a positive outcome in 2023 and I'll let you know if that outcome is it leaving my possession for a new home.
Gassing Station | Readers' Cars | Top of Page | What's New | My Stuff