A tale of three discoveries (4x4 and V8 content)
Discussion


Started playing with the new disco....
My brothers Jeep is now looking good on 33" mud tyres:

Obviously I had to keep up with the "Off road arms race" .
.
To that end the 31" Grabber A/T tyres have been swapped for a set of 33" Pro-comp xterrain muds.

Vs the standard size tyres on the TD5 (29")

Fitted to the V8 along with original 2" suspension lift from the TD5.


Looking much more like it :smoking:
Quick snaps with the BMW


Not a bad two car garage if I do say so myself
My brothers Jeep is now looking good on 33" mud tyres:
Obviously I had to keep up with the "Off road arms race"
. To that end the 31" Grabber A/T tyres have been swapped for a set of 33" Pro-comp xterrain muds.
Vs the standard size tyres on the TD5 (29")
Fitted to the V8 along with original 2" suspension lift from the TD5.
Looking much more like it :smoking:
Quick snaps with the BMW
Not a bad two car garage if I do say so myself
Edited by JordanTurbo on Friday 17th April 15:39


Nice thread. I quite fancy a D2 in a couple of years. I can't see the prices dropping any further tan what they are now, especially with the Defender going at the end of this year.
I have a 83 series 3 in the garage, which is a keeper, but its not something that I can really use everyday.
What colour interior did you get? I've always liked green bodywork combined with the cream interior
I have a 83 series 3 in the garage, which is a keeper, but its not something that I can really use everyday.
What colour interior did you get? I've always liked green bodywork combined with the cream interior
Cheers, I'd love a nice series TBH.
The new one has brown leather, in good nick considering the age but not as nice.


Will be swapping the two interiors. Firstly because the cream is nicer and secondly because I don't want to buy new headrests (without screens) for the TD5.
bakerstreet said:
What colour interior did you get? I've always liked green bodywork combined with the cream interior
Had the cream leather interior in the TD5, very nice combination IMO.The new one has brown leather, in good nick considering the age but not as nice.
Will be swapping the two interiors. Firstly because the cream is nicer and secondly because I don't want to buy new headrests (without screens) for the TD5.
Edited by JordanTurbo on Sunday 26th April 10:50
A couple of years ago I toyed with buying one of these.
Had it been just me using it - id probably have cracked on and got one bought.
But I know that if id bought one and it went a bit pearshaped reliability wise - the non enthusiasts would lose their sense of humour fairly quickly
Bit of a problem that when its the farm workhorse
Had it been just me using it - id probably have cracked on and got one bought.
But I know that if id bought one and it went a bit pearshaped reliability wise - the non enthusiasts would lose their sense of humour fairly quickly
Bit of a problem that when its the farm workhorse
Howard- said:
Do you have any more information on how you made your electric mirrors fold with locking/unlocking? None of your images appear to work any more.
Sorry, been reorganising my photobucket account this week and it broke all the [IMG] links, all fixed now.Mirrors required a total of 3 relays and 3 diodes to take a feed from the central locking circuit and use it to trigger the mirrors. They are set up as shown in the diagram below (coloured wires are factory, black are added)
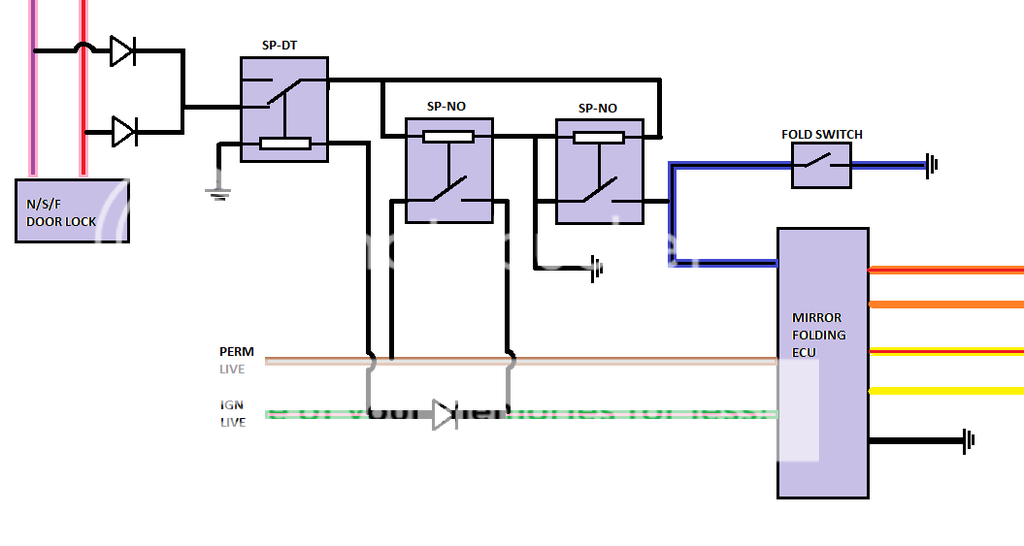
Relays from left to right:
1) Blocks the modification from working when the ignition is on, this prevents the mirrors folding if you lock the doors while in motion or if the auto lock (above 5mph) is turned on.
2) Provides a live feed to the ignition pin on the mirror ECU to "wake it up".
3) Mimics the action of the dashboard button to fold/unfold the mirrors.
The two diodes at the top are to prevent a short between the two central locking wires (one is unlock, other is lock)
The diode at the bottom is to block the feed from relay (2) so that the rest of the ignition circuit is not switched on for the duration of the central locking pulse.
Edited by JordanTurbo on Friday 17th April 16:47
Update on the V8's recent progress
As I said before, I decided to swap the two interiors and keep the lighter leather. Out with the old, which was also an opportunity for a good clean out.


Here you can see the difference in colour.

Before fitting the new seats the CD changer was removed from under the drivers seat as the new head unit makes it redundant.

Which left a nice spot free for the screen controller. Bolted down to the original changer mounts.

New seats in along with a good clean+condition using Gliptone, brilliant stuff.


New Disco came with a genuine Land Rover rubber boot floor protector, this was refitted along with an extension I made for when the centre row is folded.


As I said before, I decided to swap the two interiors and keep the lighter leather. Out with the old, which was also an opportunity for a good clean out.
Here you can see the difference in colour.
Before fitting the new seats the CD changer was removed from under the drivers seat as the new head unit makes it redundant.
Which left a nice spot free for the screen controller. Bolted down to the original changer mounts.
New seats in along with a good clean+condition using Gliptone, brilliant stuff.
New Disco came with a genuine Land Rover rubber boot floor protector, this was refitted along with an extension I made for when the centre row is folded.
Big update here.
So the new Discovery already had an LPG system fitted and working, great stuff. What you probably won't find surprising is that the fittment wasn't nearly upto the standard I'd want.


The system works but really needed some extra time and attention to detail spent on the installation. Unfortunately when the "professionals" do the work, time is money and somthing like what I have is often the result.
First job was to sort the injectors, pipes and nozzle placement. Took the upper manifold off.

Fuel rails and lower manifold off.

With the two manifolds together and on the bench you can see the issue properly.


Now it's widely regarded that the LPG injectors should be as close to the petrol ones as possible, 300mm is generally the max you should have. Having the nozzles in the upper manifold, while much quicker and easier to fit, is nowhere near ideal and the long hoses make it even worse. Changes needed to be made.
If I had small individual injectors, I could possibly fit them in the space under the upper manifold arches. Unfortunately mine are larger and in pairs so I had to get thinking.
First I sourced a new manifold without nozzle holes.

And used the dremel to remove the webs in the gaps between the runners.

This meant I could pass the LPG hoses through to the lower manifold.

Next job was fitting new nozzles to the lower manifold.

Right next to the petrol injectors as they should be

And back together to check the pipe work routing.


Much better
So the new Discovery already had an LPG system fitted and working, great stuff. What you probably won't find surprising is that the fittment wasn't nearly upto the standard I'd want.
- long pipes after the injectors
- poor placement of LPG nozzles
- injectors not secure
- looms not tidy
- ECU wedged in the corner of the bay
The system works but really needed some extra time and attention to detail spent on the installation. Unfortunately when the "professionals" do the work, time is money and somthing like what I have is often the result.
First job was to sort the injectors, pipes and nozzle placement. Took the upper manifold off.
Fuel rails and lower manifold off.
With the two manifolds together and on the bench you can see the issue properly.
Now it's widely regarded that the LPG injectors should be as close to the petrol ones as possible, 300mm is generally the max you should have. Having the nozzles in the upper manifold, while much quicker and easier to fit, is nowhere near ideal and the long hoses make it even worse. Changes needed to be made.
If I had small individual injectors, I could possibly fit them in the space under the upper manifold arches. Unfortunately mine are larger and in pairs so I had to get thinking.
First I sourced a new manifold without nozzle holes.
And used the dremel to remove the webs in the gaps between the runners.
This meant I could pass the LPG hoses through to the lower manifold.
Next job was fitting new nozzles to the lower manifold.
Right next to the petrol injectors as they should be
And back together to check the pipe work routing.
Much better
Edited by JordanTurbo on Sunday 3rd May 16:54
Thanks guys.
From a day that went well, to a day that didn't go quite so well.......
Decided while I'm doing engine work I'd sort the weaping rocker cover seals and also to look into a light top end ticking under load.
Covers off, engine has led a hard life by the looks of it.

Rocker shafts and push rods out for a clean up.


More deposits

Before stripping them down for cleaning, I gave them a quick inspection. This is what I found....


One of the rocker thrust pads has cracked and lost a chunk. More worryingly, another is missing completely and the valve has worn about 1.5mm into the rocker itself. I checked the corresponding valve stem and it's chewed up as well. That'll be the ticking noise then.
So as well as new rockers, the next job will be to take the heads off to sort the valve (at least I can clean them at the same time). I'll also have to take the sump off to see if I can find the missing fragments.
This is quickly snowballing into a full rebuild. I'm having thoughts of biting the bullet and going for a 4.6ltr conversion with top hat liners and high torque cam shaft while it's apart.
From a day that went well, to a day that didn't go quite so well.......
Decided while I'm doing engine work I'd sort the weaping rocker cover seals and also to look into a light top end ticking under load.
Covers off, engine has led a hard life by the looks of it.
Rocker shafts and push rods out for a clean up.
More deposits
Before stripping them down for cleaning, I gave them a quick inspection. This is what I found....
One of the rocker thrust pads has cracked and lost a chunk. More worryingly, another is missing completely and the valve has worn about 1.5mm into the rocker itself. I checked the corresponding valve stem and it's chewed up as well. That'll be the ticking noise then.
So as well as new rockers, the next job will be to take the heads off to sort the valve (at least I can clean them at the same time). I'll also have to take the sump off to see if I can find the missing fragments.
This is quickly snowballing into a full rebuild. I'm having thoughts of biting the bullet and going for a 4.6ltr conversion with top hat liners and high torque cam shaft while it's apart.
HarryW said:
Great, love it when threads get proper nuts and bolts oily.
You should like this then 
Since finding the recent engine issues I had to do some thinking. After a long chat with the wife (which I'm sure included the word "investment" several times
) I've decided to bite the bullet and go for a full rebuild including upping the power a bit. Spec will include:
Refurbished "top hat" linered block.
Stroked from 4ltr to 4.6ltr
Compression raised slightly from 9.35:1 to 9.75:1
Kent H180 "high torque" camshaft
Refurbished heads
Mapping by Mark Adams at tornado systems (well known in Rover V8 circles)
So the first job was to remove the old lump and that required some now toys

Whipped the heads off to make things easier

And out


Quick clean up

Sump off and stripped down.


One bare block ready to go to Turner Engineering in Surrey....

And swapped for a nice shiny one with much better "top hat" liners


And a nice box of rebuild goodies

MUCH more to come

P.S Sorry for the terrible quality phone pics

So unfortunately there was a bit of a setback this week.
I picked up the new block on Monday, and as I said the plan is to stroke it to 4.6ltrs using a p38 crank and rods. To that end I bought a donor engine which turned up by pallet Wednesday........

Lifted it off of the pallet and took the torque converter off so it could go on my engine stand.

Quick note for anyone needing longer gearbox bolts to fit an RV8 to a stand - rocker shaft bolts are perfect

Onto the engine stand so it could be stripped down.....

Decided to have a quick look inside at the general condition of everything and took the sump off......

And then I spotted it.......

It was a bloody 4ltr and absolutely no use to me!
Luckily it wasn't too much "labor time" wasted as I only lifted it onto the stand before I checked. Could have been a lot worse if I'd stripped everything else down before I noticed! Was still annoyed I wasted two days waiting for it to be delivered though.
Spoke to the breaker yesterday and they were fine about it TBH. He confirmed the Range Rover was definitely a 4.6 HSE but when we checked the engine number againced the log book, it was totally different. It must have had a new bottom end at some point.
Good news is it was an honest mistake and they're sorting a courier to take it back no problem. Bad news is that the hunt is now back on for a cheap donor engine.
I picked up the new block on Monday, and as I said the plan is to stroke it to 4.6ltrs using a p38 crank and rods. To that end I bought a donor engine which turned up by pallet Wednesday........
Lifted it off of the pallet and took the torque converter off so it could go on my engine stand.
Quick note for anyone needing longer gearbox bolts to fit an RV8 to a stand - rocker shaft bolts are perfect
Onto the engine stand so it could be stripped down.....
Decided to have a quick look inside at the general condition of everything and took the sump off......
And then I spotted it.......
It was a bloody 4ltr and absolutely no use to me!
Luckily it wasn't too much "labor time" wasted as I only lifted it onto the stand before I checked. Could have been a lot worse if I'd stripped everything else down before I noticed! Was still annoyed I wasted two days waiting for it to be delivered though.
Spoke to the breaker yesterday and they were fine about it TBH. He confirmed the Range Rover was definitely a 4.6 HSE but when we checked the engine number againced the log book, it was totally different. It must have had a new bottom end at some point.
Good news is it was an honest mistake and they're sorting a courier to take it back no problem. Bad news is that the hunt is now back on for a cheap donor engine.
Alright guys, had a good days progress today
Started off by getting the block on my stand and removing all the casting flash. Basically the raged edges left from the casting process.
Before:


After:


Highly unlikely to have caused any issues (hence why it's not removed at the factory) but I couldn't put up with knowing it's there. :lol:
Next up was a lick of paint. Starting with masking off all mating faces.


Then a few coats of high temp paint.

And masking removed


Very happy with how it came out so onto the next job which was to prep the heads for refurb.
Stripped down.

And cleaned

Marks on the underside suggest it was still on it's original head gaskets.

Backed up by the head dimensions showing they've never been skimmed :nod:


So all done and ready

Heads are now with Scholar Racing Engines for a light skim, new valve guides and re-cut valve seats. :thumb:
Have a 4.6 crank and rods on the way which should arrive tomorrow, then I can do some more building
Started off by getting the block on my stand and removing all the casting flash. Basically the raged edges left from the casting process.
Before:
After:
Highly unlikely to have caused any issues (hence why it's not removed at the factory) but I couldn't put up with knowing it's there. :lol:
Next up was a lick of paint. Starting with masking off all mating faces.
Then a few coats of high temp paint.
And masking removed
Very happy with how it came out so onto the next job which was to prep the heads for refurb.
Stripped down.
And cleaned
Marks on the underside suggest it was still on it's original head gaskets.
Backed up by the head dimensions showing they've never been skimmed :nod:
So all done and ready
Heads are now with Scholar Racing Engines for a light skim, new valve guides and re-cut valve seats. :thumb:
Have a 4.6 crank and rods on the way which should arrive tomorrow, then I can do some more building
You're one of those neighbours who'd have me twitching at the curtains wondering what the heck you were doing to the car now .... then I'd spend all day engrossed as the build progressed! Always like the Readers Cars forum, fascinated to read up on projects where people have the skills and knowledge to do this sort of stuff. I couldn't even swap over the car stereo head unit so these threads are great - keep posting!
bobby_vimto said:
You're one of those neighbours who'd have me twitching at the curtains wondering what the heck you were doing to the car now .... then I'd spend all day engrossed as the build progressed!
thanksMy driveway playing used to attract a lot of "Is it broken AGAIN?" comments. Mainly from the "cars explode after 3 years" types, and almost always followed by a blank look when I told them I just enjoy taking cars apart.

Most of the neighbours are used to it now though. So it tends to be "Can you look at XYZ" or "My car needs XYZ changing, can you help me do it" which is kind of nice.

Good thread, I had a green v8 D1. I loved that car and it's probably the only car that I actually regret selling. Have a D3 now, which is great but has lost some of the charm and I don't get Christmas cards from the petrol station anymore.
I have a hankering for a V8 in something else after reading this though.
Good pics of your travels too.
I have a hankering for a V8 in something else after reading this though.
Good pics of your travels too.
Another update for you guys, big one this time
So yesterday morning I was still waiting for my new crank to arrive. To that end I decided to get on with de-ringing and cleaning up the old pistons so they could be reused with the 4.6 rods.


Then it came, definatly the right one this time

Also with it was a set of 4.6 rods and pistons. The rods I needed, but the pistons I didn't. Due to the longer stroke of the 4.6, the pistons have a much larger dish on top to keep the compression ratio the same at 9.35:1. Here's a couple of pictures.


I could have used them no problem but a common route is to keep the 4.0 pistons, this lifts it up to about 9.75:1 compression. The gudgeon pins are pressed into the rod, and I'm not paying for the Land Rover tool, so I needed to make something to get them out again.

The larger one supports the piston on these two flat parts, the same place the genuine tool does.

I don't have my own press so off I went to the engineering bay at work, armed with my box of pistons and a packet of chocolate Hobnobs for the guys that work there


All apart

Here's the difference in the rods. Visually identified by the number of dimples on the side, the 4.6 are slightly shorter to match the longer stroke crankshaft.


So after leaving the gudgeon pins in the freezer over night to make installation easier, I went back into work this morning to carry on.
Before starting I took the opportunity to check my torque wrench was calibrated for the build later. All good

Then I spent some time weighing and matching the pistons and rods. All 8 sets are within 3 grams of each other now.

With all that done I could come home and crack on with the build. First job was to take the main caps out of the block.

New shells in

Crank in.

Out with the Plastiguage to check the main bearing clearances.

Acceptable clearance is between 0.0004" and 0.002". Plastiguage showed a little over 1 thou so all good.

Crank back out to add some assembly lube.

Back in and Hylomar blue added to the rear main cap as per the Land Rover rebuild procedure.

Cap on along with the rear crank seal.

All torqued up.

Including cross bolts, remembering to fit the sealing washers

And here's one bit people forget. Checking for, and removing any sealant that has squashed out from the rear cap. You don't want it falling off, finding it's way into the oil system and blocking something.

Next job was fitting the pistons. First the new rings needed checking for gap which were all within limits.

I also checked the ring clearance in the piston grove, and the skirt to cylinder clearance, but didn't get any pictures. With them all fine the pistons could go in.

All done.


Big end bearing clearance checked. A touch bigger than the mains but no issues, still well within tolerance.

And all torqued up with new stretch bolts.

Finished up today with fitting my ARP head studs, ready for picking up the heads from Scholar tomorrow.

Thanks for reading.
So yesterday morning I was still waiting for my new crank to arrive. To that end I decided to get on with de-ringing and cleaning up the old pistons so they could be reused with the 4.6 rods.
Then it came, definatly the right one this time
Also with it was a set of 4.6 rods and pistons. The rods I needed, but the pistons I didn't. Due to the longer stroke of the 4.6, the pistons have a much larger dish on top to keep the compression ratio the same at 9.35:1. Here's a couple of pictures.
I could have used them no problem but a common route is to keep the 4.0 pistons, this lifts it up to about 9.75:1 compression. The gudgeon pins are pressed into the rod, and I'm not paying for the Land Rover tool, so I needed to make something to get them out again.
The larger one supports the piston on these two flat parts, the same place the genuine tool does.
I don't have my own press so off I went to the engineering bay at work, armed with my box of pistons and a packet of chocolate Hobnobs for the guys that work there
All apart
Here's the difference in the rods. Visually identified by the number of dimples on the side, the 4.6 are slightly shorter to match the longer stroke crankshaft.
So after leaving the gudgeon pins in the freezer over night to make installation easier, I went back into work this morning to carry on.
Before starting I took the opportunity to check my torque wrench was calibrated for the build later. All good
Then I spent some time weighing and matching the pistons and rods. All 8 sets are within 3 grams of each other now.
With all that done I could come home and crack on with the build. First job was to take the main caps out of the block.
New shells in
Crank in.
Out with the Plastiguage to check the main bearing clearances.
Acceptable clearance is between 0.0004" and 0.002". Plastiguage showed a little over 1 thou so all good.
Crank back out to add some assembly lube.
Back in and Hylomar blue added to the rear main cap as per the Land Rover rebuild procedure.
Cap on along with the rear crank seal.
All torqued up.
Including cross bolts, remembering to fit the sealing washers
And here's one bit people forget. Checking for, and removing any sealant that has squashed out from the rear cap. You don't want it falling off, finding it's way into the oil system and blocking something.
Next job was fitting the pistons. First the new rings needed checking for gap which were all within limits.
I also checked the ring clearance in the piston grove, and the skirt to cylinder clearance, but didn't get any pictures. With them all fine the pistons could go in.
All done.
Big end bearing clearance checked. A touch bigger than the mains but no issues, still well within tolerance.
And all torqued up with new stretch bolts.
Finished up today with fitting my ARP head studs, ready for picking up the heads from Scholar tomorrow.
Thanks for reading.
Edited by JordanTurbo on Thursday 25th June 20:23
Edited by JordanTurbo on Thursday 25th June 20:38
Gassing Station | Readers' Cars | Top of Page | What's New | My Stuff