The "66 El Camino that I finally own" Thread
Discussion


A well overdue update on this - I've decided spring has finally arrived after crawling out of winter hibernation and not seeing my shadow!
It's still a bit too cold and damp for paint but there are plenty of other jobs to crack on with.
Scope creep is an ever-present danger in this project, although I have been trying to keep these words of wisdom (from page 12) in mind:
Likewise the windscreen had to come out as did the dashboard and all the switches, gauges and heater controls. Of course with all that lot removed it was obvious how bad some of the under-dash wiring was, so that will need to be tidied up.
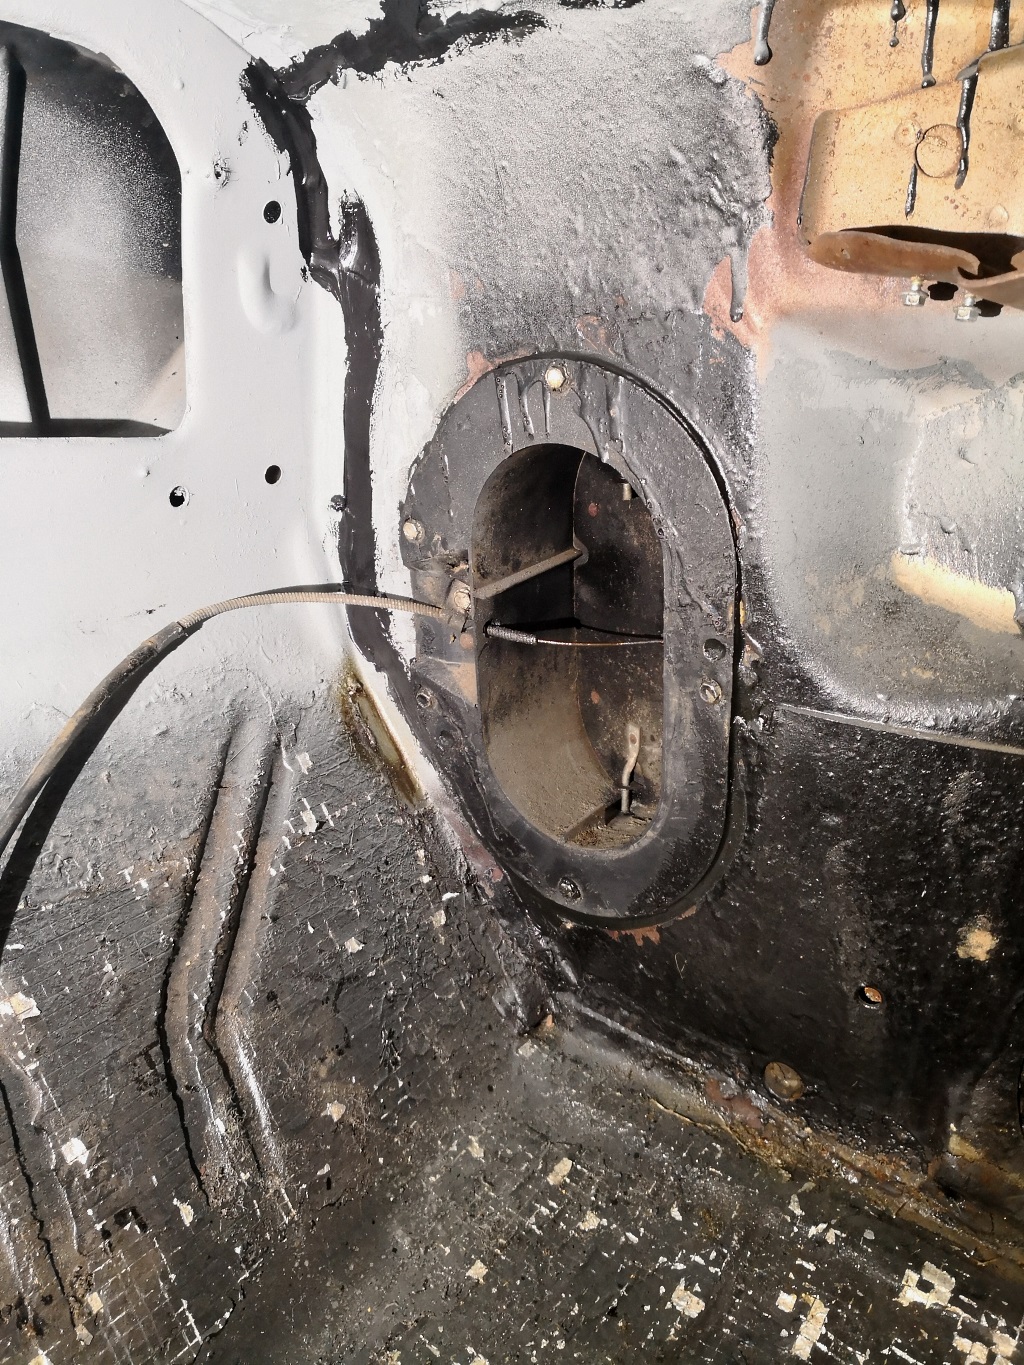
Then there is the inside of the firewall / bulkhead. Barely coated in a dusting of red oxide from the factory, time and water leaks have caused quite a bit of surface rust. And the insulation is rotting and falling apart. Access will never be better than it is now, so add sorting that to the list.
Obviously to clean the bulkhead up and renew the insulation properly, additional things like the heater box, cowl vents and various other fittings (e.g. handbrake pull lever) need to be removed. And so it goes on...
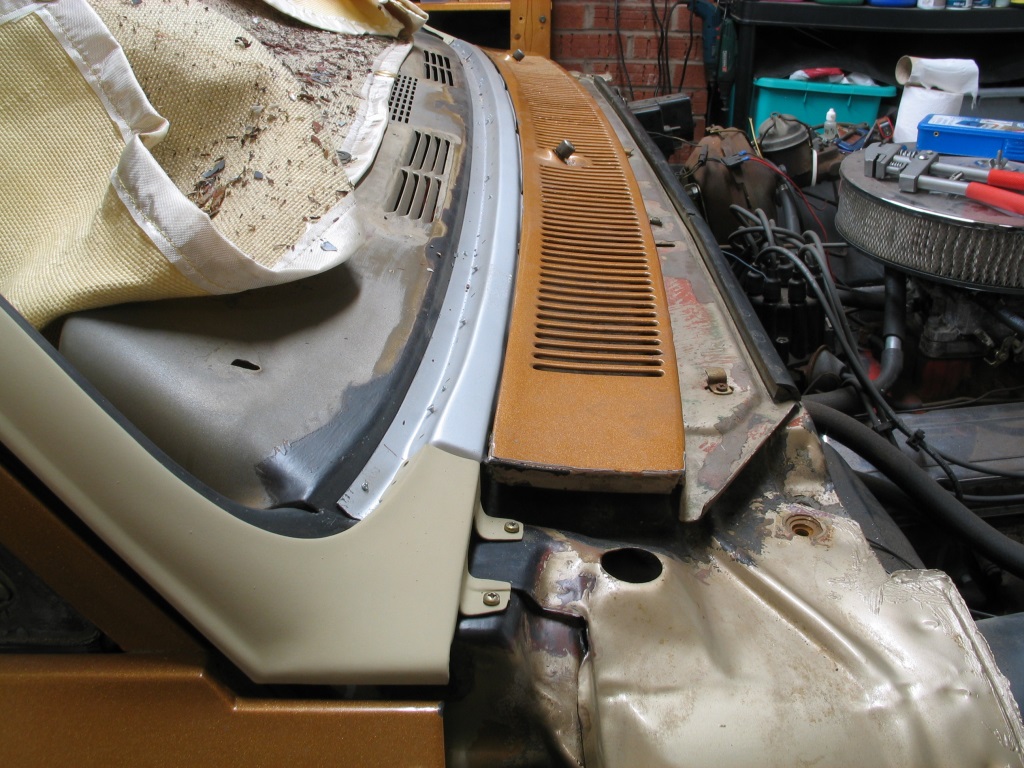
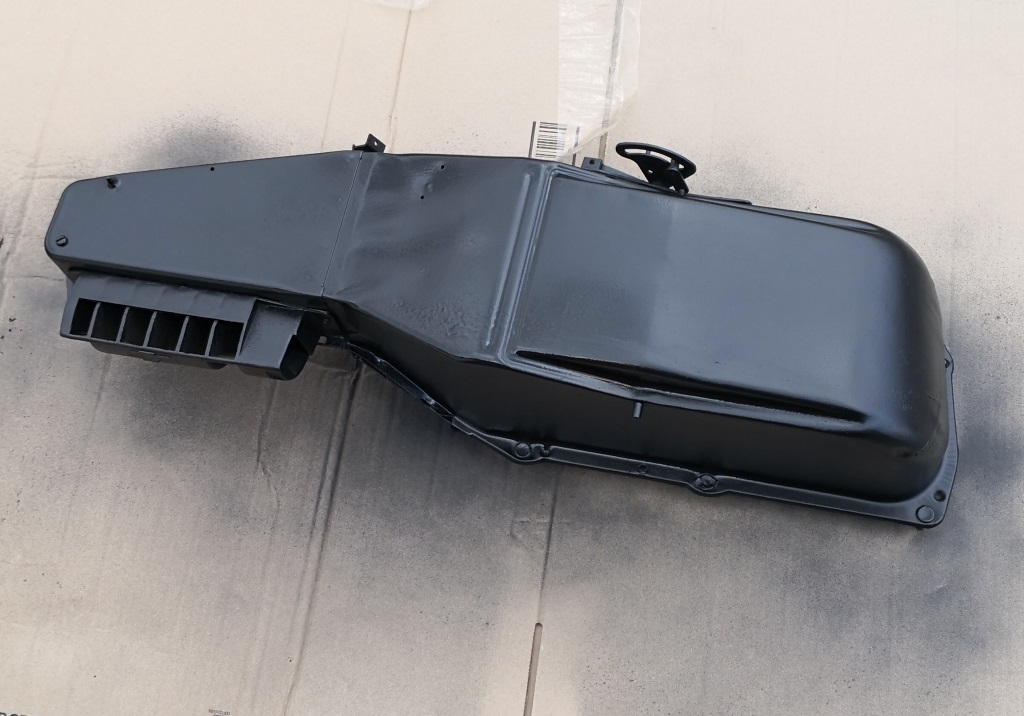
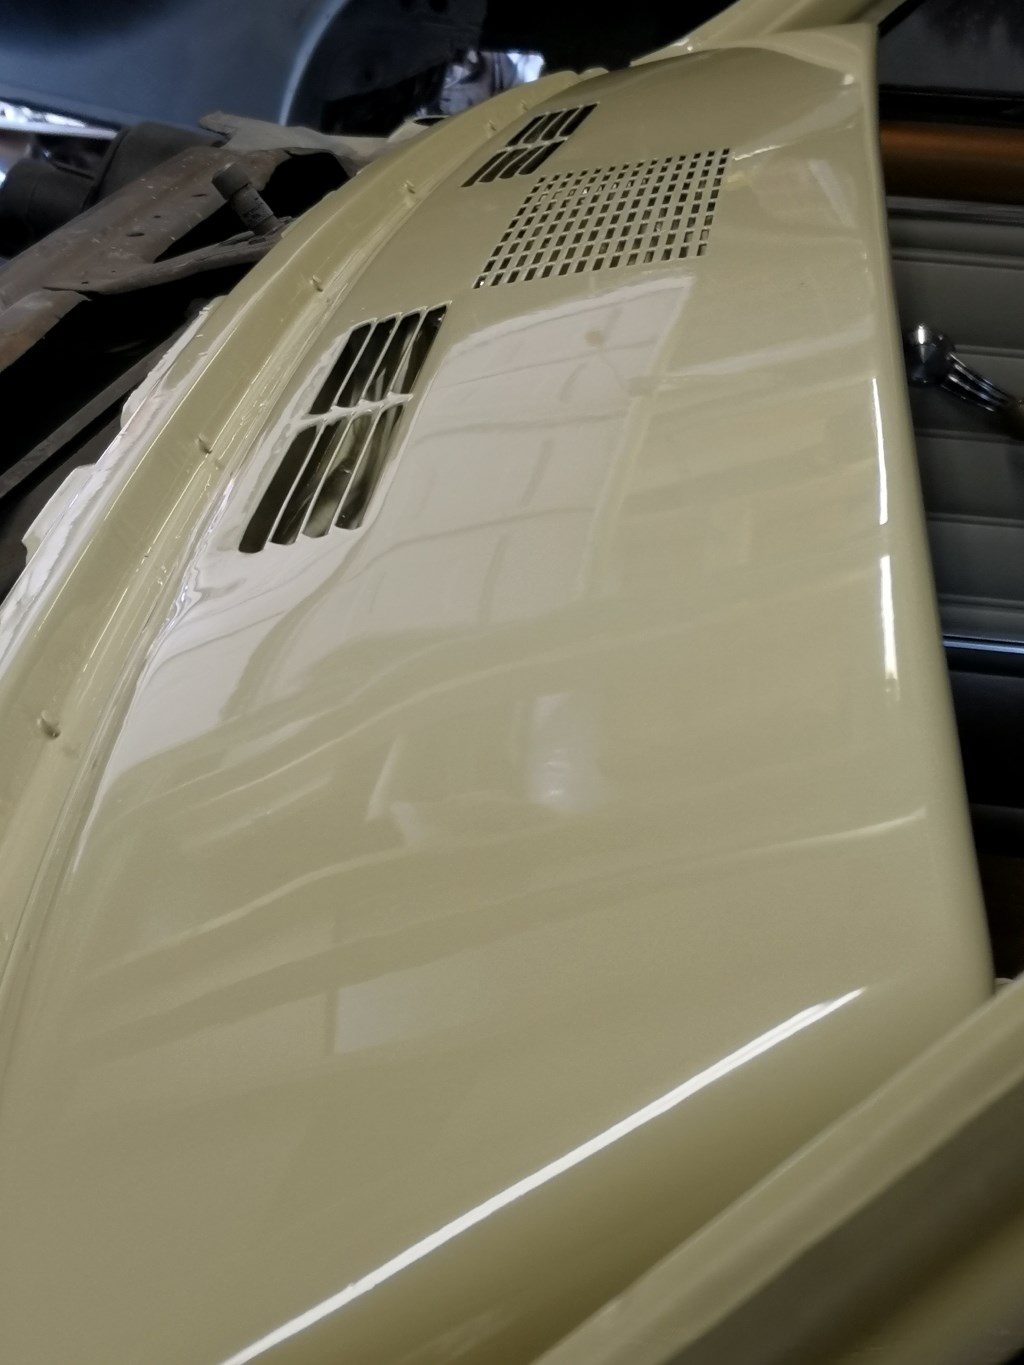
A quick primer on the ventilation system of a non-aircon '66 El Camino (similar to many other cars of the same era)
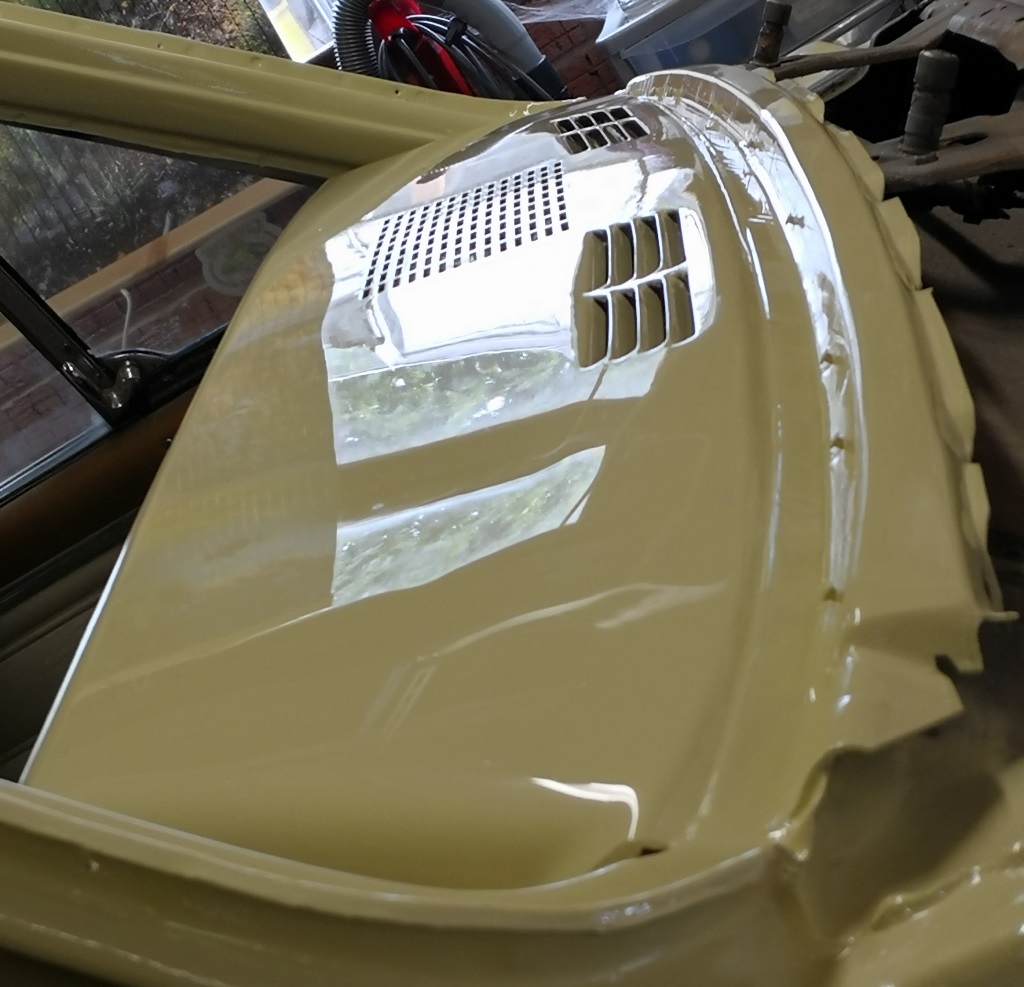
Air intake is via the cowl section - underneath the slotted vent panel that the wiper spindles protrude through
Looks like this with the outer panel removed
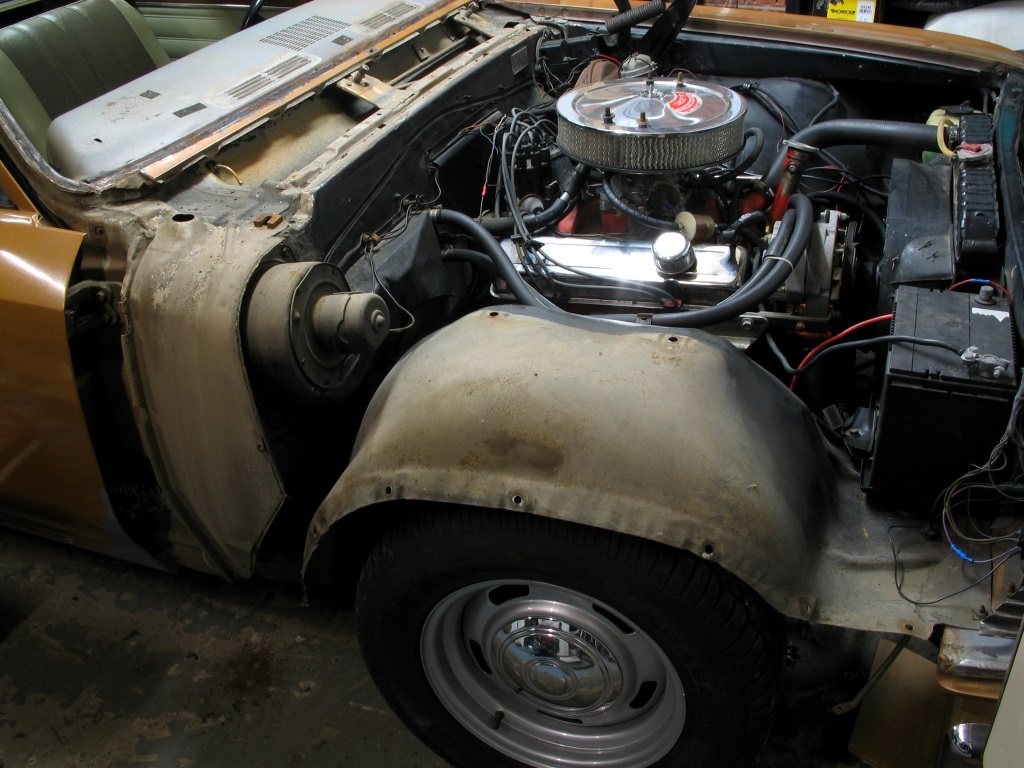
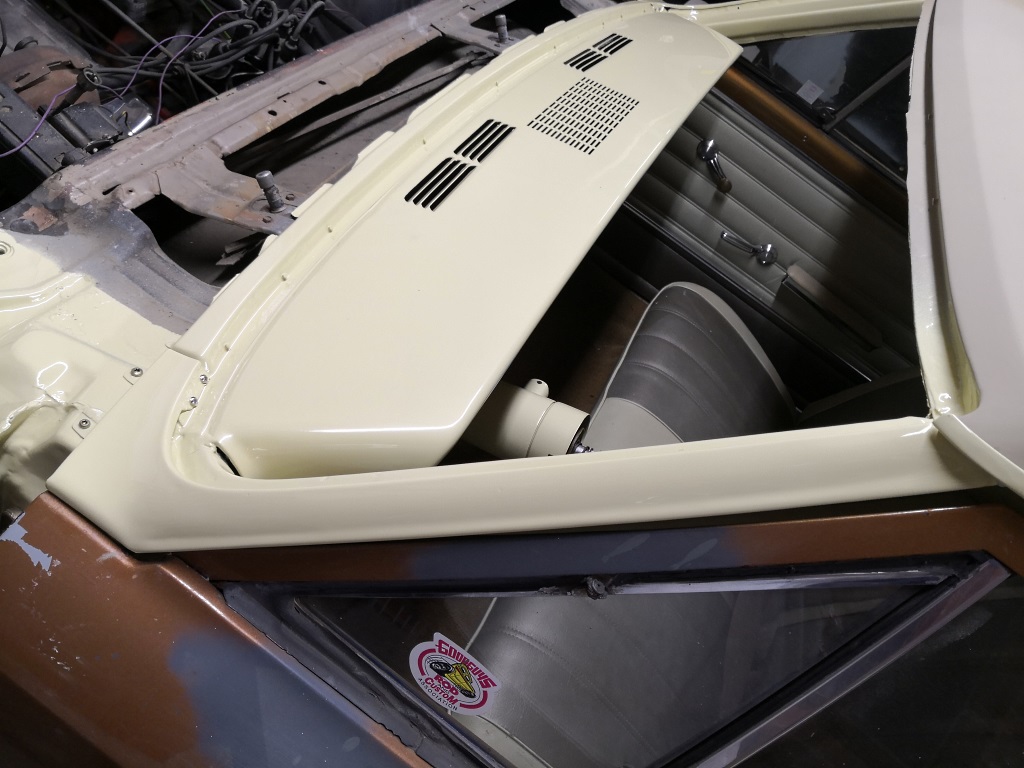
On the move, fresh air enters through the two large top openings and flows down into the large cavities either side of the firewall - in front of the doors (as does any rainwater from the windscreen).
From here, the air enters the cabin via the large oval vents in the footwell (if open) or travels forward and inboard again (with or without fan assist) into the heater box for optional warming and distribution to the screen or feet. Rainwater drains down into the sills and out through drain holes.
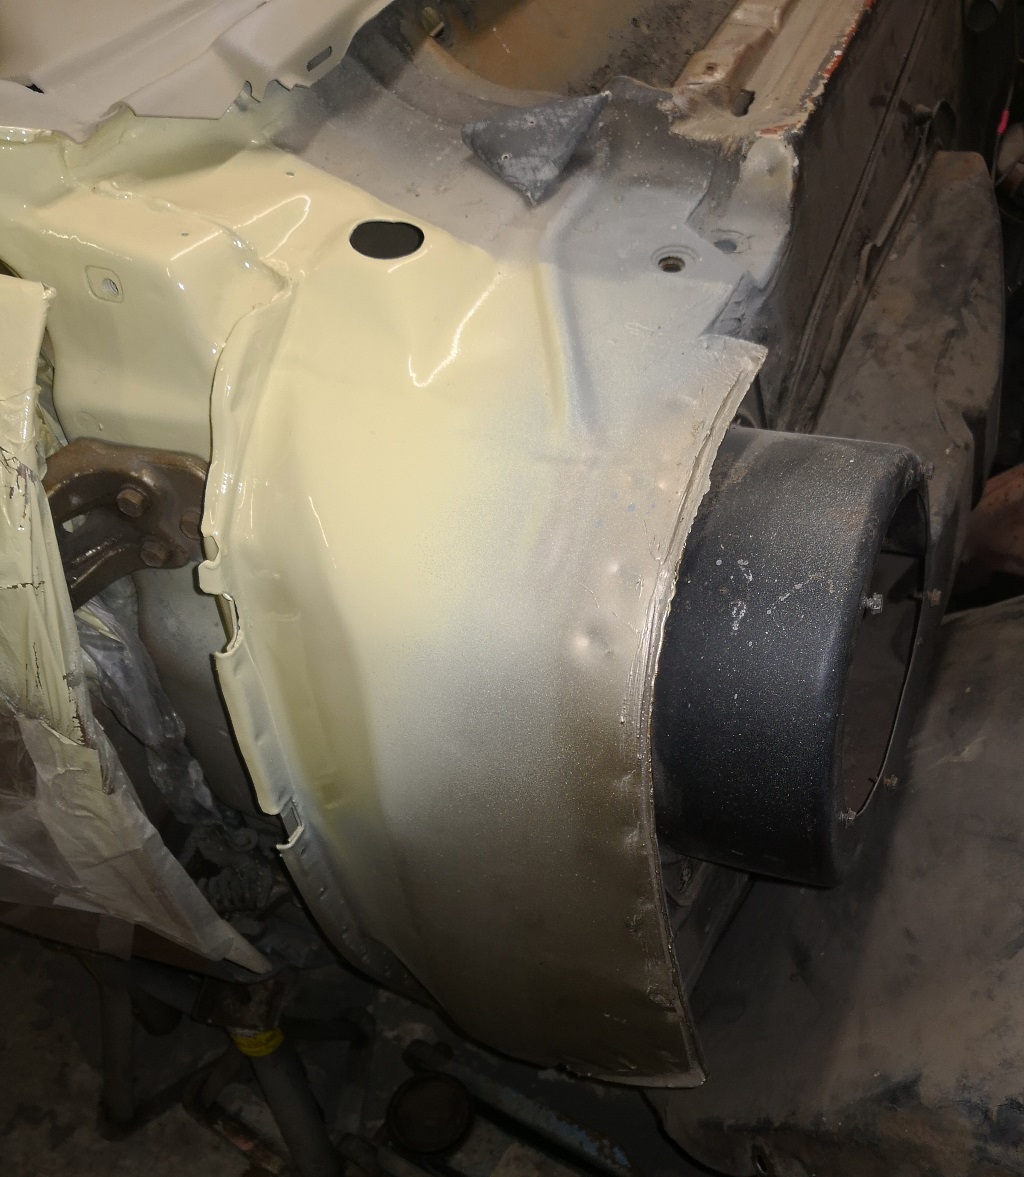
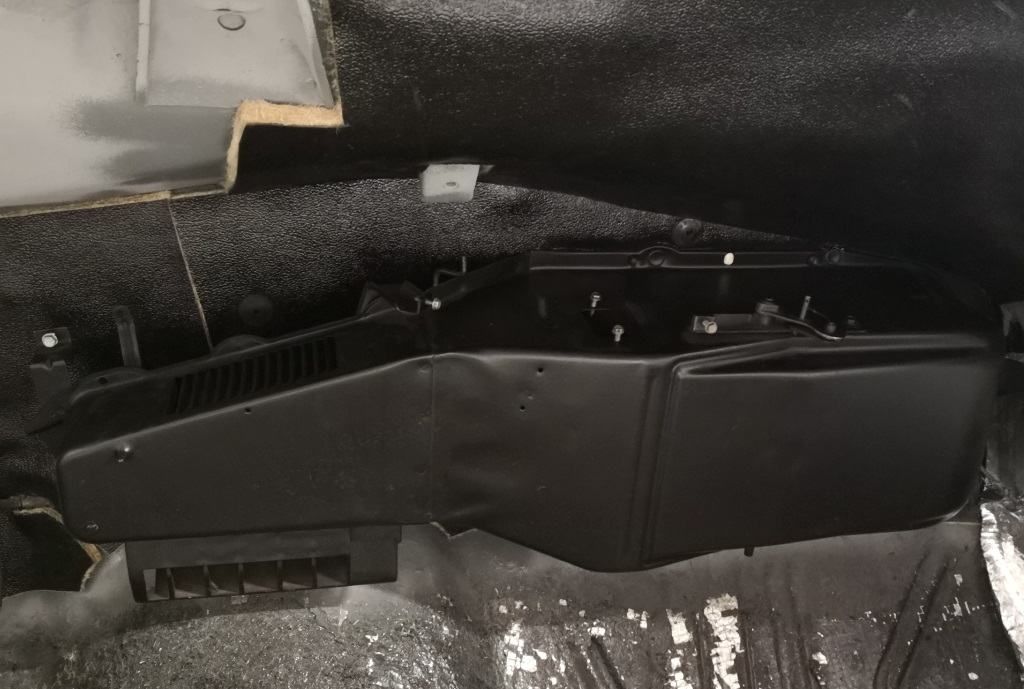
Blower motor removed
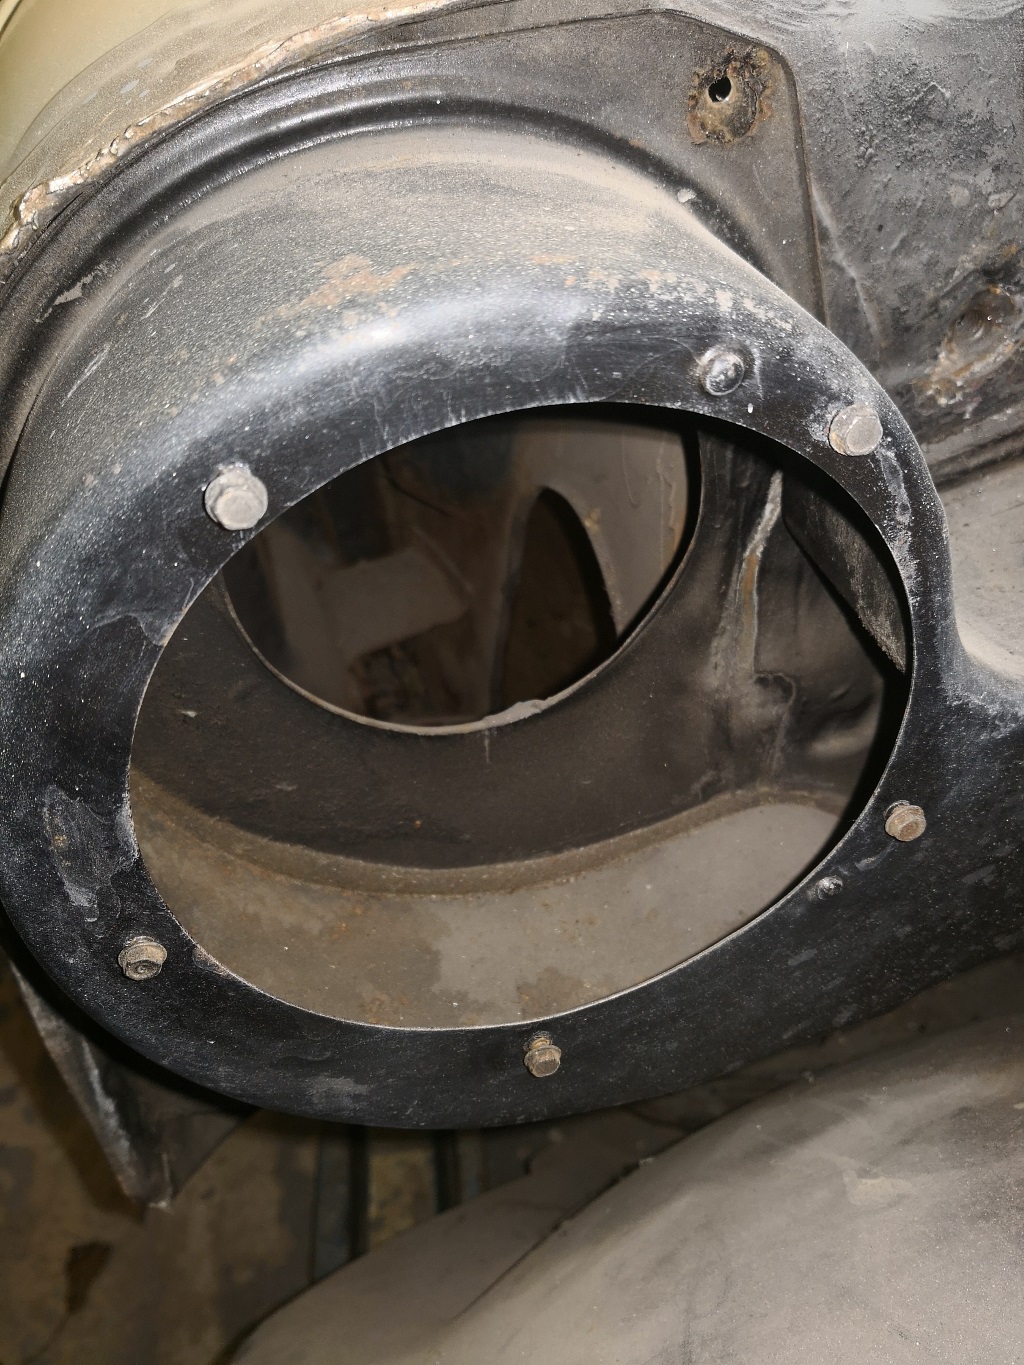
View into cowl (airbox to the right, footwell vent just visible through the two circular holes)
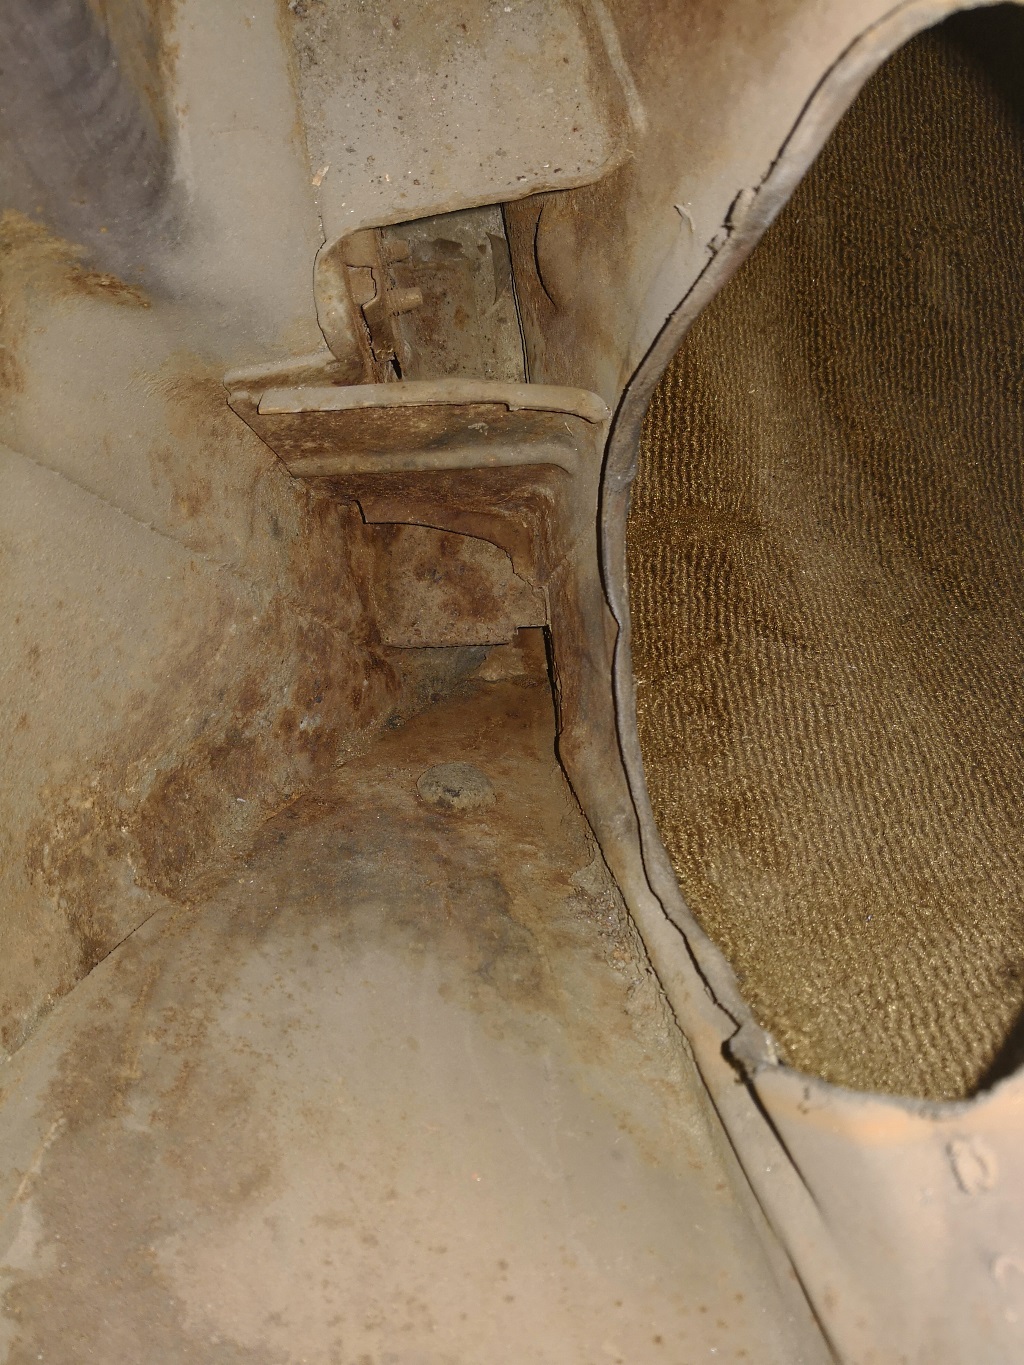
With the heater blower and cowl vents removed, it was obvious that every leaf and bit of dirt and dust that had flowed through the vents over the years had collected at the bottom of the cowl on each side, inside the front end of the sills.
This was taken after I had removed several inches of leaves and debris by hand (before wondering what else might be living down there...)
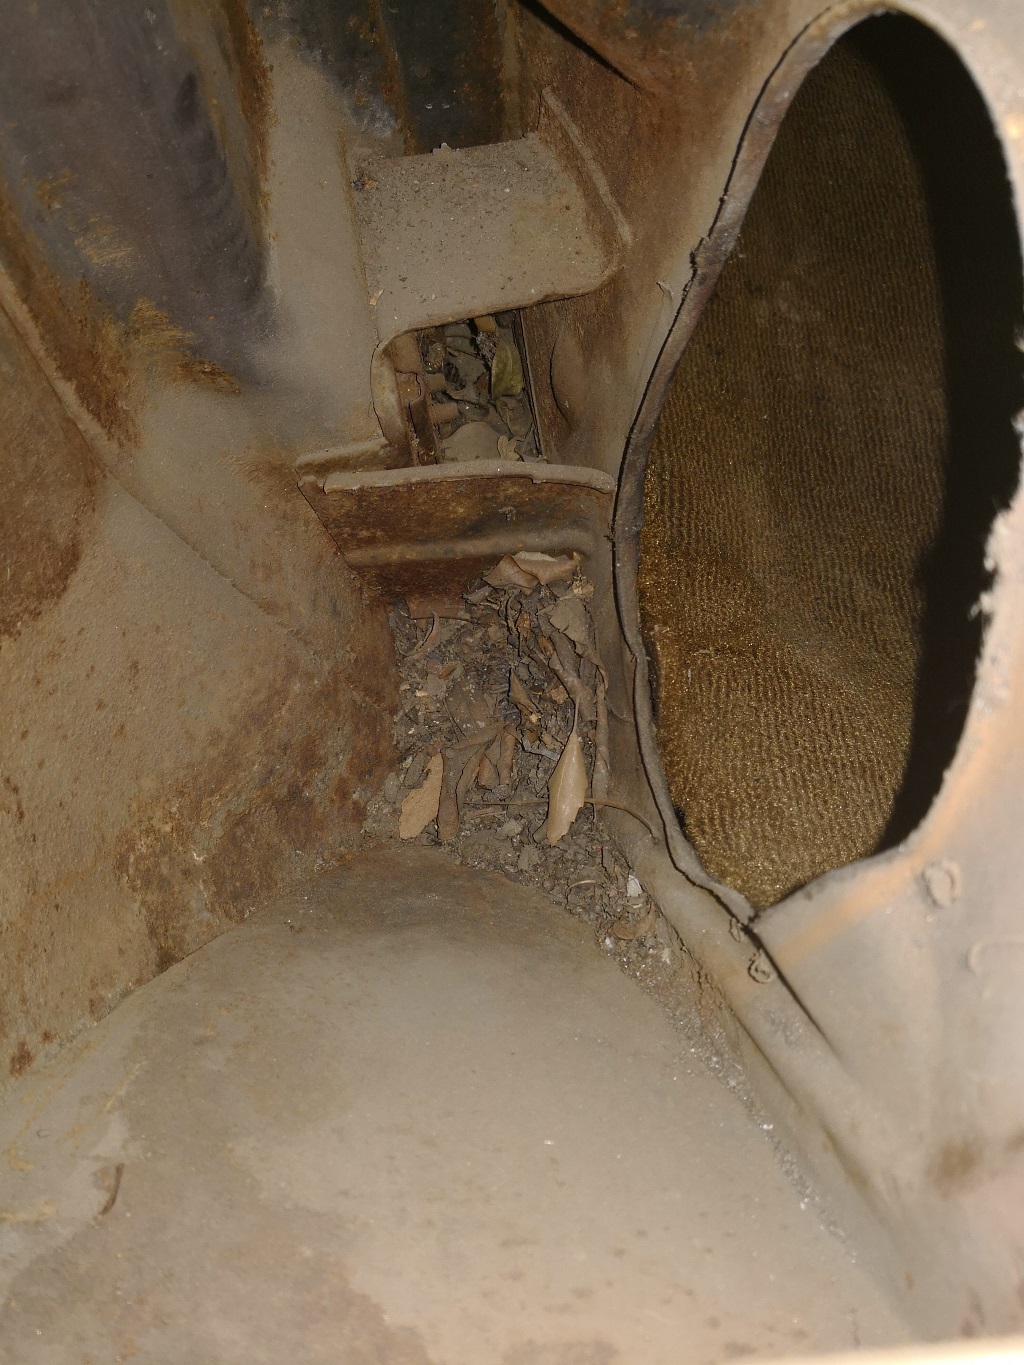
Nice amount of surface rust too. Non-dry state cars tend to rot out badly in this area.
Used a long thin attachment on the hoover to get down to the bottom and as far back in the sills as possible. Completely filled a new hoover bag with the debris that came out!
Gave it all a good coating of anti-corrosion wax.
A top tip at this point, courtesy of www.bloody-stupid-things-ive-done-in-the-garage.co... - don't spray wax into the sills whilst crouching with your foot under the drain hole...
Cleaned up the inside of the firewall, used my usual combo of Phosphoric acid followed by Hydrate 80 and Electrox. Should prevent further deterioration in our damp little island.
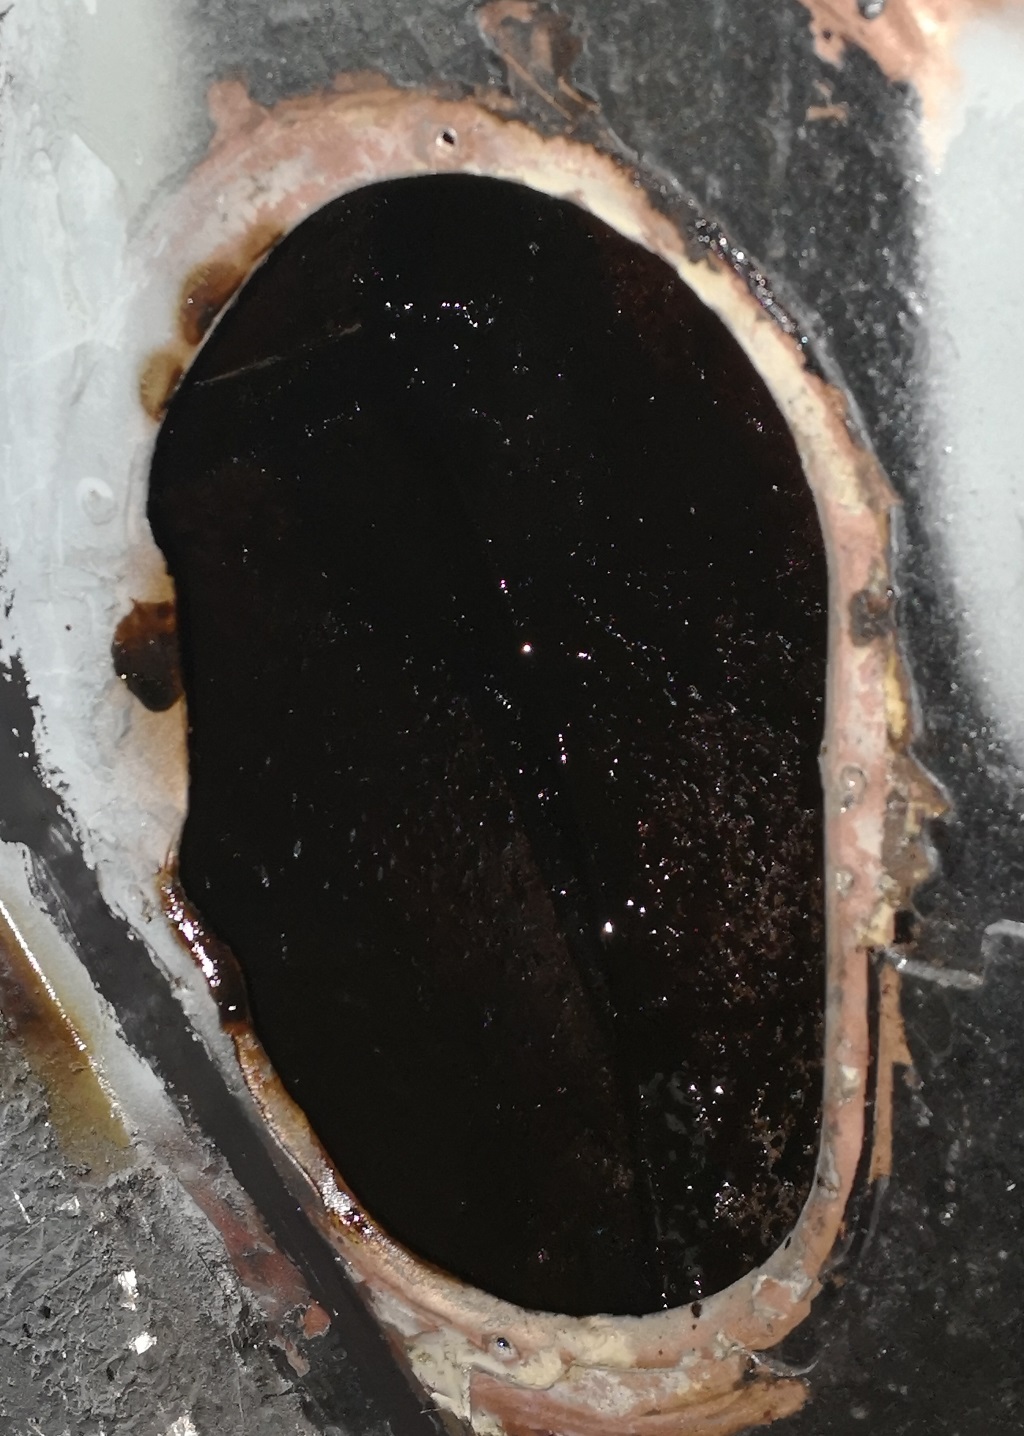
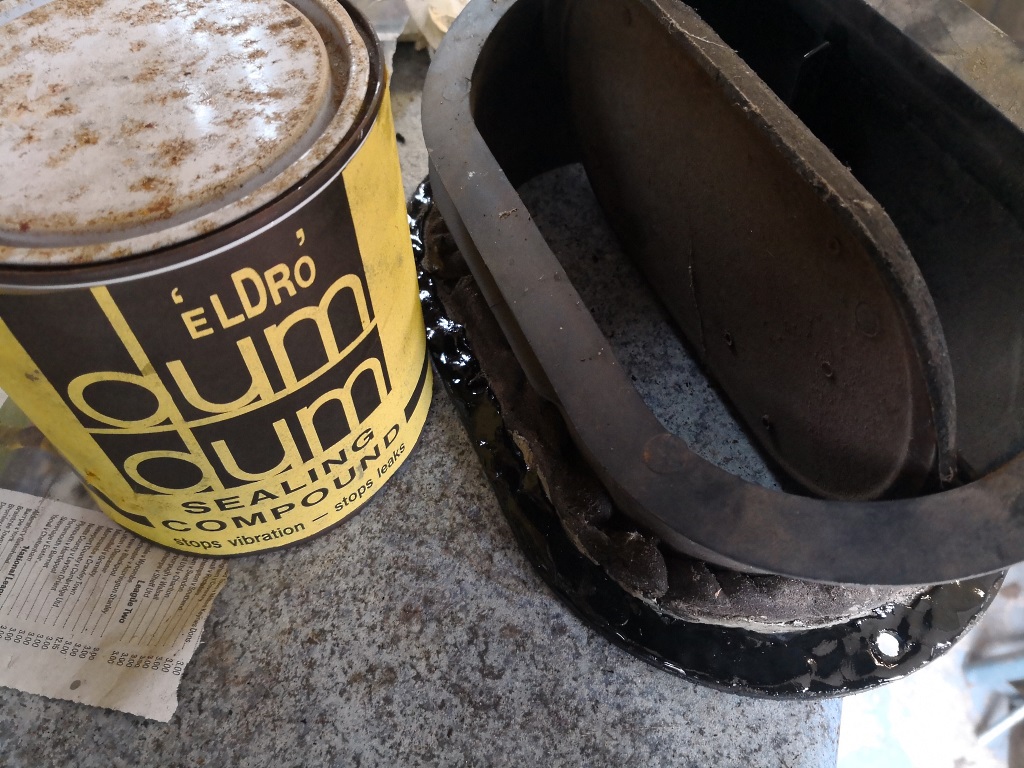
Renewed the seals on the cowl vents and re-fitted. My thirty-year-old tin of Dum Dum still as good as new. They (literally) don't make stuff like this anymore!
Please note that the nasty, runny mess of Hammerite or POR15 is as applied by a previous owner and not my doing. That said it seems to be doing a generally decent job of protecting the metal!
It occurred to me at this point - this is the first of the fixtures and fittings that I have actually re-fitted! Could this be a turning point??!!
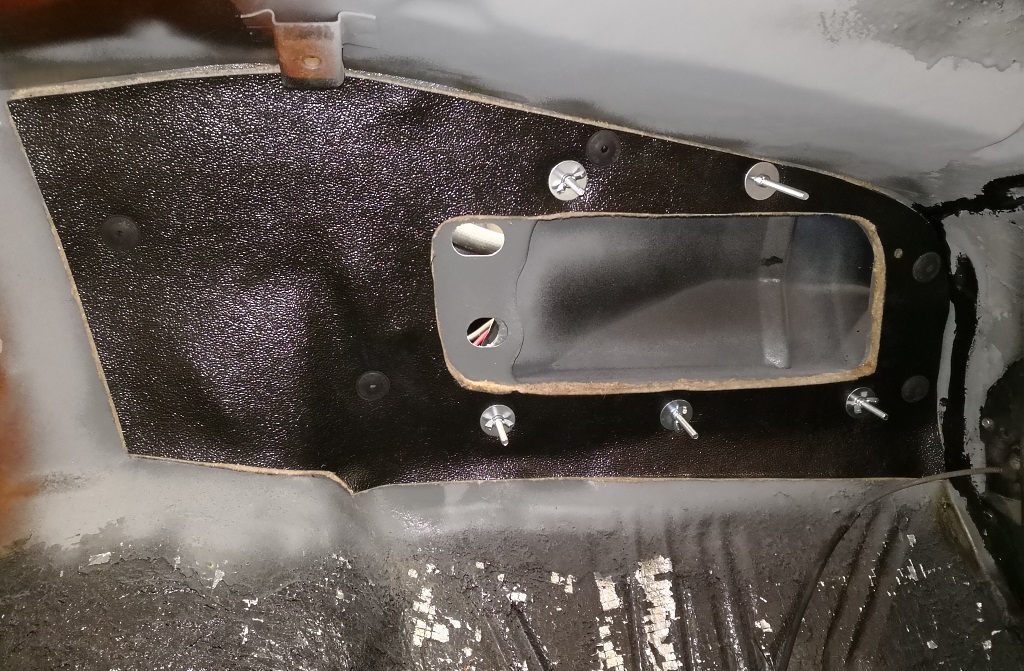
Started making up and fitting replacement insulation. Old stuff came out in pieces so wasn't much use as a template and had to resort to making cardboard templates initially
Work in progress (shiny bolts are temporary to keep the heater box holes in alignment whilst gluing)
Took the opportunity to clean and lube the flaps (obligatory ooh-er missus!) in the heater box.
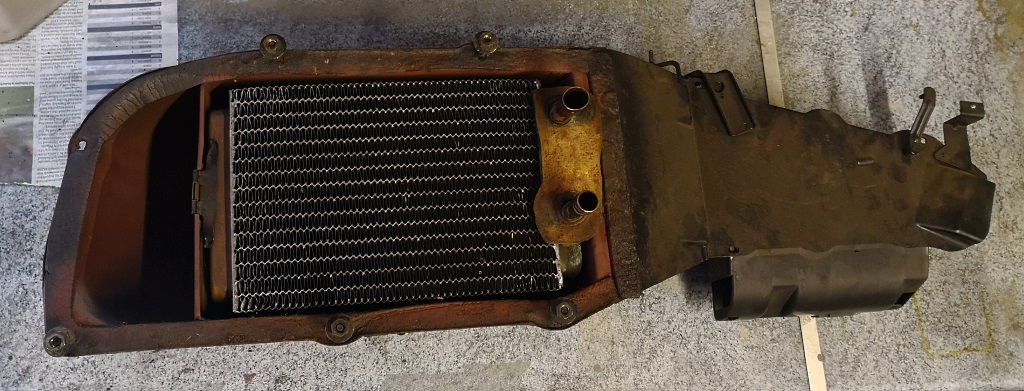
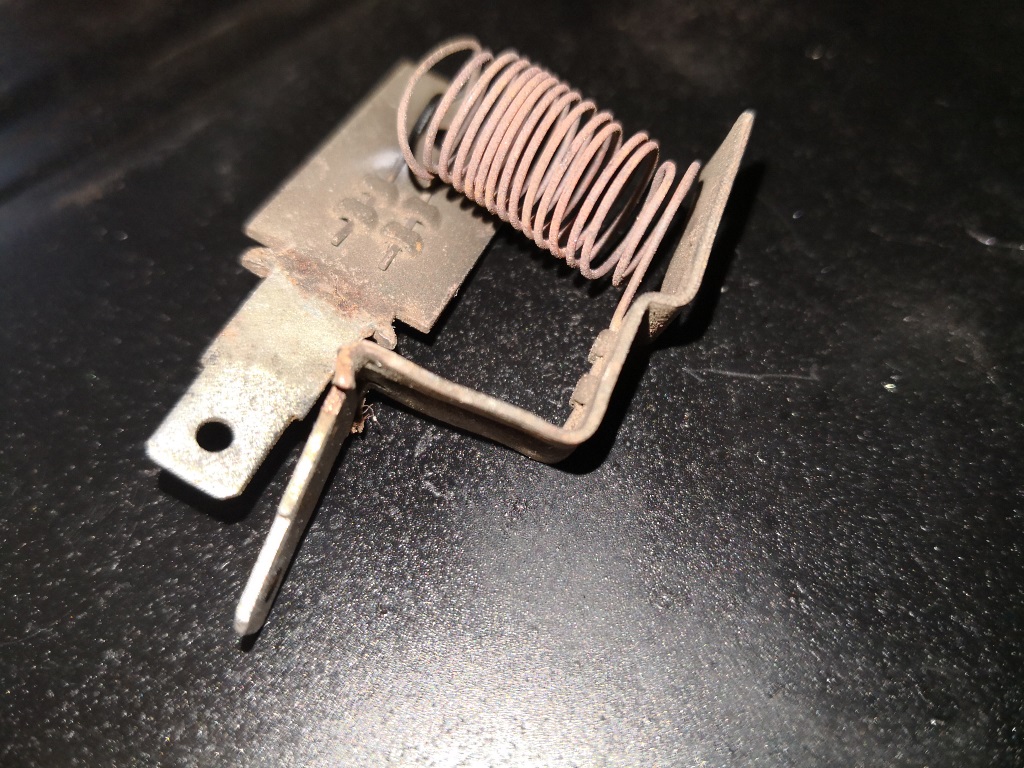
The heater box had something rattling inside it that I eventually shook loose. The blower resistor had been bypassed and when I removed the old resistor it was entirely missing its gubbins. At least now I know where it went!!
It's still a bit too cold and damp for paint but there are plenty of other jobs to crack on with.
Scope creep is an ever-present danger in this project, although I have been trying to keep these words of wisdom (from page 12) in mind:
threadlock said:
I'd recommend caution. What started out as a bit of a fettling project for me to fix a rotten body mount... now looks like this, eight years later.
It isn't easy knowing where to stop though. Externally, the front end had to come off in order to replace the lower windscreen channel - there was simply no option there. Likewise the windscreen had to come out as did the dashboard and all the switches, gauges and heater controls. Of course with all that lot removed it was obvious how bad some of the under-dash wiring was, so that will need to be tidied up.
Then there is the inside of the firewall / bulkhead. Barely coated in a dusting of red oxide from the factory, time and water leaks have caused quite a bit of surface rust. And the insulation is rotting and falling apart. Access will never be better than it is now, so add sorting that to the list.
Obviously to clean the bulkhead up and renew the insulation properly, additional things like the heater box, cowl vents and various other fittings (e.g. handbrake pull lever) need to be removed. And so it goes on...
A quick primer on the ventilation system of a non-aircon '66 El Camino (similar to many other cars of the same era)
Air intake is via the cowl section - underneath the slotted vent panel that the wiper spindles protrude through
Looks like this with the outer panel removed
On the move, fresh air enters through the two large top openings and flows down into the large cavities either side of the firewall - in front of the doors (as does any rainwater from the windscreen).
From here, the air enters the cabin via the large oval vents in the footwell (if open) or travels forward and inboard again (with or without fan assist) into the heater box for optional warming and distribution to the screen or feet. Rainwater drains down into the sills and out through drain holes.
Blower motor removed
View into cowl (airbox to the right, footwell vent just visible through the two circular holes)
With the heater blower and cowl vents removed, it was obvious that every leaf and bit of dirt and dust that had flowed through the vents over the years had collected at the bottom of the cowl on each side, inside the front end of the sills.
This was taken after I had removed several inches of leaves and debris by hand (before wondering what else might be living down there...)
Nice amount of surface rust too. Non-dry state cars tend to rot out badly in this area.
Used a long thin attachment on the hoover to get down to the bottom and as far back in the sills as possible. Completely filled a new hoover bag with the debris that came out!
Gave it all a good coating of anti-corrosion wax.
A top tip at this point, courtesy of www.bloody-stupid-things-ive-done-in-the-garage.co... - don't spray wax into the sills whilst crouching with your foot under the drain hole...
Cleaned up the inside of the firewall, used my usual combo of Phosphoric acid followed by Hydrate 80 and Electrox. Should prevent further deterioration in our damp little island.
Renewed the seals on the cowl vents and re-fitted. My thirty-year-old tin of Dum Dum still as good as new. They (literally) don't make stuff like this anymore!
Please note that the nasty, runny mess of Hammerite or POR15 is as applied by a previous owner and not my doing. That said it seems to be doing a generally decent job of protecting the metal!
It occurred to me at this point - this is the first of the fixtures and fittings that I have actually re-fitted! Could this be a turning point??!!
Started making up and fitting replacement insulation. Old stuff came out in pieces so wasn't much use as a template and had to resort to making cardboard templates initially
Work in progress (shiny bolts are temporary to keep the heater box holes in alignment whilst gluing)
Took the opportunity to clean and lube the flaps (obligatory ooh-er missus!) in the heater box.
The heater box had something rattling inside it that I eventually shook loose. The blower resistor had been bypassed and when I removed the old resistor it was entirely missing its gubbins. At least now I know where it went!!
Edited by 99t on Tuesday 10th April 14:36
Application into the cavities would have been possible (if not easy) but removal of the product afterwards in order to apply protection to the newly cleaned surfaces would have been nigh on impossible!
On balance I opted for a simple slathering of Dynax S50 which appears well reviewed (appreciate BH have a large advertising budget that means not all reviews are perhaps as impartial as one would like) but in my experience their products DO work very well.
That plus the removal of the leaves and dirt that would otherwise hold water down there must be better than doing nothing, surely!!
More progress, albeit slow and necessarily methodical, at the weekend.
Cleaned a little surface rust off the heater box and gave it a quick blow over before refitting.
Fitted a new resistor pack to it but before I could test anything I needed to do some pretty major wiring repairs.
The wiring loom had clearly suffered a major short circuit at some point previously - the ignition switch and interior fan wires had all been extensively butchered and relocated to aftermarket switches. Other remaining wires showed signs of significant melting and a couple of connections inside the fuse box had also been cut off.
The main (un-fused) positive feed from the battery...
Wanting to put it all back to original, I had already removed all the obviously incorrect wiring and switches when I stripped the dashboard out.
This weekend I renewed any obviously damaged wires and reinstated the missing wires, in the correct colours wherever possible or labelling clearly where I didn't have the correct colour wire. Also renewed the tape over various junction points (e.g. where the main positive feed from the battery splits into about five wires) as the original cloth tape was pretty much falling off!
Once it was all done I reconnected the battery, initially via an ammeter to check for current drain, of which there was none. Tentatively turned the ignition on and was pleased to see that the magic smoke remained safely inside the wires!
Could only test a couple of things as most switches and instruments are still disconnected, but the fan worked on all three speeds, the alternator light lit up with the ignition and sidelights worked.
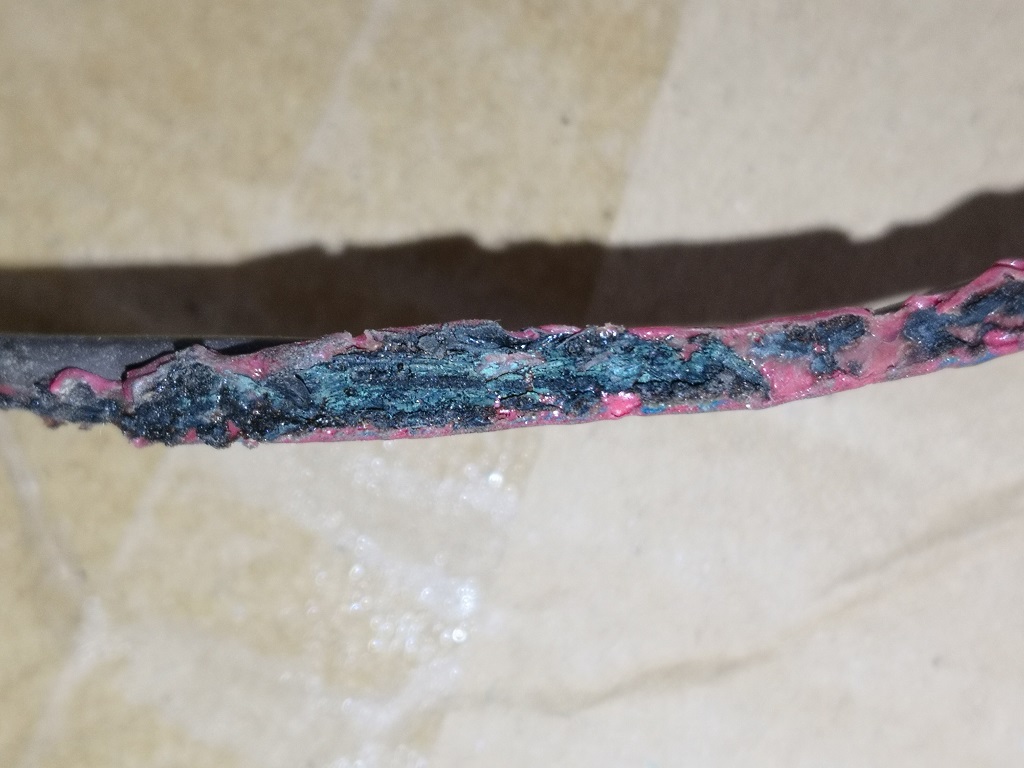
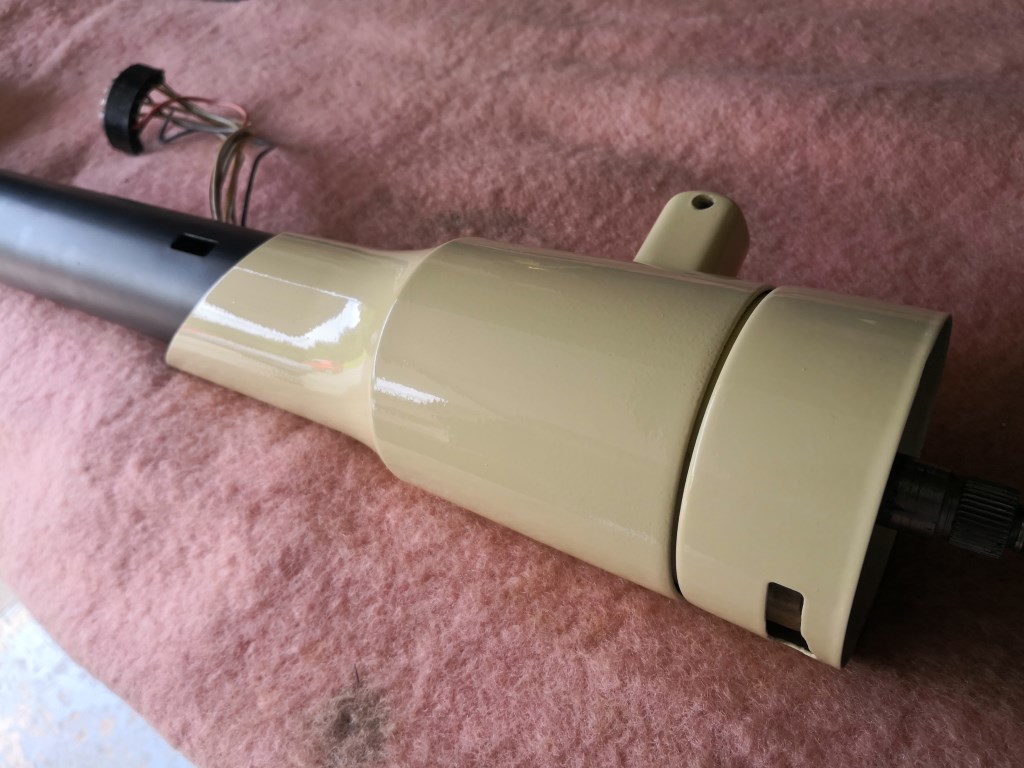
Finally, I stripped down the steering column (column shift) in order to check, clean and paint. Found the starter inhibitor switch to be broken internally which explains why the car would sometimes start with the gear selector in any position previously!
Cleaned a little surface rust off the heater box and gave it a quick blow over before refitting.
Fitted a new resistor pack to it but before I could test anything I needed to do some pretty major wiring repairs.
The wiring loom had clearly suffered a major short circuit at some point previously - the ignition switch and interior fan wires had all been extensively butchered and relocated to aftermarket switches. Other remaining wires showed signs of significant melting and a couple of connections inside the fuse box had also been cut off.
The main (un-fused) positive feed from the battery...
Wanting to put it all back to original, I had already removed all the obviously incorrect wiring and switches when I stripped the dashboard out.
This weekend I renewed any obviously damaged wires and reinstated the missing wires, in the correct colours wherever possible or labelling clearly where I didn't have the correct colour wire. Also renewed the tape over various junction points (e.g. where the main positive feed from the battery splits into about five wires) as the original cloth tape was pretty much falling off!
Once it was all done I reconnected the battery, initially via an ammeter to check for current drain, of which there was none. Tentatively turned the ignition on and was pleased to see that the magic smoke remained safely inside the wires!
Could only test a couple of things as most switches and instruments are still disconnected, but the fan worked on all three speeds, the alternator light lit up with the ignition and sidelights worked.
Finally, I stripped down the steering column (column shift) in order to check, clean and paint. Found the starter inhibitor switch to be broken internally which explains why the car would sometimes start with the gear selector in any position previously!

Very carefully reassembled the steering column / shift linkage without trapping the wires or chipping the fresh paint!
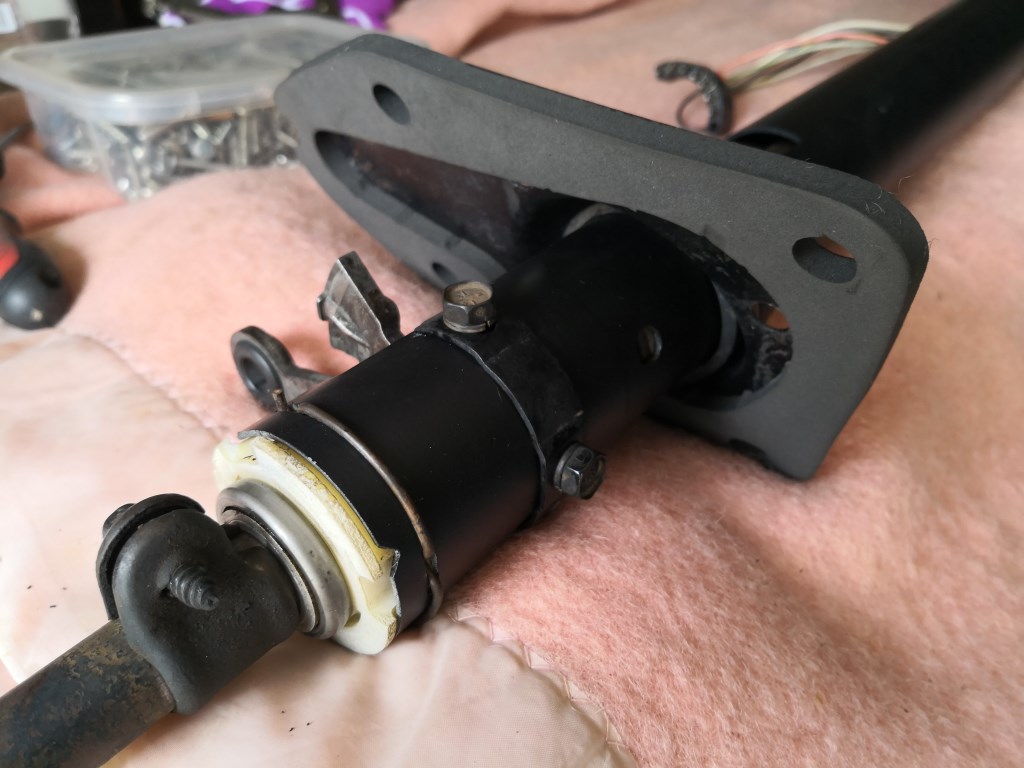
NOS lower bearing and new firewall seal
Not refitted to the car yet but the shifter appears to work as it should and there is no play in the steering shaft now, so fingers crossed...
NOS lower bearing and new firewall seal
Not refitted to the car yet but the shifter appears to work as it should and there is no play in the steering shaft now, so fingers crossed...
Cheers all, good to know my ramblings are being appreciated
At some point I need to stop fannying around with the interior and shoot the paint onto the other door shut, the roof, dash and pillars.
Although the painting I have done (one door shut and some interior pieces) has come out well enough, I am a long, long way from an experienced paint sprayer and I can't help thinking that I have had a surplus of luck over judgement so far!
So although a little poo comes out when I think about painting the roof, I need to just man up and get on with it!!
I have one or two more bits to spray before I tackle the roof, so if they come out ok I'll have a bit more confidence to "go for it"!
Cleanliness and preparation are the most important things when it comes to painting, I've certainly put in the hours on the prep side, however obtaining cleanliness in my dusty garage full of shelves and car parts is going to be a challenge.
I will most likely do the majority of the remaining paint in a 3m gazabo on the drive. I can put plastic sheeting on the floor and the gazebo itself is pretty new and clean.
To do so, I really need the Elk to be a runner again, the engine hasn't run for nearly three years, mainly due to the lack of dashboard and removal of the hacked around wiring. Now that is all sorted (or so I thought...) it was time to try and get the old girl to fire up.
Sunday evening:
The battery had taken a charge surprisingly well, so I temporarily refitted the steering column and connected up the gear shift. Checked around the engine bay, double checked the levels and made sure nothing was obviously fouling belts or sitting on exhaust manifolds. All good. Filled the carb's float chamber with petrol.
Turned the key and she cranked. Oil pressure light went out almost immediately, but no start. Cranked again. And cranked some more. Not so much as a cough. Strong petrol smell though.
Fuel filter had filled with fuel which is good, not so good was the drip of petrol from the fuel pump. Not enough to give up but something to add to the to-do list.
Pulled the King Lead from the distributor and checked for a spark when cranking, none.
Checked voltage at coil - 7v with the key in "run". That's ok, the resistance wire should drop the voltage when running to preserve the points.
What about when cranking? Should be a full 12v, measured it at 4v - that's not right!!
At this point the battery was starting to weaken (although nowhere near 4v!) and it was getting late so I put it back on charge, called it a night and went to ponder the issue...
Little bit less than three years but yes it was running and driving well before I pulled it apart.  Engine last ran around November 2015.
Identifying the issue turned out not to be too difficult.
Monday evening:
The coil should have two feeds going to the + terminal.
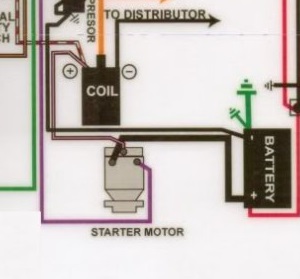
The first one, dotted in the above diagram, supplies reduced voltage when the engine is running and is a resistance wire with a white, braided covering. This was present and easily identifiable.
The other, supplying the full 12v at startup, should be a brown wire coming from the starter solenoid. This was entirely absent!
So an easy fix, but confusing as to how it happened. I am 99% sure I didn't remove any wires from the coil and 100% sure I didn't remove any from the starter solenoid. But it started without issue previously and if the resistance wire was the only one present it would have always been trying to start on a very low voltage...?
Anyway, wire added, battery charged, sparks when cranking verified, surely it would start this time?
Nope! Much cranking, still not a dickie bird. Much double checking of wires, sparks etc. Very strong smell of petrol again, which I had been assuming was the slow drip from the fuel pump. At this point I considered the choke.
The Edelbrock 1406 has an electric auto-choke which I had disconnected electrically, planning to replace it with a manual conversion - call me a control freak if you will!
Disconnected it had defaulted to permanent full choke (the electric element operates a bimetallic spring that winds the choke off over a few minutes when the ignition is on) which I had considered would be ok for the purposes of checking if it would actually run...
However, I vaguely remembered that the Elk never needed any throttle to start, hot or cold, and although it had never flooded, I felt it had come close once or twice.
The carb smelt very strongly of petrol. Pulled the dipstick and sniffed the oil - it too absolutely reeked. Decided it was probably flooded. Pulled the plugs and they were soaking.
Put the battery back on charge. Left the plugs out to dry naturally (and let excess fuel in the cylinders evaporate).
Manually adjusted the choke to "very off" and left it all to sit overnight...
Engine last ran around November 2015.Identifying the issue turned out not to be too difficult.
Monday evening:
The coil should have two feeds going to the + terminal.
The first one, dotted in the above diagram, supplies reduced voltage when the engine is running and is a resistance wire with a white, braided covering. This was present and easily identifiable.
The other, supplying the full 12v at startup, should be a brown wire coming from the starter solenoid. This was entirely absent!
So an easy fix, but confusing as to how it happened. I am 99% sure I didn't remove any wires from the coil and 100% sure I didn't remove any from the starter solenoid. But it started without issue previously and if the resistance wire was the only one present it would have always been trying to start on a very low voltage...?
Anyway, wire added, battery charged, sparks when cranking verified, surely it would start this time?
Nope! Much cranking, still not a dickie bird. Much double checking of wires, sparks etc. Very strong smell of petrol again, which I had been assuming was the slow drip from the fuel pump. At this point I considered the choke.
The Edelbrock 1406 has an electric auto-choke which I had disconnected electrically, planning to replace it with a manual conversion - call me a control freak if you will!
Disconnected it had defaulted to permanent full choke (the electric element operates a bimetallic spring that winds the choke off over a few minutes when the ignition is on) which I had considered would be ok for the purposes of checking if it would actually run...
However, I vaguely remembered that the Elk never needed any throttle to start, hot or cold, and although it had never flooded, I felt it had come close once or twice.
The carb smelt very strongly of petrol. Pulled the dipstick and sniffed the oil - it too absolutely reeked. Decided it was probably flooded. Pulled the plugs and they were soaking.
Put the battery back on charge. Left the plugs out to dry naturally (and let excess fuel in the cylinders evaporate).
Manually adjusted the choke to "very off" and left it all to sit overnight...
leglessAlex said:
You tease! 
What happened Tuesday evening?!
What happened Tuesday evening?!

Tuesday evening:
Didn't feel confident going into the garage for a third time after two sucessive evenings of failure and literally not even one cough from the engine when cranking.
Fitted the plugs and reconnected the battery. Kept my feet well away from the throttle and turned the key. It coughed a couple of times but didn't catch.
Cranked again, no coughing this time, starting to smell of fuel again.
Only one thing for it - foot to the floor and hold it there. Cranked for quite a long time and then a cough, another cough, two, three four cylinders joining in!
Gave the battery / starter / wiring a rest for a few seconds and tried the same again, foot still on floor. Five , six and then at least seven cylinders firing. Revs started to rise so eased back on the throttle a touch - and it died!
Gave it a minute, same again, this time let it rev a bit more, big cloud of smoke engulfed the garage. Kept it running on the throttle for twenty seconds or so and then took my foot off the gas, and it idled! Remarkably well considering the petrol is nearly three years old.
Left it idling whilst I a) replaced the smoke in my lungs with fresh air b) checked around the engine for leaks or other issues
Engine sounded sweet, no leaks, smoke soon cleared and it idled and revved remarkably cleanly. Didn't run it for too long as I'm aware the oil is in dire need of changing, just a couple of minutes to circulate the fluids and then switched off.
IT LIVES!!

Pulled the drain plug and left the oil draining overnight.
leglessAlex said:
Sounds absolutely ace 

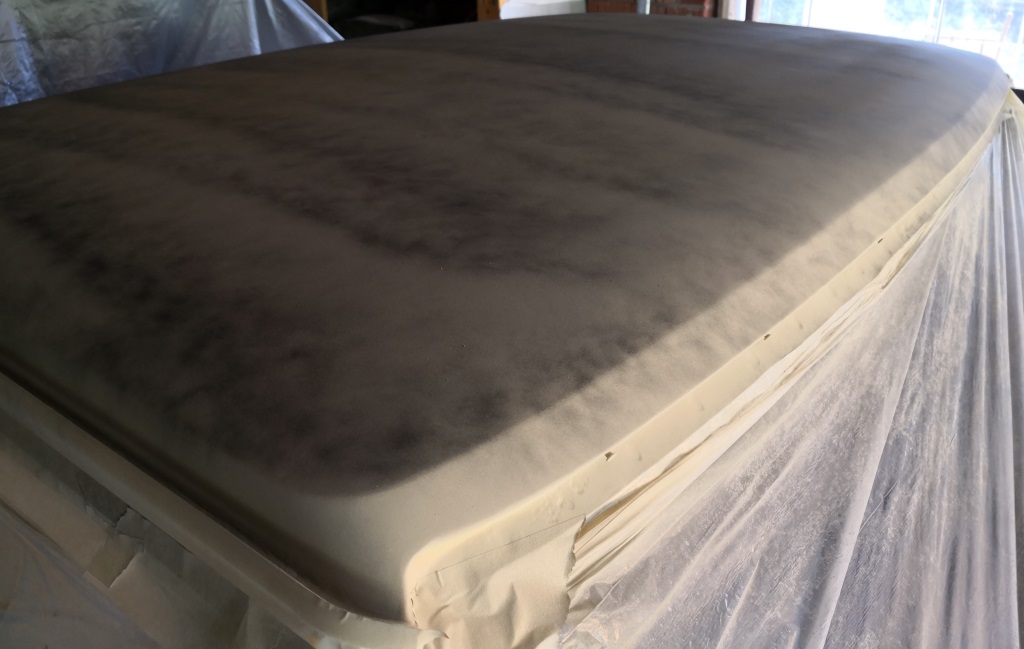
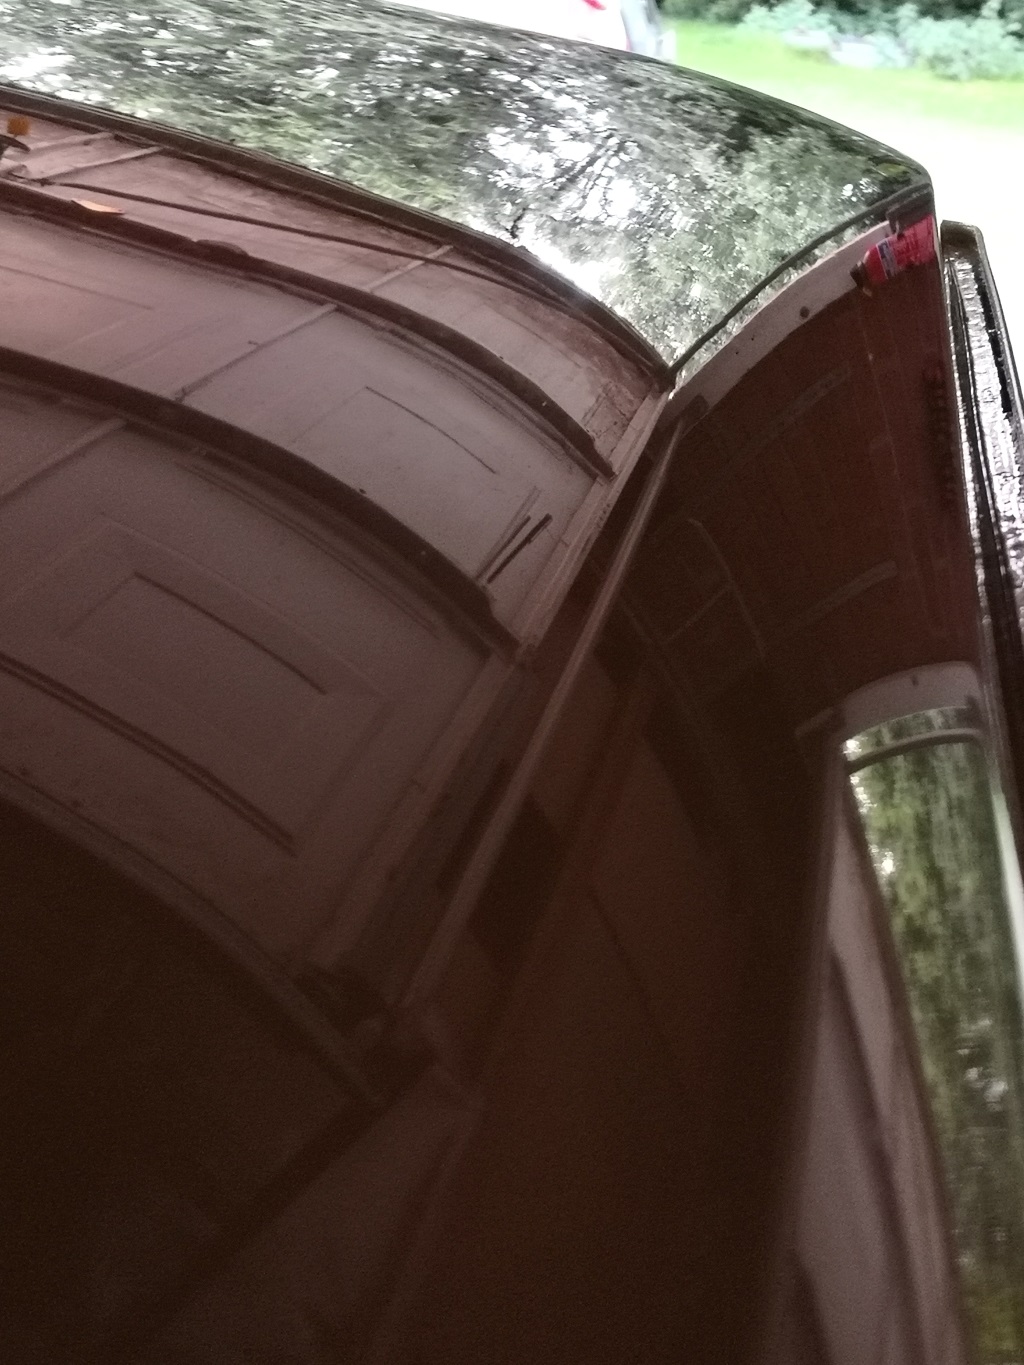
Bit more painting at the weekend, set up the gazebo on the drive as a makeshift spray booth. Not ideal as the ground is like concrete and no way of pegging it down. But on the grass it fills up with insects far too quickly so the drive was the lesser of two evils on what was a very still morning.
Main dash panel on two trestles, plus four gutter pieces hanging from a cross beam. All had received an awful lot of prep time.
Paint went on without drama, in fact inside the air-fed mask it was probably the only time this weekend that I felt comfortable and cool!
Left it all to cure and pottered around doing other jobs. An hour or so later I needed to pop out for ten minutes. Looked at the gazebo, sides not really moving. Looked at the trees, barely a leaf moving.
Decided to move the main dash panel back into the garage anyway, despite the risk to the not fully hardened paint. At least I could lift it from underneath without needing to go anywhere near the fresh paint. Couldn't move the hanging pieces without touching them so left them hanging happily.
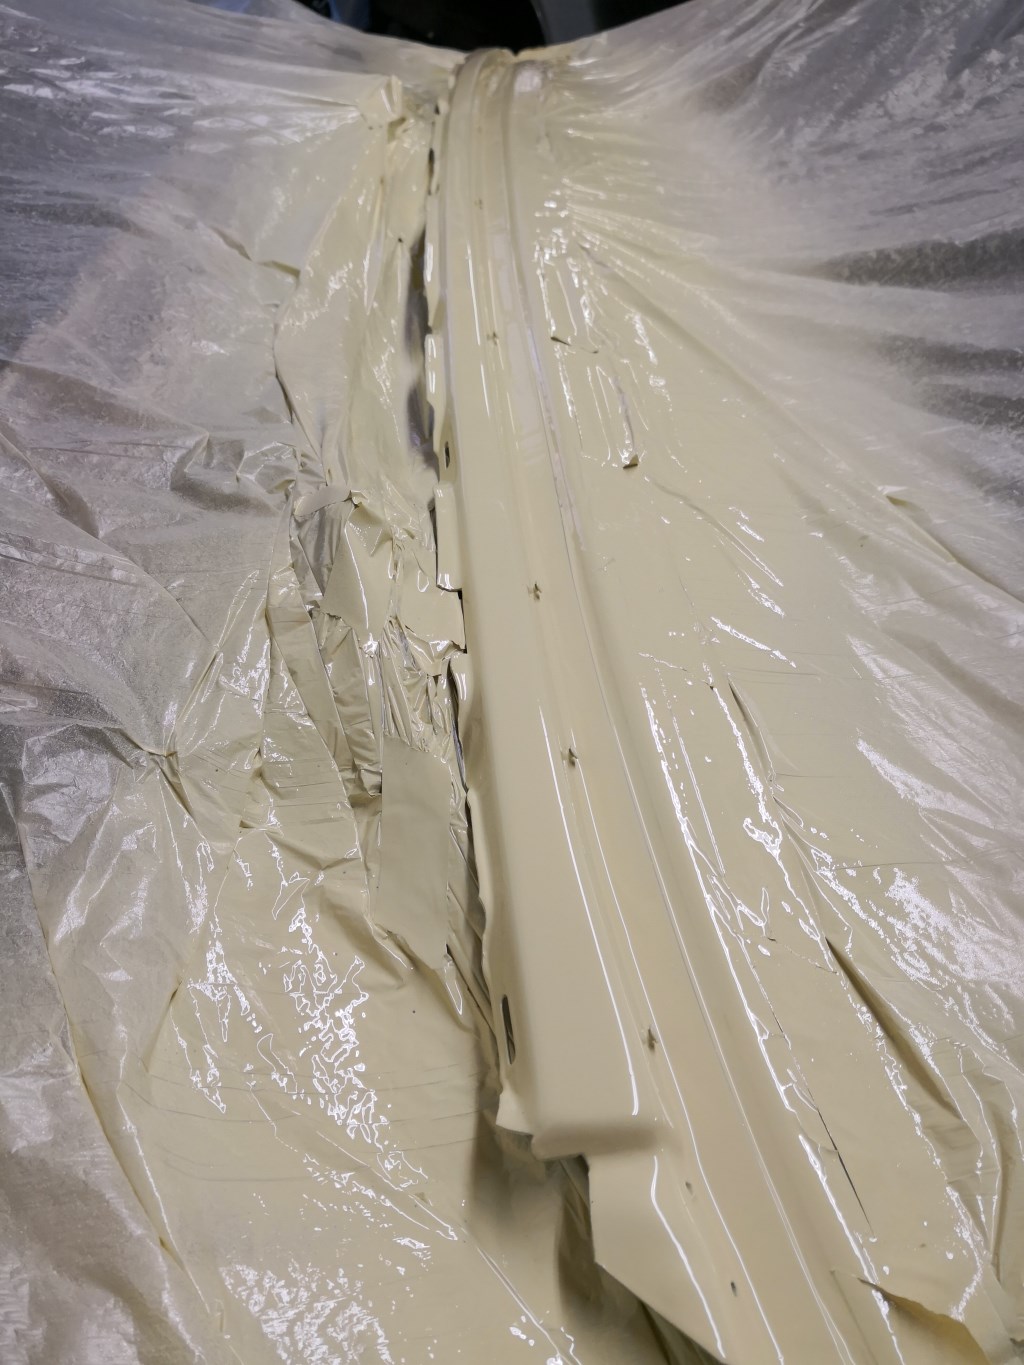
Came back ten minutes later, during which time, so far as I am aware, there was no tornado. However I came back to this
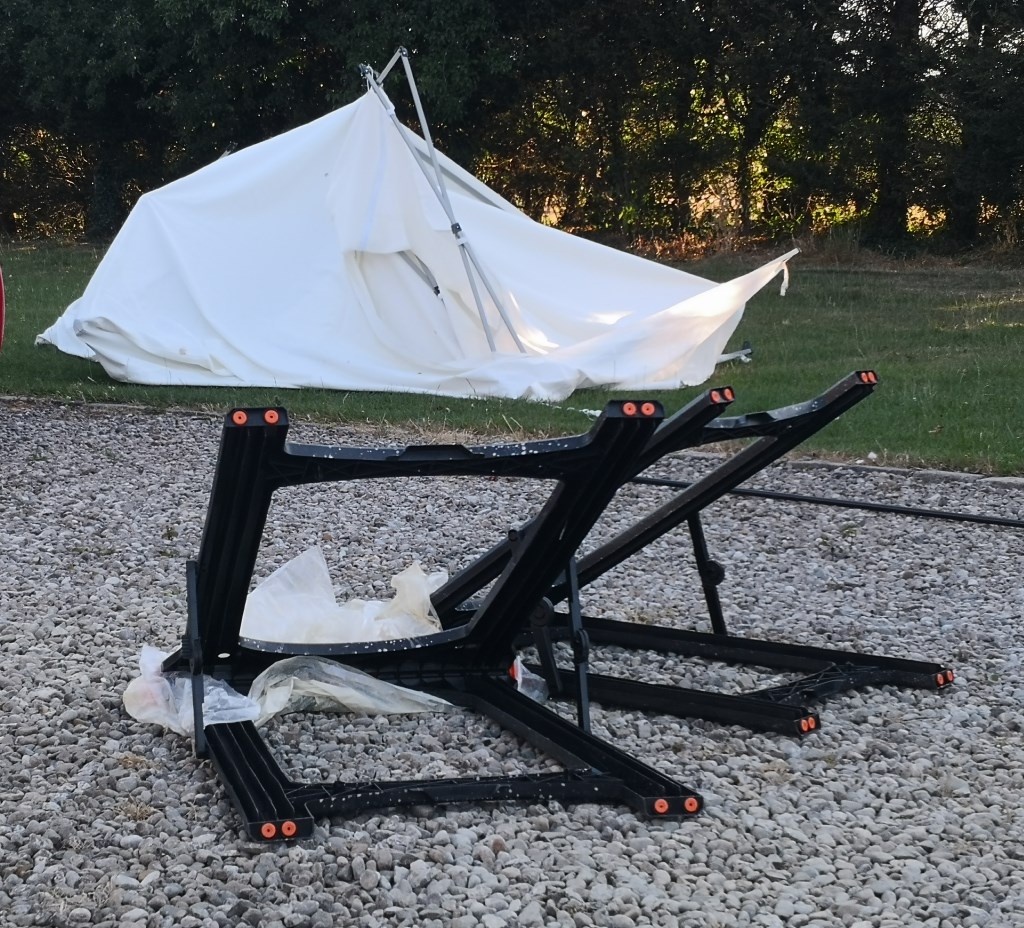


So happy that I had moved the dash but naturally I feared the worst for my trim pieces which were still somewhere inside the mangled remains.
Found them on the floor but laying on the material of one of the sides.
Amazingly, I could only find one chip out of one of them, on an edge that won't show! They had a slightly gritty feel where they had laid on the material, but that came off with a rub from my finger which also confirmed that the paint was pretty much rock hard.
Praise be to the high temperatures!!

Only a mini-update this one.
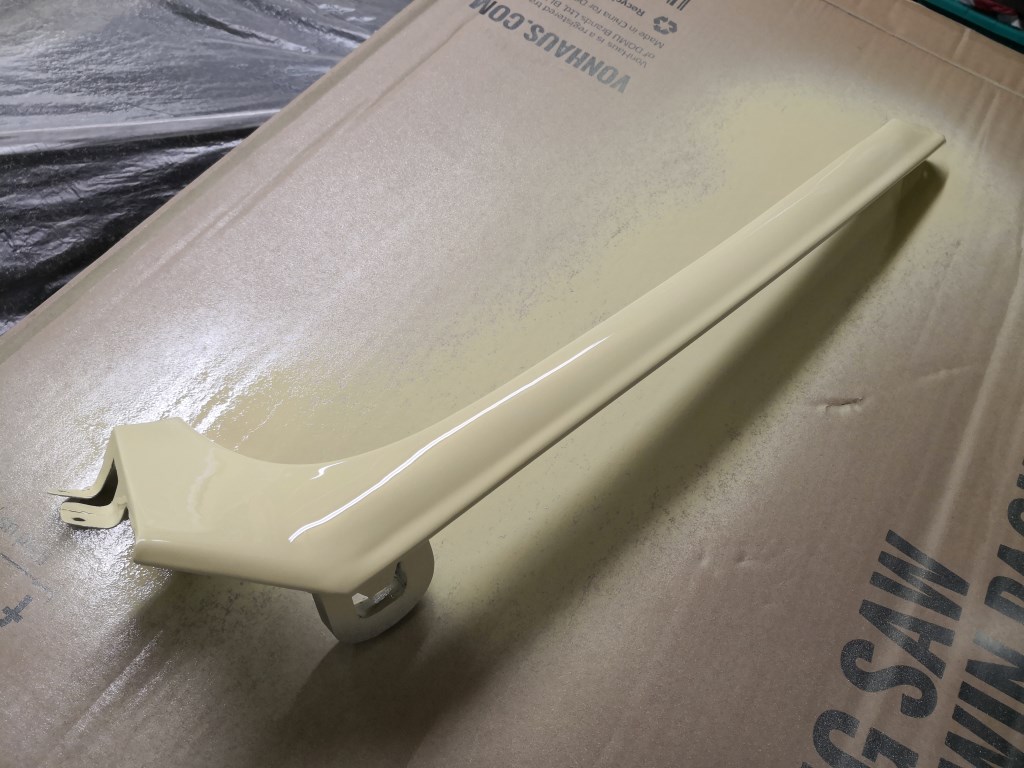
Painted the replacement lower screen channel at the end of July, along with the remaining A-pillar cover as I'd failed to mix sufficient paint last time.
Unfortunately after that, progress stalled somewhat, partly due to holidays and other non-car things getting in the way, but largely due to a family of wasps who set up residence somewhere in or around the garage.
Despite having a good scout around, I didn't manage to identify the location of the nest or the ingress point (and I wasn't prepared to completely empty the garage to do so!!)
At any given time there were always five to ten good sized wasps buzzing around the lights, crapping on everything and generally making paintwork an impossibility. The only option was to close the door and walk away until they died off naturally, which they have now done.
Will see if I can get the garage warm enough for further paint this year but I fear that may be a losing battle...
Long overdue update
So far this year I have painted the driver's side upper door shut and the section of the a-pillars that is visible in the cabin, all of which came out pretty well. To be honest, the masking off has taken far longer than the painting, with hindsight it would have been far quicker to strip out the rest of the interior and not worry too much about overspray! Lesson learned for next time...
The garage at home where I am painting is far from a dedicated paint booth, so it is always a battle with contaminants and now it is summer, insects. This time, painting the upper dash panel, I lost on both fronts!!
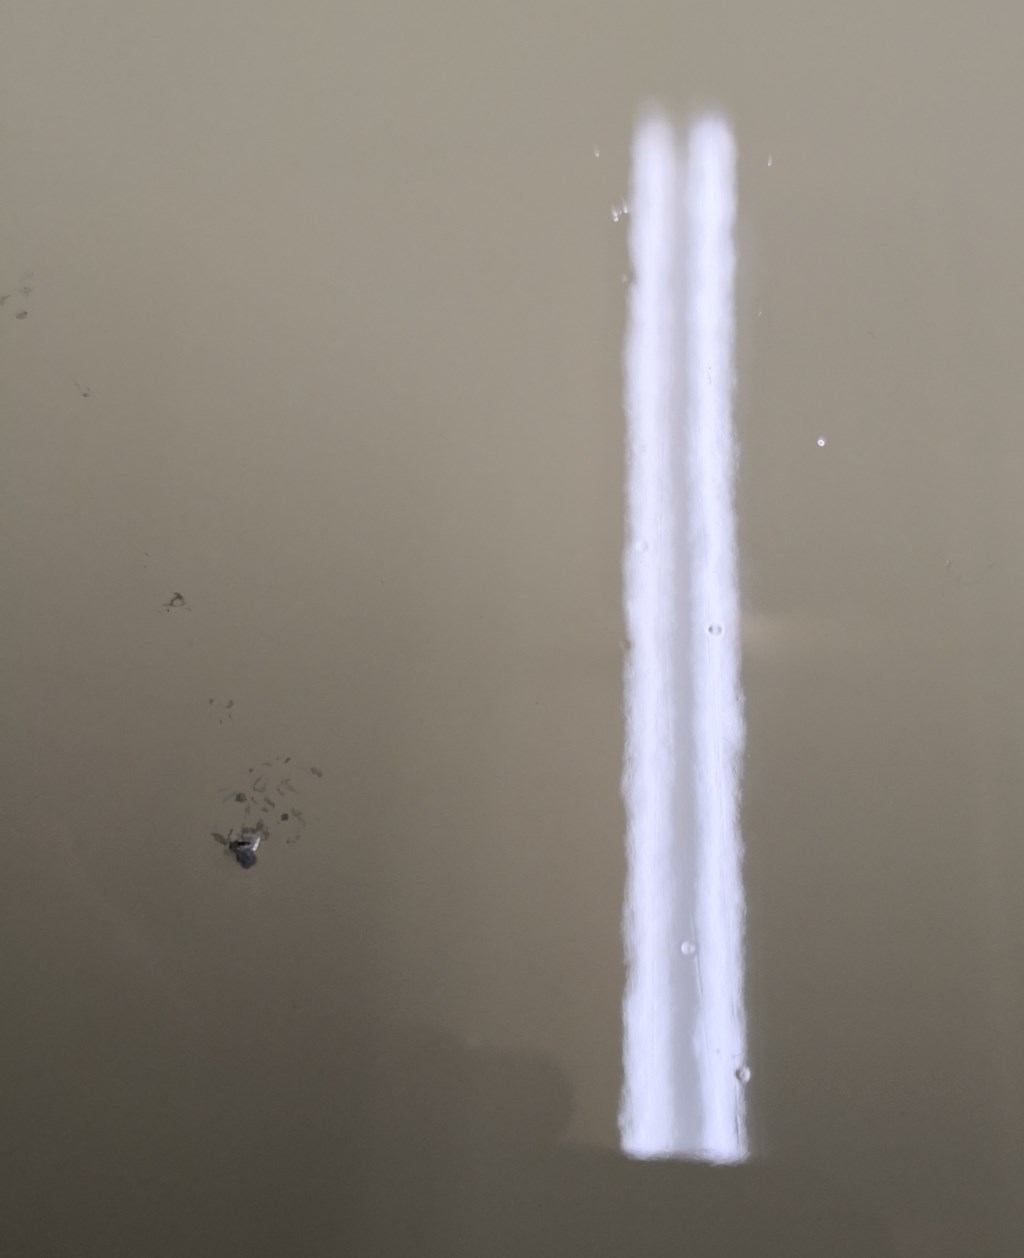
I thought initially I would have to strip it and go again, so there was nothing to lose by wet sanding it once it was reasonably hard the next day. Fortunately only a couple of the fish eyes were really deep so the majority sanded out - the couple remaining will need just a tiny blob of paint and a quick cut back.
As for the fly, well amazingly 99% of that sanded out too. There are a couple of legs still visible but since they are vertical to the paint, the marks are, quite literally, the thickness of a fly's leg!!
I think once the screen is back in, it will look perfectly ok...
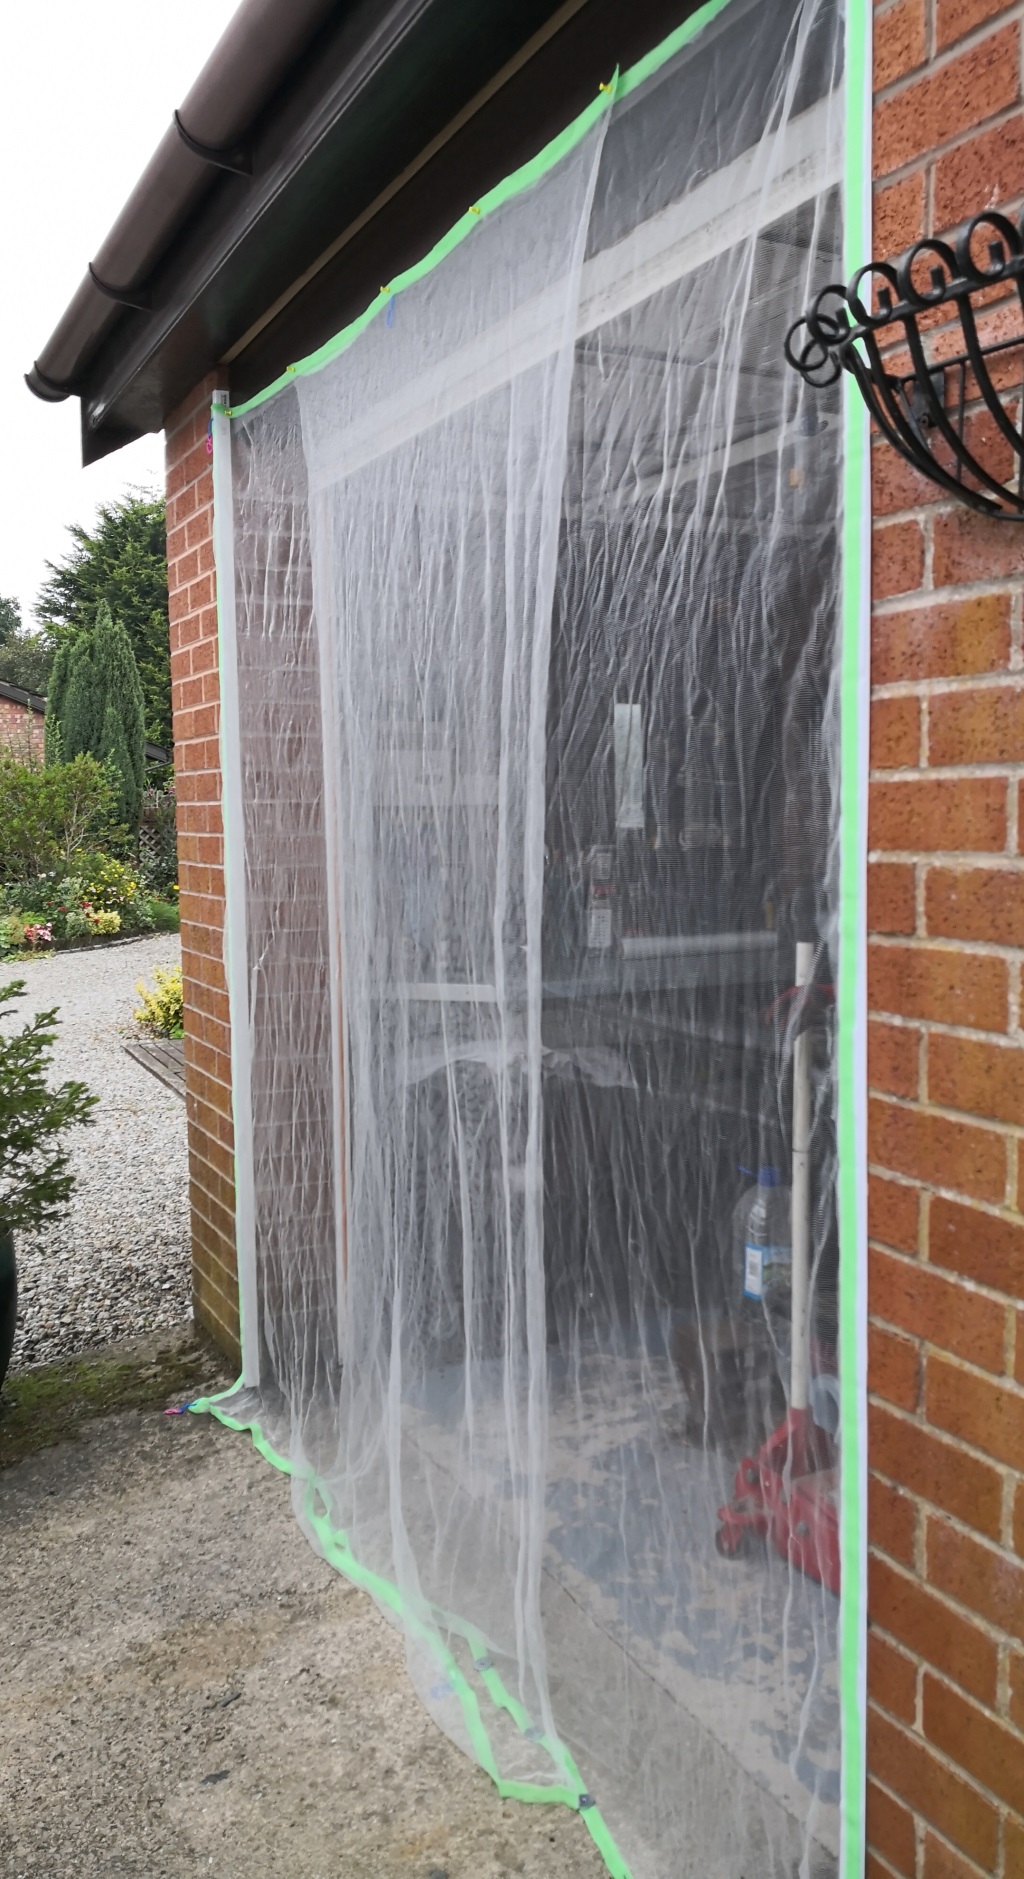
That is the last of the interior paintwork done for now, roof panel next, so I am going to have to try to rig up some sort of temporary fly-screen before I paint that!
So far this year I have painted the driver's side upper door shut and the section of the a-pillars that is visible in the cabin, all of which came out pretty well. To be honest, the masking off has taken far longer than the painting, with hindsight it would have been far quicker to strip out the rest of the interior and not worry too much about overspray! Lesson learned for next time...
The garage at home where I am painting is far from a dedicated paint booth, so it is always a battle with contaminants and now it is summer, insects. This time, painting the upper dash panel, I lost on both fronts!!
I thought initially I would have to strip it and go again, so there was nothing to lose by wet sanding it once it was reasonably hard the next day. Fortunately only a couple of the fish eyes were really deep so the majority sanded out - the couple remaining will need just a tiny blob of paint and a quick cut back.
As for the fly, well amazingly 99% of that sanded out too. There are a couple of legs still visible but since they are vertical to the paint, the marks are, quite literally, the thickness of a fly's leg!!
I think once the screen is back in, it will look perfectly ok...
That is the last of the interior paintwork done for now, roof panel next, so I am going to have to try to rig up some sort of temporary fly-screen before I paint that!
Thanks chaps, no I've not painted much before and never in 2k.
Have to say, I am impressed with how forgiving the paint is - I really didn't think the dash top was salvageable when the paint first went on.
A little more remedial work (touching in the worst fish eyes and then de-nibbing / polishing) and it is looking quite acceptable now.
Really close up there are still flaws, but from no more that a couple of feet away it looks as good as I had ever hoped to get the paint at home. If (and it's a big IF) I can get the roof panel to come out as well, I'll be pretty happy.
I said:
If (and it's a big IF) I can get the roof panel to come out as well, I'll be pretty happy.
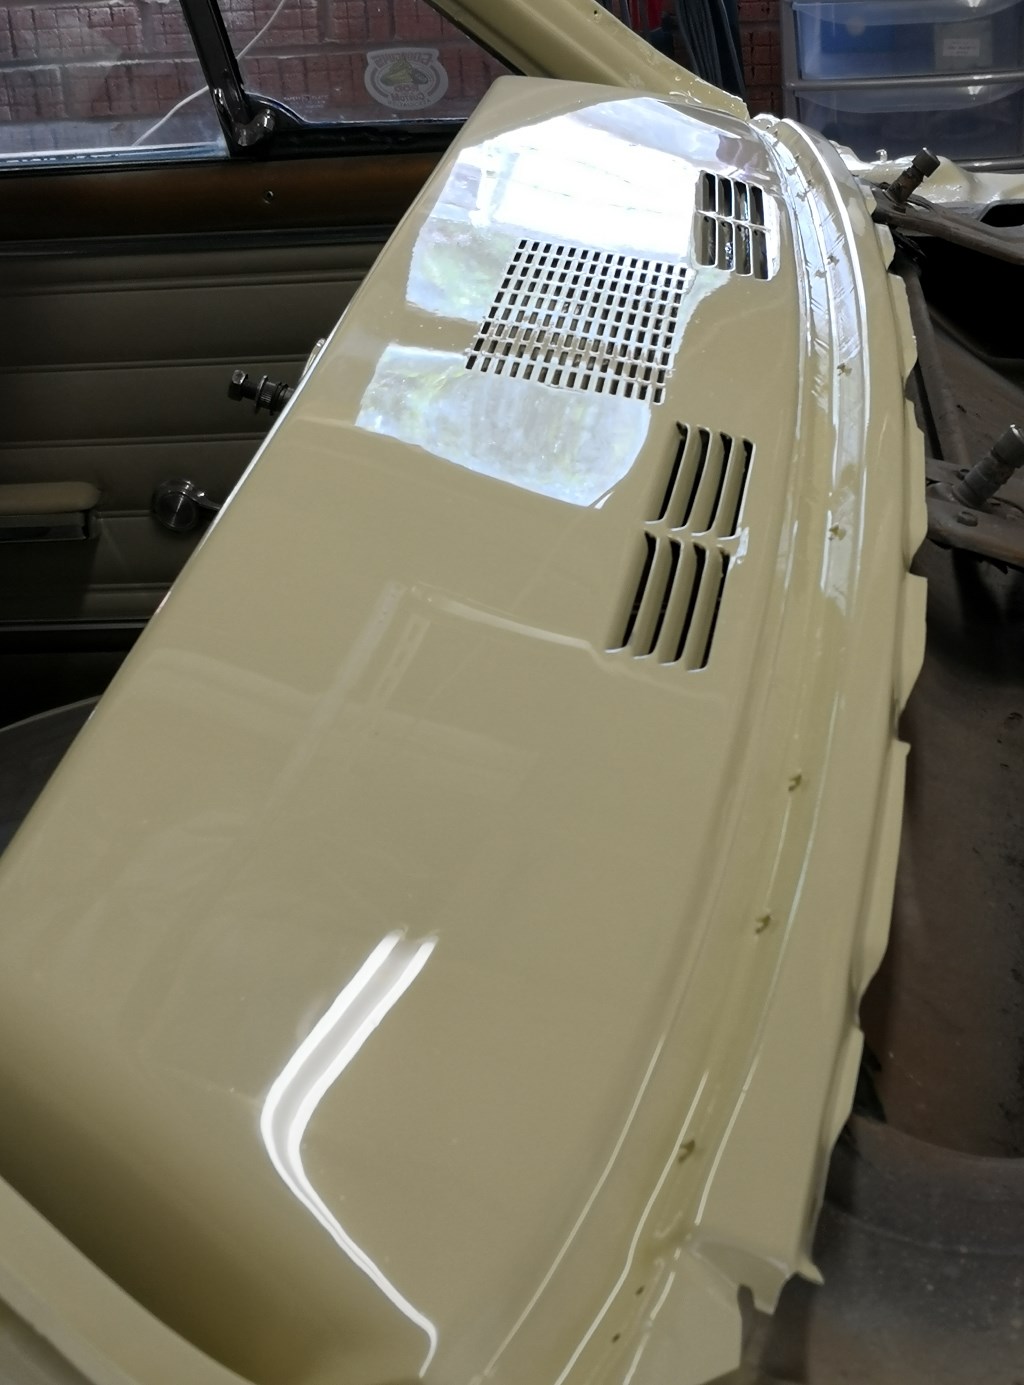
It was always going to be a big IF...However before tackling that, I refitted and sealed the a-pillar trims and started fitting the new clips for the stainless trim "screen molding"
A little before and after comparison, just to prove that progress has definitely been made even if it feels glacial at times..

At this point there was no further avoiding the elephant in the room, it was time to paint the roof.
Not feeling particularly confident about this after my previous issues with paint.
I would say my current standard of painting is very hit and miss - I've had some lovely finishes straight out of the gun and some that could at best be described as very disappointing!
Unfortunately my lack of experience means that I still don't really know what makes the difference between a good day and a bad day, which isn't ideal!
All I could do was take my time and take as many precautions I could.
Firstly a fresh coat of primer plus guide coat
This was subsequently flatted back until I was happy with it and then kept covered until I was ready to paint
Applied plastic sheeting to most surfaces in the garage and a fly screen on the open door.
Paint process:-
- Roof wiped repeatedly with expensive panel wipe with silicon remover.
- Firstly, a light dust coat of paint applied and left to tack - the theory being if any contamination remains this layer has insufficient depth for surface tension to form fish eyes around problem areas, then subsequent coats are going onto fresh, hopefully uncontaminated paint...
- Second, a slightly heavier coat to ensure good coverage all over, again left to tack
- Finally a third, heavier coat again, sufficient wetness to form a nice smooth outer surface, hopefully needing minimal rectification / flatting.
Coats one and two went on as hoped and the finish looked quite good after the second coat. Coat three is where it all went wrong.
For some reason (that I've not got to the bottom of) for the first time ever, my compressor struggled to keep up with running the gun and my mask on coat three. I knew as soon as I started spraying that the paint wasn't coming out of the gun as I would like and I had to tweak the settings to get it to flow better. However after a few passes the low pressure alarm went off on my air-fed mask, not what you want to hear when spraying 2K...
Held my breath and waited for the compressor to catch up, which it did fairly quickly. Checked for kinked hoses but nothing obvious.
Carried on spraying but unfortunately the scene was set for the rest of that coat of paint - poor coverage followed by a low pressure alarm. Nothing I could adjust made any difference and of course I couldn't get into any sort of rhythm painting either.
After a very stressful few minutes I had got all the paint out of the gun and onto the roof, so made my escape from the garage, feeling very frustrated. Left it all to sit, cleaned the gun etc.
Finally ventured back into the garage half an hour or so later, once the fumes had cleared, just to see how bad it was.
Not. Good. At. All.
I'll be as positive as I can - there were no runs and no dead flies stuck in the paint, so that's something! The orange peel was pretty bad though. Worse, there were plenty of fish eyes, again.
Took a couple of pictures before I closed the garage door and walked away. If anything they don't really show how bad the finish is...
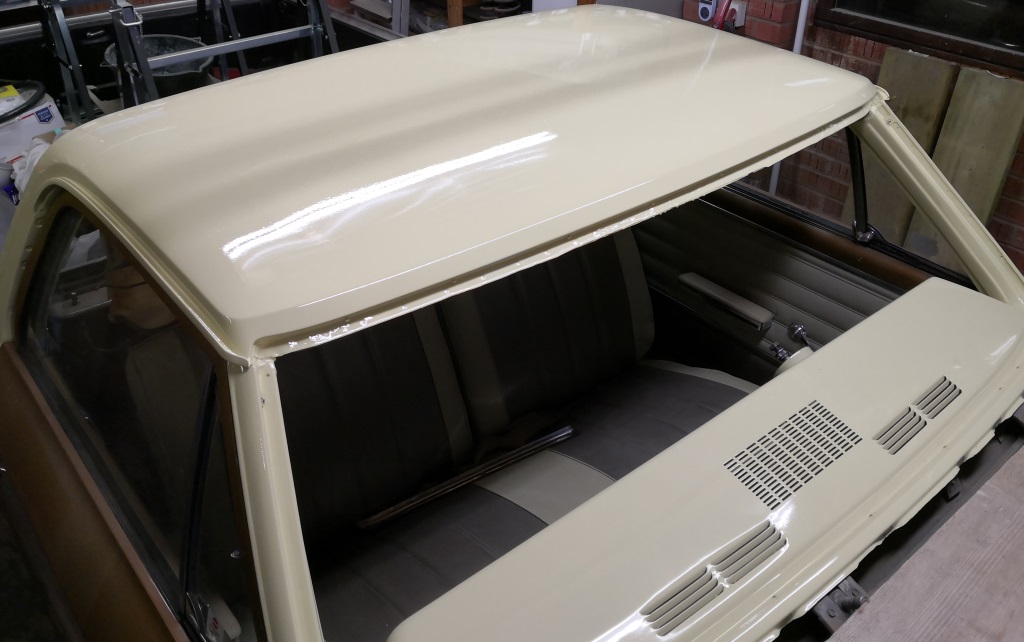
And closer...
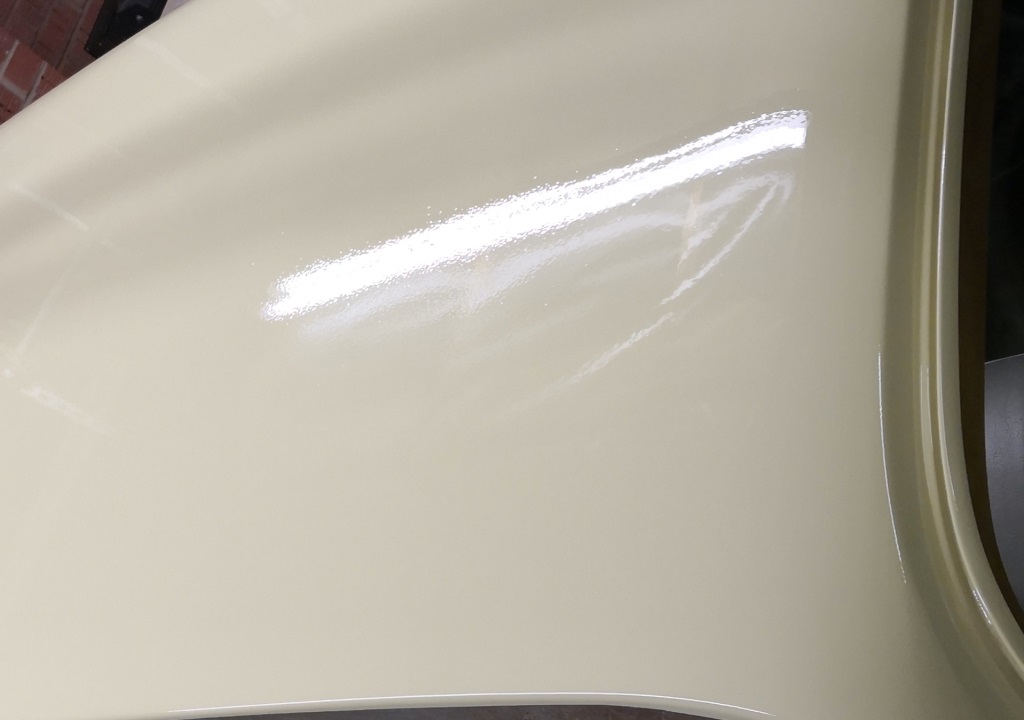
Very f
king disafkingppointing doesn't even begin to fking cover it...leglessAlex said:
Ah dude, that must be hugely irritating.
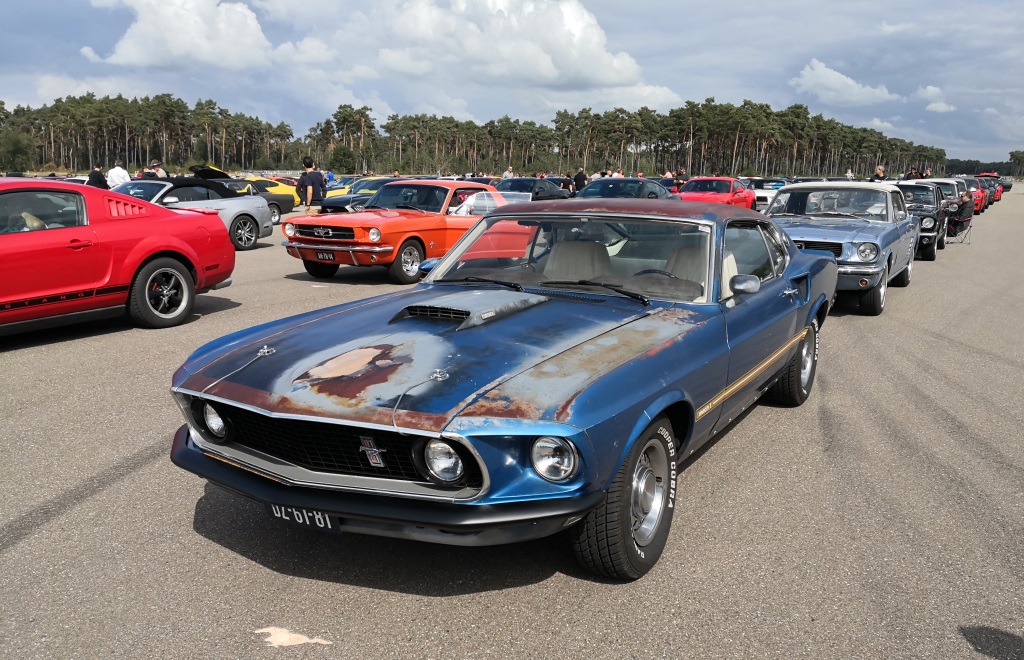
Yes, just a bit!Took a few weeks off working on anything, had hols with the missus and then went to a little Mustang meet up in Belgium with a mate and helped set a world record! I was pleased to see that at least one of the cars there had slightly worse paint than the Elk!!
Once home, I reluctantly headed back into the garage to see how best to proceed.
Sanding is of course the answer, the question being do I potentially waste time trying to salvage the paint or just flat it back and have another go?
Decided to invest the time to try to salvage it, since I felt there is plenty of paint on there, plus no guarantee that the next coat would go on any better! Plus it has got a bit cool for painting in the garage now.
I mixed up a tiny batch of paint and blobbed in the worst of the fish eyes and let that harden slightly before de-nibbing them fairly roughly, just enough to get the blobs mostly flush.
Then I hit the entire roof with 1000 grade wet and a sanding block. The worst of the orange peel sanded out reasonably quickly as did the remaining blobs of paint which were probably still slightly softer than the rest of the roof anyway.
Work in progress, still plenty of issues...

As the roof slowly turned a nice even shade of matt, it showed up more problem areas and fish eyes that I had missed, so they received further touch ups at that point, before I continued to sand.
Once I was reasonably happy, I progressed through 1600 grade up to 3000 and 5000 (although in honesty I couldn't tell much difference between those two). Many hours passed, my beard became a little more grey and my shoulder muscles a little more defined!
Eventually I was sick of sanding and had gone as far as I dare go, having removed the majority of flaws without breaking through to primer anywhere!
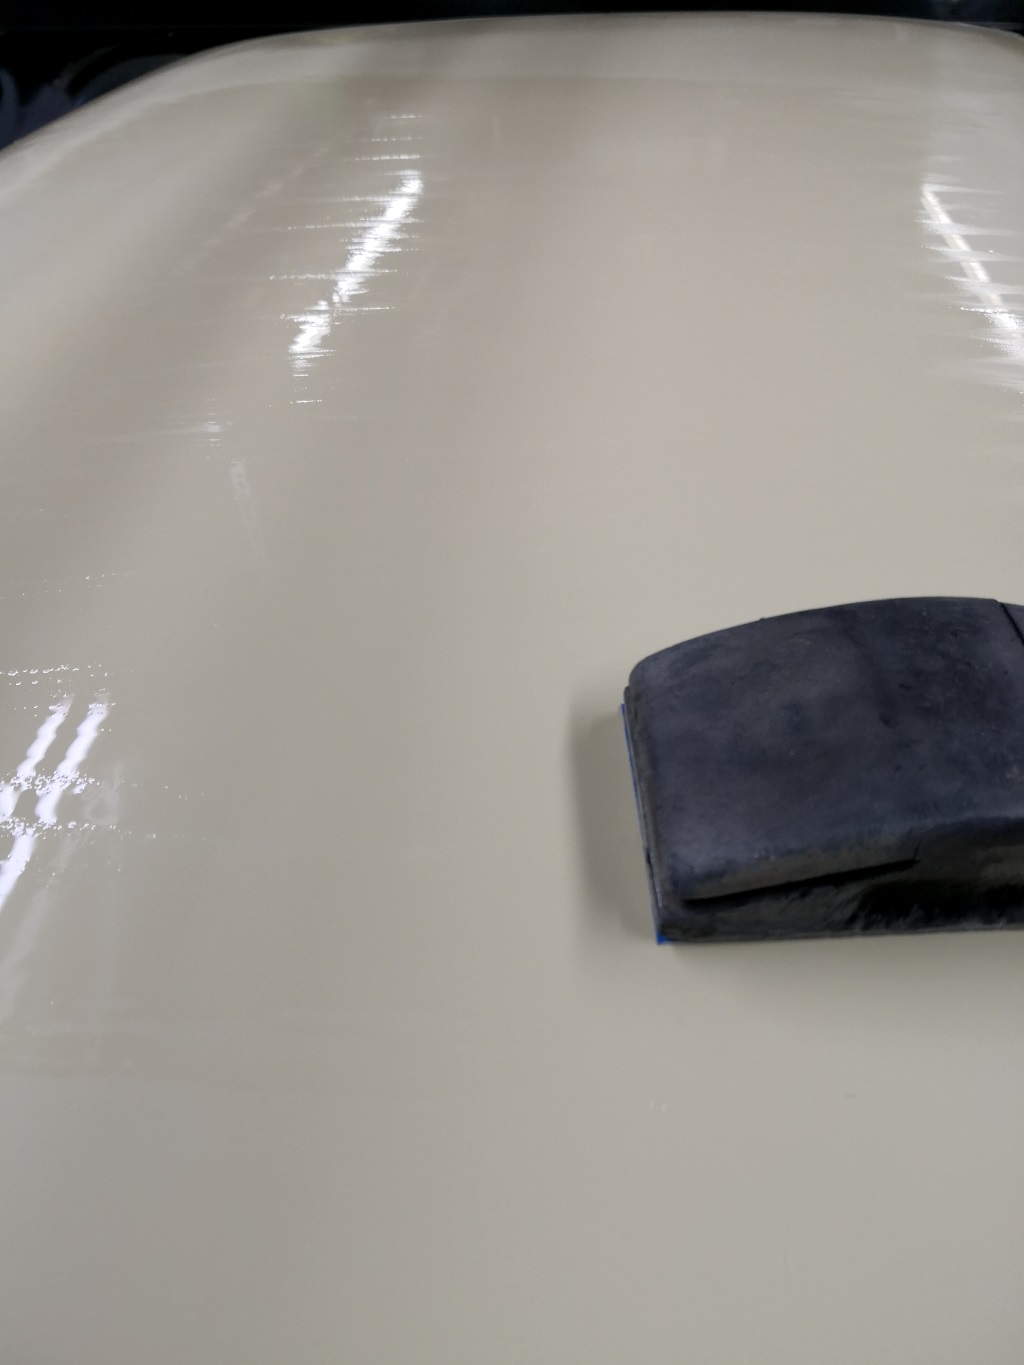
Time to hit it with the DA then, first pass.
I think it'll be ok.
Don't get me wrong, under the unforgiving glare of the strip lights, it does need more work. Several more passes with the polisher to start.
Even then that will leave a few small fish eyes that I have missed, and a section in the middle of the roof that still has a subtle orange peel effect to it compared to the edges. There are also some sanding marks that may need to be revisited with finer grade wet and dry at some point as I think they are a little deep to polish out.
However, subject to no disasters with the polisher over the next few days, I think I can call the roof done for now. Maybe when the rest of the bodywork is done and pristine
 , and I am more confident with the spraygun
  , I'll give it another, better, coat of paint...
For now though, I will start reassembly.
Very nice!
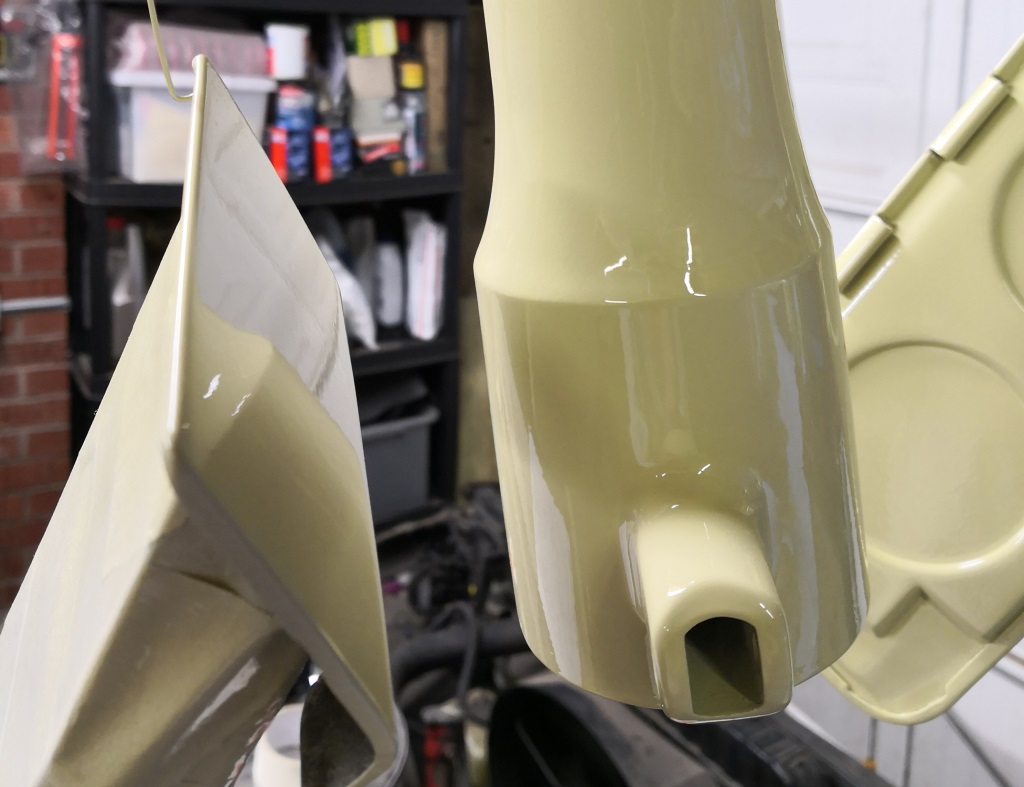
I think as a '68 (if it is the original colour) that'll be Butternut Yellow rather than Lemonwood, an extremely similar colour though.
Butternut superseded Lemonwood in '67 and also just happens to be the original colour on my '67 Camaro, before it was resprayed 15 (yes fifteen) times per DVLA!
I may well put the Camaro back to original when it gets done...
Gassing Station | Readers' Cars | Top of Page | What's New | My Stuff