My BMW E39 530d manual & the man on a galloping horse.
Discussion


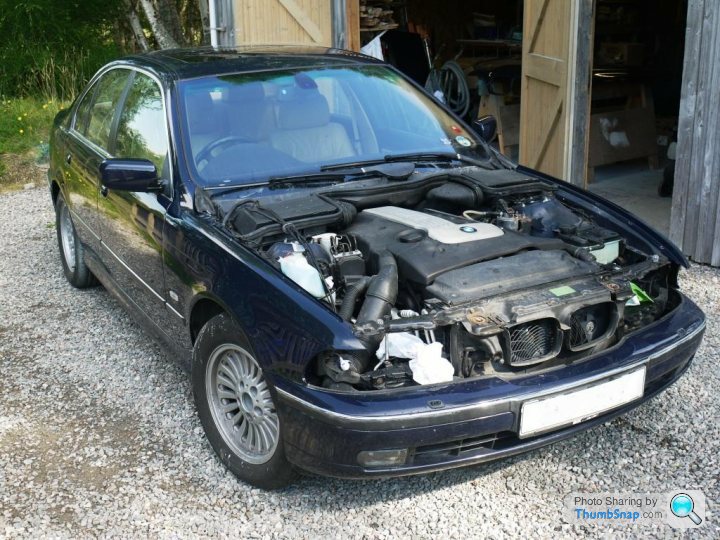
The bodywork on my otherwise mechanically sound E39 530d manual is in a shocking state.
I drive this particular car year-round but the salt on the roads up here in the Scottish Highlands has played havoc with its bodywork. The car is a great drive and has several years and many more miles of life in it but it's looking pretty tatty so I decided to embark on a relatively 'light touch' restoration of the bodywork. (Restoration is the wrong word since that, to me at least, summons up images of removing every nut & bolt and sending them away to get galvanised etc etc.).
Much as I'd like to I won't be cutting out corrosion and welding in new metal: it's definitely not that sort of approach. Rust has been attacked with my grinder and eliminated as far as possible but I know it's near impossible to get it all out without resorting to drastic cutting out and welding in new material. The rust will return. If I get 3 or 4 more years out of the car without it looking like a complete rust-fest then I'll be happy. What I'm trying to achieve is a cosmetic state that a man passing by on a galloping horse would find acceptable.
OK, I'm aiming low but am actually hoping for something a little better than that. We'll see.
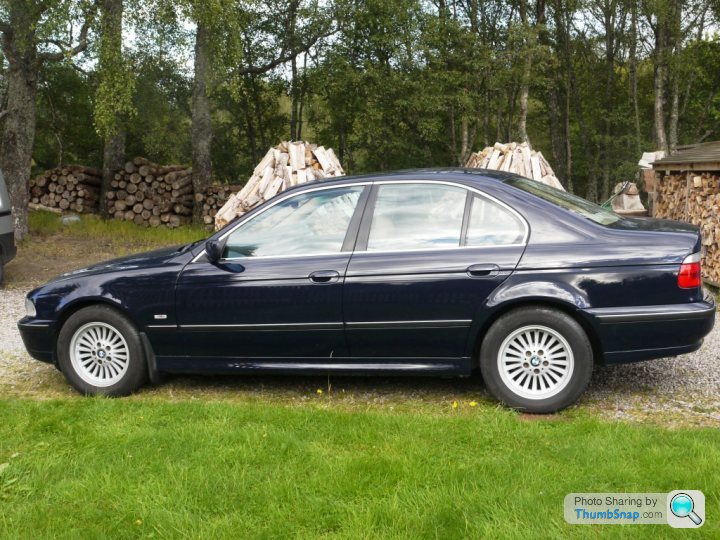
Anyway, here's the car in its pre-cosmetic facelift horribleness:
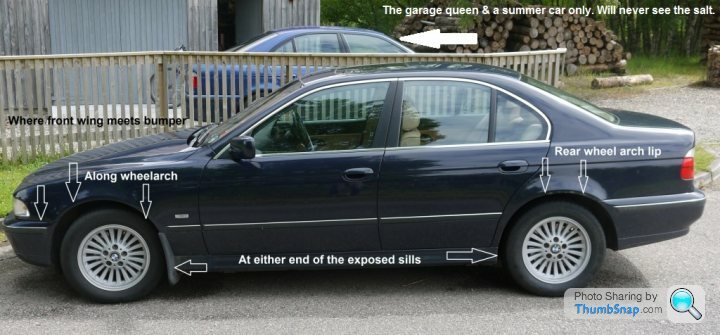
From a distance it doesn't look too bad but corrosion is all too obvious when you look more closely. (My M5 in the background is about as far away on the corrosion spectrum from the 530d as it's possible to be having led a very pampered life.)
Some corrosion porn for you:

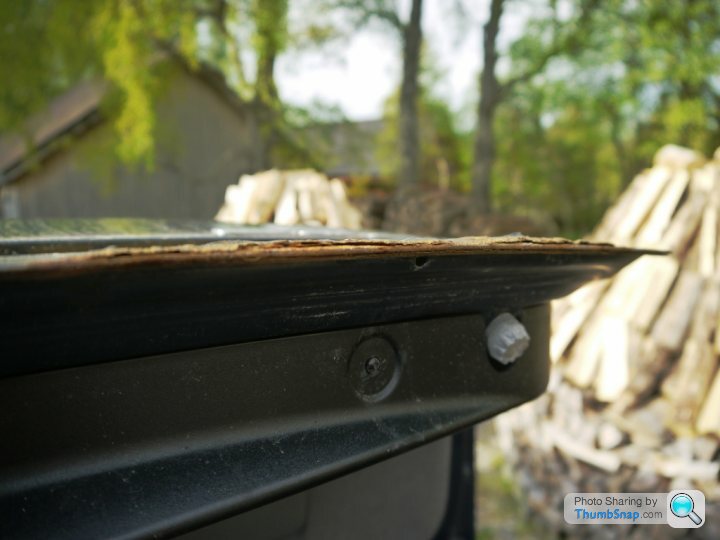
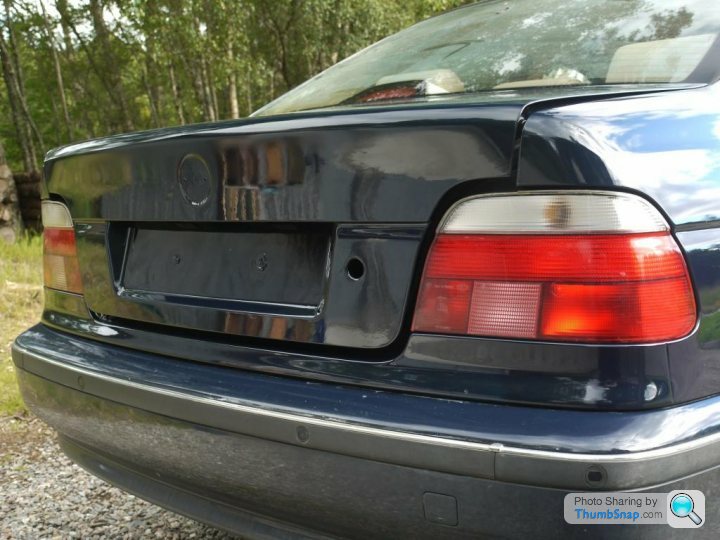
Nasty isn't it? There's a small design flaw in the boot lid which allows rust to get hold and spread unseen from the inside out. The bottom edge has a 180 degree fold in the steel that allows water to penetrate all but the most perfectly seam-sealed & painted examples.
Bottom edge of the boot lid ends up like this:
The original boot lid is scrap since there's no way even the most hopelessly optimistic could revive it into a fit enough condition for paint. Found a scrap one in silver for £30 that came off a 1998 model. (Some enthusiast owners think the earliest models are better protected than later ones; my 530d was built in June 2000.) The replacement one looked good but needed prepping as well. Here's a shot of the folded seam where corrosion often starts:
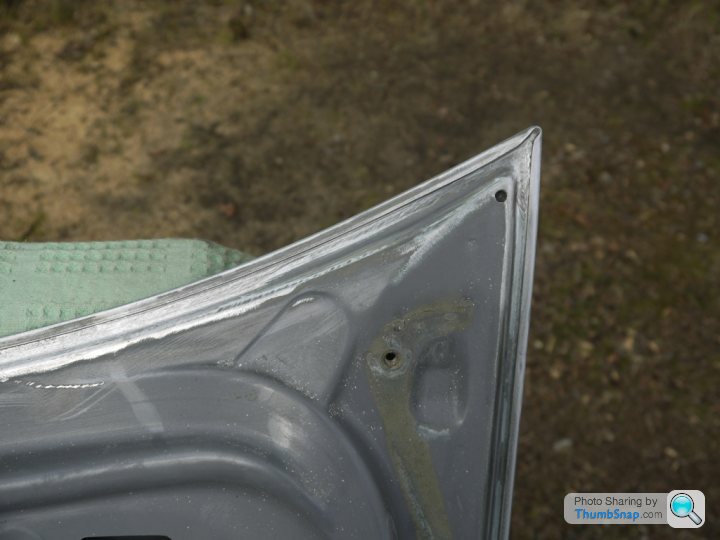
Was pretty clean even before I put the wire brush on the my grinder along the seam. Tiger Seal was used as seam sealer beside the fold, followed by etch primer. With a bit a luck that will slow down the ravages of the 'tin worm'.
Back to the big picture. More corrosion + a scuff to take care of:
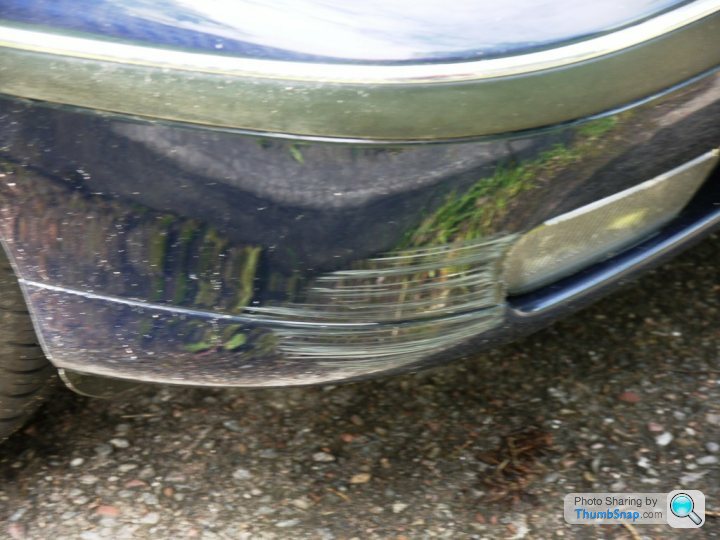
(Above) Parking...involving a very low brick wall.... (I live in the Highlands. There's one roundabout between me and Inverness 45 miles away. Until a few years ago my local village had the only set of traffic lights in the 100+ miles between Perth and Inverness. Traffic? What traffic? I've forgotten how to parallel park because I never have to do it. Sooo...I visit my sister in Edinburgh and leave a smear of BMW 'Dunkelblau 263' paint on the stupid dwarf wall she has way too close to her convoluted driveway. I've been de-skilled in urban driving. There, I admitted it.....But I do know how to drive on snow.)
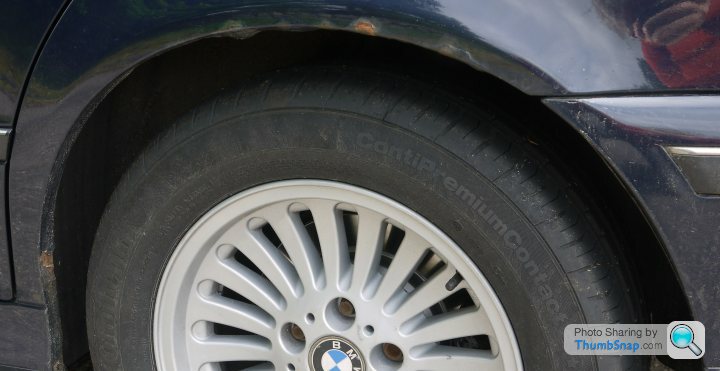
(Above) Rear wheel arch

(Above) The other rear wheel arch.

(Above) Bottom of the front wing where it meet the sill. The true condition of the bottom edge of the wing was only revealed when the wing was unbolted from the car. The grinder got a lot of use there. The sill was also pretty ropey but only where it disappears behind the mud flap. (Now regret putting those flaps on when I got the car back in 2008).
Strangely, this car has not rusted at all in one of the well-known E39 rust traps. The fuel filler aperture is pretty much pristine:

First part of the purging of rust began with the boot lid. The 'new' one was cleaned, sanded/filled/sanded to disguise minor dinks:

These apertures for the number plate lights and boot lid release button are another of the E39's rust-prone areas. The replacement silver lid looked good here:
Unwisely I decided I to paint the boot lid using rattle cans. I'd bought a new LVLP spraygun and a compressor to go with it but they took ages to arrive....and I couldn't wait to get started. Big mistake! However the Upol primer went on OK:
The basecoat wasn't too bad either:

The lacquer coat looked poor though. Rattle cans are OK on small repairs (I sorted out the scuff on the front bumper with Upol rattle cans and it looks OK) but on a larger panel you just can't shoot enough lacquer. The lacquer was 1K - fine for a spot type repair - but just couldn't create enough depth in the finished clearcoat. 1K is a bit soft, too. As you'll see later I sanded the new boot lid down again and re-shot it with 2K products.
The compressor and LVLP spray gun eventually arrived. In fact in the end I bought 2 spray guns. The LVLP came with 3 different air caps - 1.8, 1.4 & 1.3. Initial results weren't great so I bought a Devilbiss 'StartingLine' gun which claimed to have a very low cfm3 (cubic feet per minute) air requirement - 4cfm from memory. My compressor is small at 25 litres capacity but OK on paper, apparently, for these 2 spray guns.

(Above) All the gear and no idea!! Not quite as bad as that but I struggled with the LVLP gun at first. Just couldn't get it to shoot primer and basecoat without 'orange peel'. I bought the additional Devilbiss because I thought the LVLP gun just couldn't cut it. However, after much experimentation I managed to get a nice flat and matt finish out of the LVLP in the time when the Devilbiss was being posted out to me. The trick I'd missed was to thin the paint a little more than suggested in the paint manufacturer's data sheet. Professionals put on paint with high pressure guns so I guess they can use somewhat thicker paint mixes. Will probably save the Devilbiss for putting on the clearcoat since it's supposed to be ideal for that. We'll see.
Also had quite a lot of water coming through the air line and into the paint at first, which was frustrating, so rigged up an additional water separator system using 15mm copper pipe and soldered fittings. Much improved paint finish after this. Really important to drain accumulated water out of the compressor, any traps & pipework at regular intervals.
(Above) SIP compressor and water separator pipework + 2 drainage pipework drain valves.
There'll be paint/bodyshop pros out there tut-tutting at all this. Tiny compressor, LVLP (Low Pressure Low Volume) spray guns, 2K paint and no dedicated extraction system etc, etc.. But I'm not aspiring to a top-end bodyshop finish. I'm working in my garage with budget gear hoping to achieve 'acceptable' (to me) results. I'm also enjoying it! However, 2K toxicity is a live issue so I'll be shooting paint with the garage doors open and wearing a decent 3M face mask which should mitigate most of the nastiness. LVLP also means there won't be clouds of overspray thus fewer airborne particles gassing off isocyanates.
There'll almost certainly be a few dirt inclusions in the finished clearcoat because I'm using my garage so I've resigned myself to a fair amount of clearcoat sanding and buffing. Anyway....
.....remember the man on the galloping horse?
(To be continued).
I drive this particular car year-round but the salt on the roads up here in the Scottish Highlands has played havoc with its bodywork. The car is a great drive and has several years and many more miles of life in it but it's looking pretty tatty so I decided to embark on a relatively 'light touch' restoration of the bodywork. (Restoration is the wrong word since that, to me at least, summons up images of removing every nut & bolt and sending them away to get galvanised etc etc.).
Much as I'd like to I won't be cutting out corrosion and welding in new metal: it's definitely not that sort of approach. Rust has been attacked with my grinder and eliminated as far as possible but I know it's near impossible to get it all out without resorting to drastic cutting out and welding in new material. The rust will return. If I get 3 or 4 more years out of the car without it looking like a complete rust-fest then I'll be happy. What I'm trying to achieve is a cosmetic state that a man passing by on a galloping horse would find acceptable.
OK, I'm aiming low but am actually hoping for something a little better than that. We'll see.
Anyway, here's the car in its pre-cosmetic facelift horribleness:
From a distance it doesn't look too bad but corrosion is all too obvious when you look more closely. (My M5 in the background is about as far away on the corrosion spectrum from the 530d as it's possible to be having led a very pampered life.)
Some corrosion porn for you:
Nasty isn't it? There's a small design flaw in the boot lid which allows rust to get hold and spread unseen from the inside out. The bottom edge has a 180 degree fold in the steel that allows water to penetrate all but the most perfectly seam-sealed & painted examples.
Bottom edge of the boot lid ends up like this:
The original boot lid is scrap since there's no way even the most hopelessly optimistic could revive it into a fit enough condition for paint. Found a scrap one in silver for £30 that came off a 1998 model. (Some enthusiast owners think the earliest models are better protected than later ones; my 530d was built in June 2000.) The replacement one looked good but needed prepping as well. Here's a shot of the folded seam where corrosion often starts:
Was pretty clean even before I put the wire brush on the my grinder along the seam. Tiger Seal was used as seam sealer beside the fold, followed by etch primer. With a bit a luck that will slow down the ravages of the 'tin worm'.
Back to the big picture. More corrosion + a scuff to take care of:
(Above) Parking...involving a very low brick wall.... (I live in the Highlands. There's one roundabout between me and Inverness 45 miles away. Until a few years ago my local village had the only set of traffic lights in the 100+ miles between Perth and Inverness. Traffic? What traffic? I've forgotten how to parallel park because I never have to do it. Sooo...I visit my sister in Edinburgh and leave a smear of BMW 'Dunkelblau 263' paint on the stupid dwarf wall she has way too close to her convoluted driveway. I've been de-skilled in urban driving. There, I admitted it.....But I do know how to drive on snow.)
(Above) Rear wheel arch
(Above) The other rear wheel arch.
(Above) Bottom of the front wing where it meet the sill. The true condition of the bottom edge of the wing was only revealed when the wing was unbolted from the car. The grinder got a lot of use there. The sill was also pretty ropey but only where it disappears behind the mud flap. (Now regret putting those flaps on when I got the car back in 2008).
Strangely, this car has not rusted at all in one of the well-known E39 rust traps. The fuel filler aperture is pretty much pristine:
First part of the purging of rust began with the boot lid. The 'new' one was cleaned, sanded/filled/sanded to disguise minor dinks:
These apertures for the number plate lights and boot lid release button are another of the E39's rust-prone areas. The replacement silver lid looked good here:
Unwisely I decided I to paint the boot lid using rattle cans. I'd bought a new LVLP spraygun and a compressor to go with it but they took ages to arrive....and I couldn't wait to get started. Big mistake! However the Upol primer went on OK:
The basecoat wasn't too bad either:
The lacquer coat looked poor though. Rattle cans are OK on small repairs (I sorted out the scuff on the front bumper with Upol rattle cans and it looks OK) but on a larger panel you just can't shoot enough lacquer. The lacquer was 1K - fine for a spot type repair - but just couldn't create enough depth in the finished clearcoat. 1K is a bit soft, too. As you'll see later I sanded the new boot lid down again and re-shot it with 2K products.
The compressor and LVLP spray gun eventually arrived. In fact in the end I bought 2 spray guns. The LVLP came with 3 different air caps - 1.8, 1.4 & 1.3. Initial results weren't great so I bought a Devilbiss 'StartingLine' gun which claimed to have a very low cfm3 (cubic feet per minute) air requirement - 4cfm from memory. My compressor is small at 25 litres capacity but OK on paper, apparently, for these 2 spray guns.
(Above) All the gear and no idea!! Not quite as bad as that but I struggled with the LVLP gun at first. Just couldn't get it to shoot primer and basecoat without 'orange peel'. I bought the additional Devilbiss because I thought the LVLP gun just couldn't cut it. However, after much experimentation I managed to get a nice flat and matt finish out of the LVLP in the time when the Devilbiss was being posted out to me. The trick I'd missed was to thin the paint a little more than suggested in the paint manufacturer's data sheet. Professionals put on paint with high pressure guns so I guess they can use somewhat thicker paint mixes. Will probably save the Devilbiss for putting on the clearcoat since it's supposed to be ideal for that. We'll see.
Also had quite a lot of water coming through the air line and into the paint at first, which was frustrating, so rigged up an additional water separator system using 15mm copper pipe and soldered fittings. Much improved paint finish after this. Really important to drain accumulated water out of the compressor, any traps & pipework at regular intervals.
(Above) SIP compressor and water separator pipework + 2 drainage pipework drain valves.
There'll be paint/bodyshop pros out there tut-tutting at all this. Tiny compressor, LVLP (Low Pressure Low Volume) spray guns, 2K paint and no dedicated extraction system etc, etc.. But I'm not aspiring to a top-end bodyshop finish. I'm working in my garage with budget gear hoping to achieve 'acceptable' (to me) results. I'm also enjoying it! However, 2K toxicity is a live issue so I'll be shooting paint with the garage doors open and wearing a decent 3M face mask which should mitigate most of the nastiness. LVLP also means there won't be clouds of overspray thus fewer airborne particles gassing off isocyanates.
There'll almost certainly be a few dirt inclusions in the finished clearcoat because I'm using my garage so I've resigned myself to a fair amount of clearcoat sanding and buffing. Anyway....
.....remember the man on the galloping horse?
(To be continued).
Edited by Depthhoar on Sunday 2nd August 20:50
Edited by Depthhoar on Monday 31st August 13:33
Great work.
Central Scotland isn't much better than the Highlands for trying to keep an older car decent, i just about killed a 3.0S Capri running it as a daily through two harsh Scottish winters (and i dont mean sliding it off roundabouts, just with the mountains of frigging salt for 7 months of the year), last year i had a 96 BMW 750iL (E38) that had been sold new in Glasgow, spent some time in Fife, up to Aberdeen, then Paisley, the underside was a mess, surface rust everywhere, (and rot in the rear of the sills), in comparison i recently had a 92 Citroen XM which had spent it's whole life down south, mint underneath, hardly even any surface rust.
Watch the 2K paint, resperator is fine but it can eat into the surface of your skin so full overalls are adviseable too.
I feel your pain!
When I was in the market a few years ago I looked at an M5 a very decent chap had for sale nr Stirling. 60k miles and an utter rust heap! He'd been commuting to and from Glasgow for a few years and it was in a shocking condition for the mileage.
I try to buy all my cars in England because of salt and related corrosion issues so common in Scottish cars.
It's quite interesting following the musings of American E39 M5 owners on this issue over on the M5board. There seems to be a clear delineation in the amount of rot on cars according to states going north to south due to salt. The exception to this seems to be just a few of the really warm and wet southern states like Florida and Mississippi.
There's some good photos of major rust eradication on an Latvian E39 carried out in a Riga bodyshop which I found interesting (and a bit alarming). The rust had really taken hold on this one!:-
http://www.bmwccgbforum.co.uk/bmw-530d-e39-restora...
Nice to see new metal being welded in to replace the rot. God knows how much salt they must throw on the roads over there. (Actually, I contacted that bodyshop for a price on sorting out my 530d's bodywork since labour rates are really cheap over there + cheap flights from Ryanair/Easyjet. Unfortunately, didn't get beyond first base due to phone calls being missed etc..)
Won't be letting my 530d go any time soon. My wife complains about the amount of money the car soaks up but in reality it owes us very little since I've put nearly 100k miles on it in my ownership. Really can't think of another car I'd want to drive a very long distance in; it's just so accomplished at eating up the miles. No idea what I'll buy to replace it when the time comes. It has very few peers.
Phase Two: primer & masking tape.
I really must stop watching YouTube videos about body repair and refinishing.
Originally I'd decided I was just going to repair and paint each panel and let colour matching/blending take the hindmost. But blending paint from one panel to the next one looks so easy on video! So I'm going to have a go at colour and clearcoat blending. For those who don't know, colour matching starts by getting a can of basecoat as close as possible to the original colour. However, even with that you'd still see the difference in colour on an untouched original panel compared to a repainted one next door if there'd been no blending. Apparently, the trick is blur or fade the new paint from the repaired panel on to the adjoining panel so that there isn't an abrupt change. Crap resprays (...which mine may turn out to be!) often show easy-to-spot colour changes on adjacent panels.
Clearcoat blending is all about making the transition from new to old lacquer difficult to see.
It's an ambitious aspiration. Guys spend years learning this trade so my chances of carrying it off without a lot of remedial work are slim...but I'm game!
I think the most difficult part will be blending the colour basecoat. If I screw up the clearcoat blend (or get a whole load of orange peel) I'll just have to do more sanding & buffing to achieve a reasonable outcome. I won't know how successful the basecoat blend has been until after the clearcoat...by which time I'm stuck with it!
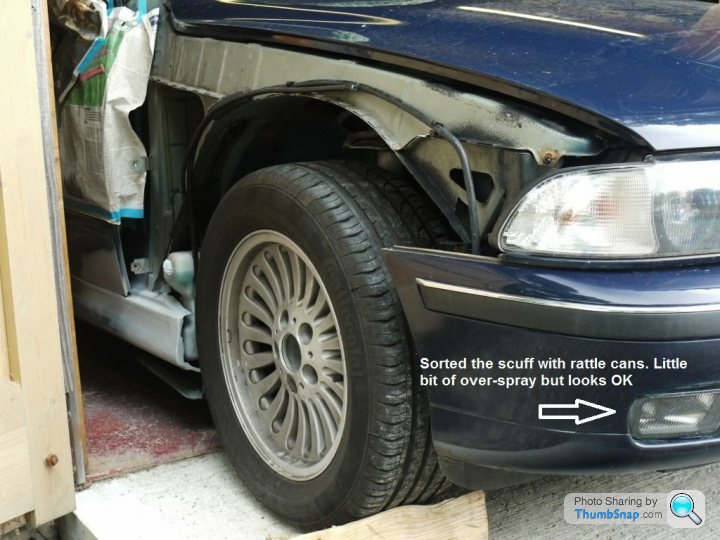
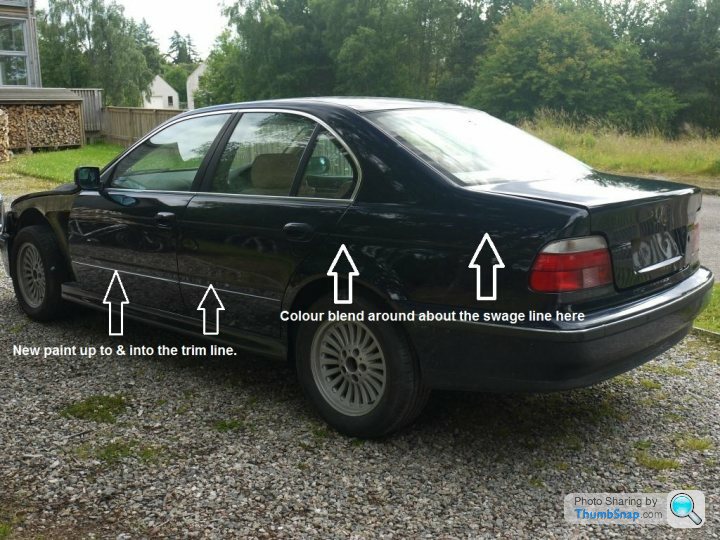
(Above) Front wings are off and the sill and part of the door prepared for basecoat. If you look closely at the front edge of the sill you can see where corrosion has eroded the narrow metal return. I've masked the door at a trim line so that I can do a basecoat and clearcoat blend into the the slot where the blue horizontal masking tape is. There's some folded masking tape there which I hope will make for more of a tapered paint/clearcoat transition. If I were to do this properly I'd be painting the whole door. The repaired scuff turned out OK: acceptable colour & gloss with 1K Upol stuff. (I can live with the small amount of overspray onto the fog light).

(Above) The sill and part of the front door on the other side. The original paintwork has been scuffed with grey (fine) Scotchbrite in preparation for basecoat and clearcoat.
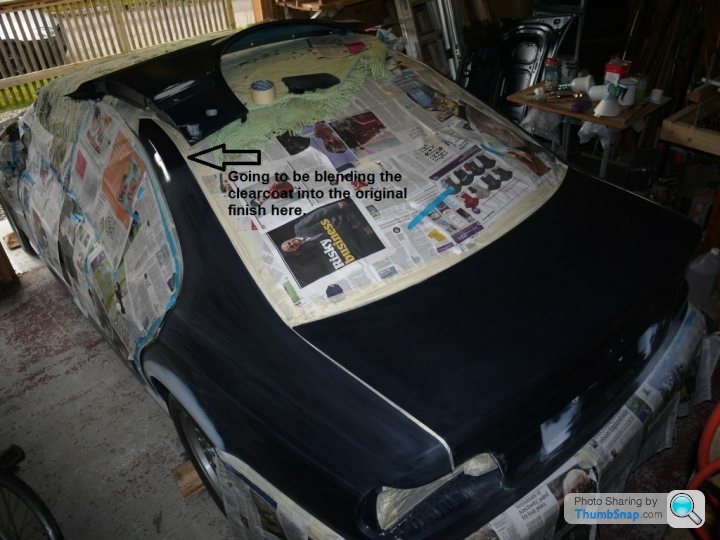
(Above) Gets more complicated now. Obviously need basecoat on the primed areas AND on the boot lid (remember I screwed that up with rattle cans and prepared it for 2K paint?) but I've got to blend so that the bumper and parts of the rear quarter panel don't glare at me with their old paint. The whole of the quarter panel will be clearcoated so I've elected to blend it into the old stuff up near roof panel just where the top of the rear window meets the roof - chosen so as to distract the eye away from the paint.

(Above) The boot lid after some additional fettling to remove a blemish or two. Now ready for more basecoat.
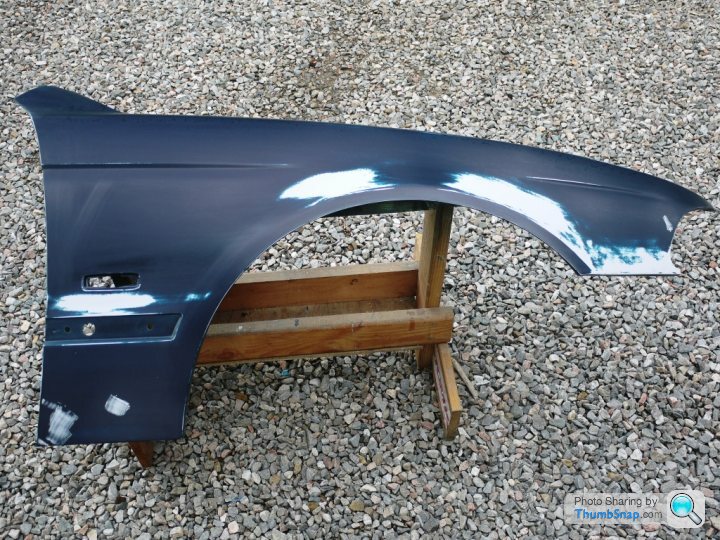
(Above) One of the front wings. Needed additional sanding after I noticed a few minor filler bulges - now I know why car doors car appear rippled after repair/new paint (poor sanding!) I really should have bought some clean secondhand front wings instead of doing all this. There was just too much prep required here (removing corrosion etc.) to achieve an OK finish. A false economy. Secondhand OE wings about £50 to £70 each?
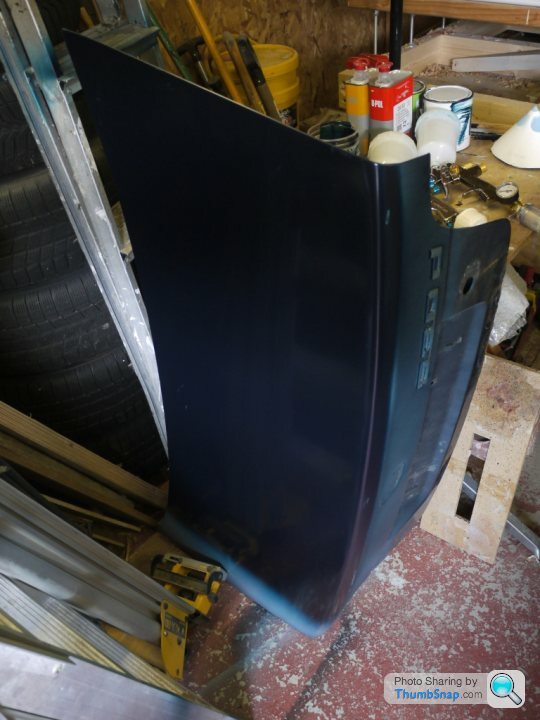
(Above) The old boot lid is an ideal practice panel!

(Above) More practice evident here. Decided against removing the old model ID numbers/letter. To much faff removing and then re-sticking them to the new boot lid so I'm settling for a model-delete look.
Should have some shots of the lacquered but pre-buffed panels in my next posting. Need a warmer day for the next and final paint stage though.
I really must stop watching YouTube videos about body repair and refinishing.
Originally I'd decided I was just going to repair and paint each panel and let colour matching/blending take the hindmost. But blending paint from one panel to the next one looks so easy on video! So I'm going to have a go at colour and clearcoat blending. For those who don't know, colour matching starts by getting a can of basecoat as close as possible to the original colour. However, even with that you'd still see the difference in colour on an untouched original panel compared to a repainted one next door if there'd been no blending. Apparently, the trick is blur or fade the new paint from the repaired panel on to the adjoining panel so that there isn't an abrupt change. Crap resprays (...which mine may turn out to be!) often show easy-to-spot colour changes on adjacent panels.
Clearcoat blending is all about making the transition from new to old lacquer difficult to see.
It's an ambitious aspiration. Guys spend years learning this trade so my chances of carrying it off without a lot of remedial work are slim...but I'm game!
I think the most difficult part will be blending the colour basecoat. If I screw up the clearcoat blend (or get a whole load of orange peel) I'll just have to do more sanding & buffing to achieve a reasonable outcome. I won't know how successful the basecoat blend has been until after the clearcoat...by which time I'm stuck with it!
(Above) Front wings are off and the sill and part of the door prepared for basecoat. If you look closely at the front edge of the sill you can see where corrosion has eroded the narrow metal return. I've masked the door at a trim line so that I can do a basecoat and clearcoat blend into the the slot where the blue horizontal masking tape is. There's some folded masking tape there which I hope will make for more of a tapered paint/clearcoat transition. If I were to do this properly I'd be painting the whole door. The repaired scuff turned out OK: acceptable colour & gloss with 1K Upol stuff. (I can live with the small amount of overspray onto the fog light).
(Above) The sill and part of the front door on the other side. The original paintwork has been scuffed with grey (fine) Scotchbrite in preparation for basecoat and clearcoat.
(Above) Gets more complicated now. Obviously need basecoat on the primed areas AND on the boot lid (remember I screwed that up with rattle cans and prepared it for 2K paint?) but I've got to blend so that the bumper and parts of the rear quarter panel don't glare at me with their old paint. The whole of the quarter panel will be clearcoated so I've elected to blend it into the old stuff up near roof panel just where the top of the rear window meets the roof - chosen so as to distract the eye away from the paint.
(Above) The boot lid after some additional fettling to remove a blemish or two. Now ready for more basecoat.
(Above) One of the front wings. Needed additional sanding after I noticed a few minor filler bulges - now I know why car doors car appear rippled after repair/new paint (poor sanding!) I really should have bought some clean secondhand front wings instead of doing all this. There was just too much prep required here (removing corrosion etc.) to achieve an OK finish. A false economy. Secondhand OE wings about £50 to £70 each?
(Above) The old boot lid is an ideal practice panel!
(Above) More practice evident here. Decided against removing the old model ID numbers/letter. To much faff removing and then re-sticking them to the new boot lid so I'm settling for a model-delete look.
Should have some shots of the lacquered but pre-buffed panels in my next posting. Need a warmer day for the next and final paint stage though.
Edited by Depthhoar on Tuesday 4th August 07:01
At last some progress.
Had a rash of summer visitors (mainly family) for the last couple of weeks so haven't been able to get into the garage much.
Had quite a few comments from neighbours, friends etc along the lines of, 'Ooh, what you're doing to your car looks pretty ambitious....Are you sure it'll turn out OK?' The simple answers to which are, respectively, yes it is & maybe it won't! People seem pretty cowed by this sort of job but if you're practical, prepared to plan a bit and take your time it's actually OK. There's loads of help out there on YouTube & modern spray guns and paint are pretty forgiving. There's definitely a bit of risk when it comes to achieving a good finish but it's one I'm prepared to take.

(Above) All panels apart from the bonnet and front wings now base & clear coated though not yet wet sanded and compounded (buffed). Quite pleased with the results so far and hope the gloss will improve and become a little 'deeper' when it's cut back and finally polished. Colour match is 'OK' and will improve a bit when the unpainted original panels are buffed to remove surface contaminants and show more of the original paint/colour.

(Above) Rear of the car. The only part not painted is the bumper. Awaiting wet sanding etc. Yes, there were a fair number of bits of dust in the clear coat but I'm hoping these will be removed by the wet & dry abrasive. Definite difference in colour here between the bumper and the new paint. Hopefully some buffing will 'smudge' the difference a little.
(Above) Detail of the rear. Gloss looks OK pre-sanding! The second hand boot lid has come up well.
(Above) The colour blend. Was dreading this but it was fairly easy in the end. I'm pretty sure this could be a 'mare of a job if I was painting a light metallic colour. Thankfully the solid colour on my car presented fewer challenges. Decided to shoot paint into the trim line on the door and not blend into the top half of the door panel as I wanted to save some paint for spraying the bonnet (see below).
(Above) Front wings now on. So much easier painting these panels off the car...less masking & easier access to the offsets and edges of the panel when wielding the spray gun.
It's been quite interesting working out how much paint and materials to use on this job. I took a fairly wild guess when I ordered the primer, base coat and clear coat and wasn't sure if I was going to over or under shoot on quantities. Well, I had enough to do an additional panel - the bonnet.
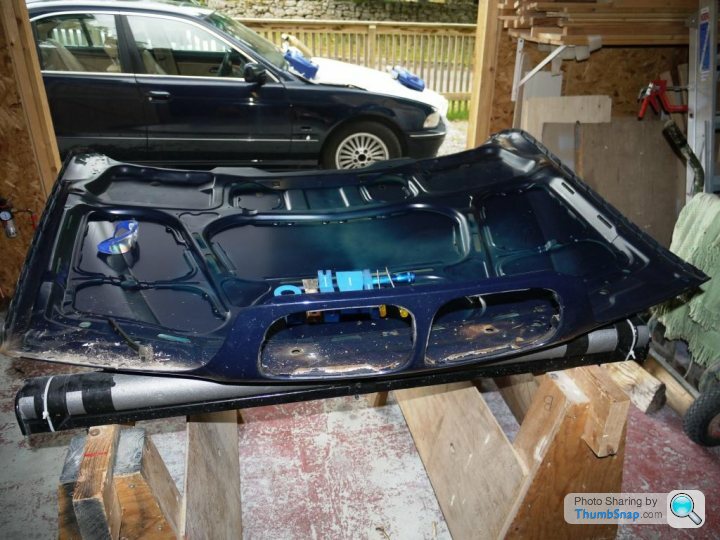
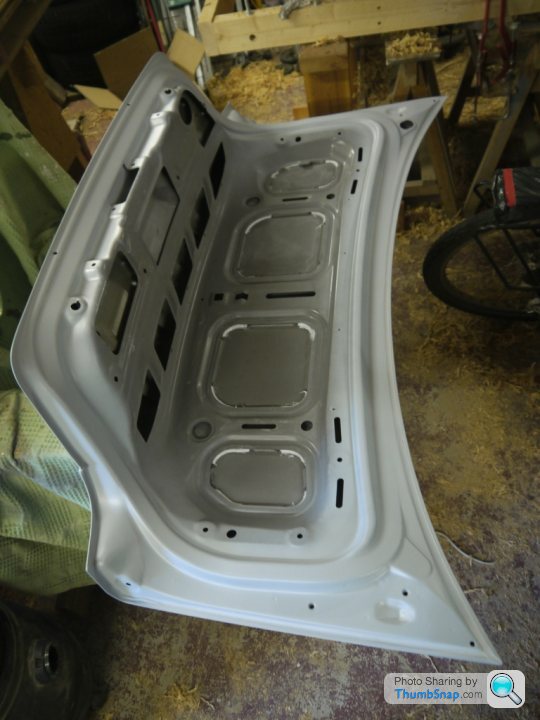
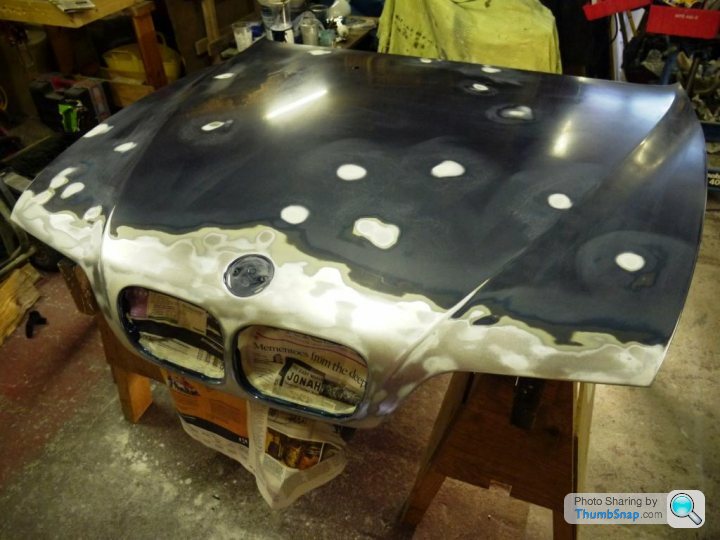
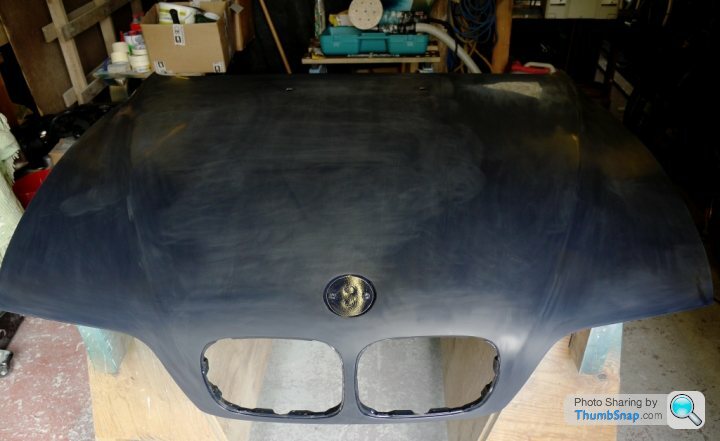
(Above) Decided to paint the outside edge of the underside of the bonnet first - the part not covered by the sound deadening pad (the middle of the underside was unblemished and is hidden by the sound insulation).

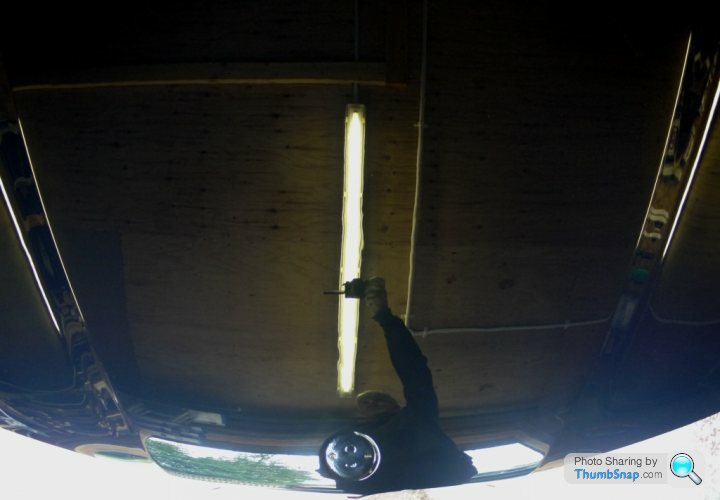
(Above) The bonnet was looking a little scruffy. Apart from a rash of stone chips on the front there was also some of the brown crumbly stuff creeping along the bottom edge that had lifted the seam sealer and a little of the paint. Nothing too serious and it cleaned up really well. Eventually used a zip brush on the grinder for a final de-scaling after this shot was taken. Some new seam sealer, primer and paint and I was ready to flip the bonnet over.

(Above) Little bit of overspray onto the old paintwork on the top side of the bonnet. Started sanding out innumerable stone chips that had penetrated all the way to the steel beneath creating very many rust spots.....
(Below) ......far too many. Made more sense to take the whole of the front end down to bare steel than faff around with a patchwork quilt of filler. A bit scary but actually saved me a lot of time. Taking it back to the metal revealed several other tiny rust spots I'd missed on the first visual inspection, so overall a win-win.
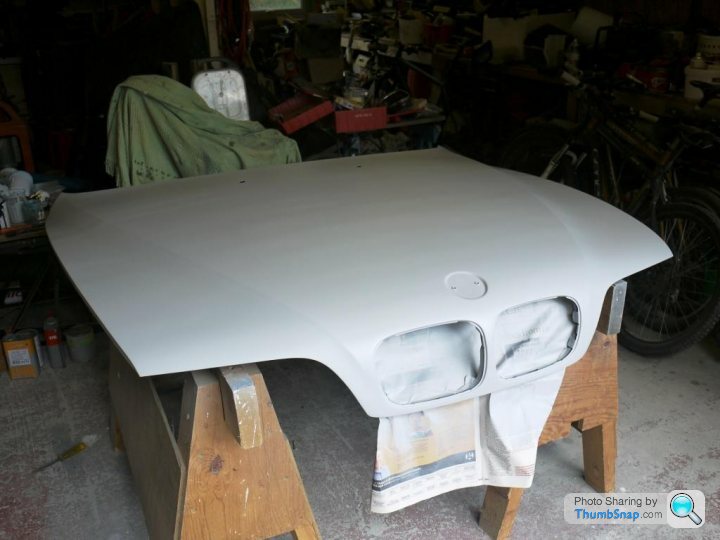
(Above) Some etch primer on the exposed steel then the first complete coat of 2K primer. 'Tiger stripes' just visible? Had two more coats of primer which were flatted back in preparation for base & clear coat.
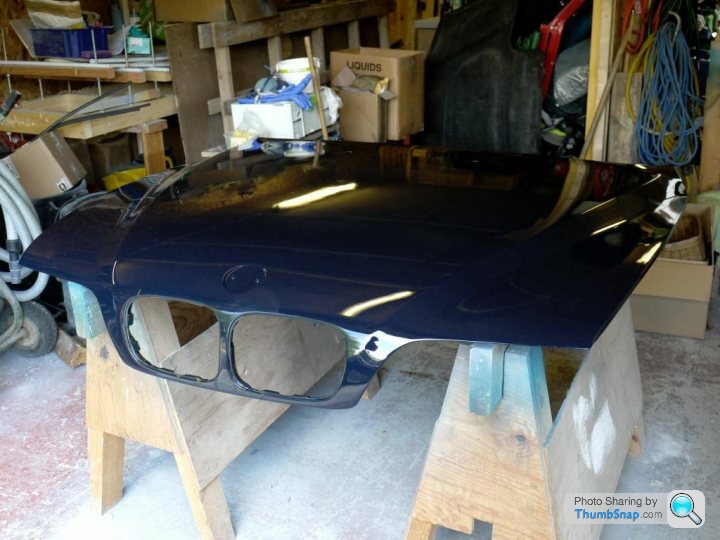
(Above) The bonnet after paint. Total of 6 coats of clear lacquer with a little sanding after the first three. If you look carefully you'll see some of the dust that settled on the panel immediately after lacquer. It's pretty impossible to get an unblemished final paint finish on a car in a domestic garage since there's always bits of stuff floating around in the air despite wetting out the floor in an attempt to lay the dust.
The wet sanding will commence soon.
Had a rash of summer visitors (mainly family) for the last couple of weeks so haven't been able to get into the garage much.
Had quite a few comments from neighbours, friends etc along the lines of, 'Ooh, what you're doing to your car looks pretty ambitious....Are you sure it'll turn out OK?' The simple answers to which are, respectively, yes it is & maybe it won't! People seem pretty cowed by this sort of job but if you're practical, prepared to plan a bit and take your time it's actually OK. There's loads of help out there on YouTube & modern spray guns and paint are pretty forgiving. There's definitely a bit of risk when it comes to achieving a good finish but it's one I'm prepared to take.
(Above) All panels apart from the bonnet and front wings now base & clear coated though not yet wet sanded and compounded (buffed). Quite pleased with the results so far and hope the gloss will improve and become a little 'deeper' when it's cut back and finally polished. Colour match is 'OK' and will improve a bit when the unpainted original panels are buffed to remove surface contaminants and show more of the original paint/colour.
(Above) Rear of the car. The only part not painted is the bumper. Awaiting wet sanding etc. Yes, there were a fair number of bits of dust in the clear coat but I'm hoping these will be removed by the wet & dry abrasive. Definite difference in colour here between the bumper and the new paint. Hopefully some buffing will 'smudge' the difference a little.
(Above) Detail of the rear. Gloss looks OK pre-sanding! The second hand boot lid has come up well.
(Above) The colour blend. Was dreading this but it was fairly easy in the end. I'm pretty sure this could be a 'mare of a job if I was painting a light metallic colour. Thankfully the solid colour on my car presented fewer challenges. Decided to shoot paint into the trim line on the door and not blend into the top half of the door panel as I wanted to save some paint for spraying the bonnet (see below).
(Above) Front wings now on. So much easier painting these panels off the car...less masking & easier access to the offsets and edges of the panel when wielding the spray gun.
It's been quite interesting working out how much paint and materials to use on this job. I took a fairly wild guess when I ordered the primer, base coat and clear coat and wasn't sure if I was going to over or under shoot on quantities. Well, I had enough to do an additional panel - the bonnet.
(Above) Decided to paint the outside edge of the underside of the bonnet first - the part not covered by the sound deadening pad (the middle of the underside was unblemished and is hidden by the sound insulation).
(Above) The bonnet was looking a little scruffy. Apart from a rash of stone chips on the front there was also some of the brown crumbly stuff creeping along the bottom edge that had lifted the seam sealer and a little of the paint. Nothing too serious and it cleaned up really well. Eventually used a zip brush on the grinder for a final de-scaling after this shot was taken. Some new seam sealer, primer and paint and I was ready to flip the bonnet over.
(Above) Little bit of overspray onto the old paintwork on the top side of the bonnet. Started sanding out innumerable stone chips that had penetrated all the way to the steel beneath creating very many rust spots.....
(Below) ......far too many. Made more sense to take the whole of the front end down to bare steel than faff around with a patchwork quilt of filler. A bit scary but actually saved me a lot of time. Taking it back to the metal revealed several other tiny rust spots I'd missed on the first visual inspection, so overall a win-win.
(Above) Some etch primer on the exposed steel then the first complete coat of 2K primer. 'Tiger stripes' just visible? Had two more coats of primer which were flatted back in preparation for base & clear coat.
(Above) The bonnet after paint. Total of 6 coats of clear lacquer with a little sanding after the first three. If you look carefully you'll see some of the dust that settled on the panel immediately after lacquer. It's pretty impossible to get an unblemished final paint finish on a car in a domestic garage since there's always bits of stuff floating around in the air despite wetting out the floor in an attempt to lay the dust.
The wet sanding will commence soon.
Edited by Depthhoar on Sunday 23 August 23:06
An excellent and interesting thread - thanks for posting it. The e39 is a lovely car and well worth repairing.
They do seem quite rust prone though - and not just Scottish cars. A friend of mine had a similar aged 530i which was really quite rusty too - and had spent its life in the Manchester area.
They do seem quite rust prone though - and not just Scottish cars. A friend of mine had a similar aged 530i which was really quite rusty too - and had spent its life in the Manchester area.
Finale.
On & off it's taken me a month to complete this job and overall I've enjoyed it (though that's not to say there hasn't been a certain amount of wailing and gnashing of teeth....just occasionally).
The wet sanding went well. As they say, if you can't paint then get good at clear coat sanding. The paintwork isn't perfect but it's turned out quite a lot better than first anticipated. There are some pin holes and one or two places where a couple of drips of sweat fell onto the bodywork when I was clear coating. I managed to wick these off with a corner of a clean rag then just buried the area with more fresh lacquer. It came out OK....after a certain amount of sanding and buffing; you'd need to look very carefully to find them.
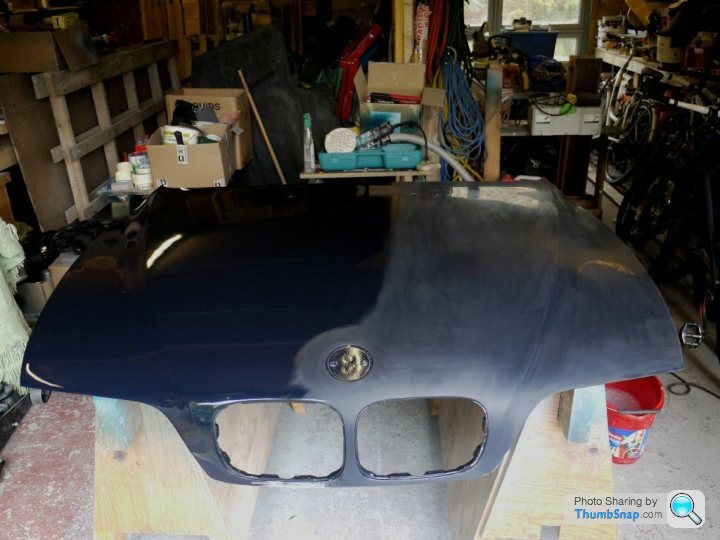
(Above) The lacquered bonnet halfway through wet sanding - 1500 followed by 2000 grit. Seems weird to be flat sanding a very glossy panel but there were plenty of dust inclusions and orange peel. Top tip! Use 3M abrasives since every other brand seems to be useless in comparison.
(Above) Fully sanded and ready for the random orbit buffer.
(Above) Shiny! Used Farecla G3 on a white (firm) pad followed by Meguiars 205 on a black (soft) pad. Experimented a bit with Farecla G10 instead of the Meguiars but found the latter much easier and less messy to use, however the results were similar.

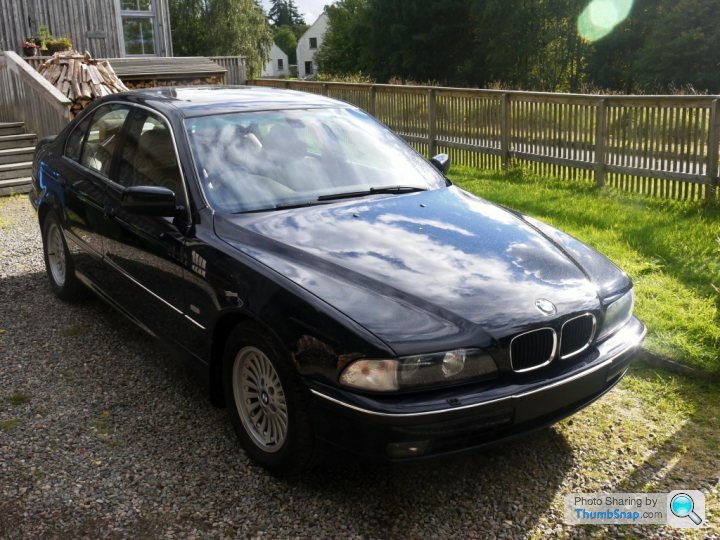
(Above) Bonnet and all the trim now fitted to the car. All old paint buffed as well with the Meguiars stuff to remove oxidation. Colour match is OK. In certain light conditions it's definitely possible to see slight differences in colour between the new and old paint.
(Below) Remember this...?

(Below)...Now looking like this......

(OK, that's a "new" panel and not the refurbed old one but it's definitely looking much better!)
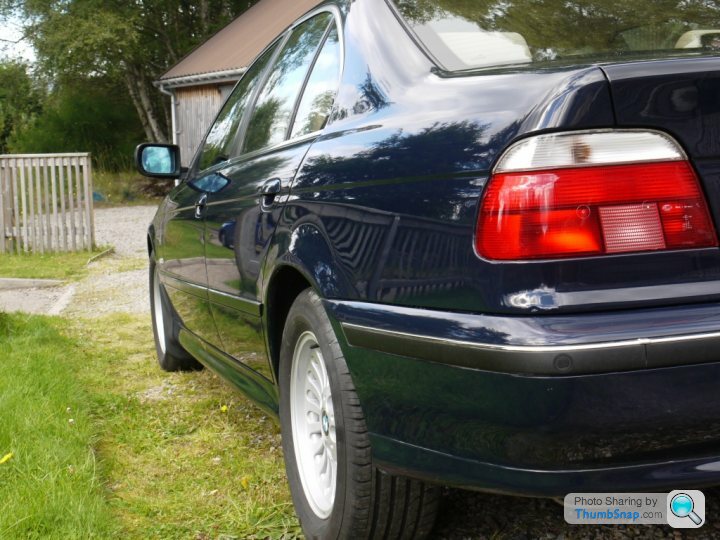
(Above) The flanks looking very clean and straight....although that wheel arch flatters to deceive given the amount of fibreglass filler that went into its repair! That little dink on the corner below the rear lamp assembly is "original" and adds...'authentic patination' (the truth is I overlooked it when wielding the filler...)
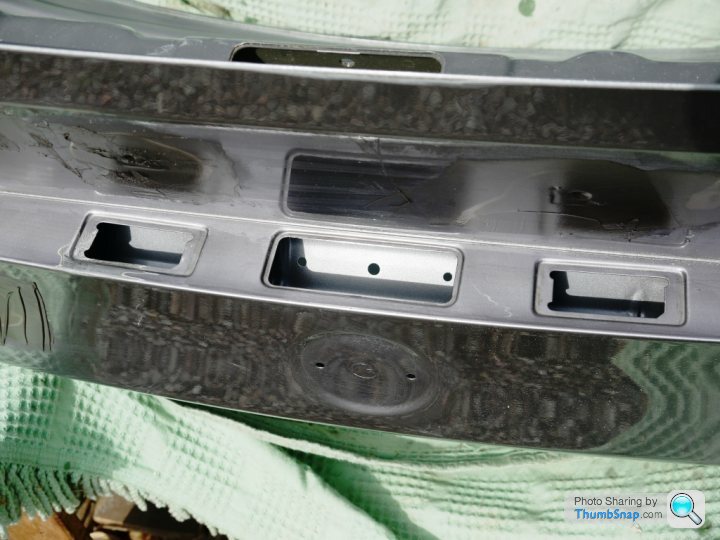
(Above) The bumper is original paintwork as is the paintwork above the trim line on the door. Colour difference just noticeable here though doesn't show much in the photo.
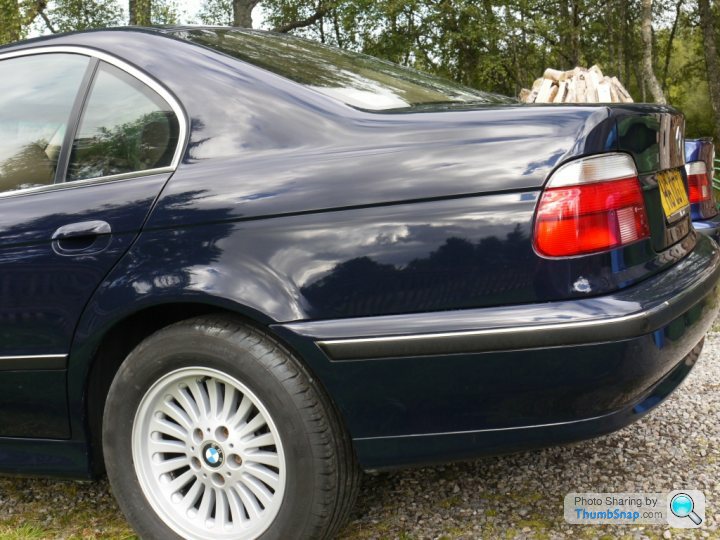
(Above) The near-side flank in its entirety.
(Above) The other side and bonnet. Difficult to see colour differences on the more shaded side.
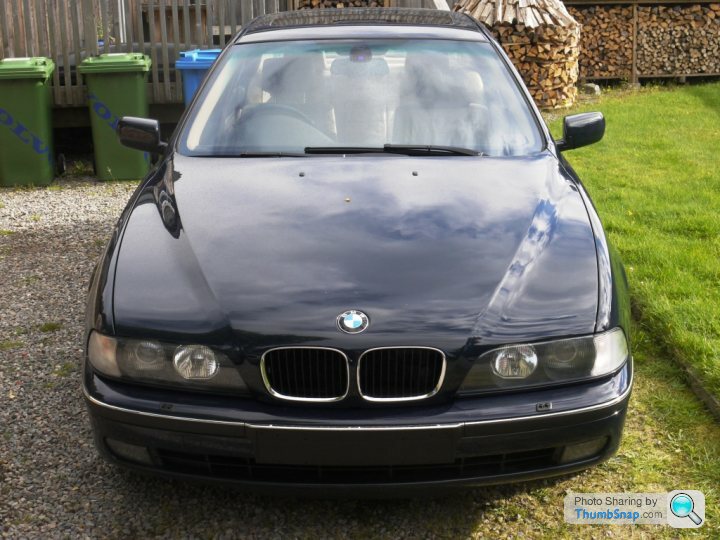
(Above) Bonnet looking quite pukka. (Photo spoiled by having a random leaf in the centre of the bonnet... )
)
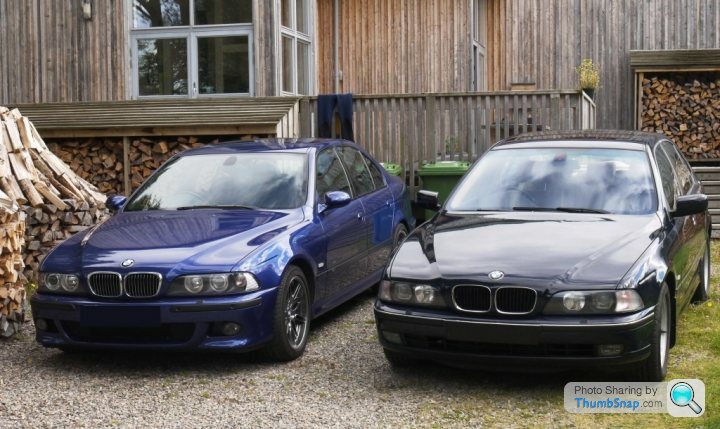
(Above) The Beauty and The Beast. (Actually, The Beast is also beautiful but would be more of a mouthful and a less snappy photo title!)
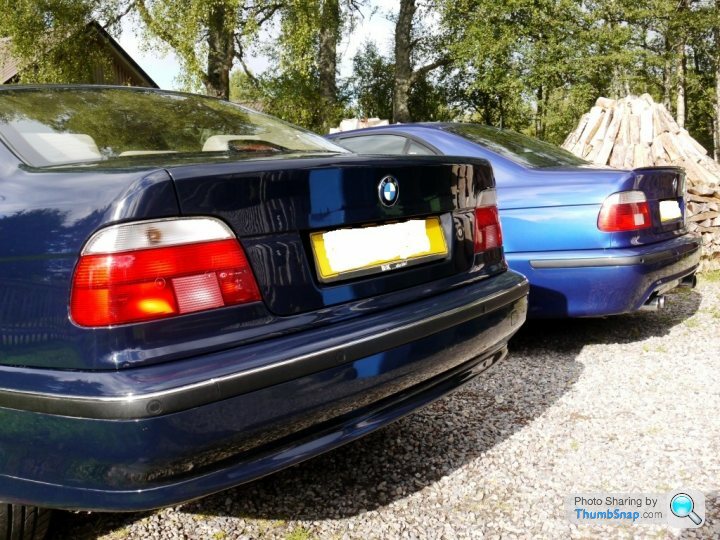
(Above) Rear view of the 530d and M5
What I've learnt:
1. You need a good spray gun and a decent size compressor. Clean, dry air is also essential since any water and oil from the compressor will make a right mess of any paintwork when it comes out of the gun.
2. Total spend on consumable materials (paint, thinners and abrasives etc.) about £230. The only panels I didn't paint were the roof, both bumpers and the top half of the all the doors. About £300 would buy enough stuff for a complete respray. Top quality paint would add another, say, £100?? Total for a full respray approx £400 then.
3. 3M abrasives (wet & dry) are the only brand that really cut it, literally and figuratively. Everything else doesn't and is poor value.
4. Sand the primer with great care working your way through the correct grits otherwise sanding marks will 'ghost' through to the lacquer.
5. Practice your paint spraying on a scrap panel. Make your mistakes there not on your car.
6. You really need to smash the lacquer coat on after the first one but you do run the risk of paint runs if it's too heavy. There's a fine line to tread. If you get orange peel you'll have to wet sand it flat and buff to a very nice deep gloss.
7. Painting a solid colour is almost certainly easier than shooting a metallic.
The apocryphal man passing by on the galloping horse wouldn't, I think, give the car a second glance. Job done then!
On & off it's taken me a month to complete this job and overall I've enjoyed it (though that's not to say there hasn't been a certain amount of wailing and gnashing of teeth....just occasionally).
The wet sanding went well. As they say, if you can't paint then get good at clear coat sanding. The paintwork isn't perfect but it's turned out quite a lot better than first anticipated. There are some pin holes and one or two places where a couple of drips of sweat fell onto the bodywork when I was clear coating. I managed to wick these off with a corner of a clean rag then just buried the area with more fresh lacquer. It came out OK....after a certain amount of sanding and buffing; you'd need to look very carefully to find them.
(Above) The lacquered bonnet halfway through wet sanding - 1500 followed by 2000 grit. Seems weird to be flat sanding a very glossy panel but there were plenty of dust inclusions and orange peel. Top tip! Use 3M abrasives since every other brand seems to be useless in comparison.
(Above) Fully sanded and ready for the random orbit buffer.
(Above) Shiny! Used Farecla G3 on a white (firm) pad followed by Meguiars 205 on a black (soft) pad. Experimented a bit with Farecla G10 instead of the Meguiars but found the latter much easier and less messy to use, however the results were similar.
(Above) Bonnet and all the trim now fitted to the car. All old paint buffed as well with the Meguiars stuff to remove oxidation. Colour match is OK. In certain light conditions it's definitely possible to see slight differences in colour between the new and old paint.
(Below) Remember this...?
(Below)...Now looking like this......
(OK, that's a "new" panel and not the refurbed old one but it's definitely looking much better!)
(Above) The flanks looking very clean and straight....although that wheel arch flatters to deceive given the amount of fibreglass filler that went into its repair! That little dink on the corner below the rear lamp assembly is "original" and adds...'authentic patination' (the truth is I overlooked it when wielding the filler...)
(Above) The bumper is original paintwork as is the paintwork above the trim line on the door. Colour difference just noticeable here though doesn't show much in the photo.
(Above) The near-side flank in its entirety.
(Above) The other side and bonnet. Difficult to see colour differences on the more shaded side.
(Above) Bonnet looking quite pukka. (Photo spoiled by having a random leaf in the centre of the bonnet...
)(Above) The Beauty and The Beast. (Actually, The Beast is also beautiful but would be more of a mouthful and a less snappy photo title!)
(Above) Rear view of the 530d and M5
What I've learnt:
1. You need a good spray gun and a decent size compressor. Clean, dry air is also essential since any water and oil from the compressor will make a right mess of any paintwork when it comes out of the gun.
2. Total spend on consumable materials (paint, thinners and abrasives etc.) about £230. The only panels I didn't paint were the roof, both bumpers and the top half of the all the doors. About £300 would buy enough stuff for a complete respray. Top quality paint would add another, say, £100?? Total for a full respray approx £400 then.
3. 3M abrasives (wet & dry) are the only brand that really cut it, literally and figuratively. Everything else doesn't and is poor value.
4. Sand the primer with great care working your way through the correct grits otherwise sanding marks will 'ghost' through to the lacquer.
5. Practice your paint spraying on a scrap panel. Make your mistakes there not on your car.
6. You really need to smash the lacquer coat on after the first one but you do run the risk of paint runs if it's too heavy. There's a fine line to tread. If you get orange peel you'll have to wet sand it flat and buff to a very nice deep gloss.
7. Painting a solid colour is almost certainly easier than shooting a metallic.
The apocryphal man passing by on the galloping horse wouldn't, I think, give the car a second glance. Job done then!
Edited by Depthhoar on Monday 31st August 23:39
Gassing Station | Readers' Cars | Top of Page | What's New | My Stuff