My Very Cheap Mini One D Dooer Upper...
Discussion


How about popping to the local Mini dealership and finding out what the workshop manual states it should take timewise - probably 0.25 or something daft. Then offer to pay the 0.25 plus time for the journey to and from your marquee for a pro to do the job. The amount of backtracking and no-ing will tell you just how hard the job will be...
Good luck. I can only image this is like fitting steel bead tyres to a pushbike with slightly oversize rims. F**king horrible.
Good luck. I can only image this is like fitting steel bead tyres to a pushbike with slightly oversize rims. F**king horrible.
I have a positive update 
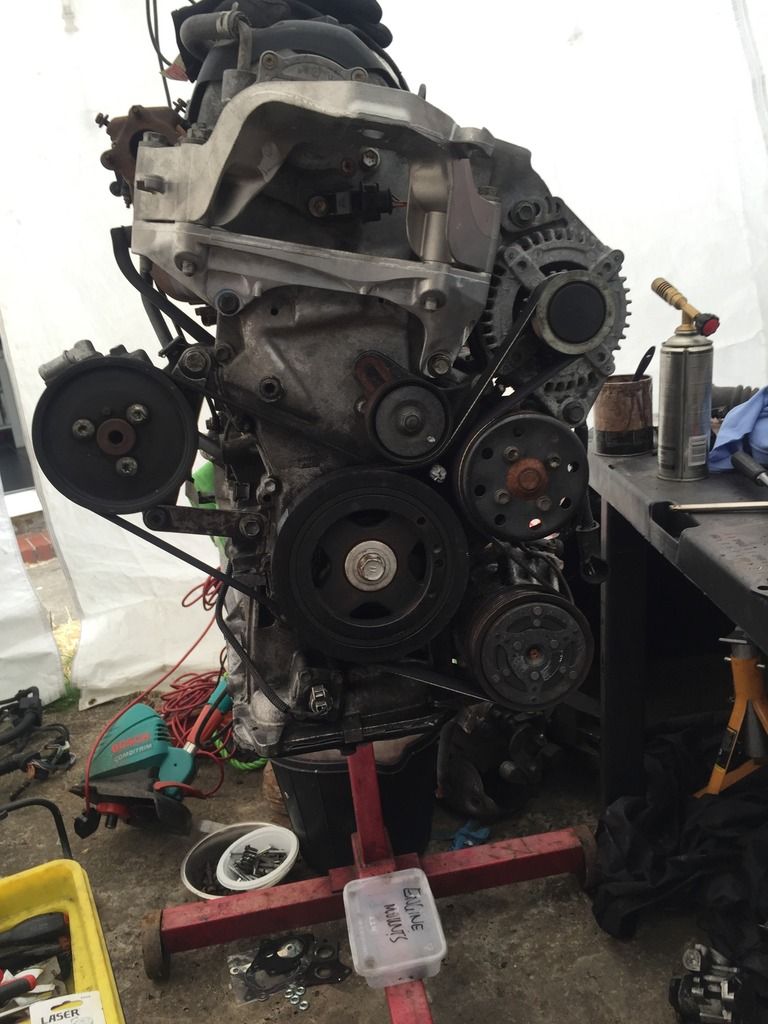
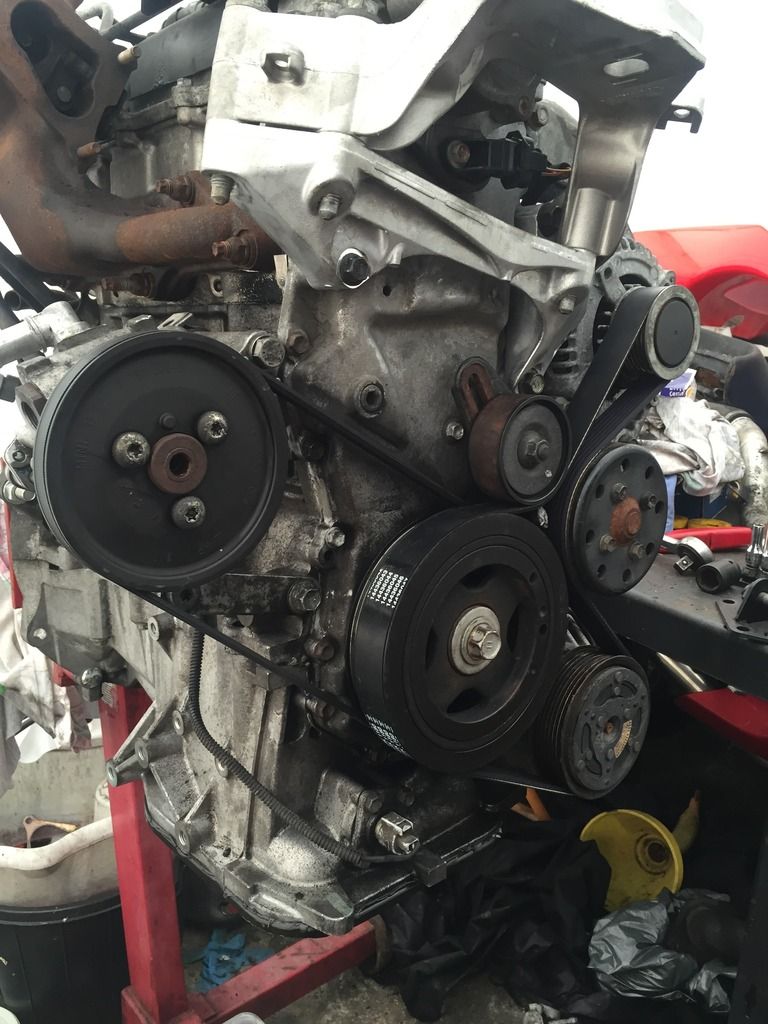
When I got home this evening I decided it was time to give the belt another try. I had changed my mind about which one to order and ended up getting one about 5mm longer than the original. I gave it and the pulley a liberal coating of WD40, attached the belt fitting tool and started to turn the crank. Again it was just trying to pull the belt off and it looked like I was going to break another chunk out of the pulley if I kept trying! I decided that this approach really wasn't getting me anywhere so I figured I'd try a different approach. I made the decision to try winding the belt on the other way. Now this meant having to turn the crank the wrong way which I really didn't want to do, but needs must and all that. I set it all up and started turning the crank and miracle of miracles the belt went on! I really hope I never have to replace it again. It's the most stupid design I've ever seen!
Anyway, I then spent an entire 5 minutes putting the second belt on and tensioning it up (with a proper tensioner! What an excellent idea!).
At this point I was on a roll and figured it was time to get the engine off the stand so I could bolt the flywheel, clutch and gearbox back on and at least get it set up on the dolly ready to wheel back into the bay. I went in the house to get my Brother and I honestly could of screamed when I realised he'd gone out
So that was it for this evening. The engine is too heavy for me to lift down by myself so I'll need to wait for my Brother to be in and then it's engine back in car time (hopefully!)
When I got home this evening I decided it was time to give the belt another try. I had changed my mind about which one to order and ended up getting one about 5mm longer than the original. I gave it and the pulley a liberal coating of WD40, attached the belt fitting tool and started to turn the crank. Again it was just trying to pull the belt off and it looked like I was going to break another chunk out of the pulley if I kept trying! I decided that this approach really wasn't getting me anywhere so I figured I'd try a different approach. I made the decision to try winding the belt on the other way. Now this meant having to turn the crank the wrong way which I really didn't want to do, but needs must and all that. I set it all up and started turning the crank and miracle of miracles the belt went on! I really hope I never have to replace it again. It's the most stupid design I've ever seen!
Anyway, I then spent an entire 5 minutes putting the second belt on and tensioning it up (with a proper tensioner! What an excellent idea!).


At this point I was on a roll and figured it was time to get the engine off the stand so I could bolt the flywheel, clutch and gearbox back on and at least get it set up on the dolly ready to wheel back into the bay. I went in the house to get my Brother and I honestly could of screamed when I realised he'd gone out
So that was it for this evening. The engine is too heavy for me to lift down by myself so I'll need to wait for my Brother to be in and then it's engine back in car time (hopefully!)

threadlock said:
That's hypnotic.I have an update. It's a proper one too, not one of my sorry excuses for an update that I've been giving you recently!
I've had this week off work which in theory meant I could get loads done to the car. It hasn't quite worked out that way but I've got a decent amount done and I'm happy! So Monday I couldn't do anything as my Daughter was staying with me for the day. I have tried working on the car when she's here and she gets bored extremely quickly and then wanders off so I have to go and keep an eye on her. Tuesday I had my ARDS test at Brands Hatch so that ruled out the majority of the day too. However I did pass my test so I can now send off for my National B race license Ok, so Wednesday was going to be the day! Or maybe not. My Brother left for work at 6am and didn't arrive home until about 10pm. This meant I had nobody here to help me get the engine off the stand. I tried it by myself and nearly crapped out a kidney so ruled that idea out pretty quickly. So today I woke up pretty late and panicked that I might of missed my Brother again. Thankfully he wasn't working today so I sat and ate some leftover Chinese for breakfast and then informed him that he was going to help me for a bit.
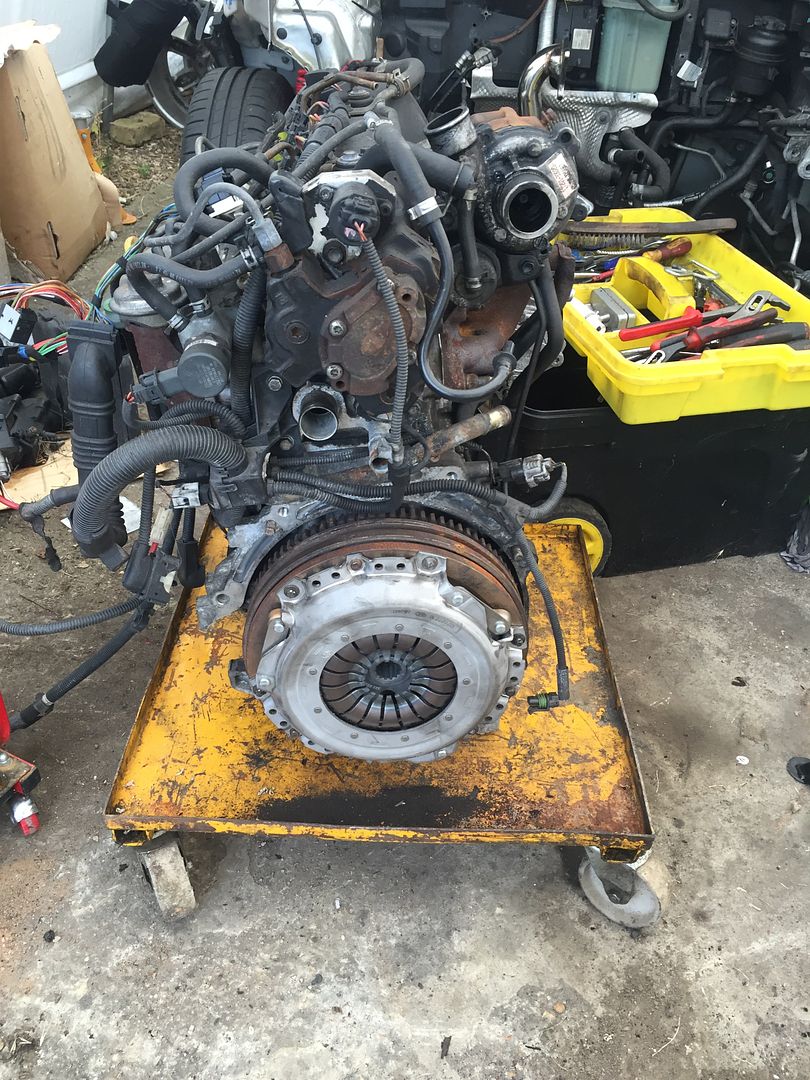
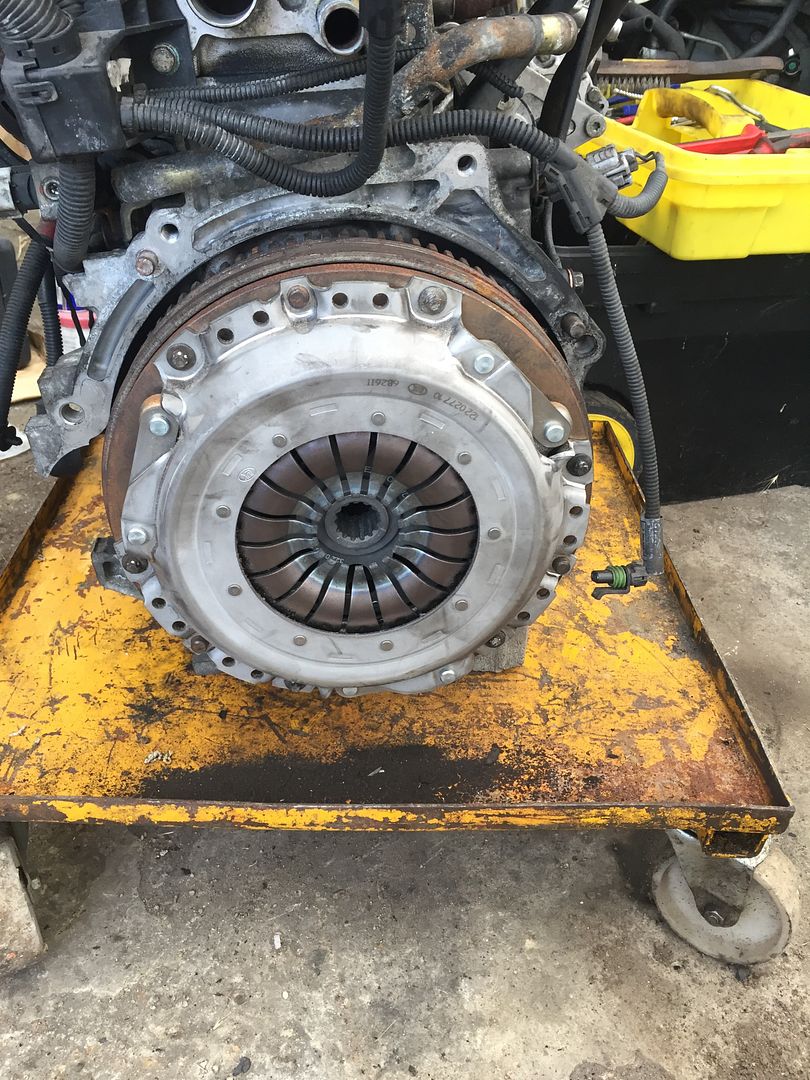
First things first we lifted the engine off the stand and onto the engine dolly. It was surprisingly heavy with everything bolted back on! Once on the stand I could get on with bolting the flywheel and new clutch on. Now when I took it all apart there wasn't anything wrong with the old clutch. In fact it looked almost brand new, however I'm not one for tempting fate so a brand new LUK clutch has been fitted along with a new release bearing. I was amazed that I managed to line it all up by eye as the gearbox slid straight on with no arguments!
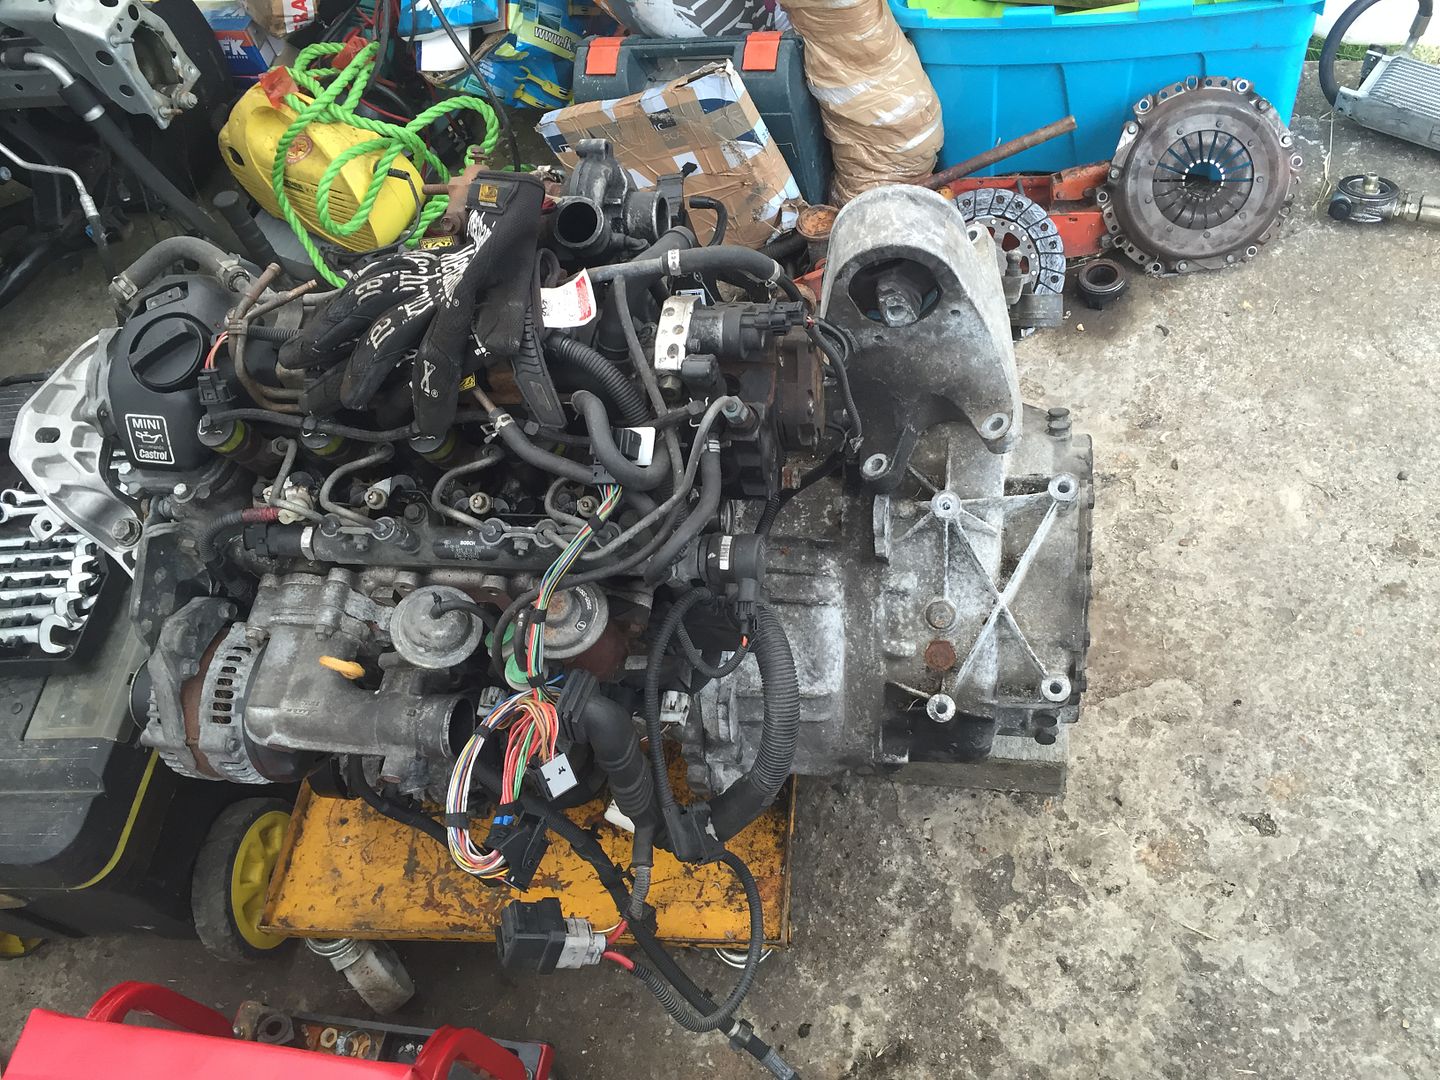
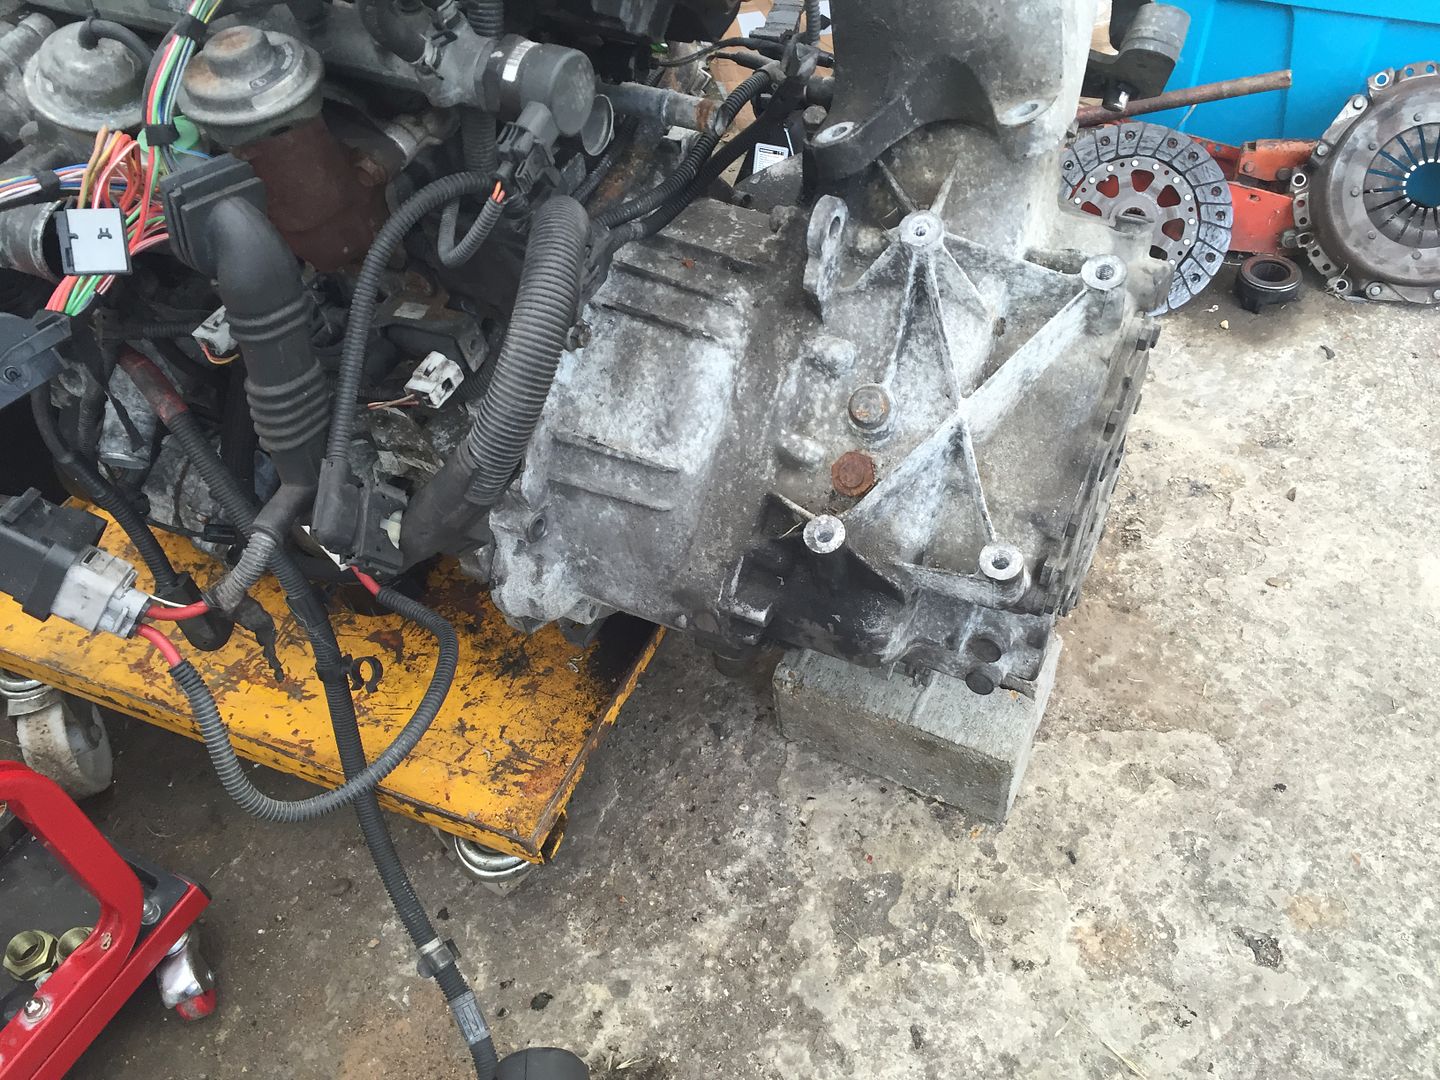
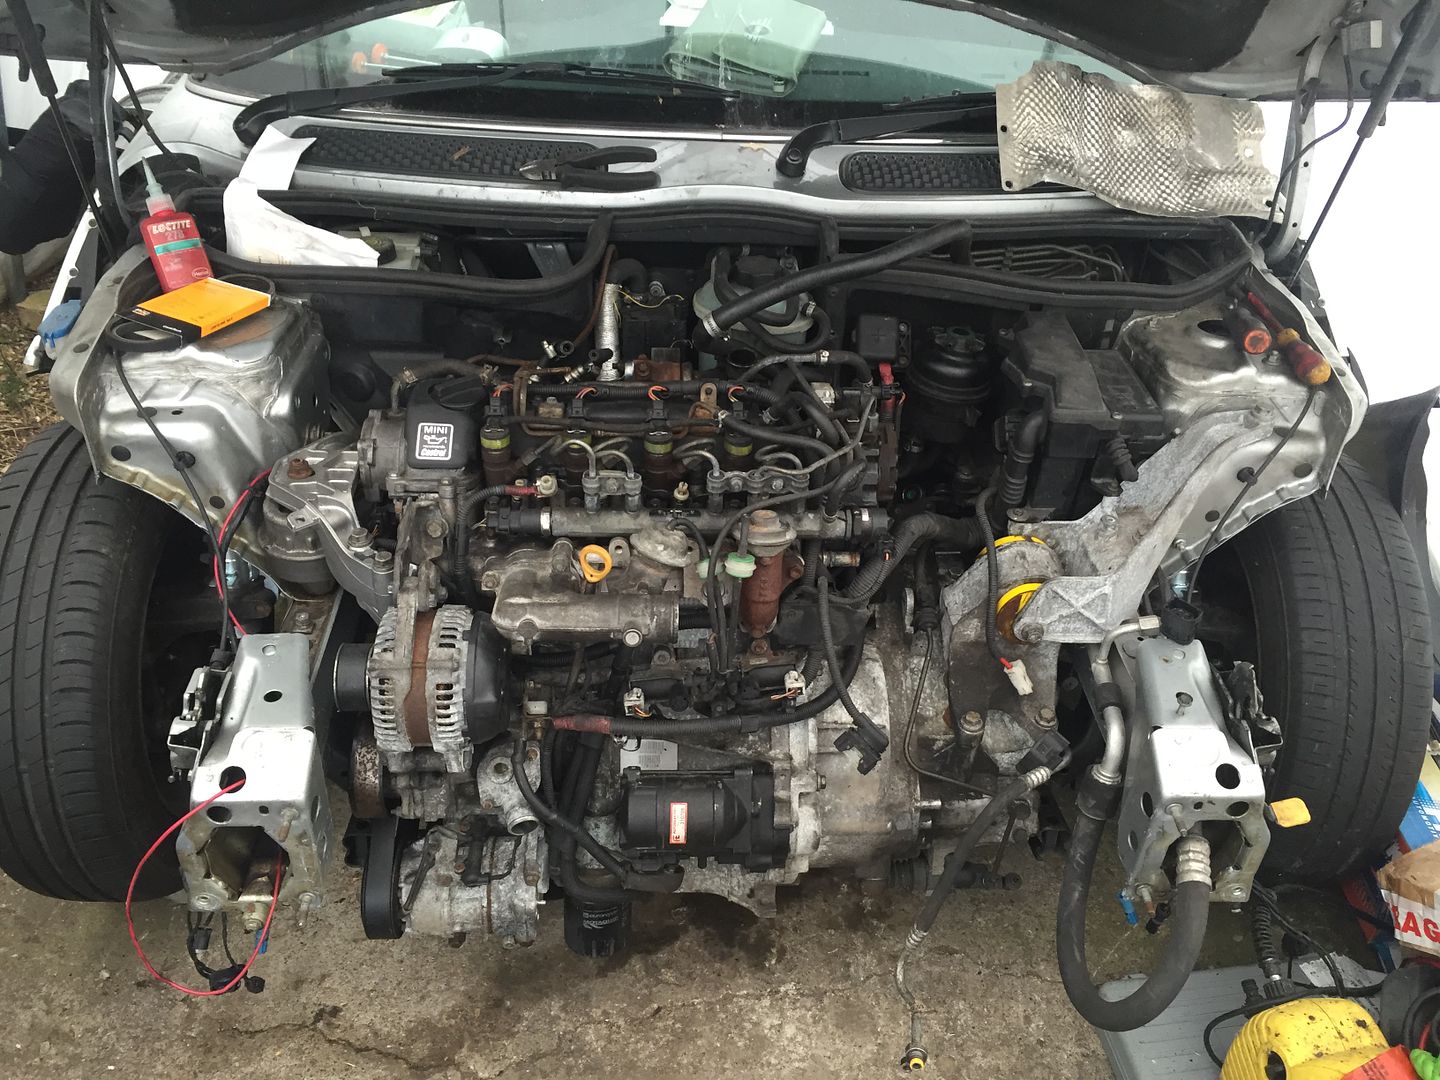
With the gearbox all bolted on it was time to manoeuvre the engine back into the bay. Now it's been a while since I removed it and I obviously had my rose tinted specs on because I seemed to think it was going to wheel straight in and that would be it. Ohhhhh how wrong I was! My Brother and I spent the best part of an hour twisting, tilting and turning the engine and gearbox trying to get it lined up so I could do up just one mount. My Brother eventually admitted defeat and went for a shower so he could go out. I wasn't going back in the house until that engine was bolted in, so I sat and had a think about what I could do. Eventually I had a plan that I thought might work. It consisted of the engine dolly and 2 trolley jacks. About 2 hours later (yes 2 bloody hours!), the engine was in and I could finally sit down and admire my handywork.
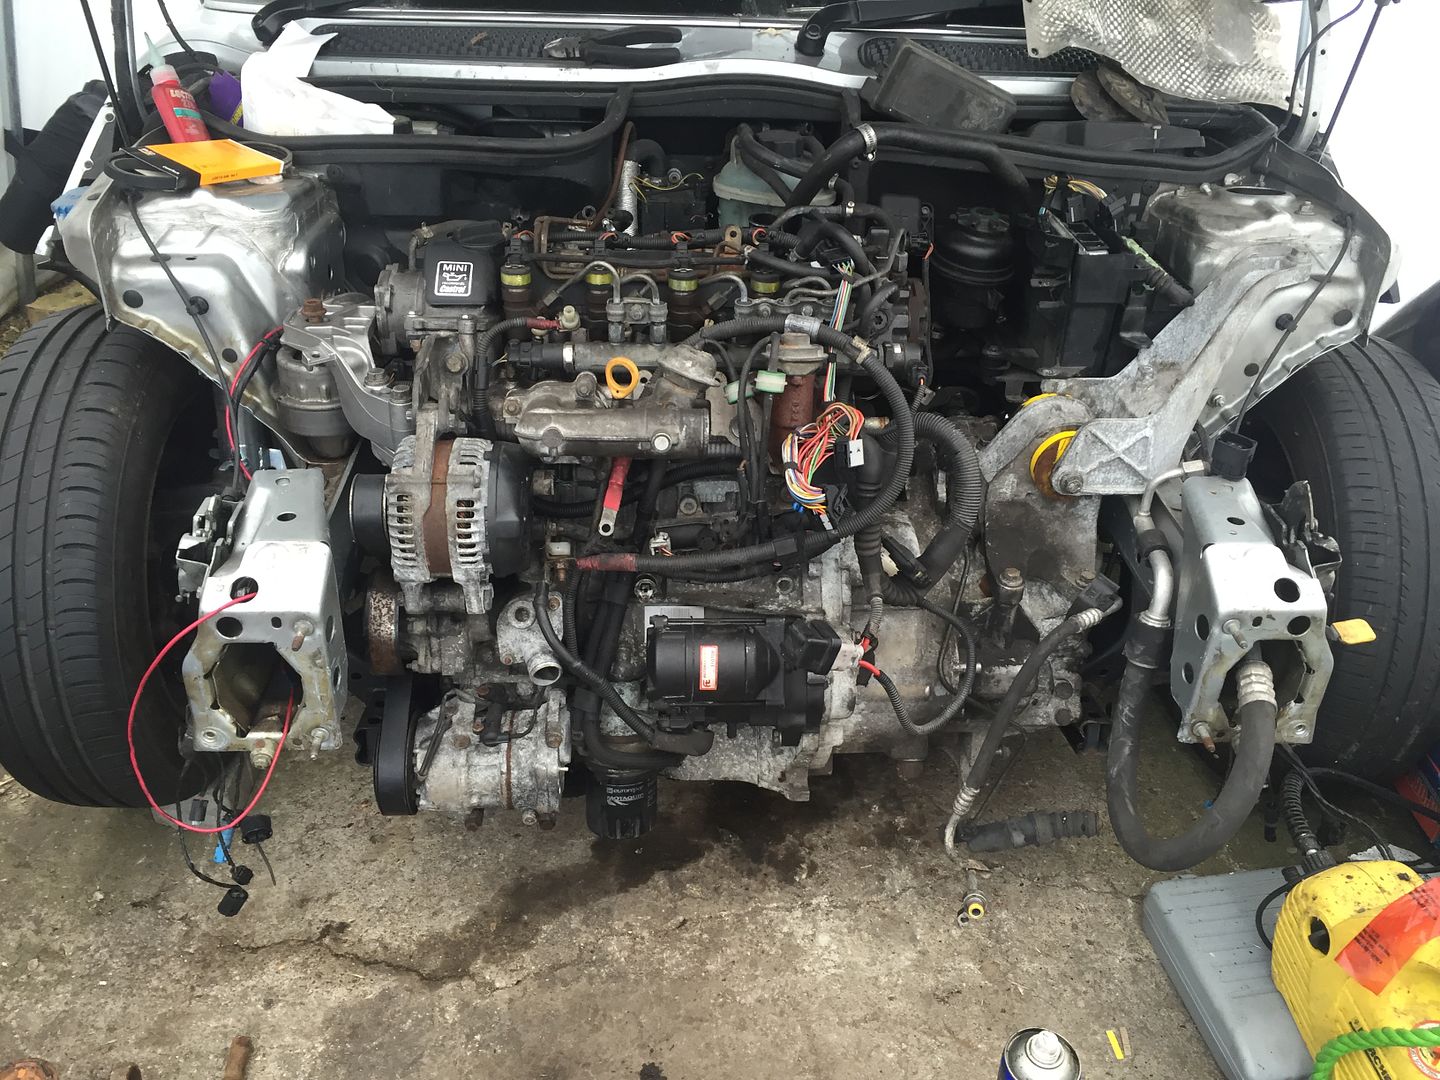
After a little rest and a pint of squash I headed back in to plug in some of the wiring before calling it a day. I managed to get the majority of it plugged back in, although I have 1 cable left over and no idea where it goes so that's going to be interesting. I reconnected the gear linkage cables, bolted the downpipe to the turbo and decided that was more than enough for one day (it was only about 3pm but I'd had enough!).
So that's it for today. I will try and get a few more hours on it tomorrow and maybe manage to get the front end on
I've had this week off work which in theory meant I could get loads done to the car. It hasn't quite worked out that way but I've got a decent amount done and I'm happy! So Monday I couldn't do anything as my Daughter was staying with me for the day. I have tried working on the car when she's here and she gets bored extremely quickly and then wanders off so I have to go and keep an eye on her. Tuesday I had my ARDS test at Brands Hatch so that ruled out the majority of the day too. However I did pass my test so I can now send off for my National B race license
Ok, so Wednesday was going to be the day! Or maybe not. My Brother left for work at 6am and didn't arrive home until about 10pm. This meant I had nobody here to help me get the engine off the stand. I tried it by myself and nearly crapped out a kidney so ruled that idea out pretty quickly. So today I woke up pretty late and panicked that I might of missed my Brother again. Thankfully he wasn't working today so I sat and ate some leftover Chinese for breakfast and then informed him that he was going to help me for a bit.First things first we lifted the engine off the stand and onto the engine dolly. It was surprisingly heavy with everything bolted back on! Once on the stand I could get on with bolting the flywheel and new clutch on. Now when I took it all apart there wasn't anything wrong with the old clutch. In fact it looked almost brand new, however I'm not one for tempting fate so a brand new LUK clutch has been fitted along with a new release bearing. I was amazed that I managed to line it all up by eye as the gearbox slid straight on with no arguments!


With the gearbox all bolted on it was time to manoeuvre the engine back into the bay. Now it's been a while since I removed it and I obviously had my rose tinted specs on because I seemed to think it was going to wheel straight in and that would be it. Ohhhhh how wrong I was! My Brother and I spent the best part of an hour twisting, tilting and turning the engine and gearbox trying to get it lined up so I could do up just one mount. My Brother eventually admitted defeat and went for a shower so he could go out. I wasn't going back in the house until that engine was bolted in, so I sat and had a think about what I could do. Eventually I had a plan that I thought might work. It consisted of the engine dolly and 2 trolley jacks. About 2 hours later (yes 2 bloody hours!), the engine was in and I could finally sit down and admire my handywork.


After a little rest and a pint of squash I headed back in to plug in some of the wiring before calling it a day. I managed to get the majority of it plugged back in, although I have 1 cable left over and no idea where it goes so that's going to be interesting. I reconnected the gear linkage cables, bolted the downpipe to the turbo and decided that was more than enough for one day (it was only about 3pm but I'd had enough!).


So that's it for today. I will try and get a few more hours on it tomorrow and maybe manage to get the front end on
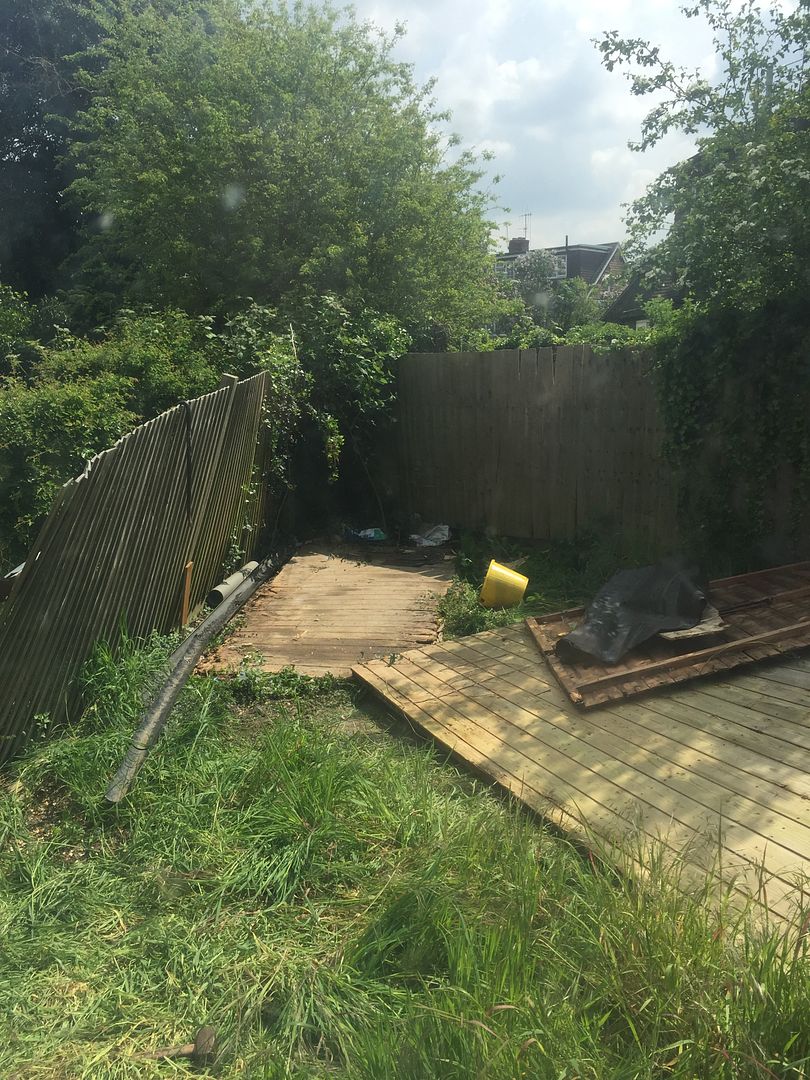
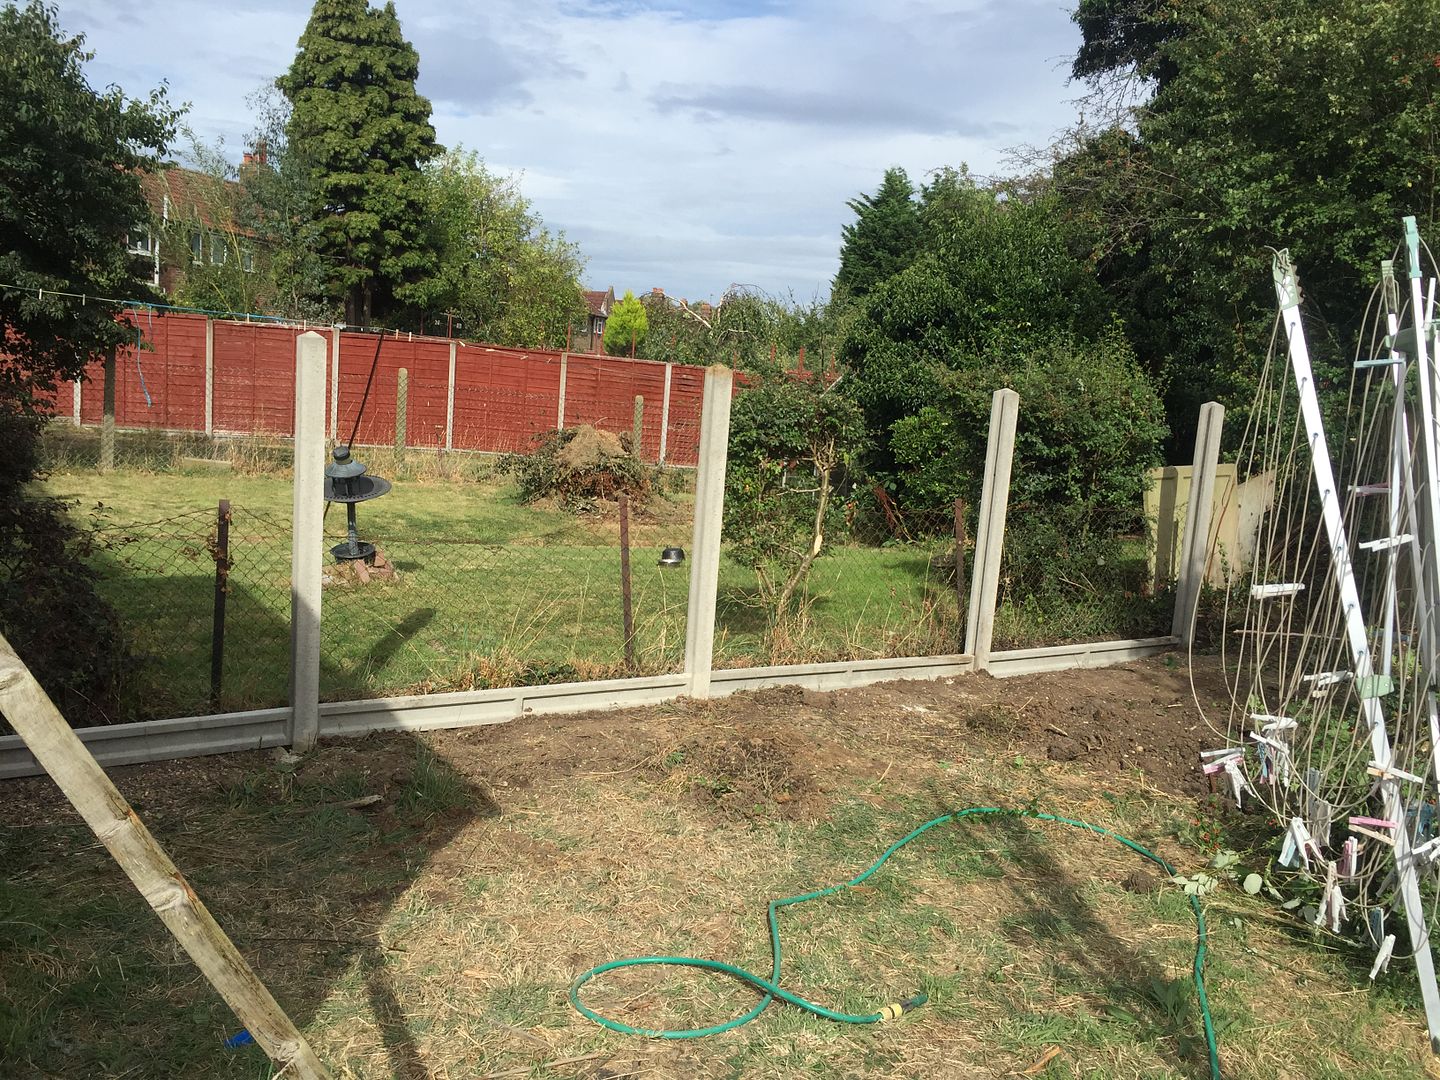
So Saturday I got into the marquee around 10.30am with a view to getting a little bit done. I say a little bit because my Dad was coming round to help me replace all the fencing that got blown down in the storms earlier this year. I had barely shuffled myself under the car (to fit the rear pendulum mount) and I heard my Dad knocking on the door! The fencing took the majority of the day (we had to dig up what was left of the snapped wooden posts and put up the new posts) so I didn't venture back into the marquee at all. The fencing looks good though
This is what the garden looked like after the wind had blown the fence down and then I knocked the shed down.
Once the garden had been cleared and the new post were in the ground.
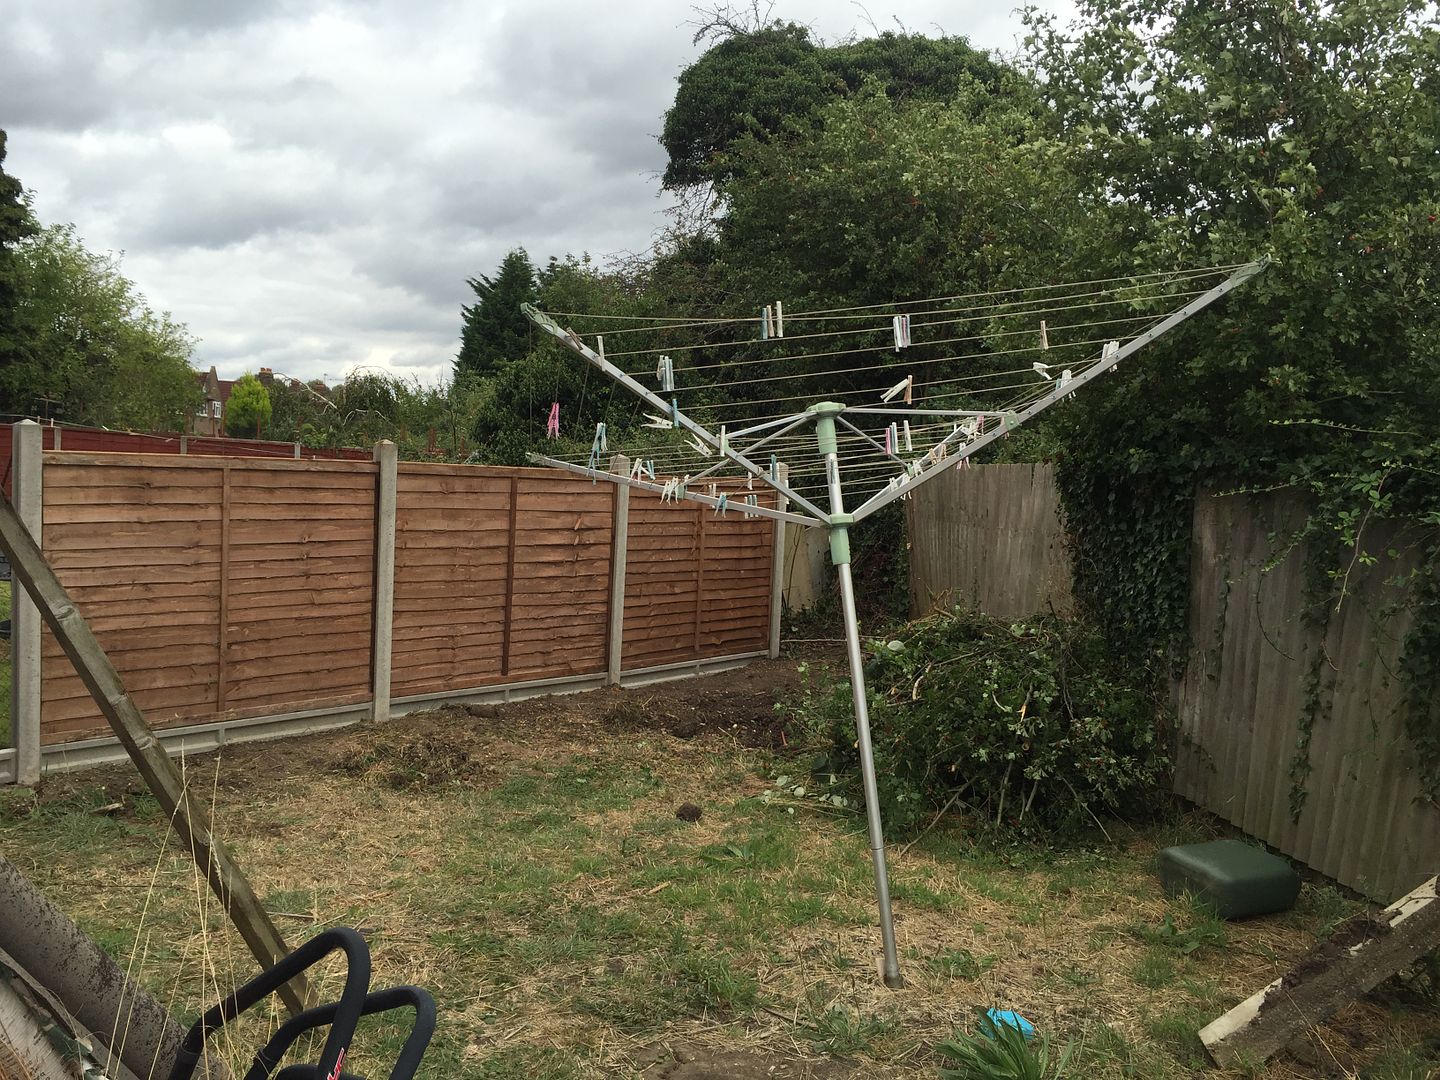
With the panels slotted in. Looks so much better!
This is what the garden looked like after the wind had blown the fence down and then I knocked the shed down.

Once the garden had been cleared and the new post were in the ground.

With the panels slotted in. Looks so much better!

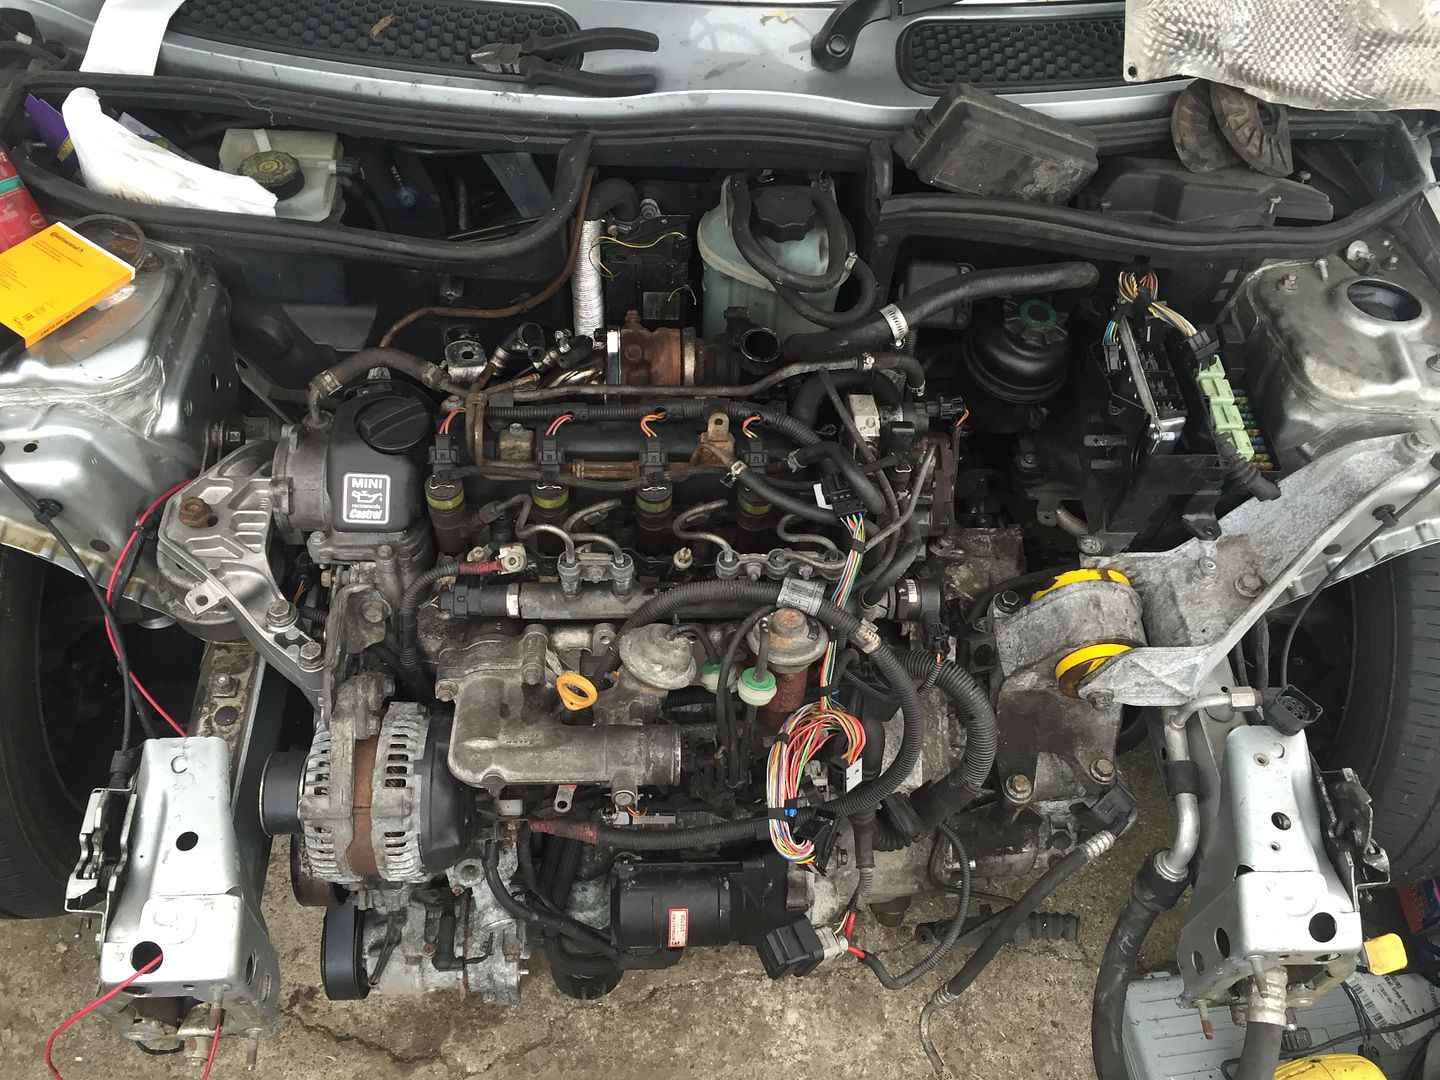
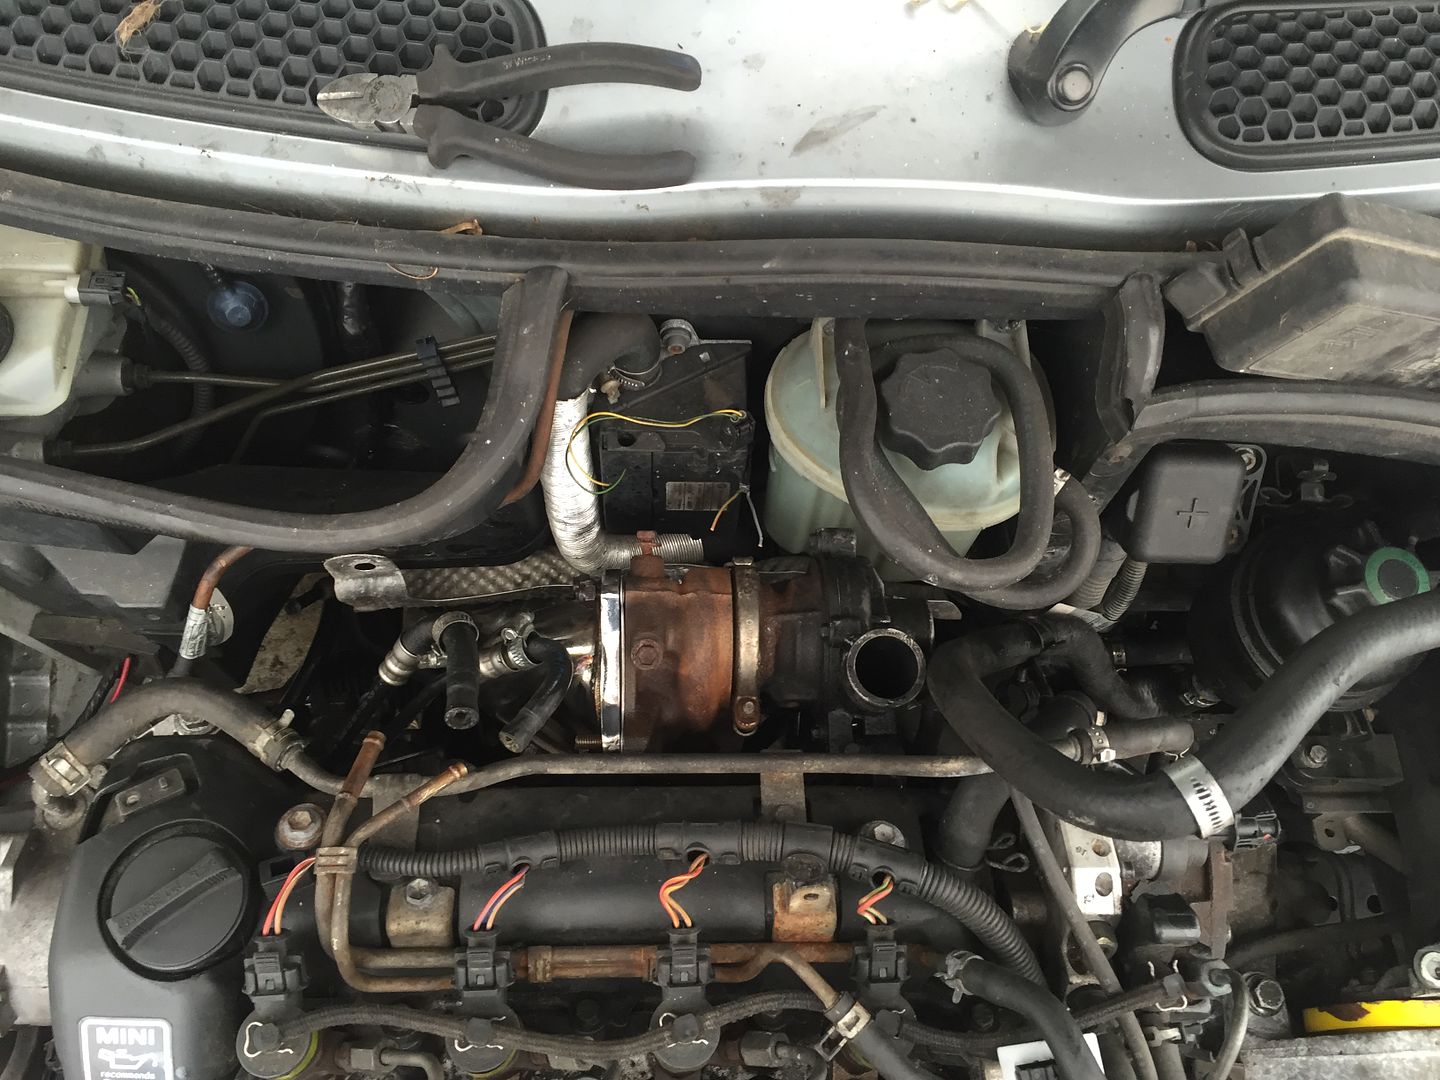
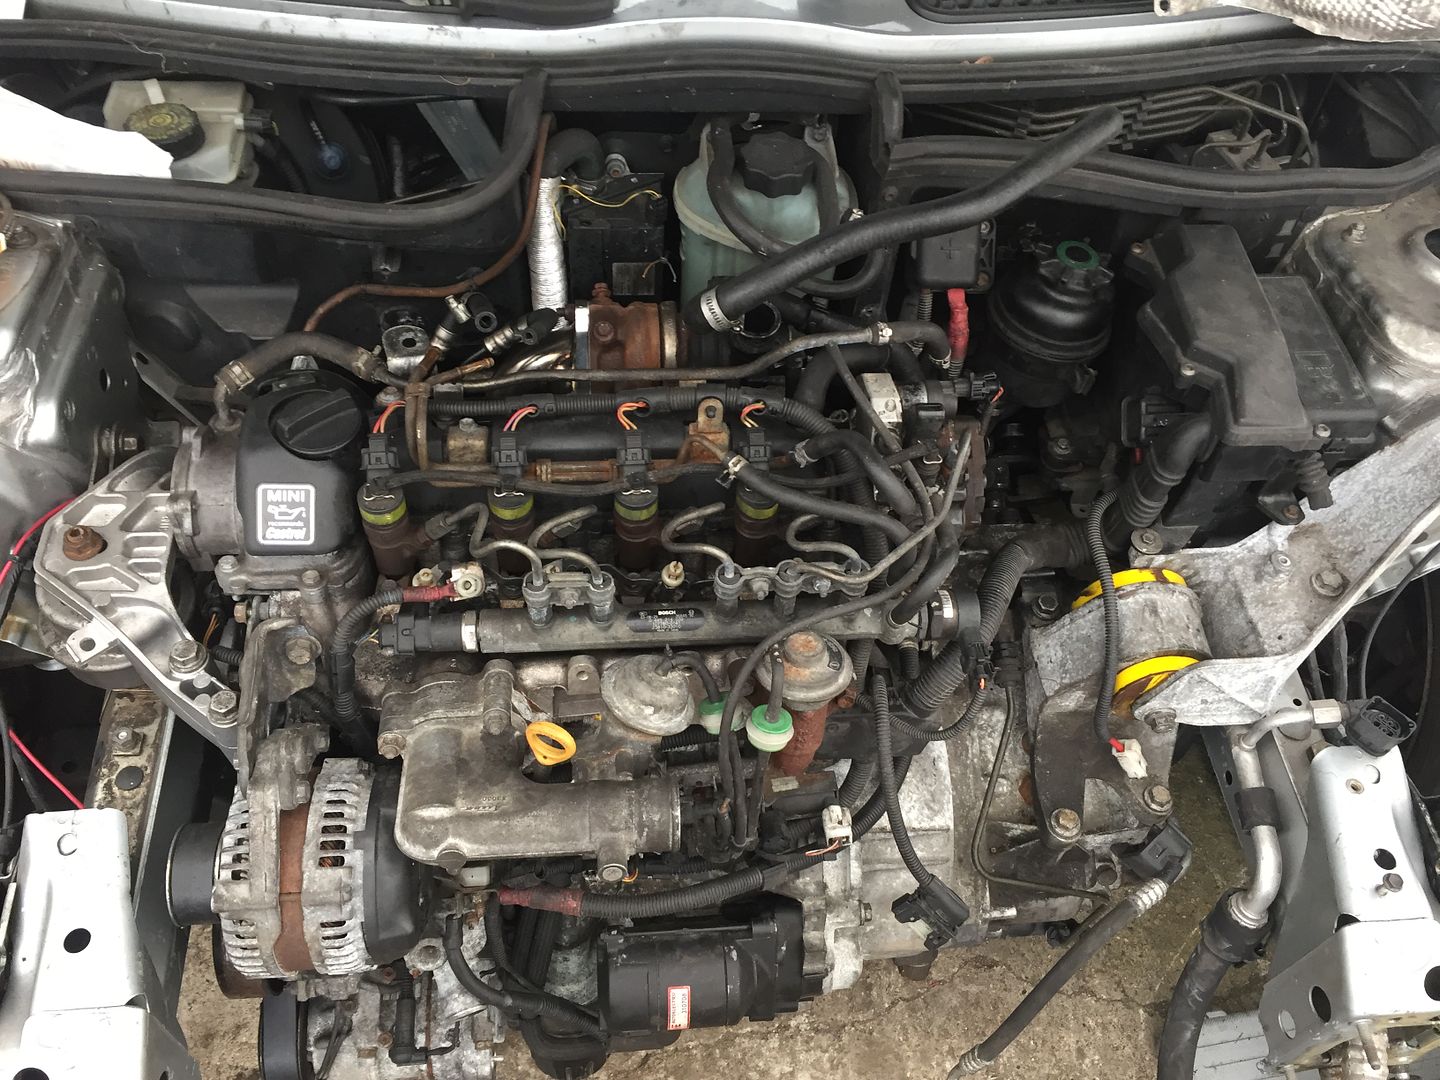
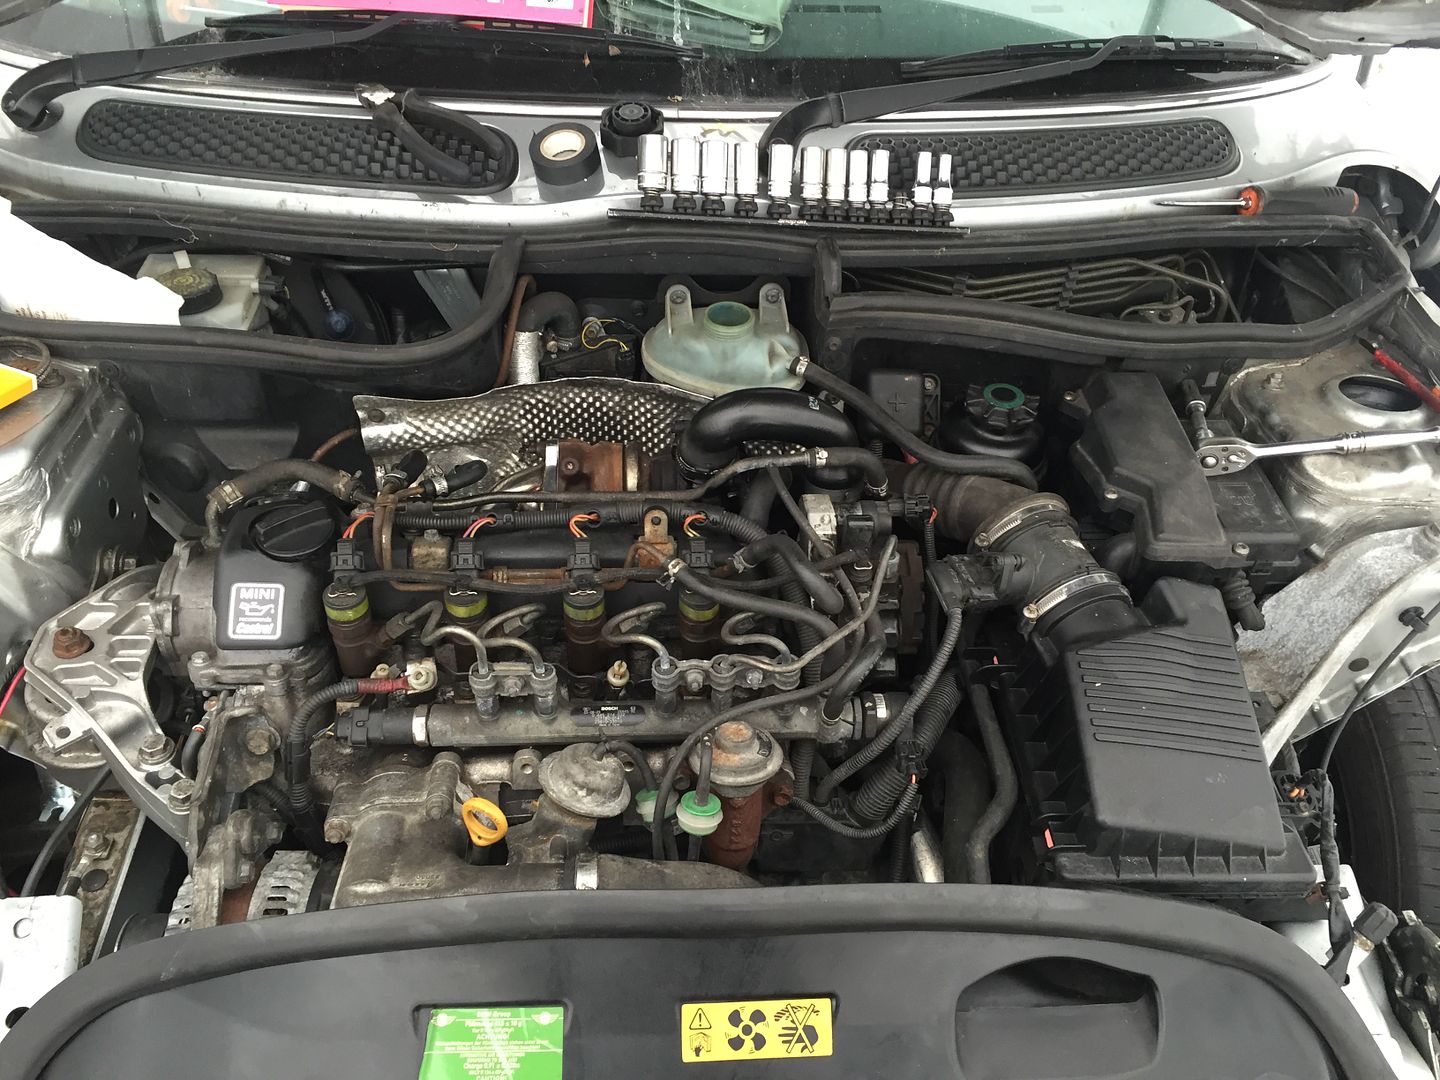
Anyway, today I was determined to get some more done to the car. So after breakfast I headed straight into the marquee to see what I could get done. Now at the last (Mini related) update I had plugged in most of the wiring and was left with a plug and no idea where it went. After wracking my brains I eventually remembered it plugged in underneath the fuse box. So all that came back out so I could plug this in, and then refit it all. Once that was done I started fitting the pendulum mount (complete with poly bushes) at the back of the engine. The poly bushes are so stiff that it took an absolute age to get this on, but I got there eventually and the engine is absolutely rock solid now!
The next thing on the list was to get the heater matrix pipes connected back up, along with the turbo boost hose and inlet hose. I also remembered that I'd bought a replacement earth strap (the original one had been mostly even if you remember from my first post), so that got fitted too. The engine bay was suddenly looking a little more full!
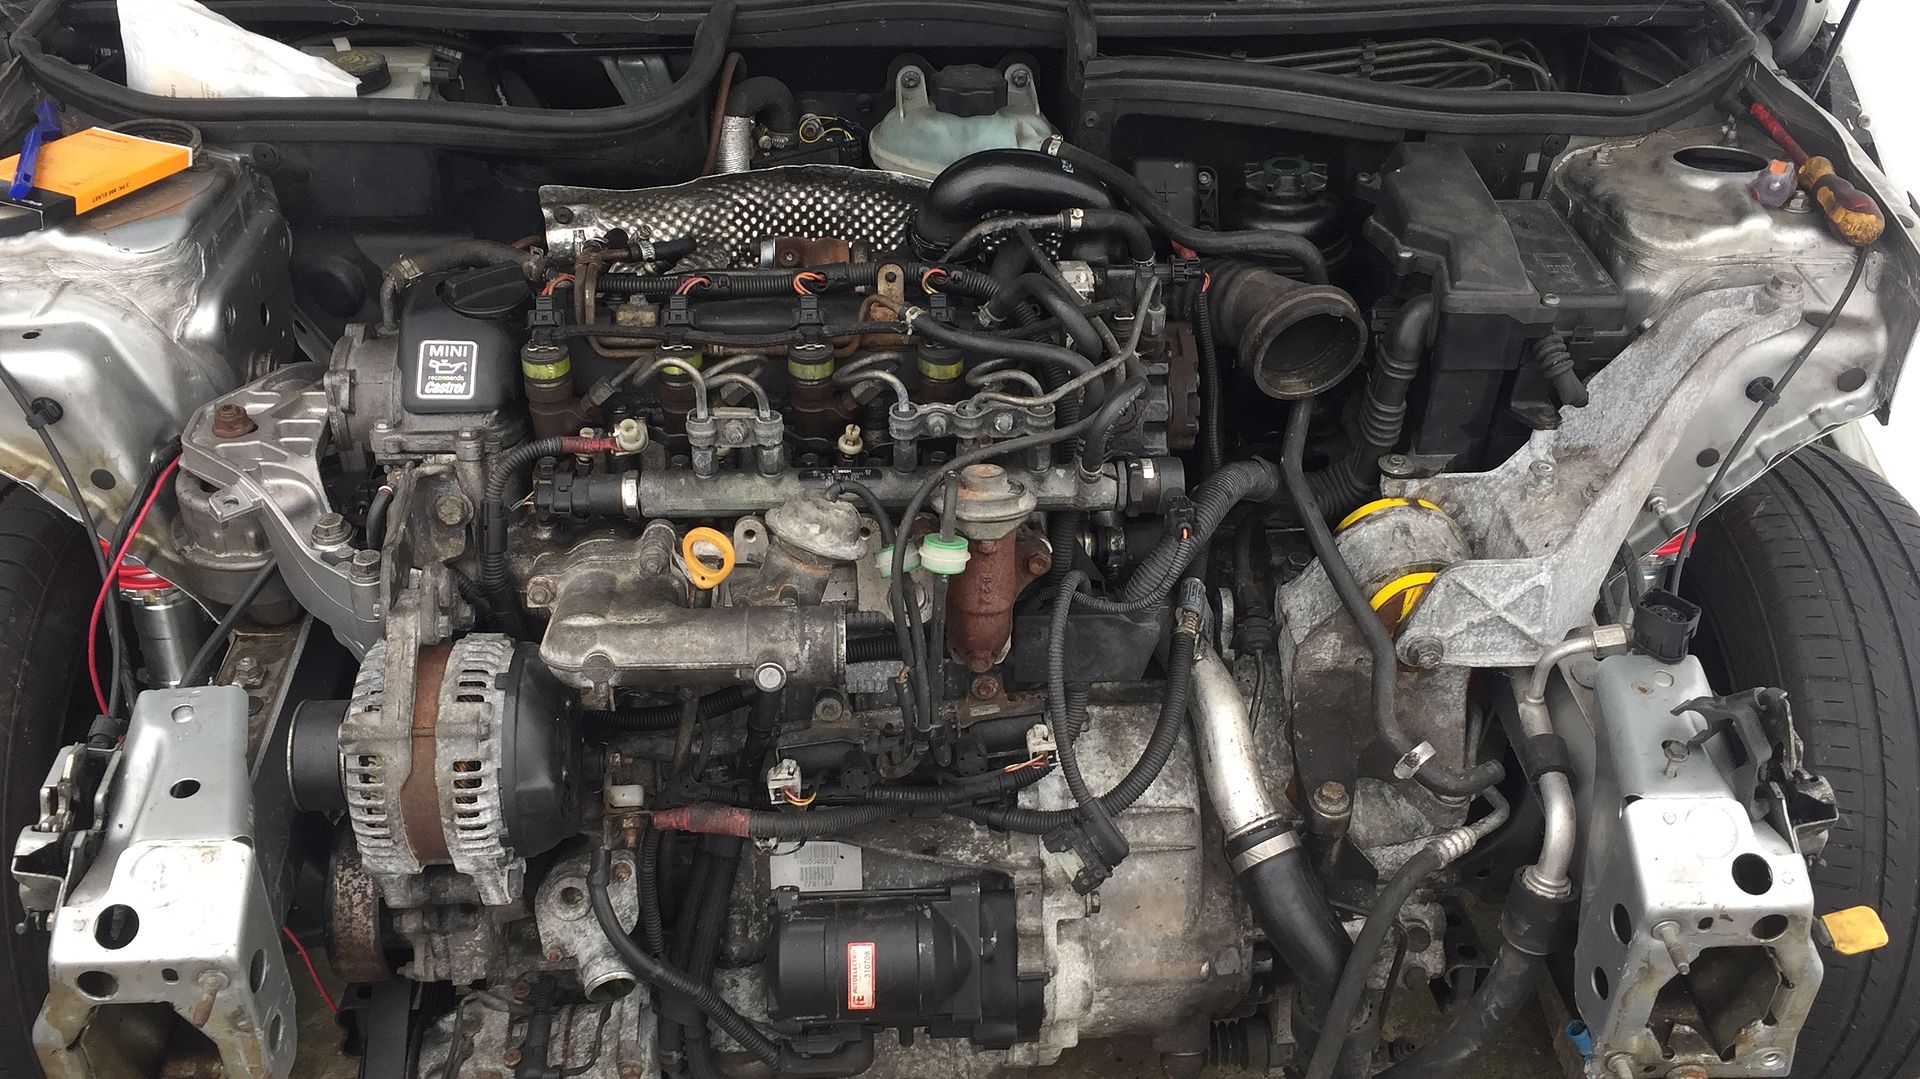
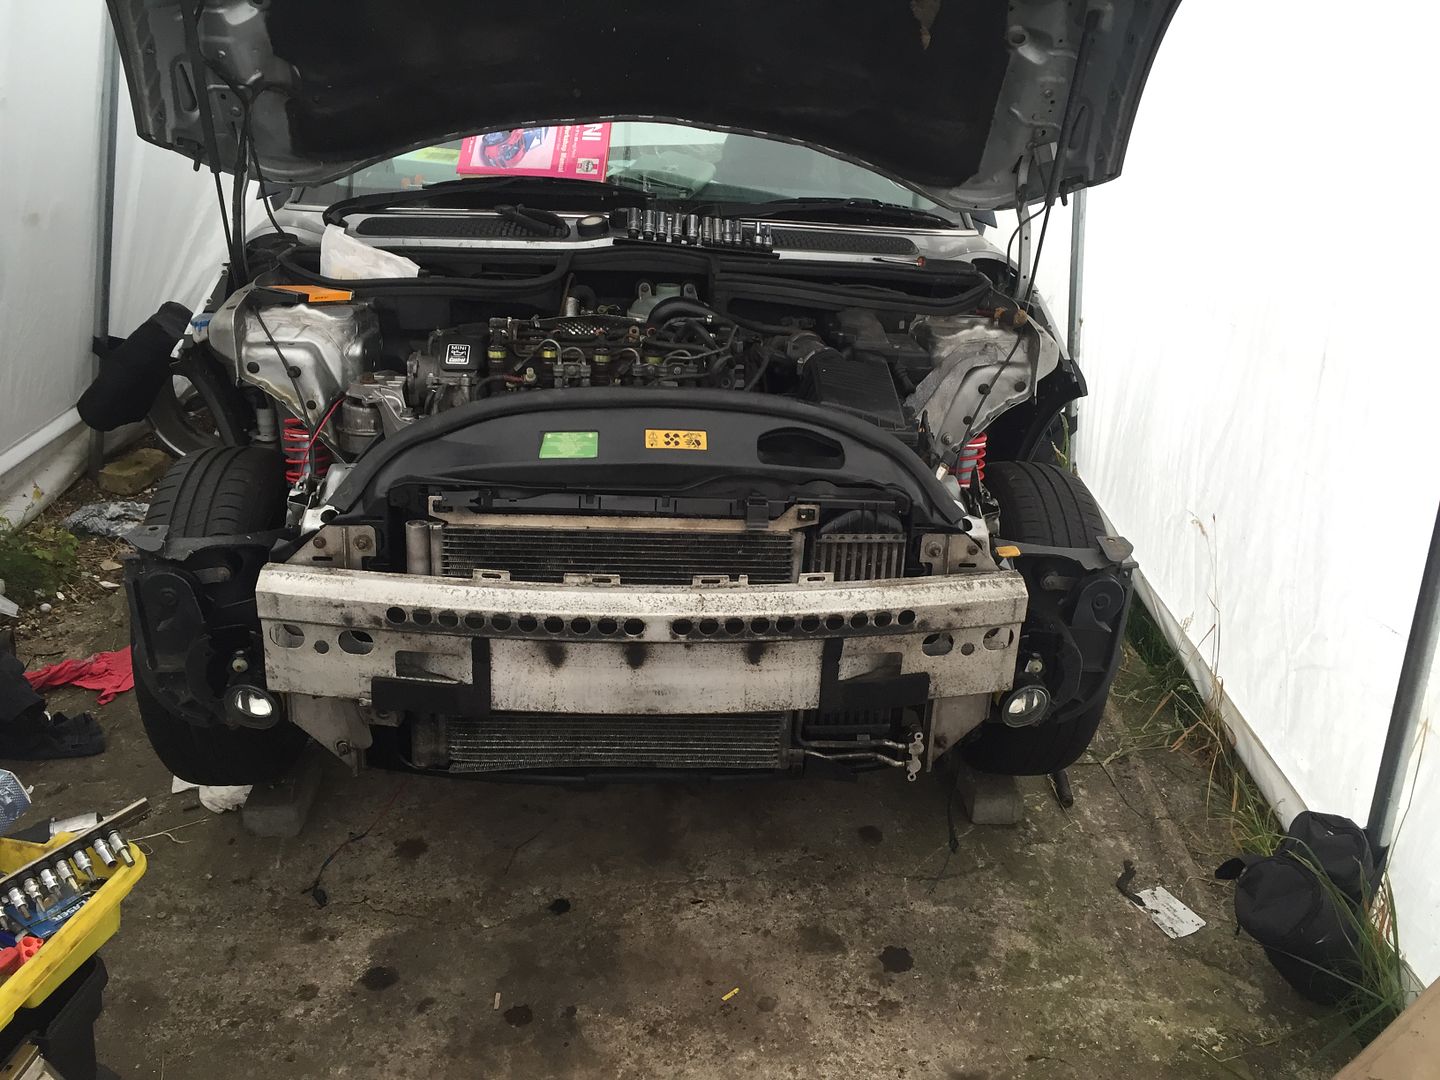
After that lot was on I figured it was about time to refit the front panel! There wasn't really much else to plug in or connect that wasn't attached to the front panel so it made sense.
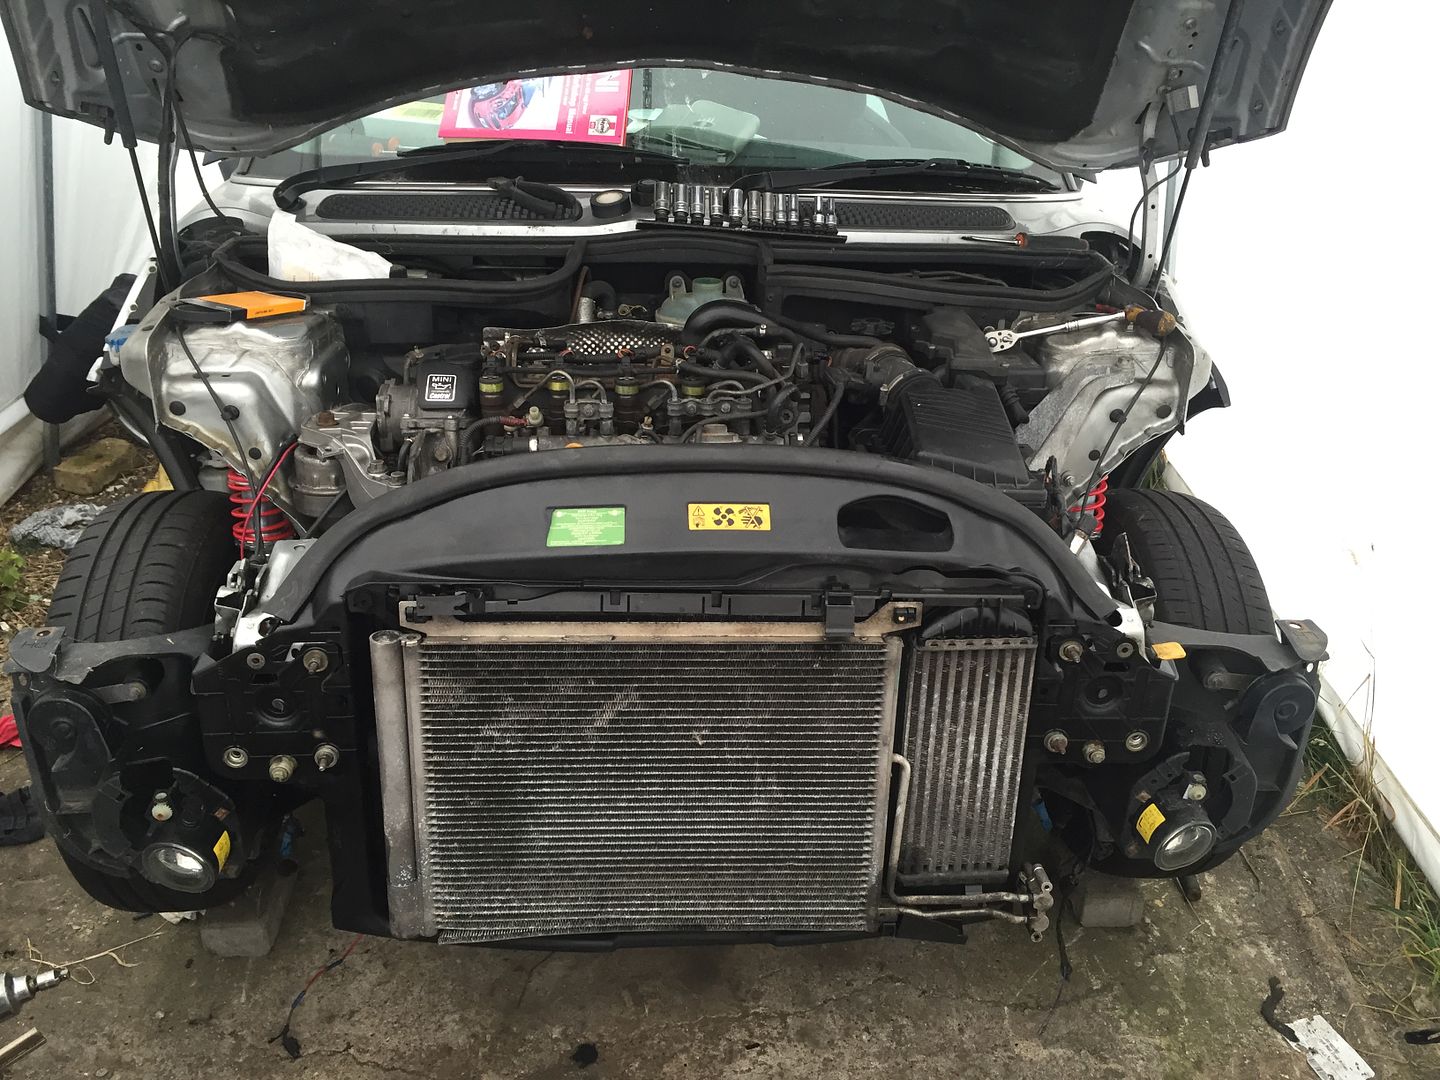
Once the front panel was on I could connect up the remaining coolant hoses, the boost hoses and reconnect the A/C pipework. Before I put it on I replaced the oil filter as it made sense while there was plenty of access. I also replaced the air filter element and refitted the air box.
Then it was time to put the bumper bar back on. This meant undoing the front panel and sliding this over the bolts before tightening it all down again. The front of the car is suddenly starting to look like the front of a car again!
At this point I filled the engine with oil and thought I better check that it turns over. Now I wasn't expecting to get this far today so annoyingly I hadn't bothered to put the battery on charge this morning. As expected it was as flat as a pancake so that was the end of that idea! I've brought the battery in and stuck it on charge so hopefully I'll be back out there after work tomorrow to try turning it over! I'll let you all know how it goes.

The next thing on the list was to get the heater matrix pipes connected back up, along with the turbo boost hose and inlet hose. I also remembered that I'd bought a replacement earth strap (the original one had been mostly even if you remember from my first post), so that got fitted too. The engine bay was suddenly looking a little more full!

After that lot was on I figured it was about time to refit the front panel! There wasn't really much else to plug in or connect that wasn't attached to the front panel so it made sense.

Once the front panel was on I could connect up the remaining coolant hoses, the boost hoses and reconnect the A/C pipework. Before I put it on I replaced the oil filter as it made sense while there was plenty of access. I also replaced the air filter element and refitted the air box.

Then it was time to put the bumper bar back on. This meant undoing the front panel and sliding this over the bolts before tightening it all down again. The front of the car is suddenly starting to look like the front of a car again!

At this point I filled the engine with oil and thought I better check that it turns over. Now I wasn't expecting to get this far today so annoyingly I hadn't bothered to put the battery on charge this morning. As expected it was as flat as a pancake so that was the end of that idea! I've brought the battery in and stuck it on charge so hopefully I'll be back out there after work tomorrow to try turning it over! I'll let you all know how it goes.

Just FYI I have been doing a bit of digging and looking on the Mini parts website/diagram portal there are two different belts specified for your car. One for cars with climate control and one for cars without.
My bet is they gave you the wrong belt to start with.
I don't know if you have seen the portal but in case you need to look up parts etc...
https://www.mini.co.uk/en_GB/home/services/why-ser...
Its a little fiddly to get work out but basically click the link on the left hand side for graphic parts search once you have searched for your car.
Gassing Station | Readers' Cars | Top of Page | What's New | My Stuff