Rover 200 BRM - 1.8 K-Series turbo project
Discussion


Finally the beast is MOT'd, insured and taxed!
Got an amazing deal on insurance with Greenlight. Great cover. Really helpful and friendly service. Chris knott wouldn't even quote because the bhp has been increased by more than 100bhp over stock (modified car socialists?) Adrian flux came within £100 of Greenlight but only when pushed and were quite rude in the process.
Not much else to say really. Just going to drive it!
Gave her a proper trip out today up to an MG Rover South East meet at the Halfway House in Essex. About a 100 miles round trip which gave me a chance to open the taps a bit and check handling, etc.
Despite the peak figures, the power delivery is quite sensible below 4k rpm even though the turbo spools well below that. It's a very linear power delivery and not the kick in the back you get from some turbo setups. It makes it very driveable. Above 4k rpm it comes alive. I'd describe it as like the 1.8 VVC on steroids. It's mental. The noise is immense and the power just keeps climbing. I dared not go anywhere near the redline in today's cold and slightly damp conditions. And this is only boosting to a mere 8psi! It'll be interesting to see how upping the boost with a boost controller affects the power delivery.
Handing is excellent. The MG ZR struts and x-power springs are a nice balance. It's compliant and grips very nicely. Slightly hard on really bumpy roads but that's the price you pay I suppose! The poly bushes provide a lot of feedback through the steering wheel which makes it a very involving drive. Couldn't push it too much obviously in these conditions. Despite initial indications, torque steer actually isn't too bad as long as there's good grip to both wheels. I had meant to take some videos but I forgot!
Things to do now:
-Sort tappy top end. Piper hydraulic followers need to come out!
-Poly bush engine mounts. It moves a lot in the bay and kicks back through the gear stick.
-Finish sound deadening in the back and install the rest of the audio.
I'm setting 600 miles as the run-in period. By then I need to upgrade the fuel pump. Then I'll ditch the running-in oil in favour of more slippery semi-synthetic and go for a full power map at 16psi.
Somewhere in there I'll also upgrade the front brakes. I have a kit that will allow me to use brembo 4-pots. I just need the calipers.
Longer term I'm still looking into resprays. Spoke to a classic car restoration guy this morning and waiting for a quote. My favourite so far of all I've spoken to. He actually took the time to talk through the details of the job (like will we take the windows out and doors off!) and he wasn't concerned at all by the rust (he's used to far worse!). Expect it'll be the most expensive of the lot so far too!
So, to summarise, I'm incredibly happy. I set out to build a hopped-up version of the original car that would at least keep up with modern performance production cars, but still be driveable every day, as well as turn heads.
And the best thing about it? I built it myself!
For your engine mounts I would recomend having a chat with these guys, we use them in the Compacts and they are superb!
http://www.vibra-technics.co.uk/
http://www.vibra-technics.co.uk/
problemchild1976 said:
Love it..... Love these cars
sorry i've only skimmed through and maybe already answered - was there a reason for turbo over supercharger?
JJ
Turbo was a relatively straightforward fit. Using the manifold and a couple of other bits from the standard 1.8 k-series turbo made it an easy job. As far as I know there's no bolt-on supercharger kit for the k-series so it would have required much more fabrication and expert input. I'm no engineer so turbo made more sense.sorry i've only skimmed through and maybe already answered - was there a reason for turbo over supercharger?
JJ
AWG said:
Great review Stu and glad you find the car drivable albeit at a lower boost than what is to come. May I ask what tyres you are currently running?
Tyres are Yokohama Parada Spec 2 but they came on the wheels and have seen better days. Given that this will be a dry weather only toy, I'll probably run something a bit more grip focused on the new wheels I'll eventually run.geeks said:
For your engine mounts I would recomend having a chat with these guys, we use them in the Compacts and they are superb!
http://www.vibra-technics.co.uk/
Don't think they make anything for my car. I was going to use powerflex bushes, starting with the stabiliser mounts to see if that reduces the back and forth swing it's got! http://www.vibra-technics.co.uk/
Stiffer mounts are definitely a good idea, I have them too in my SC Rover Elise.
Your Emerald ECU has boost control, too. So there is no need for a extra boost controller.
I t can do open loop, closed loop, temperature dependent boost and a few more things.
Do you remember out of your head if the JDM dyno piston'sd crown "rim" sticks out of the liner at TDC? If so, by how much?
I would like to estimate the squish gap.
Regards
Marko
Ive said:
Stiffer mounts are definitely a good idea, I have them too in my SC Rover Elise.
Your Emerald ECU has boost control, too. So there is no need for a extra boost controller.
I t can do open loop, closed loop, temperature dependent boost and a few more things.
Do you remember out of your head if the JDM dyno piston'sd crown "rim" sticks out of the liner at TDC? If so, by how much?
I would like to estimate the squish gap.
Regards
Marko
Hi MarkoYour Emerald ECU has boost control, too. So there is no need for a extra boost controller.
I t can do open loop, closed loop, temperature dependent boost and a few more things.
Do you remember out of your head if the JDM dyno piston'sd crown "rim" sticks out of the liner at TDC? If so, by how much?
I would like to estimate the squish gap.
Regards
Marko
Yeah I'll use the Emerald to control the n75 solenoid valve I already have plumbed in.
The rim of the piston sits pretty much flush with the liner. I never actually measured it though.
Mini update and opportunity for more photo whoring...
The top end tapping was driving me nuts and getting worse. So I decided to whip the Piper "uprated" hydraulic followers out and put the standard VVC followers back in. Just gave them a light planishing on the top surface. All back together and so much better. Still a bit tappy but expect it will quieten down once I give it a proper run. I do wonder if the treacle-thick running in oil was part of the problem. Although looking at the piper followers after I removed them you could see that the centre plungers are all different heights. They are also rock solid and I don't remember the standard ones being like that. Will be sending them back.
Meanwhile gave the old girl a quick clean and tidied up the interior.


Next up is to stiffen up the engine mounts and fit a front upper strut brace.
The top end tapping was driving me nuts and getting worse. So I decided to whip the Piper "uprated" hydraulic followers out and put the standard VVC followers back in. Just gave them a light planishing on the top surface. All back together and so much better. Still a bit tappy but expect it will quieten down once I give it a proper run. I do wonder if the treacle-thick running in oil was part of the problem. Although looking at the piper followers after I removed them you could see that the centre plungers are all different heights. They are also rock solid and I don't remember the standard ones being like that. Will be sending them back.
Meanwhile gave the old girl a quick clean and tidied up the interior.
Next up is to stiffen up the engine mounts and fit a front upper strut brace.
Edited by Stuballs on Tuesday 1st March 11:21
RumbleOfThunder said:
Shame you're having to faff with your top end issues at this point. I'm sure you'll get to the bottom of it soon enough.
To be fair, I always expected a period of snagging and fine tuning given the relative magnitude of the project against my lack of experience.I hope I've sorted the mechanical issues now and I can focus on driving it and adding to the overall package.
All going well so far. No major issues at least. Couple of very minor coolant leaks I need to sort. I had a bit of trouble getting the cold idle right as that's something you have to do yourself from stone cold. A bit of a learning curve as there are several variables and changing one thing affects another, but think I have it about right now. I also got the Emeralds OBD2 output working so now have it talking to the torque app on my phone to display some additional parameters my gauges don't cover (intake and coolant temps). Very cool!
The new engine has now covered just over 500 miles and it's really nice to drive. The poly engine mounts and strut brace have helped eliminate a lot of the torque steer, albeit with a bit more vibration in the cabin. On dead flat tarmac it hardly torque steers at all. It's worst when on an uneven surface like in the lorry tracks you get on the slow lane of a motorway.
What is weird is the couple of times I've covered longer distances, the fuelling has gone lean at low throttle openings (idle and cruising) and I had to add fuel to parts of the map to get it running right again. I'm not sure if this is just everything bedding in, or perhaps my fuel pump giving up the ghost (although it doesn't go lean at load under boost). I'm still running the stock fuel pump which is not designed for this level of power anyway, so I have a walbro 255l in-tank replacement which I'll attempt to fit this weekend.
Booked for remap on 4th April when we shall wind the boost up and see what happens. Just have to get the fuel pump fitted and change the oil for some semi synthetic.
Meanwhile i have received my upgraded calipers - brembo 4-pots from the Peugeot v6 406 (I already have the brackets to make them work and big discs). I'll give them a lick of (orange) paint and fit with braided lines and ferodo DS2500 pads. More on that later.
Edited by Stuballs on Thursday 24th March 05:50
sounds good.
I run mine SC K in the Elise in closed loop at all times with a wide correction range of +-20%. Emerald K3 with a Stack wideband lambda.
I regularly check the correction % while driving and it usually is in the +-3% range. This is what you would expect from changes in environmental parameters air pressure, humidity, fuel energy density and things like the voltage vs. injector duty cycle correction or fuel temperature correction not being perfect. The alternator voltage is temperature dependent (regulator functionality) due to the battery changing voltage being temperature dependent. (Nernst equation).
All these things add up. This is the reason many "track" mappings run the engines open loop with rich AFRs even at idle and light loads.
Spinakerr said:
Great thread, fantastic to see a BRM saved and upgraded to such a spec.
Do you already have in in-car fuel pressure regulator you adjust manually or is the Walbro sophisticated enough to be controlled by an ECU/sensor?
Thanks Do you already have in in-car fuel pressure regulator you adjust manually or is the Walbro sophisticated enough to be controlled by an ECU/sensor?
The walbro pump (which I installed this weekend) just replaces the in-tank pump and everything else is stock. The standard fuel pressure regulator is a simple mechanical device and not adjustable. It's supposed to hold fuel pressure at 3 bar although it does fluctuate a bit depending on load. It's mapped for this so not a problem.
The above being said ,the standard fpr does seem to have more trouble keeping the pressure steady at idle. I wonder if the increased flow is overwhelming it. Or perhaps the return to the tank is not manly enough and is causing pressure to build after the regulator which in turn is affecting is function.
I'll see what the mappers think next week if its a problem. I will say that installing the walbro was one of the toughest jobs yet on this project. It involved dropping the fuel tank and heavily modifying the stock housing to get it to fit and work. Never want to have to do that again!
Update time
Engine run in so time to up the boost and see what she's capable of. Back to Track N Road in Rainham.

But then something went very, very wrong and this shortly followed...

... Let me come back to that.
First I'll tell you about some other stuff that's been going on. A lot of this started some time ago and only recently got finished. Thought I'd share.
Brakes!
With great power comes a great need to be able to stop.
At the front we start with some fairly pathetic 282mm sliding calipers. they do the job, but I want more so I opted for a kit available through a rover forum called Rovertech. It uses 4-pot Brembos from the Peugeot 406 V6 Coupe and hefty 326mm discs.
old setup:

New discs:

They're big but the colour's all wrong!

Better!

Even better!

on with some nice new braided brake lines from Hel.

A nice snug fit behind the Superleggeras

At the back I'm using an MG ZR160 rear beam so have larger calipers and 260mm discs (standard are 240mm). Nothing special but used refurbished calipers (orange, naturally) with braided lines here too:


Next job was to sort out some audio. I want this beast to also be a nice place to be on longer drives, so a decent sound system was essential. Nothing groundbreaking, just some mid-level equipment powered by an amp and a little sub for some bass-fill. I also thought I'd invest some time and money in sound deadening. Always money well spent.
I actually laid all the cables when I did the battery to boot conversion as I had the seats out and carpet out.

Nice meaty 0-Gauge cable running to the battery, which I terminated at the starter motor to avoid using any unsightly connector blocks in the engine bay.

Fuse holder and terminal block. excuse the cable tie - just a temporary measure because the bend is so tight and cable is very thick!


Something very satisfying about a pile of new audio equipment.

But first a bit of sound deadening. The R200 can be a rattly beast at the best of times so this is well worth doing. I opted for Silent Coat which is basically a 2mm thick foil-backed damping material. Similar to dynamat and works in the same way by mass-loading panels to reduce vibration and resonance. I used it to cover the holes - best practice would have been to first cover the larger holes with metal sheets secured with self-tapping screws but to be honest I couldn't be bothered! This will do for my modest install.

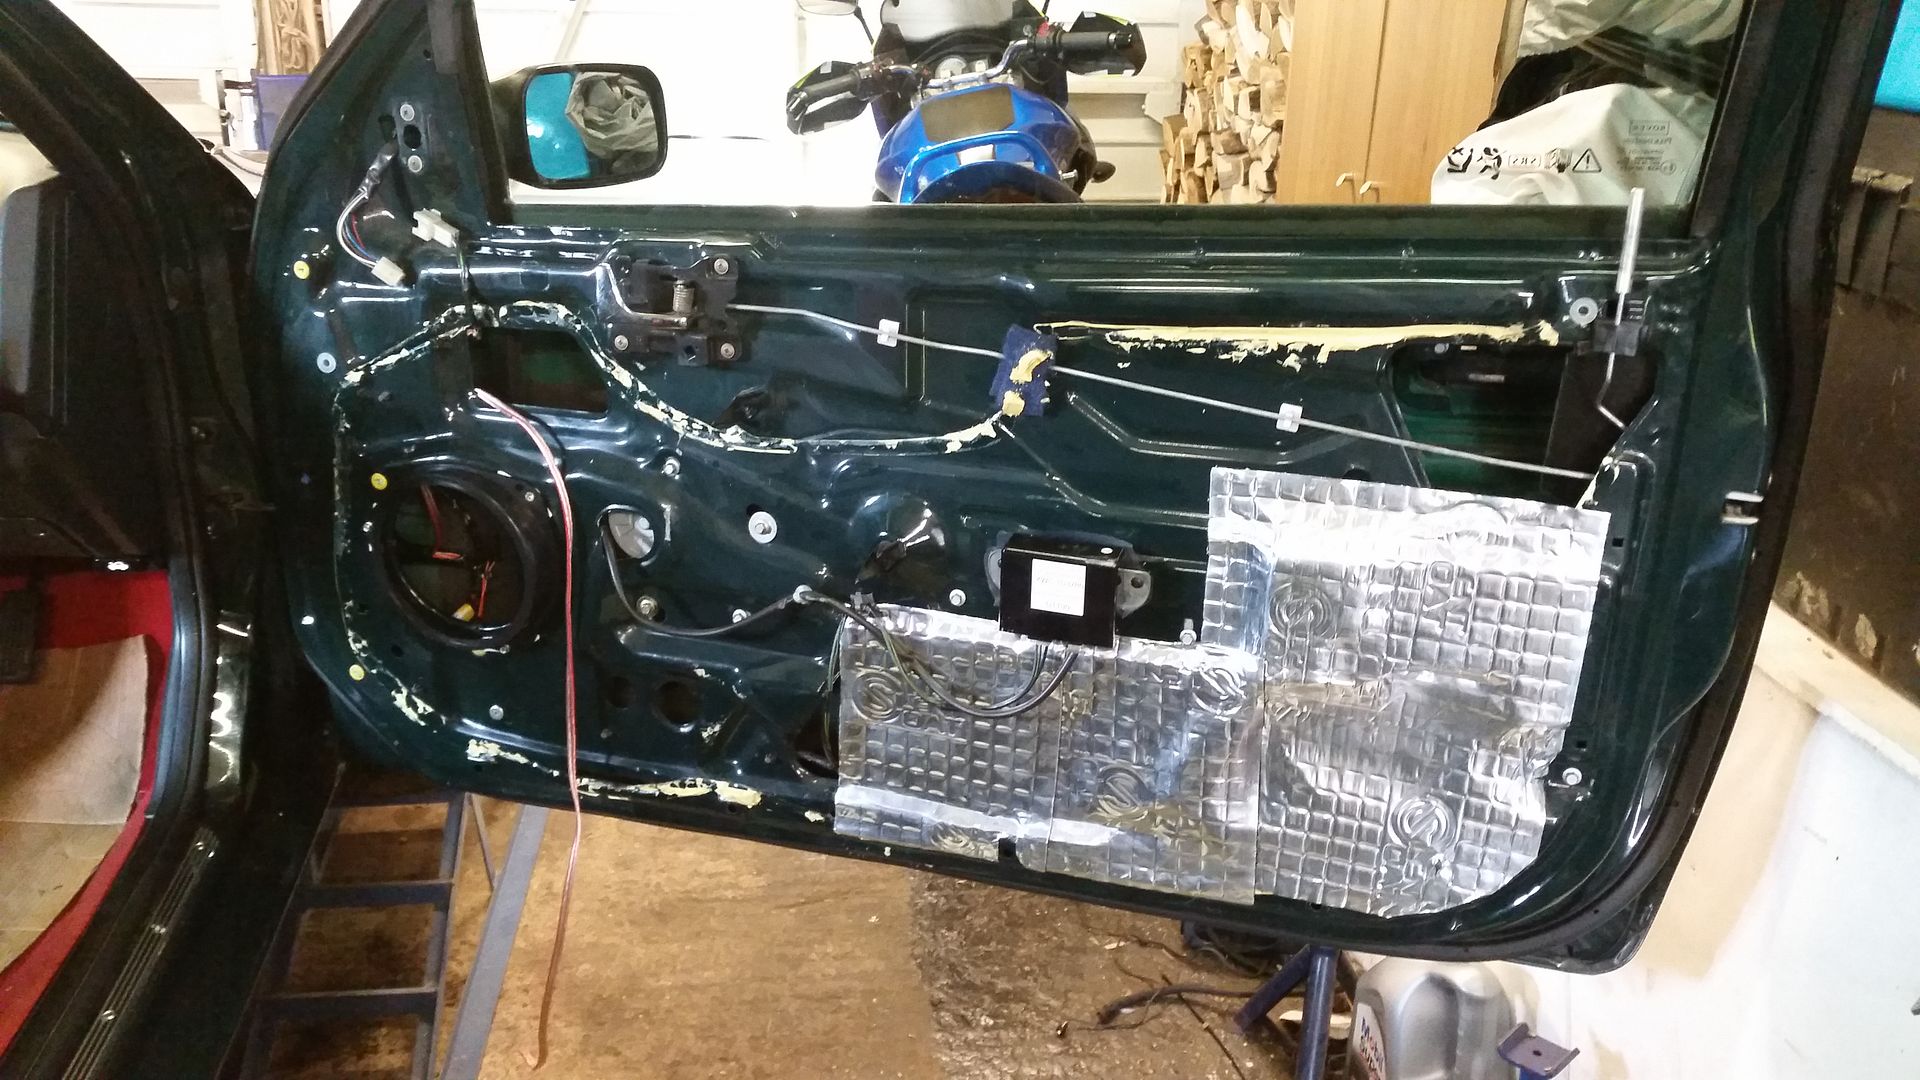

mids installed using spacers (required to clear window when it lowers)

Crossovers fitted behind the door cards.

managed to fit the tweeters in the stock housing for the standard look.

And onto the boot:

I'm hoping this also helps reduce some of the exhaust drone:

Amp installed on the back of the rear seats and sub slotted in. Amp has 4 channels so I'm using two to power the door speakers then bridging the 3rd and 4th channels to give me 180W to power the 10" sub. Again, not ground breaking but good enough for nice sound quality. I also installed some alpine co-axials in place of the stock speakers in the rear parcel shelf - just for a bit of rear-fill. The head unit is an Apline mechless unit (no CD). The bluetooth connectivity is great although I think the sound is richer when played on a USB stick.

(cables need tidying)

I'm very happy with the install. Considering it's a relatively budget setup it's actually very capable. The sub makes a massive difference and despite being quite low power, is surprisingly loud if you want it to be. I have the gain set fairly low though as I just want to add
And that brings me to the bad news.
So the mapping was going well and she'd been on the rollers for a few hours. As everything bedded in I found I had to add more fuel to the map. actually, it also turned out that my fuel pump had been dying. I upgraded to an in-tank Walbro 255 and that threw everything completely out. Anyway, once the chaps got everything running correctly again we started to engage the electronic boost controller through the Emerald in open loop.
Everything was looking good. We made small changes to see how they affected the top of the power curve. You will recall that at the top end we found the limit of the internal waste gate and so boost climbed from 7psi up to 10psi right at the top of the rev range. That can be mapped around with the controller but you have to make small changes to the solenoid duty and see what effect it has. It was looking good. Peak boost climbed to 12psi at the top, with about 10psi from 3rpm.
Then... Misfire
It happened at about 4k rpm. Everything was fine. I was sitting next to the guy with the laptop watching everything like a hawk at this stage. Temps and pressures bang on. AFR within range. Boost 10psi. Mapper immediately thought it sounded like head gasket failure between cylinders. I wasn't convinced.
We pulled the plugs to see how they looked. Plug 1 came out and the tip was smashed in. Not a good sign! My heart sank.

At this stage we think it must be a dropped valve, although peeking down the plug hole didn't show any debris or signed of damage. A compression test confirmed total loss of compression in cyl 1.
The rest of the plugs were fine. The colour indicated ideal combustion temperatures. So I called my breakdown cover and I waited dejectedly in the car park (for nearly 2 hours) for the recovery vehicle.
I wasted no time when I got home and whipped the head off. I expected to find a broken valve but as I put the head down I found this. My hear sank yet further as whilst there is obvious damage, it's not the source of the debris that's caused that patterning. It must be a piston.

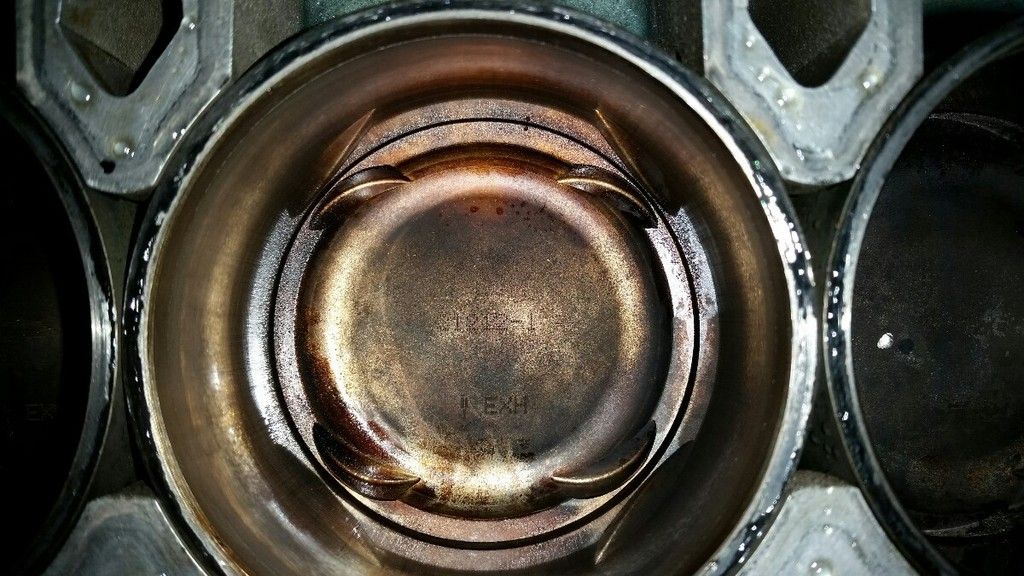
I almost didn't want to walk back to the engine. But I did and this is what confronted me:
Ring land has broken away on 1/4 of the piston on the exhaust side. If you look at the inlet side, you can see where the very thin portion where the valve cutout is has started to bend in. this is obviously the original point of failure.
Whilst the other pistons appeared ok, closer inspection reveals that this is happening to all of them.
So, why did this happen?
No signs of detonation. The colours suggest the combustion temperatures were ok. Boost was only 10psi. I think it's a combination of two things.
Firstly, the piston is simply too thin by the valve cutouts. It's a weak point that fails easily if anything right. It also will become a hot-spot and a source of detonation because the lack of material can't dissipate the heat fast enough. However, given the other pistons haven't gone this way, and cyl 1 runs coolest of all, there's obviously something else going on.
So, secondly, there's some other problem specific to cylinder 1 that has contributed to this failure. I haven't found the answer yet. However, the cylinder wall has scoring all around, which I wouldn't have expected as a result of this failure. Especially when the engine was shut off immediately. Perhaps I got the ring-gaps wrong? Another possibility is that the injector went bad and cylinder 1 went lean. I need to get the engine out and try to get to the bottom of the issue.
The rebuild?
I'm probably going to go 1.9. This will allow me to run 82mm Arias pistons. They have a great reputation and I can also get them with ceramic coated crowns and moly coated skirts. The block will be modified to accept custom ductile liners that are the same thickness as the 80mm liners except where they meet each other where they are squared off. They are also pressed in whereas the standard liners are a slide-fit. This setup has been run successfully on race cars at over 400bhp.
I might also change the turbo for the smaller GT2554. Indeed, I may have to change the turbo since most of the piston debris appears to have made it out of the exhaust and may have clouted the turbine. I'll probably be limited to 250bhp at the wheels but spool would be instant. With the extra torque from the added 100cc it should be a real midrange monster!
Finally, the head will require attention. I think the head itself is ok and just had a light peppering from the debris. The two (standard) exhaust valves on cyl are very bent but the (Paul Ivey) inlet valves seem fine - hopefully they are ok because you can now only buy them in sets of 8! So I'll upgrade all 8 exhaust valves to Paul Ivey. I also want to get the combustion chamber fettled a bit more. If I can remove 5cc from each combustion chamber I can run slightly less dished pistons (meatier and therefore more resilient). Also, with the extra 1mm all-around from the 82mm liners, you can improve the shape of the combustion chamber for improved flow and power.
So, whilst it's not the outcome I wanted, I don't feel too bad. It's not as bad as it could have been. interim results? Peak power increased from 220bhp at the wheels at 10psi when first mapped to 252bhp at the wheels at 12psi. I would have expected some increase from having run the engine in and change the oil to semi-synthetic. But that's very promising! At 16psi we could have seen nearly 300bhp at the wheels.
Watch this space!
Engine run in so time to up the boost and see what she's capable of. Back to Track N Road in Rainham.
But then something went very, very wrong and this shortly followed...
... Let me come back to that.
First I'll tell you about some other stuff that's been going on. A lot of this started some time ago and only recently got finished. Thought I'd share.
Brakes!
With great power comes a great need to be able to stop.
At the front we start with some fairly pathetic 282mm sliding calipers. they do the job, but I want more so I opted for a kit available through a rover forum called Rovertech. It uses 4-pot Brembos from the Peugeot 406 V6 Coupe and hefty 326mm discs.
old setup:
New discs:
They're big but the colour's all wrong!
Better!
Even better!
on with some nice new braided brake lines from Hel.
A nice snug fit behind the Superleggeras
At the back I'm using an MG ZR160 rear beam so have larger calipers and 260mm discs (standard are 240mm). Nothing special but used refurbished calipers (orange, naturally) with braided lines here too:
Next job was to sort out some audio. I want this beast to also be a nice place to be on longer drives, so a decent sound system was essential. Nothing groundbreaking, just some mid-level equipment powered by an amp and a little sub for some bass-fill. I also thought I'd invest some time and money in sound deadening. Always money well spent.
I actually laid all the cables when I did the battery to boot conversion as I had the seats out and carpet out.
Nice meaty 0-Gauge cable running to the battery, which I terminated at the starter motor to avoid using any unsightly connector blocks in the engine bay.
Fuse holder and terminal block. excuse the cable tie - just a temporary measure because the bend is so tight and cable is very thick!
Something very satisfying about a pile of new audio equipment.
But first a bit of sound deadening. The R200 can be a rattly beast at the best of times so this is well worth doing. I opted for Silent Coat which is basically a 2mm thick foil-backed damping material. Similar to dynamat and works in the same way by mass-loading panels to reduce vibration and resonance. I used it to cover the holes - best practice would have been to first cover the larger holes with metal sheets secured with self-tapping screws but to be honest I couldn't be bothered! This will do for my modest install.
mids installed using spacers (required to clear window when it lowers)
Crossovers fitted behind the door cards.
managed to fit the tweeters in the stock housing for the standard look.
And onto the boot:
I'm hoping this also helps reduce some of the exhaust drone:
Amp installed on the back of the rear seats and sub slotted in. Amp has 4 channels so I'm using two to power the door speakers then bridging the 3rd and 4th channels to give me 180W to power the 10" sub. Again, not ground breaking but good enough for nice sound quality. I also installed some alpine co-axials in place of the stock speakers in the rear parcel shelf - just for a bit of rear-fill. The head unit is an Apline mechless unit (no CD). The bluetooth connectivity is great although I think the sound is richer when played on a USB stick.
(cables need tidying)
I'm very happy with the install. Considering it's a relatively budget setup it's actually very capable. The sub makes a massive difference and despite being quite low power, is surprisingly loud if you want it to be. I have the gain set fairly low though as I just want to add
And that brings me to the bad news.
So the mapping was going well and she'd been on the rollers for a few hours. As everything bedded in I found I had to add more fuel to the map. actually, it also turned out that my fuel pump had been dying. I upgraded to an in-tank Walbro 255 and that threw everything completely out. Anyway, once the chaps got everything running correctly again we started to engage the electronic boost controller through the Emerald in open loop.
Everything was looking good. We made small changes to see how they affected the top of the power curve. You will recall that at the top end we found the limit of the internal waste gate and so boost climbed from 7psi up to 10psi right at the top of the rev range. That can be mapped around with the controller but you have to make small changes to the solenoid duty and see what effect it has. It was looking good. Peak boost climbed to 12psi at the top, with about 10psi from 3rpm.
Then... Misfire
It happened at about 4k rpm. Everything was fine. I was sitting next to the guy with the laptop watching everything like a hawk at this stage. Temps and pressures bang on. AFR within range. Boost 10psi. Mapper immediately thought it sounded like head gasket failure between cylinders. I wasn't convinced.
We pulled the plugs to see how they looked. Plug 1 came out and the tip was smashed in. Not a good sign! My heart sank.
At this stage we think it must be a dropped valve, although peeking down the plug hole didn't show any debris or signed of damage. A compression test confirmed total loss of compression in cyl 1.
The rest of the plugs were fine. The colour indicated ideal combustion temperatures. So I called my breakdown cover and I waited dejectedly in the car park (for nearly 2 hours) for the recovery vehicle.
I wasted no time when I got home and whipped the head off. I expected to find a broken valve but as I put the head down I found this. My hear sank yet further as whilst there is obvious damage, it's not the source of the debris that's caused that patterning. It must be a piston.
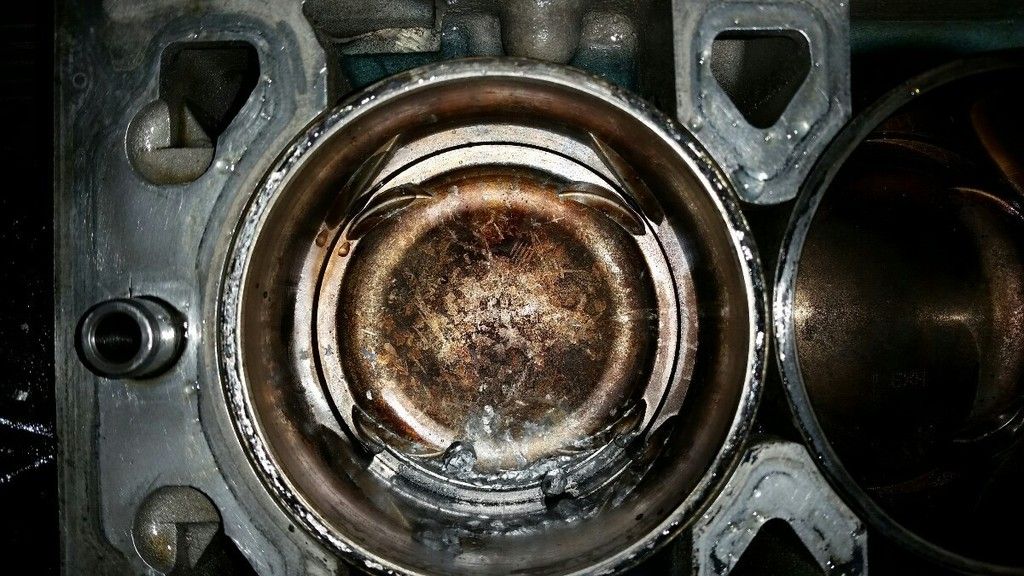
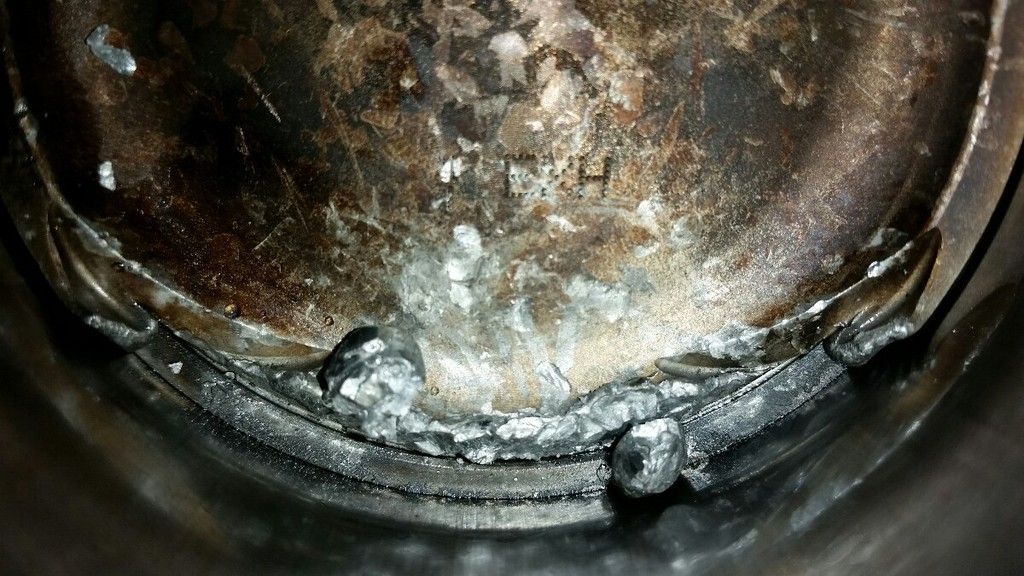
I almost didn't want to walk back to the engine. But I did and this is what confronted me:
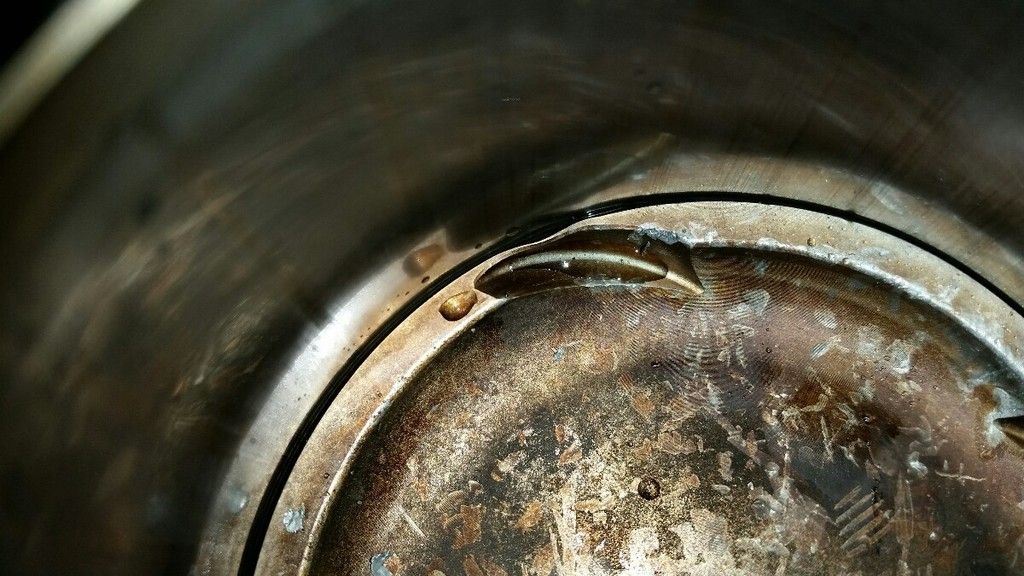
Ring land has broken away on 1/4 of the piston on the exhaust side. If you look at the inlet side, you can see where the very thin portion where the valve cutout is has started to bend in. this is obviously the original point of failure.
Whilst the other pistons appeared ok, closer inspection reveals that this is happening to all of them.
So, why did this happen?
No signs of detonation. The colours suggest the combustion temperatures were ok. Boost was only 10psi. I think it's a combination of two things.
Firstly, the piston is simply too thin by the valve cutouts. It's a weak point that fails easily if anything right. It also will become a hot-spot and a source of detonation because the lack of material can't dissipate the heat fast enough. However, given the other pistons haven't gone this way, and cyl 1 runs coolest of all, there's obviously something else going on.
So, secondly, there's some other problem specific to cylinder 1 that has contributed to this failure. I haven't found the answer yet. However, the cylinder wall has scoring all around, which I wouldn't have expected as a result of this failure. Especially when the engine was shut off immediately. Perhaps I got the ring-gaps wrong? Another possibility is that the injector went bad and cylinder 1 went lean. I need to get the engine out and try to get to the bottom of the issue.
The rebuild?
I'm probably going to go 1.9. This will allow me to run 82mm Arias pistons. They have a great reputation and I can also get them with ceramic coated crowns and moly coated skirts. The block will be modified to accept custom ductile liners that are the same thickness as the 80mm liners except where they meet each other where they are squared off. They are also pressed in whereas the standard liners are a slide-fit. This setup has been run successfully on race cars at over 400bhp.
I might also change the turbo for the smaller GT2554. Indeed, I may have to change the turbo since most of the piston debris appears to have made it out of the exhaust and may have clouted the turbine. I'll probably be limited to 250bhp at the wheels but spool would be instant. With the extra torque from the added 100cc it should be a real midrange monster!
Finally, the head will require attention. I think the head itself is ok and just had a light peppering from the debris. The two (standard) exhaust valves on cyl are very bent but the (Paul Ivey) inlet valves seem fine - hopefully they are ok because you can now only buy them in sets of 8! So I'll upgrade all 8 exhaust valves to Paul Ivey. I also want to get the combustion chamber fettled a bit more. If I can remove 5cc from each combustion chamber I can run slightly less dished pistons (meatier and therefore more resilient). Also, with the extra 1mm all-around from the 82mm liners, you can improve the shape of the combustion chamber for improved flow and power.
So, whilst it's not the outcome I wanted, I don't feel too bad. It's not as bad as it could have been. interim results? Peak power increased from 220bhp at the wheels at 10psi when first mapped to 252bhp at the wheels at 12psi. I would have expected some increase from having run the engine in and change the oil to semi-synthetic. But that's very promising! At 16psi we could have seen nearly 300bhp at the wheels.
Watch this space!
Gassing Station | Readers' Cars | Top of Page | What's New | My Stuff