Rover 200 BRM - 1.8 K-Series turbo project
Discussion


Emerald K3 closed Loop works fine even at full power. I can mail you some settings that do not oscillate and work for adaptive and closed loop.
No knock control unfortunately, that why I went with the J&S system. As a pure knock indicator., the TurboXS knocklite works even better.
Shall I take my Pistons out I will machine the pockets
No knock control unfortunately, that why I went with the J&S system. As a pure knock indicator., the TurboXS knocklite works even better.
Shall I take my Pistons out I will machine the pockets
Ive said:
Emerald K3 closed Loop works fine even at full power. I can mail you some settings that do not oscillate and work for adaptive and closed loop.
No knock control unfortunately, that why I went with the J&S system. As a pure knock indicator., the TurboXS knocklite works even better.
Shall I take my Pistons out I will machine the pockets
Thanks! No knock control unfortunately, that why I went with the J&S system. As a pure knock indicator., the TurboXS knocklite works even better.
Shall I take my Pistons out I will machine the pockets
 closed loop settings would be very helpful. I've sent you a message so you have my email.
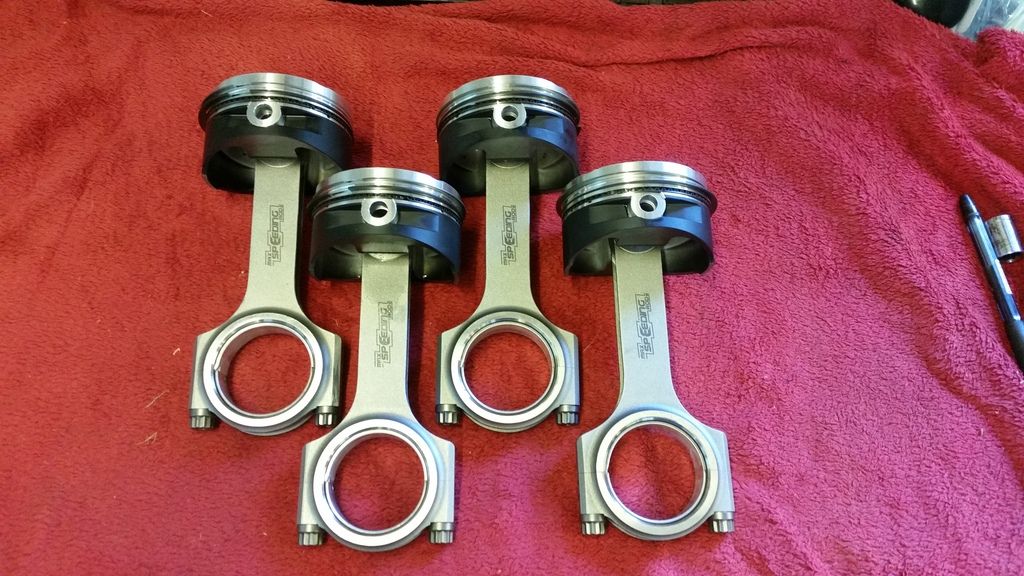
 Pistons have arrived!
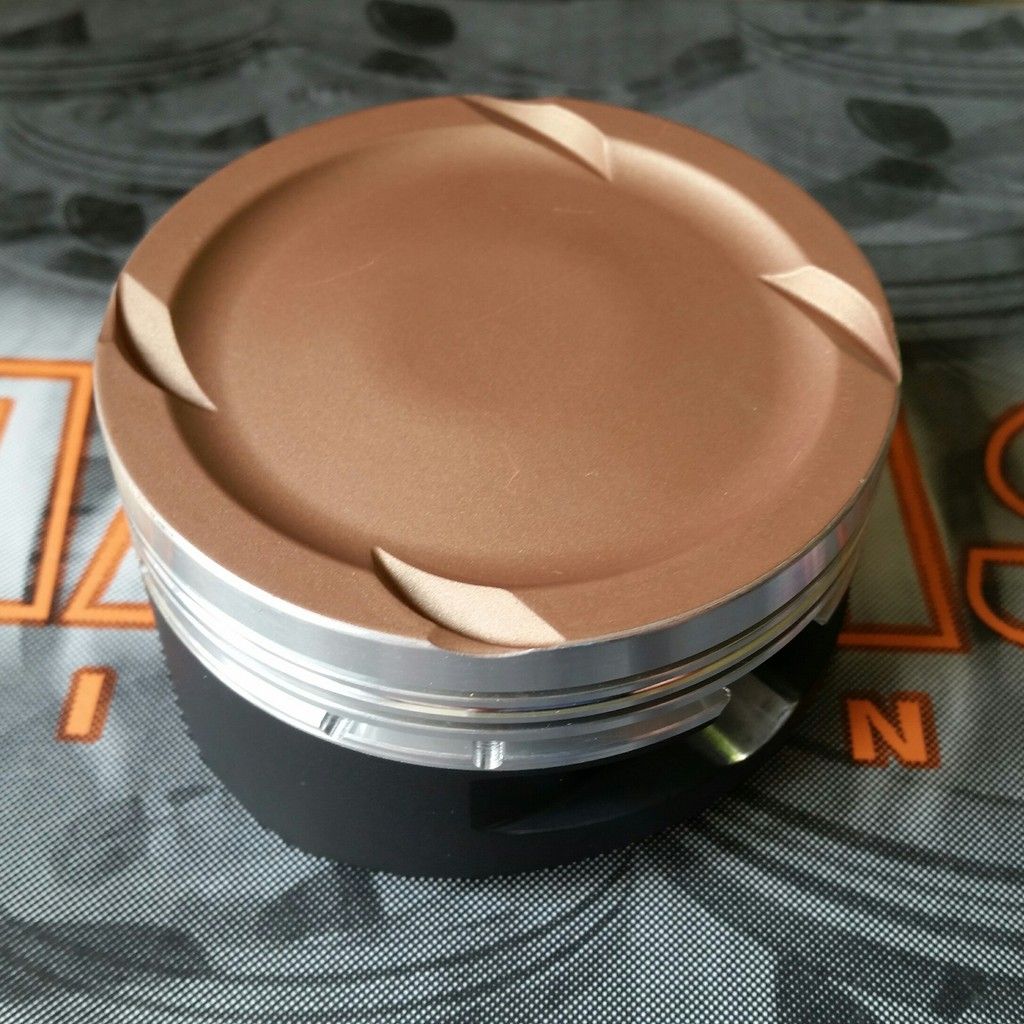
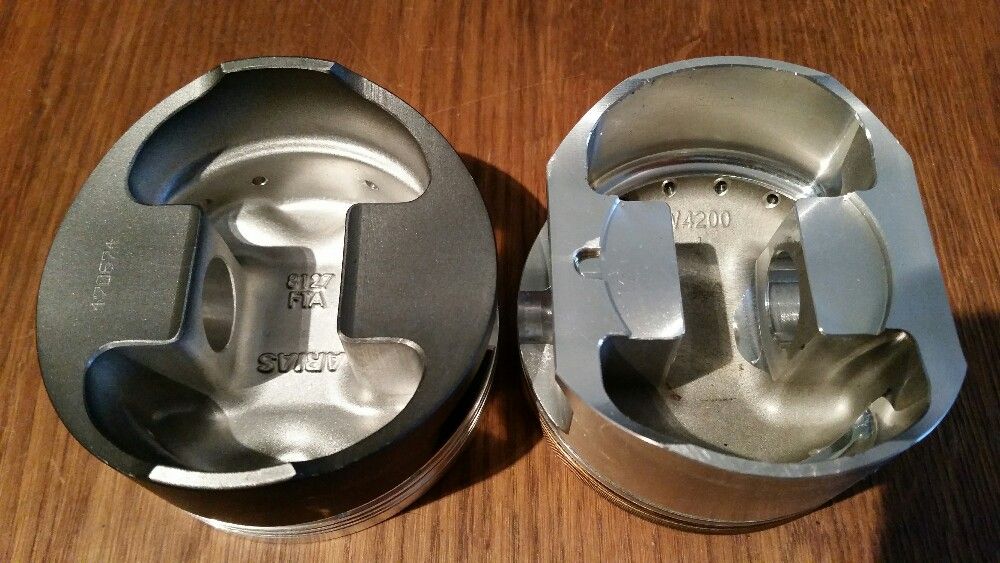
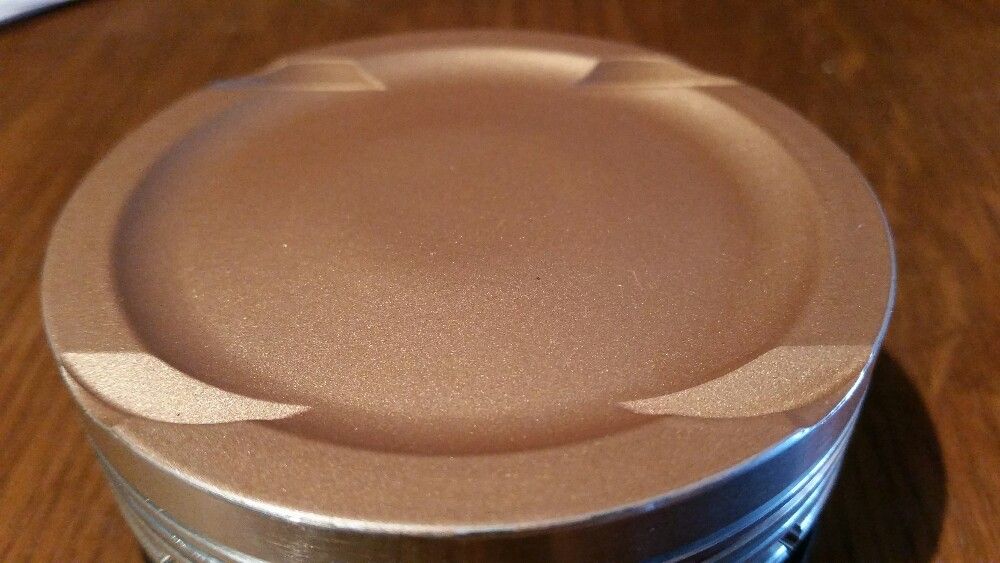
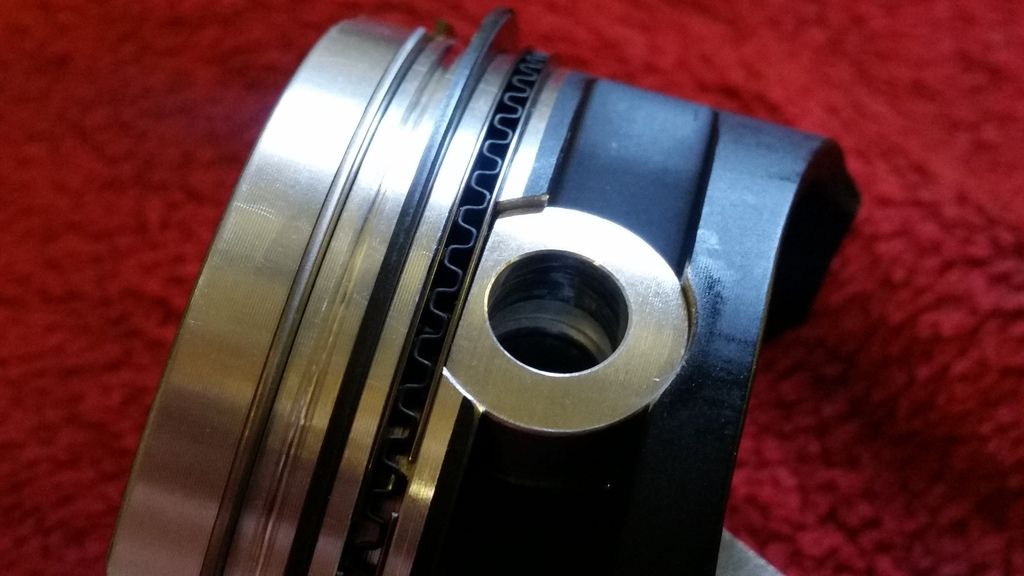
Ceramic coated crowns and moly coated skirts. They are much meatier than the Wossners and the valve cutouts are shaped so as to eliminate any overly thin material.
So now I need to get these up to scholar with the block for the 82mm conversion. They'll also do a bit of work on the head to optimise the combustion Chambers for the larger bores and change the bent valves.
Meanwhile I've been ordering everything I need to upgrade my fuel system and run an external swirl pot.
Rebuild is coming along. Dropped the block and head at Scholar Engines. They'll machine the block to accept their custom Westwood 82mm liners. Lead fine is a few weeks.
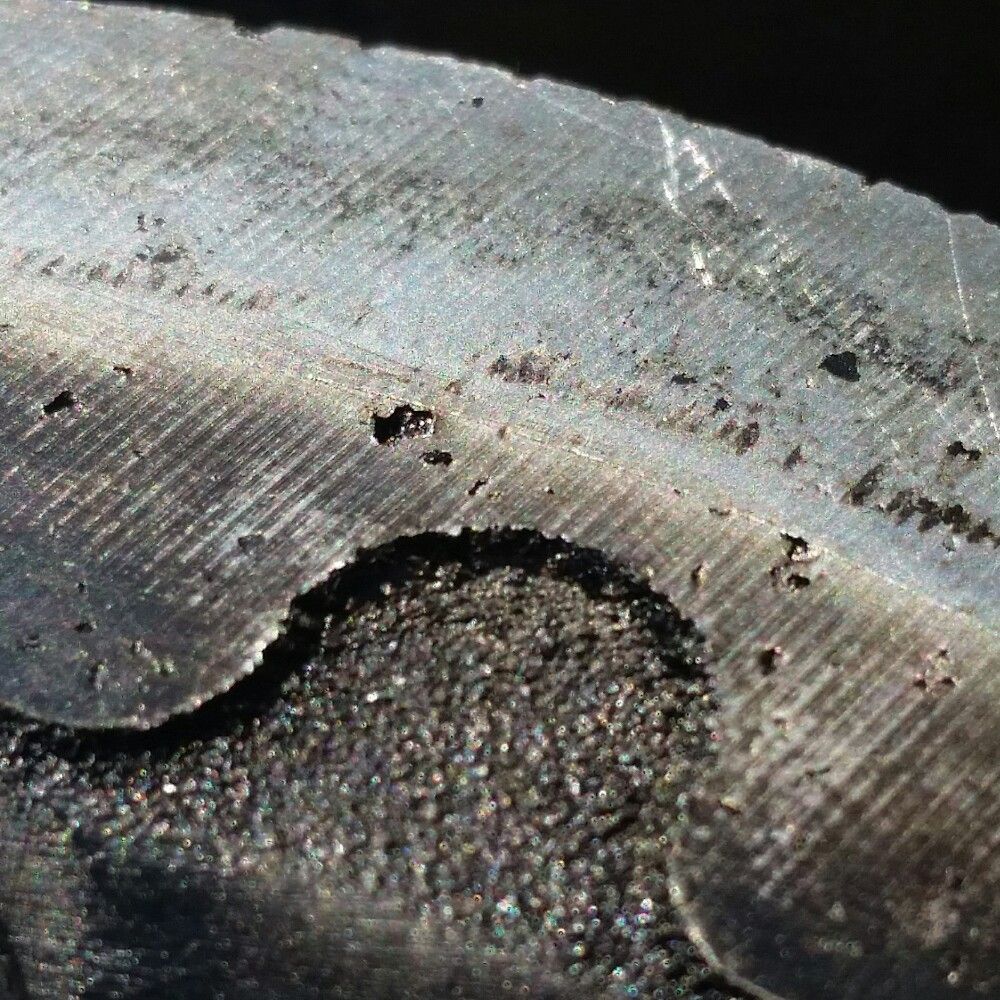
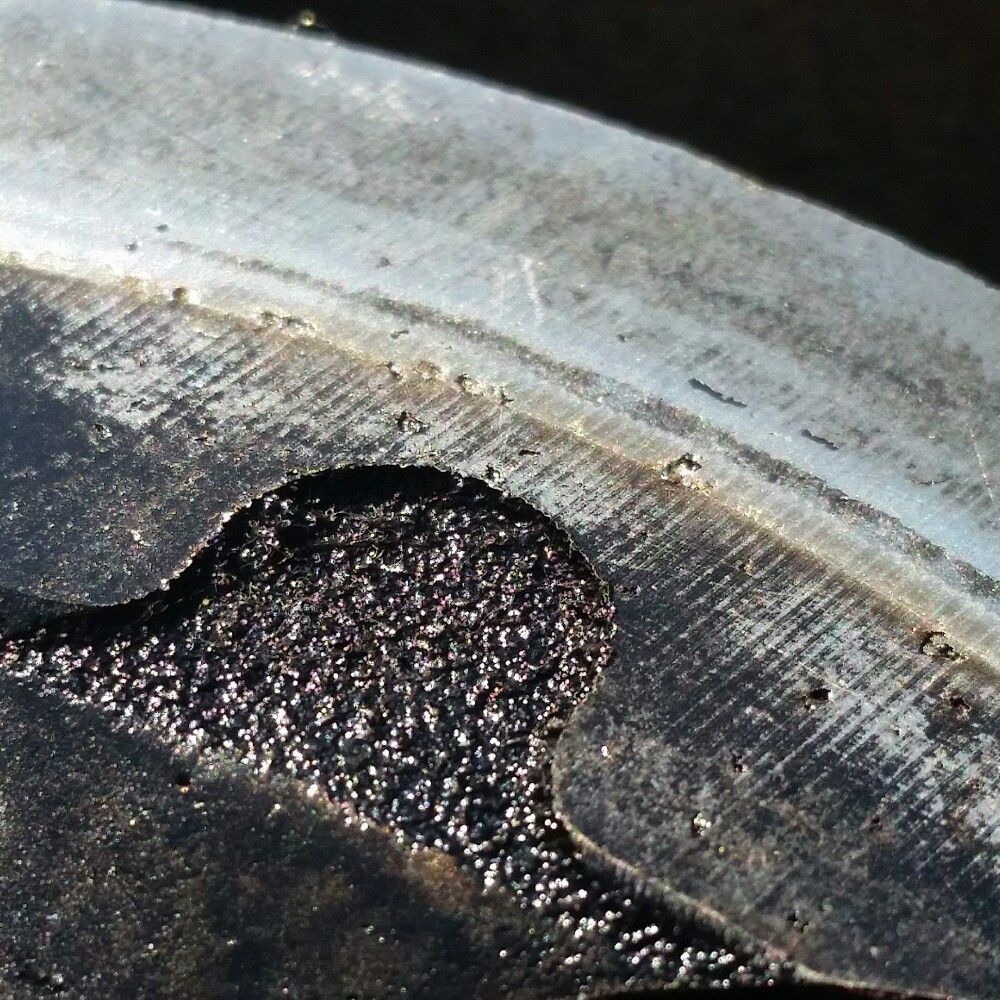
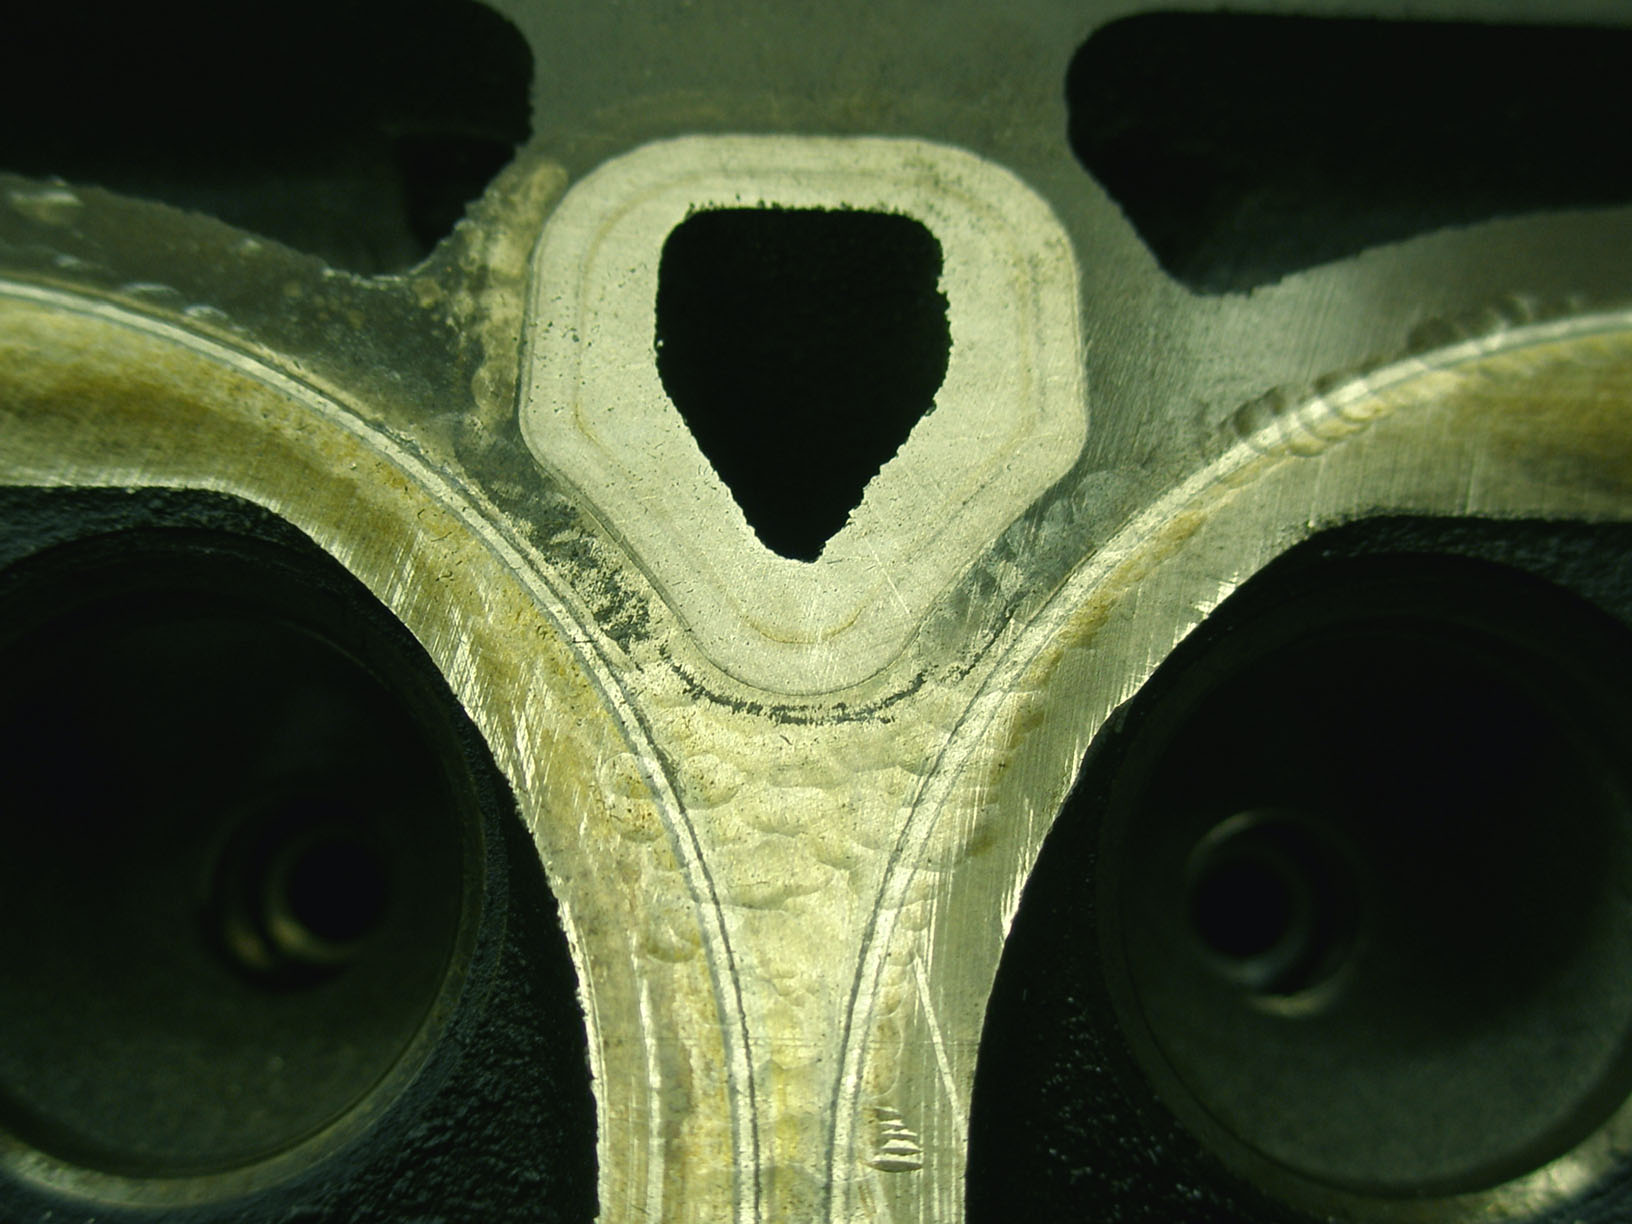
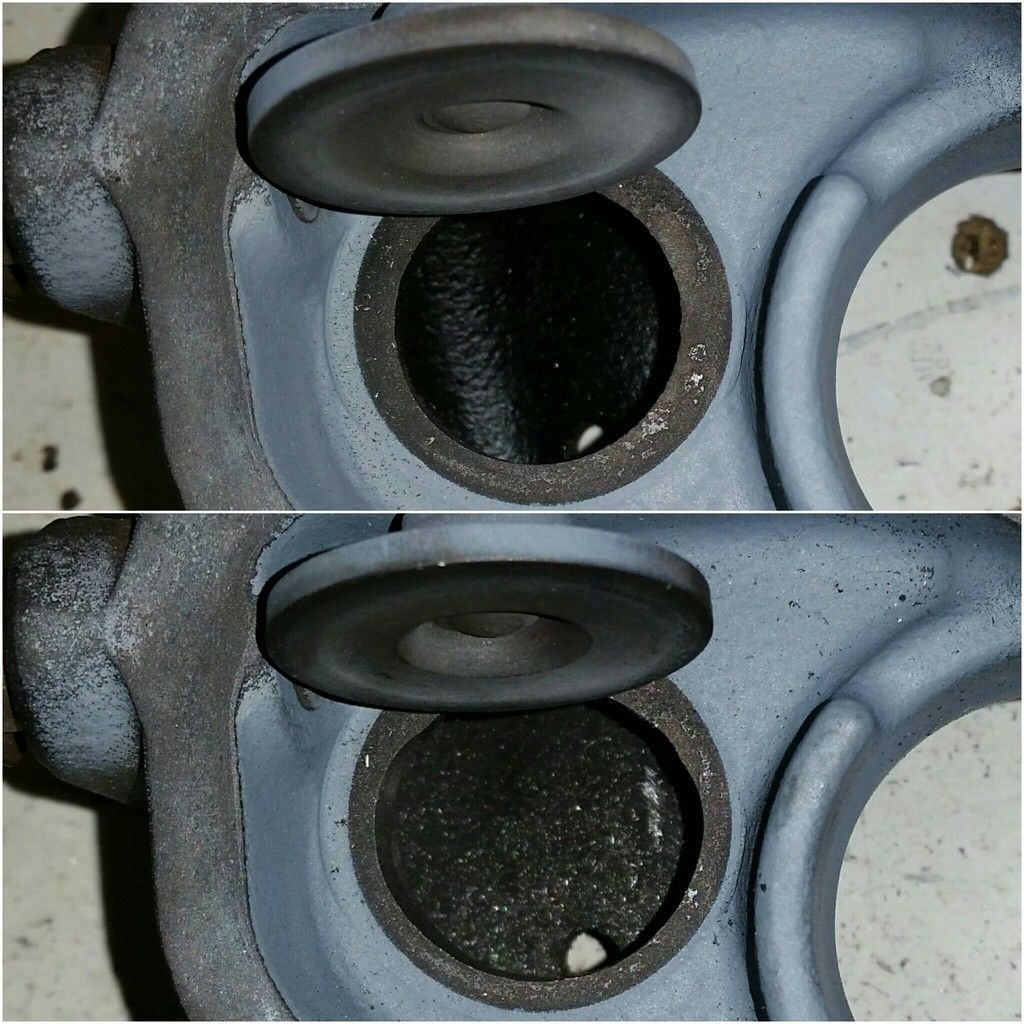
Unfortunately it turns out the head is det damaged. Mostly on and near the fire rings. They will see if this will skim out and if not the head is scrap. Annoying as I'd had it ported and good VVC heads are virtually impossible to find now. It took me a year of dealing with idiots selling me overheated, overskimmed junk before I found this one.
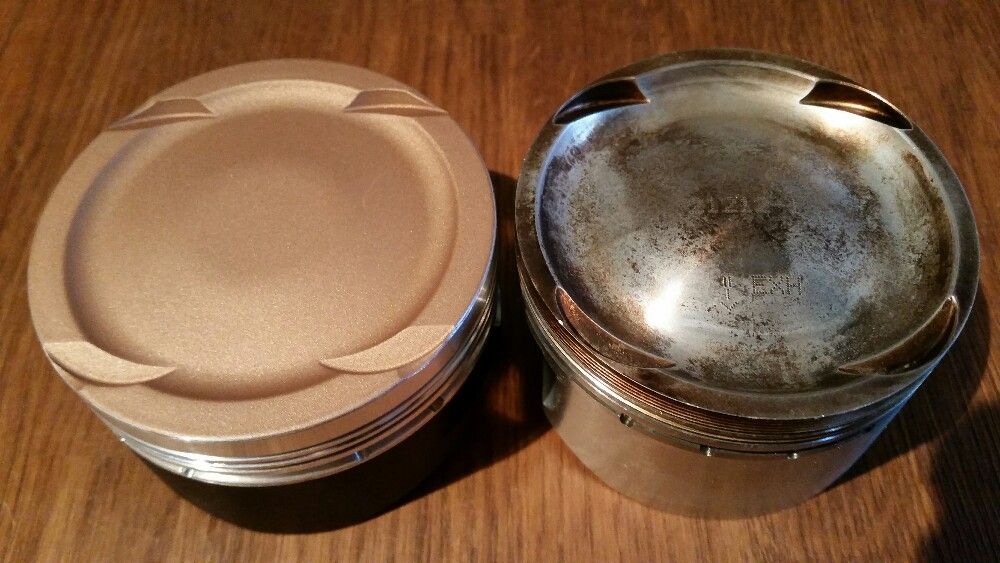
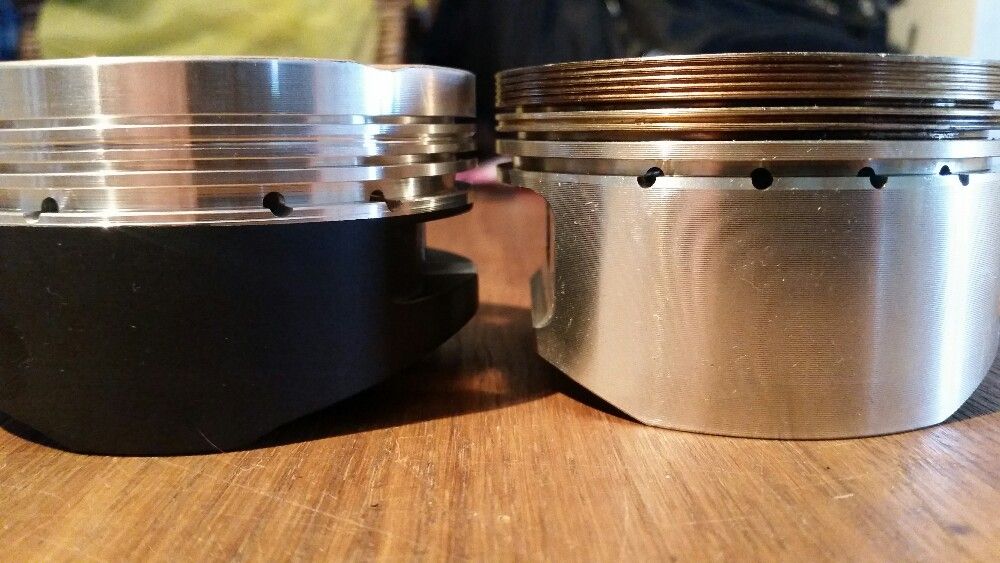
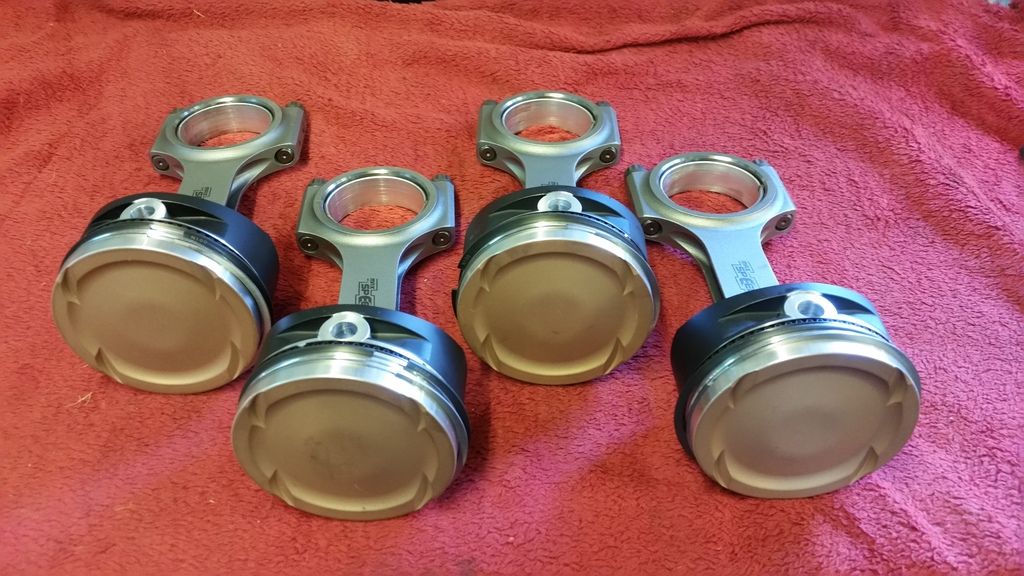
A few shots of the new and old pistons together. You can see how much more meat the Arias have on the ring land. Part off this is the lower ring pack. Part is the smaller dish - only 5cc vs 14cc I had on the Wossners, and smaller valve cutouts.
Meanwhile, I've been sorting out the fuel system. I was never happy with the walbro 255lph in-tank pump. Not only is it not a straight fit, the flow had a pulse to it that the stock pump didn't have which doesn't seem right to me. So I decided to go all-out and fit a swirl pot feeding an external pump.
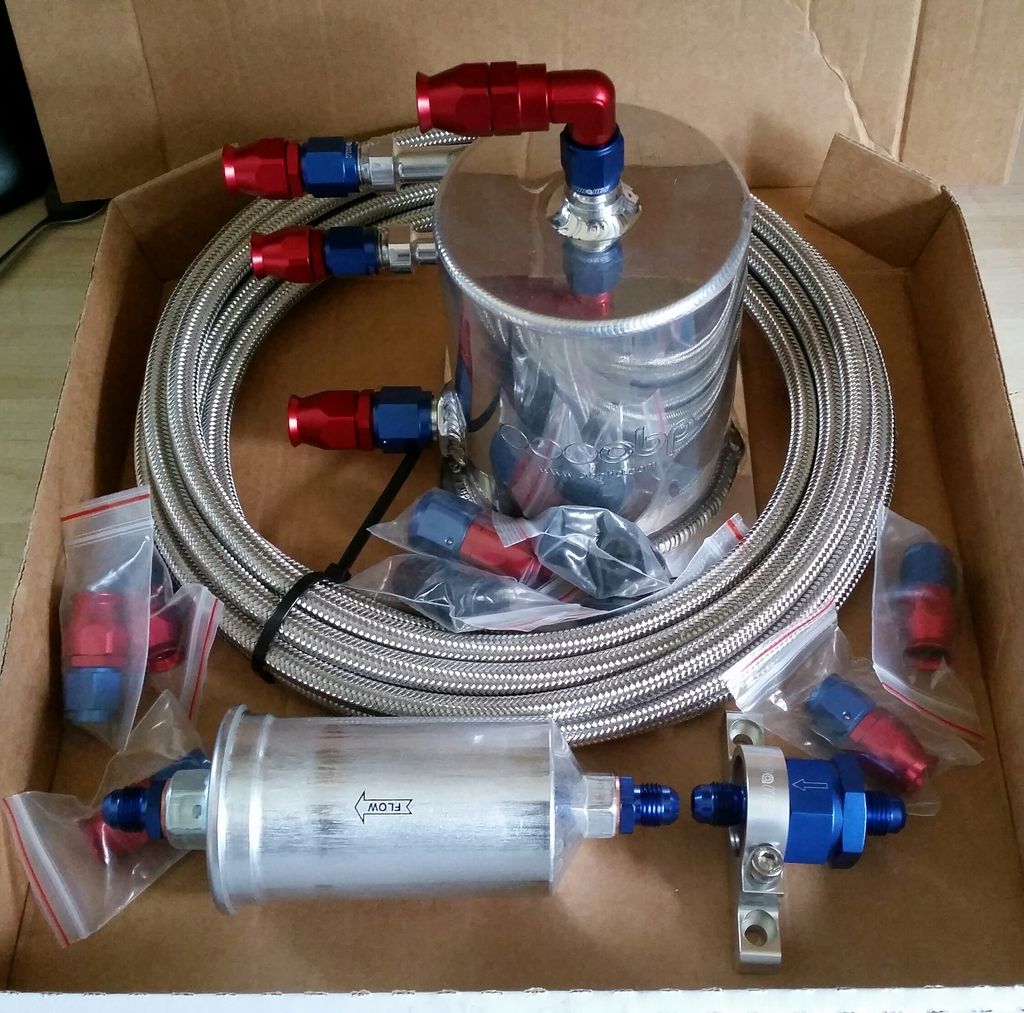
Something very satisfying about a box of an fittings.
Decided to fit in the spare wheel well. Who needs a spare wheel?! The pump is a walbro gsl394 rated to about 190lph at 3 bar and will have its own relayed and fused power supply straight from the battery. Considered a bosch 044 but too many people have problems with the noise and I don't need that much flow anyway. I put a standard pump back in the tank to feed the swirl pot.
I'm running ptfe lines all around. AN-6 lines all the way to the fuel rail. Then using the original and now redundant 8mm hard-line feed pipe as the return for better flow (stock return is only 5mm). Haven't decided whether to run an aftermarket fpr yet. Might just stick with the stock setup for now. I don't need it for increasing the pressure - would just be for flow/consistency/reliability.
How it looks so far:
Unfortunately it turns out the head is det damaged. Mostly on and near the fire rings. They will see if this will skim out and if not the head is scrap. Annoying as I'd had it ported and good VVC heads are virtually impossible to find now. It took me a year of dealing with idiots selling me overheated, overskimmed junk before I found this one.
A few shots of the new and old pistons together. You can see how much more meat the Arias have on the ring land. Part off this is the lower ring pack. Part is the smaller dish - only 5cc vs 14cc I had on the Wossners, and smaller valve cutouts.
Meanwhile, I've been sorting out the fuel system. I was never happy with the walbro 255lph in-tank pump. Not only is it not a straight fit, the flow had a pulse to it that the stock pump didn't have which doesn't seem right to me. So I decided to go all-out and fit a swirl pot feeding an external pump.
Something very satisfying about a box of an fittings.
Decided to fit in the spare wheel well. Who needs a spare wheel?! The pump is a walbro gsl394 rated to about 190lph at 3 bar and will have its own relayed and fused power supply straight from the battery. Considered a bosch 044 but too many people have problems with the noise and I don't need that much flow anyway. I put a standard pump back in the tank to feed the swirl pot.
I'm running ptfe lines all around. AN-6 lines all the way to the fuel rail. Then using the original and now redundant 8mm hard-line feed pipe as the return for better flow (stock return is only 5mm). Haven't decided whether to run an aftermarket fpr yet. Might just stick with the stock setup for now. I don't need it for increasing the pressure - would just be for flow/consistency/reliability.
How it looks so far:
Looking good so far Stu, esp after all the setbacks you have had so far!
With the new fuel setup, will you need to keep a pump in the tank and have an additional one to raise the pressure(like the 75's with their 3) or just the single high pressure pump?
If you are ever in the North-West, I might know of a head you could use going spare...
With the new fuel setup, will you need to keep a pump in the tank and have an additional one to raise the pressure(like the 75's with their 3) or just the single high pressure pump?
If you are ever in the North-West, I might know of a head you could use going spare...
SlowStig said:
With the new fuel setup, will you need to keep a pump in the tank and have an additional one to raise the pressure(like the 75's with their 3) or just the single high pressure pump?
If you are ever in the North-West, I might know of a head you could use going spare...
Yeah I'll keep the standard pump in the tank that has the job of feeding the swirl pot. Then the fuel goes from there to the main pump, through the check valve and filter and onto the engine.If you are ever in the North-West, I might know of a head you could use going spare...
I would probably drive to Scotland for a good head! (giggidy)
Nice to see some progress. I will pull my pistons after the trackday in Spa end of the month and machine the thin walls off.
Let's see, if it works as intended. Also found the source of my too low boost. I need a better air filter set-up. Intake pressure drops by 140mbar!
That porosity can be covered up with a 0.3mm LR shim and a N-series gasket. I'd not worry about it. its fire ring is much wider than the MLS gasket.
DVA showed that you can peen that area to collapse the pores followed by a skim.
Contact him for the job or DIY.
See:
http://arc.seloc.org/viewthread.php?tid=237333&...
from the above thread:
the pores in the peened area are all gone:
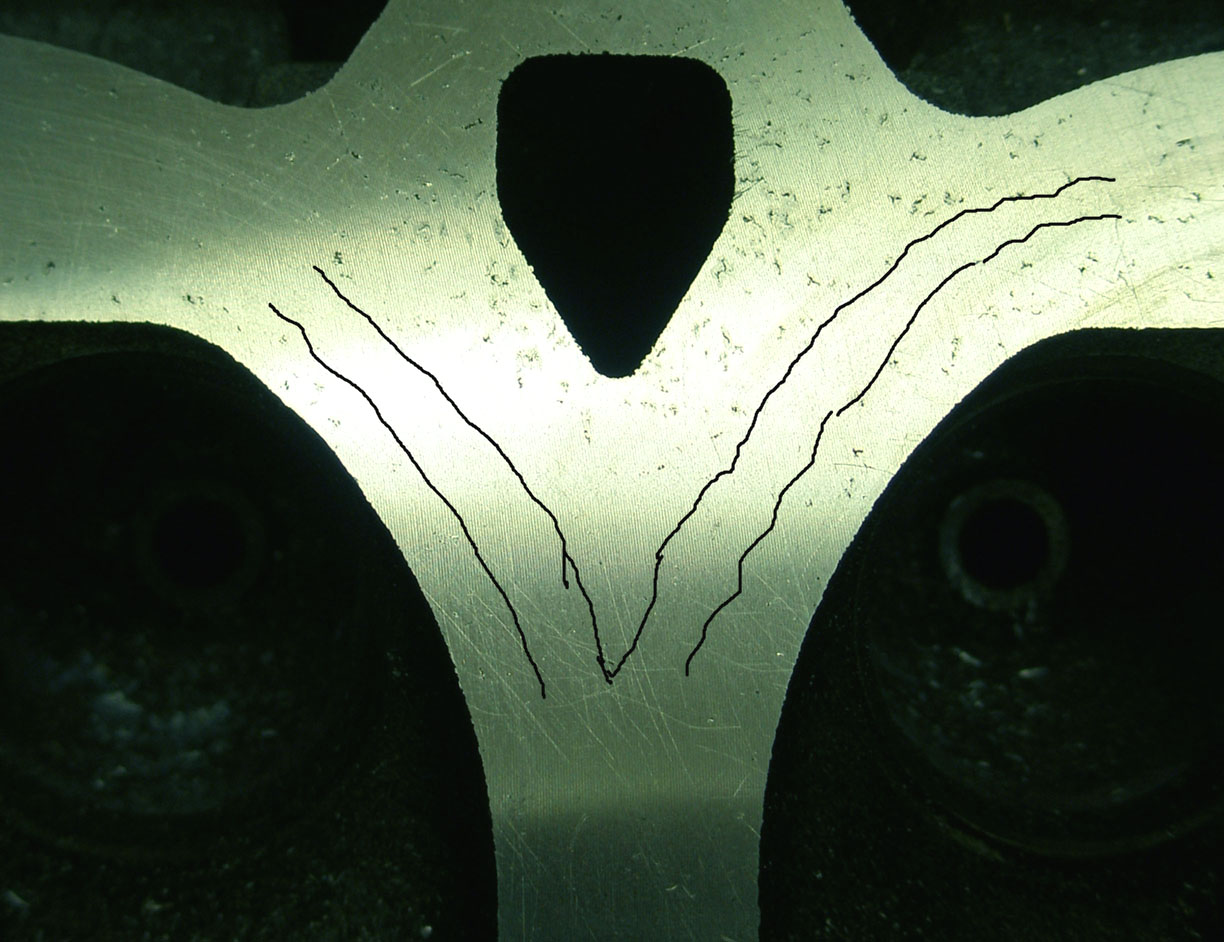
before skimming after peening
Let's see, if it works as intended. Also found the source of my too low boost. I need a better air filter set-up. Intake pressure drops by 140mbar!
That porosity can be covered up with a 0.3mm LR shim and a N-series gasket. I'd not worry about it. its fire ring is much wider than the MLS gasket.
DVA showed that you can peen that area to collapse the pores followed by a skim.
Contact him for the job or DIY.
See:
http://arc.seloc.org/viewthread.php?tid=237333&...
from the above thread:
the pores in the peened area are all gone:
before skimming after peening
Stuballs said:
Unfortunately it turns out the head is det damaged. Mostly on and near the fire rings. They will see if this will skim out and if not the head is scrap. Annoying as I'd had it ported and good VVC heads are virtually impossible to find now. It took me a year of dealing with idiots selling me overheated, overskimmed junk before I found this one.
I seem to remember DVA saying disapproving things about the workmanship of whoever skimmed my VVC cylinder head (prior to my ownership). Yours looks similar, plus the pits. When I got the head back from him the finish was like a mirror in comparison.Hope it's salvageable.
This any use to you?
http://www.gosnays.co.uk/acatalog/SaverShims.html
A friend has used one on his Caterham a few years ago after one too many skims.
http://www.gosnays.co.uk/acatalog/SaverShims.html
A friend has used one on his Caterham a few years ago after one too many skims.
gweaver said:
Stuballs said:
Unfortunately it turns out the head is det damaged. Mostly on and near the fire rings. They will see if this will skim out and if not the head is scrap. Annoying as I'd had it ported and good VVC heads are virtually impossible to find now. It took me a year of dealing with idiots selling me overheated, overskimmed junk before I found this one.
I seem to remember DVA saying disapproving things about the workmanship of whoever skimmed my VVC cylinder head (prior to my ownership). Yours looks similar, plus the pits. When I got the head back from him the finish was like a mirror in comparison.Hope it's salvageable.
rdodger said:
This any use to you?
http://www.gosnays.co.uk/acatalog/SaverShims.html
A friend has used one on his Caterham a few years ago after one too many skims.
I think he wants to do the job properly this time.http://www.gosnays.co.uk/acatalog/SaverShims.html
A friend has used one on his Caterham a few years ago after one too many skims.
Mini update. Not too much happening with the engine currently. Scholar have the block and head for the 1.9 conversion and fixing the damage the piston failure (and possible detonation) caused to the head.
So while I've been waiting on that I've been tinkering with a few other things.
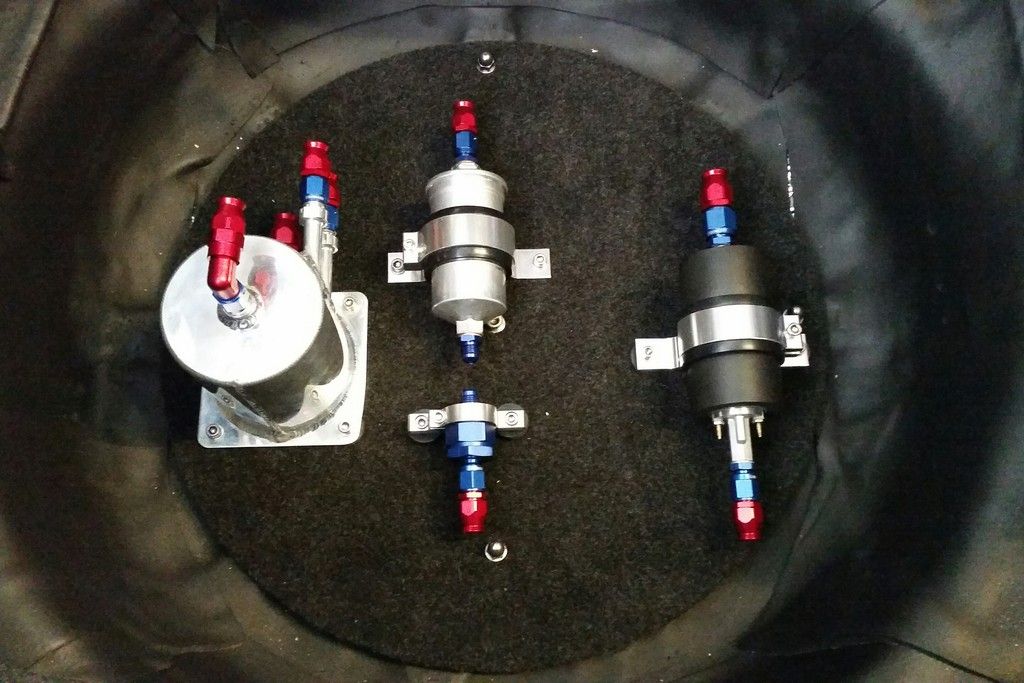
First was getting the fuel system sorted. As I've said a few times, I wasn't 's at all happy with the Walbro 255 I'd installed right before the mapping when it blew up. The Walbro was not a direct fit and required more fettling than I expected to get it to fit in the stock housing. I also suspect the stock wiring struggled with the extra current. So my only real option was to fit an external pump fed by a swirl pot. Whilst this sort of setup is typically used for track and race cars to avoid fuel starvation under high G-loads, for my purposes it's just about having a reliable fuel supply.
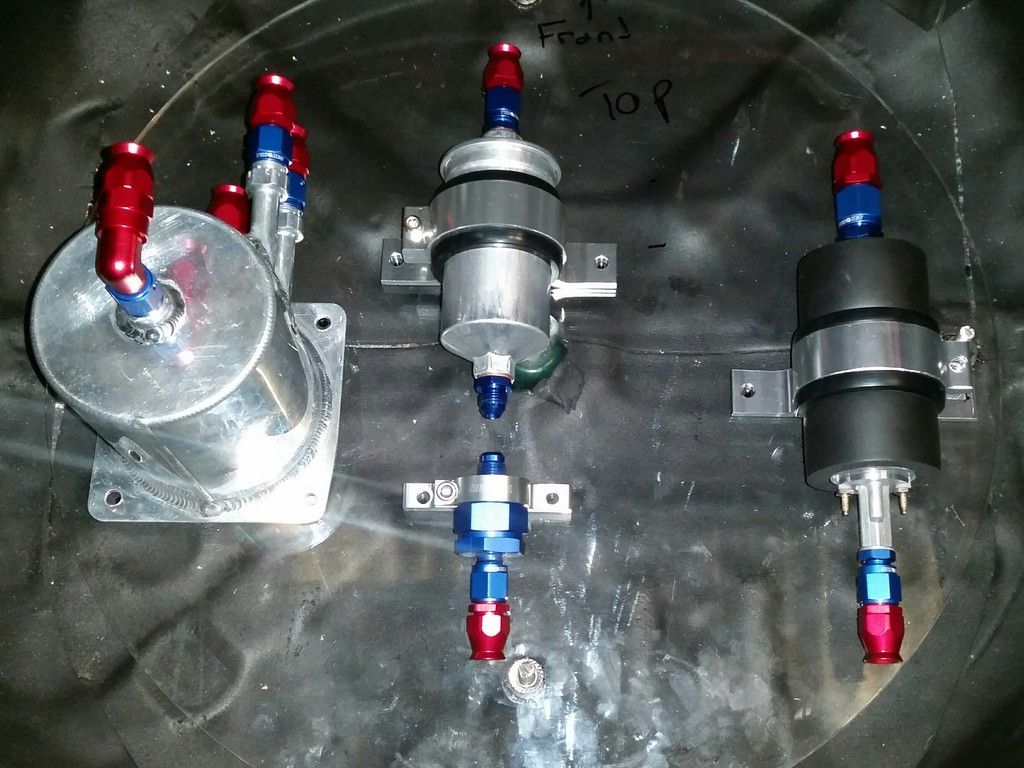
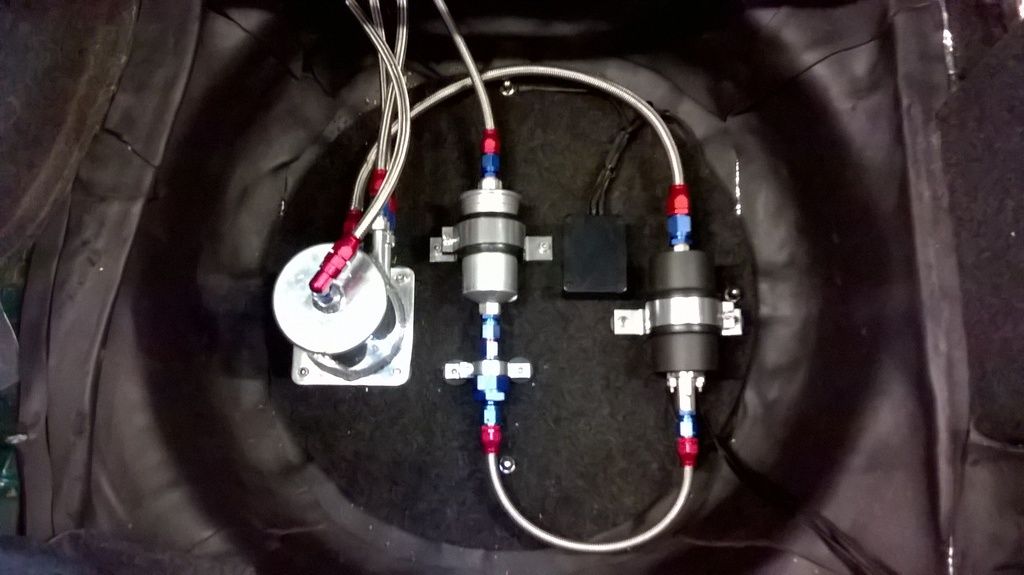
The setup now runs the stock pump as a lift pump. That feeds a swirl pot. The bottom exit of the swirl pot goes to a Walbro external pump. That then goes trough a check valve and a filter before running via the AN-6 line up to the engine.
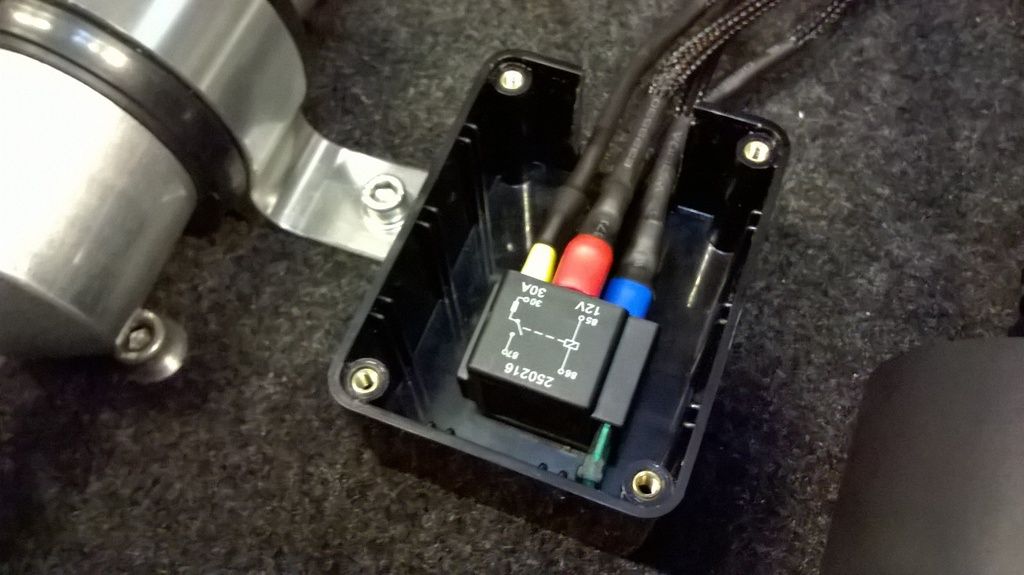
I mounted everything in the spare wheel well (who needs a spare?) on a perspex disc that I covered in carpet. Everything sits low enough that the boot carpet will still go in as before. The disc and everything on it are mounted via thick rubber washers to reduce vibration and noise. All the hoses are steel braided Teflon as rubber hoses can give off a fuel smell. Since this is in the boot I wanted to avoid the car smelling like petrol! The main external pump gets its power via a relay with a beefy 12v supply coming straight off the audio distribution block.
It doesn't like like much but it took bloody forever!

Got a fuel rail adapter that allows me to mate up to the main fuel supply with a tee for the fuel pressure gauge
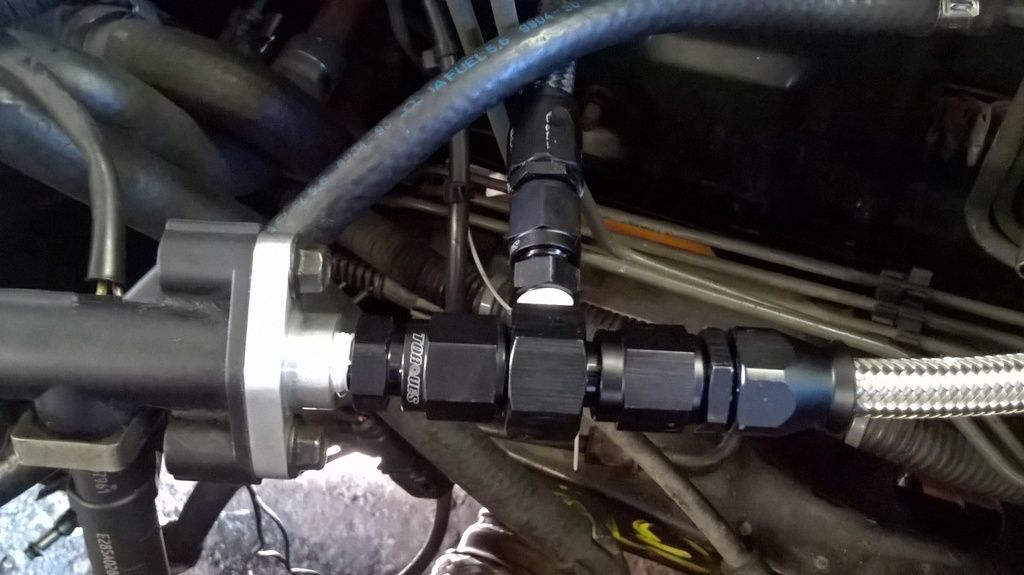
Fixing the p-clips was fun since I had to take the passenger seat out and lift the carpet up for access. Didn't think cable ties would cut it though!!
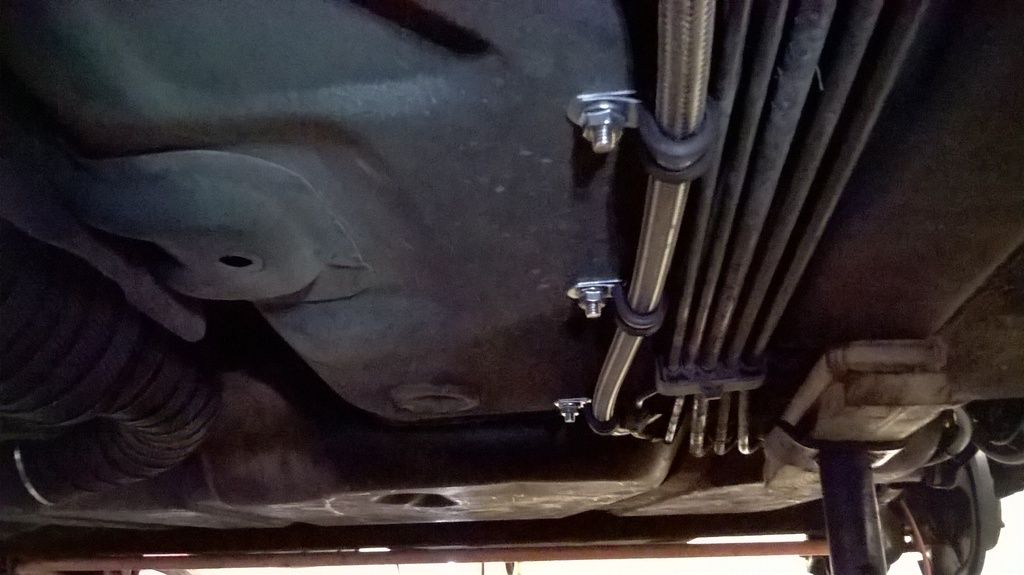
Tested everything today and it seems to work perfectly. No leaks at least (and no fuel smell i the boot!). Maintains a nice steady 3 bar. Obviously will need a full going over once the engine's running again.
Meanwhile, I thought I might fettle the turbo's internal wastegate to see if I can eliminate the boost creep - with a 7psi spring the boost crept up to 10psi at the top of the rpm range. This is apparently quite common on the GT2560 and there's a lot of info on the web about guys doing this with success. Pretty annoying and for the rebuild I want to keep boost nice and low for the run-in. This basically involved enlarging the wastegate port and fettling the housing for better flow. Might not work but worth a try.
Before and after:
I've pretty much run out of things to do now so I'll be quiet for a while!
So while I've been waiting on that I've been tinkering with a few other things.
First was getting the fuel system sorted. As I've said a few times, I wasn't 's at all happy with the Walbro 255 I'd installed right before the mapping when it blew up. The Walbro was not a direct fit and required more fettling than I expected to get it to fit in the stock housing. I also suspect the stock wiring struggled with the extra current. So my only real option was to fit an external pump fed by a swirl pot. Whilst this sort of setup is typically used for track and race cars to avoid fuel starvation under high G-loads, for my purposes it's just about having a reliable fuel supply.
The setup now runs the stock pump as a lift pump. That feeds a swirl pot. The bottom exit of the swirl pot goes to a Walbro external pump. That then goes trough a check valve and a filter before running via the AN-6 line up to the engine.
I mounted everything in the spare wheel well (who needs a spare?) on a perspex disc that I covered in carpet. Everything sits low enough that the boot carpet will still go in as before. The disc and everything on it are mounted via thick rubber washers to reduce vibration and noise. All the hoses are steel braided Teflon as rubber hoses can give off a fuel smell. Since this is in the boot I wanted to avoid the car smelling like petrol! The main external pump gets its power via a relay with a beefy 12v supply coming straight off the audio distribution block.
It doesn't like like much but it took bloody forever!
Got a fuel rail adapter that allows me to mate up to the main fuel supply with a tee for the fuel pressure gauge
Fixing the p-clips was fun since I had to take the passenger seat out and lift the carpet up for access. Didn't think cable ties would cut it though!!
Tested everything today and it seems to work perfectly. No leaks at least (and no fuel smell i the boot!). Maintains a nice steady 3 bar. Obviously will need a full going over once the engine's running again.
Meanwhile, I thought I might fettle the turbo's internal wastegate to see if I can eliminate the boost creep - with a 7psi spring the boost crept up to 10psi at the top of the rpm range. This is apparently quite common on the GT2560 and there's a lot of info on the web about guys doing this with success. Pretty annoying and for the rebuild I want to keep boost nice and low for the run-in. This basically involved enlarging the wastegate port and fettling the housing for better flow. Might not work but worth a try.
Before and after:
I've pretty much run out of things to do now so I'll be quiet for a while!
looks good. Good oportunity to optimze a few things such as your waste gate.
I have in the mean time machined the JDM Wössner pistons, removed the copper shim and installed a N-series gasket.
AT the same time I have reduced boost to a more sensible 0.7 bar at 7000 rpm to help heat management.
After a air filter modification a few weeks ago, the old one was rather restrictive, I was seeing 0.95 bar at 7000 rpm and more than 1 bar at 7300. I did a track day in Spa and things worked fine even before maching the pistons.
I have checked all pistons and on one spot on one exhasut valve the bending just about started. It was a good thing to tackle it right after Spa. Without Stu's failure we would have never known about the issue.
I was able to see a discoloration on that spot. As it corresponded to the part I machined away anyhow and the ring gaps were unaffected, I put the engine back together with a fresh set of rod bearing shells. The old ones were in good shape, but were not reused.
Cams were retimed to the old values.
Right away the engine was able to take more ignition advance off boost and a low rpm. Much better.
On boost, it also takes more timing than before, more than I expected for this boost level. I have used that level/pulley before. More squish, more quench and less straight side walls that reflect sound waves help controlling knock.
I have two track days coming up in two weeks. Let's see, if the pistons survive.
Edited by Ive on Saturday 16th July 10:42
Ive said:
looks good. Good oportunity to optimze a few things such as your waste gate.
I have in the mean time machined the JDM Wössner pistons, removed the copper shim and installed a N-series gasket.
AT the same time I have reduced boost to a more sensible 0.7 bar at 7000 rpm to help heat management.
After a air filter modification a few weeks ago, the old one was rather restrictive, I was seeing 0.95 bar at 7000 rpm and more than 1 bar at 7300. I did a track day in Spa and things worked fine even before maching the pistons.
I have checked all pistons and on one spot on one exhasut valve the bending just about started. It was a good thing to tackle it right after Spa. Without Stu's failure we would have never known about the issue.
I was able to see a discoloration on that spot. As it corresponded to the part I machined away anyhow and the ring gaps were unaffected, I put the engine back together with a fresh set of rod bearing shells. The old ones were in good shape, but were not reused.
Cams were retimed to the old values.
Right away the engine was able to take more ignition advance off boost and a low rpm. Much better.
On boost, it also takes more timing than before, more than I expected for this boost level. I have used that level/pulley before. More squish, more quench and less straight side walls that reflect sound waves help controlling knock.
I have two track days coming up in two weeks. Let's see, if the pistons survive.
Glad you've made positive progress. Intetesting that you also had the bending on the pistons.I have in the mean time machined the JDM Wössner pistons, removed the copper shim and installed a N-series gasket.
AT the same time I have reduced boost to a more sensible 0.7 bar at 7000 rpm to help heat management.
After a air filter modification a few weeks ago, the old one was rather restrictive, I was seeing 0.95 bar at 7000 rpm and more than 1 bar at 7300. I did a track day in Spa and things worked fine even before maching the pistons.
I have checked all pistons and on one spot on one exhasut valve the bending just about started. It was a good thing to tackle it right after Spa. Without Stu's failure we would have never known about the issue.
I was able to see a discoloration on that spot. As it corresponded to the part I machined away anyhow and the ring gaps were unaffected, I put the engine back together with a fresh set of rod bearing shells. The old ones were in good shape, but were not reused.
Cams were retimed to the old values.
Right away the engine was able to take more ignition advance off boost and a low rpm. Much better.
On boost, it also takes more timing than before, more than I expected for this boost level. I have used that level/pulley before. More squish, more quench and less straight side walls that reflect sound waves help controlling knock.
I have two track days coming up in two weeks. Let's see, if the pistons survive.
Edited by Ive on Saturday 16th July 10:42
I had good news from scholar today. My 1.9 block is ready and the VVC head was repairable with a light skim and some new valves. I pick it up next week!
Time for a little update.
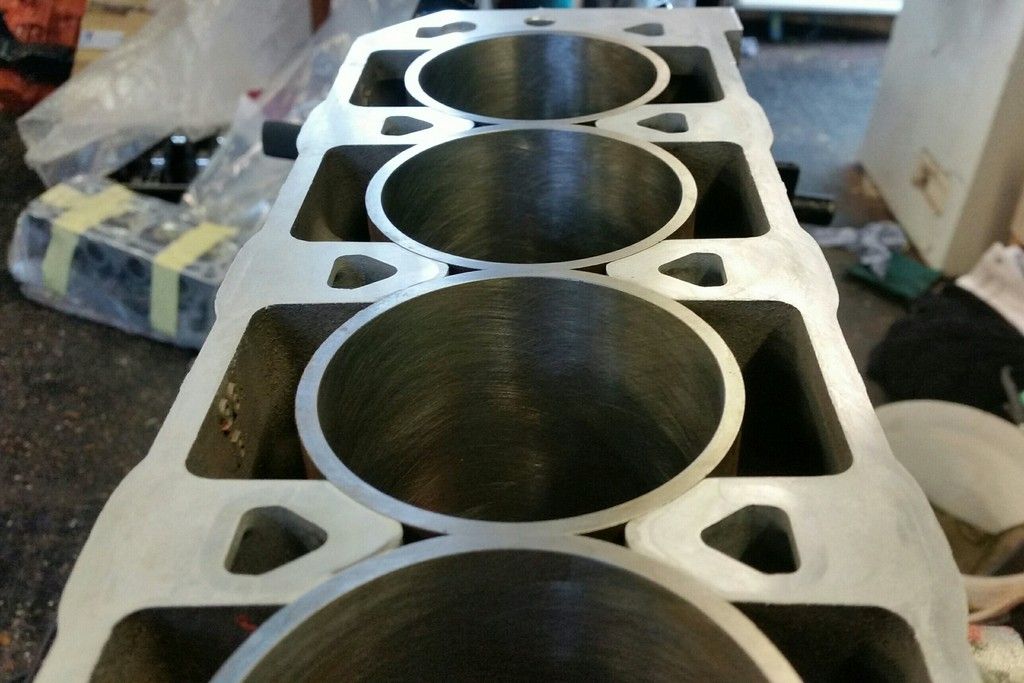
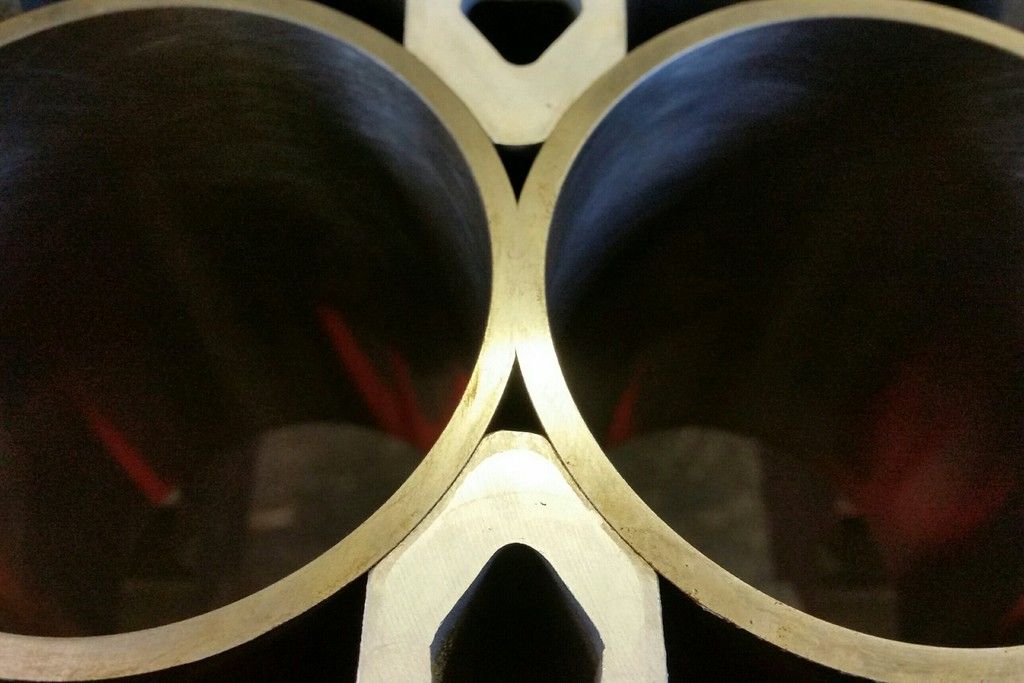
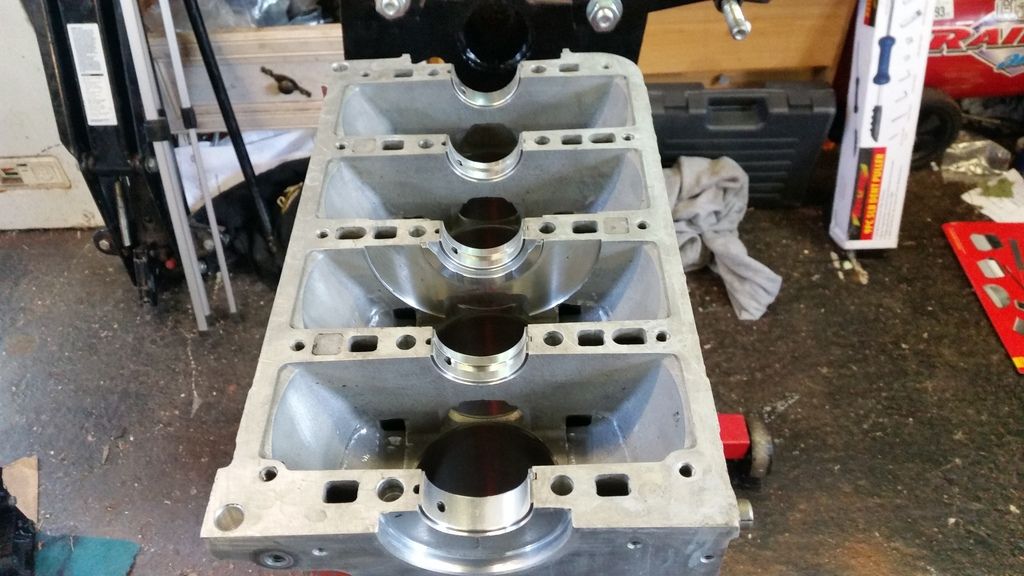
Picked the block and head up from scholar. The 1.9 conversion is nicely done. The liners are actually half a mm thicker than standard 1.8 liners, except where they abut. After being cooled and pressed into the heated block they are skimmed down to exactly 0.005" proud of the block. They are never coming out!
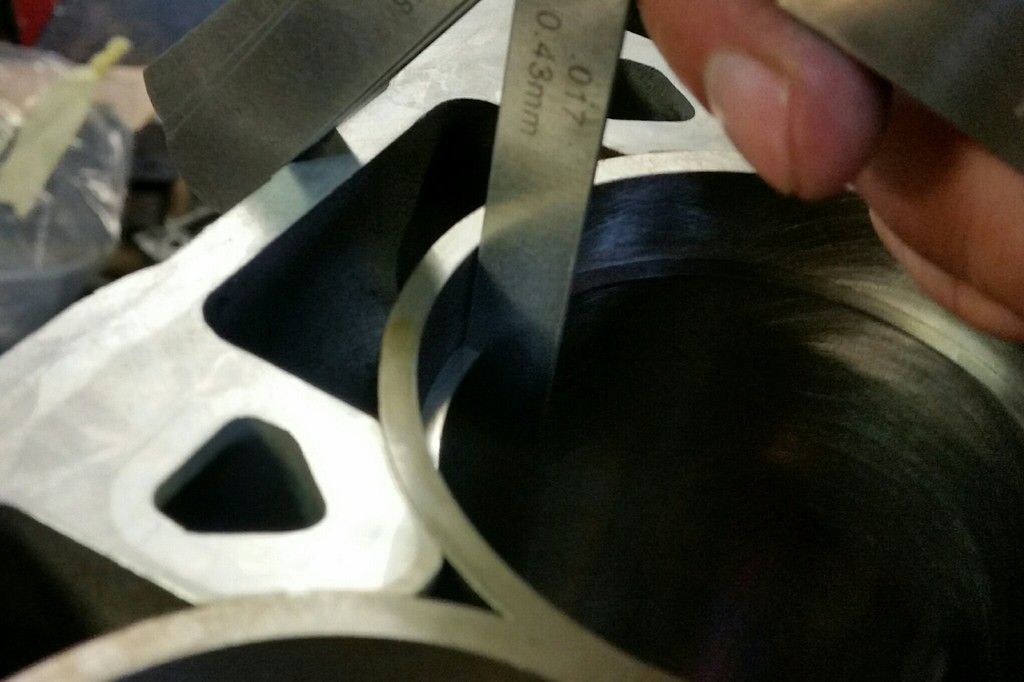
Regapping the rings. I'm giving myself a bigger safety margin with the ring gaps this time and using the top end of the range recommended by Arias. Top ring will be 0.020", second 0.017".
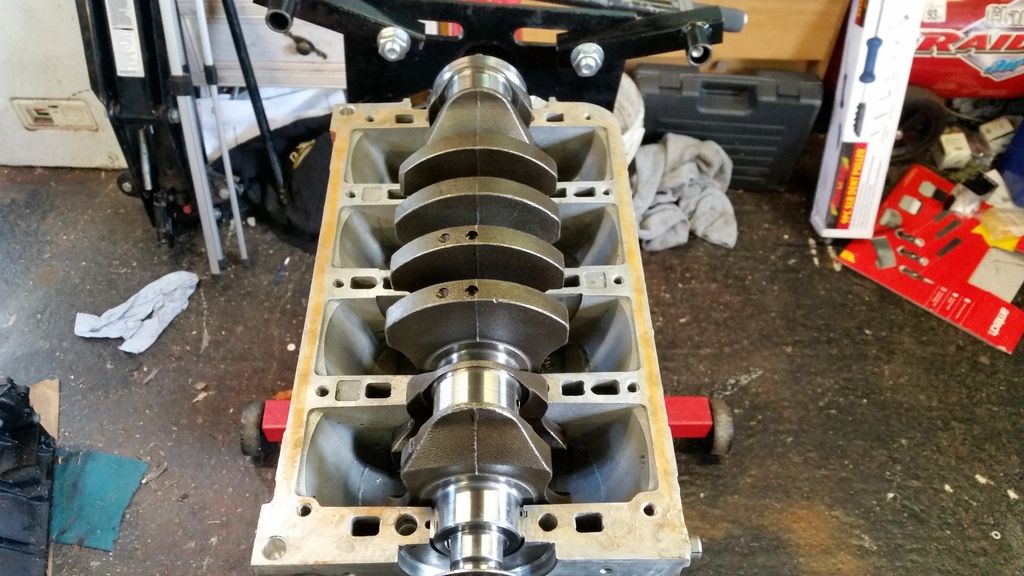
Fresh main bearings and balanced crankshaft back in:

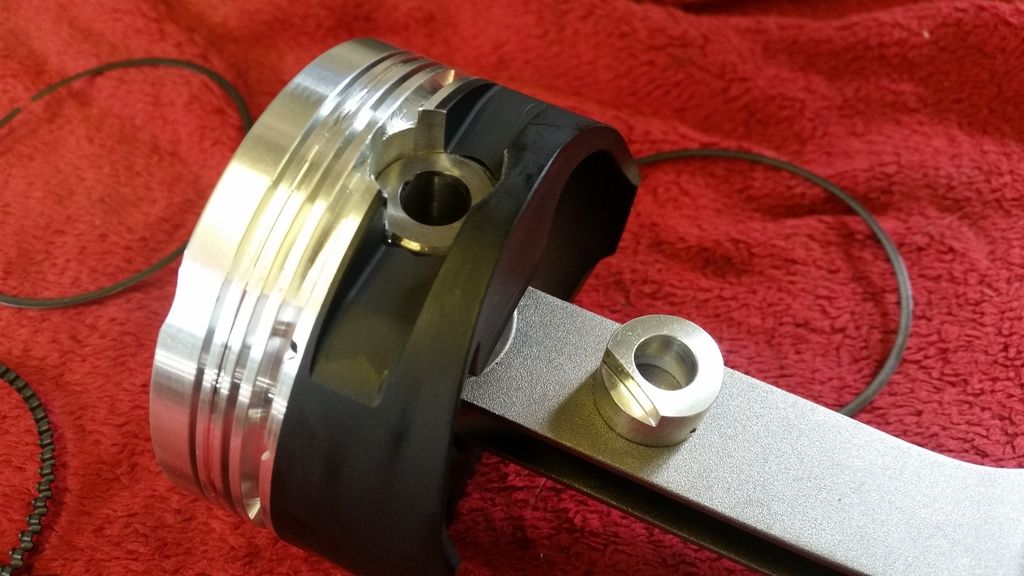
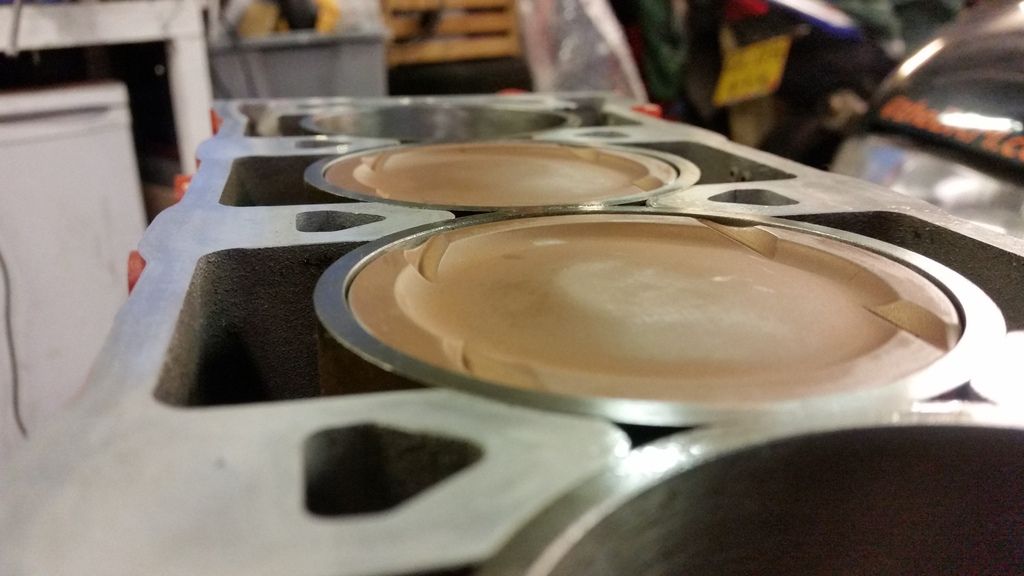
Onto the pistons. As discussed previously, these Arias are clearly much meatier than the Wossner. Critically the ring lands are thicker and taller. They are also less dished than the old pistons - 5cc vs the 14cc I measured on the Wossners. So my compression will be higher. That said the deck height is slightly below the liner. I'll take some measurements and work out what my static cr will be with this setup.
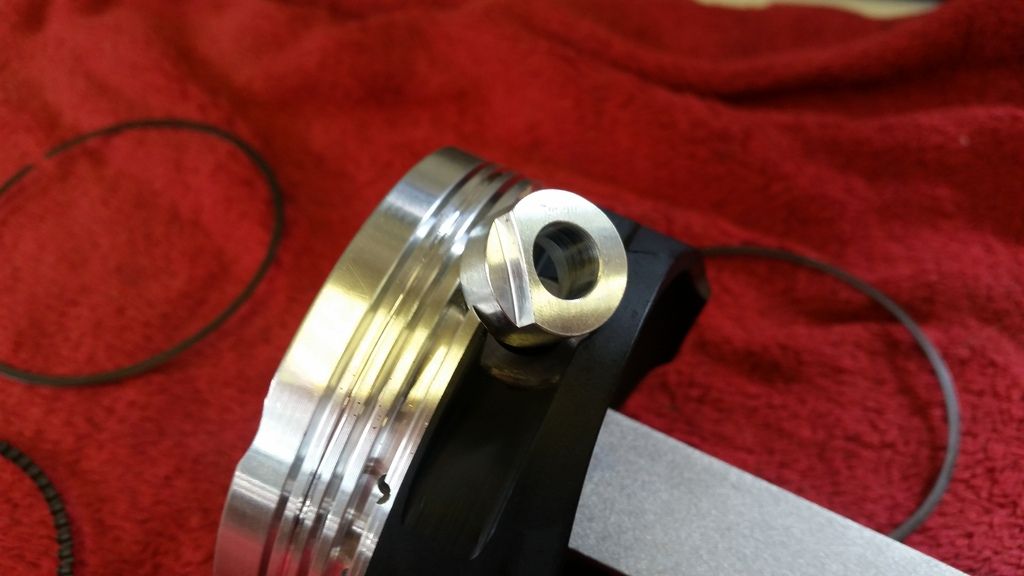
The lower and more spaced ring pack is achieved by placing the oil control ring around the pin. A machined button holds the floating gudgeon pin in, and the rings and liner wall hold the button in place. Clever stuff. For added protection from heat and friction, I opted for ceramic coated crowns and moly coated skirts. The k-series does not have oil squirters so the pistons are vulnerable to overheating.
Fitted to the rods. Sticking with the Maxspeeding.
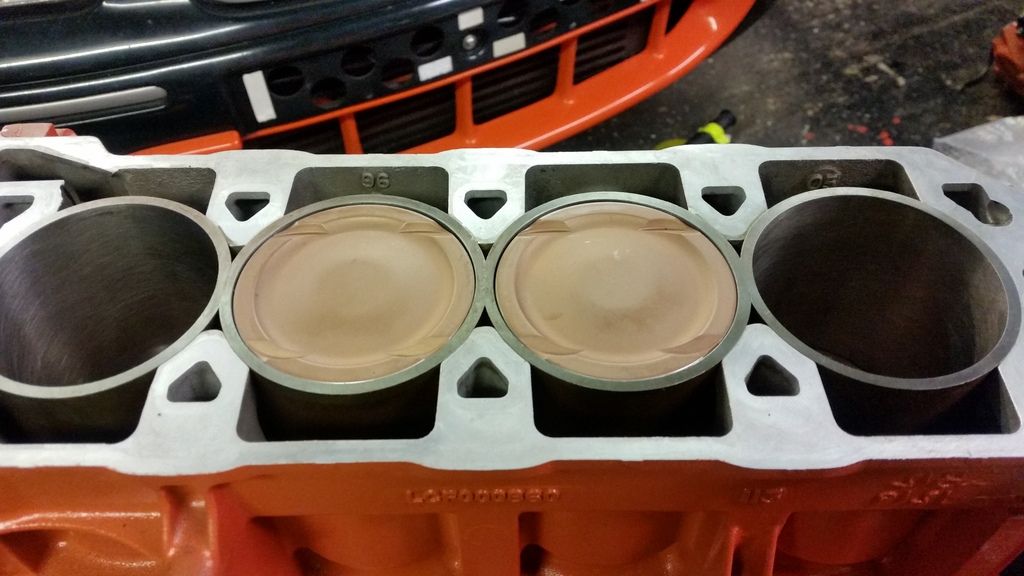
Fitting the pistons with fresh big end bearings.

All in!
Hopefully this weekend I'll get the head fitted and time the cams in. Then bolt everything on and get it back in the car.
Picked the block and head up from scholar. The 1.9 conversion is nicely done. The liners are actually half a mm thicker than standard 1.8 liners, except where they abut. After being cooled and pressed into the heated block they are skimmed down to exactly 0.005" proud of the block. They are never coming out!
Regapping the rings. I'm giving myself a bigger safety margin with the ring gaps this time and using the top end of the range recommended by Arias. Top ring will be 0.020", second 0.017".
Fresh main bearings and balanced crankshaft back in:
Onto the pistons. As discussed previously, these Arias are clearly much meatier than the Wossner. Critically the ring lands are thicker and taller. They are also less dished than the old pistons - 5cc vs the 14cc I measured on the Wossners. So my compression will be higher. That said the deck height is slightly below the liner. I'll take some measurements and work out what my static cr will be with this setup.
The lower and more spaced ring pack is achieved by placing the oil control ring around the pin. A machined button holds the floating gudgeon pin in, and the rings and liner wall hold the button in place. Clever stuff. For added protection from heat and friction, I opted for ceramic coated crowns and moly coated skirts. The k-series does not have oil squirters so the pistons are vulnerable to overheating.
Fitted to the rods. Sticking with the Maxspeeding.
Fitting the pistons with fresh big end bearings.
All in!
Hopefully this weekend I'll get the head fitted and time the cams in. Then bolt everything on and get it back in the car.

Luther Blisset said:
What does the compression ratio and squish distance work out as?
Have you considered oil cooling the pistons in some way, either by drilling the rods or fitting squirters?
I'll have to take some measurements but squish distance will be maybe 0.050 - 0.060" (1.2mm - 1.5mm) but it depends on the thickness of the gasket when compressed. Not ideal, I know. This will give me a static compression ratio of about 10:1 I think. But I'll have to measure and work it out properly.Have you considered oil cooling the pistons in some way, either by drilling the rods or fitting squirters?
I considered oil squirters but the risk of compromising my oil pressure and supply to the crank was too great in my mind. Not sure how you would drill the rods?
Gassing Station | Readers' Cars | Top of Page | What's New | My Stuff