A V8 at last - my BMW 645Ci
Discussion


parabolica said:
Managed to find a pic I had posted on another thread - don't have any of the interior but will try to get some soon. Glad to say the council plate is no longer on it either 

Can't remember which bush exactly but it was a rear, inner bushing - the car was squeaking at any slight movement!
That looks bloody lovely, there's a nice target for what mine should end up like! Any more photos, especially of the interior, would be much appreciated Can't remember which bush exactly but it was a rear, inner bushing - the car was squeaking at any slight movement!
 I too have something of an issue with NI plates over here..
The updates on these cars are quite hard to keep track of. They don't seem to have all been thrown in with LCI like on some models, but year by year. The move to push-button start and the availability of keyless access and all that seems to have been in 2005 when the 650i and 630i came in, but the updated shifter doesn't appear until 2008. The gearbox itself isn't any different (and the 8-speed in the F06 isn't actually a dual-clutch, but ZF's newest torque converter offering). I'm sure there are many more detail changes that I haven't seen enough cars to notice.
Re. space in the rear, I'm 6'0" and my 5'4" other half can sit behind my driving position. She couldn't if she was much taller at all. On the passenger side, I think you could get two people around 5'10" in comfortable positions. When buying I considered the rear seats a privilege rather than an actual feature, but they aren't too bad and apparently quite pleasant to travel in, good visibility and particularly with the glass roof very airy.
I got my first taste of how inconvenient these cars can be the other day:
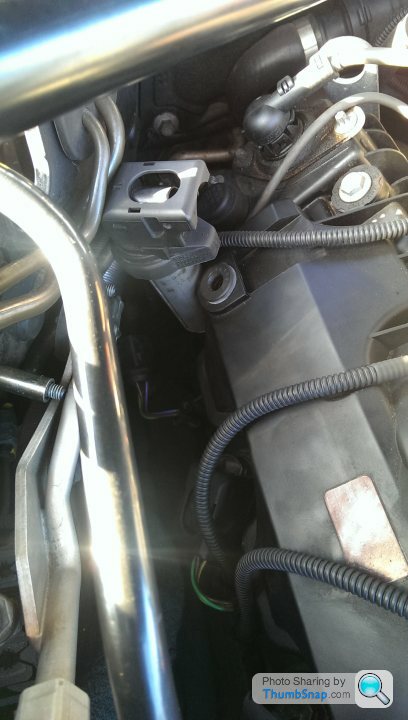
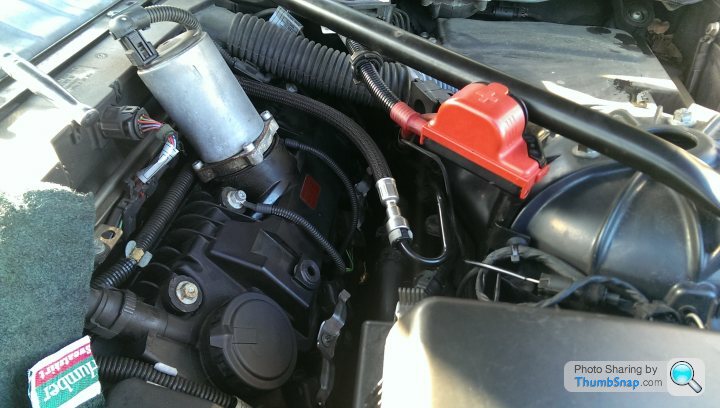
Yes, that's an ignition coil that doesn't really fit out of the engine without fouling the bulkhead, an air con pipe or a hard brake line. Very nice! Bank B (passenger's side for RHD) is even worse, the coils are underneath those two metal clamps, requiring removal directly into battery cables (not so bad), coolant hoses or the fuel line:
The car had a slight misfire from cold, and common consensus seemed to be that they're very sensitive to plugs, so I thought I'd take a look. I did a quick bit of research on the forums to see if there were any issues with doing the job, and was astonished to see huge long DIYs and talk of setting 4+ hours aside! I knew a Vee would be more awkward than the lovely straight sixes with everything accessed from straight above, but when you look under the bonnet the problem becomes quite clear. The engine's mounted very far back, with an almost unnecessarily large amount of free air between it and the cooling pack - I blame the M6's extra two cylinders for that. This means that the rear two plugs on each bank are facing the suspension turrets, and all the ancillaries are nicely crowded in around them. I was able to get them all done, but I've never had so many extensions and universal joints hanging off one part before, it was amazingly convoluted!
If you're interested, the procedure is:
- Remove both microfilter housings by releasing the big clip on the inboard side and turning the plastic 13mm locking clip on the outboard side. Might as well replaced the microfilters while you're at it, I did. Make sure to use activated carbon ones rather than just paper types.
- Remove the bonnet seal that runs along the leading edge of the scuttle. Just pulls off and only fits one way.
- Remove the plastic bracing in the centre of the scuttle, this weird little panel just slides out.
- Undo one T25 screw holding each side of the scuttle down near the suspension turret. Turn six (I think) more plastic 13mm lockers to release both halves of the scuttle. Take note of how they fit when removing them, they need to be pushed right down into the drain holes to the wings. Mentioning those, take the opportunity to clean them out, they'll be full of leaf mulch and assorted crap.
- Remove the engine acoustic cover. If I remember right, this uses a different Torx bit, but I can't recall whether it's a T20 or T30. Will check later on and update. Four of them, and it pulls off.
- Remove the side cover of the bank you're going to work on. I'd recommend Bank A (left as you're looking from the front of the car) first, it's easier. The covers just pop out of two rubber grommets, but take some force. Bank B's is fiddly to get out, if you let it slide down into the engine bay a bit then it comes out better.
- Go and buy an E7 female Torx bit, if you can find one anywhere. Even worse than using 7mm hex keys for caliper sliders, that, well done BMW. Not having one to hand, I used an E8 to undo the metal clamps holding each pair of coils down, but this was a nightmare as it would slip unless held on tightly and access is so awkward that this made it slow going. I also wouldn't make a habit of using the wrong size, as while my screws didn't show any damage, they might if yours have been overtightened in the last job. Dropping one of these screws or clamps would be very unpleasant indeed, so I stuffed a rag beneath to catch anything I dropped.
- The coils are straightforward to remove. The cable is locked in by a cap that rotates 90° upwards, release this and then use one finger in the hole on the cap, the other hand pulling and turning the coil by the boot, to remove it. It will feel very tight and then suddenly pop out in a rush - if you weren't wearing gloves before, you want to be now because you're gonna clout hard objects in the engine bay when the coils come loose. Set the coil aside. I work on one cylinder at a time, though I can't think of a technical reason why you couldn't refit the coils any place you like, and the leads won't reach incorrect coils so you can't mess up the ignition timing.
- The drop into the wells is long enough that I would only recommend doing this with a proper spark plug socket that grips them by the insulator. Get your socket and a 3" extension, and tape them together. I don't always do this, but trust me, you do not want the socket staying on the new plug when you're working two feet above it because there's no space!
- For numbers 1-3 on Bank A, quite straightforward to use an extension bar and remove the plugs. All usual precautions for working with plugs re. cross-threading apply, always start new plugs by hand, and I turn them backwards until I feel them drop back onto the top of the thread, then immediately start turning them in. This guarantees they take the thread correctly and saves time messing around with hosepipes like other methods. The correct torque for the new plugs is 31Nm, or so I'm told.
- For number 4 at the back of Bank A (the one in my first photo above), clearly the coil won't come out with everything where it stands. The easiest way to remove it is by moving the air con lines mounted to the body metal nearby. Undo the two 10mm nuts and pull the bracket off the pegs. It will feel like it really doesn't want to move, but it will come free without damage. Once free of the pegs, you can push the whole line down out of your way and you should be able to remove the coil. To get the plug, I used a universal joint on the 3" extension, then a 10" extension. Then I found it was still a pain, and I'd ran out of extensions in 3/8", so I added an embiggulator to 1/2" drive, another 10" extension and finally a ratchet to undo the bugger. Once the plug comes free, take off everything except the first 3" extension to remove it safely.
- Numbers 5 and 6 at the front of Bank B aren't so bad either.
- Numbers 7 and 8 on Bank B benefit from moving the battery jump cable. This is held on by a black plastic sleeve that has a grey plastic nut a little way along the cable, and then clips in further down. Undo the nut, manouvre the sleeve out, and the cable is a bit more mobile. You can also push the huge harness trunks running from the ECU up a little bit to get more space. Be a bit clever about where you feed your tools in - my extensions often went through the gaps between hoses or cables rather than over the top of everything - and you should be able to get them done.
This took me two and a half hours from garage-open to tools-away. I'm only mediocre with the spanners but I am quite good at working in stupid fiddly spaces, so this may take a lot longer if you struggle with that sort of thing. Three years part time at Halfords fitting bulbs means working blind, wet and numb in a space too small for human digits is normal to me! All eight of my plugs came out looking like this, which I'm happy with, pretty healthy:
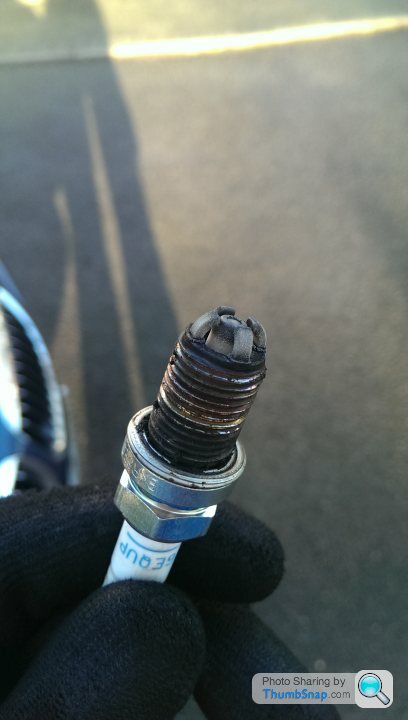
I'm also happy that these are NGK BKR6EQUP, one of only two plug types approved for this engine. The other is Bosch FGR7DQP, which are in it now. If anyone's thinking of tackling this and would like any more explanation or photos, just let me know, I'm hoping the above makes enough sense when read alongside looking in the engine bay! It's not mechanically difficult, just monumentally awkward. This procedure is obviously written from a 645Ci, you may find it varies on the 50i engine, but I believe the installs are very similar with this engine in E60 and E53.
Yes and no. It seems much happier at a cold start and feels like the response is cleaner when driving, but just once yesterday I noticed it hunting around a little bit when stationary in D. It'd only been been running for a couple of minutes, and I haven't seen it since. It didn't feel like it was necessarily a misfire, though, could be some oddity with the idle control. I'll continue to monitor that.
johnwilliams77 said:
Whats a good price for one of these? Seems a bit all over the place.
Like everything there only worth what someone is prepared to pay,but inversely you will only get the best ones for what the seller is prepared to take!Lots of high mileage cars for £6-7k but low mileage clean cars can be £10k plus.
Also these cars had some expensive options so you have to know what you want.
Dynamic Drive with 19" alloys,sport seats,upgraded leather?TV, Pro Sat Nav all added to the price, mine has over £10k of options so a base model is not as disirable!
McSam Granfondo, is that your car on 18k?! It looks immaculate, as well it should! Those wheels are a rare choice that suit it really well, too.
Maybe on 19k now!
It's never seen a winter so looks like new but doesn't get used much due to other cars but won't let it go for buttons!
Lots of people have wanted to buy it but when they tell me that they can get one on EBay for £7k my answer usually offends!
Maybe on 19k now!
It's never seen a winter so looks like new but doesn't get used much due to other cars but won't let it go for buttons!
Lots of people have wanted to buy it but when they tell me that they can get one on EBay for £7k my answer usually offends!
philmots said:
Hunting on a warm idle is most likely the PCV's..
They're about £13 a side and a doddle to fit.
Yes, I'd read about these. If I spot the issue again I'll look into them!They're about £13 a side and a doddle to fit.
Granfondo said:
Maybe on 19k now!
It's never seen a winter so looks like new but doesn't get used much due to other cars but won't let it go for buttons!
Lots of people have wanted to buy it but when they tell me that they can get one on EBay for £7k my answer usually offends!
Heh, I can imagine It's never seen a winter so looks like new but doesn't get used much due to other cars but won't let it go for buttons!
Lots of people have wanted to buy it but when they tell me that they can get one on EBay for £7k my answer usually offends!
 not something you'd want to part with! I do worry that even if mine's absolutely perfect in five years' time, it still won't be valued much because it'll have well over 150k on it. But then I decide I don't really care about that enough to stop enjoying it!
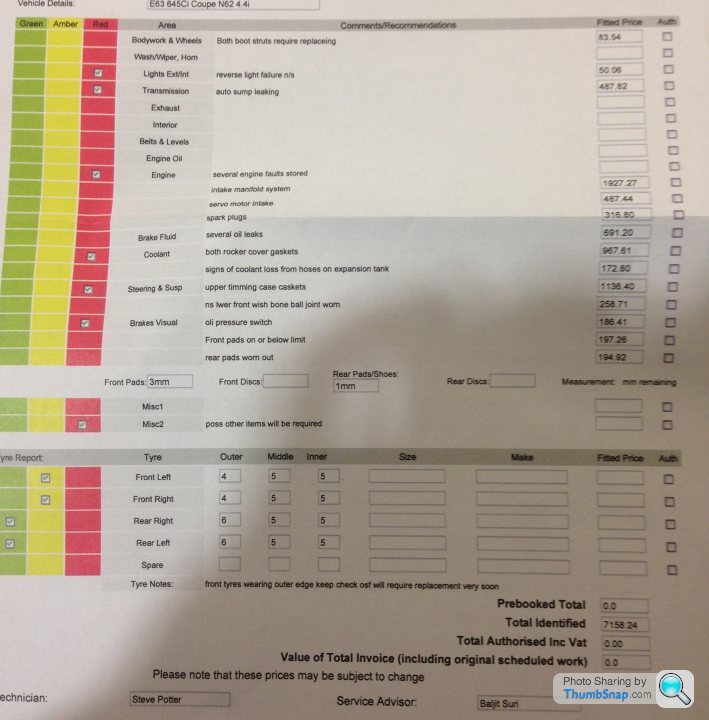
That's a very impressive list, Speedster! I just had a look on BMW's site out of idle curiosity, the cars qualify for "value servicing", and for mine an oil service came back as £222, rising to £568 for the microfilters, air filter and plugs as well. Where are you getting a full service for £250, philmots? That's very cheap even for an indy, when you have £88 of plugs, £40 of microfilter and (I think?) eight litres of oil just in materials cost.
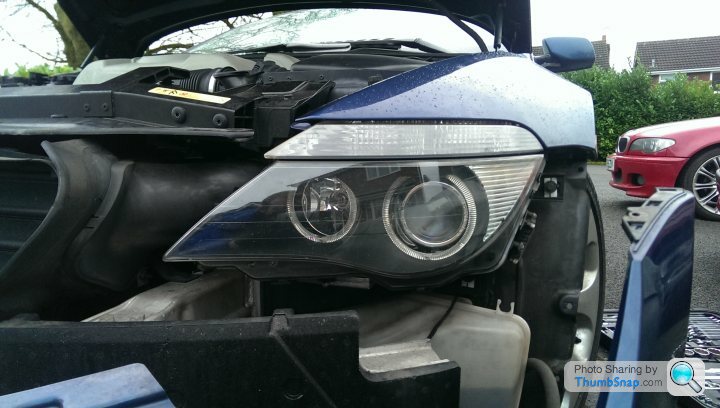
lHeadlamp condensation seems to be quite a common sight on E63s, and mine was suffering particularly badly. In fact, the xenon and parking light (angel eyes) on the passenger side failed in quick succession just a couple of days after I'd bought the car, which didn't impress me in the slightest. Not having the time to engage in the process of getting the lamps off the car, I tried replacing the dipped beam (a D2S bulb) to see if I could at least have proper lighting while I waited to sort the problem entirely.
The manual tells you to go to BMW Service to get the xenons changed, which they justify by saying they shouldn't really ever fail. In fact, the process is quite simple:

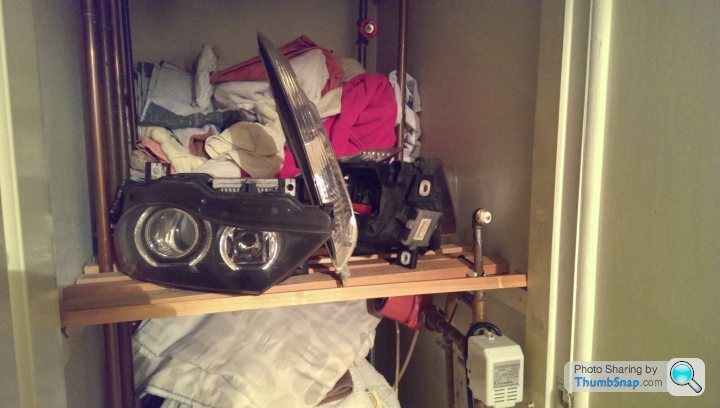
I shan't bore you with the details of removing the bumper and the lamps, not when all I did was follow the rather excellent DIY posted here. Note that these photos are after demisting, which I did by getting all the bulbs out, clearing out the ventilation tubes (which be honest were quite clear anyway), and applying a hairdrier for a while. I then left them to dry out thoroughly..
I was very popular, as you can imagine. I took a rather optimistic approach to diagnosing the problem, first taking all the "cheap" hardware from the working side and transplanting it into the dead lamp - the bulb, locking ring and igniter. Unsurprisingly, this still didn't work, leaving only one piece - the ballast unit, a silver case screwed to the bottom of the lamp. Off it came, and open it was prised, to find this:
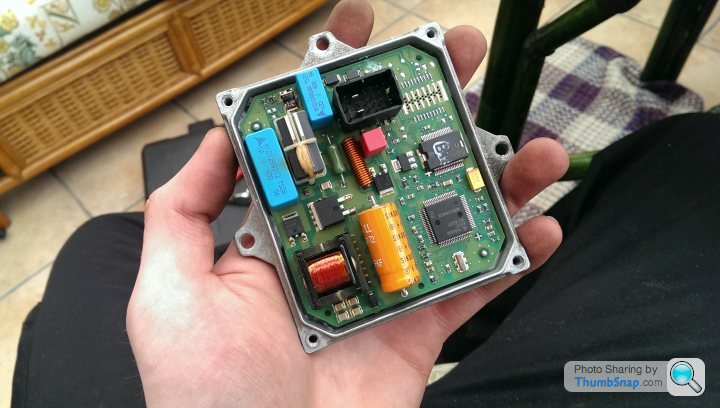
Hmm. Several obvious problems there. One would presume water damage. Sure enough, the lamp worked perfectly with all its old hardware and the ballast unit from the working side. Naturally, the only component to have failed would be the one that costs around £100 even on eBay. Anyone got a spare?!
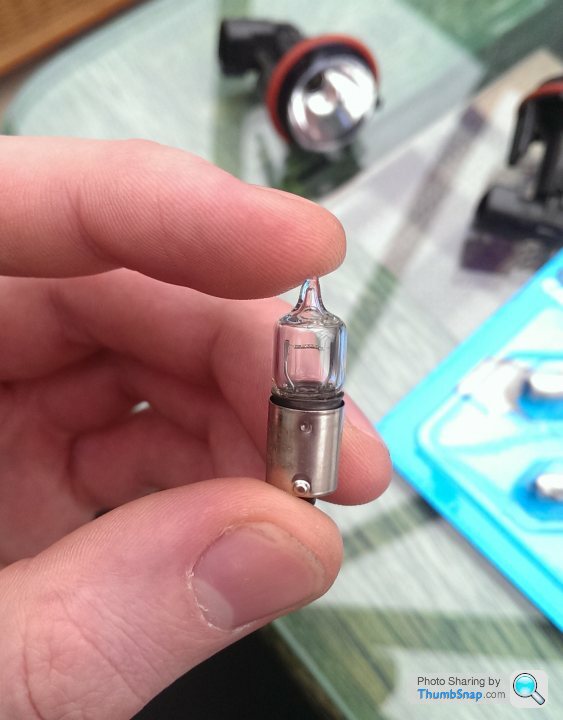
Not neglecting the parking light, which I found had shattered entirely and is really quite hard to source an exact replacement for. It looks like this, and is 10W which seems vanishingly rare in such a small bulb. BMW will only sell it to you with the holder as well, for about £25, which I politely declined.
During all this buggering around with the lamps, though, I did notice that the parking lights were quite yellow and didn't match the colour of the xenon dipped beams at all. On most cars this doesn't matter because the xenon drowns out the light from the smaller bulb, but with two separate rings, you can still see the inner one quite clearly when the dipped beam is on. Using the awkwardness of an OEM replacement as an excuse, I plumped for these LEDs designed to match the xenons. I'm very much anti-LED in almost all aftermarket applications, but these I hoped would be alright because you can't see the bulb at all, they simply feed light to the angel eye rings. Sure enough, they look rather good and like they should have been OEM. I'll try and get a photo when the light's right. I'm pleased, at £14 for the pair.
The driver's side is an utter, utter b d to fit, by the way, and this is from someone who spent three years working for Halfords and was able to achieve every single "Do Not Attempt" bulb fit in their system.. best done off the car, that one!
The manual tells you to go to BMW Service to get the xenons changed, which they justify by saying they shouldn't really ever fail. In fact, the process is quite simple:
- Turn the wheels full lock towards the side you're changing
- In the wheelarch liner, there is an access panel. There are two screws which it seems can be either 8mm or 10mm, undo these.
- Reaching through the hole, you'll find another cover on the back of the lamp, which clips at the top. Unless your name's Sam, in which case there won't be a cover there and the reason for your condensation problem will become quite obvious. £12 from the dealer, if you find your previous owner has eaten yours too.
- Now you're looking at the igniter, a black and red block on the back of the bulb holder. Turn it about 45° counter-clockwise, it disengages and can be wriggled free. The wiring harness detaches itself.
- The bulb holder is unusual, and is removed by rotating the outer black ring counter-clockwise by a similar amount. Don't try and turn the bulb or the plastic around it, won't work and you might upset your adaptive motors.
- Be careful removing the ring, as the bulb will sit loose and could drop out. Once it's off, remove the bulb, noting that the shaft under the glass goes at the bottom. The ring is helpfully marked TOP in the appropriate place.
- Refitting is the reverse of removal, with extra care once your new bulb is sitting in place without the ring to hold it yet! Make sure all four pegs of the igniter engage properly before trying to turn it, if it feels like there's resistance, pull it away and try again. Don't attempt to refit the wiring harness until the igniter is in place - there's a tab to stop it.
- Enjoy renewed illumination. Unless your name's Sam, in which case the lamp still won't work. Balls.
I shan't bore you with the details of removing the bumper and the lamps, not when all I did was follow the rather excellent DIY posted here. Note that these photos are after demisting, which I did by getting all the bulbs out, clearing out the ventilation tubes (which be honest were quite clear anyway), and applying a hairdrier for a while. I then left them to dry out thoroughly..
I was very popular, as you can imagine. I took a rather optimistic approach to diagnosing the problem, first taking all the "cheap" hardware from the working side and transplanting it into the dead lamp - the bulb, locking ring and igniter. Unsurprisingly, this still didn't work, leaving only one piece - the ballast unit, a silver case screwed to the bottom of the lamp. Off it came, and open it was prised, to find this:
Hmm. Several obvious problems there. One would presume water damage. Sure enough, the lamp worked perfectly with all its old hardware and the ballast unit from the working side. Naturally, the only component to have failed would be the one that costs around £100 even on eBay. Anyone got a spare?!
Not neglecting the parking light, which I found had shattered entirely and is really quite hard to source an exact replacement for. It looks like this, and is 10W which seems vanishingly rare in such a small bulb. BMW will only sell it to you with the holder as well, for about £25, which I politely declined.
During all this buggering around with the lamps, though, I did notice that the parking lights were quite yellow and didn't match the colour of the xenon dipped beams at all. On most cars this doesn't matter because the xenon drowns out the light from the smaller bulb, but with two separate rings, you can still see the inner one quite clearly when the dipped beam is on. Using the awkwardness of an OEM replacement as an excuse, I plumped for these LEDs designed to match the xenons. I'm very much anti-LED in almost all aftermarket applications, but these I hoped would be alright because you can't see the bulb at all, they simply feed light to the angel eye rings. Sure enough, they look rather good and like they should have been OEM. I'll try and get a photo when the light's right. I'm pleased, at £14 for the pair.
The driver's side is an utter, utter b
d to fit, by the way, and this is from someone who spent three years working for Halfords and was able to achieve every single "Do Not Attempt" bulb fit in their system.. best done off the car, that one!There is indeed, you can access it through the wheelarch. When you have the cover off the back of the dipped beam housing, there's a little lever outboard of the igniter block. For driving on the left, the left-hand headlamp's lever should be all the way down, and the right-hand headlamp's lever all the way up. Reverse this for driving on the right. I'll see if I can get a photo when I have the lamps off again to change the ballast.
I can't confirm, but I think it's only UK-spec cars that have this function, as we're in the unique position of being surrounded by countries who drive on the other side of the road!
I can't confirm, but I think it's only UK-spec cars that have this function, as we're in the unique position of being surrounded by countries who drive on the other side of the road!

Thank you!
McSam said:
I'll see if I can get a photo when I have the lamps off again to change the ballast.
Please don't go out of your way on my account, though it may add to an already interesting and useful thread. That it can be done seems fitting given the Grand Tourer nature of the car.a 645 was my first V8 too - a stunning motor and a proper "big" car. Was much more fun on (wide) country roads than I ever expected it to be. I'll definitely have another.
Mine had also been smoked in, fortunately the Dakota leather is very hard wearing and doesn't really absorb the smell. Liberal use of odour eating stuff every other day and driving with the windows down cleared it in a fortnight.
Mine had also been smoked in, fortunately the Dakota leather is very hard wearing and doesn't really absorb the smell. Liberal use of odour eating stuff every other day and driving with the windows down cleared it in a fortnight.
carinaman said:
Please don't go out of your way on my account, though it may add to an already interesting and useful thread. That it can be done seems fitting given the Grand Tourer nature of the car.
No worries, it wouldn't be any trouble and I'm happy to anyway. One problem I found when looking at these cars is that general info can be quite hard to find compared to most, and also that DIYs are relatively uncommon. I suppose the rarity and the original price point of the cars both contribute to that - but I decided I should explain things as fully as I can in this thread, in the hope that it could make a handy reference. That includes using my car to answer any queries anyone has about the type - though I can't promise that what mine does is necessarily correct jayemm89 - wholeheartedly agree
 and my leather is improving a little after two coats of Gliptone.
PugwasHDJ80 said:
How much space is ther in the second row of seats?
Could you fit an adult in?
You can fit two normalish (up to 6') adults in but the rear seats can be uncomfy for longer journeys because they are quite upright. Short journeys to the pub are okay, plus how often do you need to carry adults?Could you fit an adult in?
This thread is making my miss my 645ci. I bought it a year and a half ago for less than £10k when it was on only 15k miles. Unfortunately buying a house and a much longer commute meant it had to go. Mine had the active steering which was total crap and I'd advise anyone to avoid. It lacked all feel and did spoil the car to a degree but I'd never admit that when I owned it.
McSam said:
I just had a look on BMW's site out of idle curiosity, the cars qualify for "value servicing", and for mine an oil service came back as £222, rising to £568 for the microfilters, air filter and plugs as well. Where are you getting a full service for £250, philmots? That's very cheap even for an indy, when you have £88 of plugs, £40 of microfilter and (I think?) eight litres of oil just in materials cost.
It's bizarre, I was made aware of it from the E61 bearding thread months back, I've just done it again.. £232 for oil and filter, air filter, micro filters and spark plugs!The offers still stands now, one of the guys had it done IIRC. I really want to get mine done but it's not due while October so seems a waste to get it done now, specially as I'm selling March/April 2017.. I'd rather sell it Having had a recent major service.
Gassing Station | Readers' Cars | Top of Page | What's New | My Stuff