Lotus Elise 111R
Discussion


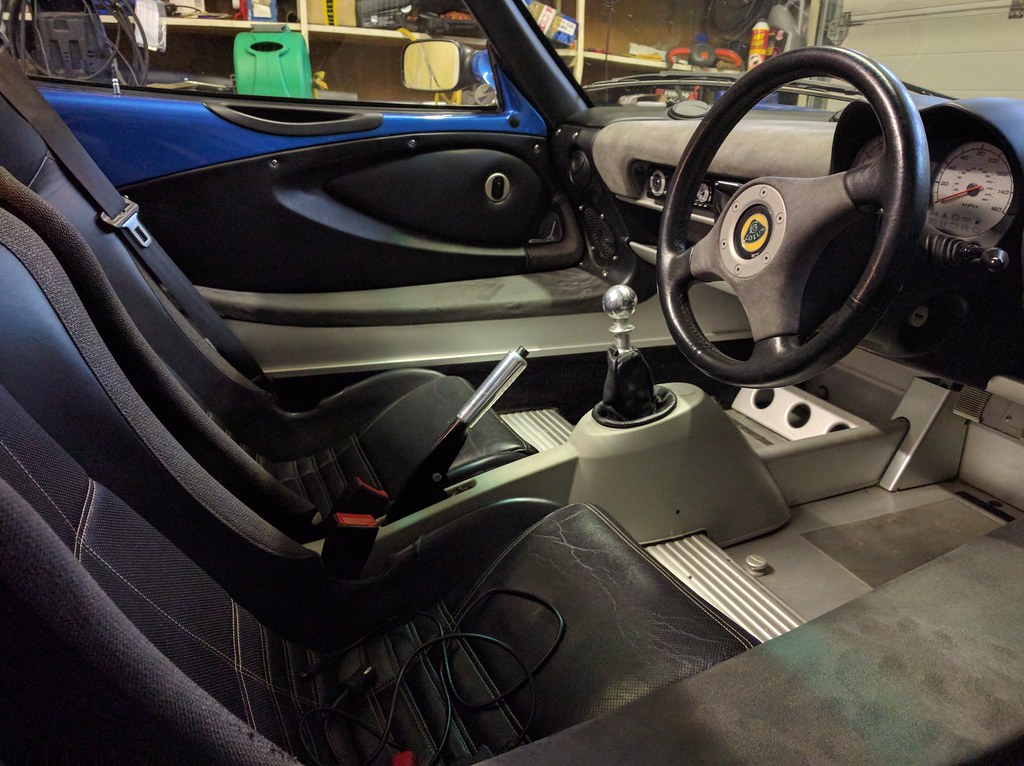
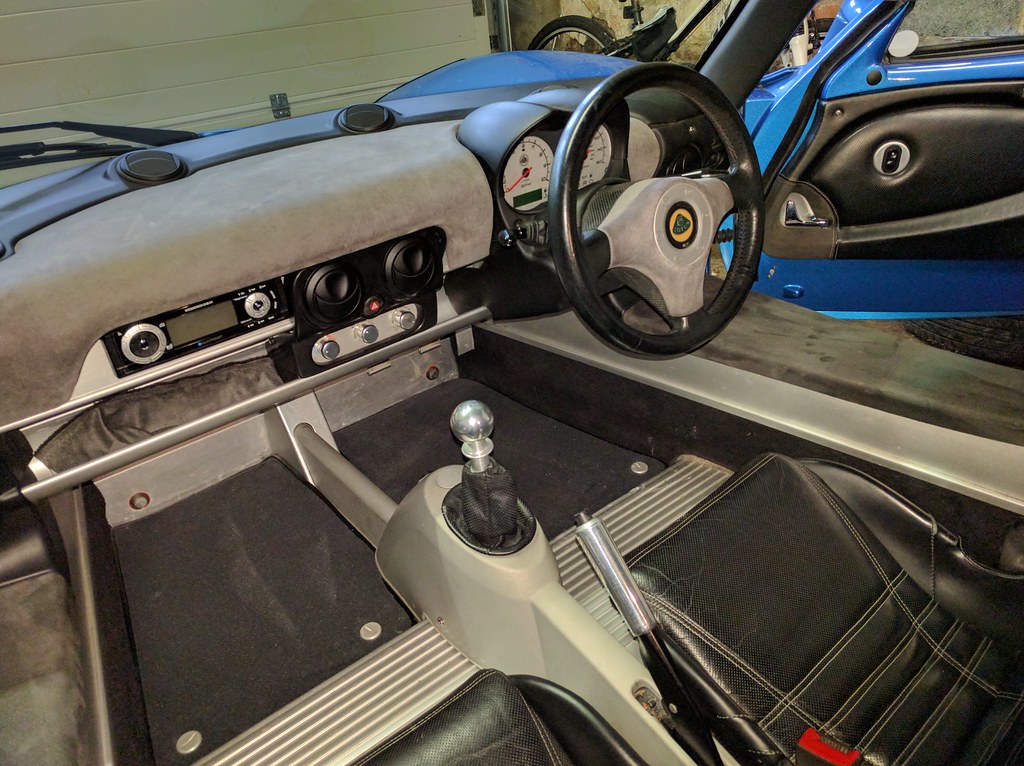
I made a couple of improvements to the interior over the last week or so.
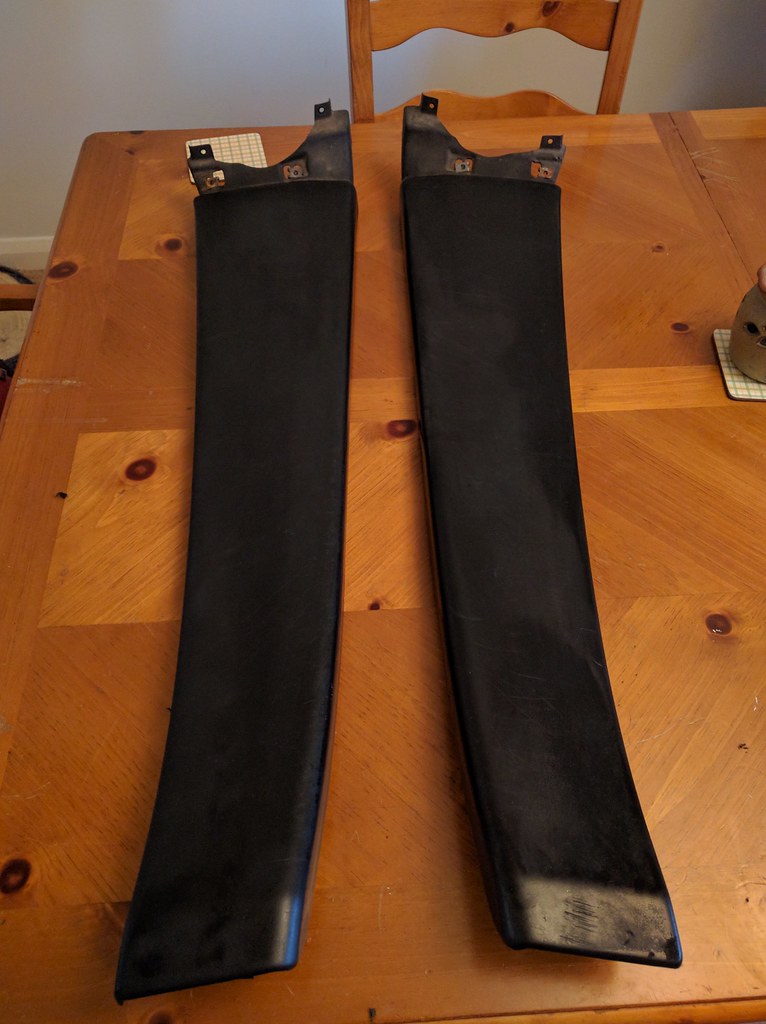
First up the sill guard things, they looked pretty tatty in their bare plastic from 10 years of shoes and bums scuffing over them.
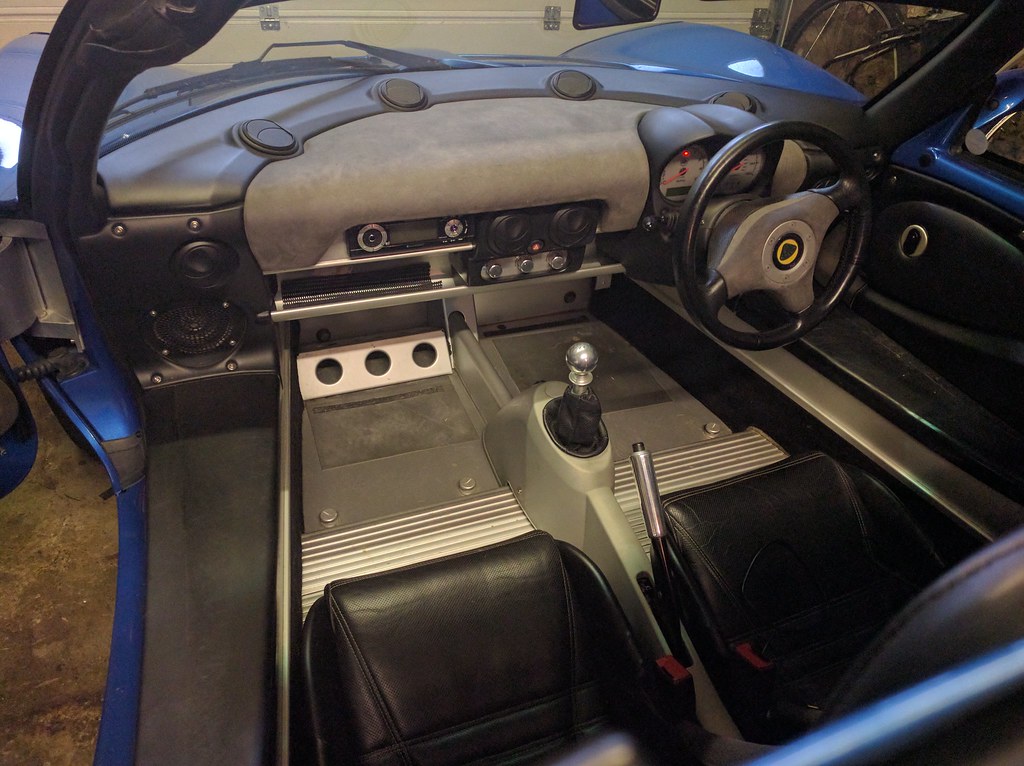
I'd considered painting them, and also a black 3M wrap but a recommendation came up from a Lotus forum for some cheap faux suede stuff on eBay. It's listed cheap enough that I can re-do this about 12 times for about £20 so I got some ordered, and set to work.
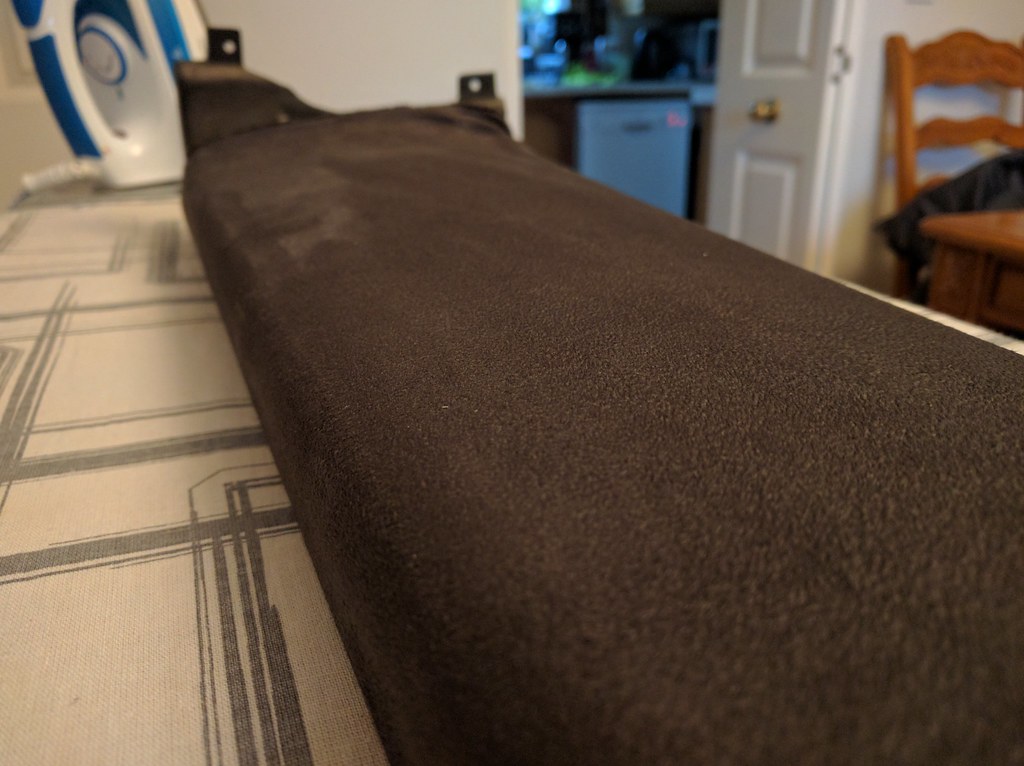
Colour isn't a million miles away from the dash top either, so that was a bit of a result.
I then picked up some new mats, as the old ones were very tatty. Finishes it nicely!
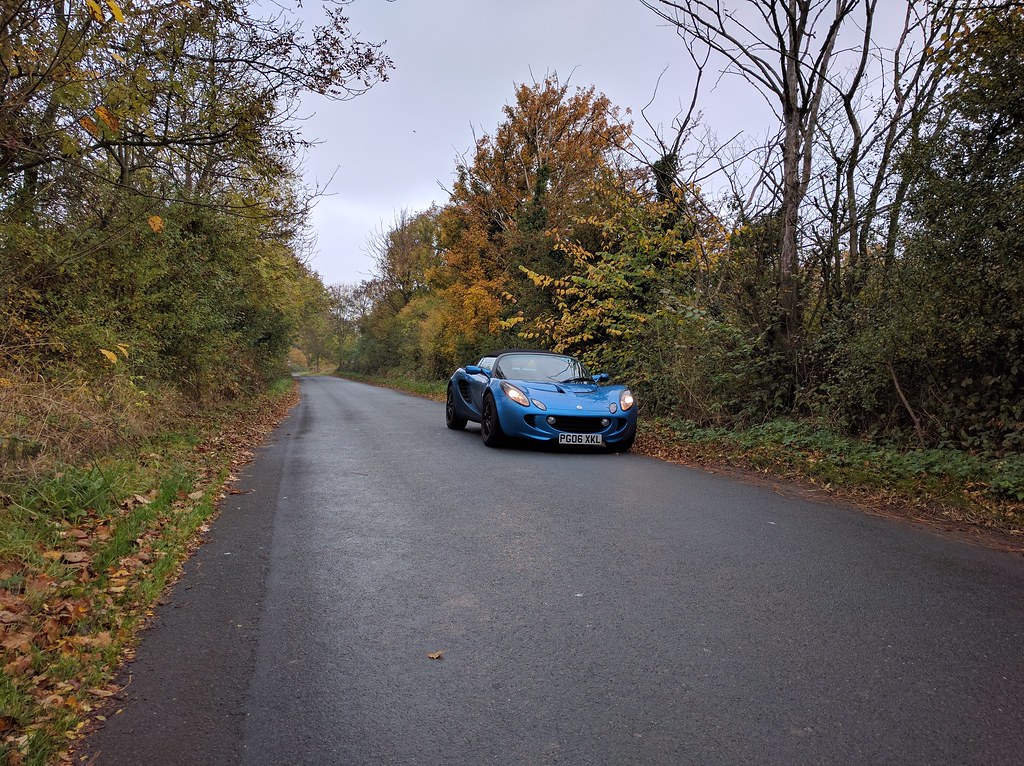
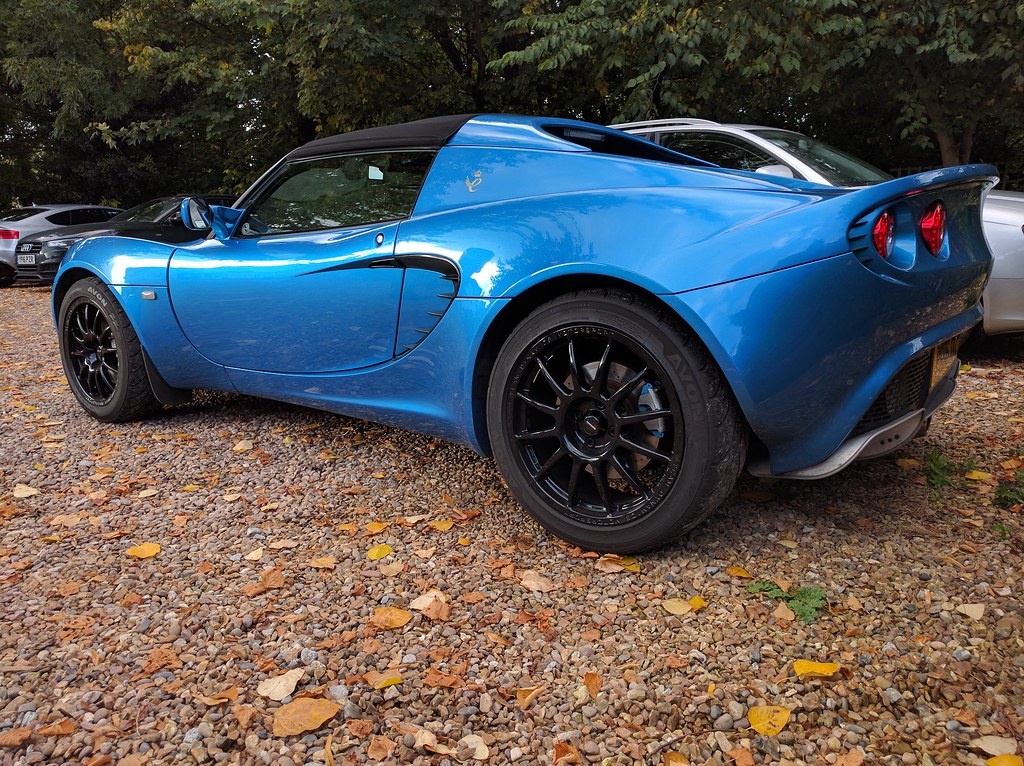
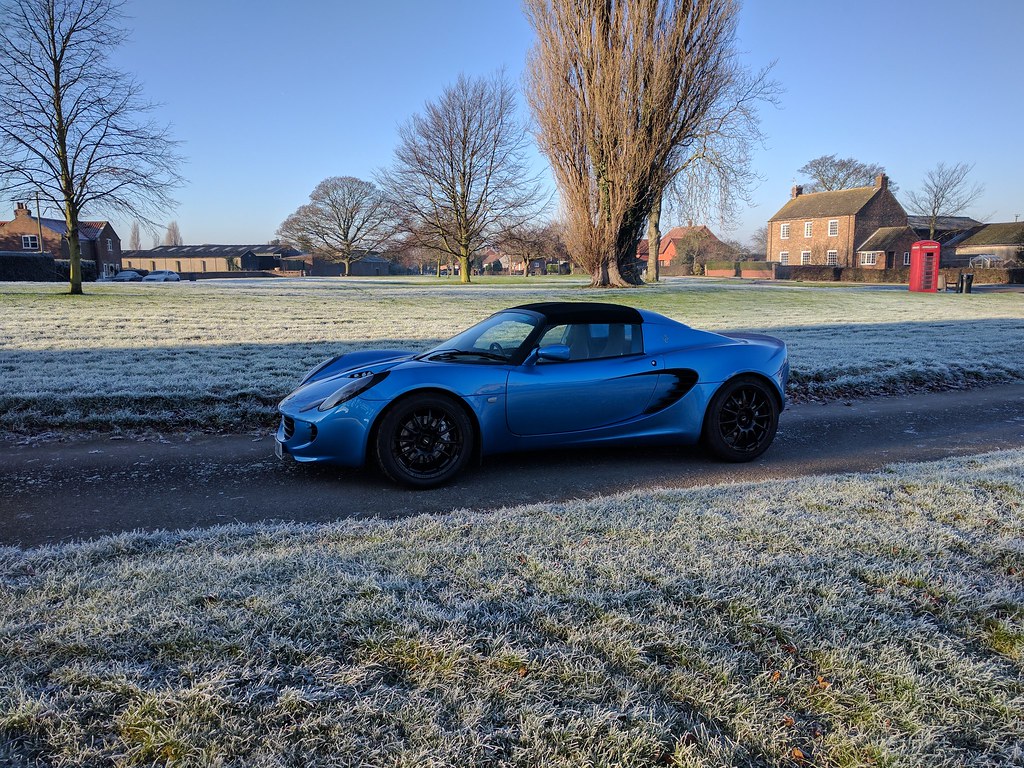
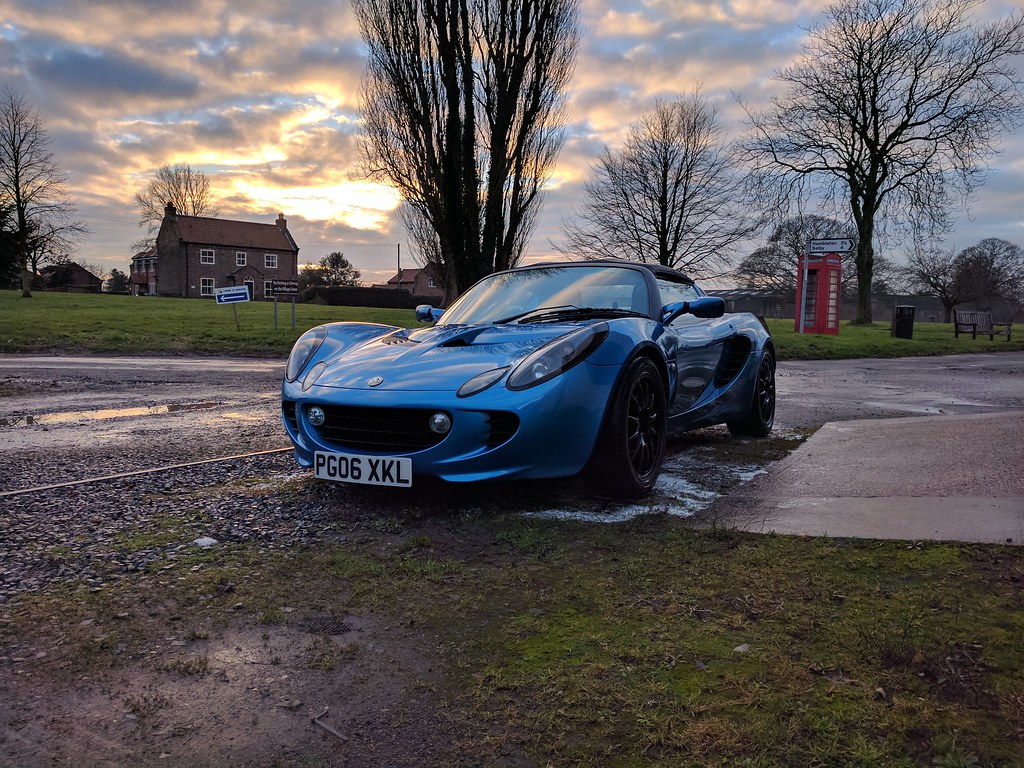
Starting to make the most of trips out now, weather is coming in and I'm still working away during the weeks - so went to pick up some coffee this morning via the scenic route
First up the sill guard things, they looked pretty tatty in their bare plastic from 10 years of shoes and bums scuffing over them.
I'd considered painting them, and also a black 3M wrap but a recommendation came up from a Lotus forum for some cheap faux suede stuff on eBay. It's listed cheap enough that I can re-do this about 12 times for about £20 so I got some ordered, and set to work.
Colour isn't a million miles away from the dash top either, so that was a bit of a result.
I then picked up some new mats, as the old ones were very tatty. Finishes it nicely!
Starting to make the most of trips out now, weather is coming in and I'm still working away during the weeks - so went to pick up some coffee this morning via the scenic route
I've been planning the winter tinkering on this car pretty much since I bought it, and made a start this week!
The plan is to refurb pretty much every suspension component on the car. The rear toe-links were done mid-year so they're ticked off, but the wishbones, balljoints and trackrod ends could all use some refreshment. In addition I'm going to respray my rear diffuser black, and generally just replace a load of minging fixtures. The front end of the car is pretty fresh now thanks to that b d bunny, so time for the rear to catch up.
I'd told myself I would get a few trackdays under my belt before uprating any parts, and I've done that this year. Although the car has still got loads more potential with a better driver, I do feel like stepping up to the sticky tyres has exposed a weakness with the spring rates and damping of the standard bilsteins. During the higher speed stuff on track, the car is rolling a fair bit as weight transfers which unsettles me a bit.
For cataloguing purposes, here are some pictures of the starting off point for this project:
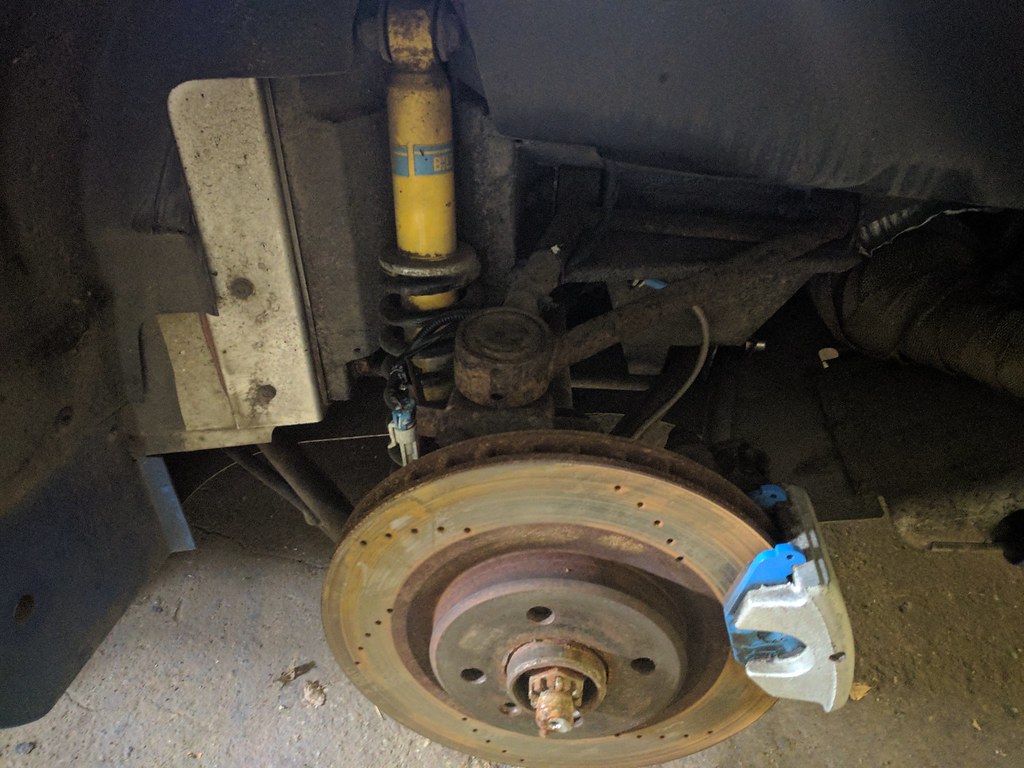
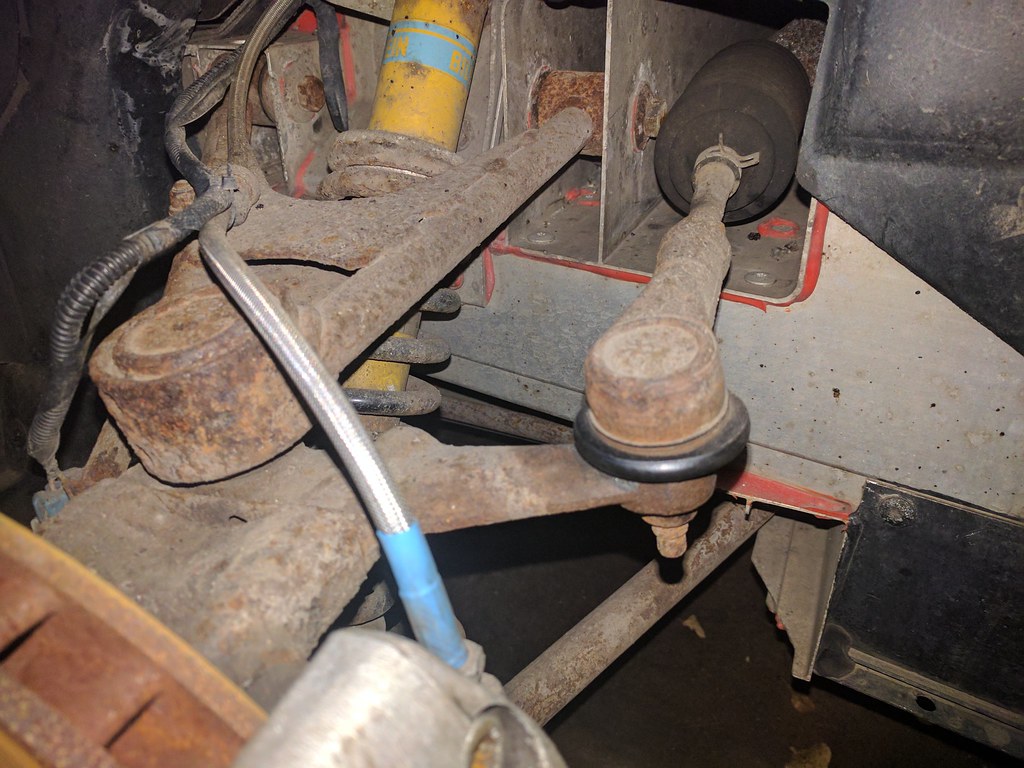
Pretty damn minging, but unfortunately is a standard affair for these cars
...and an external shot for reference ride height:
The plan is as follows:
Remove all wishbones, send off to be cleaned up and powdercoated, then refitted with OEM grade bushes and new balljoints/TREs.
Clean everything else, paint up the uprights, calipers, etc.
Replace standard shock/springs with some aftermarket coilovers.
On the coilover front, I'd been offered some Gaz shocks earlier in the year by the chap who helped me with my geo setup. I turned these down at the time partly because I'd not tracked the car yet, but mainly - I'll be honest, due to brand snobbery.
I associated Gaz suspension with cheap 90's hatchback setups but as I went into winter, I started doing some research. The Gaz Monotube coilovers specifically had some really good write-ups for the Elise, with a fair few racers using them and plenty of positive reviews from road users too. My shortlist was down to the Nitron NTR40s, Quantums and the Gaz Monotubes.
This week a set of Gaz monotubes came up on eBay, they've been refurbed and not used since the refurb - and came up at 1/3rd the cost I would potentially be spending on new Nitrons or Quantums. I took a punt, and from what I've seen so far - happy days!
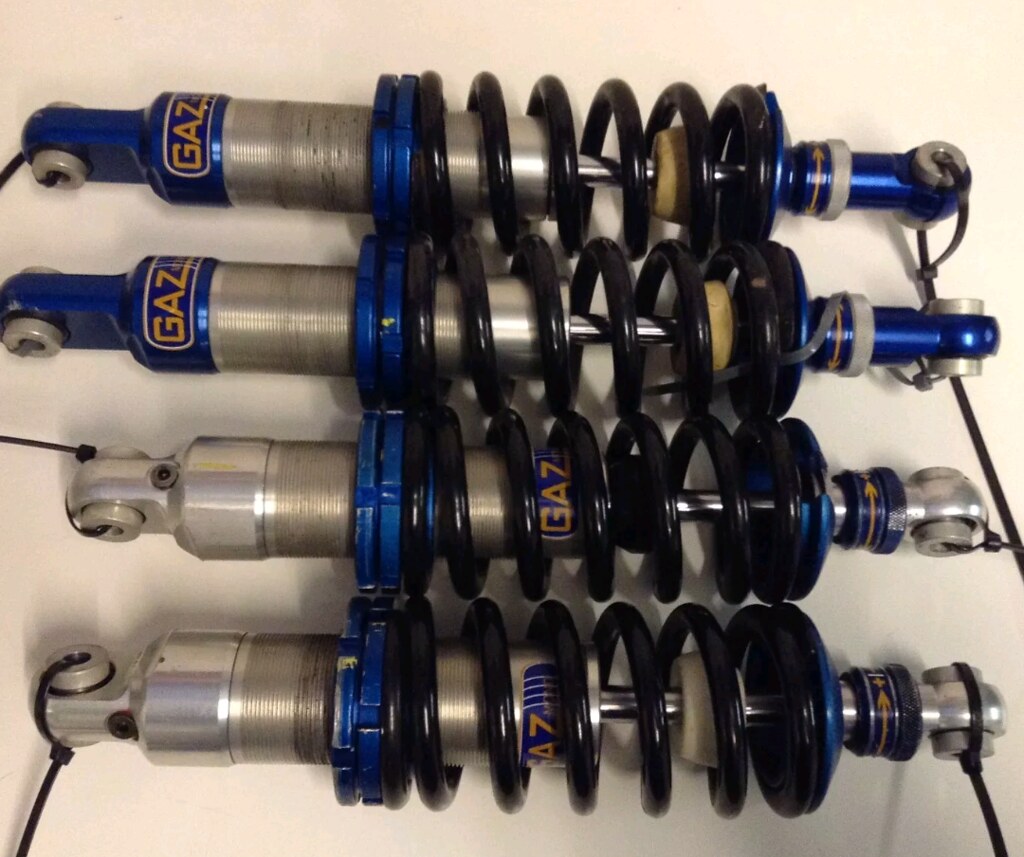
Adjusters are all nice and free, with a good tactile 'click' on each setting, locking rings are a bit scratched up but no seizing and the threaded body is fine on all units. Even the stickers have been replaced and look brand new!
Today I wanted to have a look at fitting them, just to make sure there were no issues with them rather than leave them in a box for a few weeks/months whilst everything else gets done and THEN find one of them leaks or whatever!
The rears went on pretty damn quickly, already started building up a list of all the crusty fixings I want to replace but the two bolts at each side needed to remove the coilovers came off without drama.
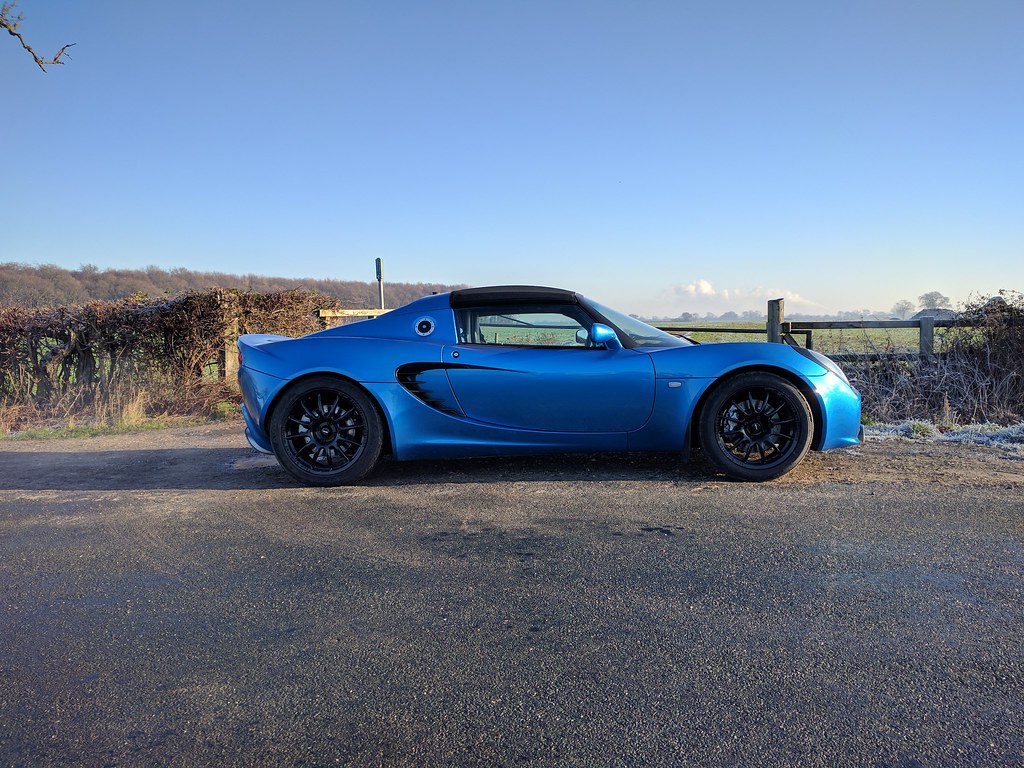
I measured ride height before I started, and it was approx 150mm from the ground both front and back (measured from the jacking points to the floor). I'm aiming for approx 120mm at the front and 130mm at the back, but of course will have it properly corner weighted once everything is done.
For my first attempt, I simply wound up the coilover collars until there was no slack in the unloaded spring, which should be the lowest I can go without helper springs - and that put me at the following rideheight:
That's approximately 125mm from the floor unloaded, and the car is very marginal on not getting beached when leaving the garage :lol: I'll wind them up a bit further next time the car is jacked up and will take it from there.
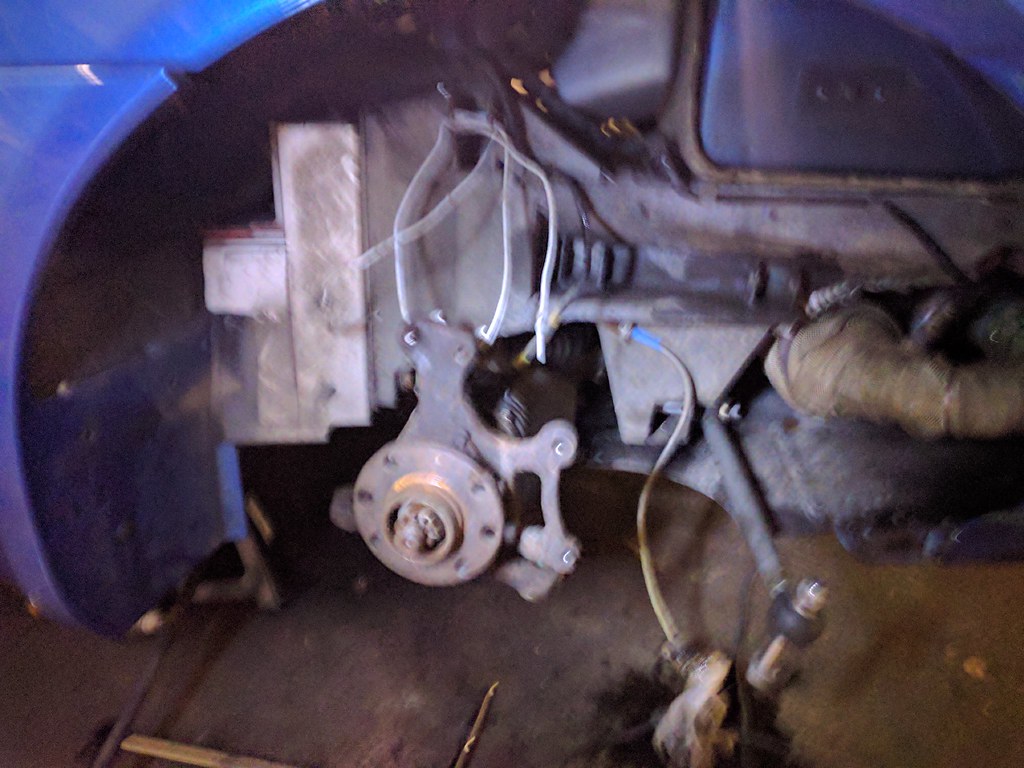
As for the fronts, they wouldn't go on - as the OEM Lotus brackets are too narrow for the Gaz coilovers. I was half-expecting this as the units from new do ship with new brackets, but apparently some cars are fine and others are not - due to the parts-bin nature of the Lotus production line I suppose. I'll get in touch with Gaz on monday and see if I can get some sourced
I'll be sending my wishbones and bits off to Chris/Jon @ Jon Seal Sports Cars after Christmas to get them all tidied up. I'll need to move the car around a bit over Christmas so probably not clever to completely dismantle it beforehand!
The plan is to refurb pretty much every suspension component on the car. The rear toe-links were done mid-year so they're ticked off, but the wishbones, balljoints and trackrod ends could all use some refreshment. In addition I'm going to respray my rear diffuser black, and generally just replace a load of minging fixtures. The front end of the car is pretty fresh now thanks to that b
d bunny, so time for the rear to catch up.I'd told myself I would get a few trackdays under my belt before uprating any parts, and I've done that this year. Although the car has still got loads more potential with a better driver, I do feel like stepping up to the sticky tyres has exposed a weakness with the spring rates and damping of the standard bilsteins. During the higher speed stuff on track, the car is rolling a fair bit as weight transfers which unsettles me a bit.
For cataloguing purposes, here are some pictures of the starting off point for this project:
Pretty damn minging, but unfortunately is a standard affair for these cars
...and an external shot for reference ride height:
The plan is as follows:
Remove all wishbones, send off to be cleaned up and powdercoated, then refitted with OEM grade bushes and new balljoints/TREs.
Clean everything else, paint up the uprights, calipers, etc.
Replace standard shock/springs with some aftermarket coilovers.
On the coilover front, I'd been offered some Gaz shocks earlier in the year by the chap who helped me with my geo setup. I turned these down at the time partly because I'd not tracked the car yet, but mainly - I'll be honest, due to brand snobbery.
I associated Gaz suspension with cheap 90's hatchback setups but as I went into winter, I started doing some research. The Gaz Monotube coilovers specifically had some really good write-ups for the Elise, with a fair few racers using them and plenty of positive reviews from road users too. My shortlist was down to the Nitron NTR40s, Quantums and the Gaz Monotubes.
This week a set of Gaz monotubes came up on eBay, they've been refurbed and not used since the refurb - and came up at 1/3rd the cost I would potentially be spending on new Nitrons or Quantums. I took a punt, and from what I've seen so far - happy days!
Adjusters are all nice and free, with a good tactile 'click' on each setting, locking rings are a bit scratched up but no seizing and the threaded body is fine on all units. Even the stickers have been replaced and look brand new!
Today I wanted to have a look at fitting them, just to make sure there were no issues with them rather than leave them in a box for a few weeks/months whilst everything else gets done and THEN find one of them leaks or whatever!
The rears went on pretty damn quickly, already started building up a list of all the crusty fixings I want to replace but the two bolts at each side needed to remove the coilovers came off without drama.
I measured ride height before I started, and it was approx 150mm from the ground both front and back (measured from the jacking points to the floor). I'm aiming for approx 120mm at the front and 130mm at the back, but of course will have it properly corner weighted once everything is done.
For my first attempt, I simply wound up the coilover collars until there was no slack in the unloaded spring, which should be the lowest I can go without helper springs - and that put me at the following rideheight:
That's approximately 125mm from the floor unloaded, and the car is very marginal on not getting beached when leaving the garage :lol: I'll wind them up a bit further next time the car is jacked up and will take it from there.
As for the fronts, they wouldn't go on - as the OEM Lotus brackets are too narrow for the Gaz coilovers. I was half-expecting this as the units from new do ship with new brackets, but apparently some cars are fine and others are not - due to the parts-bin nature of the Lotus production line I suppose. I'll get in touch with Gaz on monday and see if I can get some sourced
I'll be sending my wishbones and bits off to Chris/Jon @ Jon Seal Sports Cars after Christmas to get them all tidied up. I'll need to move the car around a bit over Christmas so probably not clever to completely dismantle it beforehand!
james_gt3rs said:
It's because it's an S2 ABS for those brackets - the Rover engined cars don't have an ABS thing to mount on top. I had to buy a bracket from Nitron and it cost an absolute fortune!
Thanks James, I've read/heard that a lot but I can't get my head around how/why the ABS bracket is an issue. The ABS bracket is not fouling the shock at all, the bracket is just too narrow for the body of the damper to fit inside of... or is it a case that the non-ABS brackets are wider?If you happened to have any before/after pictures knocking about they would be a great help!
Fonzey said:
Thanks James, I've read/heard that a lot but I can't get my head around how/why the ABS bracket is an issue. The ABS bracket is not fouling the shock at all, the bracket is just too narrow for the body of the damper to fit inside of... or is it a case that the non-ABS brackets are wider?
If you happened to have any before/after pictures knocking about they would be a great help!
Haven't actually seen a non ABS bracket, but yes they are wider. It's only by a few mm though, some people say you can hammer the old bracket to make it wider. Didn't fancy that If you happened to have any before/after pictures knocking about they would be a great help!
Fonzey said:
This week a set of Gaz monotubes came up on eBay, they've been refurbed and not used since the refurb - and came up at 1/3rd the cost I would potentially be spending on new Nitrons or Quantums. I took a punt, and from what I've seen so far - happy days!
Theres a reason for that - They don't have a high life expectancy.Had a set of Gaz golds on my Vx220 which snapped in less than 2500 miles. They were then refurbed under warranty by Gaz and sold instantly, new owner has reported that they have snapped for him as well.
Yes, snapped.. at the rod
Promptly replaced with a set of Nitron NTR40s which although they were over double the price even 2nd hand they have a much higher ride quality on the VX.
However thats the Gaz golds
not heard any horror stories about the monotubes.Car looks awesome regardless, keep it up
Thanks James, Gaz have been in touch and they can sort me out the correct brackets so happy days
"So guys, what do you think of Gaz Monotubes"
... which invariably end up with comments such as:
"They're apparently very good, but they're only marginally cheaper (new) than Nitrons, so just go with the safe option and take the Nitrons!"
Gaz would almost certainly have benefited with a rebrand I think...
We'll see, I'm an honest kind of car modifier though and I'll admit when I've picked the wrong product (unlike most that defend their choices to the death), so I'll come back to this thread if the Gaz' ever give me problems. I've had hands-on experience with BC Racing, KW V3, Bilstein and now Gaz coilovers over the years - and these look/feel as good as the best of those (KW for the record, by a mile). Looking forward to getting them on the car but realistically it'll be March/April before I get a good idea of their ride/handling characteristics!
Samjeev said:
Theres a reason for that - They don't have a high life expectancy.
Had a set of Gaz golds on my Vx220 which snapped in less than 2500 miles. They were then refurbed under warranty by Gaz and sold instantly, new owner has reported that they have snapped for him as well.
Yes, snapped.. at the rod
Promptly replaced with a set of Nitron NTR40s which although they were over double the price even 2nd hand they have a much higher ride quality on the VX.
However thats the Gaz golds not heard any horror stories about the monotubes.
Car looks awesome regardless, keep it up
Yeah the Gaz gold range really hurt Gaz I think, and much of my perception about the brand was made on horror stories like yours. The Monotube build and design is totally different though, and by all accounts rivals the build quality and longevity of the Nitron and Quantum counterparts. The Gaz brand is damaged though, I can't count the number of Lotus forum posts that I've stumbled across which start off like:Had a set of Gaz golds on my Vx220 which snapped in less than 2500 miles. They were then refurbed under warranty by Gaz and sold instantly, new owner has reported that they have snapped for him as well.
Yes, snapped.. at the rod
Promptly replaced with a set of Nitron NTR40s which although they were over double the price even 2nd hand they have a much higher ride quality on the VX.
However thats the Gaz golds
not heard any horror stories about the monotubes.Car looks awesome regardless, keep it up
"So guys, what do you think of Gaz Monotubes"
... which invariably end up with comments such as:
"They're apparently very good, but they're only marginally cheaper (new) than Nitrons, so just go with the safe option and take the Nitrons!"
Gaz would almost certainly have benefited with a rebrand I think...
We'll see, I'm an honest kind of car modifier though and I'll admit when I've picked the wrong product (unlike most that defend their choices to the death), so I'll come back to this thread if the Gaz' ever give me problems. I've had hands-on experience with BC Racing, KW V3, Bilstein and now Gaz coilovers over the years - and these look/feel as good as the best of those (KW for the record, by a mile). Looking forward to getting them on the car but realistically it'll be March/April before I get a good idea of their ride/handling characteristics!
Gaz were able to sort me out some brackets direct, for a nominal fee. (top marks for Gaz)
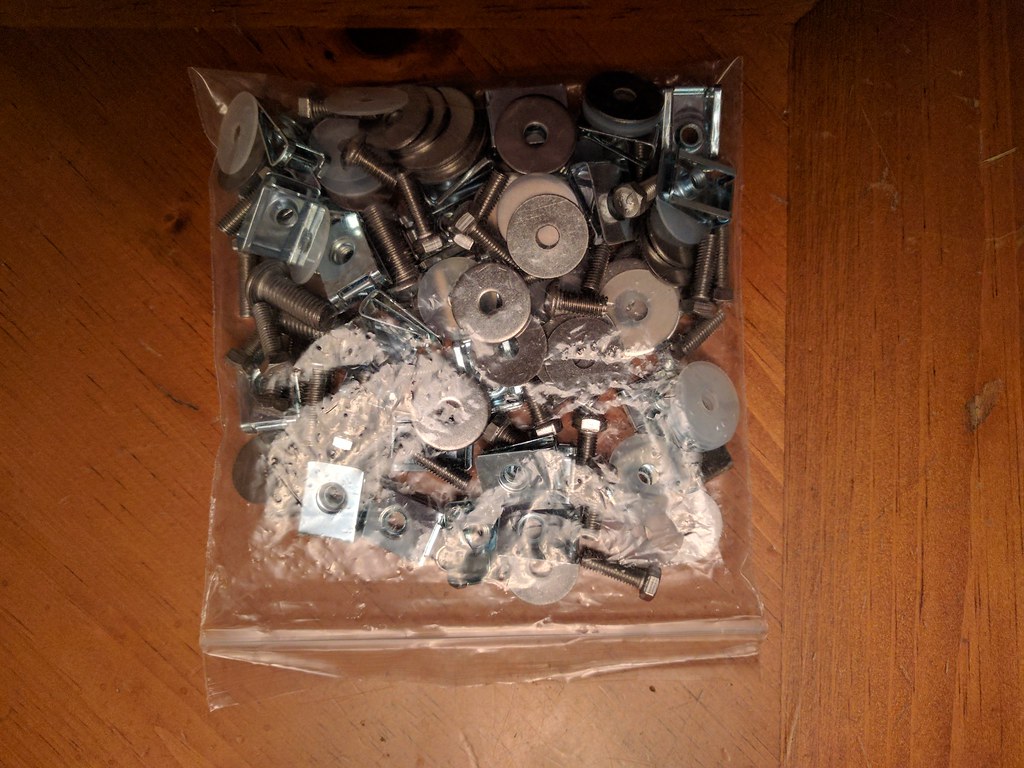
Over the last few days, I also picked up some duralac for my steel-ally meeting points and a new nut and bolt set for the dampers.
Happy days, hopefully get these on over the festive break and then I can get cracking on the proper strip down
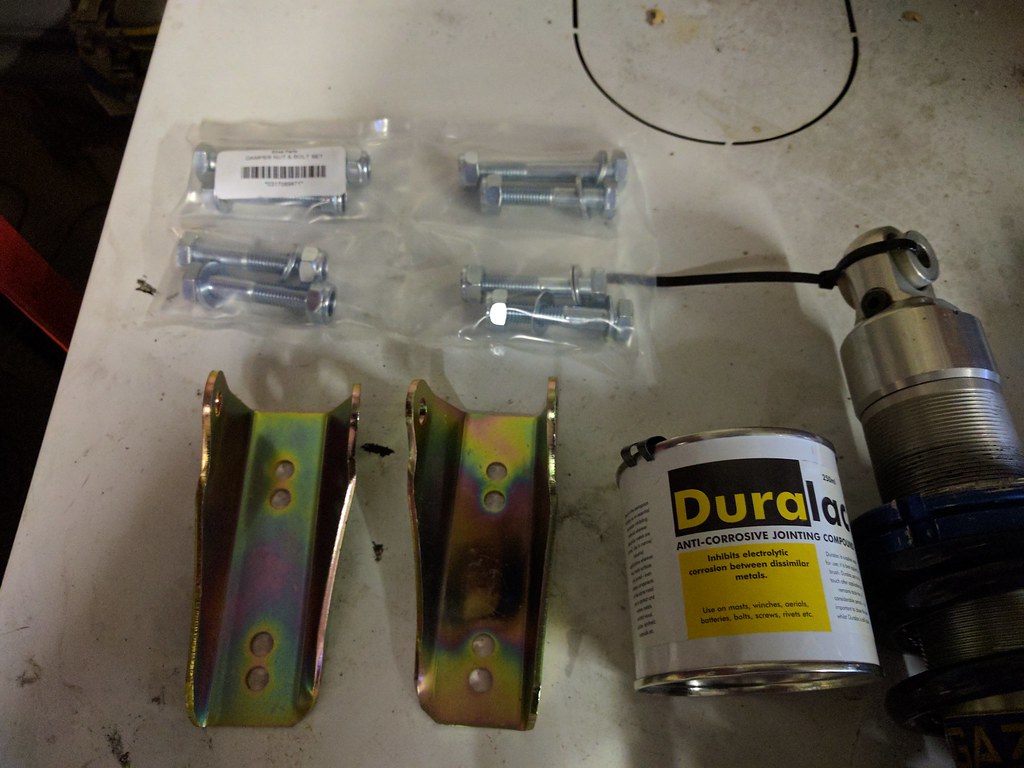
Oh, missus got me this as a birthday present too

Over the last few days, I also picked up some duralac for my steel-ally meeting points and a new nut and bolt set for the dampers.
Happy days, hopefully get these on over the festive break and then I can get cracking on the proper strip down
Oh, missus got me this as a birthday present too
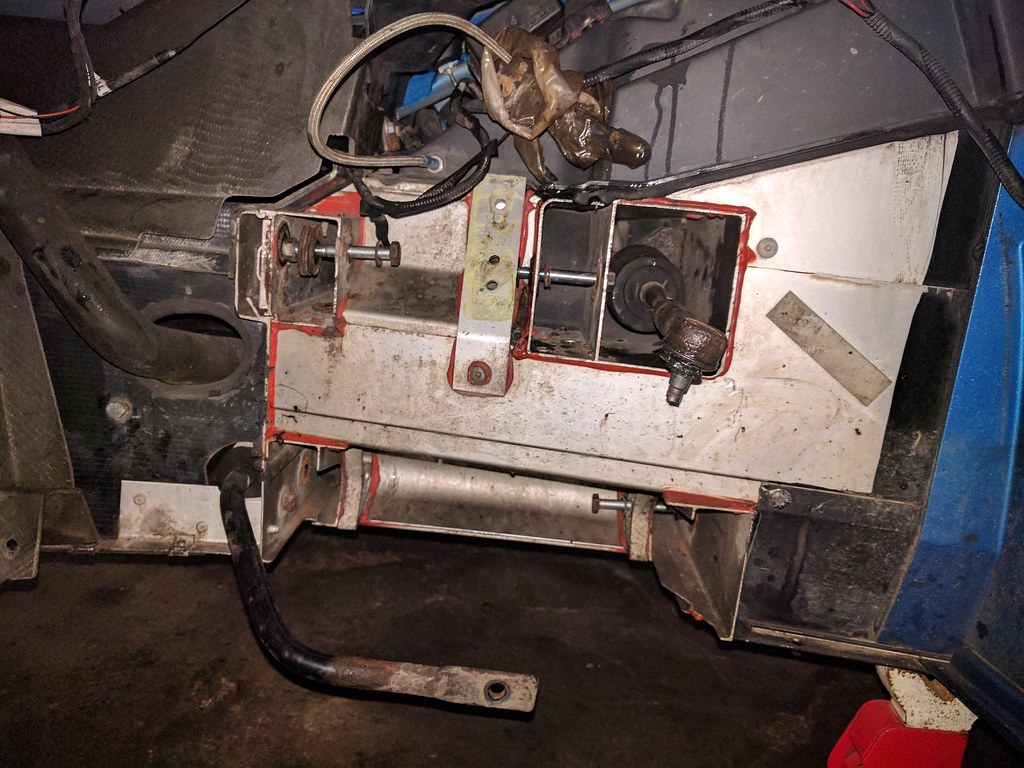
Got some time to myself over the last day or so, so I got my coilovers fitted with the new brackets.
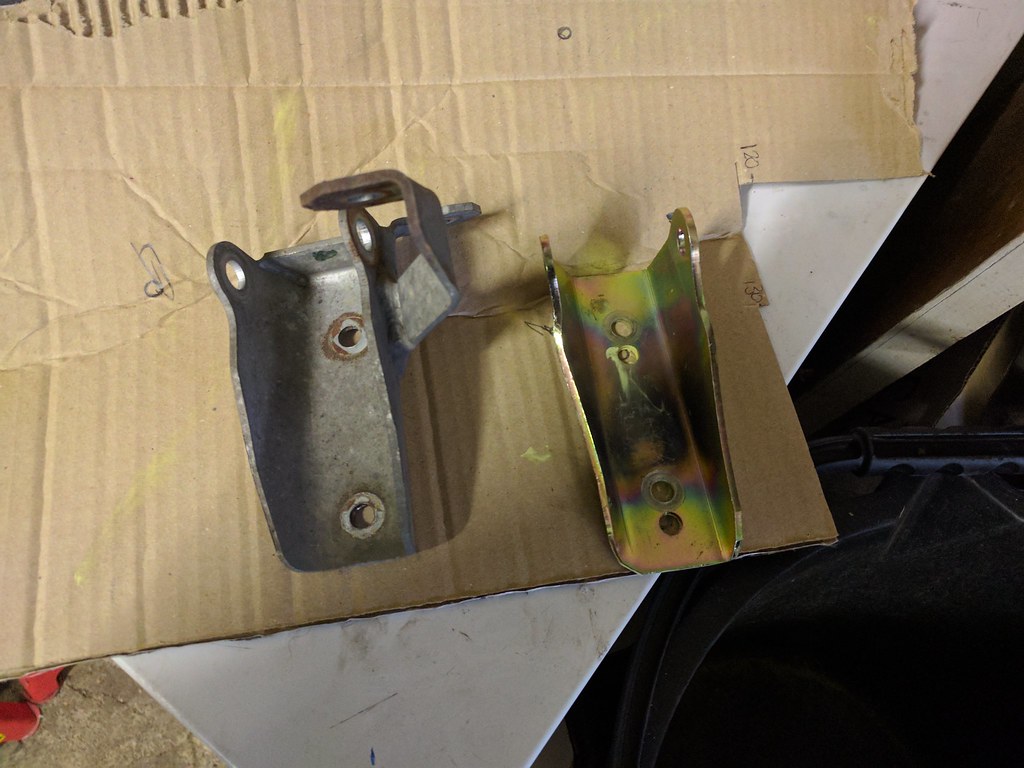
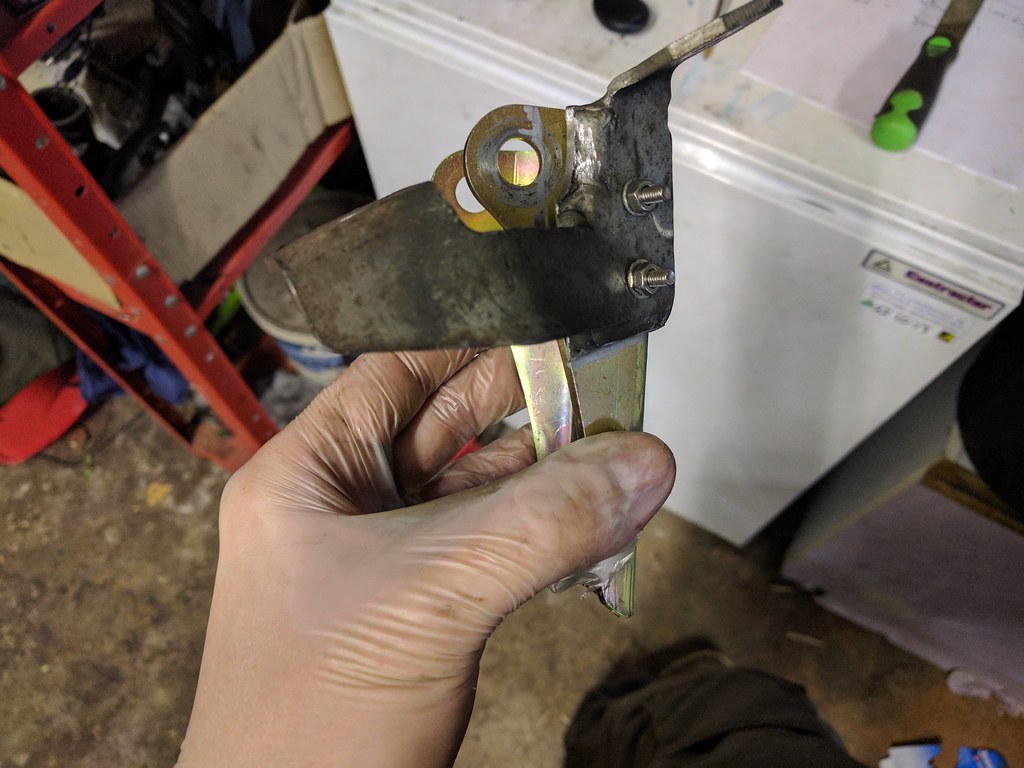
Old vs New bracket:

The additional arms you can see on the original bracket is for mounting the ABS unit on the drivers side. I was aware of this, and my next job will be finding a decent way to re-attach to the new bracket. I could cut, drill and bolt/rivet - but it would probably be tidier to just have somebody weld it.
With a splash of duralac, I refitted the new bracket on the passenger side (no ABS to worry about) and got the coilover on. My god those wishbones look nasty...
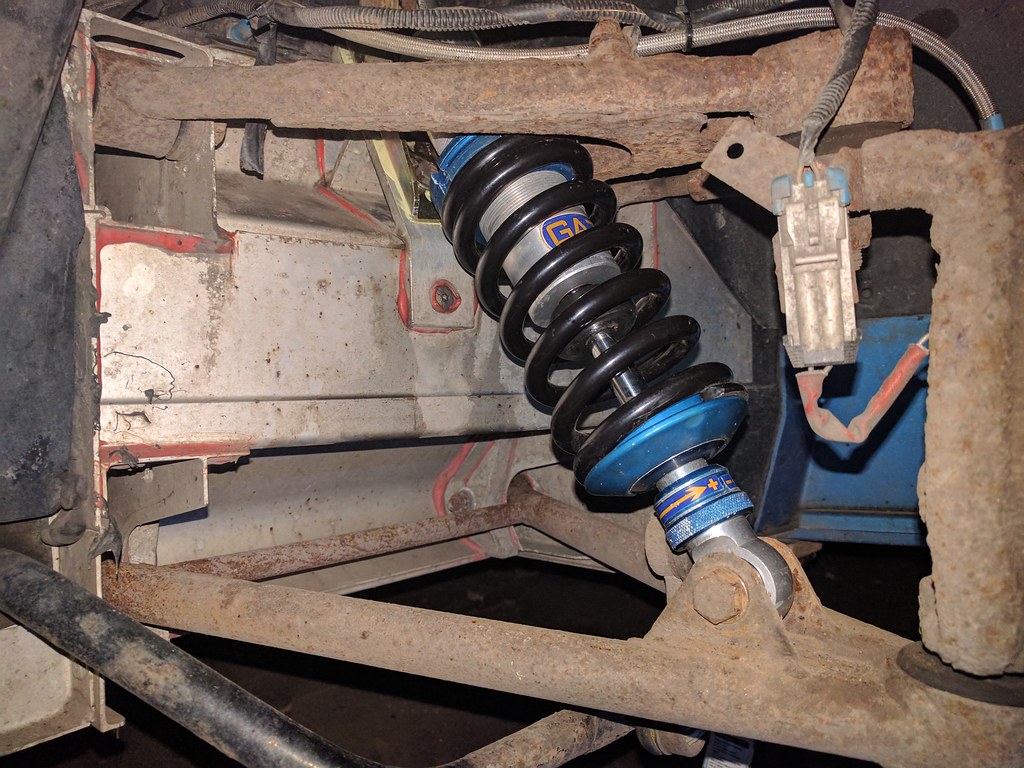
On the drivers side, the ABS unit supports itself (by the pipes etc) but obviously the damper mounting was for additional support. It did mean that I could get the coilovers on and go for a drive, checking for any dodgy noises etc before getting the bracket welded.
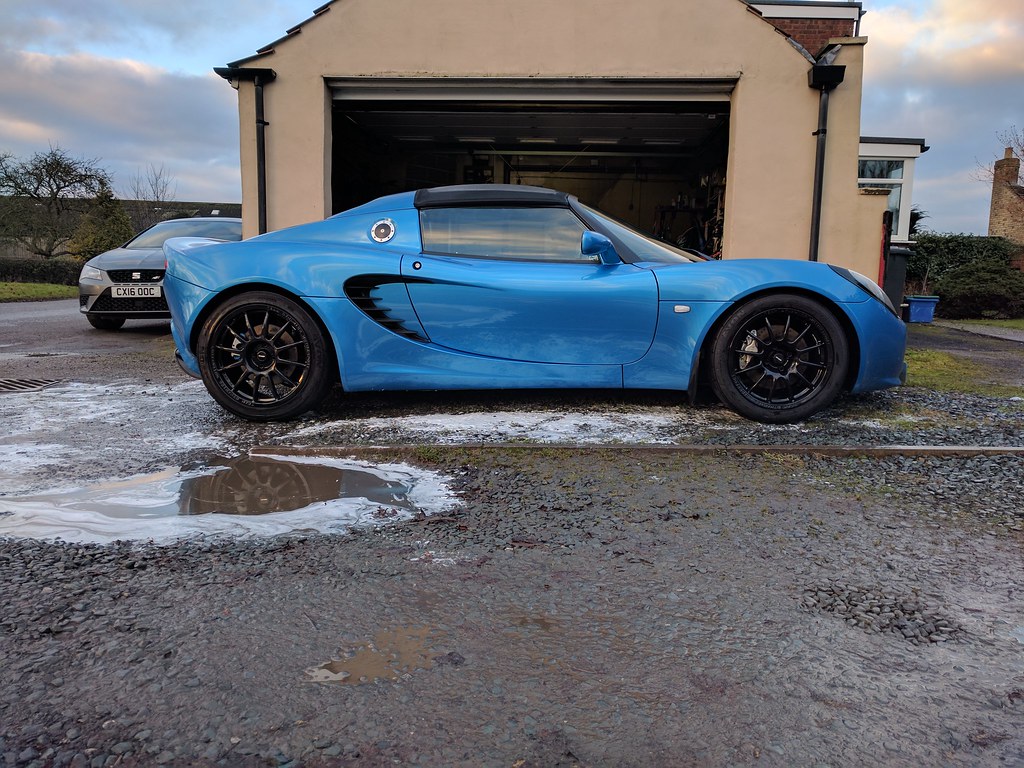
Once on, I torqued up and had a few changes of ride height. It's still not where I need it, but took the car out for a toddle around the village to check for noises etc.
Ideally the rear will come up about 10mm and the front will drop about 10mm. That'll give me a nice bit of rake, without being too low and catching on speedbumps etc. The suspension was nice and quiet, and I tried the damping settings from extreme to extreme and there was a nice noticeable range of adjustment at slow speed. I settled on a reasonable starting point based on other opinions (9 from hard at the front, and 7 from hard at the rear) and the car felt very similar to OEM in terms of ride comfort.
I need to move the car in and out of the garage a couple more times whilst I get some stuff painted, then I'll start the big strip down and get those wishbones off for some desperate treatment.
Old vs New bracket:
The additional arms you can see on the original bracket is for mounting the ABS unit on the drivers side. I was aware of this, and my next job will be finding a decent way to re-attach to the new bracket. I could cut, drill and bolt/rivet - but it would probably be tidier to just have somebody weld it.
With a splash of duralac, I refitted the new bracket on the passenger side (no ABS to worry about) and got the coilover on. My god those wishbones look nasty...
On the drivers side, the ABS unit supports itself (by the pipes etc) but obviously the damper mounting was for additional support. It did mean that I could get the coilovers on and go for a drive, checking for any dodgy noises etc before getting the bracket welded.
Once on, I torqued up and had a few changes of ride height. It's still not where I need it, but took the car out for a toddle around the village to check for noises etc.
Ideally the rear will come up about 10mm and the front will drop about 10mm. That'll give me a nice bit of rake, without being too low and catching on speedbumps etc. The suspension was nice and quiet, and I tried the damping settings from extreme to extreme and there was a nice noticeable range of adjustment at slow speed. I settled on a reasonable starting point based on other opinions (9 from hard at the front, and 7 from hard at the rear) and the car felt very similar to OEM in terms of ride comfort.
I need to move the car in and out of the garage a couple more times whilst I get some stuff painted, then I'll start the big strip down and get those wishbones off for some desperate treatment.
Enjoyed reading all that just now, car looks great!
I've just pulled my clam off today to replace the rad, tow post etc but mine's an a/c car so it's no quite as straightforward... your rad pics helped me see the differences though as I want to ditch the a/c (it's never worked and the a/c literally crumbled in my hands) so thanks for posting the pics.
I wanted to see the state of everything before I started buying replacement bits (in no rush to get it finished) but the list of jobs is getting longer already.. My rad fixings were in a real state so need some stainless replacements. Where did you get them from, if you don't mind? I'd rather buy a set if poss rather than taking them to a bolt supplier to work it all out..
New ride height is looking great on yours too. I've put off different dampers for years (in fact fitted new original Bilsteins when mine leaked). I would like to lose a little of the arch gap though and have the possibility of stiffening it up a little for track use so thinking about alternative dampers again but don't want to sacrifice ride quality on the road. I'd therefore be interested to know you're comments once it's fully set up and you've had chance to get a few more miles on it against the original dampers for comparison.
Thanks Gents.
@Flat6, I rather enjoyed my clam off experience but it did seem that as soon as I removed a part or looked under another, I found stuff that needed to be replaced!
I love Lotus to bits, but some of their choices in materials when building these cars was just shocking. You can excuse them for it with the S1 as it was so competitive price-wise, but the modern Elises' are knocking £50k and they've still got the same plaggy radiators and as far as I'm aware they'll all have rusty wishbones in a year or two! I'm not even convinced that the toe-link issues were authoritatively resolved...
I got my rad fitting kit from Eliseparts, pretty expensive for a bit of anodising and a few bolts but meh - 1000% better than OEM fittings.
My priority when buying dampers is not to compromise road behaviour too much, preferably not at all - and the feedback I'd read regarding Gaz Monos suggested that I should have ample adjust-ability for achieving this.
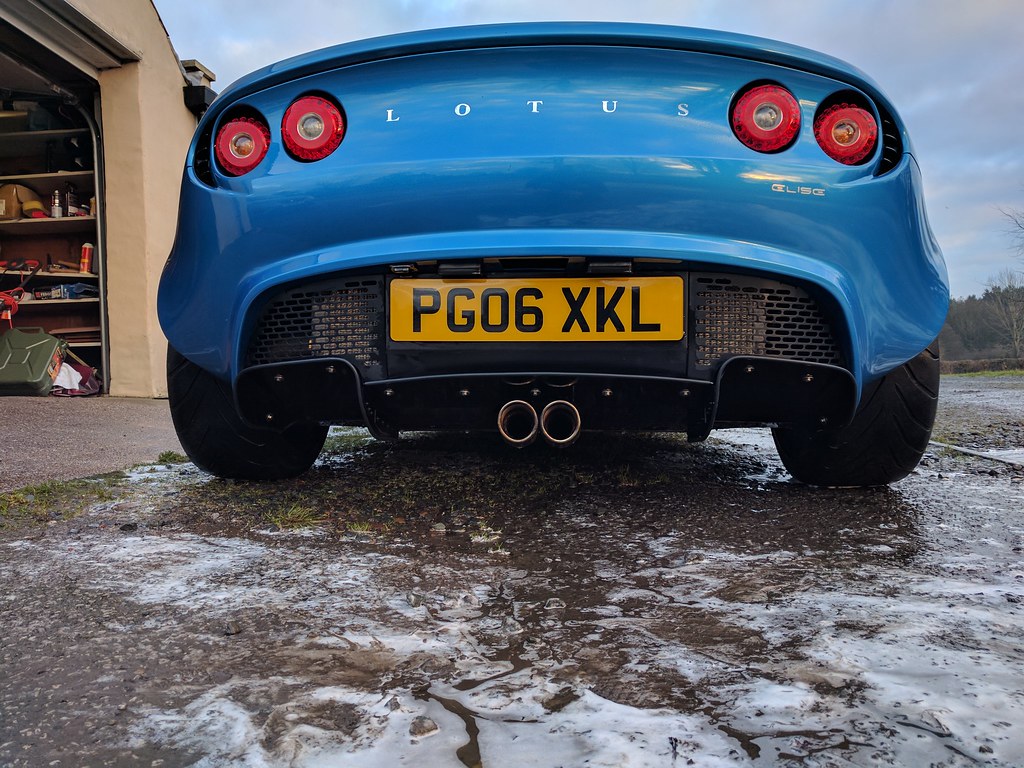
There's been some progress over the last week or so, will start with the diffuser I think!
It's been looking a bit battered for a while, burn marks from the exhaust, corrosion from stainless+ally contact and generally just tatty.
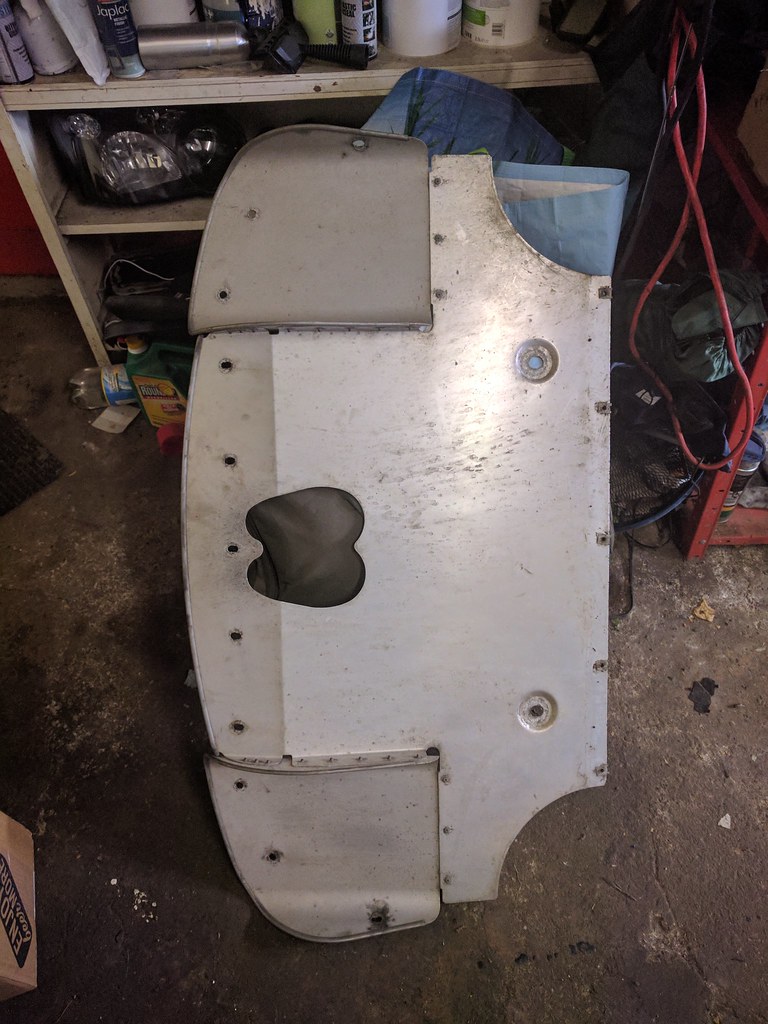
I cleaned it up, removed the edging trim and then sprayed on some etch primer:
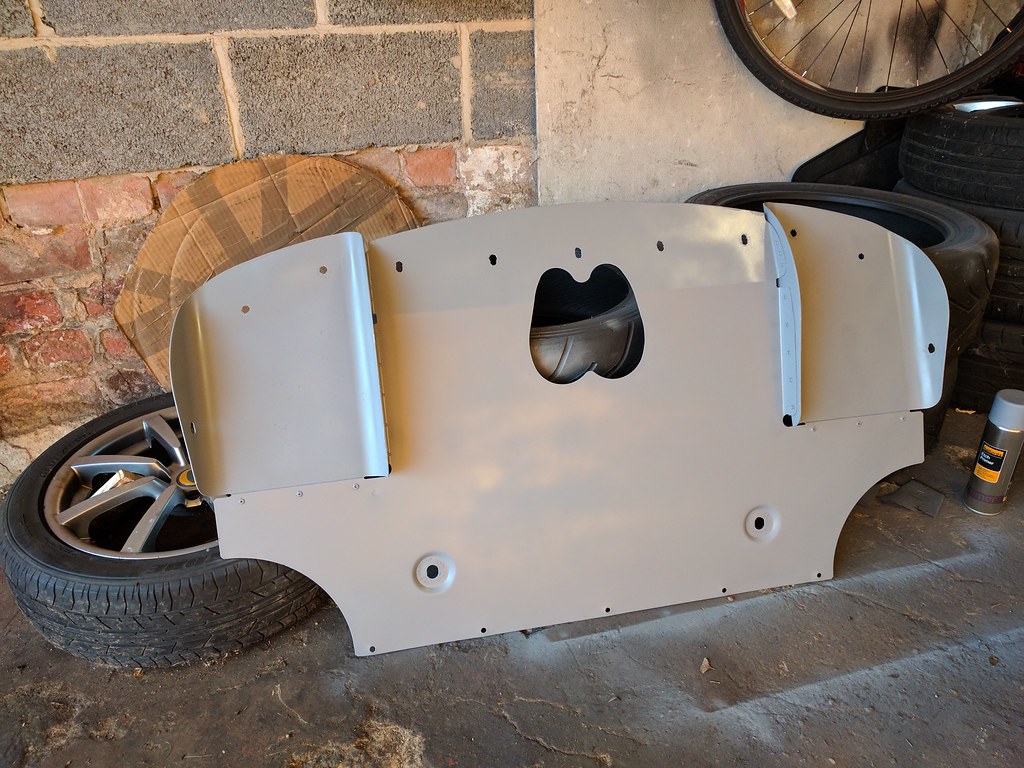
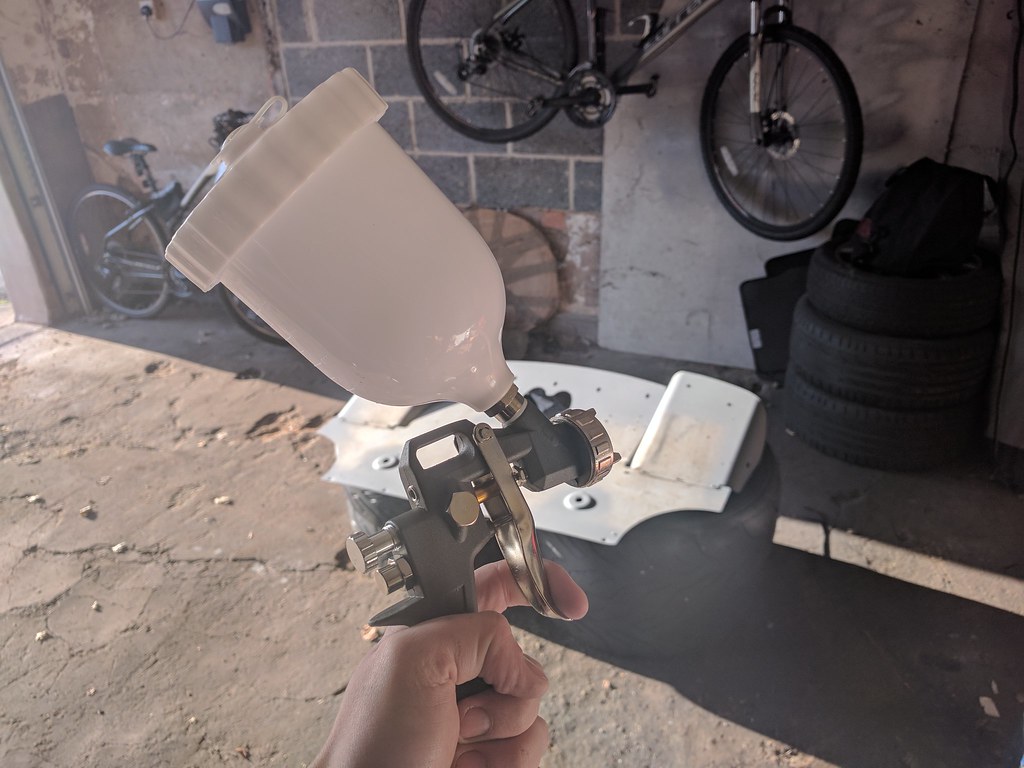
I'd be using some gloss black caliper paint, because I had some lying around! It should be heat resistant enough around the exhaust and also it's pretty tough - so hopefully will stand up to the odd stone chip.
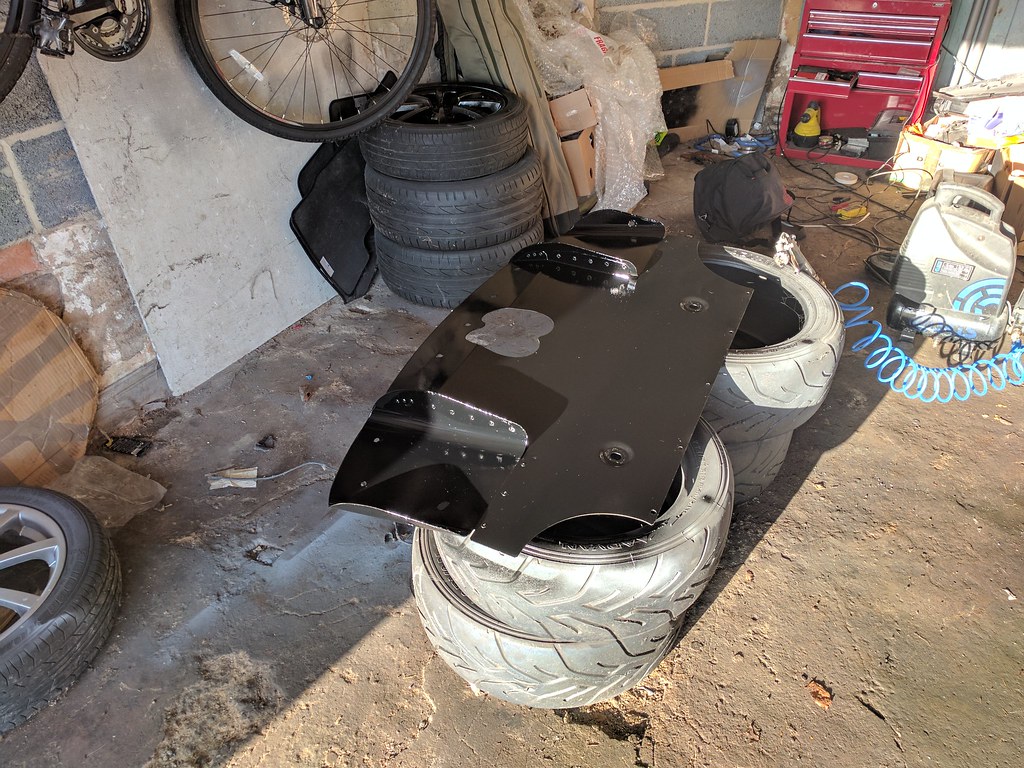
I'd be complementing this with some brand new stainless fixings:
...and then completed the diffuser with some black edge trim.
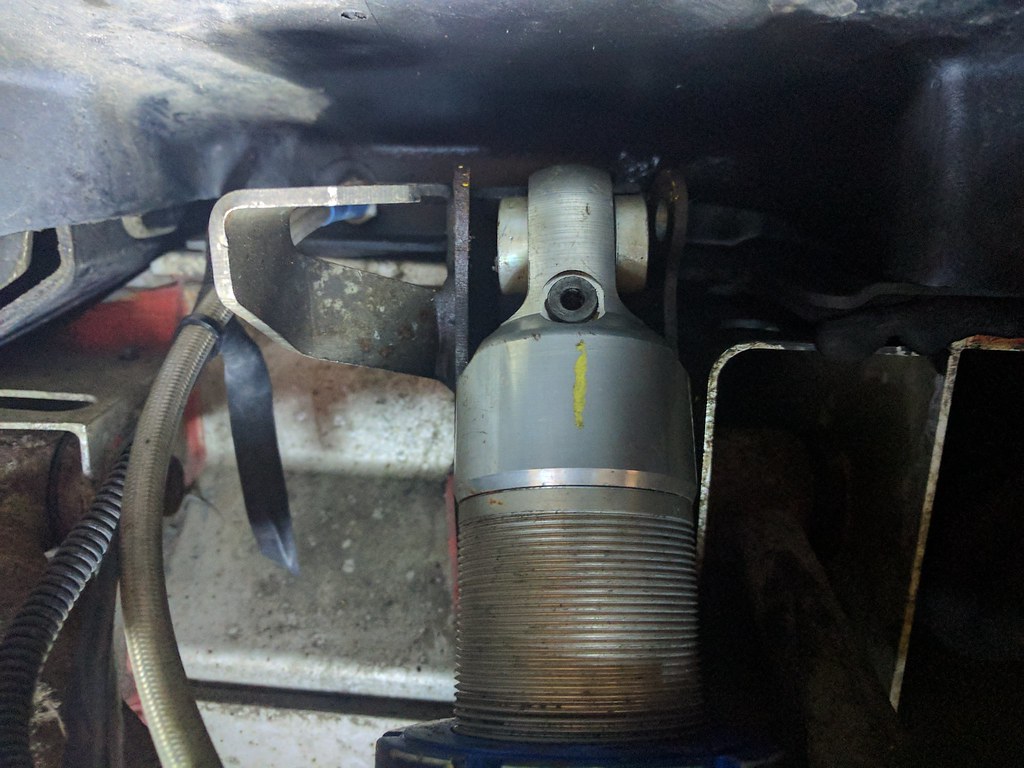
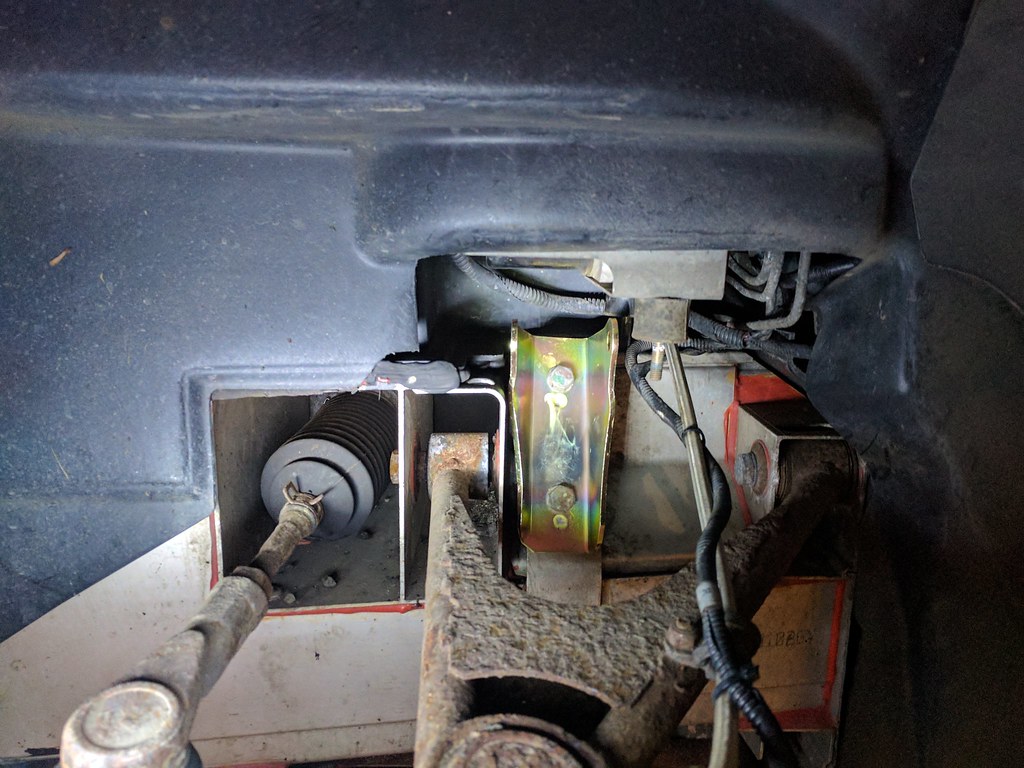
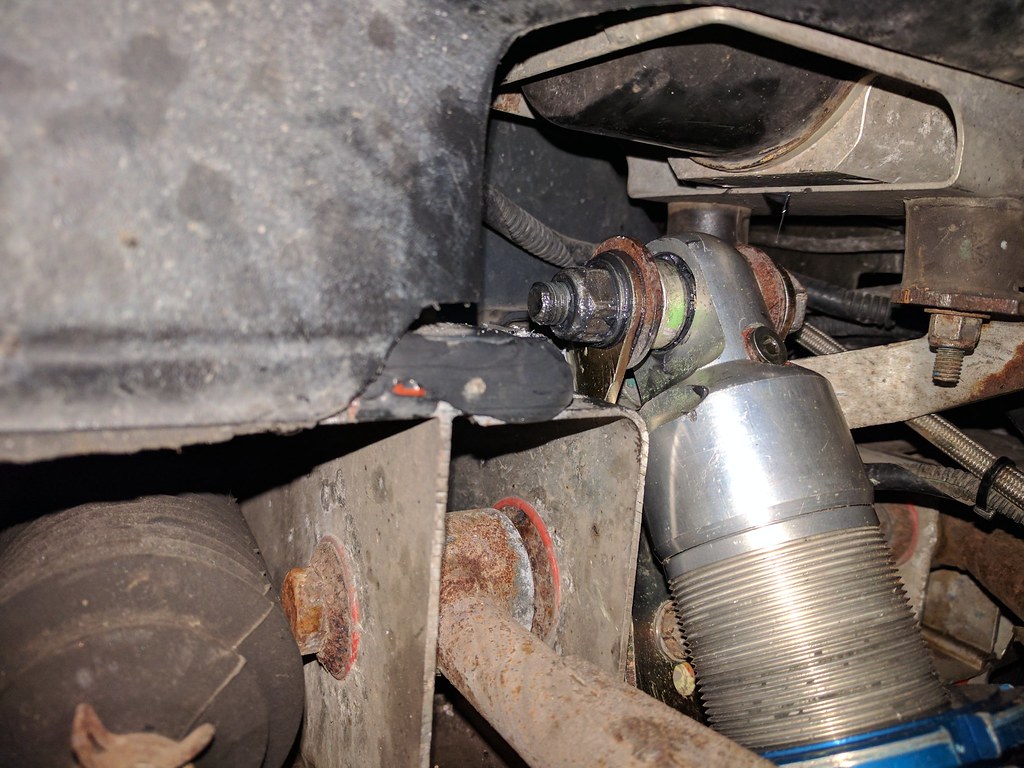
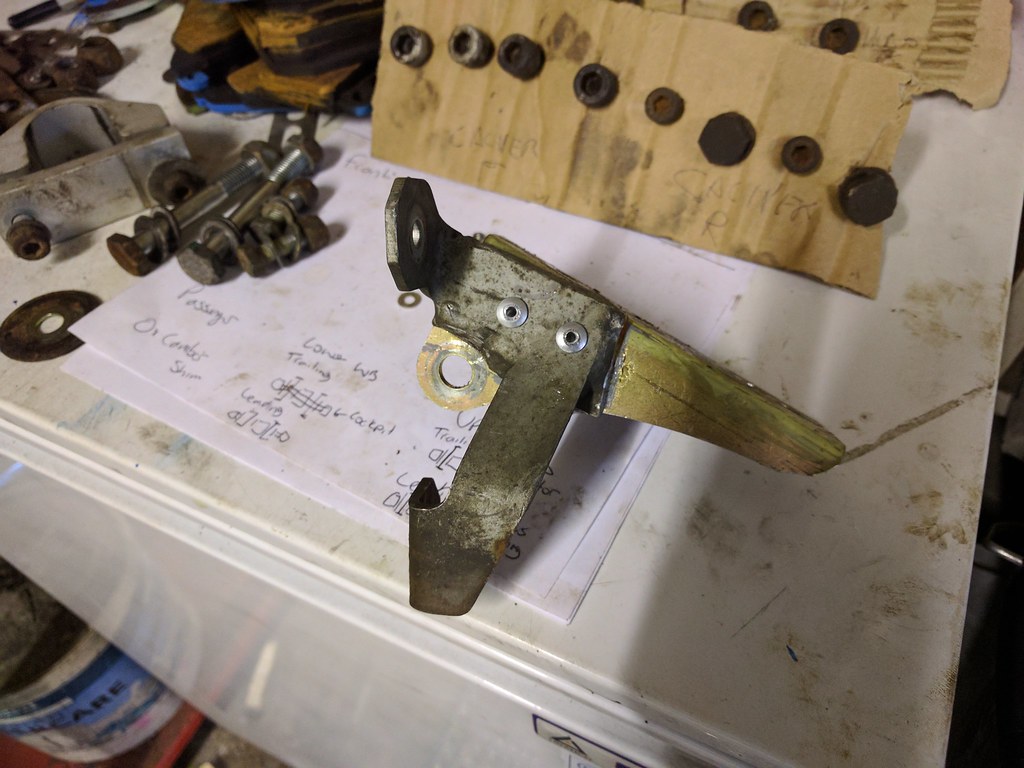
Back to the suspension, my next challenge was the ABS bracket mount that was missing from the drivers' side GAZ bracket:
My plan for the weekend was to go dump it with a local fabrication company, but I slept in on Saturday so decided to punish myself by sorting it out myself. The ABS bracket is not really load bearing as such, in fact between the bracket and the ABS pump is just some rubber anti-vibration mounts that are actually glued together... so I'm not aiming for structural strength here, just enough to stop it vibrating and straining the brake lines I suppose.
Out came the dremel, and several hours and many cutting discs later I had what I needed from the original donor mount...

Another hour or so of grinding, filing and more grinding and I had the mount down to a size and shape that would work.
I mock fitted it up, and marked round where I'd be locating the mount ready for drilling:
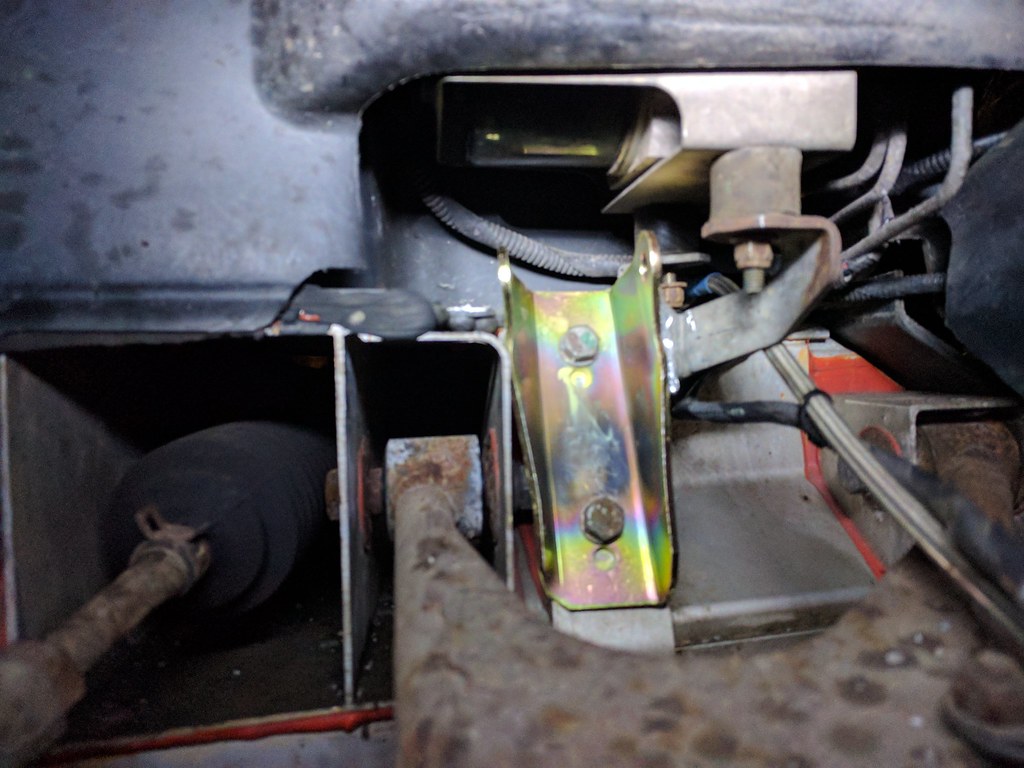
My drill bits weren't making a scratch on the stainless, so thanks to the wonders of Amazon Prime I got some replacements out for Sunday. Drilled through and temporarily mounted so that I could confirm fitment:
That nut/bolt arrangement will be going, I'm going to finalise with a very Lotus Glue+Rivet combination. For now though, I got the shock back on and had one more rideheight tweak.
When the mount comes off again, I'll glue/rivet it - grind down the edges a bit more to make it look nice then paint it all to make it look slightly less horrific!
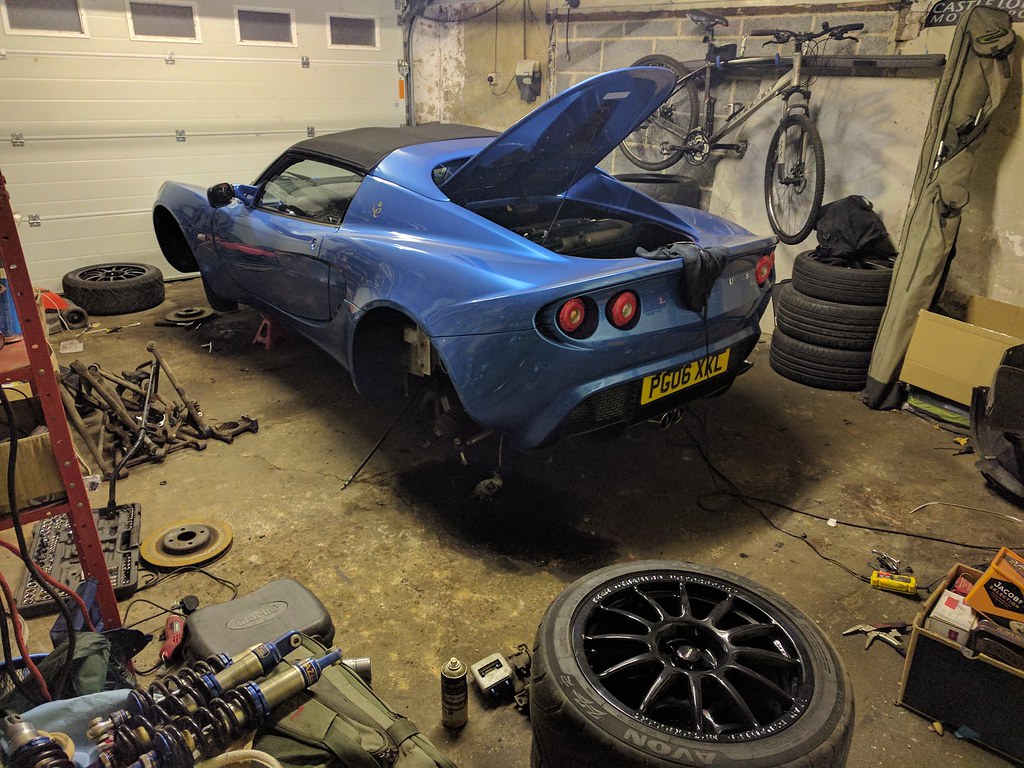
I then took the car out for what's probably its last drive before the big strip down of the wishbones etc. Only went out for 12-15 miles but it was good to be back in the car! The shocks continue to feel and sound fine, still no nasty surprises so happy days there. I've got my ride height into the ballpark it needs to be, and my only concern is that the rears are pretty damn close to their limit of adjustability. I've had to wind the rear springs right down which is no doubt limiting how much droop I get when the shock is unloaded.
I still feel like I've got plenty of droop though, not far off the standard billies - so I'm sure this'll be fine.
After the 20min drive, of course I then needed a 60min wash before getting back into the garage!
It's been looking a bit battered for a while, burn marks from the exhaust, corrosion from stainless+ally contact and generally just tatty.
I cleaned it up, removed the edging trim and then sprayed on some etch primer:
I'd be using some gloss black caliper paint, because I had some lying around! It should be heat resistant enough around the exhaust and also it's pretty tough - so hopefully will stand up to the odd stone chip.
I'd be complementing this with some brand new stainless fixings:
...and then completed the diffuser with some black edge trim.
Back to the suspension, my next challenge was the ABS bracket mount that was missing from the drivers' side GAZ bracket:
My plan for the weekend was to go dump it with a local fabrication company, but I slept in on Saturday so decided to punish myself by sorting it out myself. The ABS bracket is not really load bearing as such, in fact between the bracket and the ABS pump is just some rubber anti-vibration mounts that are actually glued together... so I'm not aiming for structural strength here, just enough to stop it vibrating and straining the brake lines I suppose.
Out came the dremel, and several hours and many cutting discs later I had what I needed from the original donor mount...
Another hour or so of grinding, filing and more grinding and I had the mount down to a size and shape that would work.
I mock fitted it up, and marked round where I'd be locating the mount ready for drilling:
My drill bits weren't making a scratch on the stainless, so thanks to the wonders of Amazon Prime I got some replacements out for Sunday. Drilled through and temporarily mounted so that I could confirm fitment:
That nut/bolt arrangement will be going, I'm going to finalise with a very Lotus Glue+Rivet combination. For now though, I got the shock back on and had one more rideheight tweak.
When the mount comes off again, I'll glue/rivet it - grind down the edges a bit more to make it look nice then paint it all to make it look slightly less horrific!
I then took the car out for what's probably its last drive before the big strip down of the wishbones etc. Only went out for 12-15 miles but it was good to be back in the car! The shocks continue to feel and sound fine, still no nasty surprises so happy days there. I've got my ride height into the ballpark it needs to be, and my only concern is that the rears are pretty damn close to their limit of adjustability. I've had to wind the rear springs right down which is no doubt limiting how much droop I get when the shock is unloaded.
I still feel like I've got plenty of droop though, not far off the standard billies - so I'm sure this'll be fine.
After the 20min drive, of course I then needed a 60min wash before getting back into the garage!
Phew, just finished the big stripdown over the last few days. It's taken a while mainly due to me only having the patience for a couple of hours at a time, but also not having the right tools or technique... more on that later. As a reminder, my goal was just to get the bits off the car and then send off to Chris & Jon at https://www.jonsealsportscars.com/
I got started last Saturday, got the car undertray off and jacked up on to stands.
I thought I'd start with the rear passenger side, as it was closest to the beer fridge.
Wheel off, first hurdle failed - I had the wrong size impact sockets for the hub nut. Amazon Prime.
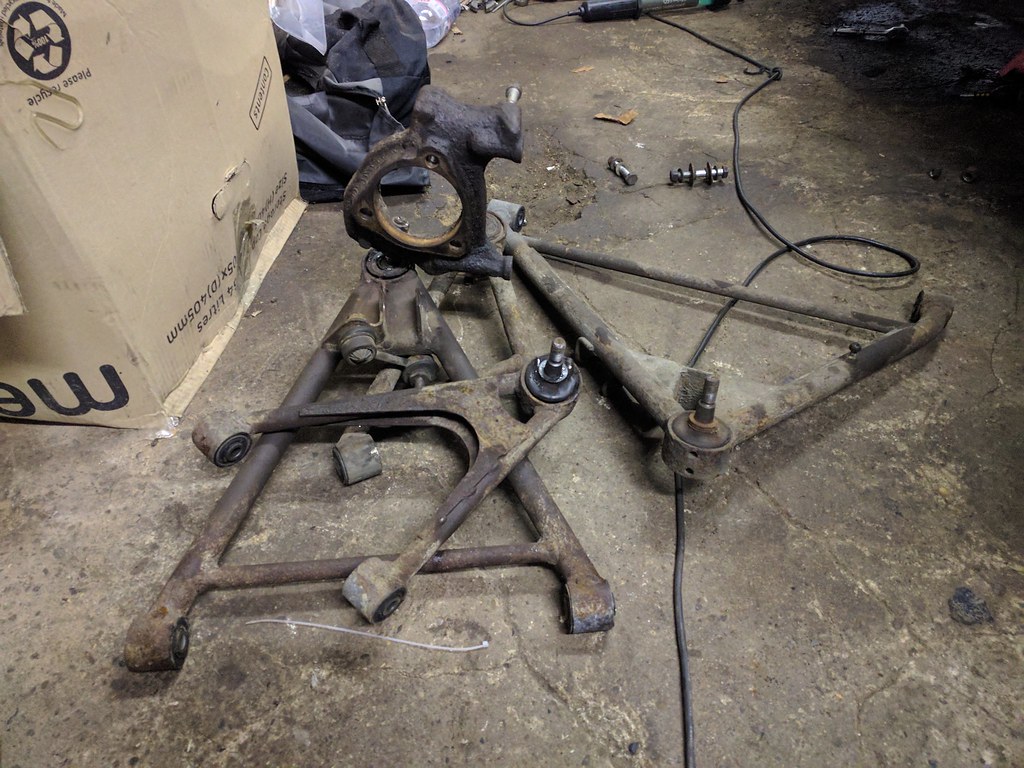
I decided to strip what I could from the corner anyway. I managed to get both wishbones off the car, and the caliper off - so the upright/hub was suspended just by the driveshaft and a wire coat hanger.
I think I fell over some tools whilst taking this...
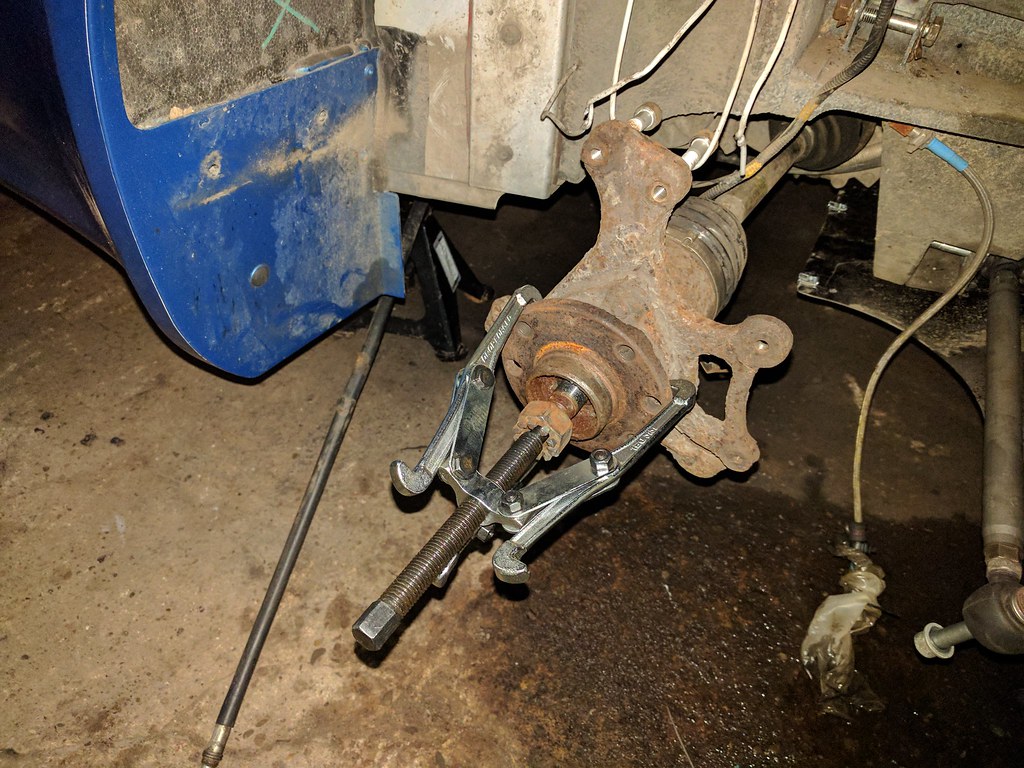
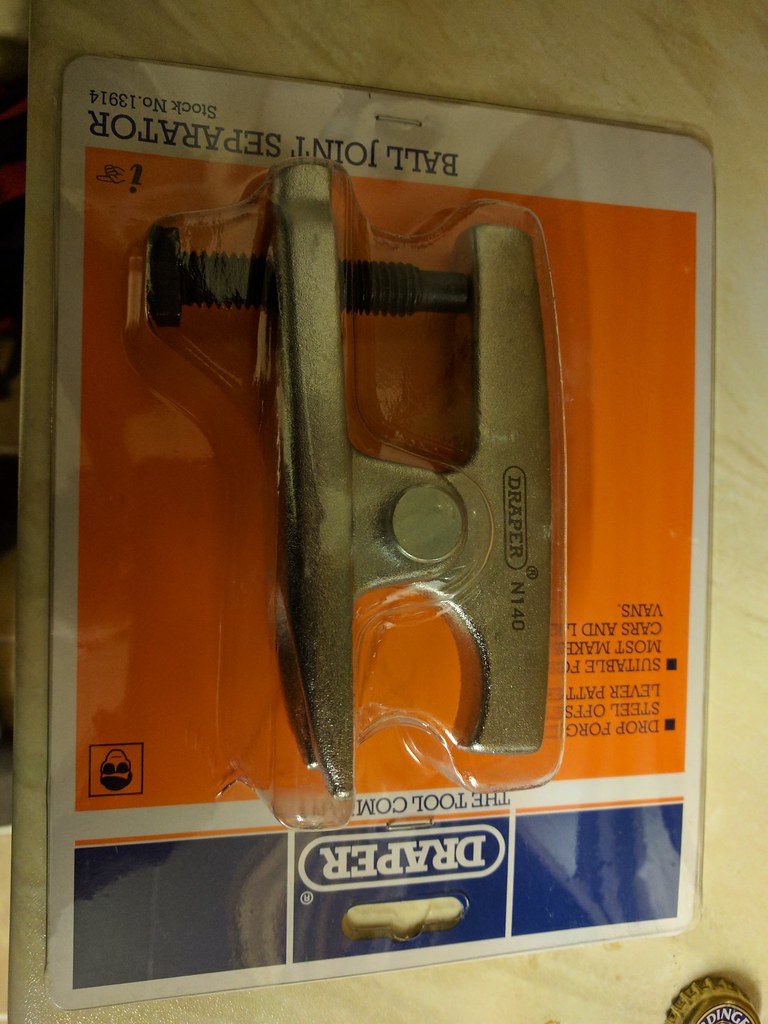
Only difficulty to note so far was getting the balljoints out of the upright once the bolts were undone. The bolts were sticky and hard to remove, but not impossible. The tapered balljoints however were proper stuck, and my wedge/fork type splitter was too bulky to get into the joint to start putting appropropriate pressure on. I managed to remove the top one by whacking it with a hammer st loads, and left the bottom one attached for Chris to sort out when he removes the bushes for me
I made a note to order a proper balljoint separator, a scissor type one. Amazon Prime
Sunday:
Amazon Prime man turned up with an impact socket, so whizzed the hubnut off. Next up, the driveshaft was seized into the hub! I tried whacking it with a hammer st loads (with the nut on the end to protect it) and it just wouldn't budge. There must be a tool for it, so parked that for later. Amazon Prime.
I moved onto the front passenger side and got that completely stripped but it took HOURS. Balljoints were causing grief and even the TRE took an age to get out, again eventually successful by whacking it with a hammer st loads.
TRE left on, as I don't have replacements yet so can keep my tracking reference for now.
With the front upright off the car, I then had to seperate the hub (which I'd be keeping to paint up) and the upright which would be going off to Chris. It's bolted in with 3x 19mm bolts which whizzed out with the rattlegun fine, but then it was seized to the face of the upright. The technique I finally landed on was screwing the bolts back in a few turns then whacking them st loads with a hammer. Eventually the hub popped off.
Monday:
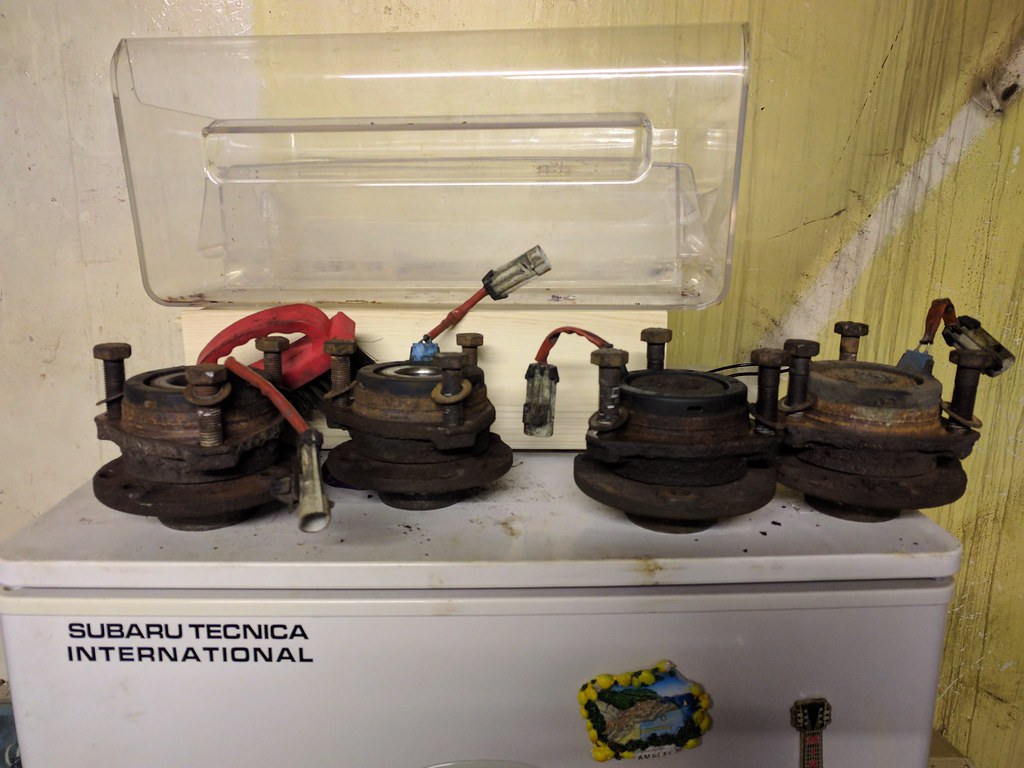
Amazon Prime man turned up with a collection of driveshaft/hub pullers. I bolted it on and started winding, eventually with a muffled pop - the driveshaft pushed out, yay!
That's the passenger side of the car done at last!
Tuesday:
Attacked the rear drivers side this time, started with the hub nut and driveshaft tool but my god I struggled to get that driveshaft out. I tried so hard, I actually stripped the thread on the largest of my driveshaft pulling tools. I was cursing my cheap £12 kit, and the poor Amazon Prime bd so I stormed upstairs to complain. After reading a bit, I found that I was actually doing it wrong! You don't keep screwing it to force the shaft out, you just bolt it up snug and then guess what... whack it with a fking hammer :lol:
After doing this, the other driveshaft came out a treat Unfortunately, I sustained hammer related injuries tonight.
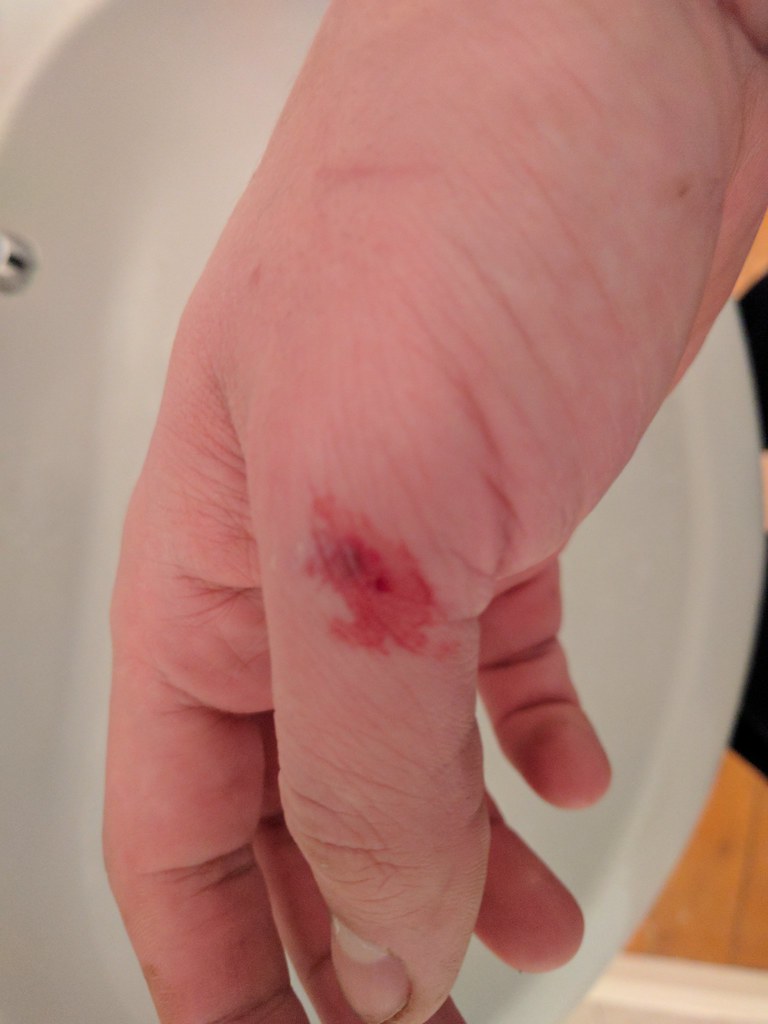
Not only that but I broke my novelty hammer! The bottle opener (that replaces the claw) snapped off!!
Wednesday:
Night off...
Thursday:
I finished off the rear drivers side, my new balljoint tool working an absolute treat.
I then moved to the final corner and stripped it all down pretty quickly, leaving myself with just the ARB to detach. The ARB brackets are held on with 6mm allen bolts, I can access one with a ratchet but the other needs an actual 6mm allen key through a little hole:
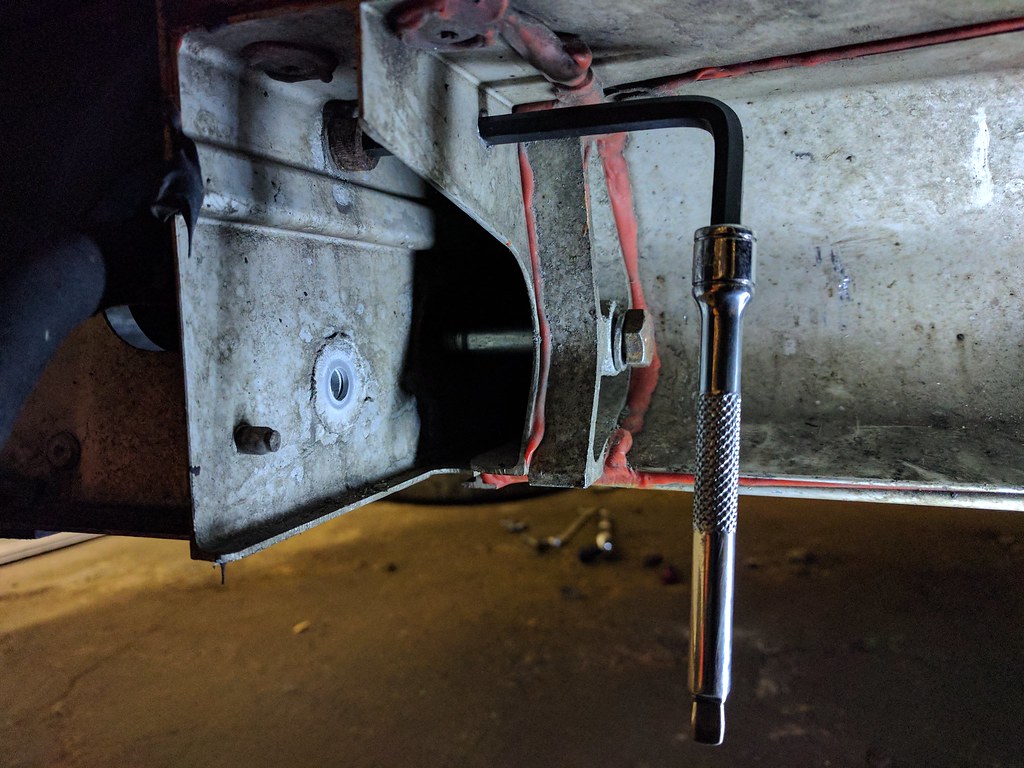
Both of my allen key kits were missing just the 6mm key, brilliant :| I'll delay the finish line one more night.
Friday, Tonight:
Halfords on the way home, 6mm key bought and whipped the brackets off. I then needed to drill out the rivets holding a little ally plate over the gap to allow me to wiggle the bar out.
The final result:
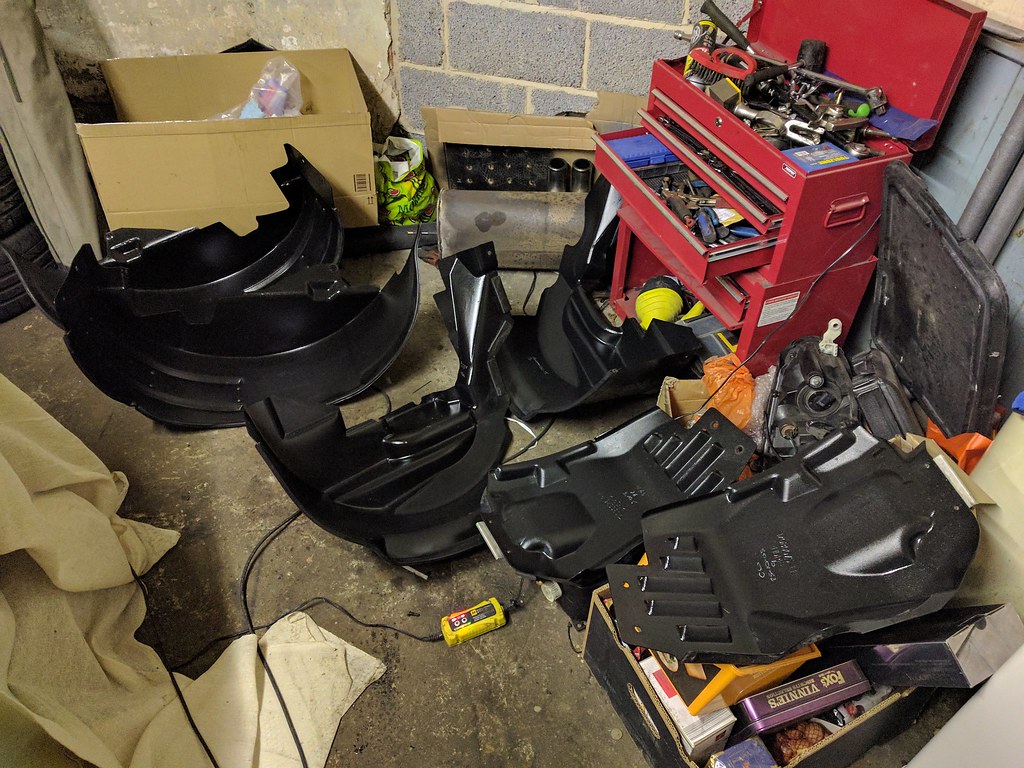
Pile of st for Chris:
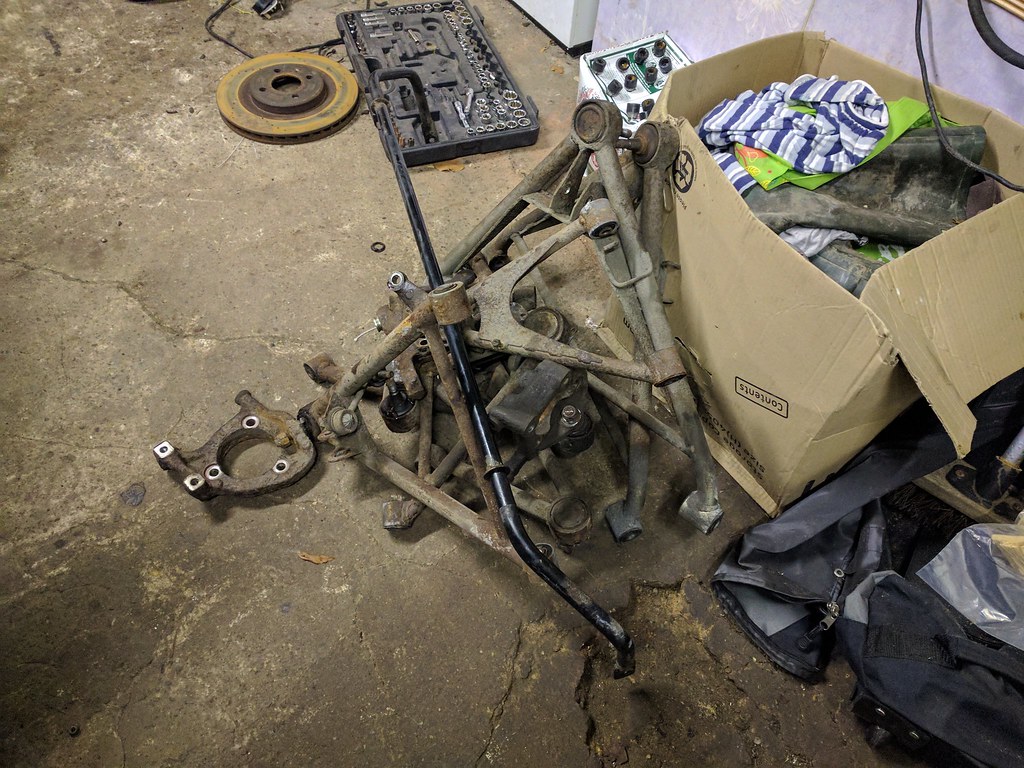
Stuff for me to clean/paint:
...and a garage that looks like it's had a bomb go off in it!
Off to see Chris tomorrow to dump my stuff, then I'll get on with the fun/therapeutic stuff of cleaning
I got started last Saturday, got the car undertray off and jacked up on to stands.
I thought I'd start with the rear passenger side, as it was closest to the beer fridge.
Wheel off, first hurdle failed - I had the wrong size impact sockets for the hub nut. Amazon Prime.
I decided to strip what I could from the corner anyway. I managed to get both wishbones off the car, and the caliper off - so the upright/hub was suspended just by the driveshaft and a wire coat hanger.
I think I fell over some tools whilst taking this...
Only difficulty to note so far was getting the balljoints out of the upright once the bolts were undone. The bolts were sticky and hard to remove, but not impossible. The tapered balljoints however were proper stuck, and my wedge/fork type splitter was too bulky to get into the joint to start putting appropropriate pressure on. I managed to remove the top one by whacking it with a hammer s
t loads, and left the bottom one attached for Chris to sort out when he removes the bushes for me I made a note to order a proper balljoint separator, a scissor type one. Amazon Prime
Sunday:
Amazon Prime man turned up with an impact socket, so whizzed the hubnut off. Next up, the driveshaft was seized into the hub! I tried whacking it with a hammer s
t loads (with the nut on the end to protect it) and it just wouldn't budge. There must be a tool for it, so parked that for later. Amazon Prime.I moved onto the front passenger side and got that completely stripped but it took HOURS. Balljoints were causing grief and even the TRE took an age to get out, again eventually successful by whacking it with a hammer s
t loads.TRE left on, as I don't have replacements yet so can keep my tracking reference for now.
With the front upright off the car, I then had to seperate the hub (which I'd be keeping to paint up) and the upright which would be going off to Chris. It's bolted in with 3x 19mm bolts which whizzed out with the rattlegun fine, but then it was seized to the face of the upright. The technique I finally landed on was screwing the bolts back in a few turns then whacking them s
t loads with a hammer. Eventually the hub popped off.Monday:
Amazon Prime man turned up with a collection of driveshaft/hub pullers. I bolted it on and started winding, eventually with a muffled pop - the driveshaft pushed out, yay!
That's the passenger side of the car done at last!
Tuesday:
Attacked the rear drivers side this time, started with the hub nut and driveshaft tool but my god I struggled to get that driveshaft out. I tried so hard, I actually stripped the thread on the largest of my driveshaft pulling tools. I was cursing my cheap £12 kit, and the poor Amazon Prime b
d so I stormed upstairs to complain. After reading a bit, I found that I was actually doing it wrong! You don't keep screwing it to force the shaft out, you just bolt it up snug and then guess what... whack it with a fking hammer :lol:After doing this, the other driveshaft came out a treat
Unfortunately, I sustained hammer related injuries tonight.Not only that but I broke my novelty hammer! The bottle opener (that replaces the claw) snapped off!!
Wednesday:
Night off...
Thursday:
I finished off the rear drivers side, my new balljoint tool working an absolute treat.
I then moved to the final corner and stripped it all down pretty quickly, leaving myself with just the ARB to detach. The ARB brackets are held on with 6mm allen bolts, I can access one with a ratchet but the other needs an actual 6mm allen key through a little hole:
Both of my allen key kits were missing just the 6mm key, brilliant :| I'll delay the finish line one more night.
Friday, Tonight:
Halfords on the way home, 6mm key bought and whipped the brackets off. I then needed to drill out the rivets holding a little ally plate over the gap to allow me to wiggle the bar out.
The final result:
Pile of s
t for Chris:Stuff for me to clean/paint:
...and a garage that looks like it's had a bomb go off in it!
Off to see Chris tomorrow to dump my stuff, then I'll get on with the fun/therapeutic stuff of cleaning
Really enjoyable read bud. I've recently got myself an '06 111R so I'll be following your progress like a hawk!
Have you thought about dyeing the grey alcantara on the dash/wheel black? I did it myself today and it personally I think it really transforms & modernizes the interior.
Also, I don't suppose you've got a link for the fabric used for the side sill covers? How is it holding up? Mine are cracked so will be looking to do something similar in the near future.
Cheers!
Ryan_T said:
Really enjoyable read bud. I've recently got myself an '06 111R so I'll be following your progress like a hawk!
Have you thought about dyeing the grey alcantara on the dash/wheel black? I did it myself today and it personally I think it really transforms & modernizes the interior.
Also, I don't suppose you've got a link for the fabric used for the side sill covers? How is it holding up? Mine are cracked so will be looking to do something similar in the near future.
Cheers!
Thanks Ryan, as long as people enjoy it - I'll keep writing. Meh, I'll keep writing anyway, I frequently look back at my Subaru pictures/info so it's good to keep a log.Have you thought about dyeing the grey alcantara on the dash/wheel black? I did it myself today and it personally I think it really transforms & modernizes the interior.
Also, I don't suppose you've got a link for the fabric used for the side sill covers? How is it holding up? Mine are cracked so will be looking to do something similar in the near future.
Cheers!
I need to do something with my wheel as the leather is rather worn, but thinking of just replacing the wheel with a quick release or something... will think on that.
http://www.ebay.co.uk/itm/FIRE-RETARDANT-FAUX-SUED...
That's the stuff I bought, holding up absolutely fine so far but hasn't really been through much. Bought enough to recover it about 8 times over if I have a problem...
Whilst my wishbones and uprights have been away with Chris, I've had a few hours here and there just tinkering and cleaning stuff up and preparing myself for the big re-assembly.
First up was to finish the damper/abs unit bracket modification off. Just swapped the little nuts/bolts with some epoxy and some rivets:
I've since painted them, so it looks slightly less horrible.
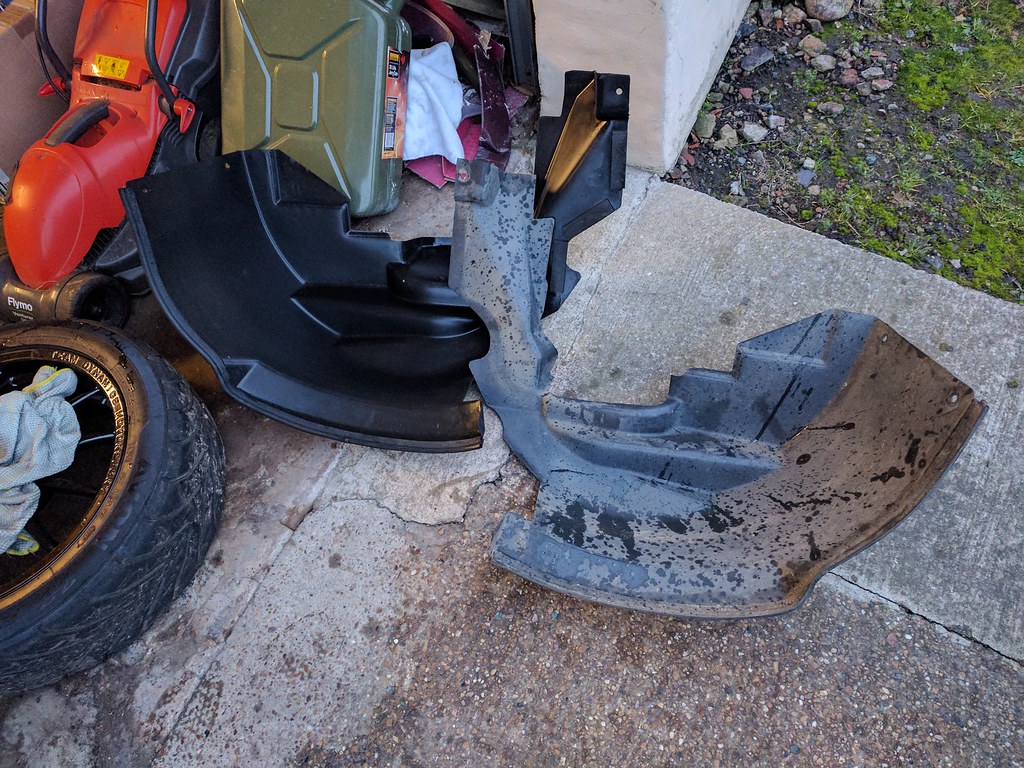
Next up, all my plastic arch liners got some loving. Just scrubbed them down and then cheated a bit with some tyreshine on a rag.
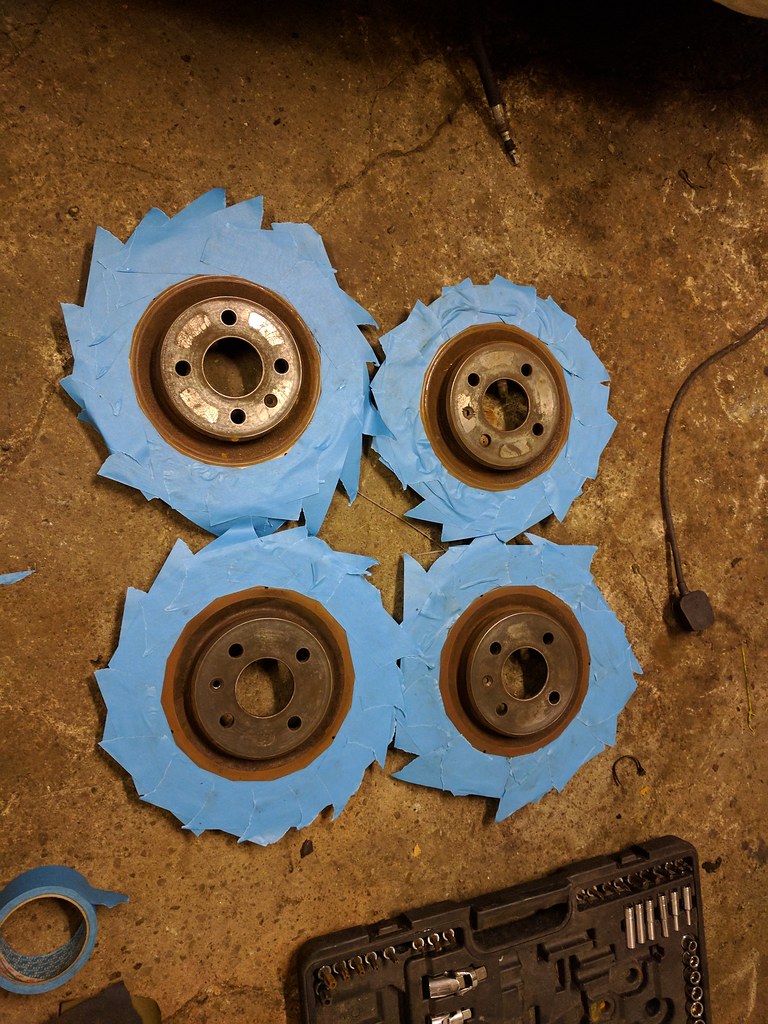
Discs got a rubbing down and then a light coat of VHT silver... no finished photo for some reason, but they'll pop up later!
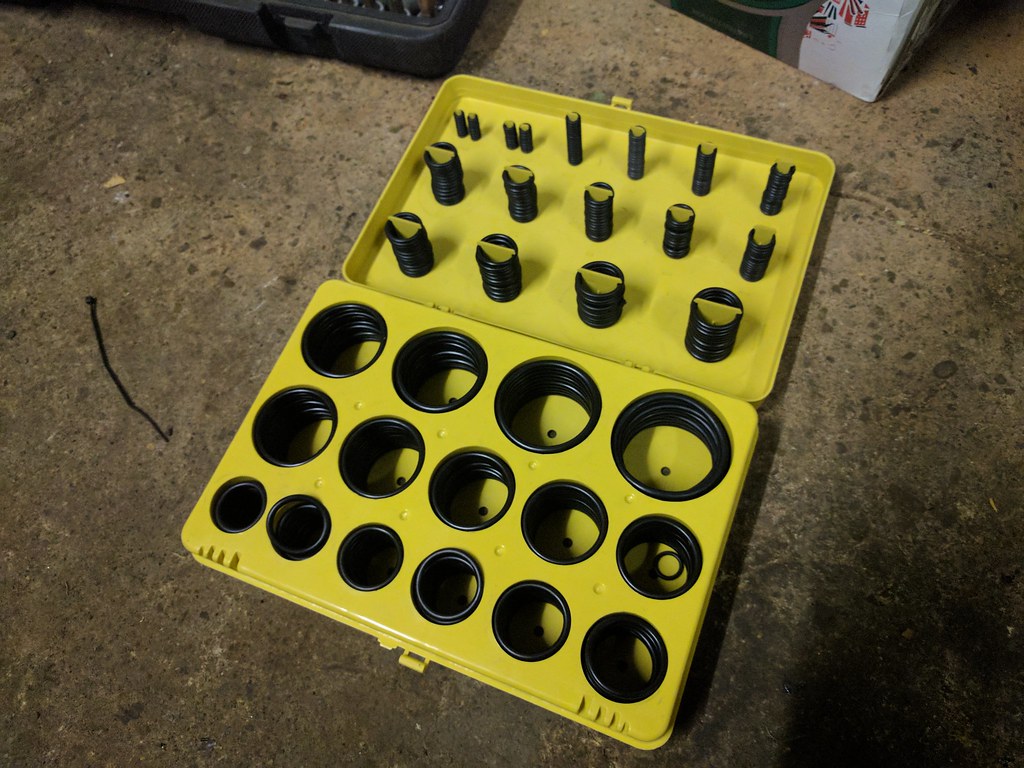
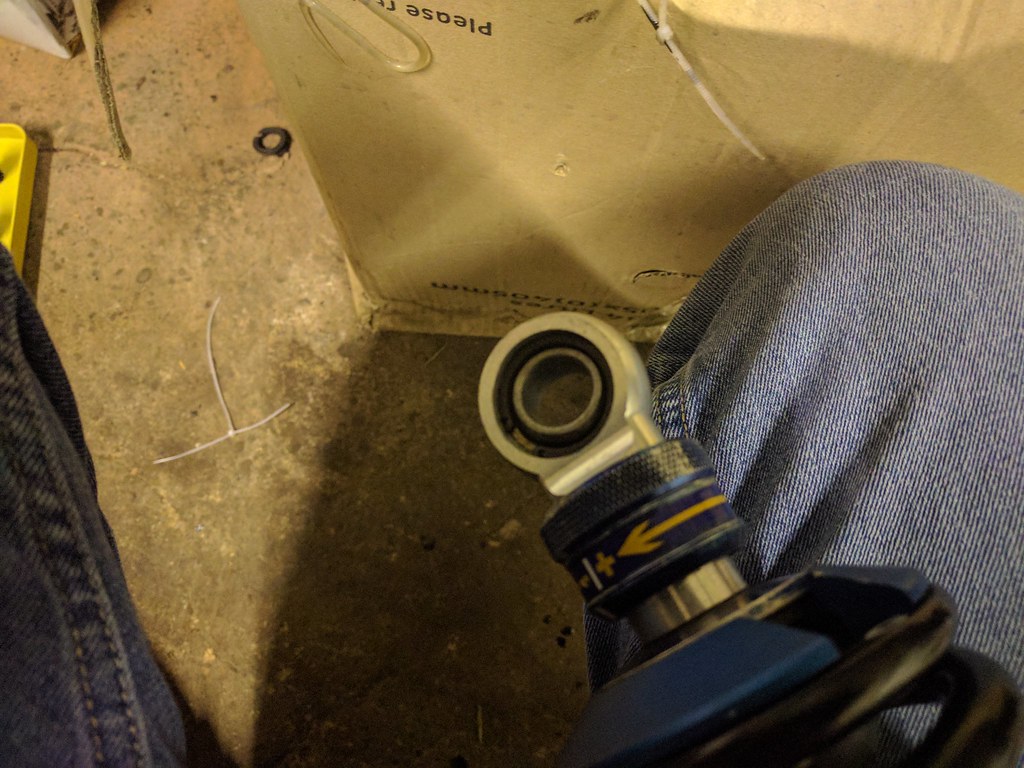
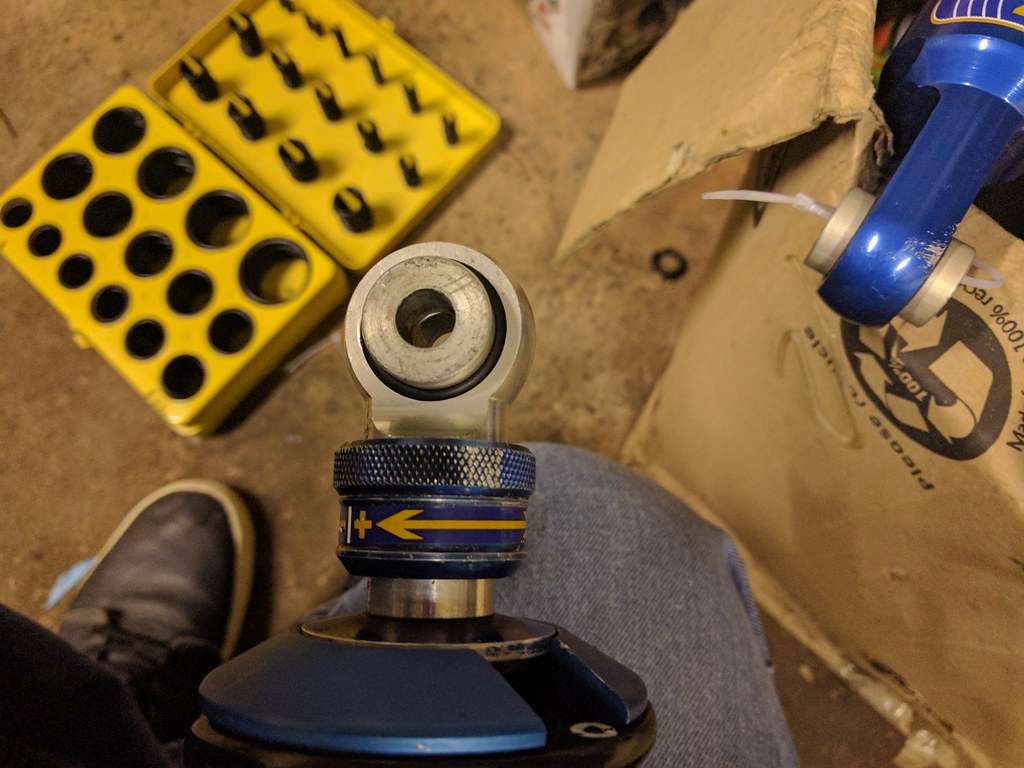
I was cleaning up the Gaz dampers and I noticed that on one of the units, that one of the bearings seemed a lot free'er than the others. Upon inspection, it was missing a rubber o-ring to protect the bearing from grit/dirt. It probably fell out whilst I was messing with the shocks, so I headed to Amazon to find a replacement. It cost me less for a kit of hundreds (£13) than it did to buy two of the specific size I needed!
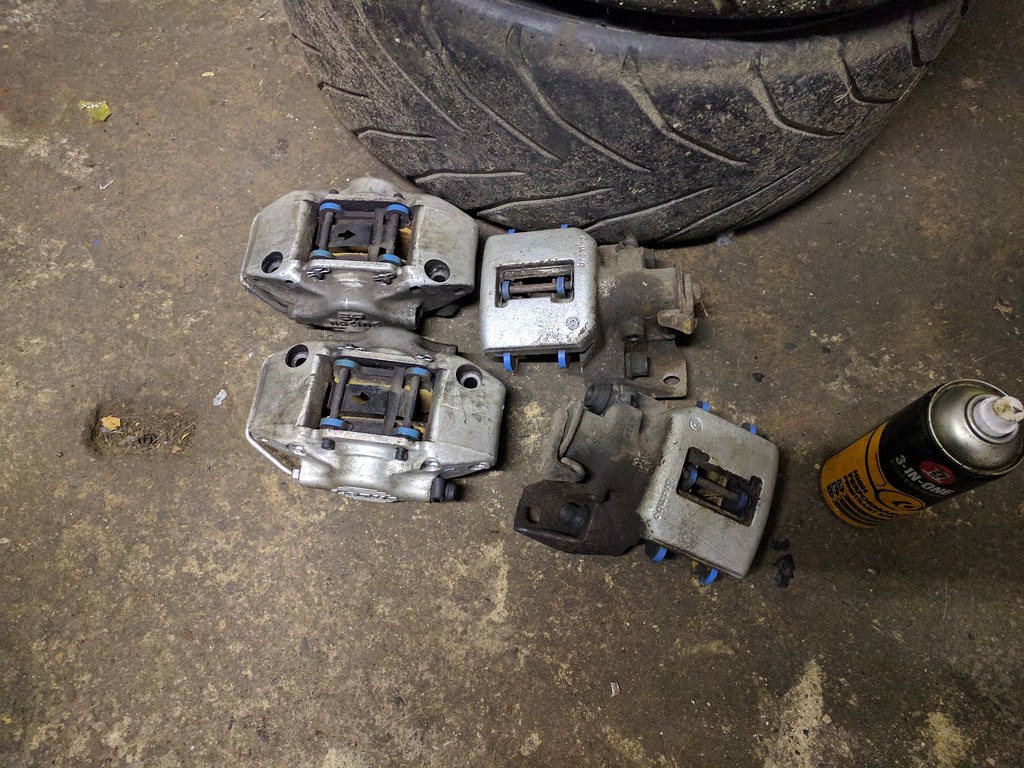
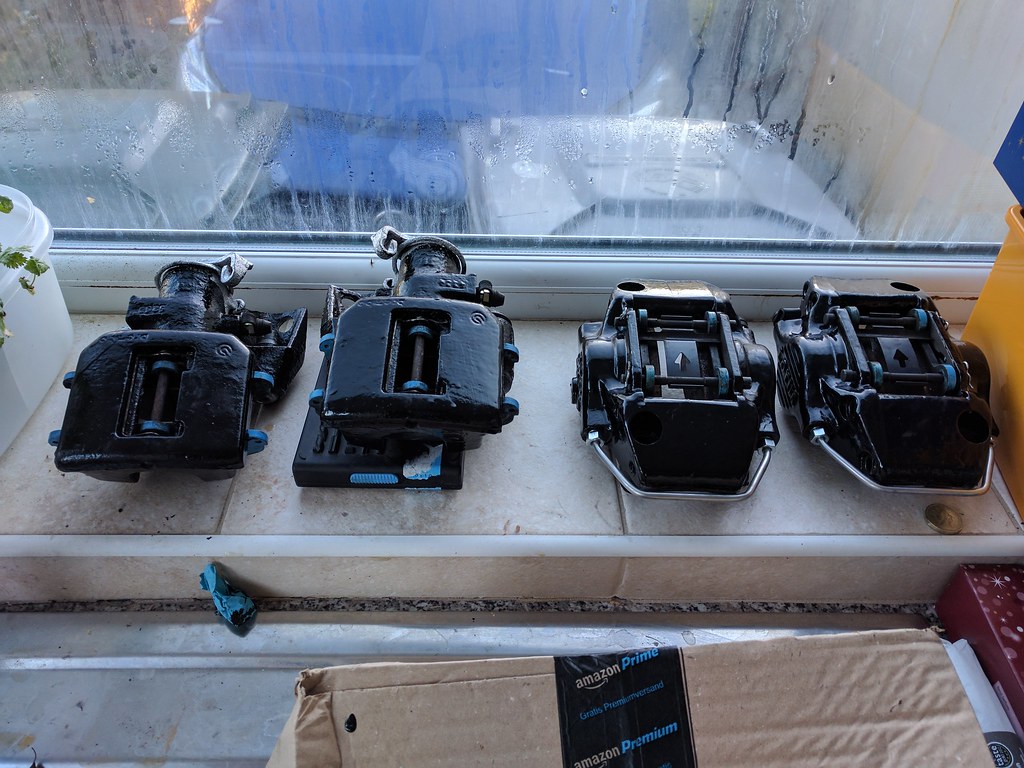
My Calipers have been treated to a good scrub down, then some VHT gloss black. Also added new fittings (nipples and crossover pipes) to finish the job. I had one drama (as usual when I'm messing with brakes) in that one of the nipples seemed to drag with it half a thread on its way out Maybe cross-threaded in a past life, as it didn't really stick when I was undoing it. I managed to clean the top couple of threads up with an appropriately sized tap, and the new nipple has hopefully seated nicely. I'll obviously check for leaks when refitting, worst case scenario I can get it drilled out and an insert stuck in.
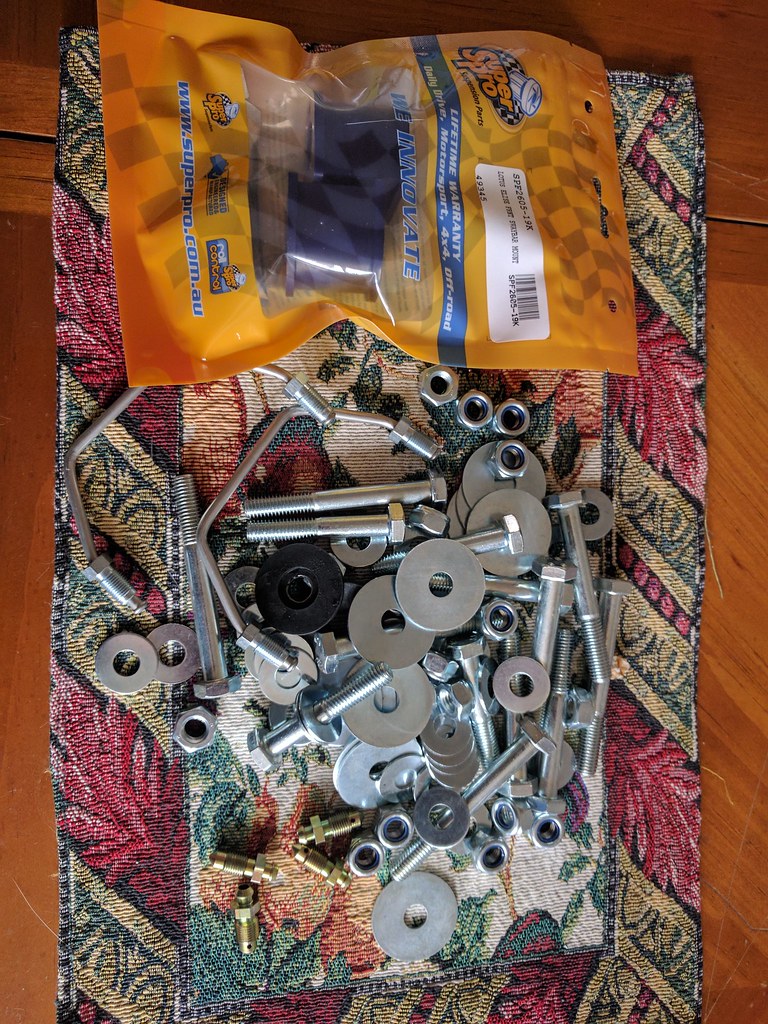
Post man has brought a steady stream of bits and bobs, still waiting on some parts from Lotus but I got the bulk of the fixings ready for the refit.
First up was to finish the damper/abs unit bracket modification off. Just swapped the little nuts/bolts with some epoxy and some rivets:
I've since painted them, so it looks slightly less horrible.
Next up, all my plastic arch liners got some loving. Just scrubbed them down and then cheated a bit with some tyreshine on a rag.
Discs got a rubbing down and then a light coat of VHT silver... no finished photo for some reason, but they'll pop up later!
I was cleaning up the Gaz dampers and I noticed that on one of the units, that one of the bearings seemed a lot free'er than the others. Upon inspection, it was missing a rubber o-ring to protect the bearing from grit/dirt. It probably fell out whilst I was messing with the shocks, so I headed to Amazon to find a replacement. It cost me less for a kit of hundreds (£13) than it did to buy two of the specific size I needed!
My Calipers have been treated to a good scrub down, then some VHT gloss black. Also added new fittings (nipples and crossover pipes) to finish the job. I had one drama (as usual when I'm messing with brakes) in that one of the nipples seemed to drag with it half a thread on its way out
Maybe cross-threaded in a past life, as it didn't really stick when I was undoing it. I managed to clean the top couple of threads up with an appropriately sized tap, and the new nipple has hopefully seated nicely. I'll obviously check for leaks when refitting, worst case scenario I can get it drilled out and an insert stuck in.Post man has brought a steady stream of bits and bobs, still waiting on some parts from Lotus but I got the bulk of the fixings ready for the refit.
Gassing Station | Readers' Cars | Top of Page | What's New | My Stuff