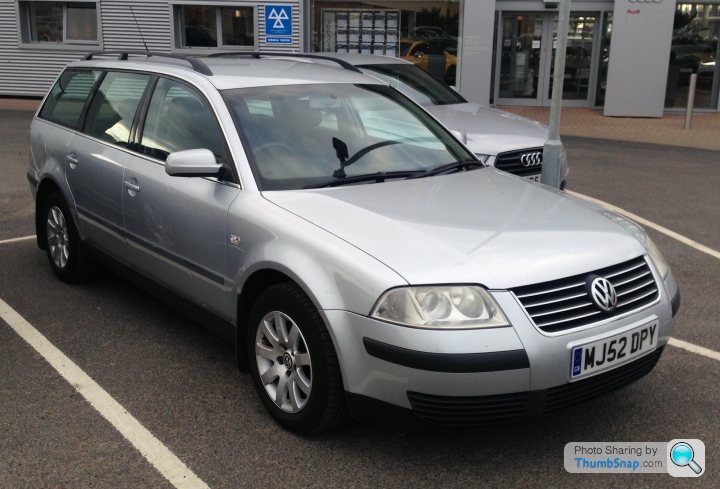
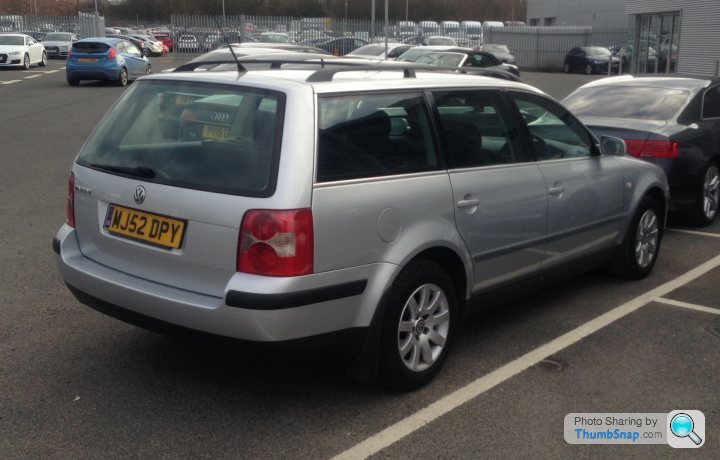
Shedding properly, 2004 Passat Estate 1.9 TDI
Discussion


I just sold my one of these. Was f king great. Swallowed luggage, boats, skis, boxes, Christmas trees, rubbish. 55/60mpg on a run and just brisk enough on the motorway to keep up with stuff in the cruise.
I had a similar issue with water ingress although it wasn't through the pollen filter it was the drain beneath the battery that was blocked. I made a video of how to fix it if you need it.
king great. Swallowed luggage, boats, skis, boxes, Christmas trees, rubbish. 55/60mpg on a run and just brisk enough on the motorway to keep up with stuff in the cruise.I had a similar issue with water ingress although it wasn't through the pollen filter it was the drain beneath the battery that was blocked. I made a video of how to fix it if you need it.
bulldong said:
I just sold my one of these. Was fking great. Swallowed luggage, boats, skis, boxes, Christmas trees, rubbish. 55/60mpg on a run and just brisk enough on the motorway to keep up with stuff in the cruise.
I had a similar issue with water ingress although it wasn't through the pollen filter it was the drain beneath the battery that was blocked. I made a video of how to fix it if you need it.
I know, they are not the fastest but not exactly slow and will cruise effortlessly at high speed and in comfort. They re-map cheaply and safely up to about 165hp will lots more torque, strangely it is something I've not as yet. They are the best kept barge secret and if looked after the 1.9 PD engines will do massive mileages as evidenced by problemchild1976's pic further up, that one is pushing 260k !king great. Swallowed luggage, boats, skis, boxes, Christmas trees, rubbish. 55/60mpg on a run and just brisk enough on the motorway to keep up with stuff in the cruise.I had a similar issue with water ingress although it wasn't through the pollen filter it was the drain beneath the battery that was blocked. I made a video of how to fix it if you need it.
Edited by colin_p on Tuesday 1st March 15:59
Working from home!
During my "lunch" I tackled the slightly bubbling rear brake lines.
Note that this is a temporary measure and I'll tackle the brakes once the suspension is back in place. I also noticed the rear flexi hoses had a few surface cracks in them. Good enough for the forthcoming MOT but not for me. To undo the flexies it means splitting the joint between them and the main front to rear hard lines. From bitter experience I know that these won't split or undo without ruining the main front to rear brake pipes / hard lines. So the that whole job is on the list sometime soon but not immediately.
It is still good enough (hopefully) to pass its forthcoming MOT but I'd not be happy with them as they are.
So a temporary fix was to remove the plastic bubbled coating, scrape and sand the corrosion away and then paint the exposed lines. Sounds like a lot but this only on the short hard lines that clip to the beam. The corrosion ironically was where the green clips are. These particular pipes are £18 each new but as stated above I don't want to disturb the hydraulic circuits just yet.
When doing work like this, things do escalate and unplanned works do creep in. I'll now leave the new rear calipers and drain down the and bleed the system once.
Anyway, I did of course take some photos, saying that, the camera really struggled to focus on the thin pipes so some are a bit blurred.
Bubbly

Part cleaned, notice the white corrosion, these lines are aluminium it seems unless there is some ali in the plastic coating


Prepped

And painted, I'll give these at least three coats as the brake hydraulics side project may not follow immediately.

During my "lunch" or was it the teabreak? I also popped down to VW and picked up £64 worth of bolts !


It was the big beam pivot bolts that cost most, almost a Kings ransom on their own! And good job I counted them as there were only nine of the hub bolts, one short.

During my "lunch" I tackled the slightly bubbling rear brake lines.
Note that this is a temporary measure and I'll tackle the brakes once the suspension is back in place. I also noticed the rear flexi hoses had a few surface cracks in them. Good enough for the forthcoming MOT but not for me. To undo the flexies it means splitting the joint between them and the main front to rear hard lines. From bitter experience I know that these won't split or undo without ruining the main front to rear brake pipes / hard lines. So the that whole job is on the list sometime soon but not immediately.
It is still good enough (hopefully) to pass its forthcoming MOT but I'd not be happy with them as they are.
So a temporary fix was to remove the plastic bubbled coating, scrape and sand the corrosion away and then paint the exposed lines. Sounds like a lot but this only on the short hard lines that clip to the beam. The corrosion ironically was where the green clips are. These particular pipes are £18 each new but as stated above I don't want to disturb the hydraulic circuits just yet.
When doing work like this, things do escalate and unplanned works do creep in. I'll now leave the new rear calipers and drain down the and bleed the system once.
Anyway, I did of course take some photos, saying that, the camera really struggled to focus on the thin pipes so some are a bit blurred.
Bubbly
Part cleaned, notice the white corrosion, these lines are aluminium it seems unless there is some ali in the plastic coating
Prepped
And painted, I'll give these at least three coats as the brake hydraulics side project may not follow immediately.
During my "lunch" or was it the teabreak? I also popped down to VW and picked up £64 worth of bolts !
It was the big beam pivot bolts that cost most, almost a Kings ransom on their own! And good job I counted them as there were only nine of the hub bolts, one short.
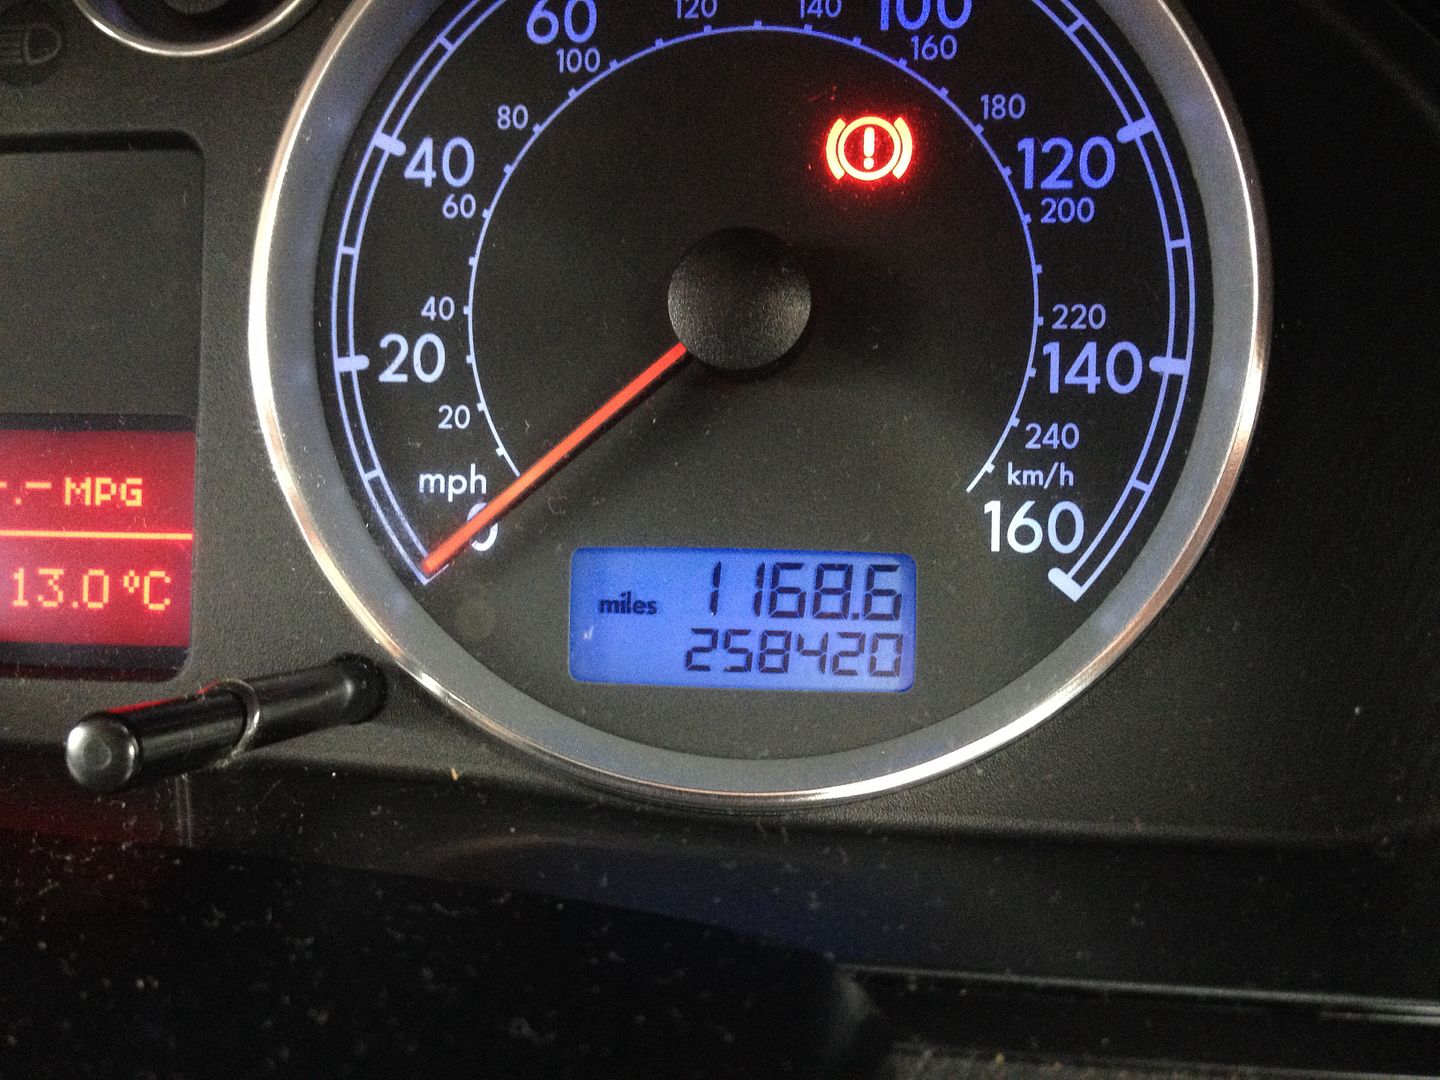

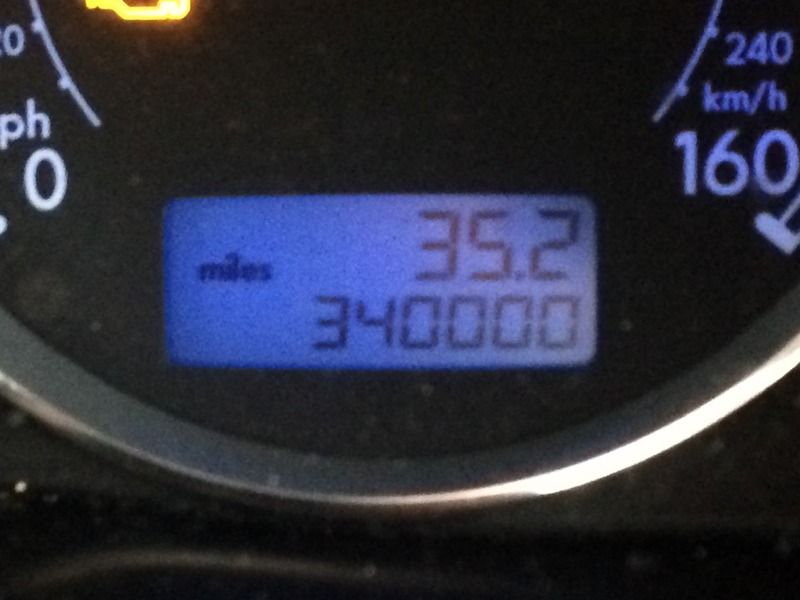
258k and 340k, mine at 140k is barely run in then.
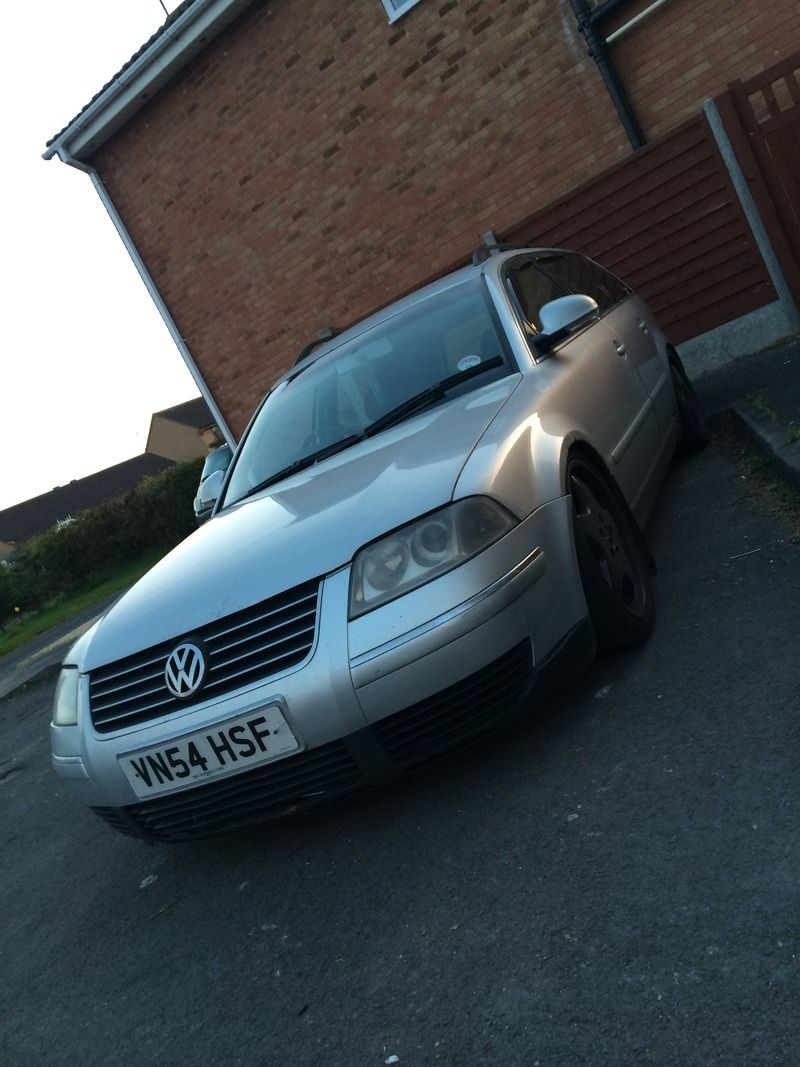
It is also strange that of all the "special guest appearance / stars" cars in this thread including mine have all been Reflex Silver and all have been estates.
As for getting rid of mine, obviously with all this work done, I plan to keep it for a while longer. At my current annual mileage though it would take me over ten years to 258k and pushing twenty years to get to 340k. I don't know if I'll keep it that long.
These Passats really are the King of Sheds and as I'm sure I've mentioned in TDI guise mini smoker barges as well. The 2.5 V6 TDI's are proper smoker barges though but sadly they are not reliable.
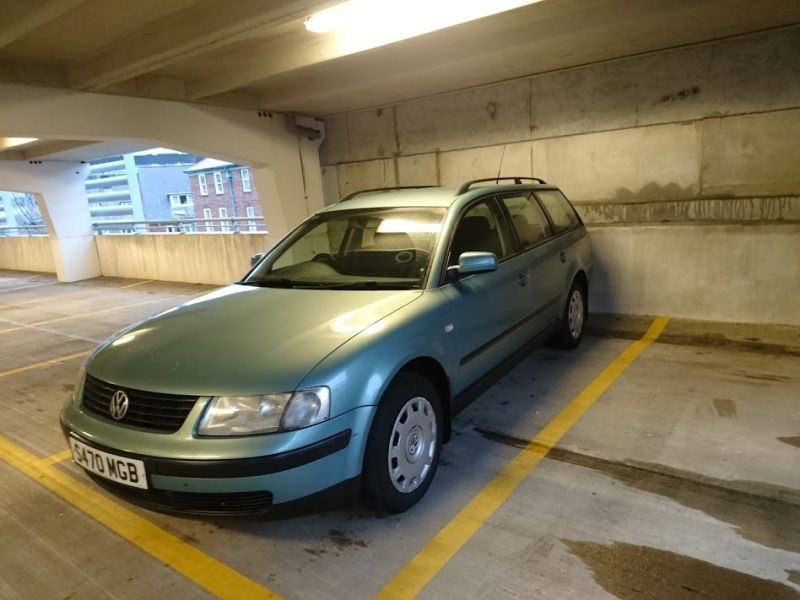
Another estate but a blue one, or is it green?
That is a B5 whereas mine and the others are B5.5's
Is it a 1.8 non turbo? If so not far off the turbo'd 1.8's with 125hp vs 150hp. And if it is non turbo'd it won't suffer from the oil pickup and turbo oil sludging problem.
Nice car, I'd like a B5 with the older 110hp AFN TDI engine, they put modern stuff to shame with their very frugal appetite for fuel.
Yep, my last passat was a 1.8t estate on a T-reg I think. It was fast-ish, but not much more so than this - as some members alluded to in another thread, this lacks the low-down torque of the turbo model, but for me it's fine as a sheddy bike-carrier.
I also had a Y-reg Octavia with the 110bhp 1.9TDI engine, that was a lovely car, pulled really well.
Good to know that I won't get the sludging problem, ta!
Also, I think it's officially blue, but looks green to me!
I also had a Y-reg Octavia with the 110bhp 1.9TDI engine, that was a lovely car, pulled really well.
Good to know that I won't get the sludging problem, ta!
Also, I think it's officially blue, but looks green to me!
Just had a 52 plate 1.9TDi estate in for a "mid life" fettle  first new clutch at 178K
  , new 4 part clutch, cam belt and water pump, starter, 2 outer Cvs, new discs and pads pluss i sanded and laquerd his headlamps and did some odd tidying jobs (odd screws here and there, re-seat bumpers ect) and the owner didn't bat an eylid at the £1500 i quoted, i was suprised TBH but i must say it does drive really nice (red Di spec so 130? ), the old DMF was siezed, the new one really makes a differance! lots less ESC flashing up on accell out of corners and off roundabouts and gear changing is so much smoother it really flatters the driver (and saves the Fr tyres)
I cant say i'm a fan of the dash lighting, way too many lights to find the one you want ! but i guess you get used to it i am a bit oldschool (or neanderthal as the ex wife would say) when it comes to my cars so anything this century is new and confusing to me
All in a really nice solid feeling old bus, had 5 offers to buy it from local cab drivers over the week i had it in the workshop, strangely they all drive mercs and wish they didn't
first new clutch at 178K , new 4 part clutch, cam belt and water pump, starter, 2 outer Cvs, new discs and pads pluss i sanded and laquerd his headlamps and did some odd tidying jobs (odd screws here and there, re-seat bumpers ect) and the owner didn't bat an eylid at the £1500 i quoted, i was suprised TBH but i must say it does drive really nice (red Di spec so 130? ), the old DMF was siezed, the new one really makes a differance! lots less ESC flashing up on accell out of corners and off roundabouts and gear changing is so much smoother it really flatters the driver (and saves the Fr tyres) I cant say i'm a fan of the dash lighting, way too many lights to find the one you want ! but i guess you get used to it i am a bit oldschool (or neanderthal as the ex wife would say) when it comes to my cars so anything this century is new and confusing to me
All in a really nice solid feeling old bus, had 5 offers to buy it from local cab drivers over the week i had it in the workshop, strangely they all drive mercs and wish they didn't
You know I said there was no rust...
Well, I had a very very good look and found some. Very minor superficial surface rust but I found some. So, I whizzed it off and touched it up.
Can you see it? Clue I've removed the wheelarch liner clips

Same again but whizzed off ready for paint

Some here, whizzed off ready for paint

Just a tad on a spot weld, in fact there were a few like this.


At the moment I'm waiting for a few bits and bobs to arrive before re-fitting the beam and building things up. I also had a think and decided to go for it on the brakes, I've ordered new flexis, hoses and a roll of kunifer to make up new front to main lines if things go wrong.
I think this is now firmly out of shedding and into restoration territory. Shedding requires that NO money is spent on a shed.
This evening I also spent five minutes fitting the bush cassettes and the green clips back onto the beam.

Well, I had a very very good look and found some. Very minor superficial surface rust but I found some. So, I whizzed it off and touched it up.
Can you see it? Clue I've removed the wheelarch liner clips
Same again but whizzed off ready for paint
Some here, whizzed off ready for paint
Just a tad on a spot weld, in fact there were a few like this.
At the moment I'm waiting for a few bits and bobs to arrive before re-fitting the beam and building things up. I also had a think and decided to go for it on the brakes, I've ordered new flexis, hoses and a roll of kunifer to make up new front to main lines if things go wrong.
I think this is now firmly out of shedding and into restoration territory. Shedding requires that NO money is spent on a shed.
This evening I also spent five minutes fitting the bush cassettes and the green clips back onto the beam.
Nice to see some love being shown to a Passat!
I do miss my old estate, it was a great work horse.
My current saloon is up to 111k miles now, bought it with 54k. It's been a brilliant car, it's regularly serviced and hasn't let me down. It's a 1.9 TDI 130 highline with a revo map to 170bhp
 IMG_1356 by Rob Joyce, on Flickr
I do miss my old estate, it was a great work horse.
My current saloon is up to 111k miles now, bought it with 54k. It's been a brilliant car, it's regularly serviced and hasn't let me down. It's a 1.9 TDI 130 highline with a revo map to 170bhp
IMG_1356 by Rob Joyce, on FlickrEdited by big dub on Thursday 3rd March 22:04
Some will be bored to death of this and some will understand.
Another busy evening.
I got the beam back onto the car with the assistance of my 15 year old son. It would have taken me much longer to do on my own. The bits and bobs I was waiting for turned so it meant I could get things done. I've ended up getting one side 3.4's built up on the beam and then decided I'd had enough. I didn't take any photos of the build up but will when I do the other side.
A load of nice new shiny and rust free trim screws turned up. These are the T25 torx ones that fix many many things to the car, I got 50 delivered for not much. Funnily enough they arrived just as I was putting the arch liner back in so some of the pics below are with the me using the old screws as a temporary measure.

Scabby old vs shiny new. It is the small things.

Oh no... There is run in the paint! This is an example of where I splodged it on on the bits where there was rust!

This tin of waxoyl must be 20 years old. I looked all over the tin and couldn't see a www dot anywhere on it. The irony is the tin is a bit rusty, maybe I should waxoyl it?

Dabs of waxoyl on the arch where the liner tightly fits against it. It'll also help the mounting screw holder holes to not go rusty like the two I had to deal with in a previous post.

Arch liner on

A bit more dabbaging of waxoyl on the shock top mount.

Shock on


The spring cups turned up each in there own nice red box.

The old uppers were possibly re-usable but the lowers were quite knarled up. As I'm going this far, I though whats another £27 or so....

A pointless shot of old and new

Shiny screws

Cleaned up the carrier sliders. They were actually perfectly good from five years ago when I last changed the discs and pads. All I had to do was clean and re-grease

Greasing anything on the brakes should be done with ceramic grease. NEVER use copper grease.

Trial fit of pad in carrier, I wanted to know if the paint had caused clearance issues. It hadn't

So, beam on !

One side 3/4's done before I gave up.

More completely mind numbing updates tomorrow.
Another busy evening.
I got the beam back onto the car with the assistance of my 15 year old son. It would have taken me much longer to do on my own. The bits and bobs I was waiting for turned so it meant I could get things done. I've ended up getting one side 3.4's built up on the beam and then decided I'd had enough. I didn't take any photos of the build up but will when I do the other side.
A load of nice new shiny and rust free trim screws turned up. These are the T25 torx ones that fix many many things to the car, I got 50 delivered for not much. Funnily enough they arrived just as I was putting the arch liner back in so some of the pics below are with the me using the old screws as a temporary measure.
Scabby old vs shiny new. It is the small things.
Oh no... There is run in the paint! This is an example of where I splodged it on on the bits where there was rust!
This tin of waxoyl must be 20 years old. I looked all over the tin and couldn't see a www dot anywhere on it. The irony is the tin is a bit rusty, maybe I should waxoyl it?
Dabs of waxoyl on the arch where the liner tightly fits against it. It'll also help the mounting screw holder holes to not go rusty like the two I had to deal with in a previous post.
Arch liner on
A bit more dabbaging of waxoyl on the shock top mount.
Shock on
The spring cups turned up each in there own nice red box.
The old uppers were possibly re-usable but the lowers were quite knarled up. As I'm going this far, I though whats another £27 or so....
A pointless shot of old and new
Shiny screws
Cleaned up the carrier sliders. They were actually perfectly good from five years ago when I last changed the discs and pads. All I had to do was clean and re-grease
Greasing anything on the brakes should be done with ceramic grease. NEVER use copper grease.
Trial fit of pad in carrier, I wanted to know if the paint had caused clearance issues. It hadn't
So, beam on !
One side 3/4's done before I gave up.
More completely mind numbing updates tomorrow.
Edited by colin_p on Thursday 3rd March 22:17
big dub said:
Nice to see some love being shown to a Passat!
I do miss my old estate, it was a great work horse.
My current saloon is up to 111k miles now, bought it with 54k. It's been a brilliant car, it's regularly serviced and hasn't let me down. It's a 1.9 TDI 130 highline with a revo map to 170bhp
IMG_1356 by Rob Joyce, on Flickr
That is nice, is it on bags?I do miss my old estate, it was a great work horse.
My current saloon is up to 111k miles now, bought it with 54k. It's been a brilliant car, it's regularly serviced and hasn't let me down. It's a 1.9 TDI 130 highline with a revo map to 170bhp
IMG_1356 by Rob Joyce, on FlickrEdited by big dub on Thursday 3rd March 22:04
I also like the side markers which I'd like for mine but they really do cost a fortune. Are you in the UK?
colin_p said:
That is nice, is it on bags?
I also like the side markers which I'd like for mine but they really do cost a fortune. Are you in the UK?
Yes it's on air, the side markers really didn't cost a lot, I got them off US ebay. I found some clear ones to go better with the look I was after, and picked up some orange bulbs.I also like the side markers which I'd like for mine but they really do cost a fortune. Are you in the UK?
While the car was in for body mods and paint, the bodyshop fitted the side markers into the original corner strips.
Yes I'm in the UK, I'm up in Cheshire.
Rob
A jolly good session has been had. The rear end is now complete. I've still yet to do the brake hydraulics but as I've mentioned that will be a separate project from the suspension.
As I mentioned in the previous update post, I 75% finished one side last night after getting the beam back on the car with the help of my 15 year old son. This afternoon I finished the 25% of work on the side I'd started last night and then proceeded to build up and finsh the other (drivers side). Whilst doing the driver side I took some pictures...
Passenger side done (except for the brake hydraulics)


Which me the drivers side to do. This is as it was after fitting the beam last night. All I've done is tie the brake caliper back up out the way.

You will note the marks on the paint. This is where I'd 'levelled it off' in truth removing a run with a wood chisel. The hub needs to fit a flat surface.

A bit of dabbage of waxoyl on the mating faces

Hub on

Brake caliper carrier bracket going on

All tightened and torqued up

New nuts and washers on the handbrake cable brackets

Caliper piston wound back in although the picture below gives no clue

Those cheese haeded bolts that were crusty rusty, I didn't want these nice new one going the same way, so I painted them!

And I painted the new nuts on the handbrake cable

Disc on, a nice feature on the rears is that you do not have to remove the carrier bracket to remove and fit the disc

Diego. He is the research and development bloke at Brembo and such is his importance there is a pictore of him on the brake pad box. I wonder what he drives? I bet he has got an old Alpha and goes for long boozy lunches at various pavement cafes and that is where he gets his ideas from.

When fitting pads, a blob of ceratech grease needs to go on the pads end ears. I'm hoping the built in squeal shims will do their job and hence have not applied any to the backs of the pads.

Pads mounted

Old caliper back on for now

Job done. All that hard work will never be seen except by me and the MOT man. But whenever I drive the car, I will know and be safe in the knowledge that the car is "sorted".

As I mentioned in the previous update post, I 75% finished one side last night after getting the beam back on the car with the help of my 15 year old son. This afternoon I finished the 25% of work on the side I'd started last night and then proceeded to build up and finsh the other (drivers side). Whilst doing the driver side I took some pictures...
Passenger side done (except for the brake hydraulics)
Which me the drivers side to do. This is as it was after fitting the beam last night. All I've done is tie the brake caliper back up out the way.
You will note the marks on the paint. This is where I'd 'levelled it off' in truth removing a run with a wood chisel. The hub needs to fit a flat surface.
A bit of dabbage of waxoyl on the mating faces
Hub on
Brake caliper carrier bracket going on
All tightened and torqued up
New nuts and washers on the handbrake cable brackets
Caliper piston wound back in although the picture below gives no clue
Those cheese haeded bolts that were crusty rusty, I didn't want these nice new one going the same way, so I painted them!
And I painted the new nuts on the handbrake cable
Disc on, a nice feature on the rears is that you do not have to remove the carrier bracket to remove and fit the disc
Diego. He is the research and development bloke at Brembo and such is his importance there is a pictore of him on the brake pad box. I wonder what he drives? I bet he has got an old Alpha and goes for long boozy lunches at various pavement cafes and that is where he gets his ideas from.
When fitting pads, a blob of ceratech grease needs to go on the pads end ears. I'm hoping the built in squeal shims will do their job and hence have not applied any to the backs of the pads.
Pads mounted
Old caliper back on for now
Job done. All that hard work will never be seen except by me and the MOT man. But whenever I drive the car, I will know and be safe in the knowledge that the car is "sorted".
A slow day, lots of time spent but seemingly with nothing happening.
Saying that, I did spend a fair bit of time tidying up as things were a right mess with tools everywhere. I hate that and when in that state you can spend, I do anyway, more time looking for tools than actually using the damned things. You put one down and then five seconds later you cannot find it. So I tidied up.
Then I commenced the front end. Jacked it up, axle stands and wheels off. Then wheels back on and down off the axle stands as I'd forgotten to undo the CV joint nuts. And back up it went.
I started to tackle the passenger side first. I've previously had issues with the lower arm balljoints releasing from knuckle so have left them as were / is. I released the uppers though with the infamous pinchbolt coming out easily as expected, it has only been a year since I last replaced it. What was surprising though was the complete absence of any copper grease which I liberally coated it with.
Upper arms released, lower shock mount bolt undone, the three top mount / upper arm carrier plate bolts undone and them I wriggled the strut assembly complete out from the car. Nice.
I swapped the strut over for the new one and refitted it back on the car, no drama. When I do the drovers side I'll take some pics.
I then whipped the complete drveshaft off the car for the CV joint swap on the bench, a much nicer place to do it. With the shaft on the bench, I cut the boot off and gave the joint a tap with the lump hammer and off the joint popped.
Cleaned and inspected the splines, all good.

Old joint. I shall carry out a clean up and inspection of it when I've finished doing the car, more out of curiosity than anything.

New boot on and then a trial fit of the new joint, just to make sure...

Greased it up, the full sachet supplied with the joint and fitted it. Then fitted the clip. A pair of pliers like this are essential for this job.

Cleaned up and carefully inspected the inner joint boot. It is like new with no signs of wear at all. Not bad for something that old.

A random shot of the dirty disc shield.

Back onto the car. This era of VW and Audi's are prone to the front wings going rusty. Starting from here and also where a lump of foam in close proximity remains wet. Mine was / is spotless.

Same here, no rust at all

Edge of the bit of foam on the left, again spotless and rust free.

Subframe alignment holes for reference. I'm not dropping the subframe this time as I don't have an engine crane any more. You need to support the engine to remove the subframe. What I will though is touch up the subframe on the exposed bits facing the wheelarch.

A tiny bit of surface rot on the subframe. Not the best pic but this type of rot leads to bad things and maybe in another 20 years it could cause an MOT failure!

On a Ford of this era, a seam / joint like this would be rusty, this is as clean as a whistle, no sign of rust at all.

Same here, no sign of rust and testament to the VW build quality. Very pleased to see nothing in these areas. I do know that there is a bit on the drivers side but that may be due to a bad accident repair earlier in the cars life.

And that is it for today, I really couldn't be arsed to do anymore.
Saying that, I did spend a fair bit of time tidying up as things were a right mess with tools everywhere. I hate that and when in that state you can spend, I do anyway, more time looking for tools than actually using the damned things. You put one down and then five seconds later you cannot find it. So I tidied up.
Then I commenced the front end. Jacked it up, axle stands and wheels off. Then wheels back on and down off the axle stands as I'd forgotten to undo the CV joint nuts. And back up it went.
I started to tackle the passenger side first. I've previously had issues with the lower arm balljoints releasing from knuckle so have left them as were / is. I released the uppers though with the infamous pinchbolt coming out easily as expected, it has only been a year since I last replaced it. What was surprising though was the complete absence of any copper grease which I liberally coated it with.
Upper arms released, lower shock mount bolt undone, the three top mount / upper arm carrier plate bolts undone and them I wriggled the strut assembly complete out from the car. Nice.
I swapped the strut over for the new one and refitted it back on the car, no drama. When I do the drovers side I'll take some pics.
I then whipped the complete drveshaft off the car for the CV joint swap on the bench, a much nicer place to do it. With the shaft on the bench, I cut the boot off and gave the joint a tap with the lump hammer and off the joint popped.
Cleaned and inspected the splines, all good.
Old joint. I shall carry out a clean up and inspection of it when I've finished doing the car, more out of curiosity than anything.
New boot on and then a trial fit of the new joint, just to make sure...
Greased it up, the full sachet supplied with the joint and fitted it. Then fitted the clip. A pair of pliers like this are essential for this job.
Cleaned up and carefully inspected the inner joint boot. It is like new with no signs of wear at all. Not bad for something that old.
A random shot of the dirty disc shield.
Back onto the car. This era of VW and Audi's are prone to the front wings going rusty. Starting from here and also where a lump of foam in close proximity remains wet. Mine was / is spotless.
Same here, no rust at all
Edge of the bit of foam on the left, again spotless and rust free.
Subframe alignment holes for reference. I'm not dropping the subframe this time as I don't have an engine crane any more. You need to support the engine to remove the subframe. What I will though is touch up the subframe on the exposed bits facing the wheelarch.
A tiny bit of surface rot on the subframe. Not the best pic but this type of rot leads to bad things and maybe in another 20 years it could cause an MOT failure!
On a Ford of this era, a seam / joint like this would be rusty, this is as clean as a whistle, no sign of rust at all.
Same here, no sign of rust and testament to the VW build quality. Very pleased to see nothing in these areas. I do know that there is a bit on the drivers side but that may be due to a bad accident repair earlier in the cars life.
And that is it for today, I really couldn't be arsed to do anymore.
Gassing Station | Readers' Cars | Top of Page | What's New | My Stuff