Shedding properly, 2004 Passat Estate 1.9 TDI
Discussion


colin_p said:
Wow, £1,500 is a big bill.
Question for you regarding the clutch; As a DIY'er I think I'd struggle to drop the box the traditional way, I assume you have a proper ramp and transmission jack etc. Do you reckon it is do-able up on ramps?
Nope i use axle stands and ramps, not fun but easyer than the normal FWD as you can use a trolly jack to support and move the box Question for you regarding the clutch; As a DIY'er I think I'd struggle to drop the box the traditional way, I assume you have a proper ramp and transmission jack etc. Do you reckon it is do-able up on ramps?
 just watchout for the gear linkadge support rod bolt! (it's longer than the doctors dong in deep throat)
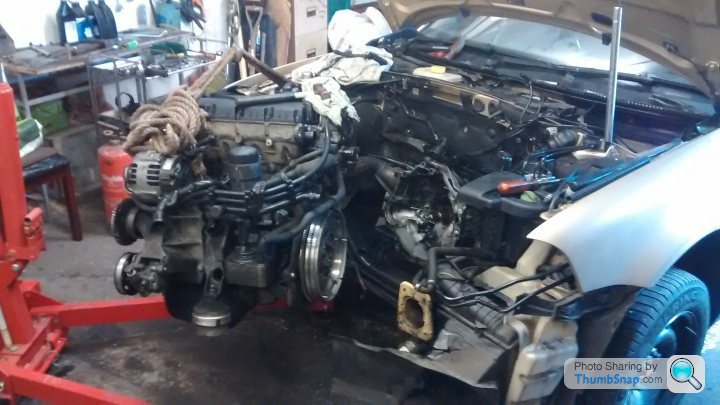
This one i removed the engine, as i was doing the timing belt so the front has to come forward by a few inches and fully removing it was like an extra 10 mins work, there is a LOT of wiring and pipes to do however i wouldn't do it this way just for a clutch

The bottom B/H bolts are a PITA tucked up close to the Xmember and many of the bolts are 1/8th of a turn at a time to undo so i have cut down spanners especialy for this sort of issue, going back in lube them well and you can wind them 95% of the way with fingers only
£1500 was a hell of a bill but the car was worth it (full dealer SH), for that money he'd get a similar car with unknown issues and all the main scarey ones were delt with in 1 go on this.
The one problem is even after all that work (clutch appart) the car felt no better, even with many worn parts it felt tight and like a car with 150K less on the odo but it's future proofed and ready for another 100K + with no scarey big bills to come (well hopefully) lol
This is ace, not the most 'PH' of cars, but I think it's great that you have so much passion for the car (that's why we're all here, right?) and meticulous attention to detail. That thing looks spotless! I wish I had the time, skills and knowledge to maintain mine to such a high level.
S0 What said:
Nope i use axle stands and ramps, not fun but easyer than the normal FWD as you can use a trolly jack to support and move the box just watchout for the gear linkadge support rod bolt! (it's longer than the doctors dong in deep throat)
This one i removed the engine, as i was doing the timing belt so the front has to come forward by a few inches and fully removing it was like an extra 10 mins work, there is a LOT of wiring and pipes to do however i wouldn't do it this way just for a clutch
The bottom B/H bolts are a PITA tucked up close to the Xmember and many of the bolts are 1/8th of a turn at a time to undo so i have cut down spanners especialy for this sort of issue, going back in lube them well and you can wind them 95% of the way with fingers only
£1500 was a hell of a bill but the car was worth it (full dealer SH), for that money he'd get a similar car with unknown issues and all the main scarey ones were delt with in 1 go on this.
The one problem is even after all that work (clutch appart) the car felt no better, even with many worn parts it felt tight and like a car with 150K less on the odo but it's future proofed and ready for another 100K + with no scarey big bills to come (well hopefully) lol
Thanks for that. I've had the front off completely, swinging the A/C rad to one side when I last did the cambelt, like you say it is only another ten minutes work and makes access to belts much easier. It also makes replacing the coolant radiator much easier as well. The coolant rad and the electric aux being another common failure on these as they age. The rad weeps coolant at the lower corners and the brushes wear out on the fan motor, which is always running when the A/C is on which it always is on my car. just watchout for the gear linkadge support rod bolt! (it's longer than the doctors dong in deep throat) This one i removed the engine, as i was doing the timing belt so the front has to come forward by a few inches and fully removing it was like an extra 10 mins work, there is a LOT of wiring and pipes to do however i wouldn't do it this way just for a clutch
The bottom B/H bolts are a PITA tucked up close to the Xmember and many of the bolts are 1/8th of a turn at a time to undo so i have cut down spanners especialy for this sort of issue, going back in lube them well and you can wind them 95% of the way with fingers only
£1500 was a hell of a bill but the car was worth it (full dealer SH), for that money he'd get a similar car with unknown issues and all the main scarey ones were delt with in 1 go on this.
The one problem is even after all that work (clutch appart) the car felt no better, even with many worn parts it felt tight and like a car with 150K less on the odo but it's future proofed and ready for another 100K + with no scarey big bills to come (well hopefully) lol
So apart from needing acquire an engine crane, it does look like the engine out way for me is preferable for a clutch change. I'm in no hurry on the clutch as it doesn't slip all the time, I just get the occasional slight bit of slip.
matt21 said:
Mine continues to chug away. 54 plate Highline 184k. It's great.
And long may it continue, by and large these cars seem to go on and on and on...JakeT said:
Spent some time in an '03 model with the 130bhp unit. While not a great handler it was very much at home on motorways and dual carriageways. That also explains how the front wings were rusty on the one I was in!
Yes, they are great at wafting along, not full on luxo barges but very close and cheaper and less of a gamble for replacement parts made out of un-obtainium.samj2014 said:
This is ace, not the most 'PH' of cars, but I think it's great that you have so much passion for the car (that's why we're all here, right?) and meticulous attention to detail. That thing looks spotless! I wish I had the time, skills and knowledge to maintain mine to such a high level.
As I've mentioned I should really be in something newer, either take a company car of jump on the the lease / pcp wagon but there is no fun in that. With all this work I'm doing, i'll be safe in the knowledge that I shouldn't receive any nasty surprises and big bills which normally would be at the back of your mind if you run a shed type car.I've already had it almost five years and plan to keep it at least another five. It was all bought and paid for years ago. To put it in context, the cost of all this work to me is just parts and although quite a bit on such a car is still less than say two months of pcp / lease payments.
Madril said:
Great topic OP.
Have you touched the EGR yet?
Yes and no.Have you touched the EGR yet?
I had the EGR off once soon after I got the car to clean it but with it being to Euro 4 emission standards an EGR delete brings on the engine management light. The first one of these I had was exactly the same but was Euro 3 and on that I simply pulled the vac line off the egr and plugged it.
What I have done though is dial down the EGR duty cycle using VCDS / Vagcom to the lowest setting. I had to look up this procedure online and cannot remember how but it was easily done. I would really like to to do away with it completely but that will require it being 'mapped' out. Strangely I've resisted having a re-map and have no plans to get one.
Edited by colin_p on Sunday 6th March 12:42
Another non day.
I got the bumper and part of the front end off as well as the front wings and gave it all a good jet wash and scrub clean So I could inspect things. My suspicion always was that the car had early in its life been involved in a dink to the front drivers side, those suspicions were confirmed when the wing came off, it was / is a replacement.
Having carefully inspected everything for rust, all is good except for some very minor bits here and there which will be easy to deal with. One bonus is there was a bit where I was sure it was a bit rotty but for the time being it seems now that the dirt is out the way it just some runs in the paint.
Font end off


Dirty but rust free

Mud trapped by the poofa block type thing

Removing the big foam rubber poofa block type thing.

A poofa block !

The poofa block stops crud collecting here at the wing base but not all. No rust though in what is a mud trap

You can see the depth of wax applied from the factory, good work VW

Suspicion / exibit Nr1; overspray on the cable gaitor

exibit Nr2; paint off the wing bolt

Wing off

And the other wing off

Initial inspection, just dirty

Hinge and bracket! I can clean these now which is very difficult otherwise

Wings. the factory fitted one is silver, the replacement on is black.

Very clean and totally rust free although I've to carefully inspect these

Another poofa block of foam. This one is bad as it is the primary cause of wings rusting on this vintage of VW / Audi cars. I'm not sure if it is going to remain or if I'll remove it. It is the bit that touches the lip / edge of the arched bit. It obviously chaffs and and stays wet and lets rust get a hold. I've no idea why this car seems to be un-effected by the issue. I was at least expecting to see the start of some rot, but as said I've yet to take a close look.

The other side of the mud trap

Wings on the garden seat cushions. The Wife will be pleased just as she will be when she finds outs about me using all of her cotton buds I used earlier to clean the brake slider brackets!

A quick look after jet washing.
Spot welds again as were a few on the back showing some light surface rust. I wonder why they are susceptible?

A tiny bit of rust but above the paint runs which I thought were rust. The black stuff is factory applied rustproofing wax and nothing to worry about.

And just another tiny bit of surface rust. Likely to be as a result of low standards in the repair done years before when the wing was replaced.

I got the bumper and part of the front end off as well as the front wings and gave it all a good jet wash and scrub clean So I could inspect things. My suspicion always was that the car had early in its life been involved in a dink to the front drivers side, those suspicions were confirmed when the wing came off, it was / is a replacement.
Having carefully inspected everything for rust, all is good except for some very minor bits here and there which will be easy to deal with. One bonus is there was a bit where I was sure it was a bit rotty but for the time being it seems now that the dirt is out the way it just some runs in the paint.
Font end off
Dirty but rust free
Mud trapped by the poofa block type thing
Removing the big foam rubber poofa block type thing.
A poofa block !
The poofa block stops crud collecting here at the wing base but not all. No rust though in what is a mud trap
You can see the depth of wax applied from the factory, good work VW
Suspicion / exibit Nr1; overspray on the cable gaitor
exibit Nr2; paint off the wing bolt
Wing off
And the other wing off
Initial inspection, just dirty
Hinge and bracket! I can clean these now which is very difficult otherwise
Wings. the factory fitted one is silver, the replacement on is black.
Very clean and totally rust free although I've to carefully inspect these
Another poofa block of foam. This one is bad as it is the primary cause of wings rusting on this vintage of VW / Audi cars. I'm not sure if it is going to remain or if I'll remove it. It is the bit that touches the lip / edge of the arched bit. It obviously chaffs and and stays wet and lets rust get a hold. I've no idea why this car seems to be un-effected by the issue. I was at least expecting to see the start of some rot, but as said I've yet to take a close look.
The other side of the mud trap
Wings on the garden seat cushions. The Wife will be pleased just as she will be when she finds outs about me using all of her cotton buds I used earlier to clean the brake slider brackets!
A quick look after jet washing.
Spot welds again as were a few on the back showing some light surface rust. I wonder why they are susceptible?
A tiny bit of rust but above the paint runs which I thought were rust. The black stuff is factory applied rustproofing wax and nothing to worry about.
And just another tiny bit of surface rust. Likely to be as a result of low standards in the repair done years before when the wing was replaced.
colin_p said:
Cupramax said:
Just read this from start to finish. I doff my cap to your patience, engineering skills and attention to detail, top thread. 
I have no skills so to speak of, it is just nuts and bolts. But obviously do have some patience to undertake such a task.Sunday evening.
What would you do? Watch whatever cack is on the telly, too early for "Netflix and chill" not that the Wife has any idea what that means so I guess it is a no-no, go to the pub or if you have a lit garage mess about with lumps of your car?
I thought it'd be nice to mess about with the car or lumps of it.
The front wings as taken off the car earlier on. I gave them a good clean and had a good look at them. Good news, almost completely rust free and what bits there were were only light and superficial. Wanting to keep them that way I set to work. The replacement wing by the way is a genuine VW one not a pattern part so i guess it must have been fitted very early on the cars life.
I spot sanded the few bits of surface rust off them, mainly on the return edge where it folds back under the wheelarch and then got the rattle cans out. Ordinarily I wouldn't attempt any spray painting when it is this cold and damp as it can lead to the paint 'blooming' but the areas were small it meant I could use the electric paint stripper as a drier for the paint.
After sanding the rust spots out, I lightly sanded the rest of the lip to act as key, then primed, base coated and two coats of laquer. It was a very quick process as I was drying it almost immediately with the heat gun and secondly the finish is not important.
I then masked off and applied a nice thick coat of my favourite black paint on the section where the wheelarch liner bear onto and could possibly rub and chaff the paint off. I plan another two thick coats of this. Much like Gandalf telling the Balrog that he shall not pass, I said to myself "these wings shall not rust" or that is the plan.
Quite how the car had avoided the rust issue on the wings in the first place is unexplained but I'm very pleased that it hadn't as I was expecting to have to do a lot more to the wings. A bonus. The foam rubber poofa block on the wing is not going back on I've decided. Don't confuse them with the other poofa blocks that will be going back on by the door shuts.
A post wouldn't be complete without pictures...
As clean as a whistle

As was this one.

Clean wing with now redundant poofa

An action shot of me somehow drying paint with the heat gun and taking a photo.

The wings cunningly hanging up from the garage roof on bungy chords

Nice gloopy thick coat of paint.


What would you do? Watch whatever cack is on the telly, too early for "Netflix and chill" not that the Wife has any idea what that means so I guess it is a no-no, go to the pub or if you have a lit garage mess about with lumps of your car?
I thought it'd be nice to mess about with the car or lumps of it.
The front wings as taken off the car earlier on. I gave them a good clean and had a good look at them. Good news, almost completely rust free and what bits there were were only light and superficial. Wanting to keep them that way I set to work. The replacement wing by the way is a genuine VW one not a pattern part so i guess it must have been fitted very early on the cars life.
I spot sanded the few bits of surface rust off them, mainly on the return edge where it folds back under the wheelarch and then got the rattle cans out. Ordinarily I wouldn't attempt any spray painting when it is this cold and damp as it can lead to the paint 'blooming' but the areas were small it meant I could use the electric paint stripper as a drier for the paint.
After sanding the rust spots out, I lightly sanded the rest of the lip to act as key, then primed, base coated and two coats of laquer. It was a very quick process as I was drying it almost immediately with the heat gun and secondly the finish is not important.
I then masked off and applied a nice thick coat of my favourite black paint on the section where the wheelarch liner bear onto and could possibly rub and chaff the paint off. I plan another two thick coats of this. Much like Gandalf telling the Balrog that he shall not pass, I said to myself "these wings shall not rust" or that is the plan.
Quite how the car had avoided the rust issue on the wings in the first place is unexplained but I'm very pleased that it hadn't as I was expecting to have to do a lot more to the wings. A bonus. The foam rubber poofa block on the wing is not going back on I've decided. Don't confuse them with the other poofa blocks that will be going back on by the door shuts.
A post wouldn't be complete without pictures...
As clean as a whistle
As was this one.
Clean wing with now redundant poofa
An action shot of me somehow drying paint with the heat gun and taking a photo.
The wings cunningly hanging up from the garage roof on bungy chords
Nice gloopy thick coat of paint.
colin_p said:
Cupramax said:
Just read this from start to finish. I doff my cap to your patience, engineering skills and attention to detail, top thread.
I have no skills so to speak of, it is just nuts and bolts. But obviously do have some patience to undertake such a task. dont do yourself a disservice, you have skills, 50% of drivers couldn't even change a wheel !
S0 What said:
Trust me, when it comes to modern vehaicals patience is a skill ! and one you have in shedloads dont do yourself a disservice, you have skills, 50% of drivers couldn't even change a wheel !
True, there is too much "get a man in" these days. I don't know the reason but can think of a few. dont do yourself a disservice, you have skills, 50% of drivers couldn't even change a wheel !Photobucket for some reason changes the order of the photos so some of this may appear out of sequence.
I've almost got the front suspension built up and finished but came in for my 'tea'.
When using a wire brush in an angle grinder, sometimes this happens. Not too bad in the finger, having one in your lip stings a little bit.

Cleaned off the surface rust

And painted it


Also had a go at the crush damage on the sills. They will never be perfect but I can add back so form of protection.


Bashed back as good as I could get it and cleaned off the surface rust

The rear sills were easier, got them nice and straight

And then, you guessed it... paint

I've almost got the front suspension built up and finished but came in for my 'tea'.
When using a wire brush in an angle grinder, sometimes this happens. Not too bad in the finger, having one in your lip stings a little bit.
Cleaned off the surface rust
And painted it
Also had a go at the crush damage on the sills. They will never be perfect but I can add back so form of protection.
Bashed back as good as I could get it and cleaned off the surface rust
The rear sills were easier, got them nice and straight
And then, you guessed it... paint
Sometimes something happens that makes you think, 'oh dear' but in real life the words are stronger.
Remember the new front brake carriers, well I came to fit the first one. Sxxt the bolts don't got in. Sxxt, no wonder they were cheap. I got the drill out, the carrier in the vice took the photo below and started to drill and then off popped a washer, one of the ones I'd put on to prevent paint going on the mating face. Turns out that I'd painted them so well it wasn't obviously visible.
Emergency over!
Comparing the existing one with the new one which the holes are too small on....

The offending washers prized off!

What a plonker.
Remember the new front brake carriers, well I came to fit the first one. Sxxt the bolts don't got in. Sxxt, no wonder they were cheap. I got the drill out, the carrier in the vice took the photo below and started to drill and then off popped a washer, one of the ones I'd put on to prevent paint going on the mating face. Turns out that I'd painted them so well it wasn't obviously visible.
Emergency over!
Comparing the existing one with the new one which the holes are too small on....
The offending washers prized off!
What a plonker.
So here we go, the drivers front wheel
As it was at the start. With the wing off you get a view not normally seen.

Starting off the the upper arm pinchbolt. These rust solid in place and can cause a whole world of pain trying to remove. I've never had any bother with them. When I initially removed these from the I plusgassed them every day for a few weeks before hand, they were tight but came out. I've replaced them twice over as well since and always slather them in copper grease when they go back on. Strangely allmost all traces of it are gone each time they come back off.


Pop the upper arm balljoints out of the knuckle top

Trackrod end. Not the feeler gauges in there, this dimension needs to be preserved. That dimension and what it signifies and does could take up a thread on its own.

Caliper spring off

Then the caliper, two allen headed slider bolts on the back then you have to lever the caliper off the disc. Pic is the caliper unside down on an axle stand showing the slider bolt ends

Then the caliper carrier bracket and then the disc which just lifts off, well did on mine, others may be stuck with rust and need a whack. You can see the wear on the carrier here and where the pad end was sticking.

Into the engine bay to undo the carrier plate for the strut and tops arms, x3 bolts. One here
One here

And one here

Remove strut / shck lower bolt

Press down and take the shock, upper arms and carrier assembly complete. More later on that.

Pull the abs sensor out of its housing, I'd already cleaned it in this pic. Reason for removing is not to damage it when pulling the cv joint out of the hub and also so it is out the way when you tackle the driveshaft inner joint bolts.

ABS sensor safely tucked out the way.

As it was at the start. With the wing off you get a view not normally seen.
Starting off the the upper arm pinchbolt. These rust solid in place and can cause a whole world of pain trying to remove. I've never had any bother with them. When I initially removed these from the I plusgassed them every day for a few weeks before hand, they were tight but came out. I've replaced them twice over as well since and always slather them in copper grease when they go back on. Strangely allmost all traces of it are gone each time they come back off.
Pop the upper arm balljoints out of the knuckle top
Trackrod end. Not the feeler gauges in there, this dimension needs to be preserved. That dimension and what it signifies and does could take up a thread on its own.
Caliper spring off
Then the caliper, two allen headed slider bolts on the back then you have to lever the caliper off the disc. Pic is the caliper unside down on an axle stand showing the slider bolt ends
Then the caliper carrier bracket and then the disc which just lifts off, well did on mine, others may be stuck with rust and need a whack. You can see the wear on the carrier here and where the pad end was sticking.
Into the engine bay to undo the carrier plate for the strut and tops arms, x3 bolts. One here
One here
And one here
Remove strut / shck lower bolt
Press down and take the shock, upper arms and carrier assembly complete. More later on that.
Pull the abs sensor out of its housing, I'd already cleaned it in this pic. Reason for removing is not to damage it when pulling the cv joint out of the hub and also so it is out the way when you tackle the driveshaft inner joint bolts.
ABS sensor safely tucked out the way.
My method of removing the driveshaft inner bolts. These are 10mm triple square "cheese heads". In the pic two bolts in the drive flange where the wheel bolts go with a breaker bar to prevent things turning. And then a 10" wobble extension bar, another 10" extension bar and a 5" extension bar, a total of 25" with the triple square bit on the end with another breaker bar on the other to do the undoing...
Looks bonkers but beats struggling under the car itself

How long...

There she blows. I had the break the joint between the 'flange' and the joint with a screwdriver lightly tapped by Mr Ballpien Hammer.

You can then pull the knuckle forward and withdraw the driveshaft from the car. Much easier than splitting the lower arms providing you pinch bolts are good.


Looks bonkers but beats struggling under the car itself
How long...
There she blows. I had the break the joint between the 'flange' and the joint with a screwdriver lightly tapped by Mr Ballpien Hammer.
You can then pull the knuckle forward and withdraw the driveshaft from the car. Much easier than splitting the lower arms providing you pinch bolts are good.
On the bench to have a look. Regardless of condition I was swapping the CV joint. The hadn't failed but it wouldn't be long until it did.

Split the clips

Cut the old boot off, new stanley blade for this job!

Mess, clean as much of this off as possible using the kitchen roll you stole from the kitchen before you start hittng it with the lump hammer.

Joint popped off the shaft after some whacking with Mr Lump Hammer (pictured). I had to give this one a good clout and wouldn't have really struggled if I didn't have a bench vice. For this reason alone it is worth taking the shaft off the car. I would never have been able to have hit it hard enough with the shaft still on the car and would have risked damage to the inner joint and or gearbox bearings.

Clean the shaft end, really clean it! Then trial fit the new joint with no circlip just to make sure everything is good before you apply grease into the new joint.

New CV joint kit

Concave thrust washer on, note direction, plastic sleeve

Deliberate mistake in previous shot. PUT THE BOOT ON FIRST, you plum!

That is better, this time with the boot and the new circlip.

New grease in the joint. Some say put half in the joint and half in the boot. I say put it all in the joint and let what will be work its way into the boot when in use. Also less messy to fit doing it my way.

I've said before and say it again, if you are doing this get some of there clip pliers. Also; TOP TIP, if you have never done this buy a few spare clips as you WILL ruin a few until you get the hang of it unless of course you are a super hero type.

As was on the passenger side shaft the inner joint boot was as new.

A moody sidelit shot of the gearbox drive flange.

Action shot - SHAFT SCREWED to FLANGE ... only finger tight.

Split the clips
Cut the old boot off, new stanley blade for this job!
Mess, clean as much of this off as possible using the kitchen roll you stole from the kitchen before you start hittng it with the lump hammer.
Joint popped off the shaft after some whacking with Mr Lump Hammer (pictured). I had to give this one a good clout and wouldn't have really struggled if I didn't have a bench vice. For this reason alone it is worth taking the shaft off the car. I would never have been able to have hit it hard enough with the shaft still on the car and would have risked damage to the inner joint and or gearbox bearings.
Clean the shaft end, really clean it! Then trial fit the new joint with no circlip just to make sure everything is good before you apply grease into the new joint.
New CV joint kit
Concave thrust washer on, note direction, plastic sleeve
Deliberate mistake in previous shot. PUT THE BOOT ON FIRST, you plum!
That is better, this time with the boot and the new circlip.
New grease in the joint. Some say put half in the joint and half in the boot. I say put it all in the joint and let what will be work its way into the boot when in use. Also less messy to fit doing it my way.
I've said before and say it again, if you are doing this get some of there clip pliers. Also; TOP TIP, if you have never done this buy a few spare clips as you WILL ruin a few until you get the hang of it unless of course you are a super hero type.
As was on the passenger side shaft the inner joint boot was as new.
A moody sidelit shot of the gearbox drive flange.
Action shot - SHAFT SCREWED to FLANGE ... only finger tight.
Back the to upper arms and strut
Old strut

The spring was getting crusty, another year or two like this, this would have snapped.

Two 13mm nuts secure the strut to the carrier. Everything looks messy but this is mainly waxoyl from last time I had this off, no need to clean it.


Man maths time. This dimension should be 47mm for standard ride height. I guessed it would need to be 40mm for the revised ride height. I was going to go for 42mm but thought sod it and went for 40mm.

Back on the car, new strut on

An random shot of the completed passenger side. As I've said with the wing off, you get a full view not often seen of the full mutlilink suspension.


Back to the drivers side. Strut in, driveshaft in

Old strut
The spring was getting crusty, another year or two like this, this would have snapped.
Two 13mm nuts secure the strut to the carrier. Everything looks messy but this is mainly waxoyl from last time I had this off, no need to clean it.
Man maths time. This dimension should be 47mm for standard ride height. I guessed it would need to be 40mm for the revised ride height. I was going to go for 42mm but thought sod it and went for 40mm.
Back on the car, new strut on
An random shot of the completed passenger side. As I've said with the wing off, you get a full view not often seen of the full mutlilink suspension.
Back to the drivers side. Strut in, driveshaft in
Gassing Station | Readers' Cars | Top of Page | What's New | My Stuff