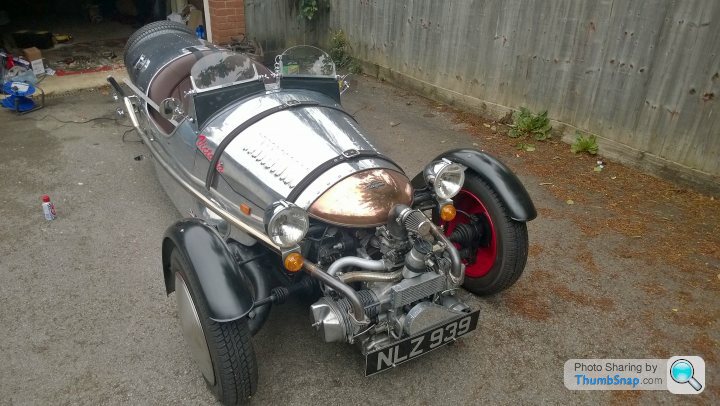
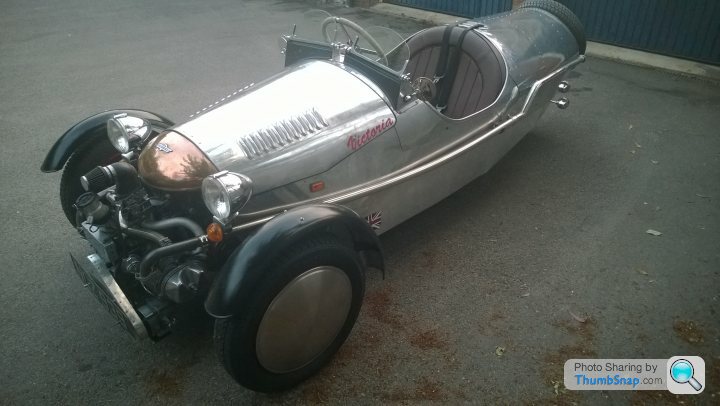
Victoria - Pembleton SuperSport
Discussion


So long as it wasn't guilt that was talking that was thoroughly decent of him to offer that! I don't think anyone with half a conscience would sell such a car in a dangerous condition anyway. It's so lucky that something really bad didn't happen! Hopefully that little mishap hasn't put your passengers off riding in it any more 
LewG said:
It's so lucky that something really bad didn't happen! Hopefully that little mishap hasn't put your passengers off riding in it any more
Indeed! I'm glad it was my mate, and not my missus that was in the car at the time. My mate just laughed it off and told me to carry on saying.. "its getting worse, but what could possibly go wrong?!"... I love his enthusiasm...If it was the OH, she wouldn't go out in it ever again, which is understandable. I'm mainly glad that I wasn't on the outside of a wagon or similar on the roundabout otherwise it may have been much worse!
Ambleton said:
So to overhaul the steering rack/pinion I need to remove (in no particular order)...
Once you've got it out, don't even think of DIYing it. Talk to Rick Pembro - http://www.gearbox-guru.co.uk/TooMany2cvs said:
Once you've got it out, don't even think of DIYing it. Talk to Rick Pembro - http://www.gearbox-guru.co.uk/
To the contrary I've been told that an overhaul of the steering tube assy is the easy bit, and removing it the worst part of the job! Ambleton said:
To the contrary I've been told that an overhaul of the steering tube assy is the easy bit, and removing it the worst part of the job!
It's easy enough to dismantle and reassemble, if you've got the right tools and can get the bits, but setting it all up right with the right preload on the pinion...I dunno about a Pembleton - but on a normal 2cv, it's a doddle to remove the rack. You don't even need to remove the engine and box. Just undo the gearbox mount, take one suspension arm off and slide it through sideways.
TooMany2cvs said:
Ambleton said:
To the contrary I've been told that an overhaul of the steering tube assy is the easy bit, and removing it the worst part of the job!
It's easy enough to dismantle and reassemble, if you've got the right tools and can get the bits, but setting it all up right with the right preload on the pinion...I dunno about a Pembleton - but on a normal 2cv, it's a doddle to remove the rack. You don't even need to remove the engine and box. Just undo the gearbox mount, take one suspension arm off and slide it through sideways.
ArtVandelay said:
That is brilliant. I remember your Lomax thread well.
I've started getting the kit car itch again, despite having a nightmare of a time with the one I used to have...
Where did you find that? I love the look of the Morgan 3 wheeler but I couldn't justify over 30k on a toy!
Cheers! Its not without its heartaches though! The lomax was just so well sorted for what it was... I've started getting the kit car itch again, despite having a nightmare of a time with the one I used to have...
Where did you find that? I love the look of the Morgan 3 wheeler but I couldn't justify over 30k on a toy!
Owning the lomax opened my eyes up to loads of weird and unusual cars and these don't come up on the market very often. Id had my eyes on owning one for years though. Just came at the right time, although right now its being a PITA.
This one was up Newcastle way. If you know what you're after, you just have to keep your eyes out.
What was wrong with your MNR Vortex? It looked like a really nice example!
If you really want a three wheeler, then there are a few options.
Pembleton and Lomax (obviously), but also JZR, BRA and Triking. Then there are more modern looking ones like Blackjack, Grinnall scorpion etc.
They are unusual, but I just love em!
Ambleton said:
ArtVandelay said:
That is brilliant. I remember your Lomax thread well.
I've started getting the kit car itch again, despite having a nightmare of a time with the one I used to have...
Where did you find that? I love the look of the Morgan 3 wheeler but I couldn't justify over 30k on a toy!
Cheers! Its not without its heartaches though! The lomax was just so well sorted for what it was... I've started getting the kit car itch again, despite having a nightmare of a time with the one I used to have...
Where did you find that? I love the look of the Morgan 3 wheeler but I couldn't justify over 30k on a toy!
Owning the lomax opened my eyes up to loads of weird and unusual cars and these don't come up on the market very often. Id had my eyes on owning one for years though. Just came at the right time, although right now its being a PITA.
This one was up Newcastle way. If you know what you're after, you just have to keep your eyes out.
What was wrong with your MNR Vortex? It looked like a really nice example!
If you really want a three wheeler, then there are a few options.
Pembleton and Lomax (obviously), but also JZR, BRA and Triking. Then there are more modern looking ones like Blackjack, Grinnall scorpion etc.
They are unusual, but I just love em!
It was a Toniq-R that I had (or a MAC with Toniq-R body) and it constantly had reliability problems and perhaps wasn't as well built as I thought it has. I think I rushed in to the purchase without enough of an inspection of the vehicle. Fun when it worked mind.
Just found the 3-wheeled section on carandclassic. There's quite a few for sale. This should keep me busy during nightshift...
ArtVandelay said:
You got it not too far from where I live then!
It was a Toniq-R that I had (or a MAC with Toniq-R body) and it constantly had reliability problems and perhaps wasn't as well built as I thought it has. I think I rushed in to the purchase without enough of an inspection of the vehicle. Fun when it worked mind.
Just found the 3-wheeled section on carandclassic. There's quite a few for sale. This should keep me busy during nightshift...
Ah yes! I remember now!It was a Toniq-R that I had (or a MAC with Toniq-R body) and it constantly had reliability problems and perhaps wasn't as well built as I thought it has. I think I rushed in to the purchase without enough of an inspection of the vehicle. Fun when it worked mind.
Just found the 3-wheeled section on carandclassic. There's quite a few for sale. This should keep me busy during nightshift...
I think my Lomax might still be advertised on there! I should probably take the advert down....
Sometimes its better to buy older kit cars that have a good few miles under their belt! At least that way you know that all the niggles will have been sorted, even if the bodywork isn't so perfect! Car and classic is probably the best place to look to be honest... Although owners forums can come up with the goods! JZR Pilates association, and the triking owners forum... There's always plenty on the Citroen Specials Club forum too....
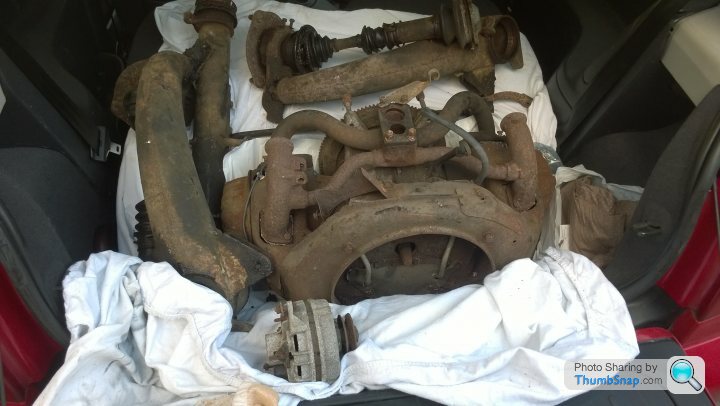
Well I'm quite chuffed today. Not because I've got the steering rack sorted out, but because I managed to get a decent haul of items for free!
One of the guys on one of the many forums I frequent is moving house and was clearing out his shed and offered these for free for collection! What a thoroughly decent chap! We had a good chat and talked about all things 2cv and three wheelers, and had a good look over his Lomax.
I walked away with the following:
- A front beam/steering rack. (no play in this, although ill strip, inspect and rebuild anyway)
- a small original alternator, not the later larger ones.
- Complete engine with oil cooler, fuel pump, flywheel and clutch etc (free turning)
- Inlet manifold
- Carb
- Suspension arms (not for me)
Although grubby from sitting in a garage on a farm for ~30years, it'll clean up fine, and with a little work, will come up good.
What a thoroughly decent chap!!
So this evening I jacked up victoria and had a rummage underneath to inspect... I found the cause of the problem.
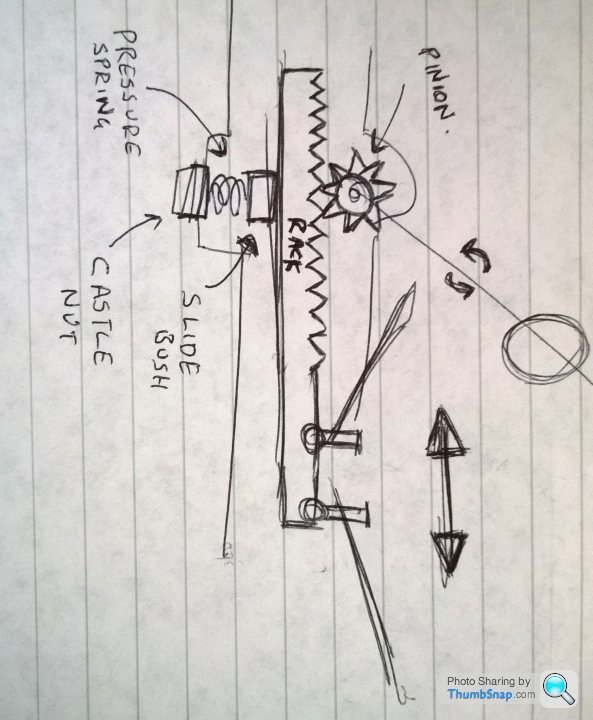
It is indeed the pressure screw/bush that isn't engaged fully, and the original builder clearly had no idea of the importance of this, I'm genuinely shocked as the rest of the car is spot on, but this is an absolute shocker, almost criminal!
Without teaching a granny to suck eggs, a steering rack basically the drawing below, no matter what the vehicle.
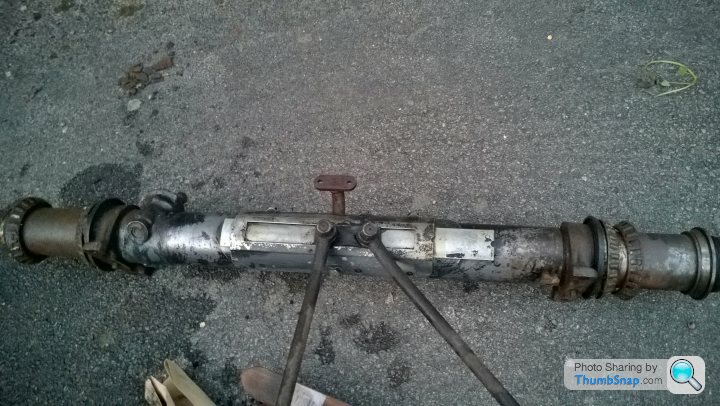
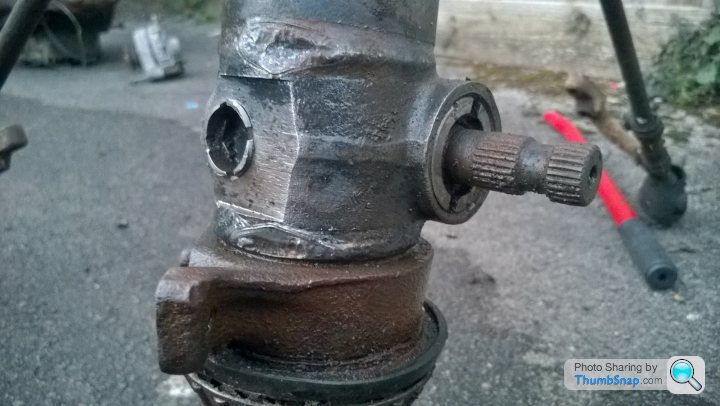
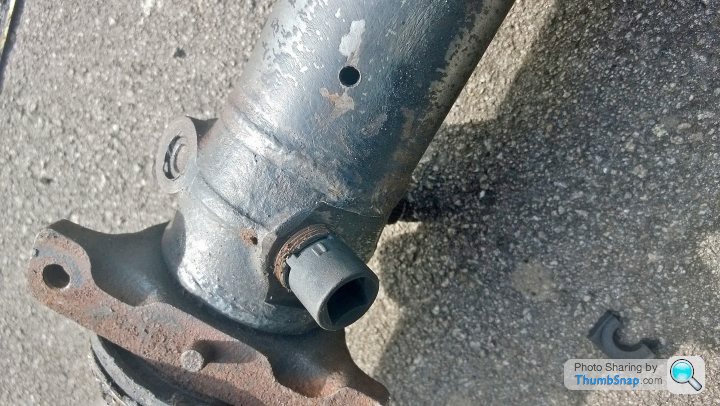
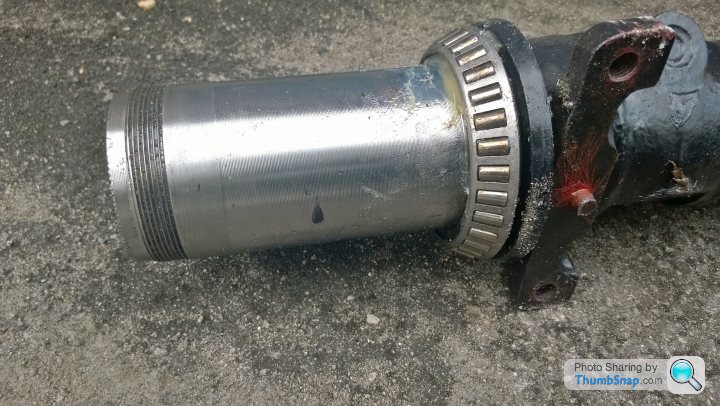
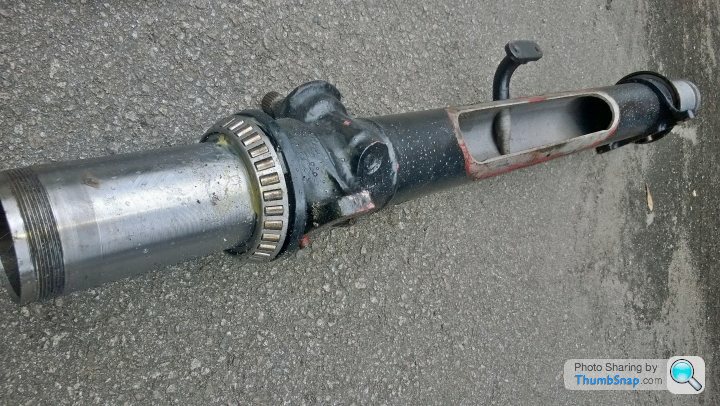
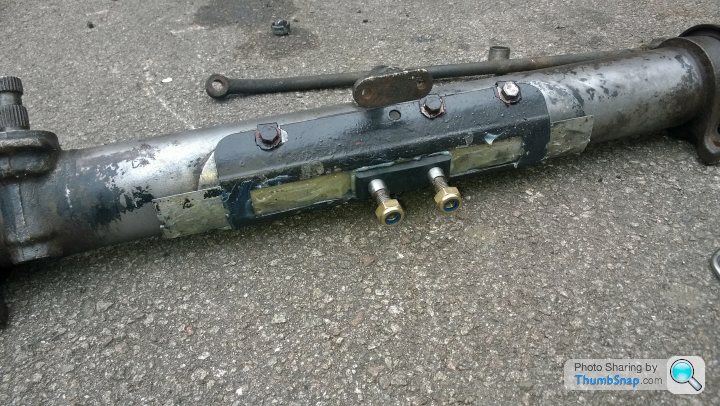
I gave the other steering rack I acquired a brush down and wipe. Very pleased considering how much it cost! Its very taught with no play in any of the bearings/bushes, but ill give it a good once over anyway... You can clearly see the splined fitting that attaches to the steering wheel. Note that the castle nut that retains the spring and guide bush has a split pin through it and has just one thread showing...
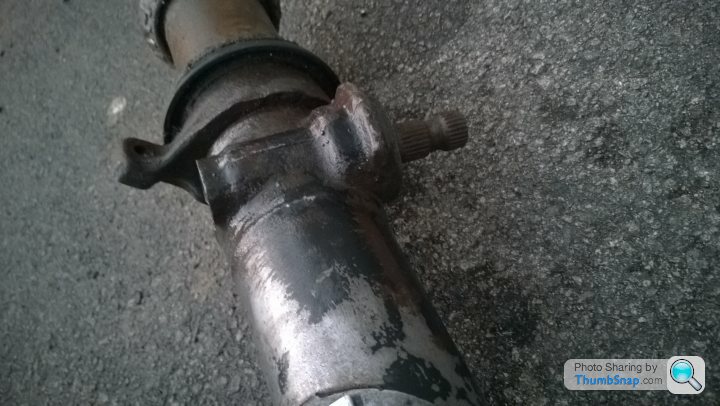
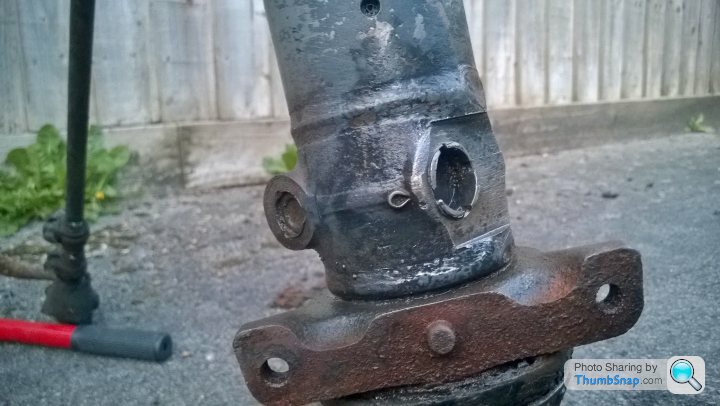
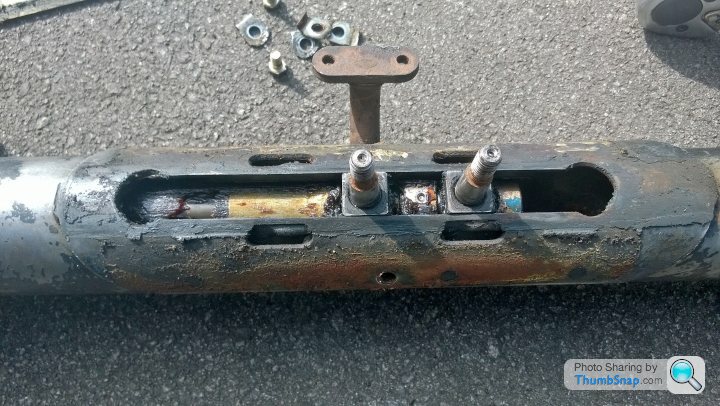
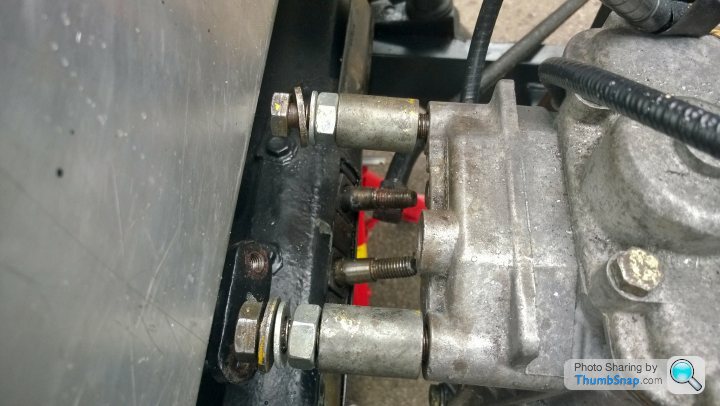
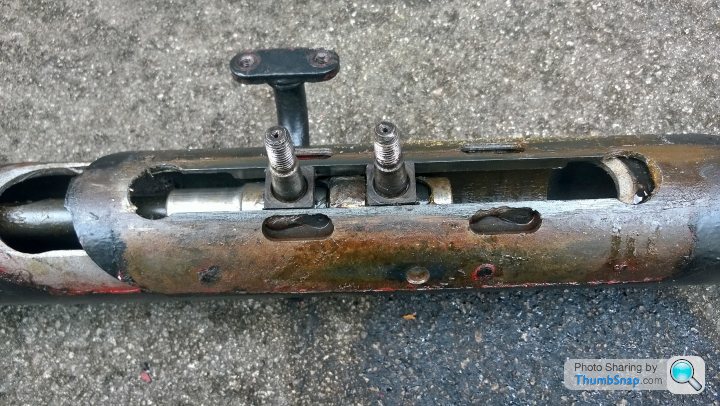
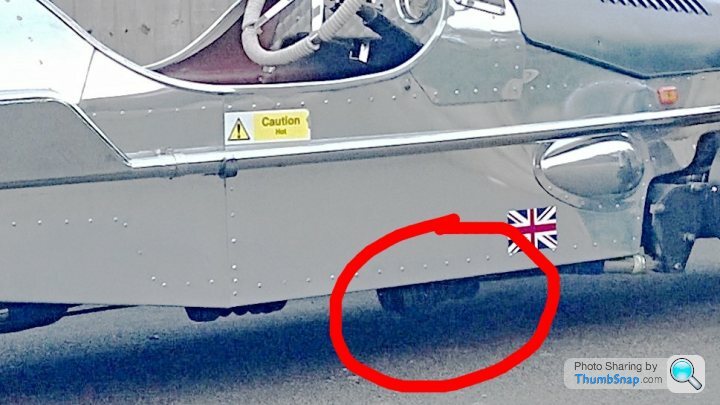
Now when we compare this to what's on the pembleton currently....

There are several things here to note....
1) There are 5 threads showing
2) There is no split pin preventing any unwinding
3 (and most worryingly)) you can see that the castellations have been ground off to clear the chassis, which indicates that the rack was either partly, or fully overhauled, and not put back together correctly, and instead of correcting the issue, reached for the grinder to make it fit.
How me, or the previous owner, or the builder wasn't killed is a freaking miracle!
It is indeed the pressure screw/bush that isn't engaged fully, and the original builder clearly had no idea of the importance of this, I'm genuinely shocked as the rest of the car is spot on, but this is an absolute shocker, almost criminal!
Without teaching a granny to suck eggs, a steering rack basically the drawing below, no matter what the vehicle.
I gave the other steering rack I acquired a brush down and wipe. Very pleased considering how much it cost!
Its very taught with no play in any of the bearings/bushes, but ill give it a good once over anyway... You can clearly see the splined fitting that attaches to the steering wheel. Note that the castle nut that retains the spring and guide bush has a split pin through it and has just one thread showing...Now when we compare this to what's on the pembleton currently....
There are several things here to note....
1) There are 5 threads showing
2) There is no split pin preventing any unwinding
3 (and most worryingly)) you can see that the castellations have been ground off to clear the chassis, which indicates that the rack was either partly, or fully overhauled, and not put back together correctly, and instead of correcting the issue, reached for the grinder to make it fit.
How me, or the previous owner, or the builder wasn't killed is a freaking miracle!
Eek.
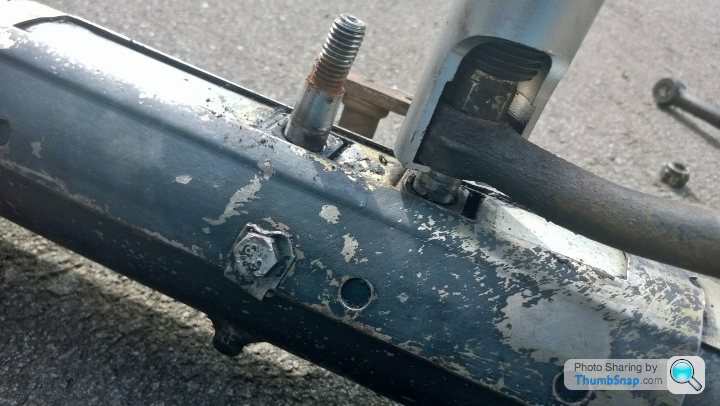
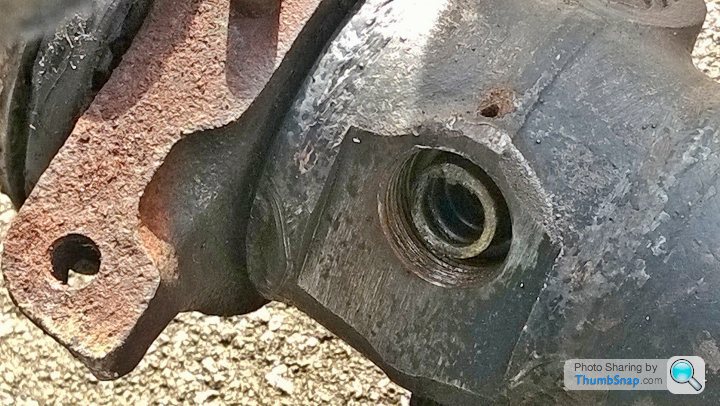
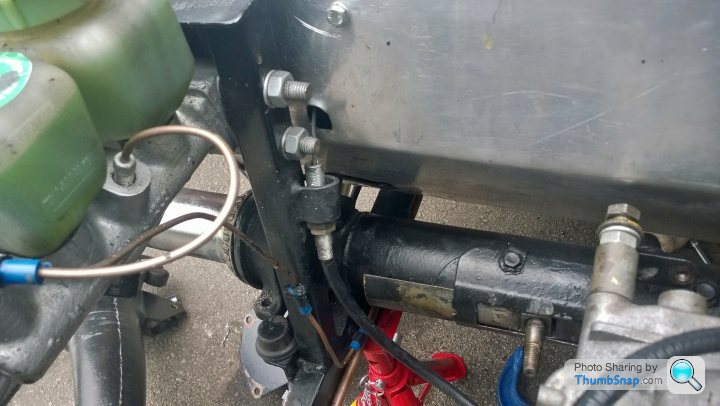
As an aside, the last photo also shows neatly-fitted P clips with tidy ( and overkill) bushings to protect the brake pipework passing through in a place no-one will ever look; if that's the standard of the rest of the build, it's very, very nice indeed - seems put together with great care otherwise
As an aside, the last photo also shows neatly-fitted P clips with tidy ( and overkill) bushings to protect the brake pipework passing through in a place no-one will ever look; if that's the standard of the rest of the build, it's very, very nice indeed - seems put together with great care otherwise
Huff said:
Eek.
As an aside, the last photo also shows neatly-fitted P clips with tidy ( and overkill) bushings to protect the brake pipework passing through in a place no-one will ever look; if that's the standard of the rest of the build, it's very, very nice indeed - seems put together with great care otherwise
This is what surprises me! The rest of the build is immense! The level of care and thought about everything is cock on! I wouldn't be at all surprised if this was overhauled by someone else and fitted, without the builder really looking at it in too much depth, just assuming it was done properly! I cant believe that this was done by the same man, a retired engineer, who built the car over a period of 4 years. I have every single receipt and bill for the build, so I might go through it and see if I can see anything mentioning a steering rack...As an aside, the last photo also shows neatly-fitted P clips with tidy ( and overkill) bushings to protect the brake pipework passing through in a place no-one will ever look; if that's the standard of the rest of the build, it's very, very nice indeed - seems put together with great care otherwise
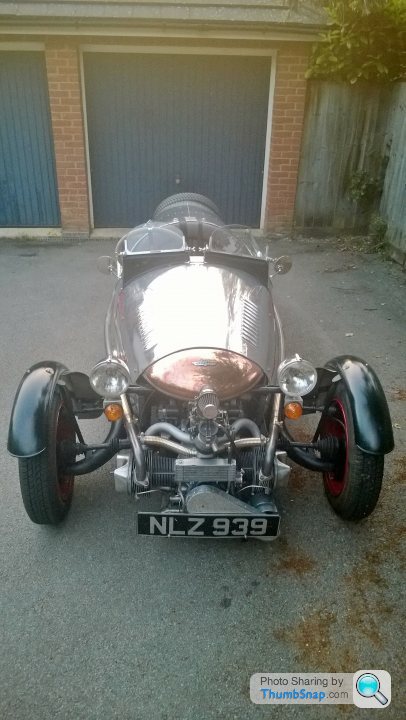
I managed to get my hands on a nice little dateless 3x3 numberplate the other day for Victoria. As soon as the paperwork is through that'll be going on. I hate the look of the one that's on. It's just not in keeping with the rest of the car.
Obviously I will have white/yellow ones for the road, and a pair of black and silver plates for pictures and show visits etc....
Obviously I will have white/yellow ones for the road, and a pair of black and silver plates for pictures and show visits etc....
Well this morning, with permission from the other half, I wandered out to the garage. Looking over the pembleton, I decided that rebuilding the steering rack was a mornings work, 4 hours absolute tops.
How wrong I was....
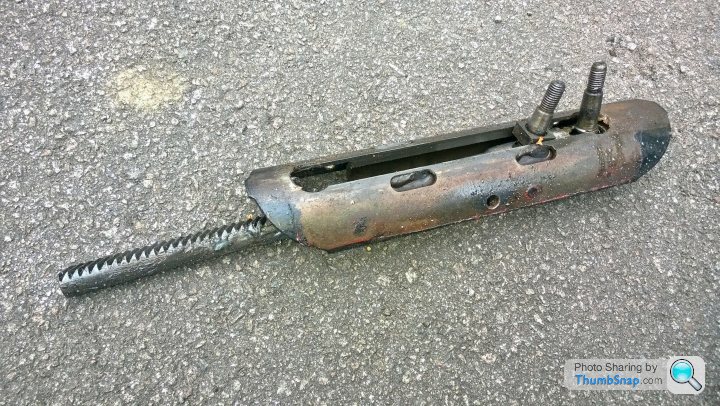
First job was to strip down and have a look at the free one I was given.
break the steering arms free from the ball joints.
Remove the cover from the slide plate

Time for a look inside!
Everything looks in brilliant order. The grease is still lovely and golden, a bit darker to the top.
Time to remove the castle nut and guide bush...
With a better idea of what I was letting myself in for, I started to pull victoria apart in order to do the job...

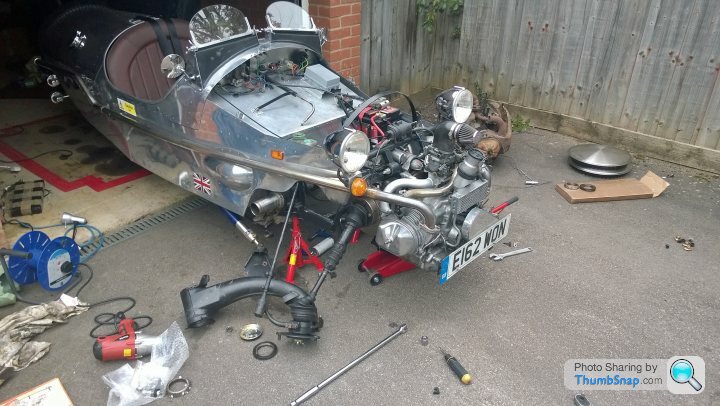
With everything disconnected, it was time to try and release the steering rack from the grips of the engine bay. I supported the gearbox from underneath and removed the gearbox mount on the front beam assy.
This is where the job got a lot more complex.... The builder obviously built the bodywork around the organs, so it was a nightmare to remove. I had to reach for the tin snips in the end to make the steering column hole larger in order to rotate the beam and lift out. Was a fricking nightmare..
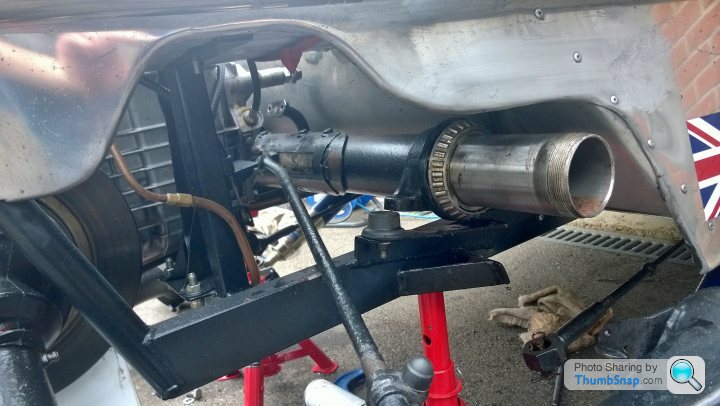
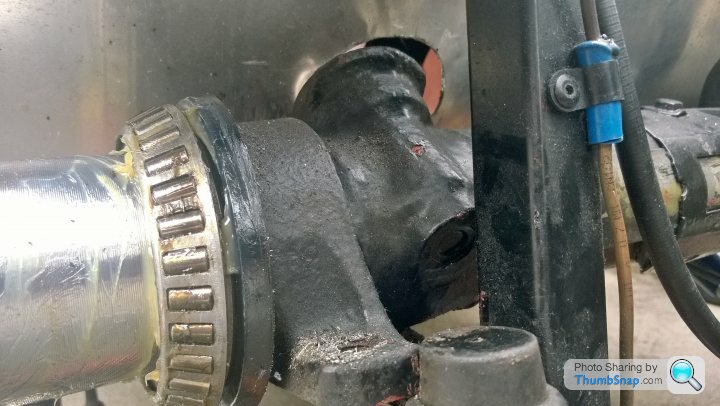
And finally it was out!!
With it out and apart you can clearly see that this unit had been properly overhauled/renewed. BUT, the threads were absolutely ruined at the castle nut/guide bush. So although it looks good, is actually bad. Whoever built/did this needs shooting...
With all this in mind, I decided to rebuild and fit the free one I was given. This included new ball joints, guide bush, spring and castle nut, as well as a new anti rattle pad.
Here t is ready to be put in... Although it doesn't look as neat (a quick lick of paint will sort that). I know its in good order...
I started putting it back together but had to rush as I was being beckoned in, and it was going to get dark... Only 10hrs... Fml...
Huzzah! Just got to finish putting the steering column/interior back in and purt the wings back on....
How wrong I was....
First job was to strip down and have a look at the free one I was given.
break the steering arms free from the ball joints.
Remove the cover from the slide plate
Time for a look inside!
Everything looks in brilliant order. The grease is still lovely and golden, a bit darker to the top.
Time to remove the castle nut and guide bush...
With a better idea of what I was letting myself in for, I started to pull victoria apart in order to do the job...
With everything disconnected, it was time to try and release the steering rack from the grips of the engine bay. I supported the gearbox from underneath and removed the gearbox mount on the front beam assy.
This is where the job got a lot more complex.... The builder obviously built the bodywork around the organs, so it was a nightmare to remove. I had to reach for the tin snips in the end to make the steering column hole larger in order to rotate the beam and lift out. Was a fricking nightmare..
And finally it was out!!
With it out and apart you can clearly see that this unit had been properly overhauled/renewed. BUT, the threads were absolutely ruined at the castle nut/guide bush. So although it looks good, is actually bad. Whoever built/did this needs shooting...
With all this in mind, I decided to rebuild and fit the free one I was given. This included new ball joints, guide bush, spring and castle nut, as well as a new anti rattle pad.
Here t is ready to be put in... Although it doesn't look as neat (a quick lick of paint will sort that). I know its in good order...
I started putting it back together but had to rush as I was being beckoned in, and it was going to get dark... Only 10hrs... Fml...
Huzzah! Just got to finish putting the steering column/interior back in and purt the wings back on....
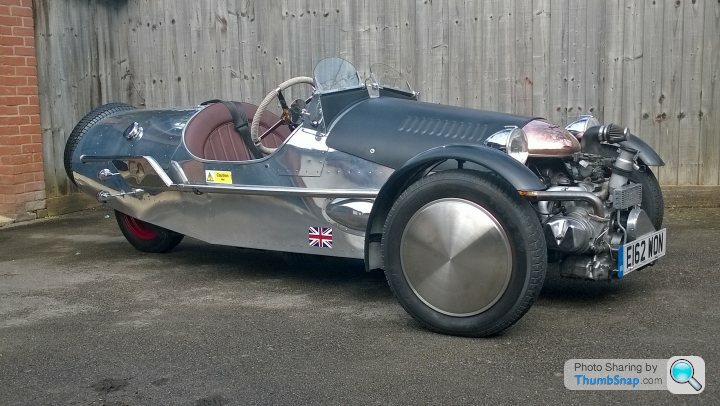
This afternoon/evening I managed to get another couple of hours in the garage and put the Pem back together properly, I had another go over the bonnet (still not perfect but it'll do for now). Put the new plates on it (these are just for pictures, I have a set of white and yellow ones for driving on the road before any of you grumpy old gits point it out), put her names on and give her a quick wipe down to remove all the greasy handprints on the Ali bodywork.
Now I just need yo bloody well get out in her! Its been too long! Especially with the way the weather has been over the last week!


Now I just need yo bloody well get out in her! Its been too long! Especially with the way the weather has been over the last week!
With the wedding now out of the way, I have been able to spend a little more time in the pembleton over the last few days/weekend.
First job was to raise the suspension a bit. Last time I was out with my friend in the passenger seat, I bottomed out the front end as we were pootling along, it wasn't even rough terrain, or at speed! Unfortunately, the lowest bit is the sump and I nearly shat myself, as it was such a loud bang I thought id taken the whole bloody lot off.... Good news is it was just a fin that got scuffed up. I raised the whole car by about 30-35mm though as it was way too low according to the build/design height.
Before
After

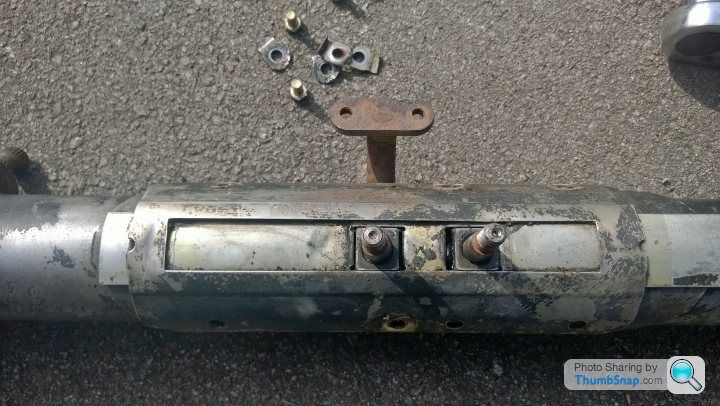
While I was at it I looked over the front spring cups and set up. The front springs were drooping down and looked pretty ugly. This also caused the pull rod to droop and was catching on the fwd spring cup. Its difficult to see, but ive blown this image up and lightened it a bit...
Upon closer inspection, it appeared that the cups were not aligned. Essentially the fwd end of the spring rests on 2 bits of metal. The upper bit is the chassis rail, the lower bit is a plate, with a surrounding strip holding it all in place. The lower plate was not exactly aligned to the chassis rail (about 3/4mm). So I made up a packer for the lower cup for the spring to rest on (3mm), and hey-presto, problem fixed!
I also finally got round to removing those bloody "warning hot" stickers. They were really bloody sticky!
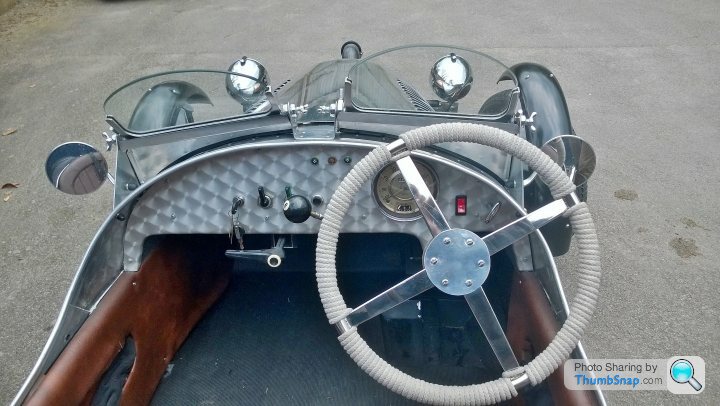
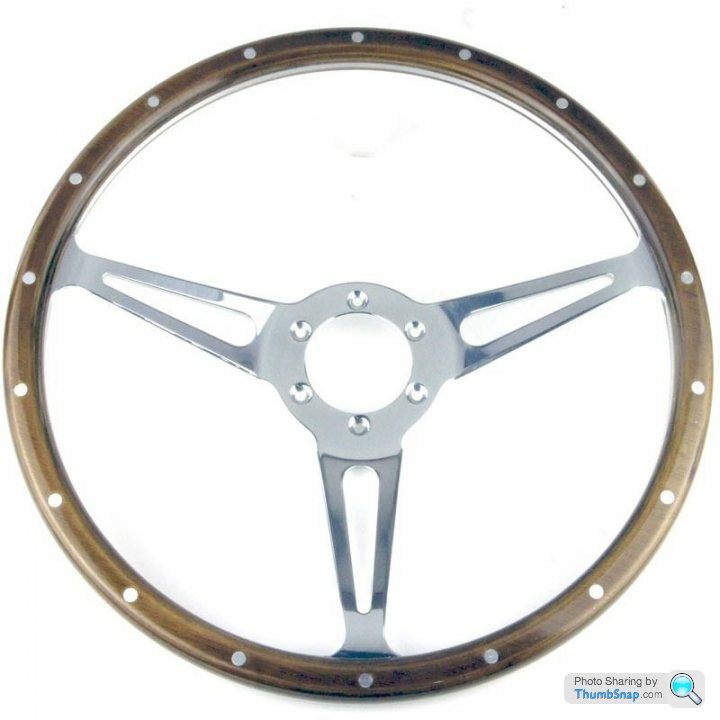
Next on the agenda is to fit a smaller steering wheel. The string one does look good, but at 16.5 inches its a bit big for my liking "ooh er missus". Plus it catches on my leg. Ive opted for a wood rim 14" riveted one which should be arriving this week!
Ive also been on the lookout for some hefty belts that I could make some decent looking bonnet straps out of. We were in north wales last week and I found these in a local factory shop. They just need trimming down to size and mounting. They are nice and thick, have reinforced eyelets and a decent buckle...
I've also started tinkering around with an inlet too. My plan is to move the carb back under the bonnet. The mod is not massively complex, but needs to be thought out properly.... More on that later....
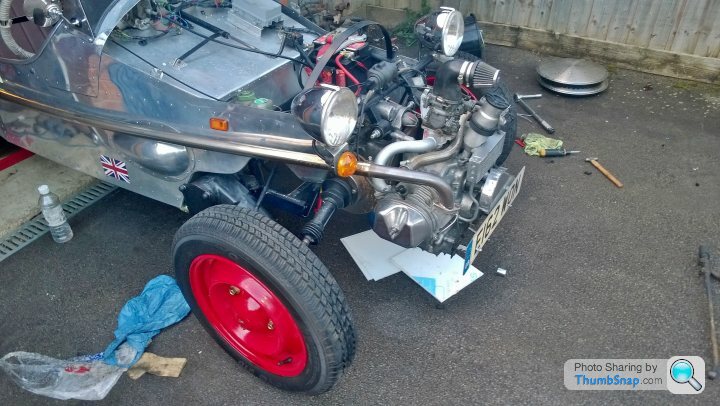
Here's how she currently stands...

First job was to raise the suspension a bit. Last time I was out with my friend in the passenger seat, I bottomed out the front end as we were pootling along, it wasn't even rough terrain, or at speed! Unfortunately, the lowest bit is the sump and I nearly shat myself, as it was such a loud bang I thought id taken the whole bloody lot off.... Good news is it was just a fin that got scuffed up. I raised the whole car by about 30-35mm though as it was way too low according to the build/design height.
Before
After
While I was at it I looked over the front spring cups and set up. The front springs were drooping down and looked pretty ugly. This also caused the pull rod to droop and was catching on the fwd spring cup. Its difficult to see, but ive blown this image up and lightened it a bit...
Upon closer inspection, it appeared that the cups were not aligned. Essentially the fwd end of the spring rests on 2 bits of metal. The upper bit is the chassis rail, the lower bit is a plate, with a surrounding strip holding it all in place. The lower plate was not exactly aligned to the chassis rail (about 3/4mm). So I made up a packer for the lower cup for the spring to rest on (3mm), and hey-presto, problem fixed!
I also finally got round to removing those bloody "warning hot" stickers. They were really bloody sticky!
Next on the agenda is to fit a smaller steering wheel. The string one does look good, but at 16.5 inches its a bit big for my liking "ooh er missus". Plus it catches on my leg. Ive opted for a wood rim 14" riveted one which should be arriving this week!
Ive also been on the lookout for some hefty belts that I could make some decent looking bonnet straps out of. We were in north wales last week and I found these in a local factory shop. They just need trimming down to size and mounting. They are nice and thick, have reinforced eyelets and a decent buckle...
I've also started tinkering around with an inlet too. My plan is to move the carb back under the bonnet. The mod is not massively complex, but needs to be thought out properly.... More on that later....
Here's how she currently stands...
Edited by Ambleton on Monday 6th June 23:50
In an attempt to tidy up the front end i've come up with a plan....
1) move the Carb back under to bonnet
2) biff off that big old oil filler/breather unit and fabricate something up
3) move the oil cooler somewhere else (still in decent air flow)
Number one!
During the build of a pembleton, if you are sticking with a 2CV engine, there are a number of options you can take regarding carbs. You can locate 2 sets of 250 Honda Superdream carbs and use 2 x left carbs (old and outdated some would say), you can use 2 x Dellorto PHBH carbs (expensive) or you can use the trusty old solex carb from the 2CV. Ive never had an issue with the Solex Carb (either on this or on my Lomax), in fact, i quite like it. When mine was build, it was obviously done with simplicity in mind so the Solex Remains!
The touble is, its pretty damn ugly lump. I managed to acquire another inlet manifold so im going to have a go at doing a bit of a frankenstien job to move it back under the bonnet. Its been done before, so its not a completely alien concept. A few people have raised that Carb Icing may be an issue as you have to extend the inlet by probably around 100mm, but those who have done the mod said they have face no such problems.
Here's a piccy of one hosed and clipped! I'm hoping i can weld something up on mine!

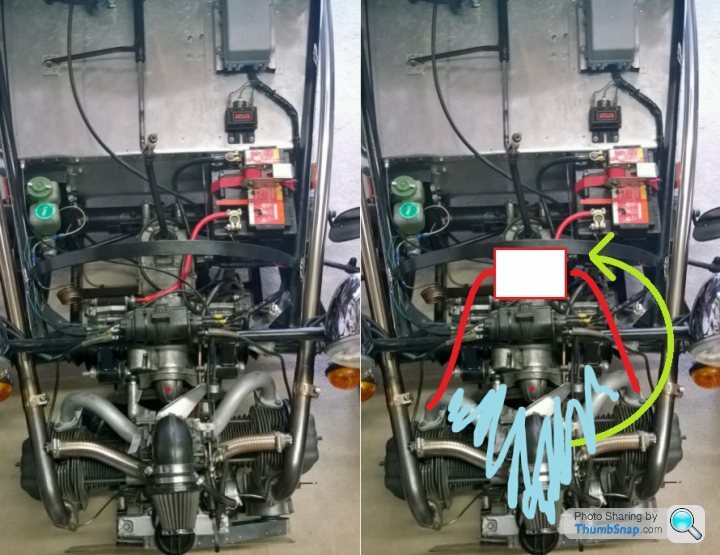
heres an image of mine... and what i plan to do....
Number two!
Sorry if im teaching a granny to suck eggs!
For those who don't know, the pistons both compress at the same time in the crank-case as one cylinder sucks and one is firing. This means that there is a high amount of pressure in in the the case that needs to be vented off on the compression. This is done with the breather valve, which also doubles up as the oil filler. Its that big thing on the front that looks like a can of beans with a clip on top!
Traditionally this is done with a rubber diaphragm but these are prone to perish, crack and fail, resulting in a crank-case that is open and results in a loss of power (no vacuum), and oil mist everywhere! More recently people have been cutting out the rubber all together and fitting a reed valve on the outlet - these last forever and give a better vacuum. These are usually bolted onto the original breather as an addition. There are a few well known 2CV retailers who sell new style units with reed valves built in, but these are still quite tall!
Here's my idea!
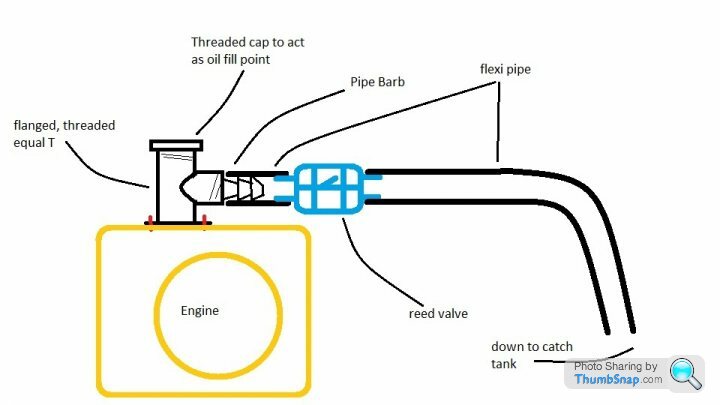
Most of it is using off the shelf components, but i'm still looking for a suitable flanged base!
Number three!
probably the simplest of all, but maybe the most thought required is moving the oil cooler to under the bonnet somewhere. I'll get some flexis made up, but i'm still unsure of its location! It needs to be hidden away, but still with a good airflow! maybe ill get a slightly bigger on to compensate for the loss of air flow....
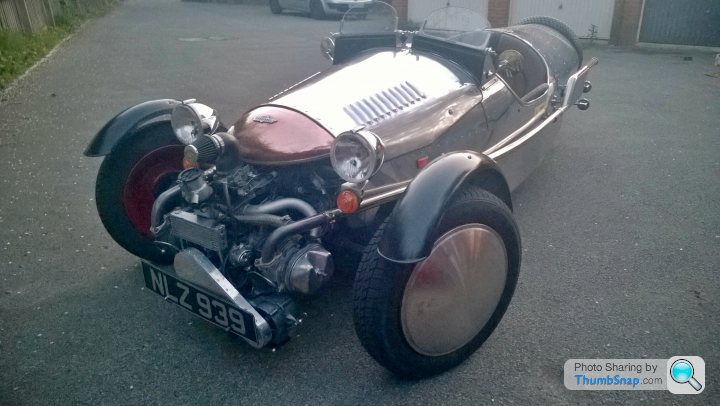
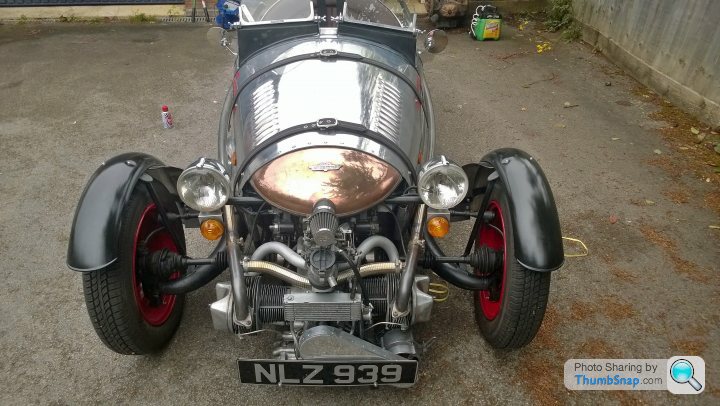
The aim is to get the front end looking as clean, or cleaner to this one....
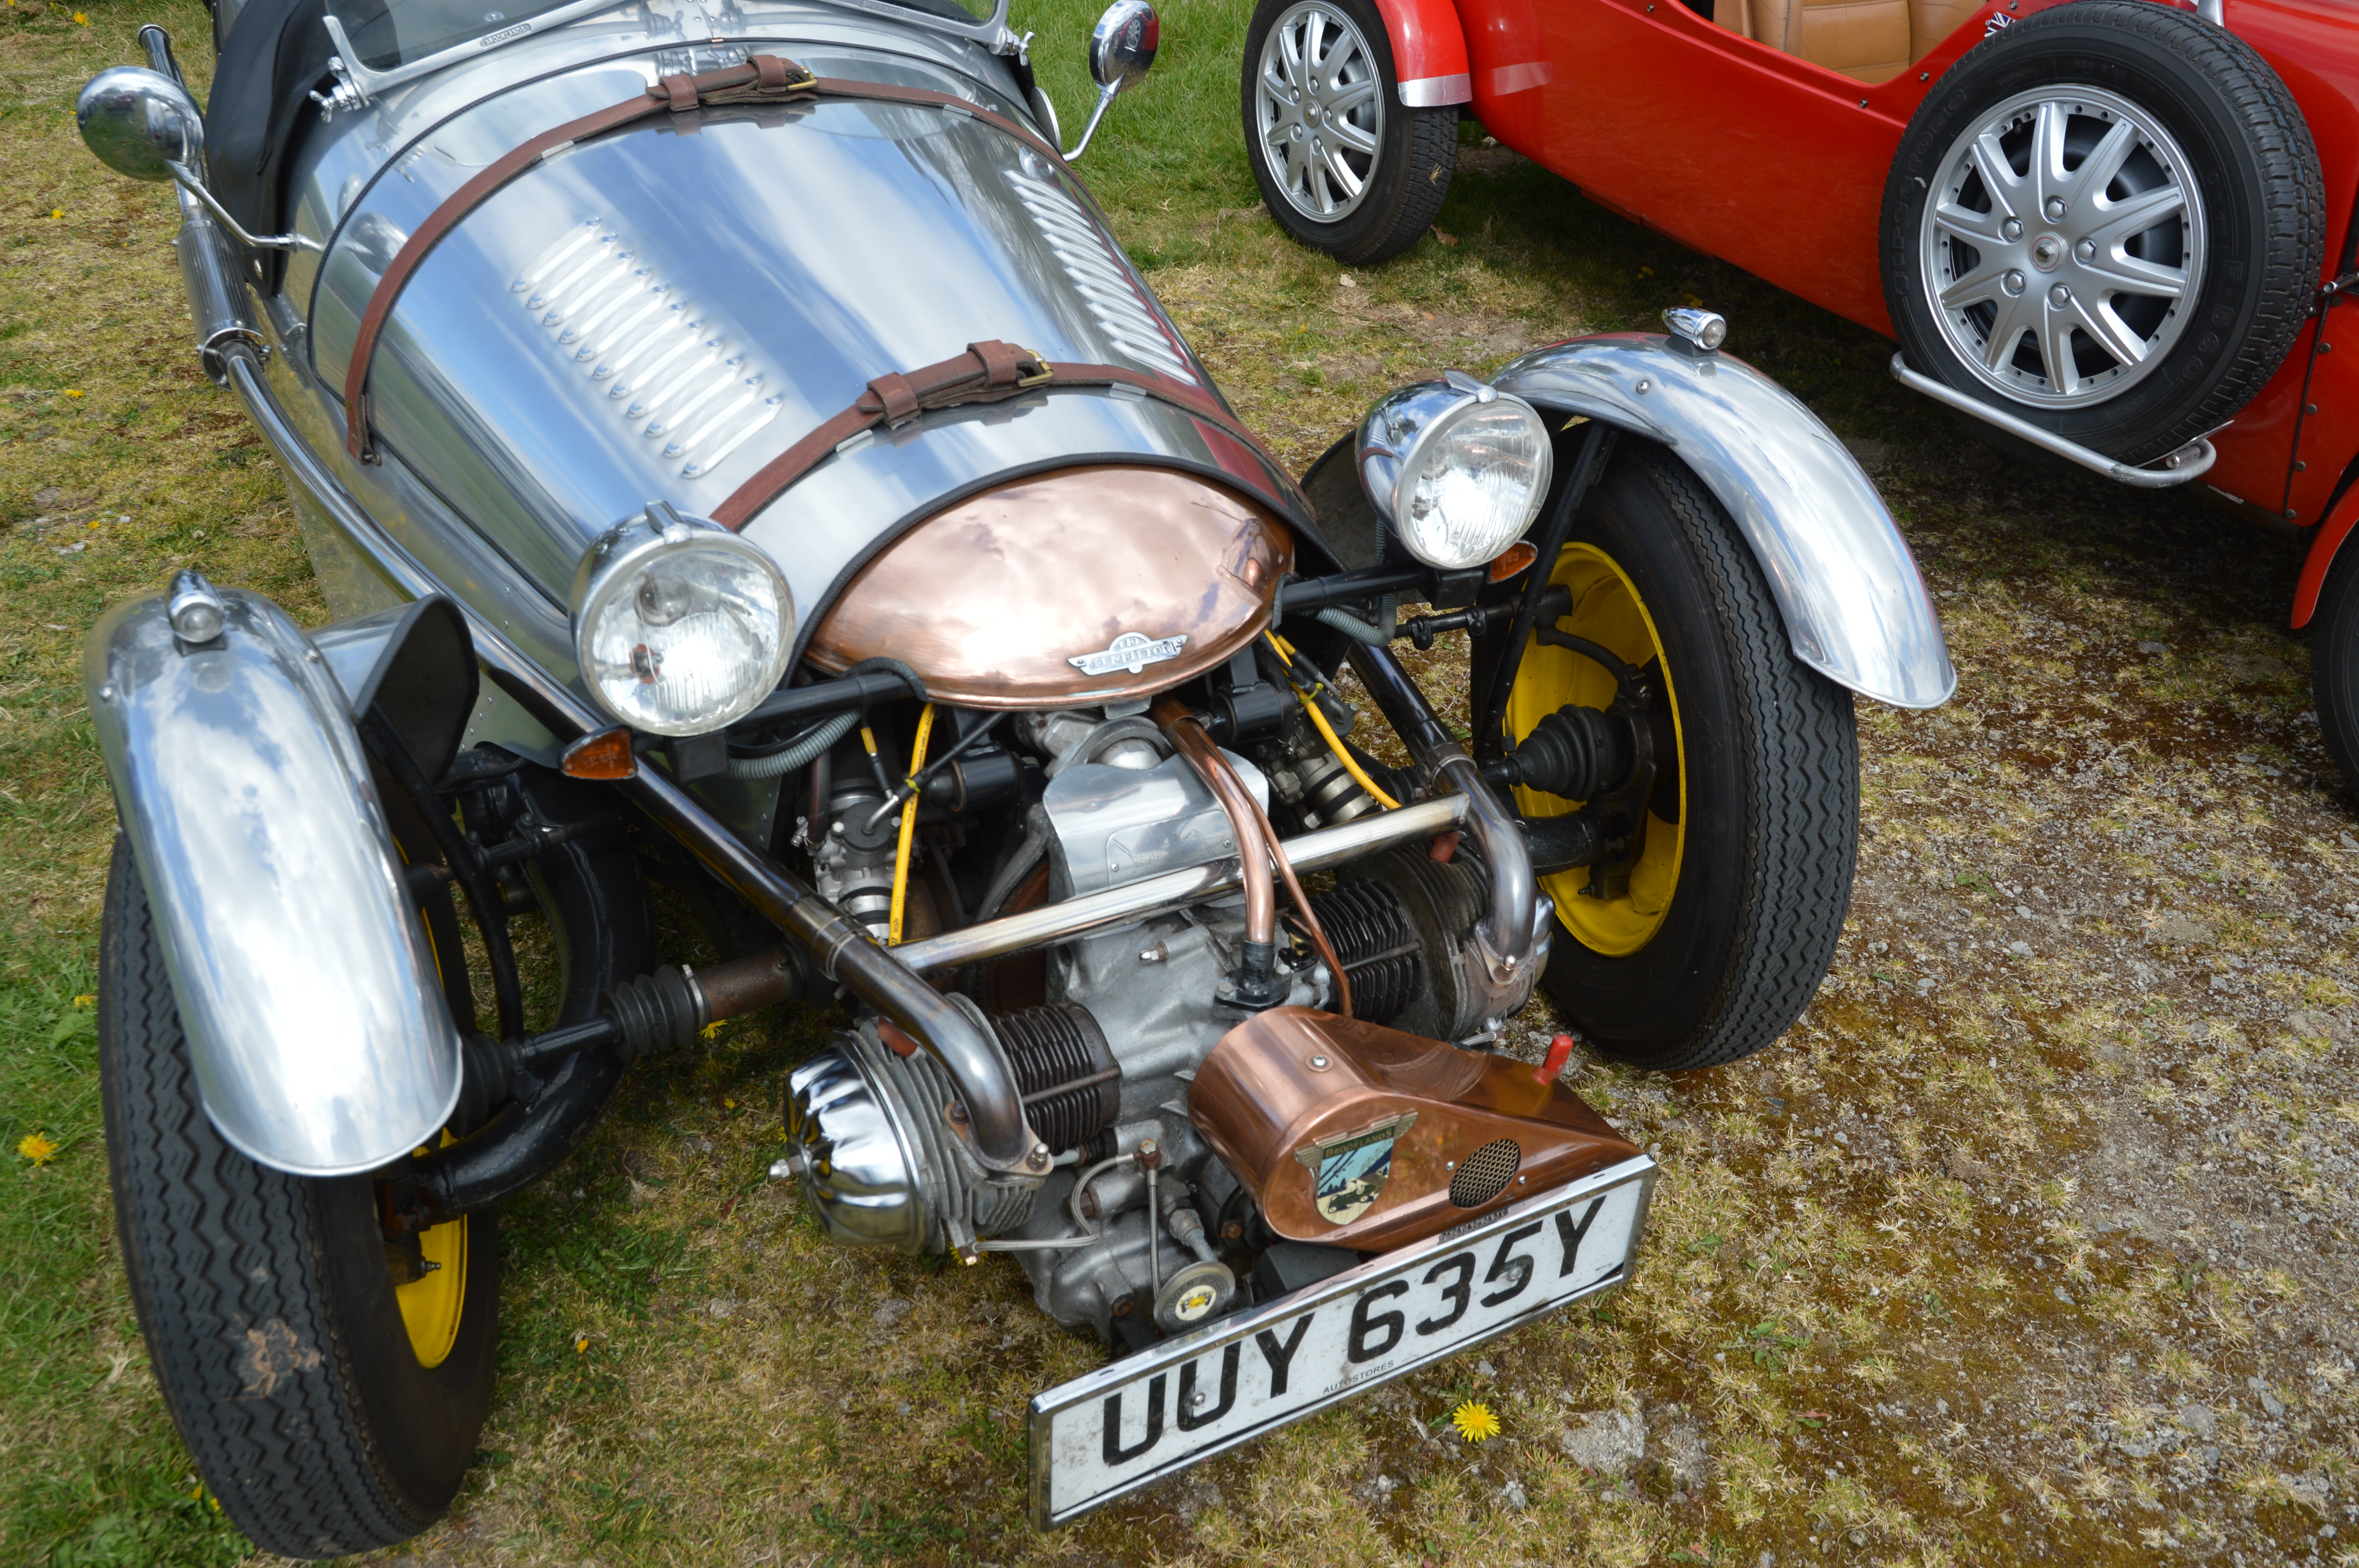
(yes i know thats running twin carbs....)
1) move the Carb back under to bonnet
2) biff off that big old oil filler/breather unit and fabricate something up
3) move the oil cooler somewhere else (still in decent air flow)
Number one!
During the build of a pembleton, if you are sticking with a 2CV engine, there are a number of options you can take regarding carbs. You can locate 2 sets of 250 Honda Superdream carbs and use 2 x left carbs (old and outdated some would say), you can use 2 x Dellorto PHBH carbs (expensive) or you can use the trusty old solex carb from the 2CV. Ive never had an issue with the Solex Carb (either on this or on my Lomax), in fact, i quite like it. When mine was build, it was obviously done with simplicity in mind so the Solex Remains!
The touble is, its pretty damn ugly lump. I managed to acquire another inlet manifold so im going to have a go at doing a bit of a frankenstien job to move it back under the bonnet. Its been done before, so its not a completely alien concept. A few people have raised that Carb Icing may be an issue as you have to extend the inlet by probably around 100mm, but those who have done the mod said they have face no such problems.
Here's a piccy of one hosed and clipped! I'm hoping i can weld something up on mine!
heres an image of mine... and what i plan to do....
Number two!
Sorry if im teaching a granny to suck eggs!
For those who don't know, the pistons both compress at the same time in the crank-case as one cylinder sucks and one is firing. This means that there is a high amount of pressure in in the the case that needs to be vented off on the compression. This is done with the breather valve, which also doubles up as the oil filler. Its that big thing on the front that looks like a can of beans with a clip on top!
Traditionally this is done with a rubber diaphragm but these are prone to perish, crack and fail, resulting in a crank-case that is open and results in a loss of power (no vacuum), and oil mist everywhere! More recently people have been cutting out the rubber all together and fitting a reed valve on the outlet - these last forever and give a better vacuum. These are usually bolted onto the original breather as an addition. There are a few well known 2CV retailers who sell new style units with reed valves built in, but these are still quite tall!
Here's my idea!
Most of it is using off the shelf components, but i'm still looking for a suitable flanged base!
Number three!
probably the simplest of all, but maybe the most thought required is moving the oil cooler to under the bonnet somewhere. I'll get some flexis made up, but i'm still unsure of its location! It needs to be hidden away, but still with a good airflow! maybe ill get a slightly bigger on to compensate for the loss of air flow....
The aim is to get the front end looking as clean, or cleaner to this one....
(yes i know thats running twin carbs....)
Ambleton said:
A few people have raised that Carb Icing may be an issue as you have to extend the inlet by probably around 100mm, but those who have done the mod said they have face no such problems.
I can't imagine they get used much in carb-icing weather... That is some SERIOUSLY long intake tracts, though.
Ambleton said:
The aim is to get the front end looking as clean, or cleaner to this one....
There's one thing about that which makes my teeth itch - and it's the same on yours...Sort those front mudguard mounts out! Get hold of a set of older front hubs, with mounts for the inertia dampers on. Then they'll turn with the steering... I can put you in touch with a likely suspect, if you want.
Gassing Station | Readers' Cars | Top of Page | What's New | My Stuff