1996 Mercedes SL 600
Discussion


That's appreciated, thank you, but I should be all sorted when my unit is repaired. I think parts for the Becker units are harder to source than the Panasonic units.
I changed some of the hydraulic fluid from the ADS reservoir tonight. Not a full drain down, I would doubtless break something trying to loosen off the drain nut.
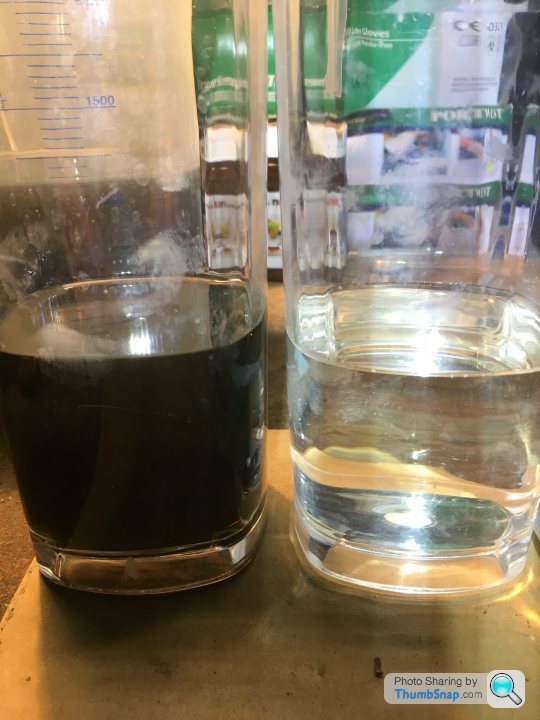
Siphoned about 1.3 litres out. The oil was filthy, it's possible it's never been changed.

Old oil on the left. The new stuff (Febi ZH-M 02615) looks like elderflower cordial, with a hint of yellow. Probably doesn't taste quite as good, though.
The filter is only 7 quid so I've ordered a couple of new ones. The gauze is filthy but also very delicate. The hydraulic return line is attached at the top left, on the threaded section.

I will change the power hood reservoir fluid at the weekend.
I changed some of the hydraulic fluid from the ADS reservoir tonight. Not a full drain down, I would doubtless break something trying to loosen off the drain nut.
Siphoned about 1.3 litres out. The oil was filthy, it's possible it's never been changed.
Old oil on the left. The new stuff (Febi ZH-M 02615) looks like elderflower cordial, with a hint of yellow. Probably doesn't taste quite as good, though.
The filter is only 7 quid so I've ordered a couple of new ones. The gauze is filthy but also very delicate. The hydraulic return line is attached at the top left, on the threaded section.
I will change the power hood reservoir fluid at the weekend.
Edited by Hereward on Tuesday 18th October 21:43
I haven't got round to renewing the soft top's hydraulic fluid but I have replaced the thermostat.
The water was taking 20 mins to get up to temperature so clearly the coolant thermostat had failed in the open position.
A new Wahler thermostat was sourced, after initially being told I may have to wait 5 months for one!
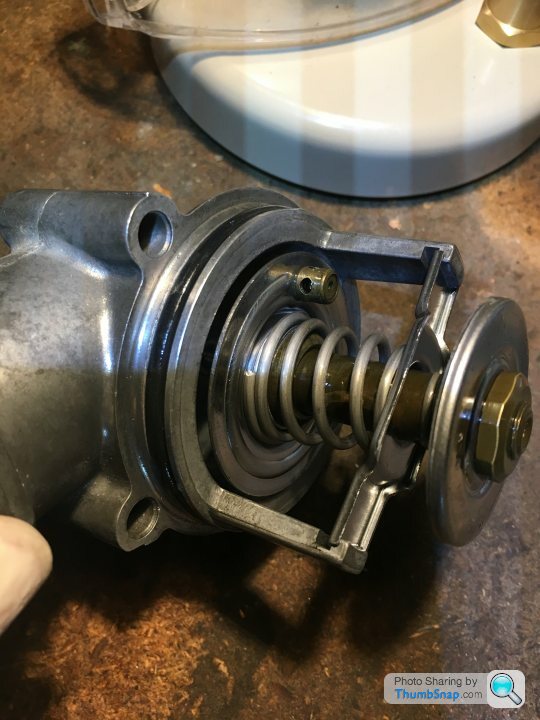
It's a nice bit of kit. I tested it in a pan of water first. It's set to open at 87 degrees C and lo and behold it did.

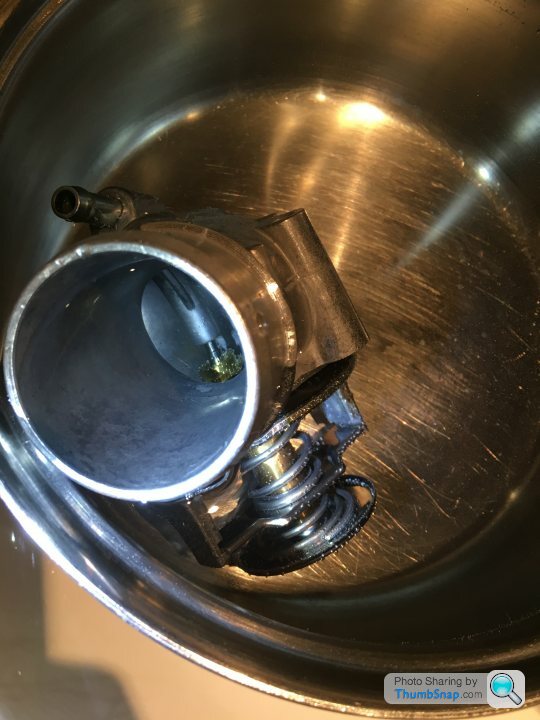
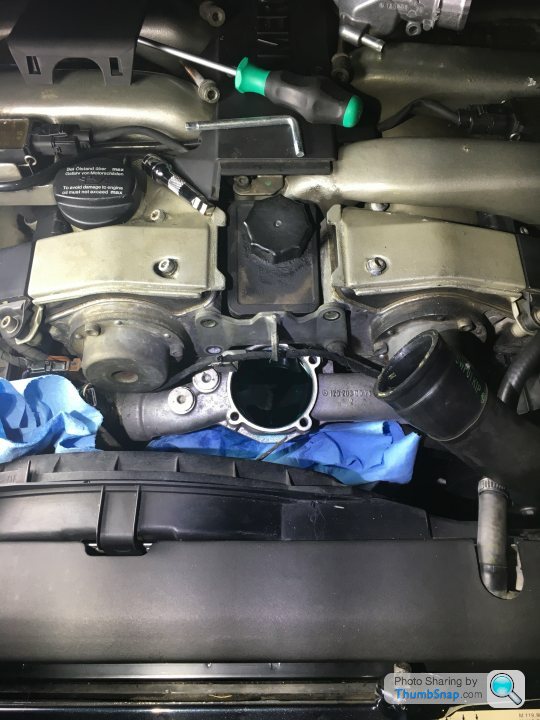
The thermostat is about the only easy access part on the engine, nicely mounted at the top of the V at the front of the engine. I didn't even need to drain the coolant.
Upon inspection you can see the old unit was stuck open. I was impressed to see the date stamp of 08/96. It was the original, 20 year old part!
The water was taking 20 mins to get up to temperature so clearly the coolant thermostat had failed in the open position.
A new Wahler thermostat was sourced, after initially being told I may have to wait 5 months for one!
It's a nice bit of kit. I tested it in a pan of water first. It's set to open at 87 degrees C and lo and behold it did.
The thermostat is about the only easy access part on the engine, nicely mounted at the top of the V at the front of the engine. I didn't even need to drain the coolant.
Upon inspection you can see the old unit was stuck open. I was impressed to see the date stamp of 08/96. It was the original, 20 year old part!
I have been using the car occasionally over Winter on dry, salt-free days, cycling the hood and suspension hydraulics. I refreshed the hood reservoir fluid at the end of last year.
With the hood down I could hear an occasional clicking from the rear wheels so decided to strip down and inspect the rear brakes. I also purchased new backing plates, with the current items being heavily corroded after 20 years.
The rear brakes are fixed caliper with one pair of opposing pistons. The park brake is a shoe-in-drum type.
The calipers are the originals with plenty of surface corrosion so they would be cleaned up and chemically treated.
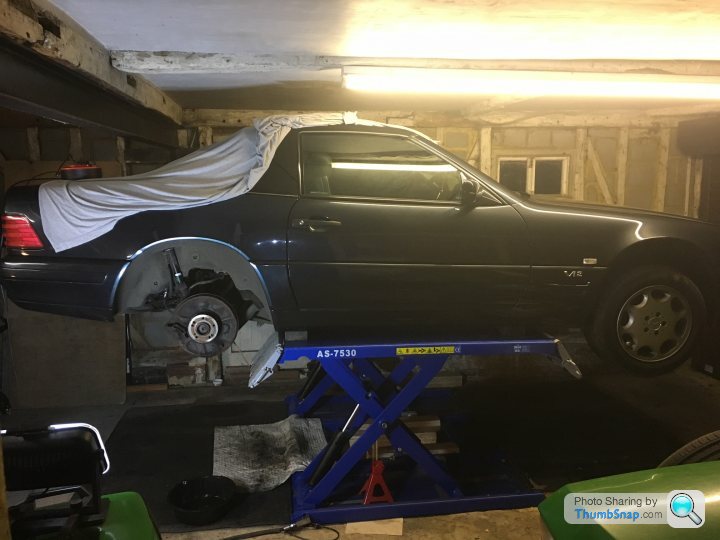
Stripping down the brakes is very simple, although having a ramp does make the job so much more civilised. Car in the air, wheel off then it’s easy to access the two 15mm bolts that hold the caliper in place. These came off without complaint and the caliper slid off the disc with no fuss. No need to bleed the system at all.
The disc is retained on the hub flange with a small hex screw and then the disc can be pulled off the hub to reveal the parking brake assembly.
I scraped off years of crud and used a can of brake cleaner spray on each side of the car to clean the backing plate, caliper and hub. To replace the backing plate would require removal of the hub and that was a job too far at this stage, so I cleaned up the existing backing plates and coated them with Hydrate 80. Despite the current ones looking rather shabby their renewal is a job for another day.
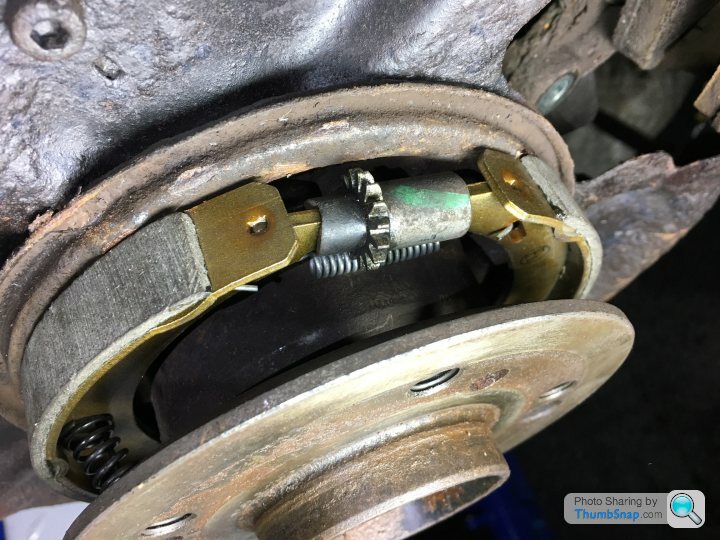
I fitted new Febi brake shoes and retaining springs and adjusted the disc biting point. The clicking noise was caused by the tip of the wheel bolts hitting the park brake mechanism. This was evident on both sides of the car, with minor impact damage to the components. Surprising because the wheels and bolts are OEM but the thread is simply a few mm too long for this application. I replaced the M12x1.5x40mm radius wheel bolts with 35mm bolts so they would clear the mechanism. 35mm is adequate; this gives 21mm of available thread of which 7mm is brake disc and 11mm is hub flange, leaving just 3mm of protruding thread, which is not enough to foul the park brake.
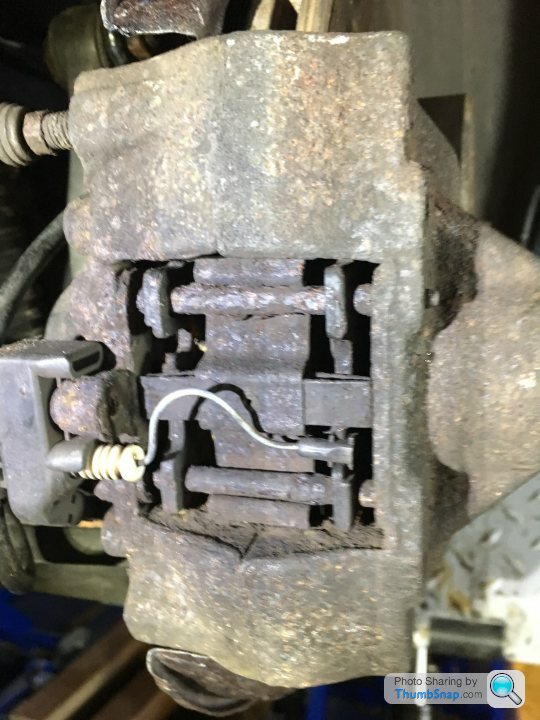
The current pads and discs are in good condition. I removed the pads from the calipers and regreased their backs. The pads can be replaced with the caliper bolted in position on the disc. The pad retaining pins and spring clips were heavily corroded so I fitted new ones. The calipers were cleaned then surface treated with Hydrate 80. There was no need to push back the pistons when refitting the pads and calipers over the disc.
A very satisfying job. I will do the fronts next. They look like fixed caliper four piston jobbies.
Up she goes:
Pad retainers and caliper looking shabby:
That's better:
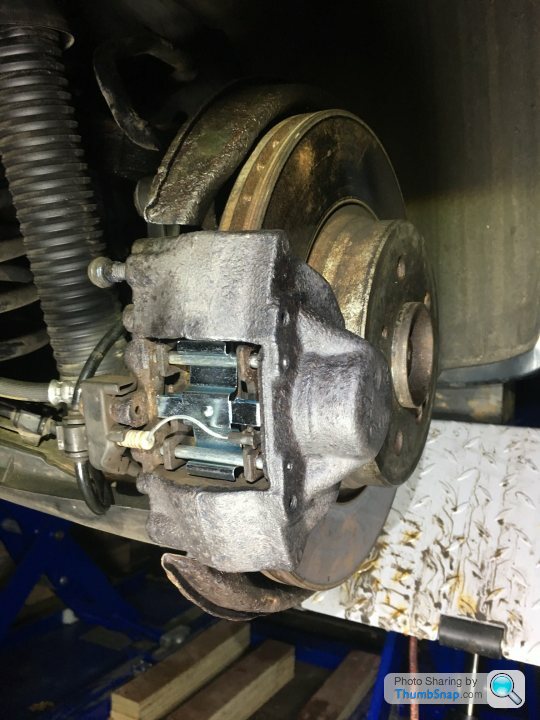
With pads removed you can just make out the circular pistons that push the pad against the disc:

New parking brake shoes, with adjusting teeth:
Shorter (35mm thread) bolt clears the park brake mechanism. No more uncivilised clicking noises:

With the hood down I could hear an occasional clicking from the rear wheels so decided to strip down and inspect the rear brakes. I also purchased new backing plates, with the current items being heavily corroded after 20 years.
The rear brakes are fixed caliper with one pair of opposing pistons. The park brake is a shoe-in-drum type.
The calipers are the originals with plenty of surface corrosion so they would be cleaned up and chemically treated.
Stripping down the brakes is very simple, although having a ramp does make the job so much more civilised. Car in the air, wheel off then it’s easy to access the two 15mm bolts that hold the caliper in place. These came off without complaint and the caliper slid off the disc with no fuss. No need to bleed the system at all.
The disc is retained on the hub flange with a small hex screw and then the disc can be pulled off the hub to reveal the parking brake assembly.
I scraped off years of crud and used a can of brake cleaner spray on each side of the car to clean the backing plate, caliper and hub. To replace the backing plate would require removal of the hub and that was a job too far at this stage, so I cleaned up the existing backing plates and coated them with Hydrate 80. Despite the current ones looking rather shabby their renewal is a job for another day.
I fitted new Febi brake shoes and retaining springs and adjusted the disc biting point. The clicking noise was caused by the tip of the wheel bolts hitting the park brake mechanism. This was evident on both sides of the car, with minor impact damage to the components. Surprising because the wheels and bolts are OEM but the thread is simply a few mm too long for this application. I replaced the M12x1.5x40mm radius wheel bolts with 35mm bolts so they would clear the mechanism. 35mm is adequate; this gives 21mm of available thread of which 7mm is brake disc and 11mm is hub flange, leaving just 3mm of protruding thread, which is not enough to foul the park brake.
The current pads and discs are in good condition. I removed the pads from the calipers and regreased their backs. The pads can be replaced with the caliper bolted in position on the disc. The pad retaining pins and spring clips were heavily corroded so I fitted new ones. The calipers were cleaned then surface treated with Hydrate 80. There was no need to push back the pistons when refitting the pads and calipers over the disc.
A very satisfying job. I will do the fronts next. They look like fixed caliper four piston jobbies.
Up she goes:
Pad retainers and caliper looking shabby:
That's better:
With pads removed you can just make out the circular pistons that push the pad against the disc:
New parking brake shoes, with adjusting teeth:
Shorter (35mm thread) bolt clears the park brake mechanism. No more uncivilised clicking noises:
Zonergem said:
Looks good. The more I learn about the R129 the more I realise how rare and special the 600 is.
With the hood reservoir did you flush the system or just replace the reservoir contents? I've got two litres of Febi 02615 ready to go as that is now top of my to-do list.
Are you still looking for a panoramic roof? There was a silver one advertised in the Member Classifieds of the March edition of Mercedes Benz Club magazine for a reasonable sum (£750ish IIRC).
Objectively there is very little reason to choose the 600 over the 500. Subjectively it's worth it for the elevated dopamine and serotonin levels it produces in the driver.With the hood reservoir did you flush the system or just replace the reservoir contents? I've got two litres of Febi 02615 ready to go as that is now top of my to-do list.
Are you still looking for a panoramic roof? There was a silver one advertised in the Member Classifieds of the March edition of Mercedes Benz Club magazine for a reasonable sum (£750ish IIRC).
I didn't drain the hood hydraulics by the book (I think there's a system drain point somewhere?). I siphoned the reservoir, refilled it, cycled the hood a few times then siphoned and refilled again. The fluid seemed pretty clean anyway.
Ha, I saw that panny roof ad and thought about it. Decent price. However, my car is only used in the dry so I really don't need any form of hardtop at all at this stage. I do keep an eye on Ebay. If one comes up in the right (or nearly right) colour I may bite but currently it's an extravagance not a necessity.
I hope you're enjoying your car.
cheddar said:
Hereward said:
Objectively there is very little reason to choose the 600 over the 500. Subjectively it's worth it for the elevated dopamine and serotonin levels it produces in the driver
Rare honesty, thankyou HerewardMy thoughts:
I've driven two 600's, one in SL form the other an S class, I found them fussy, orchestrally muddled, mechanically unrefined and not THAT much quicker than the sweet(er) V8
Love this thread though

However, just as the V8 owner probably regards his engine/car as superior to the V6, so the V12 owner feels the same. A V12 flagship car is a nice luxury to own. It's also cool to go to the Pagani website and see "Mercedes-Benz M120" stated as the Zonda powerplant. It's a special engine.
I find the V12 to be almost too refined. It is SILENT, even with the roof down. Above 4,000 rpm there is a distant turbine stirring itself. My son is hassling be to get it straight-piped so it sounds like this (go to 45 seconds in on this Youtube clip):
https://www.youtube.com/watch?v=uTklVFGYYZw
But that's not what this car is about for me. It's for wafting around on a sunny day thinking that, actually, life is okay.
IanA2 said:
Only my opinion, but I think the SL60 in the pick of the range.
Ah, if we're talking about the special R129's (other than the run-of-the-mill 280/320/500/600) then it has to be the SL73. 12 cylinders are better than 8, right? 
http://jalopnik.com/5421459/sl73-amg-the-pagani-zo...
I'd love to see some pics of your SL60.
I have tidied up the front brake calipers with a coat of rust treatment. The front pads and discs are in great shape, having being renewed by the previous owner just before I purchased the car. I also removed the front wheel arch liners and cleaned out the drain hoses that handle water coming off the windscreen. One of them had a plug of crud so good to sort out. The front ADS spring actuators ("spheres") and damper valves are also housed here so they were inspected and coated with corrosion protection. The wheel arch liners do their job well with minimal corrosion in the area, except on a few tired looking bolt threads.
I also squirted corrosion inhibitor in to all four jacking slots. Two had corrosion, the other two were in great shape.
I had noticed recently the car's idle was a little erratic so I have started the process of fixing it. The two simplest items to attend to first are to plug a tiny crack on the vacuum distributor block and renew the fuel pressure regulator:
Position of Vacuum distributor block, mounted on passenger-side (UK) engine bulkhead. Engine out of shot to the left, windscreen out of shot to the right. It's the unit with red and yellow hoses attached:

Close up you can see a small crack next to the "ball bearing" that can introduce unmetered air in to the system. This needs to be covered with epoxy resin to be made air tight. I think these are common across all R129's so if you're an owner have a look.

Next job was to replace the fuel pressure regulator. This is easy to access being mounted on the top of the engine (see the red arrow in the pic):
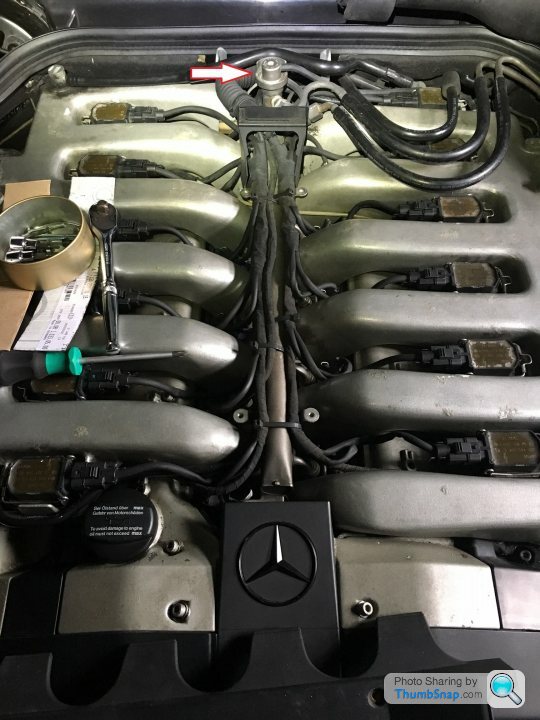
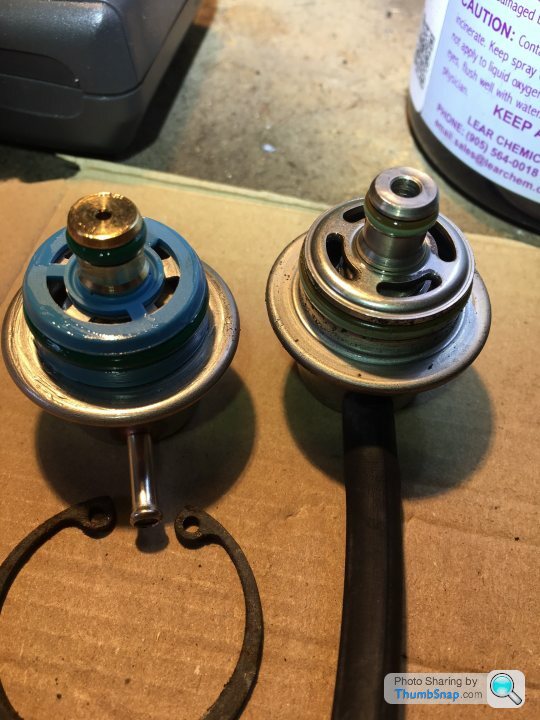
The old unit is easy to prise out after removal of the retaining circlip and the new one pushes straight in easily. I lubed the two o-rings with dielectric grease to ensure no tearing. New one on the left. Slightly different design so hopefully no operational issues:
I will go for a drive tomorrow if dry and see if these have made any difference to the idle stability. I have also cleaned the MAF's. If not then there's a rats nest of vacuum hoses to test and inspect...
I also squirted corrosion inhibitor in to all four jacking slots. Two had corrosion, the other two were in great shape.
I had noticed recently the car's idle was a little erratic so I have started the process of fixing it. The two simplest items to attend to first are to plug a tiny crack on the vacuum distributor block and renew the fuel pressure regulator:
Position of Vacuum distributor block, mounted on passenger-side (UK) engine bulkhead. Engine out of shot to the left, windscreen out of shot to the right. It's the unit with red and yellow hoses attached:
Close up you can see a small crack next to the "ball bearing" that can introduce unmetered air in to the system. This needs to be covered with epoxy resin to be made air tight. I think these are common across all R129's so if you're an owner have a look.
Next job was to replace the fuel pressure regulator. This is easy to access being mounted on the top of the engine (see the red arrow in the pic):
The old unit is easy to prise out after removal of the retaining circlip and the new one pushes straight in easily. I lubed the two o-rings with dielectric grease to ensure no tearing. New one on the left. Slightly different design so hopefully no operational issues:
I will go for a drive tomorrow if dry and see if these have made any difference to the idle stability. I have also cleaned the MAF's. If not then there's a rats nest of vacuum hoses to test and inspect...
It’s been a stressful few weeks. After changing the fuel pressure regulator, sealing a potential vacuum leak and spray-cleaning the MAFs I went for a test drive. All went well until I used kickdown which immediately put the car in to Limp Mode and illuminated the BAS/ESP orange warning light. I crawled back home, put the car away and sulked. After a few hours I started the car and all was well – turning the engine off cleared the problem.
The following Saturday I took the car to my independent specialist. I drove sedately to avoid using kickdown and all was fine. They plugged in the car and read and cleared some codes then I went for a test drive. Same problem again – use of kickdown instantly puts the car in Limp Mode and activates the BAS/ESP light. Limp Mode also sends the idle crazy – I assume it uses a fixed set of fuel/air mixture values to run the engine, bypassing the MAF/O2 sensor data?
The codes were read again and it was suggested the first thing to do was replace the O2 sensors. I re-started the car (clearing the problem) and drove home carefully. The garage were brilliant, the owner refused to charge me for his time and use of the code reader.
I ordered a pair of O2 sensors and also purchased the Carsoft diagnostic software so I could read codes myself at home.
Last night I replaced the O2 sensors and went for a drive. After the engine was warm I used kickdown and Boom, same problem again. Bugger. The car is absolutely fine accelerating hard UP through the gears or pottering around, it's only kickdown conditions that trigger the issue.
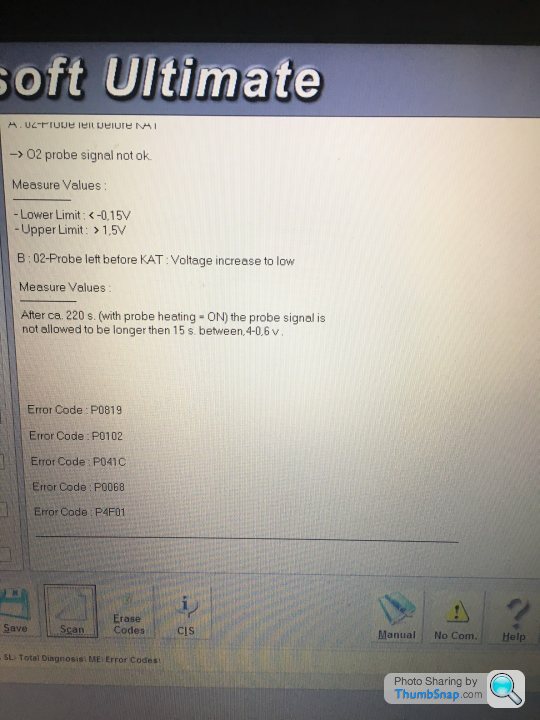
I read the codes and have the following:
P0150 – O2 sensor (despite them being brand new! Maybe this in an old code from the drive home from the garage with the old sensors in place)
P0819 – Autobox Shift switch function
P0102 – MAF
P041C – EGR temperature sensor
P0068 – MAF / MAP / Throttle relationship
P4F01 – No idea what this is…
It looks like I am going to admit defeat and send her back to the garage for them to sort out. I cleaned the MAFs but maybe they are simply past it. The automatic transmission error is potentially interesting. I have read that replacing the “Conductor Plate” on the 722.6 gearbox could be something worth investigating.
Annoyingly I binned the old fuel pressure regulator valve. I would love to refit that and see if that made any difference, since the aperture on the new one is so much smaller.
On the plus side I did find a large crack in the air intake hose between the MAF and throttle body. I have temporarily sealed it with electrical tape so hopefully that will assist the idle by banishing some unmetered air.
Car parked with engine running in Limp Mode with the BAS/ESP light illuminated. Look at the idle speed!:

Diagnostic results:
The hefty crack in the air intake hose just before the throttle body. The crack is at the tip of the screwdriver. My headtorch is inside the hose, illuminating the crack:

The following Saturday I took the car to my independent specialist. I drove sedately to avoid using kickdown and all was fine. They plugged in the car and read and cleared some codes then I went for a test drive. Same problem again – use of kickdown instantly puts the car in Limp Mode and activates the BAS/ESP light. Limp Mode also sends the idle crazy – I assume it uses a fixed set of fuel/air mixture values to run the engine, bypassing the MAF/O2 sensor data?
The codes were read again and it was suggested the first thing to do was replace the O2 sensors. I re-started the car (clearing the problem) and drove home carefully. The garage were brilliant, the owner refused to charge me for his time and use of the code reader.
I ordered a pair of O2 sensors and also purchased the Carsoft diagnostic software so I could read codes myself at home.
Last night I replaced the O2 sensors and went for a drive. After the engine was warm I used kickdown and Boom, same problem again. Bugger. The car is absolutely fine accelerating hard UP through the gears or pottering around, it's only kickdown conditions that trigger the issue.
I read the codes and have the following:
P0150 – O2 sensor (despite them being brand new! Maybe this in an old code from the drive home from the garage with the old sensors in place)
P0819 – Autobox Shift switch function
P0102 – MAF
P041C – EGR temperature sensor
P0068 – MAF / MAP / Throttle relationship
P4F01 – No idea what this is…
It looks like I am going to admit defeat and send her back to the garage for them to sort out. I cleaned the MAFs but maybe they are simply past it. The automatic transmission error is potentially interesting. I have read that replacing the “Conductor Plate” on the 722.6 gearbox could be something worth investigating.
Annoyingly I binned the old fuel pressure regulator valve. I would love to refit that and see if that made any difference, since the aperture on the new one is so much smaller.
On the plus side I did find a large crack in the air intake hose between the MAF and throttle body. I have temporarily sealed it with electrical tape so hopefully that will assist the idle by banishing some unmetered air.
Car parked with engine running in Limp Mode with the BAS/ESP light illuminated. Look at the idle speed!:
Diagnostic results:
The hefty crack in the air intake hose just before the throttle body. The crack is at the tip of the screwdriver. My headtorch is inside the hose, illuminating the crack:
Edited by Hereward on Monday 10th April 21:29
Damn, the problem is not the fuel pressure regulator. I found the original big-bore one late last night and immediately legged it to the garage, fitted it and went out for a triumphant drive. Once the engine was warm I booted a kickdown and immediately triggered Limp Mode and the BAS/ESP orange light.
I need to investigate the P0819 code further and identify the relevant hardware on my car in case there is a gearbox sensor/electrical issue. The internet states:
https://www.yourmechanic.com/article/p0819-obd-ii-...
I know that this doesn't necessarily mean it is a gearbox issue, though, and the other codes do hint of a fuel/air issue. The gearbox/engine behaves impeccably in all other situations other than kickdown. I drove 30 miles today with no issue, the gearbox shifts up and down perfectly when driven conservatively, it is solely a kickdown command that triggers this. I will clear the codes again, go for a drive and spend some more time playing with the diagnostic software.
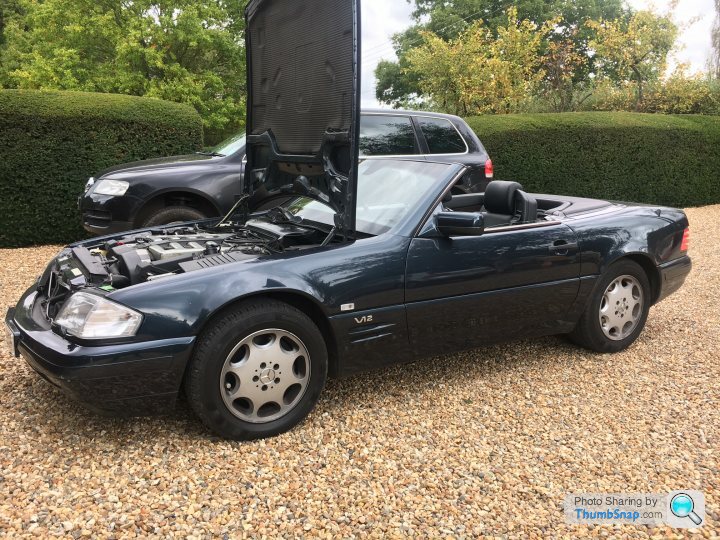
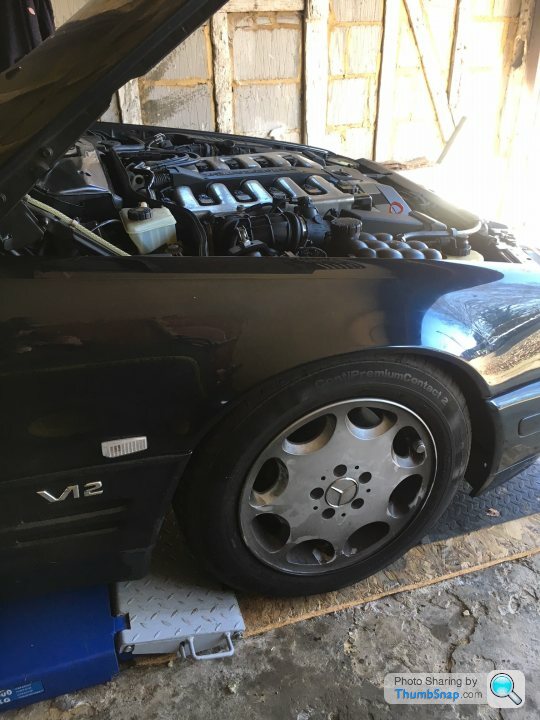
I have also been messing around with the adjustable ride height. As you can see in the pic I need to drop the front of the car a little more. This is the car at standard height. It can be raised higher manually via a dash button and will also automatically lower itself a little further when driving at speed.

I need to investigate the P0819 code further and identify the relevant hardware on my car in case there is a gearbox sensor/electrical issue. The internet states:
https://www.yourmechanic.com/article/p0819-obd-ii-...
I know that this doesn't necessarily mean it is a gearbox issue, though, and the other codes do hint of a fuel/air issue. The gearbox/engine behaves impeccably in all other situations other than kickdown. I drove 30 miles today with no issue, the gearbox shifts up and down perfectly when driven conservatively, it is solely a kickdown command that triggers this. I will clear the codes again, go for a drive and spend some more time playing with the diagnostic software.
I have also been messing around with the adjustable ride height. As you can see in the pic I need to drop the front of the car a little more. This is the car at standard height. It can be raised higher manually via a dash button and will also automatically lower itself a little further when driving at speed.
Edited by Hereward on Friday 7th April 23:03
Stegel said:
Hereward said:
Thanks for that. I gave that connection a visual inspection and it was bone dry, very clean and corrosion-free. I have also checked the ATF level and that is fine. I will get in touch with a transmission specialist.
There was no sign of a leak externally with my car - it is an internal seal that fails, allowing fluid into the electrical connection (the replacement part is simply a tubular body with seals - I cleaned the electrical connection with brake cleaner, reassembled it and no problems getting on for a year later). Sorry, my post wasn't clear - I inspected the inside of the pilot bushing and it was perfect.
I have bitten the bullet and ordered a new gearbox conductor plate:
https://www.onestopgearboxshop.com/products/m5auto...
Relatively cheap and simple to replace and it controls the gearbox electrics. I have re-watched my Apollo space programme missions for technical inspiration and I would love to be able to resolve this issue without going to a specialist.
I've loosened off all the ATF sump retaining bolts in preparation, so that's a good start. They can seize up, which requires them to be drilled out, so that's a relief.
Since sealing the split in the pre-throttle body inlet hose the MAF error codes have all vanished. I have ordered a brand new hose section from MB, it's ready for collection at the end of the week.
leef44 said:
Also owning a CL420 many many years ago before the days of google, I could only consult the dealer or my local unscrupulous specialist and things got very expensive. An example is the shaky rear view mirror. I was told by the dealer that it was a broken pin inside the assembly. So I said "well just take it apart and replace the pin". They replied, "sorry sir, it only comes in one unit with the rain sensor and auto dimming mirror, it's £425 for a unit and we have to order it from Germany." So I turned around, pulled my pants down, and they continued spanking. Like I said, it got expensive without the knowledge or know how.
This is a very important point. We are fortunate enough to live in an age where a little bit of internet sleuthing can provide all the information needed to diagnose and fix something. You can also find and buy virtually any part and have it delivered to your home address. There is a lot of dross on the internet too, but if you can wade through it the golden nuggets are there. These are great times to be a car nut.Success. The new conductor plate has cured the kickdown/limp mode issue. I am so, so chuffed.
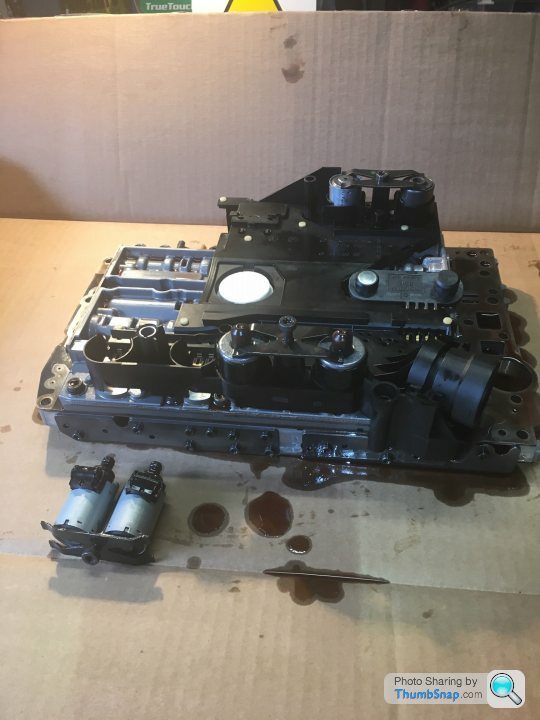
The swap is very simple in theory but it seems someone had been rummaging around in that part of the transmission not too long ago and had massively over-torqued all the bolts on the valve body. 9 of them came off without trouble but I rounded off one and had to cut the head off it. Luckily its threaded section could then be unwound easily. The valve body with conductor plate attached is about 10kg, so an extra pair of hands whilst the last couple of bolts come off is most helpful.
There are great step-by-step instructions on the internet so I won't go in to the detail.
Undoing the ATF sump plug releases just under 3 litres of ATF. You then need to refit the sump plug and remove the sump body carefully - the design means that not all the ATF can drain and about 1.4 litres is left in a puddle in the sump, so lower it carefully. The valve body then drips merrily so have plenty of newspaper etc ready. In total I measured about 4.7 litres of ATF released. I didn't drain the torque converter.
The innards were absolutely immaculate, no swarf or sludge at all. The existing conductor plate had a manufacturing stamp indicating 2012, so my heart sank when I saw that, it implied the hardware was all pretty new and may not therefore be the problem. I fitted the new plate anyway and swapped over the six solenoids. It is essential that this is all done in a clean environment. Dust or bits of fluff/rag/tissue etc can cause havoc with the internals.
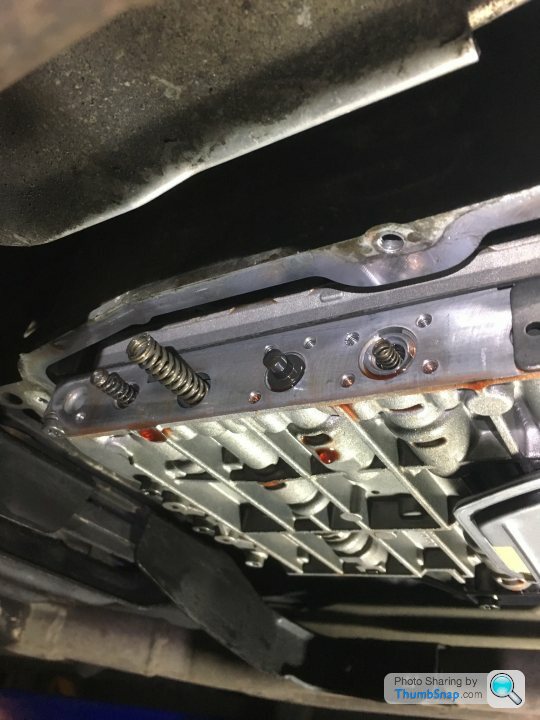
I refitted the valve body to the car (using the proper torque setting of 8nm) and checked a spring in the side of the valve body (in earlier designs it can snap, causing shift problems). My car had the later, modified spring, all okay.
I fitted a new filter, refitted the sump bolts (8nm again) and pilot bushing, refilled with ATF, started her up, worked the gearbox lever through all positions for a few minutes to allow the ATF to circulate, went for a drive and then booted the throttle once warm. Result - perfect kickdown!
I should add that I also fitted a brand new section of air intake hose between the left-side MAF and throttle body, to replace a cracked section, so there is always a chance this helped too, by ironing out any fuel/air issues.
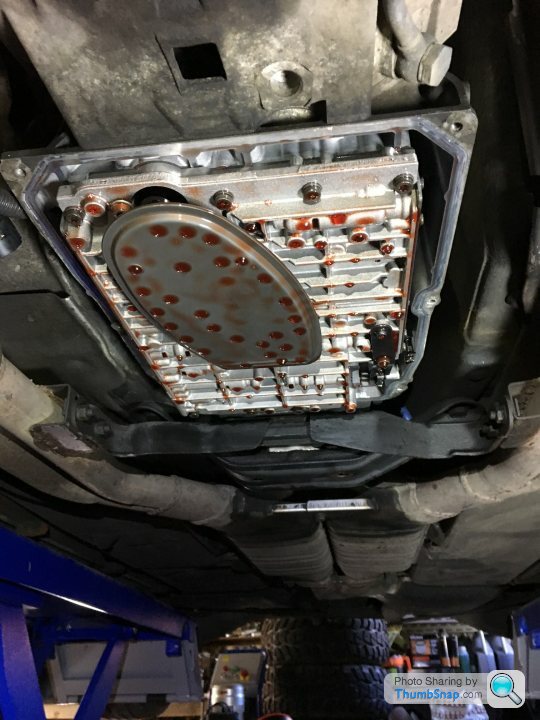
Sump removed to show bottom of valve body and filter:
New conductor plate being fitted to top of valve body and 3 pairs of solenoids being swapped over:
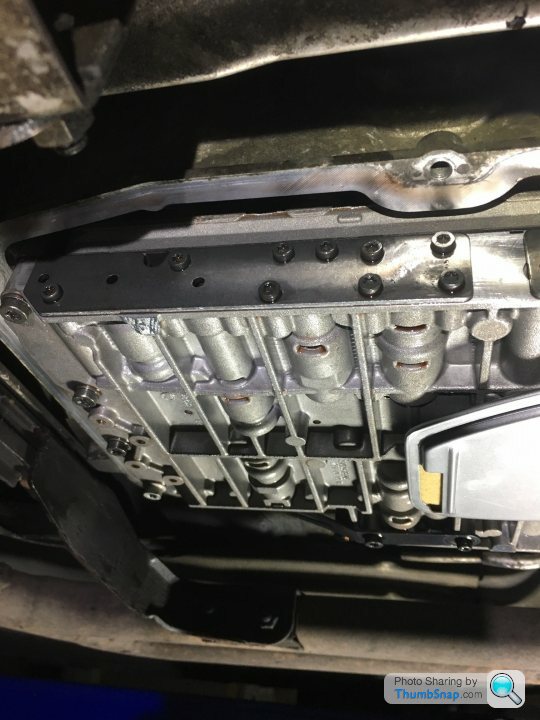
View of gearbox housing where the conductor plate and valve body resides. A float valve on the conductor plate sits in the left hole and prevents overfilled ATF rising higher. The two holes to the right are for the conductor plate speed sensors:

Valve body refitted in position:
Checking spring (the big one) is in one piece. This is a revised design version:
The swap is very simple in theory but it seems someone had been rummaging around in that part of the transmission not too long ago and had massively over-torqued all the bolts on the valve body. 9 of them came off without trouble but I rounded off one and had to cut the head off it. Luckily its threaded section could then be unwound easily. The valve body with conductor plate attached is about 10kg, so an extra pair of hands whilst the last couple of bolts come off is most helpful.
There are great step-by-step instructions on the internet so I won't go in to the detail.
Undoing the ATF sump plug releases just under 3 litres of ATF. You then need to refit the sump plug and remove the sump body carefully - the design means that not all the ATF can drain and about 1.4 litres is left in a puddle in the sump, so lower it carefully. The valve body then drips merrily so have plenty of newspaper etc ready. In total I measured about 4.7 litres of ATF released. I didn't drain the torque converter.
The innards were absolutely immaculate, no swarf or sludge at all. The existing conductor plate had a manufacturing stamp indicating 2012, so my heart sank when I saw that, it implied the hardware was all pretty new and may not therefore be the problem. I fitted the new plate anyway and swapped over the six solenoids. It is essential that this is all done in a clean environment. Dust or bits of fluff/rag/tissue etc can cause havoc with the internals.
I refitted the valve body to the car (using the proper torque setting of 8nm) and checked a spring in the side of the valve body (in earlier designs it can snap, causing shift problems). My car had the later, modified spring, all okay.
I fitted a new filter, refitted the sump bolts (8nm again) and pilot bushing, refilled with ATF, started her up, worked the gearbox lever through all positions for a few minutes to allow the ATF to circulate, went for a drive and then booted the throttle once warm. Result - perfect kickdown!
I should add that I also fitted a brand new section of air intake hose between the left-side MAF and throttle body, to replace a cracked section, so there is always a chance this helped too, by ironing out any fuel/air issues.
Sump removed to show bottom of valve body and filter:
New conductor plate being fitted to top of valve body and 3 pairs of solenoids being swapped over:
View of gearbox housing where the conductor plate and valve body resides. A float valve on the conductor plate sits in the left hole and prevents overfilled ATF rising higher. The two holes to the right are for the conductor plate speed sensors:
Valve body refitted in position:
Checking spring (the big one) is in one piece. This is a revised design version:
Edited by Hereward on Tuesday 18th April 21:56
I will check the Carsoft application tonight or tomorrow night and let you know.
I'm not sure what alarm system I have but, based on the window sticker, it was installed by the Dutch dealer the first owner purchased the car from. I vaguely remember that era - a UK new car buyer could make quite a saving by purchasing through a dealer on the continent.
I'm not sure what alarm system I have but, based on the window sticker, it was installed by the Dutch dealer the first owner purchased the car from. I vaguely remember that era - a UK new car buyer could make quite a saving by purchasing through a dealer on the continent.
Stegel said:
Thanks - I spoke to Carsoft as their brochure shows RST being visible to 129s, not just late ones, and they're coming back to me, but it would be good to know about the software as that comes with adapters to allow it to speak to 124s.
Hmm, I tried this last night and it reported "Status: Module does not respond!"I am not an advanced used so may be doing somethng wrong (but have been able to bring up engine error codes with no trouble). My car is Dec96 build.
My software is the Carsoft V12 package.
Sorry I can't be of much help.
Time flies. Nothing dramatic to report. The MOT was issued with no advisories and the car continues to be a pleasure to own and drive.
I have noticed the oil pressure drops to just under 2 bar when the engine is hot at idle. Instantly rises back to 3 bar when throttle applied (and when idling cold) so I hope this isn't anything to worry about.
The roof mechanism will very occasionally stop moving mid-operation when closing. A quick release and re-application of the button finishes the operation.
The engine continues to weep a little oil from the front cover. I think this Winter I will stump up the cash for some new gaskets.
A variety of pics from the last few months:
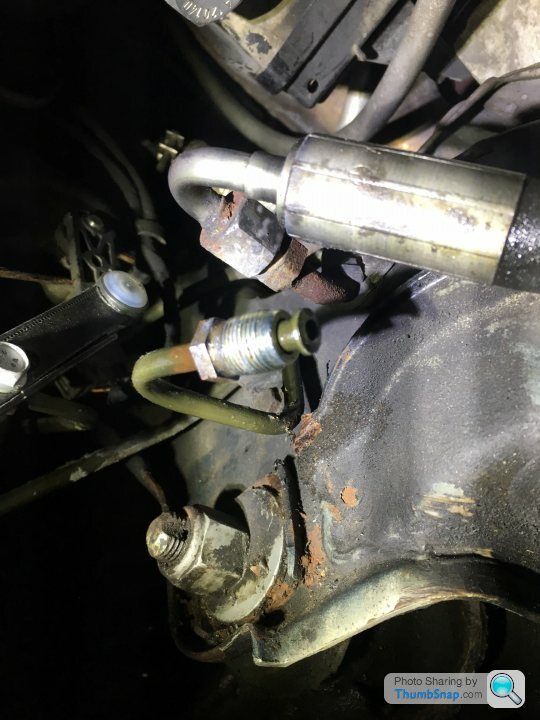
Preventative maintenance - I fitted a new hose that supplies pressurised hydraulic fluid from the pump to the ADS valve block:
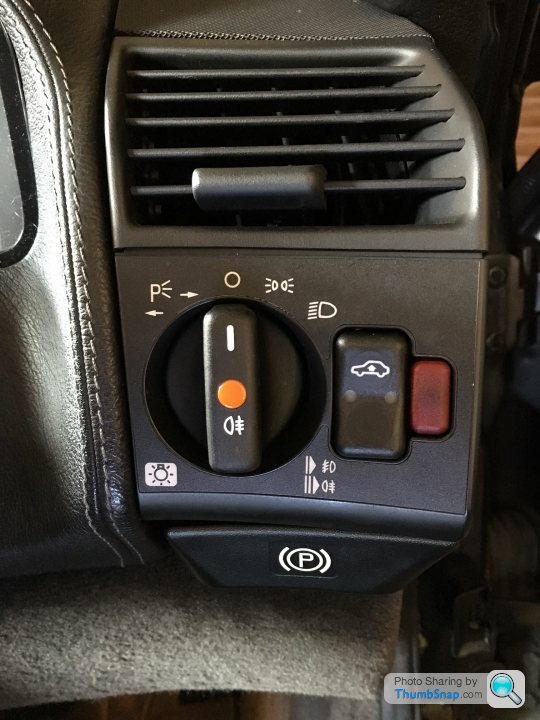
Fitted a new ADS switch. The red lock switch on the original one was occasionally reluctant to engage:
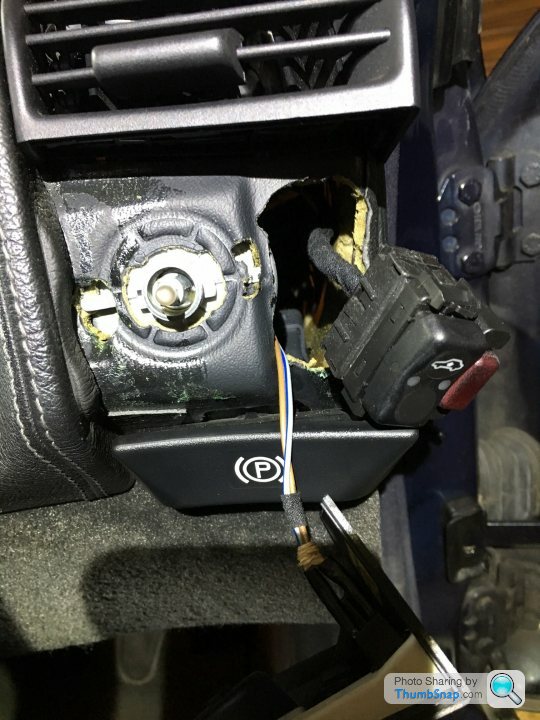
Voila:
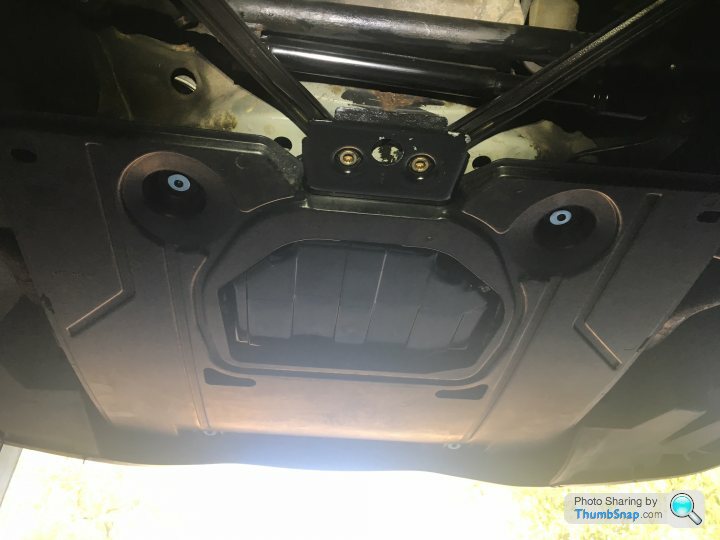
I ordered a new engine undertray. Helps hide the oil leaks! The snooty woman at Mercedes Gatwick told me these were NLA so I ordered direct from Germany and it arrived in about 2 weeks:
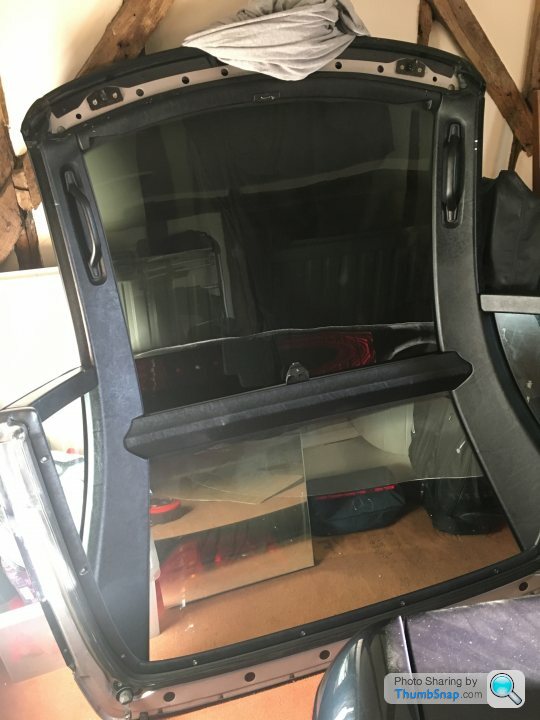
I had been looking for a panoramic roof for a while and this one popped up on Ebay. It was black and the vendor lived 15 minutes away. He even drove to mine to deliver it. Lovely:
I have noticed the oil pressure drops to just under 2 bar when the engine is hot at idle. Instantly rises back to 3 bar when throttle applied (and when idling cold) so I hope this isn't anything to worry about.
The roof mechanism will very occasionally stop moving mid-operation when closing. A quick release and re-application of the button finishes the operation.
The engine continues to weep a little oil from the front cover. I think this Winter I will stump up the cash for some new gaskets.
A variety of pics from the last few months:
Preventative maintenance - I fitted a new hose that supplies pressurised hydraulic fluid from the pump to the ADS valve block:
Fitted a new ADS switch. The red lock switch on the original one was occasionally reluctant to engage:
Voila:
I ordered a new engine undertray. Helps hide the oil leaks! The snooty woman at Mercedes Gatwick told me these were NLA so I ordered direct from Germany and it arrived in about 2 weeks:
I had been looking for a panoramic roof for a while and this one popped up on Ebay. It was black and the vendor lived 15 minutes away. He even drove to mine to deliver it. Lovely:
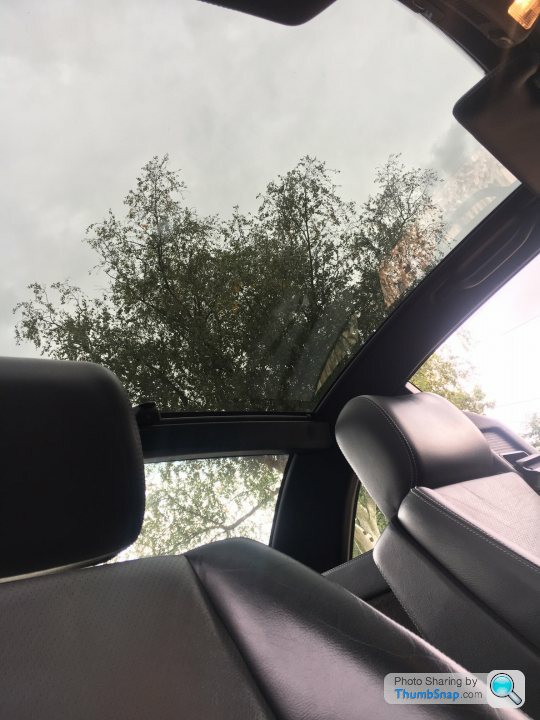
The panoramic roof is noticeably heavier than the standard roof. It's a wild guesstimate but from what I can remember from handling them both yesterday I would say perhaps 15kg difference?
There's a YouTube video of someone single-handedly fitting/removing a hard top. I'm not brave enough to give that a go. I would resemble a tortoise in its death throws before staggering the wrong way and trashing something.
There's a YouTube video of someone single-handedly fitting/removing a hard top. I'm not brave enough to give that a go. I would resemble a tortoise in its death throws before staggering the wrong way and trashing something.
Zonergem said:
I saw a very clean solid hardtop roof appear for sale on eBay... 
Hope it sells for something decent - that extended leather interior trim is fairly rare and the headliner seems alright.
Hardtop trim - both interior and exterior - comes to pieces fairly easily and it may be worth more in bits than as one unit. Bit easier to post that way too.
My first Ebay Nutter experience (I am Alex and my Ebay feedback is perfect):Hope it sells for something decent - that extended leather interior trim is fairly rare and the headliner seems alright.
Hardtop trim - both interior and exterior - comes to pieces fairly easily and it may be worth more in bits than as one unit. Bit easier to post that way too.
New message from: i-love-mercs (2)
Alex
Thank you but no thanks I have just read some of your reviews and I dont believe you!!!
Please stop these games you playing. You wasting time.
Jozef
YOU:
Hello, Jozef.
Sorry but this won't be able to fit on a passenger train. It is too big and I estimate it weighs about 30kg. For collection you would need to turn up in an SL, so it can be fitted on, or a van/pickup truck.
Regards,
Alex
i-love-mercs:
Morning, Looking to take this off your hands. Will I be able to carry the roof on the train or is it to heavy?
Regards
Jozef
Edited by Hereward on Friday 13th October 11:42
Not much to report. This Winter has dragged and the weekends have been generally damp, meaning not much driving. When possible I take the car out for a 45 minute local lap to get everything hot and dry and work the hood hydraulics.
I have recently replaced the front suspension top mounts. The original items have surface cracking and a 400bhp, 2.2 tonne, 21 year old car car needs tip-top suspension components. The process was straightforward but the ADS hydraulic suspension components added a bit of excitement compared to a dry set up.
The top mount's job is to locate and secure the top of the suspension strut on to the body of the car and also absorb energy and reduce NVH.
The below is just a general guide, not gospel. It's an easy DIY job, though. Some of my jargon will probably be wrong.
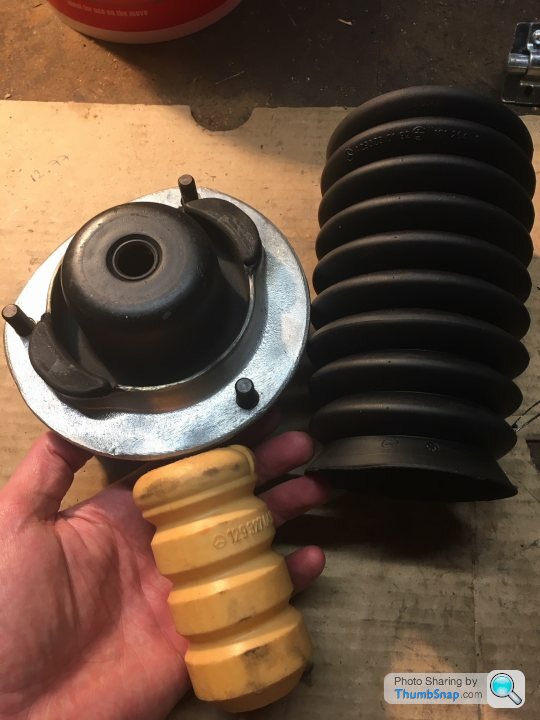
New top mount, bump stop and dust boot for each side, with my dainty hand providing scale. The top mounts for ADS-equipped cars are ~3 times the price of the non-ADS ones, not sure why.
1. Raise the car and remove the wheel. Jack up the suspension so it is partially compressed.
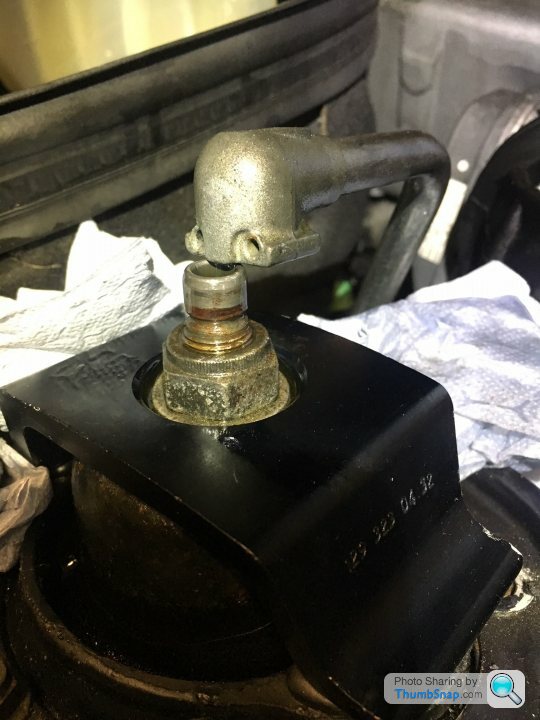
2. Remove engine bay plastic cover adjacent to top mount. This is the Offside (UK RHD car). The hydraulic line is push-fit to the top of the suspension strut and held in place with the retaining pin. I have circled in Red the ADS accelerometer. My car (with ADS2) has three of these; one on each front suspension turret and one mounted on the rear right suspension turret, which is accessible from inside the boot. These three accelerometers measure vertical movement and report this live data to the ADS computer which adjusts the hydraulic damping effect accordingly. These sensors are hardier than the original ADS1 units and second hand ones are available for £30 on Ebay. I have stocked up on a few just in case, since my Nearside one is original (the Offside one in the pic is not, as its 2008 date stamp shows)

As an aside this Youtube video shows the diagnosis of a bad accelerometer from this era:
https://www.youtube.com/watch?v=oqatLelB0u4&t=...
3. Prise the hydraulic line from the top of the strut. I had a collection bottle and lots of towel ready since hydraulic fluid goes everywhere and it's nasty stuff to clean up. I lost about 1 litre, I reckon. I think the protocol is to drain the system properly from the drain point near the front left wheel but I was feeling wild and reckless. Probably best to wear goggles/glasses.
4. Undo the big top nut that attaches the suspension to the top mount. You can then compress and lower the strut's piston down in to the wheel arch. More hydraulic fluid fountains ensue, so have towels ready. It's nice that the spring is located separately from the strut so you don't need to worry about compressing/removing the spring. The top mount itself can then be simply removed from the car by undoing its 3 mounting nuts and lowering it down in to the wheel arch.
5. The old red bumpstop slides off the strut's piston and it's easy to replace the dust boot, too.
Installation is "simply" the reverse process. Ensure the ADS hydraulic fluid tank is topped up with the same volume of oil lost BEFORE starting the engine (with wheels back on terra firma). The system is self-bleeding and there were a tense ~4mins after starting the car before she suddenly rose like a majestic salmon. The ADS pump (same pump that pressurises the power steering) must not be allowed to run dry. It's not very apparent in this pic but this is the front suspension in a collapsed state before engine start:
What else? The engine still leaks a small amount of oil. I can't quite face the bill to get that sorted yet (probably an engine out job).
This video shows the scale of the undertaking for an M120 engine re-build (turn the appalling background music right down):
https://www.youtube.com/watch?v=yPzKs1I68mc&in...
I have recently replaced the front suspension top mounts. The original items have surface cracking and a 400bhp, 2.2 tonne, 21 year old car car needs tip-top suspension components. The process was straightforward but the ADS hydraulic suspension components added a bit of excitement compared to a dry set up.
The top mount's job is to locate and secure the top of the suspension strut on to the body of the car and also absorb energy and reduce NVH.
The below is just a general guide, not gospel. It's an easy DIY job, though. Some of my jargon will probably be wrong.
New top mount, bump stop and dust boot for each side, with my dainty hand providing scale. The top mounts for ADS-equipped cars are ~3 times the price of the non-ADS ones, not sure why.
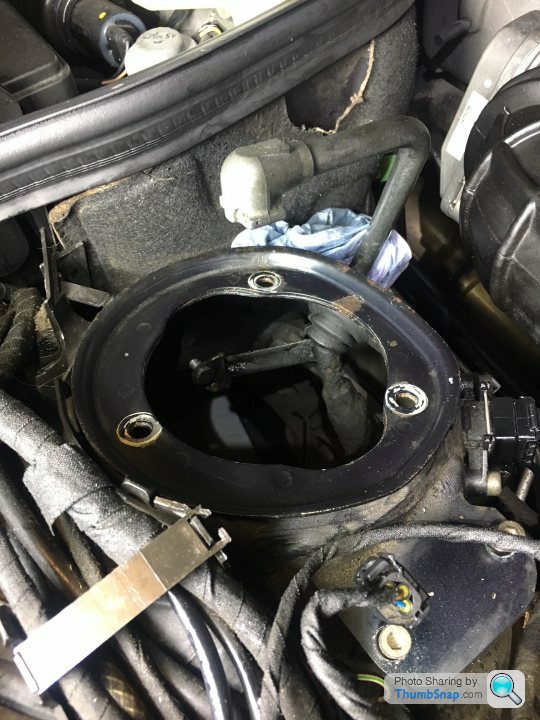
1. Raise the car and remove the wheel. Jack up the suspension so it is partially compressed.
2. Remove engine bay plastic cover adjacent to top mount. This is the Offside (UK RHD car). The hydraulic line is push-fit to the top of the suspension strut and held in place with the retaining pin. I have circled in Red the ADS accelerometer. My car (with ADS2) has three of these; one on each front suspension turret and one mounted on the rear right suspension turret, which is accessible from inside the boot. These three accelerometers measure vertical movement and report this live data to the ADS computer which adjusts the hydraulic damping effect accordingly. These sensors are hardier than the original ADS1 units and second hand ones are available for £30 on Ebay. I have stocked up on a few just in case, since my Nearside one is original (the Offside one in the pic is not, as its 2008 date stamp shows)
As an aside this Youtube video shows the diagnosis of a bad accelerometer from this era:
https://www.youtube.com/watch?v=oqatLelB0u4&t=...
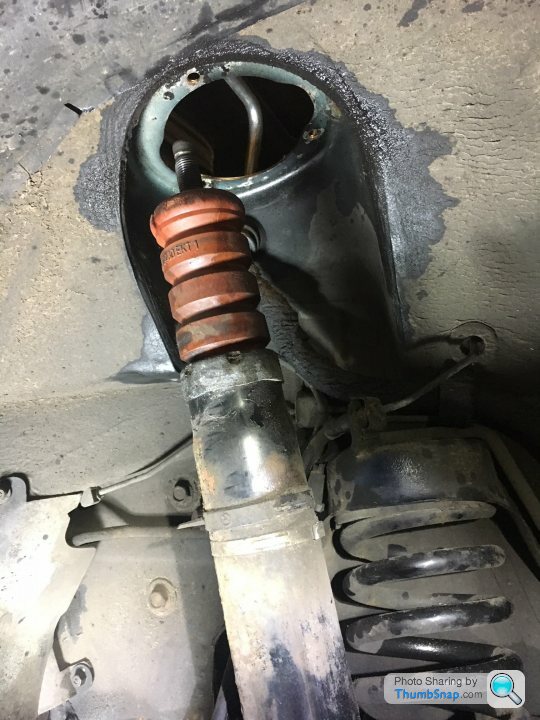
3. Prise the hydraulic line from the top of the strut. I had a collection bottle and lots of towel ready since hydraulic fluid goes everywhere and it's nasty stuff to clean up. I lost about 1 litre, I reckon. I think the protocol is to drain the system properly from the drain point near the front left wheel but I was feeling wild and reckless. Probably best to wear goggles/glasses.
4. Undo the big top nut that attaches the suspension to the top mount. You can then compress and lower the strut's piston down in to the wheel arch. More hydraulic fluid fountains ensue, so have towels ready. It's nice that the spring is located separately from the strut so you don't need to worry about compressing/removing the spring. The top mount itself can then be simply removed from the car by undoing its 3 mounting nuts and lowering it down in to the wheel arch.
5. The old red bumpstop slides off the strut's piston and it's easy to replace the dust boot, too.
Installation is "simply" the reverse process. Ensure the ADS hydraulic fluid tank is topped up with the same volume of oil lost BEFORE starting the engine (with wheels back on terra firma). The system is self-bleeding and there were a tense ~4mins after starting the car before she suddenly rose like a majestic salmon. The ADS pump (same pump that pressurises the power steering) must not be allowed to run dry. It's not very apparent in this pic but this is the front suspension in a collapsed state before engine start:
What else? The engine still leaks a small amount of oil. I can't quite face the bill to get that sorted yet (probably an engine out job).
This video shows the scale of the undertaking for an M120 engine re-build (turn the appalling background music right down):
https://www.youtube.com/watch?v=yPzKs1I68mc&in...
Edited by Hereward on Friday 16th February 20:36
Gassing Station | Readers' Cars | Top of Page | What's New | My Stuff