First Porsche, high miles 944, what could go wrong...
Discussion


It looks brilliant, well done 
They seem to have aged very well and I still love the shape after working on and driving my friend's 944.
I've just worn a set of ZV7's out and didn't find them very good to be honest, albeit they were on my shed Golf. If you run standard pressures they seem to wear out in the centre of the tyre quite fast. I don't think it's just that the Golf is a bit nose-heavy either with the diesel engine, my father had the same issue on a Fiesta!
Yes I've read mixed reviews on the Avon's but they were super cheap (£213.00 fitted) and are one of the very few tyres available in my staggered sizes. Wearing out fast isn't really an issue. I don't do many miles these days so usually end up changing them when they go hard and old, rather than them wearing out. I have to say it drives so much better on the new set.
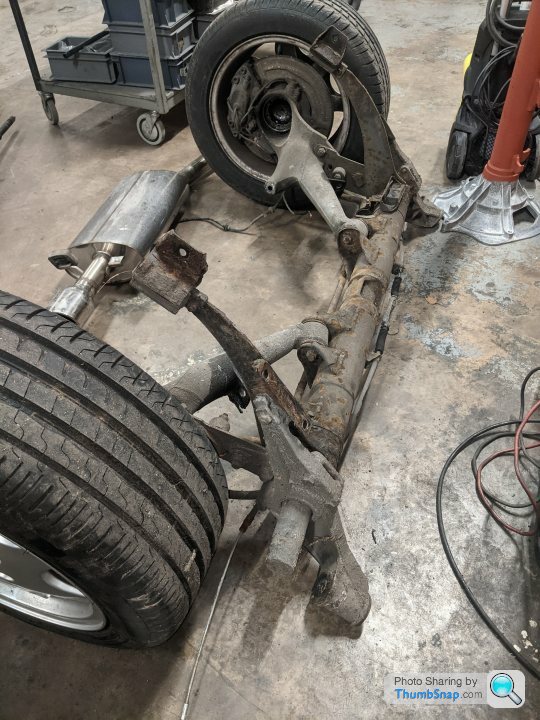
Bit of an update as I've had a bit of work done which has really improved the car. I've had a very annoying buzzing/rattle at certain rev points and narrowed it down to the torque tube.
After contacting Augment Automotive, a Porsche specialist about an hour from me, we arranged to get the car in for a rebuilt unit. They have a special bench to remove and replace the bearings in the tubes and seem to know everything there is to know about removing, rebuilding and re fitting.
While they had the box out they checked the clutch which was ok, but the gearbox mount and the beam mounts were past their time, so I ordered new ones from porsche. Another thing worth doing was the shifter linkage on the gearbox. It was totally shot and rusted up so a new one again from porsche fixed that.
The car is back and driving much better and quieter. There's a bit of a myth I think that these cars always have very noisey drivetrains. They are noisey when they're worn out, but with a fresh set of bearings in the tube and decent gear oil it's really running smoothly and quietly.
A few pics from when the work was being carried out. Unfortunately no pics of replacement parts except the little arm the mechanic made up for the new gear linkage.


And it's back with me. Getting better and better!

Edited by rufusgti on Friday 15th January 22:44

Being of a certain age, when these were current, they were a bit naff. The cars themselves were just as good as they are now, the problem was the image and the people who owned them.
Back then, although I liked the looks, I had no interest in the cars themselves (much the same with 911s).
Now however they are owned by the people who should have bought them in the first place, people who have them because they like and appreciate them for what they are and not just so that they can wave around their Porsche key rings.
Anyway, keep up the good work, it really is a beautiful looking car.
LanceRS said:
Being of a certain age, when these were current, they were a bit naff. The cars themselves were just as good as they are now, the problem was the image and the people who owned them.
Back then, although I liked the looks, I had no interest in the cars themselves (much the same with 911s).
Now however they are owned by the people who should have bought them in the first place, people who have them because they like and appreciate them for what they are and not just so that they can wave around their Porsche key rings.
Anyway, keep up the good work, it really is a beautiful looking car.
Thankyou, that's very kind. I must say I wanted a Porsche for many years but never looked at the 944 for the same reasons as you mention. The truth is I couldn't afford a 911, and I couldn't find a 968, which was my first choice at the time. It was only when I started looking at 944's that I realized how good they really are. I kick myself now for dismissing them for so long on nothing more than image. But I suppose we all do that to some degree. I actually think they have aged slightly better than the 968 now, but it's just because the 80's theme is kind of in fashion again. The 968 will have its day. Back then, although I liked the looks, I had no interest in the cars themselves (much the same with 911s).
Now however they are owned by the people who should have bought them in the first place, people who have them because they like and appreciate them for what they are and not just so that they can wave around their Porsche key rings.
Anyway, keep up the good work, it really is a beautiful looking car.
Bit of an update after this car took a bit of a back seat. Change of my wife's job, lockdowns, just meant it wasn't getting used.
Unfortunately times taken its toll and a few previous bad repairs have shown through and need sorting. Mainly the lower front wings.
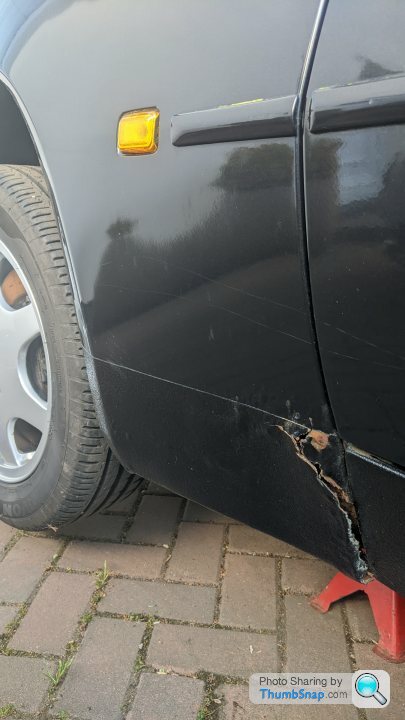
That's the worse side but the other side has gone in the same place. It's been repaired before but not particularly well. So I've bought some replacement sections to go in.
The wings were a bit of a job to get off but they came off in the end. Where the wing sits on the body there's some surface rust. I don't think it's gone through, looks solid but I'm going to grind it all back and recoat in epoxy primer. I'm pretty new to this so any advice along the way most welcome.

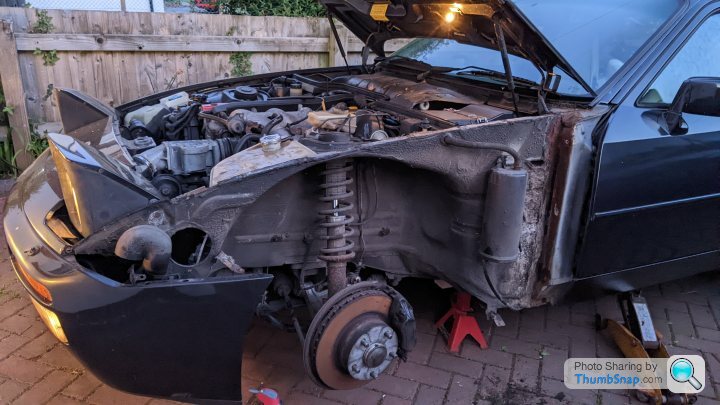
One of the most amazing things I found was with the passenger wing removal. There's so much underseal in the wheel wells I had to pry it away to get at the fixings. Whatever they use between the inner wing and outer wing, along the top where the bonnet meets, was actually still wet inside. The sealant hadn't actually dried out, even after 30 plus years.
The pic is terrible but theres shining bright metal from under the sealant. I need to get some more sealant to refit the wings so do let me know if you have any recommendations.

So plenty of work to get on with. I'm going to be stripping some old underseal off and treating any rust, repairing any holes and using epoxy primer to cover any bare metal. Bit of a learning curve but it needs doing and I don't mind getting my hands dirty.
Unfortunately times taken its toll and a few previous bad repairs have shown through and need sorting. Mainly the lower front wings.
That's the worse side but the other side has gone in the same place. It's been repaired before but not particularly well. So I've bought some replacement sections to go in.
The wings were a bit of a job to get off but they came off in the end. Where the wing sits on the body there's some surface rust. I don't think it's gone through, looks solid but I'm going to grind it all back and recoat in epoxy primer. I'm pretty new to this so any advice along the way most welcome.
One of the most amazing things I found was with the passenger wing removal. There's so much underseal in the wheel wells I had to pry it away to get at the fixings. Whatever they use between the inner wing and outer wing, along the top where the bonnet meets, was actually still wet inside. The sealant hadn't actually dried out, even after 30 plus years.
The pic is terrible but theres shining bright metal from under the sealant. I need to get some more sealant to refit the wings so do let me know if you have any recommendations.
So plenty of work to get on with. I'm going to be stripping some old underseal off and treating any rust, repairing any holes and using epoxy primer to cover any bare metal. Bit of a learning curve but it needs doing and I don't mind getting my hands dirty.
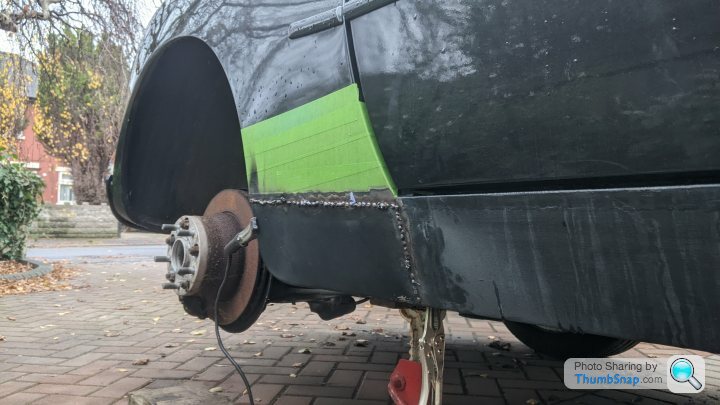
They do go in that wing bottom and panels are available which you've got. I've done the job on both sides of my car. One I did with the proper repair panel and for the other side I kinda made one which I welded on - it's not great but it is doing the job for now. I've bought another repair panel to put on there at some point.
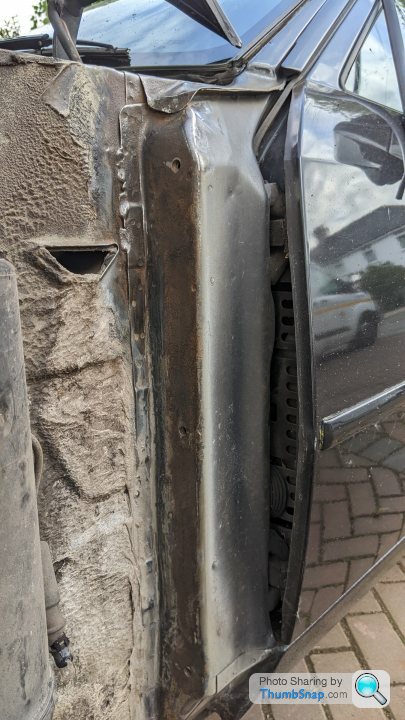
You're right to say the underseal they used from the factory is incredible stuff - it took me AGES to get the wings off mine. They'd never been off and I had to slice through from the engine bay with a metal bracket to separate where the underseal went seemlessly from inner wing to the actual wing. Likewise the three mounting bolts that go into the base of the A-pillar/door jamb. Being half an inch thick with underseal meant they were easily undoable (after you'd found where they were and they got the underseal off the bolt head so you could get a socket on them).
Here's some pics of mine when I did it - see the bracket going between inner wing and the wing.


The outer sill was shot but the inner one cleaned up okay.


I cut down the reapir panel for the full length outer sill as I didn't want to take the door off.

The sills are one of the areas that when they go, they go pretty quickly and remember, what you can see is the tip of the (rust) iceberg ...
Keep us updated as to progress.
You're right to say the underseal they used from the factory is incredible stuff - it took me AGES to get the wings off mine. They'd never been off and I had to slice through from the engine bay with a metal bracket to separate where the underseal went seemlessly from inner wing to the actual wing. Likewise the three mounting bolts that go into the base of the A-pillar/door jamb. Being half an inch thick with underseal meant they were easily undoable (after you'd found where they were and they got the underseal off the bolt head so you could get a socket on them).
Here's some pics of mine when I did it - see the bracket going between inner wing and the wing.
The outer sill was shot but the inner one cleaned up okay.
I cut down the reapir panel for the full length outer sill as I didn't want to take the door off.
The sills are one of the areas that when they go, they go pretty quickly and remember, what you can see is the tip of the (rust) iceberg ...
Keep us updated as to progress.
Well what looked pretty horrific above turned out to be minor surface rust. I brushed it back with a wore wheel and treated the rust pits with a stabiliser , left that a few days, wire wheeled it back again and repeated. Then gave all the areas I cut back a coat of epoxy primer. Will check again tomorrow and give it another coat.
I've decided to start at the front of the car and work back. So far so good. No nasty surprises yet.

I've decided to start at the front of the car and work back. So far so good. No nasty surprises yet.


That all looks pretty good. The plastic arch liners have saved many of these cars down the years. My old MGB was rotten as a peach in the top inner arch area as there were no liners back then of course and MG thoughtfully put a box construction at the top upon which wet mud got trapped … very helpful. Rusted through in no time!
Well. It's been a busy year on this car so time for an update.
Having previously said, I have never welded before so this was all new to me. I'll try and pick up where I left last time. The wings were repaired with new sections. And then I moved onto the sills and inner sills. A few pics I took along the way.

Started to open up the sills


I can't lie. I wasn't feeling good at this point.
Having previously said, I have never welded before so this was all new to me. I'll try and pick up where I left last time. The wings were repaired with new sections. And then I moved onto the sills and inner sills. A few pics I took along the way.
Started to open up the sills
I can't lie. I wasn't feeling good at this point.

You can see in this pic I've chopped out all the rot, cleaned up any surface rust and then treated the area ready to start cutting pieces in. From here on it was lots of measuring, cutting, bending and hammering before any welding took place. But then. I was able to start welding in the lips of the floor section where it meets the inner sill.


And from there I could start cutting in the inner sill section

This is where confidence was starting to grow a little. I was able to cut and shape the steel panels with basic tools and tak them in before welding them properly. Very very time consuming. Some days I'd spend hours and hours and only get one section welded. But it was coming together. I'd finish sections and then paint the area with epoxy primer before rust would set in. As I closed the sections off I'd seam seal and re coat.


Gassing Station | Readers' Cars | Top of Page | What's New | My Stuff