1985 Rover 3500 Vitesse
Discussion


miniman said:
Yikes, that’s a big job. Definitely a few more steps than swapping the heater out on a Mini 
I think I can name every bolt and fixing to do a mini heater box, this is a different kettle of fish...Stick Legs said:
Last heater matrix I did was in a BMW 635CSi which was actually quite straightforward.
I remember doing one in an XJ-S which was like this; essentially it’s inside a huge HVAC assembly which is the first thing they put in the body shell.
Good luck!
Damn Germans designing things with service items in mind! I remember doing one in an XJ-S which was like this; essentially it’s inside a huge HVAC assembly which is the first thing they put in the body shell.
Good luck!

The Rover is exactly how you describe an XJS, I'd be shocked if it wasn't the first thing that went in after the sound deadening...
bangerhoarder said:
Is it possible to pressure test it before full reassembly? It’d really spoil my day/week if I had to do that job twice!
Now that sounds like an incredibly sensible solution, rather than just wanging it back in and hoping for the best... 
21st Century Man said:
'kin 'ell!
Yeah not one for the faint hearted! So with the matrix really throwing a spanner in the works I spent the evening seeing if anyone else had had similar issues. I actually had another Aircon Vitesse owner respond to my pleas of help, he said he had a company near Birmingham make him a matrix. when he was restoring his car earlier this year.
When he sent me the name of the company (foursome vehicle heaters) I was pleasantly surprised as it was the same company I'd already bought my replacement matrix off!
So bright and early Monday morning I was on the phone to them. They were very helpful and we discussed the issue. They were a little confused as they've sold loads of SD1 matrixes with no issues, with Andy (other aircon vitesse owner) being the first to have issues earlier this year. So obviously not many aircon cars have gone bad! Even more luckily for me Andy had sent them his matrix to copy, and they still had it onsite. They asked how urgently I needed it, and I said ideally in the next few days...
It was made later that day, dispatched Tuesday and at my door Wednesday midday. Amazing customer service!

I've also opted to bypass the original seals to pipe design from the matrix as these are long since NLA and prone to leak. I'll connect it with conventional heater hose and clamps.
With the matrix solution sorted I could see a light at the end of the tunnel so I cracked on with the HVAC unit.

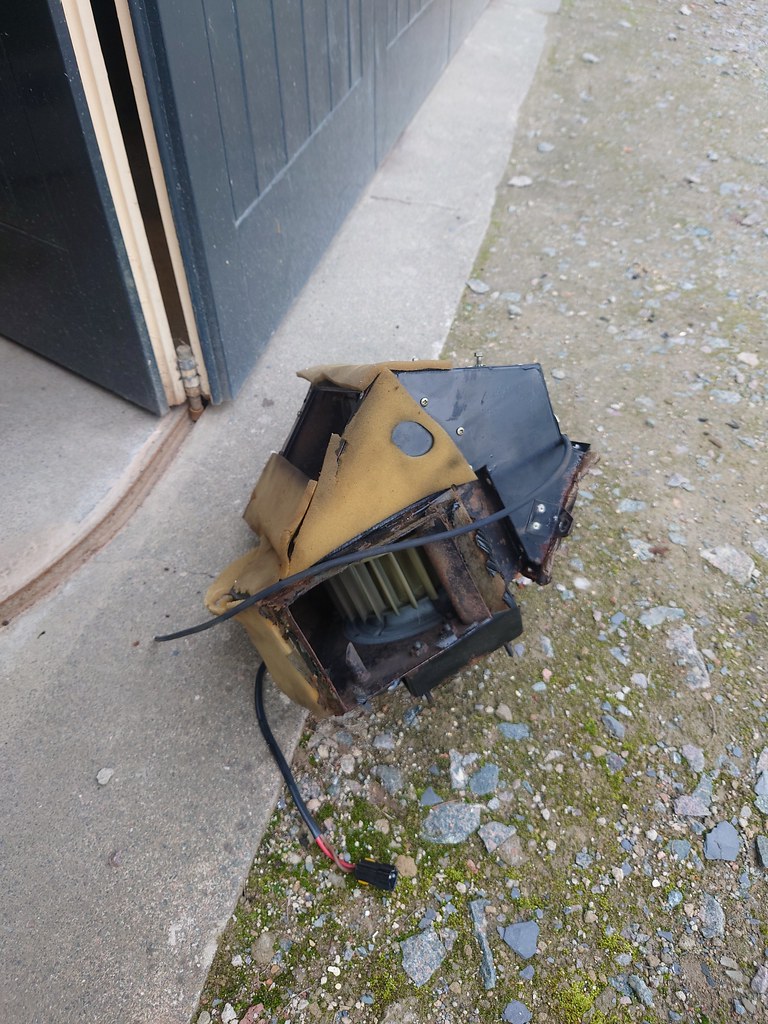
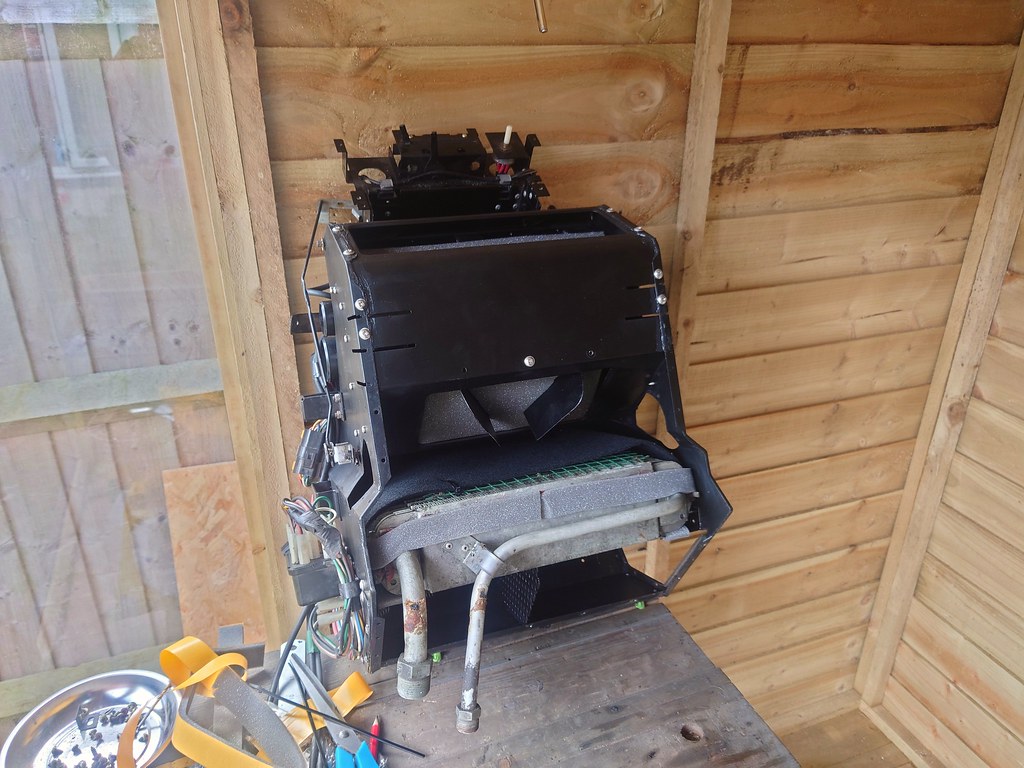
It honestly doesn't look that bad, until you start to look inside...

First up for removal is the aircon evaporator.
It has a filter behind it, which was disintegrated and was responsible for chucking bits of foam at my face for the last 5 years.

There also was a lot of leaves and crap. It was really gross in there.

Every flap's foam was disintergrated, and had rusted behind where the foam was.

To do it properly I drilled out the rivets holding the unit together to strip it properly.
A little test fit of the matrix.

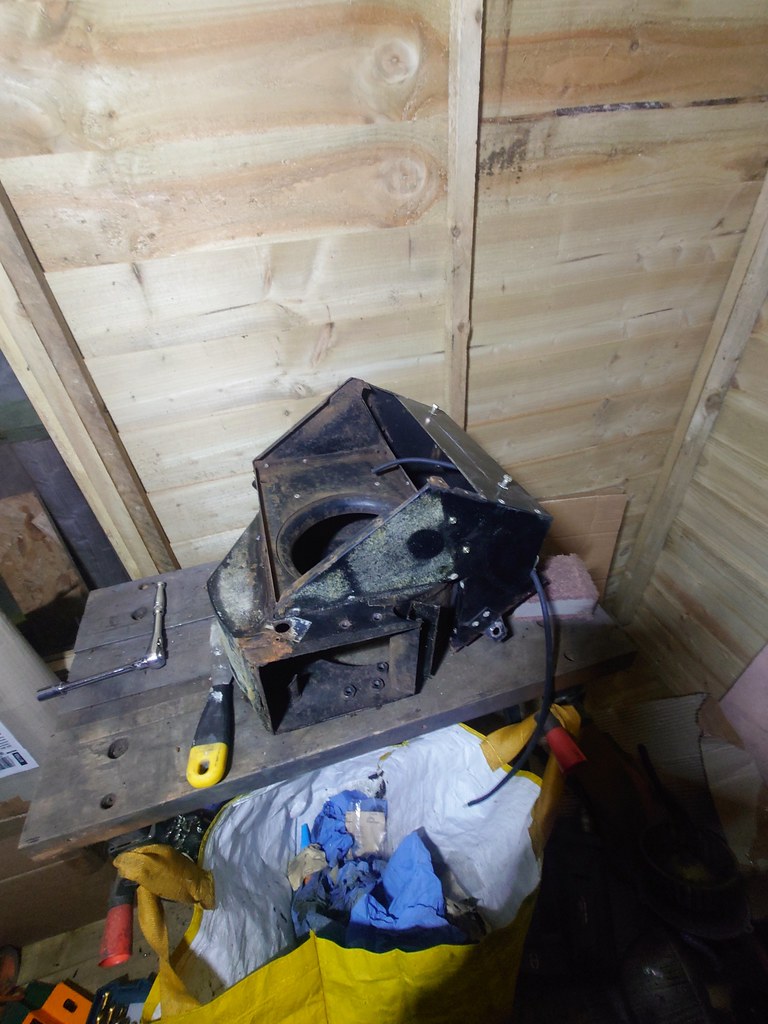
I then spent a few hours with a wire brush cleaning everything that I could, and then painted on the rust converter (bilt hamber hydrate 80 this time)
I left that for the recommended 24 hours, and then prepped and got the first coat of paint on.

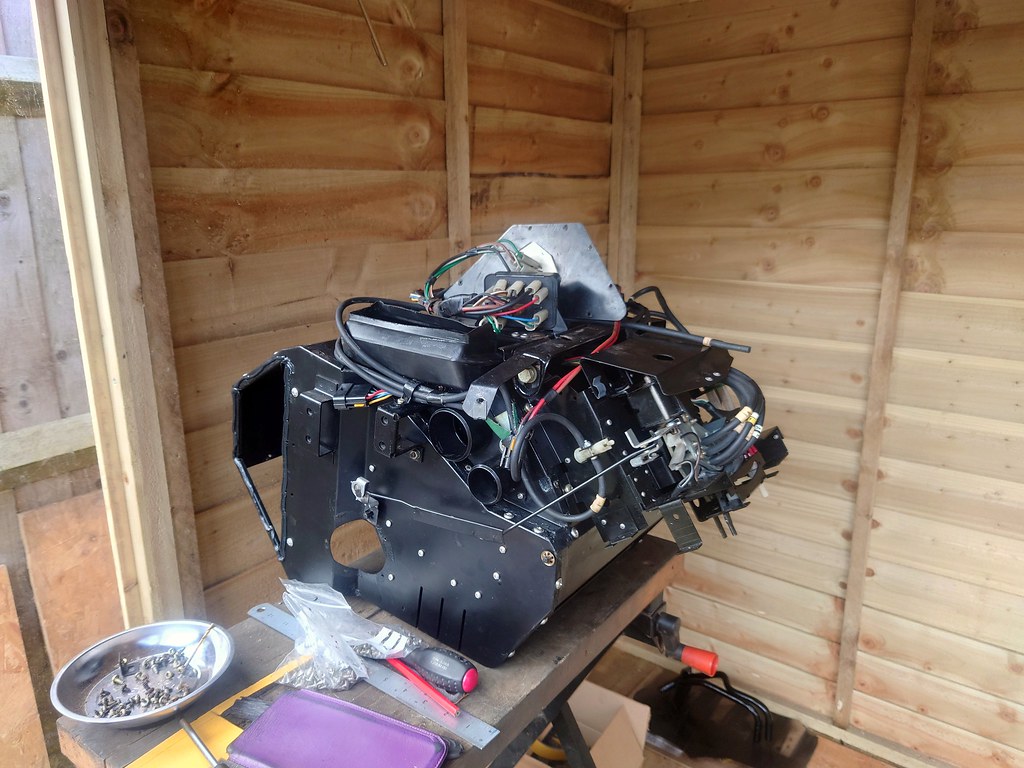
While I was waiting for this to all dry, I had talked myself into also headed back to the car to unbolt the heater blower motor housing.
I want to do this properly, and as my heater had stopped working on setting 3, I was looking for the otter switch (the thermal switch that controls the fan speeds)
This has studs through to the engine bay that attach the bracket for the air con drier, so more engine bay disassembly!
There's also 2 bolts that go through to the scuttle.

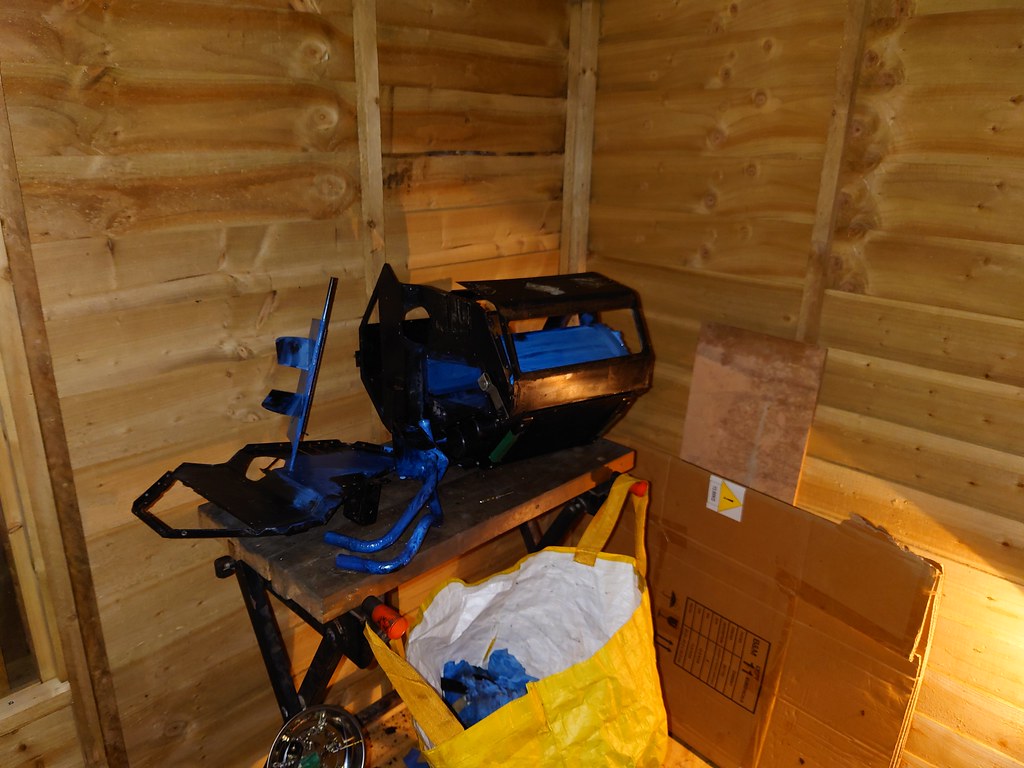
I then took this back for more refurbishment...

The underside faces the passenger foot well and is suppose to the the recirculation flap. That was siezed open. It also has two blast flaps, so it can't create excess pressure in the cabin, these are riveted aluminum panels that used to have some kind of plastic inbetween them, which has long since disintergrated.

Much easier to see with the panel removed.

The rest of the unit was much simpler than the HVAC unit, the fan motor came out, all the old foam removed, then the usual rust removal, treatment, and ready for paint.

Much nicer!

Now I had some fun with the recirculation panel, I freed off the pivot point, cleaned the vacuum actuator, and remade the blast panels with polyurethane sheet. My foam was a little messy, I cut the template upside-down...

I replaced all the rivets I'd removed with SS screws, and sealed the unit with loctite 5980 my favourite sealant.
Next up was the HVAC unit.
First up was cleaning the aircon evaporator, reinstalling all the foam ( i bought 10m of adhesive tape, and 5 A4 sheets. I used almost all of it!
I also made a new evaporator filter using correct spec foam.

Again replacing all rivets with stainless fixings.

And both all back together.

In goes the heater matrix, all sealed with new foam.

With the sealing panel on with new pipes. Looking very water tight!
I also cleaned all the plastics that had coolant in them so now everything should be ready to fit!
This in the end took almost all week, and I even took Thursday and Friday off work to get this done. But ready and prepped for a Saturday installation.
Joe
Edited by 1275 GT on Friday 13th October 21:15
You have my sympathies. Just done this on my P38 Range Rover. What started as a project to replace blend motors and heater O rings, ended up as a new matrix as well as the plastic housing was cracked and leaking.
Had to take the dash out and half of the frame, which means undoing bolts that go through the bulkhead. Of course you cannot get at anything as every bolt is hidden and not intended for maintenance. Got it done over a couple of weekends but I nearly gave up on at least one occasion. Never again!
God luck!
wormus said:
You have my sympathies. Just done this on my P38 Range Rover. What started as a project to replace blend motors and heater O rings, ended up as a new matrix as well as the plastic housing was cracked and leaking.
Had to take the dash out and half of the frame, which means undoing bolts that go through the bulkhead. Of course you cannot get at anything as every bolt is hidden and not intended for maintenance. Got it done over a couple of weekends but I nearly gave up on at least one occasion. Never again!
God luck!
That sounds all to familiar, I think the only positive of the SD1 is at least the heater box is metal. Had to take the dash out and half of the frame, which means undoing bolts that go through the bulkhead. Of course you cannot get at anything as every bolt is hidden and not intended for maintenance. Got it done over a couple of weekends but I nearly gave up on at least one occasion. Never again!
God luck!
Ahh yes, whoever designed the fixings to go through the bulkhead definitely needs some kind of punishment.

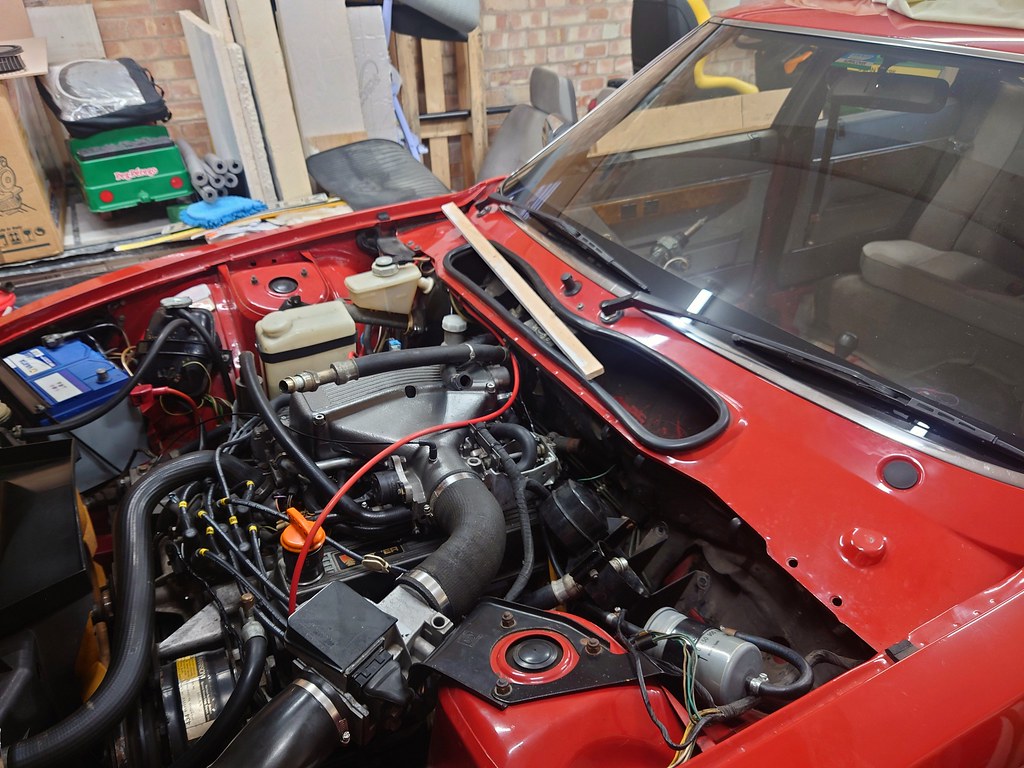
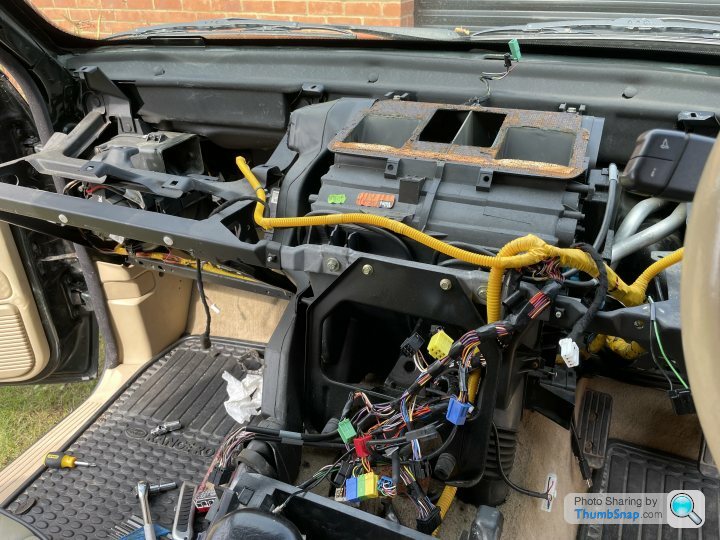
This is about as deep into a car as you can get, and honestly I was pleasantly surprised. Just look at that bulkhead!
A little paint flaking around the intake opening, so treated and painted. But no hidden corrosion or paint loss. and beautifully sealed around the windscreen. Wiring loom is unmolested, and I'm pretty sure nobodies been here before which is always nice.
On the sealing plate for the aircon pipes I found this little nugget.

It's screwed from the inside, so I'd be confident this is the first time this has seen the light of day in 38 years.

What's more curious is to me that looks like cents, so American?
I know the aircon was suppose to be American sourced but that's an interesting find.

I started the re-assembly at around 5pm Friday afternoon. I'd spent most of the day on the re-assembly of the heater boxes so not much time left to work on the car.
Getting the blower motor back in wasn't too bad, I also foamed the outside as it was originally too.
The biggest pain of that was the top bolts aren't captive, so I had to get some help to push them through and hold them while trying to get the nuts on through the bulkhead cavity.
I called it a day at 9pm on the Friday.

Bright and early Saturday I started getting the main HVAC unit in. It's a bit of a mission, it weighs quite a bit and is bulky so making sure you don't catch it on anything while straddling the transmission tunnel requires a very weird squatting motion.
I actually had the unit in at 10:30am Saturday morning, so I was optimistic at this point!
At this point I had to make sure everything was tip top. This of course looks simple but also took hours. I replaced all the aging tape, rebound bits of loom, found a grounding wiring that needed repairing, repaired and re-terminated some of the aerial wiring. And of course vacuumed all the crap that fell around the floors.
I also replaced all the vacuum lines that had gone hard in the engine bay that come through into the cabin.
Now just the task of bolting in the heater box through the bulkhead and to the transmission tunnel. Connecting the heater hoses through the bulkhead of course isn't as simple as it sounds either, I had to replace some of the heater hose, and replaced all the hose clamps with new while I was there.
I started to connect the electrical connections first to verify everything still worked, and of course remembered that my heater hadn't been working on speed 3.

This little box of magic clicked on every setting apart from that...
The fan speed controller.
It's buried under the dash so while I had one last opportunity we decided to dive deeper. At this point it was 3pm on Saturday and I really didn't have the time, but it has to be done right.

Removal and disassembly found one of those teeny pink wires had broken off from it's mount.
So while i held it with tweezers my dad soldered it back on.
We also put a dob of solder on some of the other connections that were looking a little green.
Clipping it back together and connecting it back correctly (many pictures were taken of the correct wiring order) yielded a satisfactory click and working fan on all speeds.
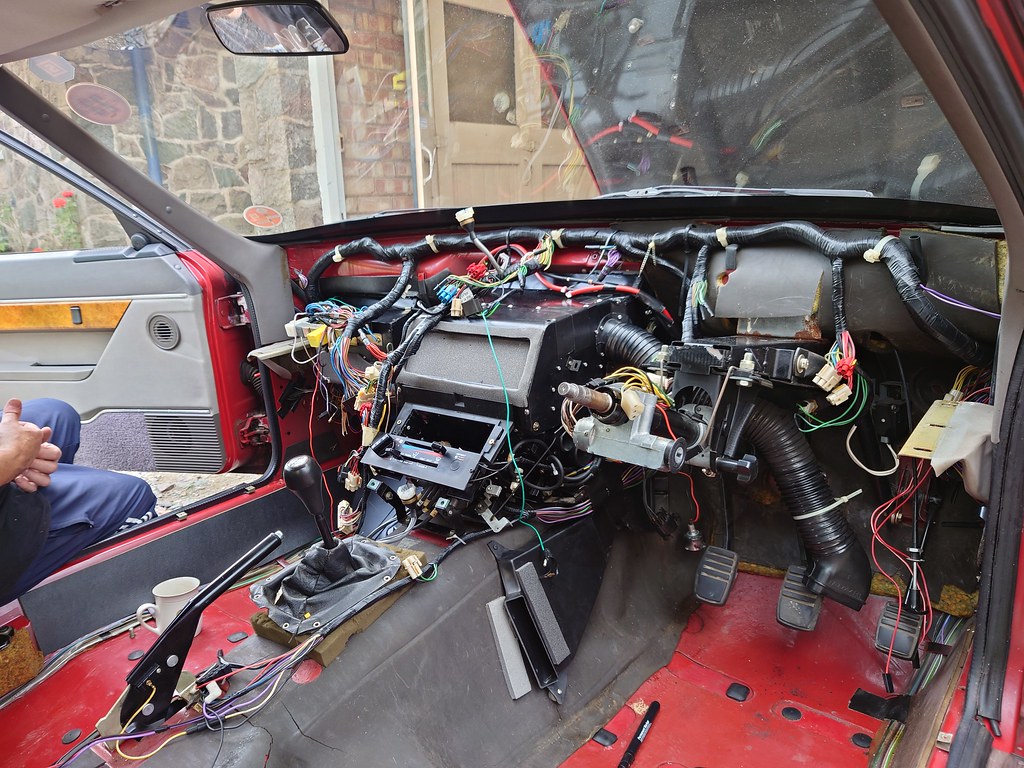
At this point it was time for the dash to go in.
Now this too both of us, and all hands to guide the wiring harness through the hole in the back of the dash, careful not to trap any wiring.
So you just get the result!

Dash in at 4:40pm.
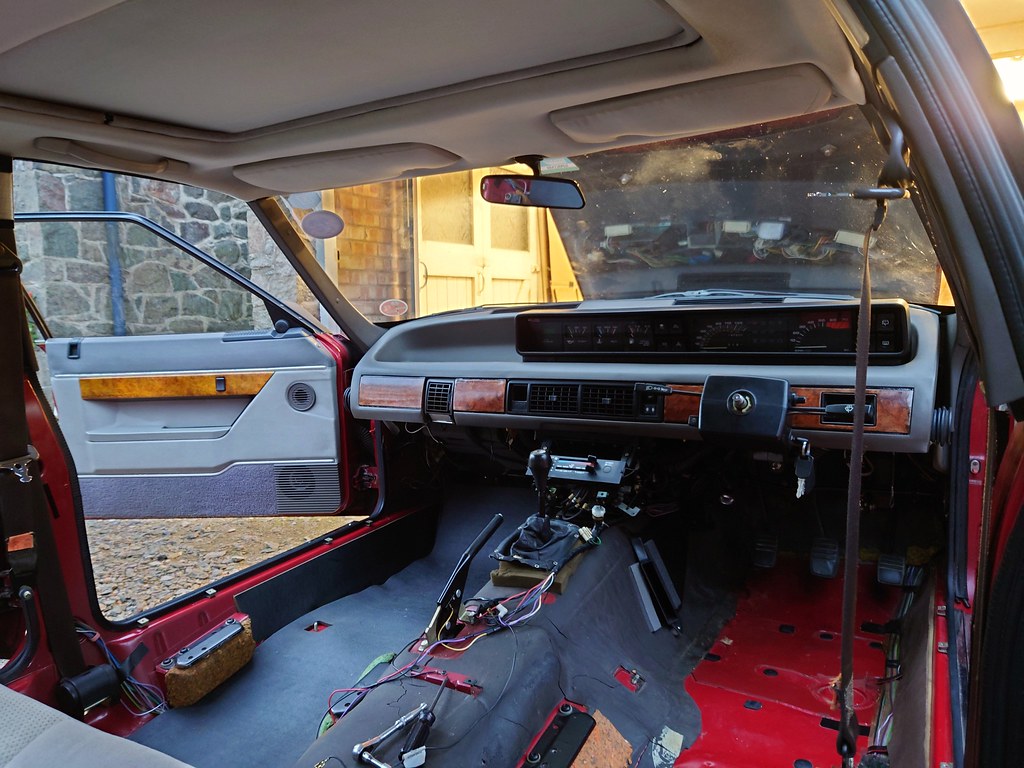
Getting the dash all connected in, and all the ducting under the dash took some time. I also re-installed the column switches.
I'd actually bought the car with a snapped column pinch ring, so the stalks moved. I'd replaced it with one out of my other Vitesse.
But when doing the bulkhead repair in 2019 when the engine was out I had to remove it, and you guessed it snapped that one too when tightening it.
Luckily 2 weeks ago I'd won a good used stalk set on ebay, with a description of good condition, bit of movement in the stalk. The slip ring was in perfect condition though. Turns out the stalk had snapped one of it's locating lugs.
Again my dad came to the rescue and disassembled both and making one perfect indicator assembly from the parts.
6:30pm.

Final vacuum of the floors and the carpet can go in! This again was cleaned by my dad in preparation of the refit. So looks brilliant.
I also got the coolant system sorted, and bled the entire system. This is a little tricky on the SD1, taking a few goes, but comes good in the end. I can also report beautifully leak free in the cabin.


8:24pm.

I'd committed at this point so the car was outside so we could both get access.

The seats went back in at 9:07pm, and after some last minute tinkering we called it finished at 10pm.
Everything went back exactly as I wanted, but it wasn't half a slog of a few days to get to that point!
At this point I treated myself to a well earned meal, and eventually set off for home at 11:30pm.

Heater blowing beautifully hot, and leak free and everything working as it should.
As previously mentioned, and incredibly annoyingly my low speed shunting has magically reappeared...
So 2 steps forward, one back...
Had a very uneventful drive home, and hit my bed just after midnight.
Just intime to get up at 7:30 for a photoshoot!
Joe
I absolutely do not envy you for doing that job! I'd heard it was a horrible task, and that pretty well confirms it. It also shows how insanely complex the AC heater system is too, the non-AC heater box and controls are comparatively basic; all cable and lever controlled.
Its a job well done, of course. Looks better than new, and will last many many years now.
Its a job well done, of course. Looks better than new, and will last many many years now.
Wow, what a mammoth task! Very impressive work.
Are the AFM on these the clock spring flapper type? Could the shunting be caused by the spring tension having relaxed with age, producing erratic fueling in low throttle/low air flow situations?
Could the new engine mounts have improved the situation by reducing jolting of the engine, which was in turn jolting the AFM and causing the flap to open and close because of the slack in the spring, thereby improving the shunting but not eliminating it? Probably something you'd have already looked at, but just a thought.
Edited by clubracing on Tuesday 17th October 13:26
Great stuff! Lovely pics too, the last one for the late night rumble home is great. Who needs a photoshoot?
I've been trying to read this on my commute and the images wouldnt load - there was no way I was reading this without them!
I know the heater is great looking wiht the Bilt Hamber and new foam, but the super-clean carpet must be fantastic.
I've been trying to read this on my commute and the images wouldnt load - there was no way I was reading this without them!
I know the heater is great looking wiht the Bilt Hamber and new foam, but the super-clean carpet must be fantastic.
bolidemichael said:
Absolutely excellent work Joe and Father Joe! What's the reference to the 'other' Vitesse, I don't recall there being another hanging around -- is it a donor car?
Thankyou very much!There is a second Vitesse hiding away that will eventually also get restored. Or at least that's the plan.
I actually bought both on the same day and it's even background of one of the pics on my second post on this thread.

But that will of course get it's own thread when the time is right, currently I just have it so every time someone asks if BCK is a twin plenum I can say no, but I've got one at home.
KelvinatorNZ said:
I absolutely do not envy you for doing that job! I'd heard it was a horrible task, and that pretty well confirms it. It also shows how insanely complex the AC heater system is too, the non-AC heater box and controls are comparatively basic; all cable and lever controlled.
Its a job well done, of course. Looks better than new, and will last many many years now.
Yeah I'd also been warned of how bad it was, and to be honest the disassembly wasn't that bad, but dealing with the aftermath of a leaking matrix was definitely the worst bit. Its a job well done, of course. Looks better than new, and will last many many years now.
The difference between the AC and non-AC cars is ridiculous! The vacuum control is so unnecessary too. It's also amazing how little documentation there is documenting the differences, and annoyingly how sparse the parts are to find.
But it's all savable, and lucky I now have a source for the matrixes.
Thankyou very much, yes not a job I want to be doing again in a hurry!
clubracing said:
Wow, what a mammoth task! Very impressive work.
Are the AFM on these the clock spring flapper type? Could the shunting be caused by the spring tension having relaxed with age, producing erratic fueling in low throttle/low air flow situations?
Could the new engine mounts have improved the situation by reducing jolting of the engine, which was in turn jolting the AFM and causing the flap to open and close because of the slack in the spring, thereby improving the shunting but not eliminating it? Probably something you'd have already looked at, but just a thought.
Thankyou! It definitely was a lot more than I was expecting. Are the AFM on these the clock spring flapper type? Could the shunting be caused by the spring tension having relaxed with age, producing erratic fueling in low throttle/low air flow situations?
Could the new engine mounts have improved the situation by reducing jolting of the engine, which was in turn jolting the AFM and causing the flap to open and close because of the slack in the spring, thereby improving the shunting but not eliminating it? Probably something you'd have already looked at, but just a thought.
The AFM's are "flapper" type and I think you're onto something with that. It was something I planned on investigating until I thought I solved it with the engine mounts, so it's back to no.1 priority. Apparently it can also be exacerbated by a hotter cam, which I also have.
After reading your thoughts I went and grabbed my 3 spare AFM's I have stashed and checked all of them, 2 have very light springs and you can induce a bounce, one is quite a bit tighter.
Annoyingly ATC has increased their price for refurbishment of the units to £360 now, and there's also a NOS one listed on ebay for offers over £800!
Might have to bite the bullet, even if it's just to rule it out.
I have one "good" second hand AFM that I can swap in and try that. I also want to stick a GoPro just upwind of it, and see if I can prove the theory with a video! Job for the weekend I reckon.
Mr Tidy said:
Wow, that turned into a bit of a marathon - congratulations on getting it all back together! 
It really did, especially on the Saturday. I really didn't think it was going to go back together in time.Spinakerr said:
Great stuff! Lovely pics too, the last one for the late night rumble home is great. Who needs a photoshoot?
I've been trying to read this on my commute and the images wouldnt load - there was no way I was reading this without them!
I know the heater is great looking wiht the Bilt Hamber and new foam, but the super-clean carpet must be fantastic.
Oh that drive home was so satisfying, especially with a blasting hot heater. I took the long way home despite it being so late! I've been trying to read this on my commute and the images wouldnt load - there was no way I was reading this without them!
I know the heater is great looking wiht the Bilt Hamber and new foam, but the super-clean carpet must be fantastic.
Oh the carpets come up so nicely. If anything it was a good excuse to get them nice and clean after 5 years of use since I last did it!

You especially would have loved the photoshoot, it was full of our fellow Rover/MG brethren.

I spent most of this weekend doing some "testing" which is just me driving around both loving the Vitesse and being frustrated at it's low speed manners, and of course enjoying the lovely warm heater.
I also chucked the turbofans on for a laugh and made the most of golden hour, I'm far from the best photographer, but I'm damn pleased with how this shot turned out.
Enjoy!

Joe
Edited by 1275 GT on Wednesday 18th October 22:15
So it's MOT season yet again, so a few service items for the Vitesse were due.
Mainly the wiper blades actually.
I also chucked in a new air filter and fuel filter.

I ordered some fancy fronts, and just an insert for the rear, as I couldn't find a decent "pin" type blade in a big enough size.

Quite enjoying the Michelin wiper blades...

The Mann fuel filter definitely isn't as aesthetically pleasing as the Bosch one I had on, so I don't think that'll be staying...

But almost ready for another years inspection.
So I've been driving myself a little made on my pursuit of getting the Vitesse to run perfectly.
I've swapped between a few, but I've never really dug into the Air Flow Meter...
I have a few spare including the one I put down as the reason for the death of the original engine...

It's really not that complicated, it's just a mechanical sweeper that moves on a carbon track which alters the output to the ecu. There's also a temperature sensor, and the initial feedback to start the fuel pump. But if the ecu doesn't see the air flow it can't alter the open timing for the injectors.
The screw on the top that "adjusts" the AFM is just an air bypass bleed that minutely adjusts the position. The major adjustment is the clock spring, the looser the spring the easier it moves, i.e the more airflow so the richer the engine runs. Tighter leaner.
All the outputs are analogue, so can be checked with a multimeter.
I checked through my spare one, and compared it to the one on the car. the spring tension was a little different, but without feedback adjusting it would be complete guess work. Annoying I've been locked out of my Gas analyser, it needs calibrating and is now useless...
But I did want to check my function with what I have available. I'd also suspected that maybe a AFM flutter could be causing my shunting, and clubracing had again prompted me to check again.
https://youtu.be/IjoZdSXrkQg?feature=shared
So whipping off the air filter and a gopro infront of it I could check. I tried at all driving conditions, and even when shunting it stays really steady.
I also did a few full throttle runs, and I'm not entirely smooth at the top end, which isn't good either...
Sounds again like high RPM breakup, but apart from the actual distributor I've been through my ignition system.
If it's fuel related then lets see.
So my next brilliant plan is to bring some data to this problem.
I did look at portable gas analysers and soon gave up when I saw the price! So a little standalone wideband AFM gauge is just what I need.
My AEM Infinity wideband arrived today

I don't see anywhere to mount it in the SD1 cockpit, (happy for suggestions!) I'm not cutting or removing anything from my dash, so I'm thinking either in the drivers glove box, or a temporary installation just for tuning.
I plan to weld bosses to the bottom of both downpipes and go from there.
So that's a job for the next few days I reckon...
Joe
Mainly the wiper blades actually.
I also chucked in a new air filter and fuel filter.
I ordered some fancy fronts, and just an insert for the rear, as I couldn't find a decent "pin" type blade in a big enough size.
Quite enjoying the Michelin wiper blades...
The Mann fuel filter definitely isn't as aesthetically pleasing as the Bosch one I had on, so I don't think that'll be staying...
But almost ready for another years inspection.
So I've been driving myself a little made on my pursuit of getting the Vitesse to run perfectly.
I've swapped between a few, but I've never really dug into the Air Flow Meter...
I have a few spare including the one I put down as the reason for the death of the original engine...
It's really not that complicated, it's just a mechanical sweeper that moves on a carbon track which alters the output to the ecu. There's also a temperature sensor, and the initial feedback to start the fuel pump. But if the ecu doesn't see the air flow it can't alter the open timing for the injectors.
The screw on the top that "adjusts" the AFM is just an air bypass bleed that minutely adjusts the position. The major adjustment is the clock spring, the looser the spring the easier it moves, i.e the more airflow so the richer the engine runs. Tighter leaner.
All the outputs are analogue, so can be checked with a multimeter.
I checked through my spare one, and compared it to the one on the car. the spring tension was a little different, but without feedback adjusting it would be complete guess work. Annoying I've been locked out of my Gas analyser, it needs calibrating and is now useless...
But I did want to check my function with what I have available. I'd also suspected that maybe a AFM flutter could be causing my shunting, and clubracing had again prompted me to check again.
https://youtu.be/IjoZdSXrkQg?feature=shared
So whipping off the air filter and a gopro infront of it I could check. I tried at all driving conditions, and even when shunting it stays really steady.
I also did a few full throttle runs, and I'm not entirely smooth at the top end, which isn't good either...
Sounds again like high RPM breakup, but apart from the actual distributor I've been through my ignition system.
If it's fuel related then lets see.
So my next brilliant plan is to bring some data to this problem.
I did look at portable gas analysers and soon gave up when I saw the price! So a little standalone wideband AFM gauge is just what I need.
My AEM Infinity wideband arrived today
I don't see anywhere to mount it in the SD1 cockpit, (happy for suggestions!) I'm not cutting or removing anything from my dash, so I'm thinking either in the drivers glove box, or a temporary installation just for tuning.
I plan to weld bosses to the bottom of both downpipes and go from there.
So that's a job for the next few days I reckon...
Joe
Edited by 1275 GT on Tuesday 24th October 21:43


What a great read, the 80's is when cars started to get really complicated, and they didn't really have the gear to back up the ideas!
The Vitesse looks fantastic on those BBS' rims, kudos for fitting the Turbofans.
More power, new box, new suspension, must be time for a Quaife LSD now?
The Vitesse looks fantastic on those BBS' rims, kudos for fitting the Turbofans.
More power, new box, new suspension, must be time for a Quaife LSD now?
KelvinatorNZ said:
You could do similar to what I did on Lucas, if you wanted a temporary solution. Innovate tailpipe adaptor, and then taped the gauge in a pod to the top steering column shroud. I even wired mine to a 12v plug so i can plug it in the ciggy socket.
That's a really neat solution, if I hadn't already committed I'd have gone with one of those, as I could use it on other projects too... TheDoggingFather said:
What a great read, the 80's is when cars started to get really complicated, and they didn't really have the gear to back up the ideas!
The Vitesse looks fantastic on those BBS' rims, kudos for fitting the Turbofans.
More power, new box, new suspension, must be time for a Quaife LSD now?
It's definitely getting to that switch over point when cars weren't built to last. The Vitesse looks fantastic on those BBS' rims, kudos for fitting the Turbofans.
More power, new box, new suspension, must be time for a Quaife LSD now?
Cheers
It's definitely on the list, the rear end is one of the few things I haven't rebuilt and it does have quite a bit of backlash. So when I get around to that I'll have to chuck an LSD of some sort in there, it would be rude not too!
So another reason for choosing to just pop a lambda boss on the exhaust was I'd noticed a blow from the manifold to the downpipe so I knew I had to re-seal it before it's MOT anyway.
I'd even bought some stainless filler wire so I could have a go at welding it myself. But when I couldn't even see my welder in the back of the garage I had to revert to plan B, have someone at my work TIG it for me.

Did a really nice job,
While it was off, I gave it a clean up.


My positioning was spot on and the sensor came out exactly where I wanted it too. It comes up over the gearbox, into an unused factory cable stay on the body and through the same grommet as the ECU wiring loom into the cabin.
This is where things took a turn for the worse. When I went to remove the downpipe I noticed a little wet patch by one of my wheels, no bother it'll only be water. But then I noticed the back of the tyre was also wet...
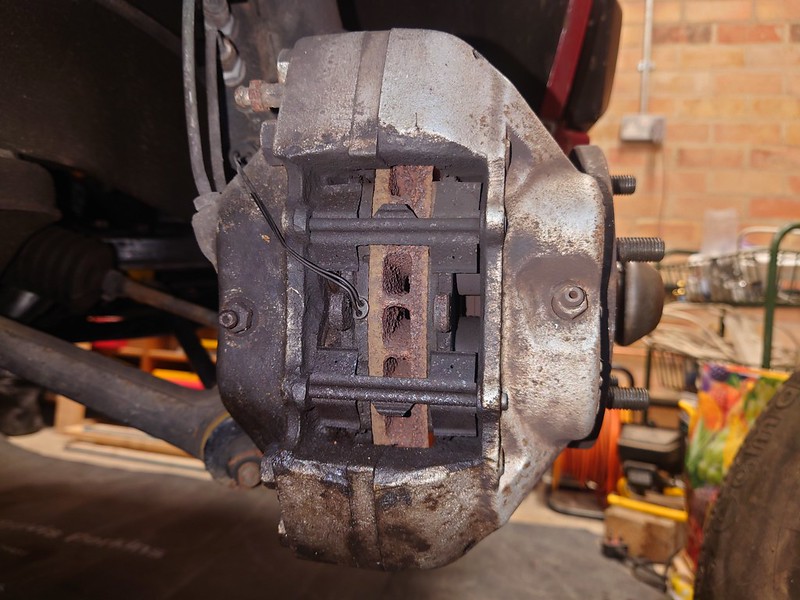
A wheel off quickly confirmed my fears. I'd got a failing brake caliper seal.
Like all projects my timing was tight, MOT was due in a week booked for Friday 4th, and I was displaying on Voodoo Motorsport's Stand at Ultimate Stance in Telford the day after. (I'm aware my car isn't even a little "stanced" but the wheels are cool)
If I'd had the time I'd have just sent both calipers out for refurb.
I'd actually already planned to do this when I change the front struts for the Bilstein's if they ever pull their finger out and finish them off!
But I figured I could turn the calipers around faster so I bought a caliper rebuild kit from Big Redd with 8 new SS pistons.
The kit arrived next day so started to pull the calipers apart.

I'd read my workshop manual, and thought I'd have them done nice and quickly... how wrong I was.
In essence the 4 pot AP Lockheed calipers are the same as most SD1's (although the Vitesse is vented and has twin fluid feeds)
They're also the same as most Land and Range Rovers of the same vintage, and even LDV vans. So nothing exotic by any means.
What I hadn't read up on, and something that a quick internet search reveals what a colossal pain in the arse the lip seal dust covers are to get back in.
The little metal cups bend at the first sign of force, and of course the kit only comes with how many is needed.
The actual fluid seals are lower down and are easily changed. I figured they're only dust covers, so replaced the rubber elements and re-used the original metal covers that reinserted easily.
lubed up the new pistons and refitted everything.
I popped them on the car and soon regretted not painting them, as they looked rubbish. So gave them a quick blowover.

With new bleed screws they really didn't look too bad.
I even found in my stocks some NOS brake pads!


Things took a turn for the worse when I tried to bleed them, and promptly pissed brake fluid all over the floor.
Re-using the original lip seal covers was an obvious mistake, but as 2 of them had been pushed out, it obviously wasn't sealing on the fluid seal either. I figured I just hadn't got the calipers clean enough, or contaminated the fluid seals with the old lip seal covers. Either way I pulled them both back off.

I ordered another seal kit from Big Redd, and the next day spent the day cleaning the calipers making sure all the sealing areas were spotless.

You can see my less than stellar paint job!

While I was at work my Dad proceeded to completely strip the calipers.

After watching a few videos I also finally worked out there is of course a special tool to fit the lip seal covers. There's also a few different DIY solutions.

This video is absolutely brilliant.
https://www.youtube.com/watch?v=MbpcHuVWpkA
He also shows that the fluid seals are handed, but I couldn't tell with the ones I had...
I used my big magnifying glass and really couldn't tell an orientation. There was no instructions either to help with decode the 3 red stripes on the seals either.

Using the threaded rod and large washers worked a treat to get the lip seals in, but 3 still got kinked, they're so hard to get in!
I was really running out of time at this point so I started to look for a landrover parts place within driving distance. A drive to John Craddock came next, they list genuine, AP, and britpart. But sadly only stock britpart instore. At £2.10 I bought 4 sets to avoid a return trip.
Ironically only 1 further kinked seal occured.
At this point they'd gone together really nicely so I was feeling optimistic, and I thought I'd treat them to a proper paint job.


Both came out so nicely.
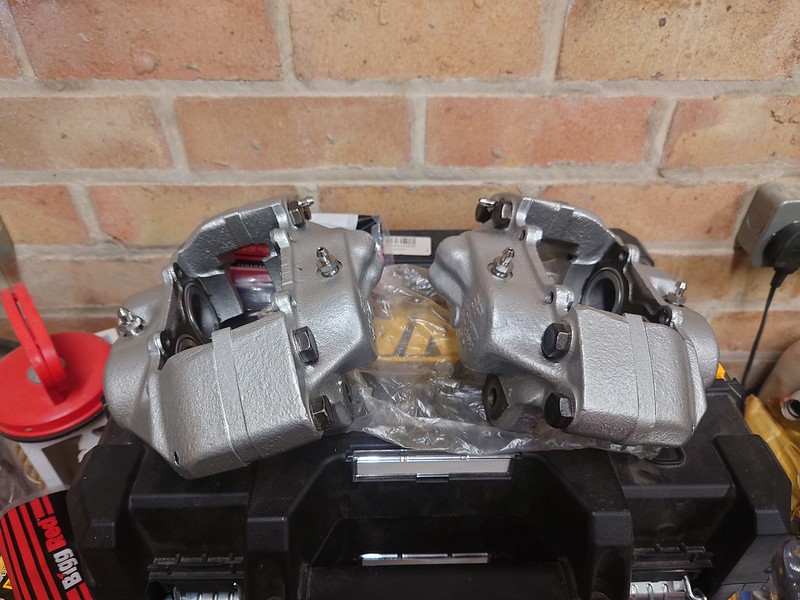
I left them to dry, and on Thursday I got them fitted.

I'd pressure tested them with an compressor to about 50PSI so was feeling confident.
I started to bleed them and heard a pop, and I had fluid coming out of my caliper.

I looked across, and I had a drip coming from the other caliper too...
This was 8pm. MOT booked for 8:50am the next day.
A more sensible person would have called it.
In reality I should have called it, but I had 4 sets of seals...
This I don't have pictures from but unbolting the calipers and flexi lines from their brackets I took the calipers off, pushed the pistons out, changed all the fluid seals for the britpart ones ( those I could see a rounded and square edge, square edge faces outwards) left the lip seals in place, lubed up the pistons with rubber grease and got them back in.
I did this in a drip tray to keep fluid loss to a minimum, and then ended up with this.

I lost a bit of paint, but in general they still looked pretty good.

Now to just try the bleeding again.
This was now 11pm, I needed a win. Thankfully the bas***ds bled, and standing on the pedal didn't leak.
The pedal actually felt really nice. I didn't want the false hope, but I couldn't find a reason not too.
So I carried on making sure everything was nice and clean, chucked the wheels on and went to bed with the MOT looming in the morning.
Joe
Gassing Station | Readers' Cars | Top of Page | What's New | My Stuff