Discussion


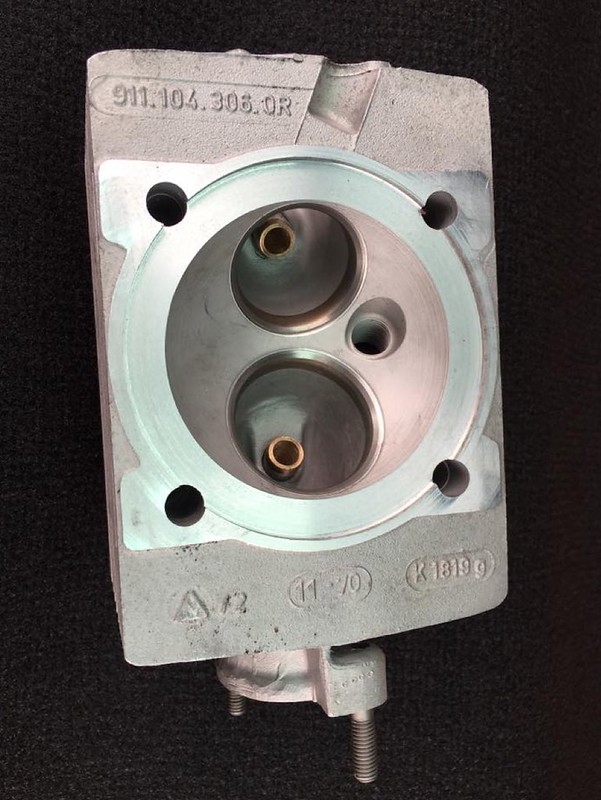
The cylinder heads are now all finished ready for new valve guides and seat facing.
So onto the cylinders:
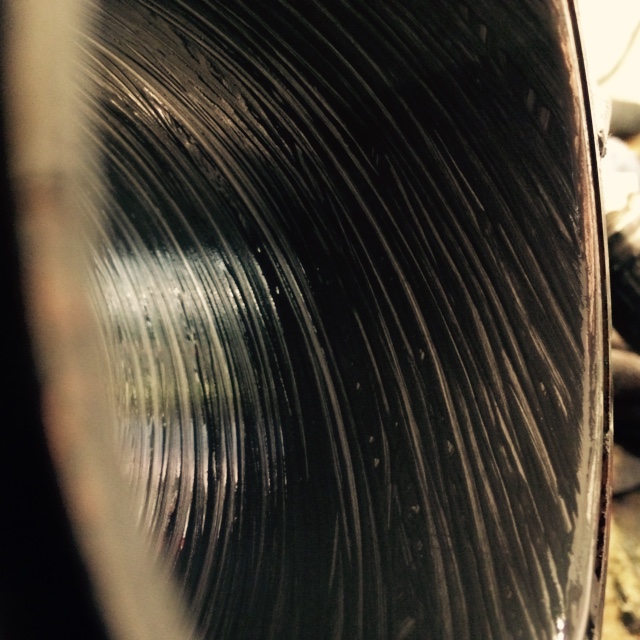
A very quick job for a change, probably no more than 10 seconds for each cylinder of actual honing. A couple of very shallow score marks are still visible so I'm happy not to have removed too much material
End result:
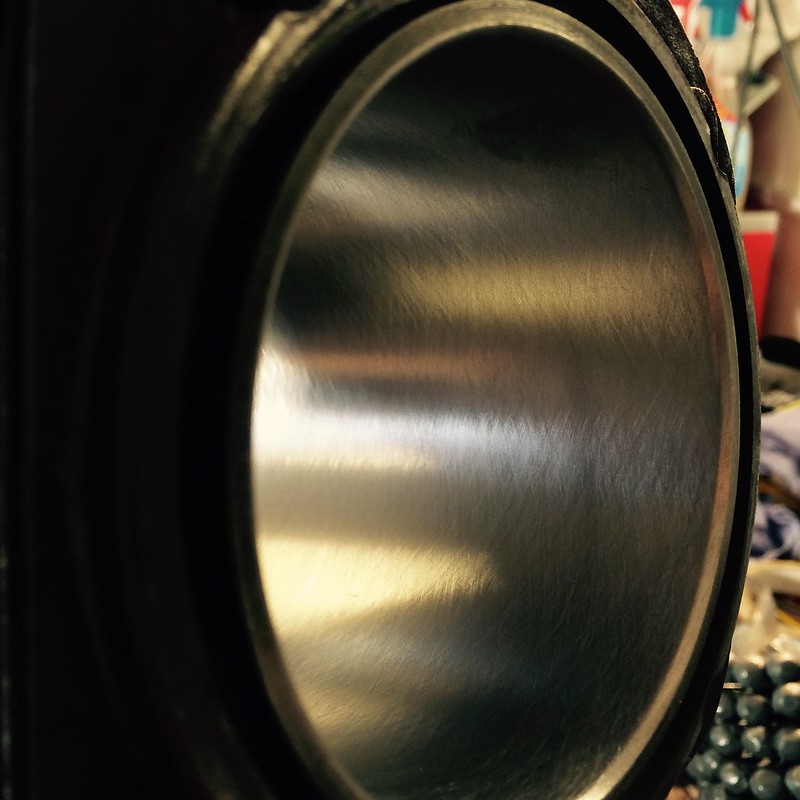
Whilst pumping the hone tool in and out you can see the traces left behind in the oil which gives you a good clue if you are getting the crosshatching about right.
Downside is having a big egg wisk covered in wet abrasive grey muck spinning at 1000 rpm seems to have taken the edge off the clean garage.
So onto the cylinders:
A very quick job for a change, probably no more than 10 seconds for each cylinder of actual honing. A couple of very shallow score marks are still visible so I'm happy not to have removed too much material
End result:
Whilst pumping the hone tool in and out you can see the traces left behind in the oil which gives you a good clue if you are getting the crosshatching about right.
Downside is having a big egg wisk covered in wet abrasive grey muck spinning at 1000 rpm seems to have taken the edge off the clean garage.
Progress has been slow to say the least due to family life and this project having a budget that got dented by a sudden need for a new washing machine!
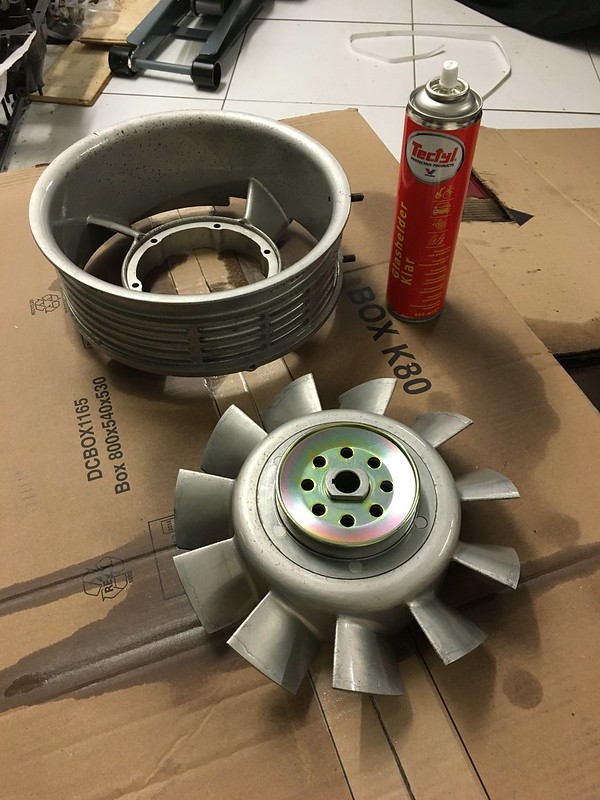
So I've consoled myself with a little job and refinished the fan. I've had it vapour blasted and the pulley plated by a local company prior to me coating it with clear Tectyl to try and prevent corrosion. It's magnesium so difficult to do much with and the vapour blasting has revealed all the corrosion that was previously hiding under thick paint!
Still looks OK so far.
Lovely car, writing style and of course pictures; the Holy Trinity of precious few threads - congratulations you deliver it with the same unflustered ease with which you strip and rebuild a gearbox or spot weld a sill.
As the owner of an 88 930, I recognise so many of the issues you have experienced and so many of the parts are I'm sure familiar between our cars (although not familiar to me as I pay through the nose via remortgages, overdrafts and loans for someone else to do the work!)
I follow a whole plethora of readers car threads, but this is one of my favourites; carrying me through many a days winter commute - keep up the excellent work, and thank you.
mudy said:
Lovely car, writing style and of course pictures; the Holy Trinity of precious few threads - congratulations you deliver it with the same unflustered ease with which you strip and rebuild a gearbox or spot weld a sill.
As the owner of an 88 930, I recognise so many of the issues you have experienced and so many of the parts are I'm sure familiar between our cars (although not familiar to me as I pay through the nose via remortgages, overdrafts and loans for someone else to do the work!)
I follow a whole plethora of readers car threads, but this is one of my favourites; carrying me through many a days winter commute - keep up the excellent work, and thank you.
Well said, the pictures from here are gracing a desktop or two of mine - though I was hoping for an update As the owner of an 88 930, I recognise so many of the issues you have experienced and so many of the parts are I'm sure familiar between our cars (although not familiar to me as I pay through the nose via remortgages, overdrafts and loans for someone else to do the work!)
I follow a whole plethora of readers car threads, but this is one of my favourites; carrying me through many a days winter commute - keep up the excellent work, and thank you.

It's been quiet for a while but I've started to progress things now. I'm taking various bits of engine to the machine shop for the following jobs on Monday:
- Beadblast & prep heads
- Replace valve guides
- Recut seats
- Reface head sealing surfaces
- Line hone crankcase
- Remove bent head stud ops:
ops:
- Polish and clean crank
Also this pile has turned up this afternoon:
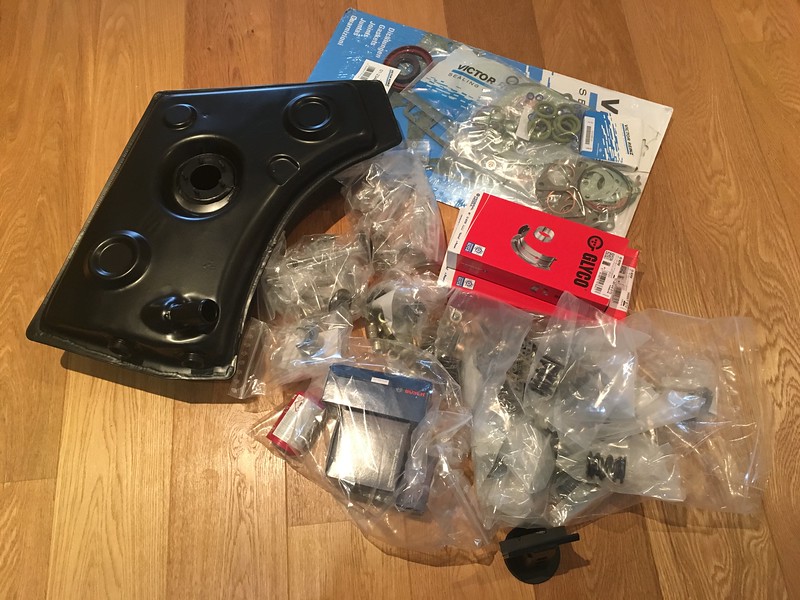
Doesn't look like a family holiday's worth of bits does it?
Such is the joy of Porsche ownership, it if were a Golf it would be £500 all in!
Hopefully rebuild can start towards the end of March.
- Beadblast & prep heads
- Replace valve guides
- Recut seats
- Reface head sealing surfaces
- Line hone crankcase
- Remove bent head stud
ops:- Polish and clean crank
Also this pile has turned up this afternoon:
Doesn't look like a family holiday's worth of bits does it?
Such is the joy of Porsche ownership, it if were a Golf it would be £500 all in!
Hopefully rebuild can start towards the end of March.
gary71 said:
Cheers for the kind words.
Nothing desktop picture worthy for a while but this is my current one:

It will be quiet for a while until the cash is in place for the next step. I'm determined to do (most) of this without beating a credit card. The new washing machine is great though...
How did Porsche go from that and Le Mans hero status, to making sNothing desktop picture worthy for a while but this is my current one:
It will be quiet for a while until the cash is in place for the next step. I'm determined to do (most) of this without beating a credit card. The new washing machine is great though...
 te like the Macan?
Small updates:
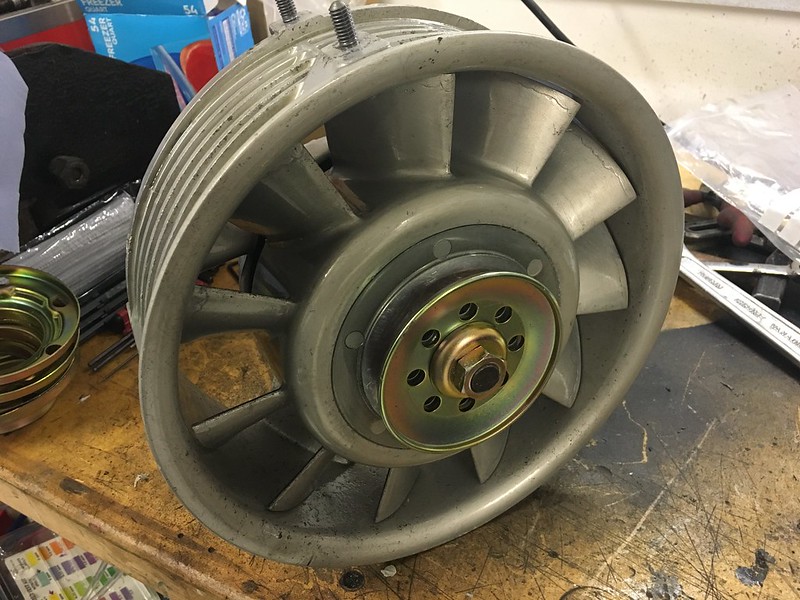
Fan & alternator now finished with new brushes, replated hardware etc.
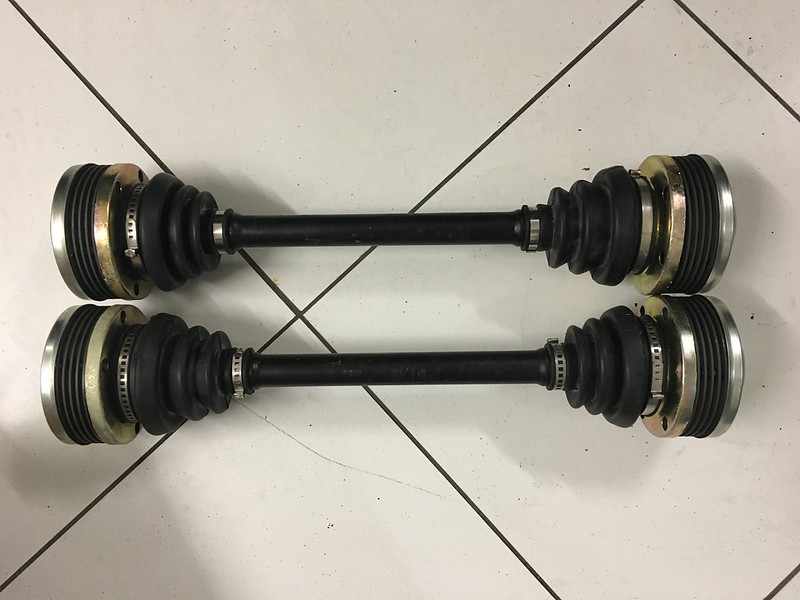
Driveshafts rebuilt with new lightweight joints, replated 4 bolt inner covers, lightly modified 997 grease caps to try and keep everything in place a little better than the silly little gaskets that never worked.
I've had the call today that the machining work on the case/heads/crank is all finished on time and under budget... Lets hope we can achieve garage service utopia and the quality is good as well. Now I just need to find the time to drive back to Oxford to pick it up.
I have all the parts I need ( I think!) so nothing should stop it all going back together now, other than time of course.
Fan & alternator now finished with new brushes, replated hardware etc.
Driveshafts rebuilt with new lightweight joints, replated 4 bolt inner covers, lightly modified 997 grease caps to try and keep everything in place a little better than the silly little gaskets that never worked.
I've had the call today that the machining work on the case/heads/crank is all finished on time and under budget... Lets hope we can achieve garage service utopia and the quality is good as well. Now I just need to find the time to drive back to Oxford to pick it up.
I have all the parts I need ( I think!) so nothing should stop it all going back together now, other than time of course.
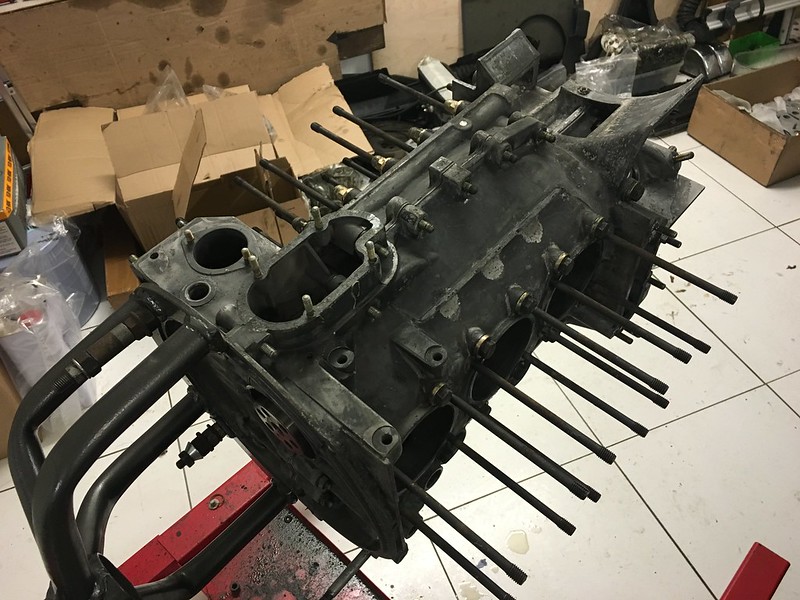
I picked up the case/heads/crank from the machine shop this morning after a long and very wet early drive down. Shockingly it does appear to have achieved the garage service utopia and was on time, on budget and certainly by visual inspection so far appears to be to quality... Maybe miracles do happen?
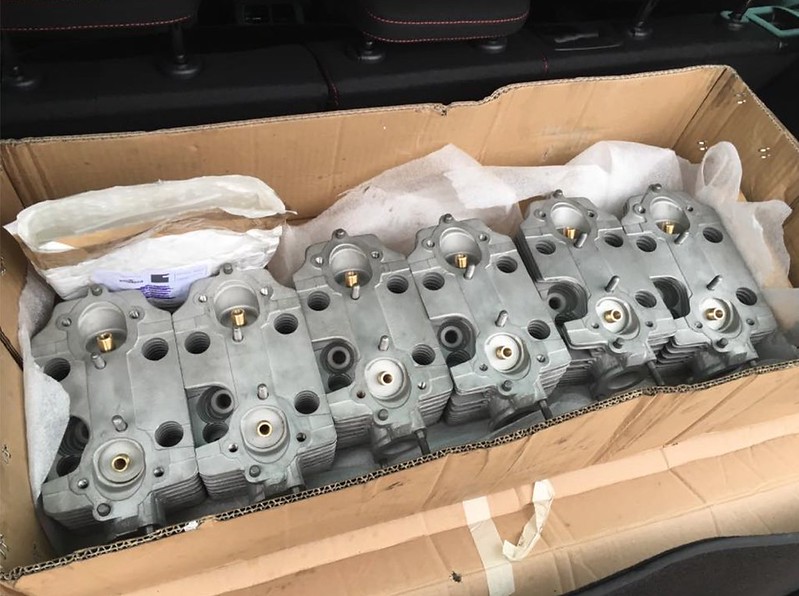
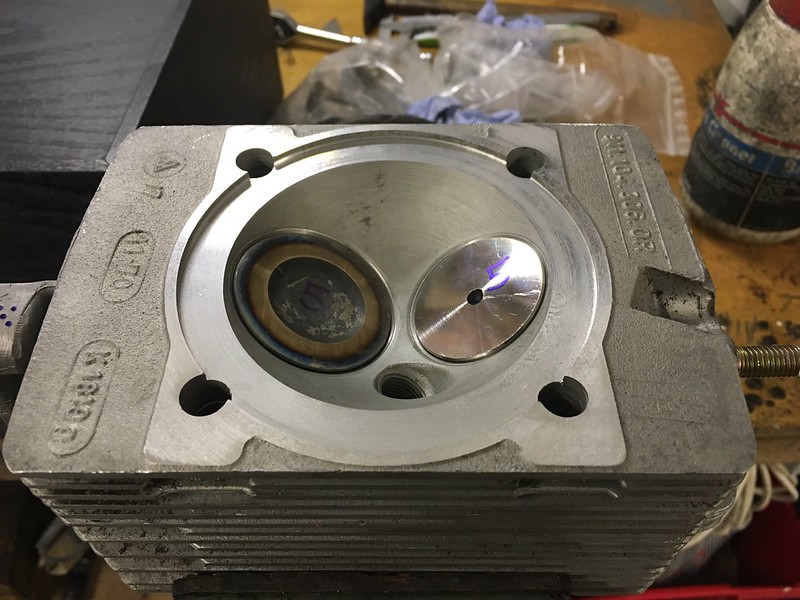
Heads - All shiny ready to be rebuilt
Ported, bead blasted, new valve guides, recut seats, refaced gasket surface, and finally thread inserts for the exhaust studs replacing my dodgy efforts with helicoils, some of which have been done from underneath the car with a hand drill!
The next job is a dry build of crank into case with the new bearings and make sure it turns over.
I'm going to borrow some decent scales from work this weekend and check the pistons/rod balance and make any adjustments before the detail cleaning and rebuild proper can start.
A boat may have been more appropriate transport at times this morning! I turned around at this point...
Grabbed an hour in the garage tonight for what is for me the most nerve wracking part of the build: Dry build of case, crank and new bearings. Particularly when the consequences of the case being distorted are quite expensive to put it mildly... The reputation of magnesium 911 engine cases does precede them, hence I had the case honed, but sometimes that's not enough and much complex machining is required.
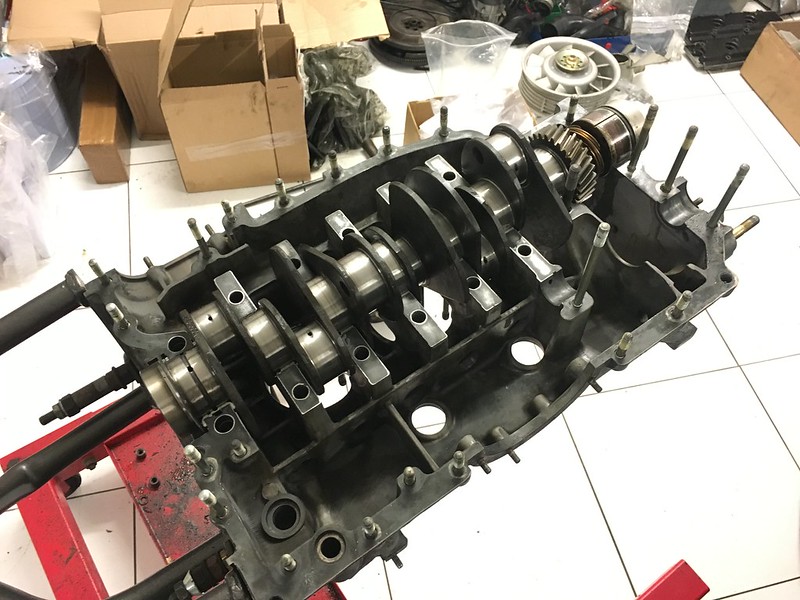
Luckily the crank still rotates freely by hand
Now onto the head rebuild, rod balance etc and of course endless cleaning before it goes back together properly!
Luckily the crank still rotates freely by hand
Now onto the head rebuild, rod balance etc and of course endless cleaning before it goes back together properly!
Edited by gary71 on Saturday 12th March 23:41

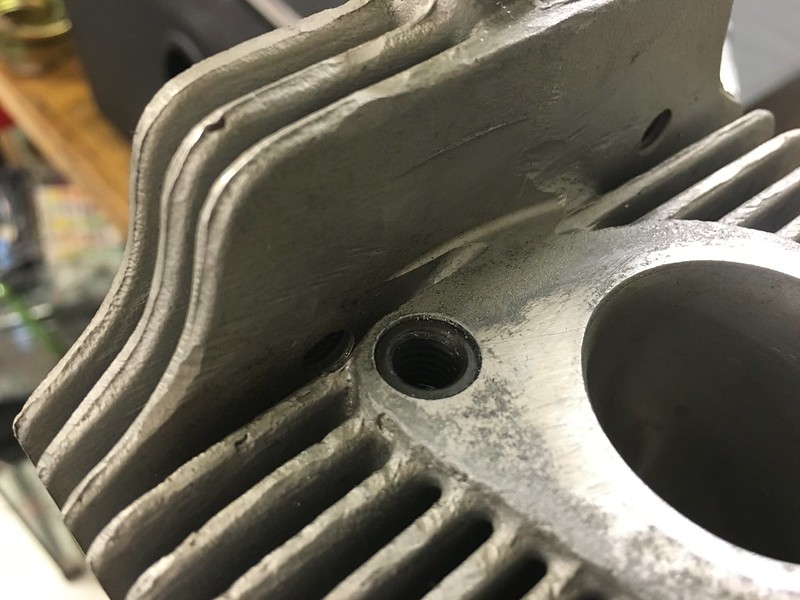
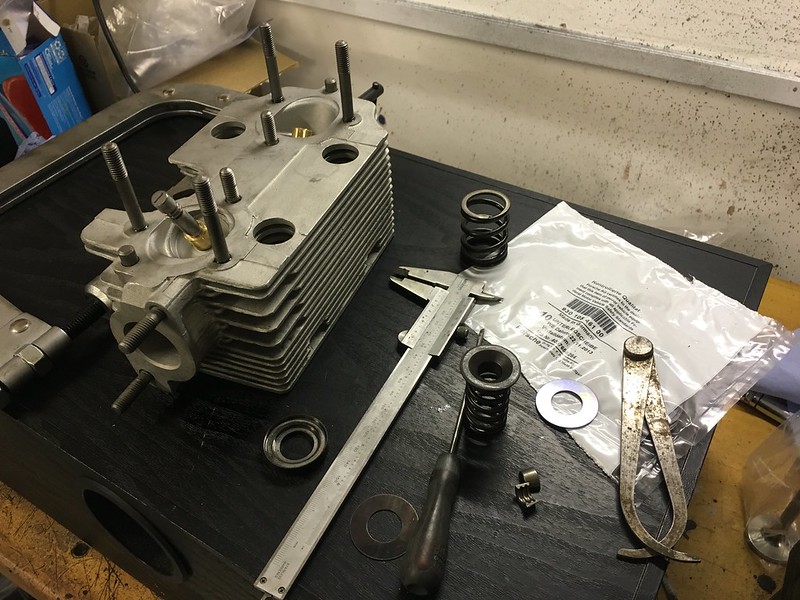
A few more jobs today: Fitted all the studs back to the heads double checking (and adjusting!) the length of the exhaust studs by dry building with the exhaust so they don't stick out too far into the hex nut and stop you getting the tool in properly.
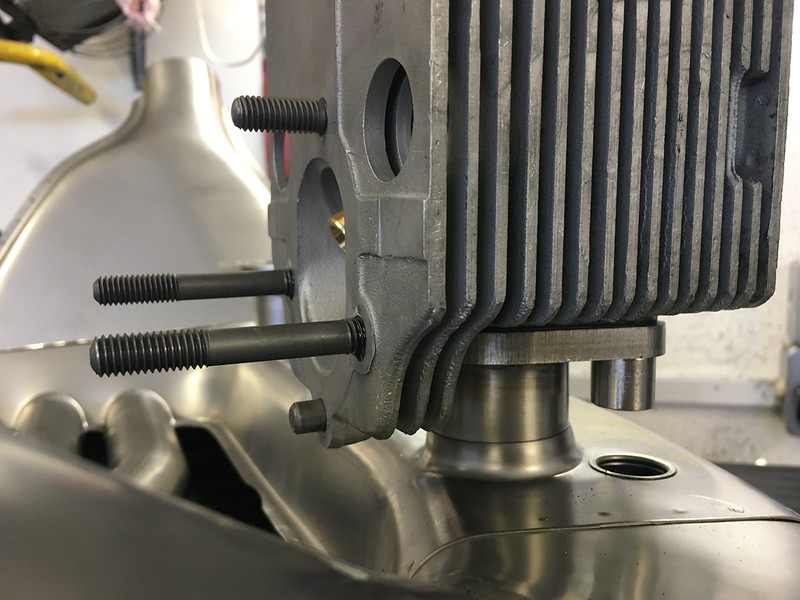
The machine shop fitted Timeserts to replace my dodgy helicoils for the exhaust studs
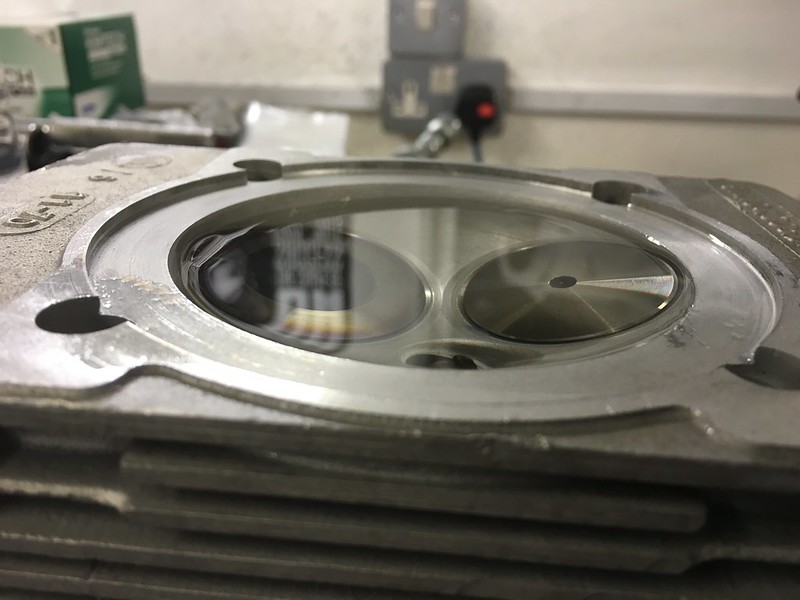
I've lapped all the valves in with a fine paste just to make sure.
You have to set the preload on the valve with shims under the valve spring. There is a proper Porsche tool but you can just fit the inner valve spring and use calipers and a vernier. As I've had the seats recut and have new valves chances are it will have changed.
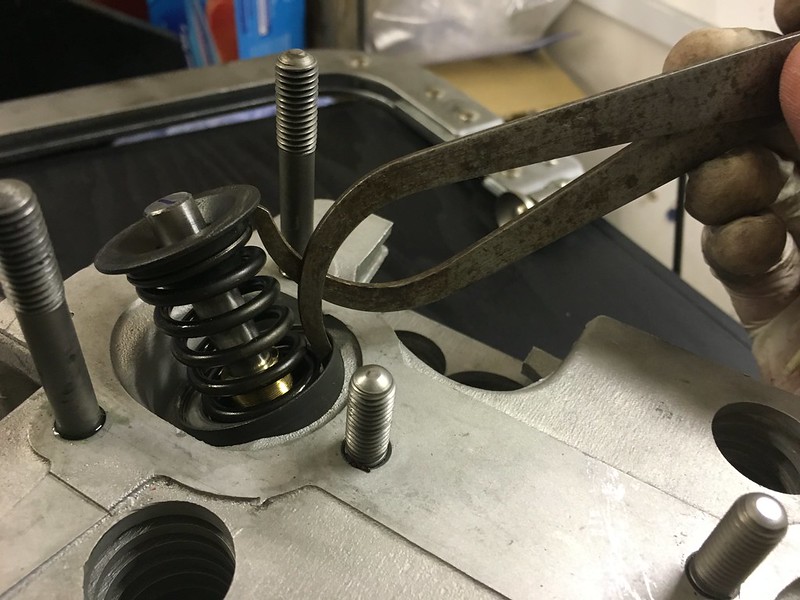
It does mean you have to strip and rebuild each valve a couple of times, but it's not so bad as the spring pressure is light with only the inner spring.
Once everything is measured then the heads can be rebuilt for the last time with new stem seals and springs.
The machine shop fitted Timeserts to replace my dodgy helicoils for the exhaust studs
I've lapped all the valves in with a fine paste just to make sure.
You have to set the preload on the valve with shims under the valve spring. There is a proper Porsche tool but you can just fit the inner valve spring and use calipers and a vernier. As I've had the seats recut and have new valves chances are it will have changed.
It does mean you have to strip and rebuild each valve a couple of times, but it's not so bad as the spring pressure is light with only the inner spring.
Once everything is measured then the heads can be rebuilt for the last time with new stem seals and springs.
Hi, I'm not much further on than the pictures above, I have a day job that gets in the way!
However all the heads are now shimmed and tested for leaks with white spirit, all except one as I ran out of shims and damaged a valve stem seal...
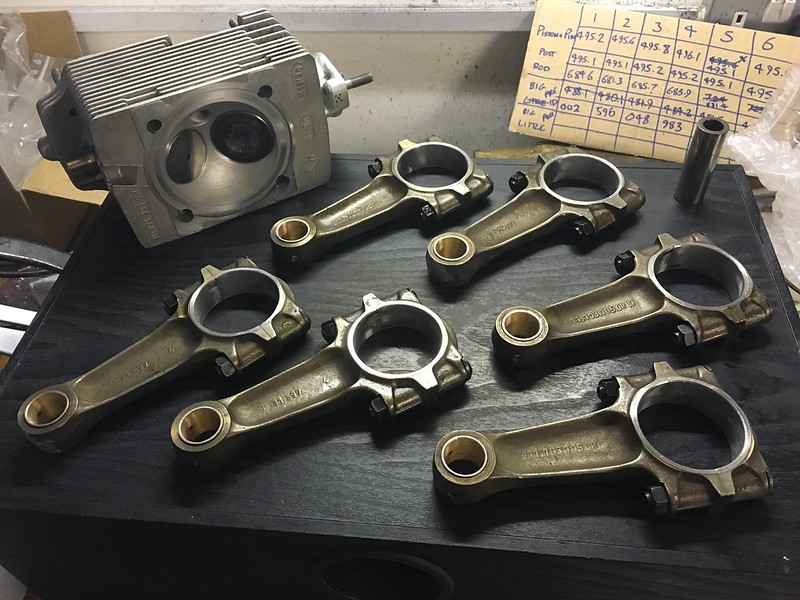
I've matched the pistons, which were all pretty much spot on anyway:
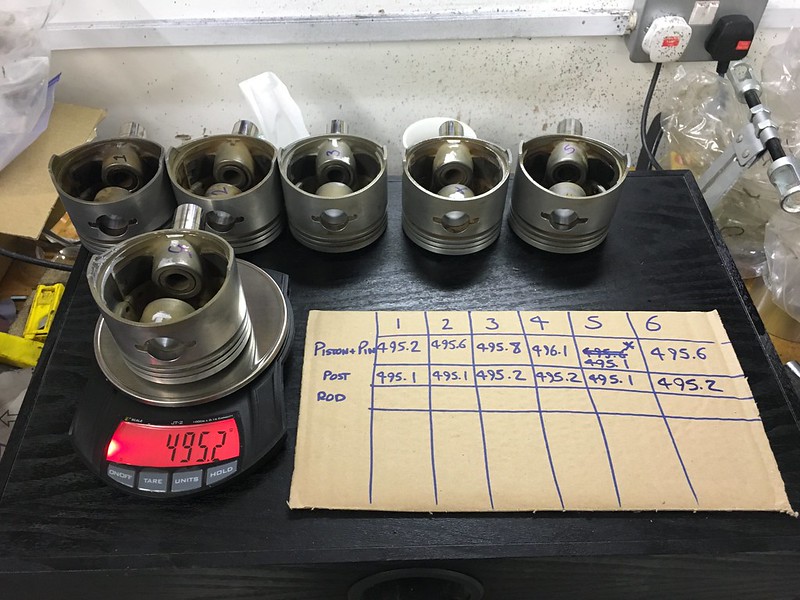
I've tried to do the rods but I can't get a consistent reading of end to end weight on my primitive balancing set up so they will be off in the post back to the machine shop. I'm probably going to get the small ends done whilst they are there.
Next job is lots of cleaning...!
However all the heads are now shimmed and tested for leaks with white spirit, all except one as I ran out of shims and damaged a valve stem seal...
I've matched the pistons, which were all pretty much spot on anyway:
I've tried to do the rods but I can't get a consistent reading of end to end weight on my primitive balancing set up so they will be off in the post back to the machine shop. I'm probably going to get the small ends done whilst they are there.
Next job is lots of cleaning...!
Not massive progress, but reassembly has finally started!
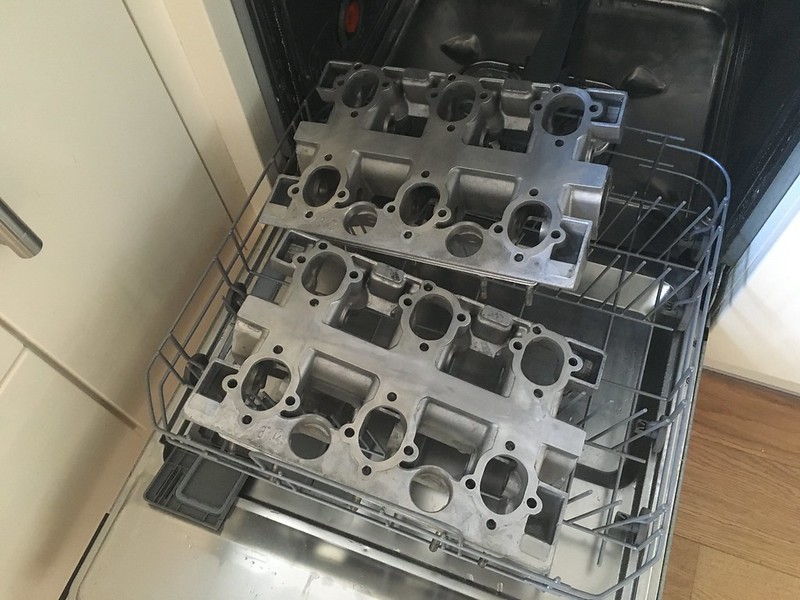
The cam carriers have been cleaned within an inch of their lives and back through the dishwasher one last time... I've reckon I've spent at least 6 hours on these. I can now see where all the money goes on a rebuild, it's the hours spent with bloody toothbrushes and wipes!
A friend has made some new plugs for the cam spray bars oil galleries. They were too tight to push in so the carriers went in the oven for half an hour then they could be gently tapped home.

I've spent a few happy hours cleaning the crank cases, another massive job.
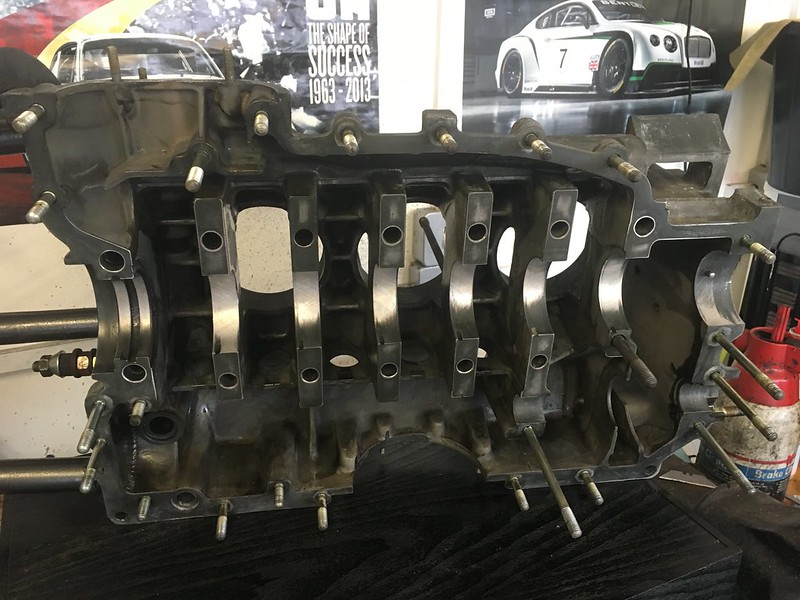
I've some long spiral brushes so I can do my best with the oilways, but the jet wash was the final move just to blast every little orifice out.
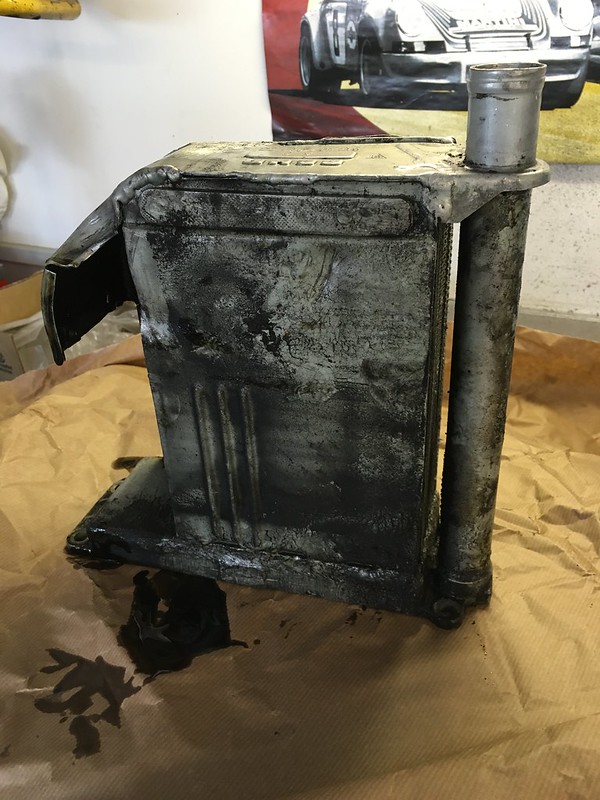
I've been ignoring the oil cooler for a while as it was never going to be easy to sort out, but it had to be done. I've not got an 'after' picture but needless to say it was better than this. Externally it was caked in grit filled grease, presumably from various leaks and the CV joints spraying it. A litre or two of brake cleaner inside and out it looks much better and ready for clean oil! It's from 1984 according to the date stamp.
My rods arrived back yesterday so my list of excuses to not crack on and commit to the build slipped away. The rods have new small ends, honed to match my gudgeon pins, big ends resized, and then balanced overall and end to end.
My scales put the overall weight difference to be within half a gramme so I can't complain at that!
The rods went back on the crank, using a super funky torque and angle wrench. Beeps once at the preset torque, then beeps again when you reach the angle. The beeping helps when you are fighting the whole assembly on the bench trying to stop it exiting stage left, particularly on the upper rods, as you don't have to look at the display.
A major advantage of working for a car manufacturer is you can borrow really good calibrated tools!
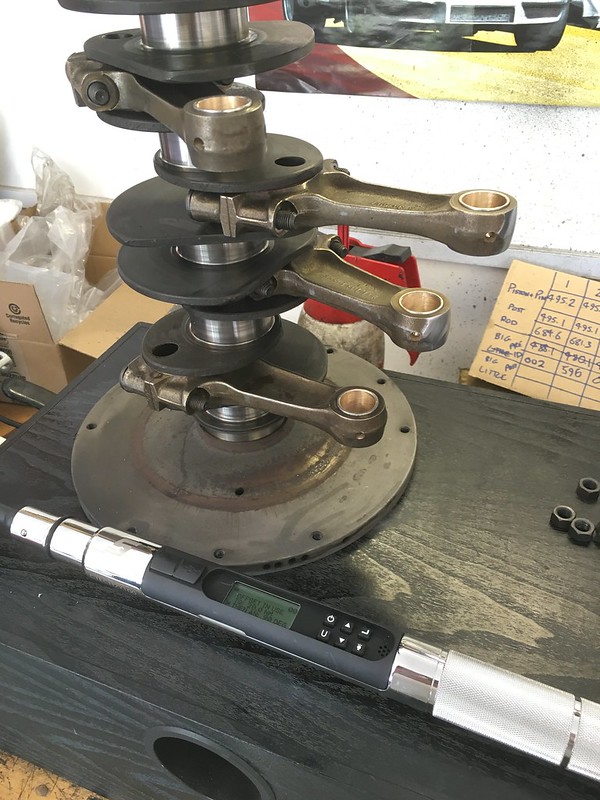
It also logs the final torque for interest and this was between 75 and 85nm.
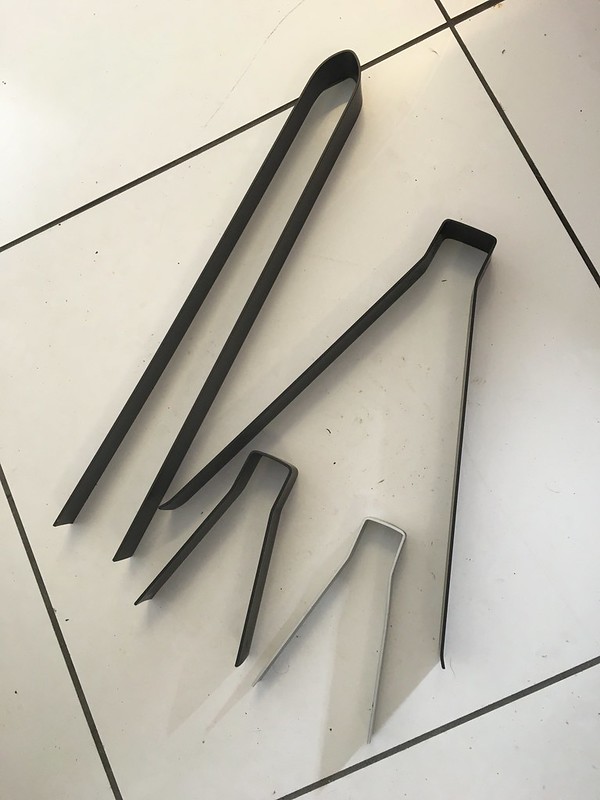
I've made a set of rod/chain supports using some strip material from B&Q. Should do the job just fine I think. 15 minutes to make and it should save a lot of grief during those tense moments putting the case back together when you don't have octopus arms to hold everything in the right place.
So rebuild time! All goes pretty quick if you ignore the preparation...
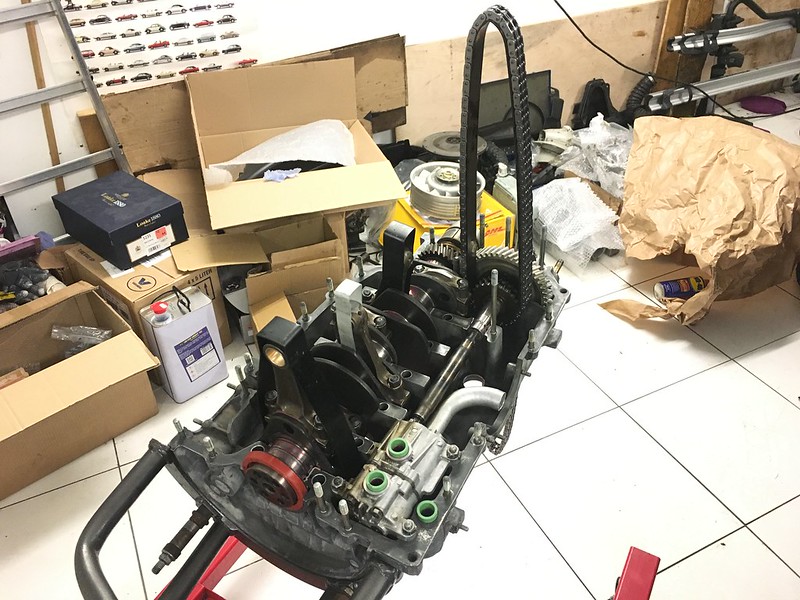
Tempting as it is to push on and fit the other case that's enough for tonight. One false move and it will be oil leak central for ever.
The cam carriers have been cleaned within an inch of their lives and back through the dishwasher one last time... I've reckon I've spent at least 6 hours on these. I can now see where all the money goes on a rebuild, it's the hours spent with bloody toothbrushes and wipes!
A friend has made some new plugs for the cam spray bars oil galleries. They were too tight to push in so the carriers went in the oven for half an hour then they could be gently tapped home.
I've spent a few happy hours cleaning the crank cases, another massive job.
I've some long spiral brushes so I can do my best with the oilways, but the jet wash was the final move just to blast every little orifice out.
I've been ignoring the oil cooler for a while as it was never going to be easy to sort out, but it had to be done. I've not got an 'after' picture but needless to say it was better than this. Externally it was caked in grit filled grease, presumably from various leaks and the CV joints spraying it. A litre or two of brake cleaner inside and out it looks much better and ready for clean oil! It's from 1984 according to the date stamp.
My rods arrived back yesterday so my list of excuses to not crack on and commit to the build slipped away. The rods have new small ends, honed to match my gudgeon pins, big ends resized, and then balanced overall and end to end.
My scales put the overall weight difference to be within half a gramme so I can't complain at that!
The rods went back on the crank, using a super funky torque and angle wrench. Beeps once at the preset torque, then beeps again when you reach the angle. The beeping helps when you are fighting the whole assembly on the bench trying to stop it exiting stage left, particularly on the upper rods, as you don't have to look at the display.
A major advantage of working for a car manufacturer is you can borrow really good calibrated tools!
It also logs the final torque for interest and this was between 75 and 85nm.
I've made a set of rod/chain supports using some strip material from B&Q. Should do the job just fine I think. 15 minutes to make and it should save a lot of grief during those tense moments putting the case back together when you don't have octopus arms to hold everything in the right place.
So rebuild time! All goes pretty quick if you ignore the preparation...
Tempting as it is to push on and fit the other case that's enough for tonight. One false move and it will be oil leak central for ever.
Gassing Station | Readers' Cars | Top of Page | What's New | My Stuff