WRX RA powered VW 1303 beetle cabrio with a bit of Porsche
Discussion


trackdemon said:
Wow! Have really enjoyed following the progress of this, stunning project and looks like its nearing completion. Hope you're still up for a photoshoot when it's done Richard!!
lol, I dont think this sort of car is ever really finished, just have to pick a point and go with it!As the only thing I haven't done personally and on my own is the final stitchwork there will probably always be niggles that I can see, perfection would probably just stop me from using it though..
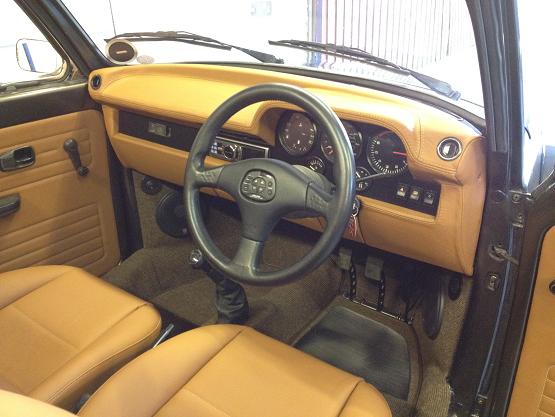
As for the steering wheel, it's an extremely rare Momo/Alpine wheel so it's definitely staying, I think I got that before the car..
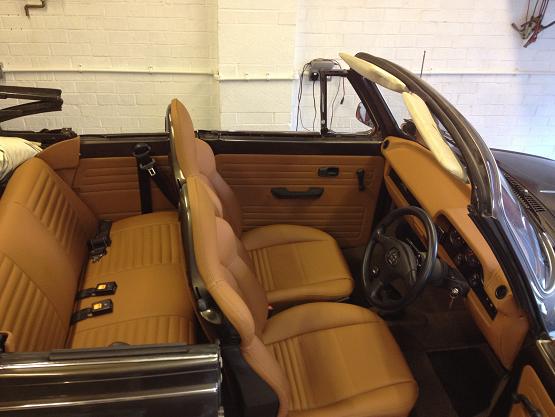
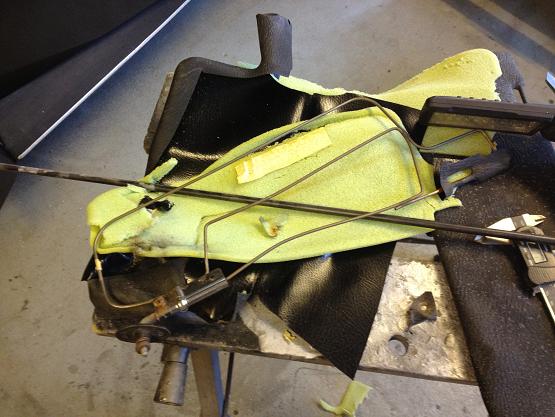
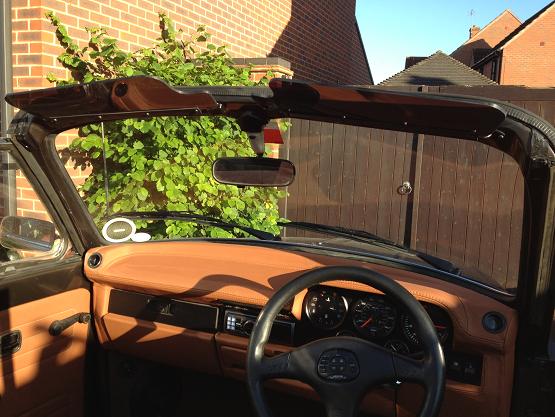
The pictures above drove me into coming up wiht a replacement set of sunvisors quickly! Although they matched the headlining I think they clashed badly with the roof down. I'd have the idea of making up some smoked plastic ones, in the style of early VWs, for a while so decided now was the time! Above is what a stripped sunvisor looks like, all this just to get the pivot.
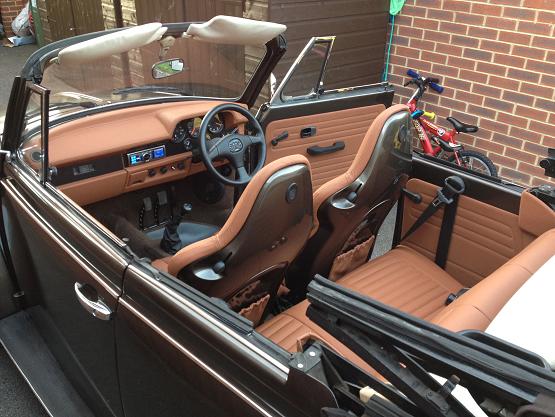
I then made up a hinge assembly and cut some 5mm tinted perspex to shape and this is how they ended up, I'm very happy with this look.. At the same time I also painted the rear-view mirror base black to match.
I then made up a hinge assembly and cut some 5mm tinted perspex to shape and this is how they ended up, I'm very happy with this look.. At the same time I also painted the rear-view mirror base black to match.
I extended the bit of bar that acts as the main pivot point with some 8mm bar which then becomes the hinge. Then I got a strip of aluminium sheet and bent it around the bar and a strip of 5mm steel plate to form the outer part of the hinge. Slot it all together and drill some holes for a few bolts to clamp it all together, it's fairly stiff and doesn't seem to sag at all, in fact it's probably a bit too stiff but it can be adjusted by the torque in the clamp bolts..
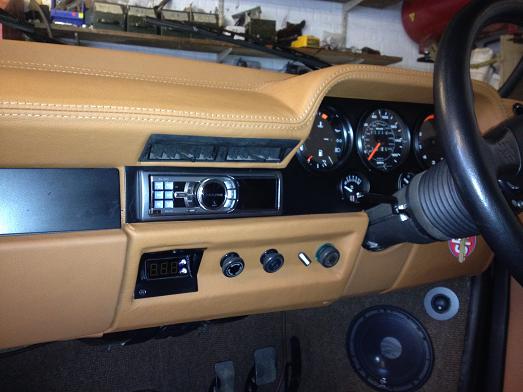
I got fed up with messing around trying to trick the stock ECU to make the correct boost with my much modified from stock (subaru) intake and exhaust so I have now fitted a Gizzmo MS-2 electronic boost controller. This has closed loop boost control as well as turbo timer and FCD (which I won't be using). It now finally makes 1.1 bar without overshooting and hitting the fuel cut but I will still be playing with the rate at which boost comes in. I had a second ashtray surround which I welded up and modified to fit the Gizzmo controller. It certainly feels a lot quicker now so my times will undoubtedly be better!
Just to show that this sort of car is never finished!
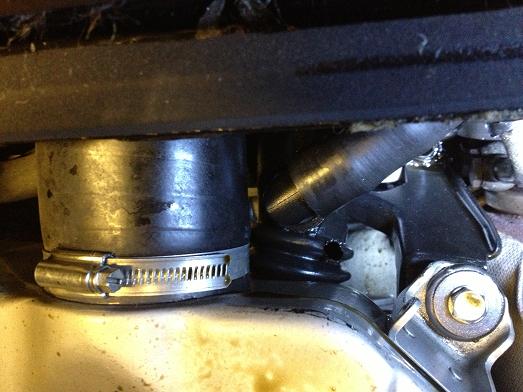
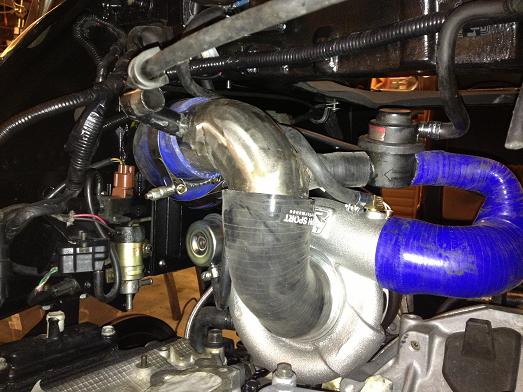
I took the car on track and although it was struggling with the ignition side of things, at 1.2Bar boost, it was going OK. GPS'd it at 130mph with loads more to go but then I blew the intercooler pipe and sudden loss of power along with clouds of smoke out of the back end! You should be able to spot the hole in the turbo to chargecooler pipe in the pic above..
I'm hoping it's an easy fix (and excuse to upgrade to silicone pipe), worst case it may be the turbo but I have a spare one of those. I've also got some newage coilpacks on the way to upgrade from the old ones which degrade quite badly with age.
Fingers crossed the pipe arrives today then!
130mph sounds good but there was a lot more in it and it felt strangled to get there. Observers did say it looked good at speed and then spitting fire on lift, to me that shows the spark was a problem..
If all goes to plan it will all be back together over the weekend.
130mph sounds good but there was a lot more in it and it felt strangled to get there. Observers did say it looked good at speed and then spitting fire on lift, to me that shows the spark was a problem..
If all goes to plan it will all be back together over the weekend.
trackdemon said:
I'd love to see the reactions from others sharing the track - not everyday you see a Beetle flying along at 130mph!  Might be on for the shoot next week, will give you a shout to confirm & hopefully it'll work for you.
cheers,
Steve
Might be on for the shoot next week, will give you a shout to confirm & hopefully it'll work for you.cheers,
Steve
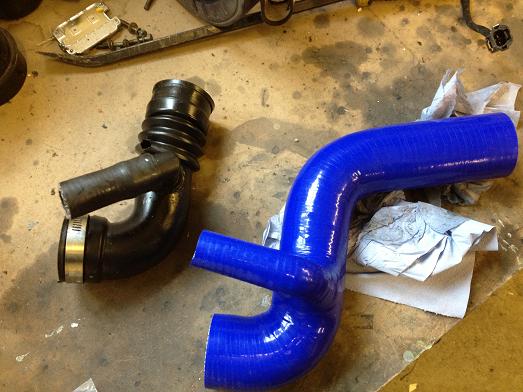
The parts arrived late yesterday afternoon so I got cracking...
New silicone pipe bought to replace the holed one, this should be good for much higher boost too.
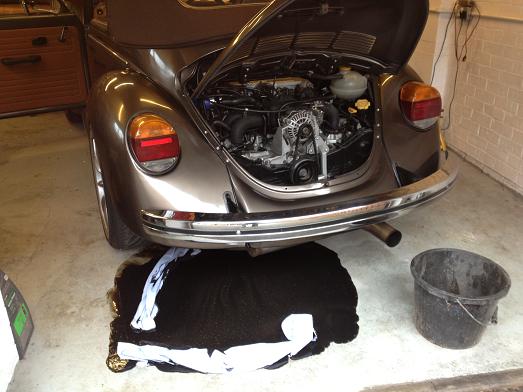
Unfortunately after swapping the pipe and the turbo the oil filter seal blew dumping oil all over the garage floor. I tried another filter and the same thing happened. Googling is pointing towards the relief valve on the oil pump being jammed shut. Unless anyone has any other ideas?
Not looking good for a shoot next week Steve
New silicone pipe bought to replace the holed one, this should be good for much higher boost too.
Unfortunately after swapping the pipe and the turbo the oil filter seal blew dumping oil all over the garage floor. I tried another filter and the same thing happened. Googling is pointing towards the relief valve on the oil pump being jammed shut. Unless anyone has any other ideas?
Not looking good for a shoot next week Steve
I'm quietly confident now  After fitting another oil pump the engine seems to run ok with normal oil pressure, albeit chucking out a lot of smoke from the oil it has in the intake! The old oil pump relief valve was jammed solid almost closed, even with the pump off the car I can't move it!
Changing the pump meant stripping the rear panels off the car as well as cambelt etc etc so now I have to refit and seal things back up. I'm also using the opportunity of it being up in the air to convert to newage coilpacks which will also help it run better on boost. I made new looms for them tonight as a change and will bypass the old ignitor as the new coilpacks have built in igniters..
After fitting another oil pump the engine seems to run ok with normal oil pressure, albeit chucking out a lot of smoke from the oil it has in the intake! The old oil pump relief valve was jammed solid almost closed, even with the pump off the car I can't move it!Changing the pump meant stripping the rear panels off the car as well as cambelt etc etc so now I have to refit and seal things back up. I'm also using the opportunity of it being up in the air to convert to newage coilpacks which will also help it run better on boost. I made new looms for them tonight as a change and will bypass the old ignitor as the new coilpacks have built in igniters..
Time for an update...
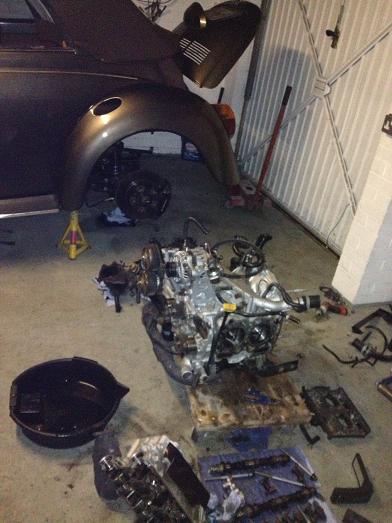
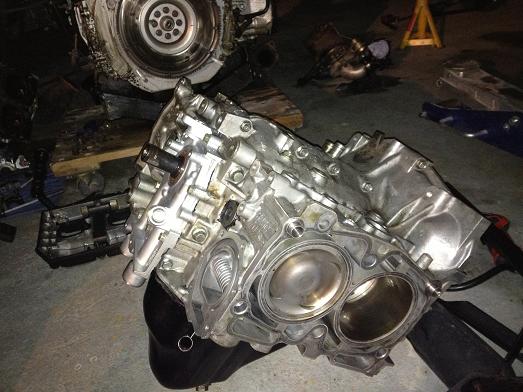
The early optimism ended in disappointment, I went for a drive and it was gutless and the oil screen didn't improve. I got a compression tester and one of the cylinders showed no compression at all. There was nothing to do but pull the engine and get the head off to assess...
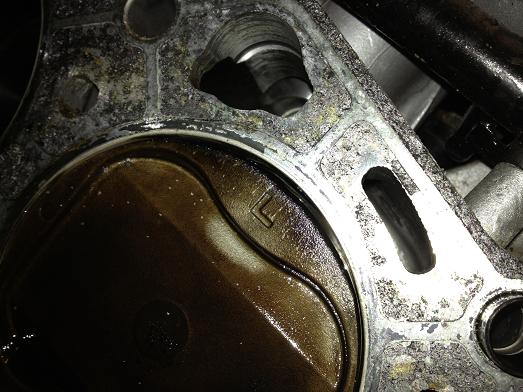
You can just about make out some damage to the top of the cylinder wall
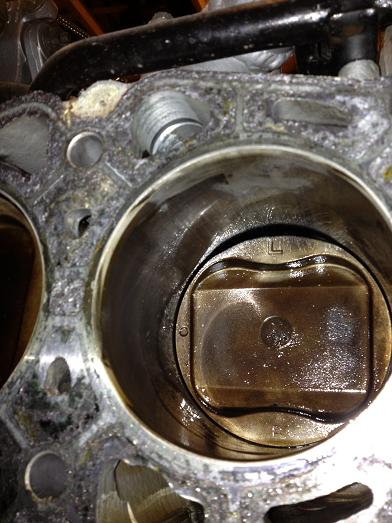
and if you look carefully you can see that the ring is distorted, I'm assuming that the piston ring land has failed underneath...
So, after contemplating my options and considering where I want to be realistically with this car I've decided to rebuild it with a 2.5 sti bottom end. It's a semi-closed deck block but they are good for about 450bhp, I think that should be enough in a bug!! I was also considering a forged 2 or 2.1 stroker but for drivability the torque of a 2.5 wins for me. I'll upgrade the externals to allow greater power at a later date.
The early optimism ended in disappointment, I went for a drive and it was gutless and the oil screen didn't improve. I got a compression tester and one of the cylinders showed no compression at all. There was nothing to do but pull the engine and get the head off to assess...
You can just about make out some damage to the top of the cylinder wall
and if you look carefully you can see that the ring is distorted, I'm assuming that the piston ring land has failed underneath...
So, after contemplating my options and considering where I want to be realistically with this car I've decided to rebuild it with a 2.5 sti bottom end. It's a semi-closed deck block but they are good for about 450bhp, I think that should be enough in a bug!! I was also considering a forged 2 or 2.1 stroker but for drivability the torque of a 2.5 wins for me. I'll upgrade the externals to allow greater power at a later date.
Hmm, even man maths is struggling with this one!!
The sti bottom end I've bought looks to be good but I'm still going to split the block to check things over. It is a V9 with nitrided crank, sti forged rods and I will be fitting supertech pistons honed to fit. The early RA heads will be a bit limiting so to futureproof the bottom end I'll be fitting V4 sti heads with solid lifters from APIs stock with API head studs. They will be doing the measuring etc and I'll do the assembling.. By the end the longblock should be good for about 450bhp which is probably more than I'll go to. I'll upgrade my turbo to td05-20g spec, maybe with a billet wheel. Some upgrading of the fuel rail and finally an ESL ECU and remap (probably by Bob Rawle).
The sti bottom end I've bought looks to be good but I'm still going to split the block to check things over. It is a V9 with nitrided crank, sti forged rods and I will be fitting supertech pistons honed to fit. The early RA heads will be a bit limiting so to futureproof the bottom end I'll be fitting V4 sti heads with solid lifters from APIs stock with API head studs. They will be doing the measuring etc and I'll do the assembling.. By the end the longblock should be good for about 450bhp which is probably more than I'll go to. I'll upgrade my turbo to td05-20g spec, maybe with a billet wheel. Some upgrading of the fuel rail and finally an ESL ECU and remap (probably by Bob Rawle).
With the old block unusable in its state I decided to bring the final plan forwards... So, with a bit of hunting I found a 'rebuilt' 2.5l STI shortblock on ebay.
Final build will consist of 2.5 sti upgraded with forged pistons, V3/V4 sti heads which I will rebuild, upgrade one of my turbos to td05-20g, new bigger injectors, new oil modine, sump baffle plate and probably some other supporting mods being topped off with a remap on an ESL daughterboard, probably by Bob Rawle when he visits API.
The shortblock as I received it. With some thought I decided that I will always feel uneasy about the stock pistons as they haven't got a very good reputation. After a chat with David at API (well respeced Impreza engine builders only 5 miles away from my house!) I decided to go with some forged pistons. Supertechs have a good reputation for not being rattly like most and API have experience of them so that's the way I have gone. The stock rods are good for 450bhp ish as they are the latest spec ones. My goal is a good 400bhp.
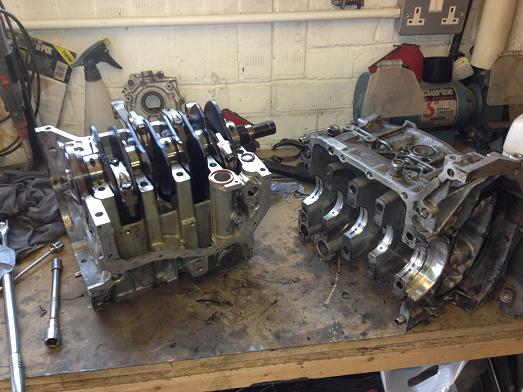
Time to split the block as the cylinders needed honing to fit the pistons. It would also give me a good opportunity to inspect the 'rebuild'.
The big end bearings were supposedly new! I've replaced them with ACL bearings
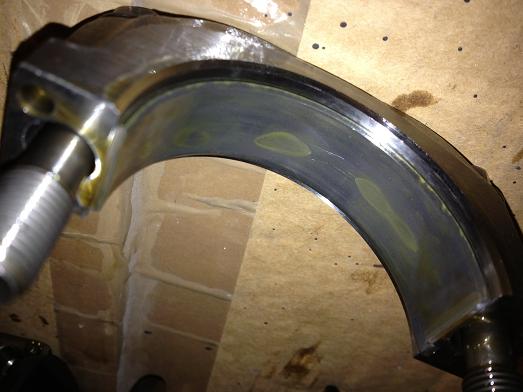
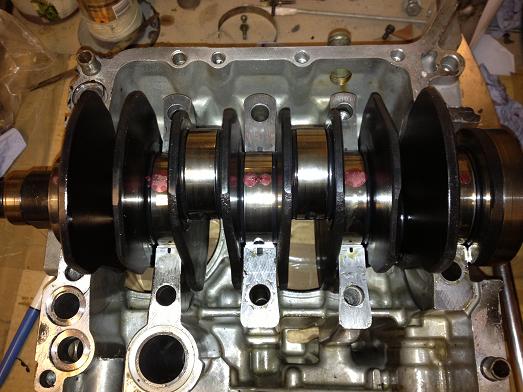
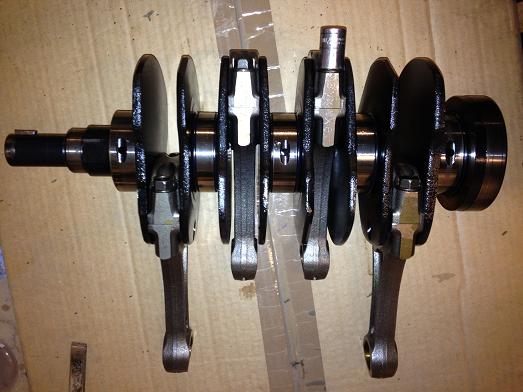
Main bearing clearances checked with plastigage, they are all good, as are the bearings. Luckily this is the better nitrided crank too..
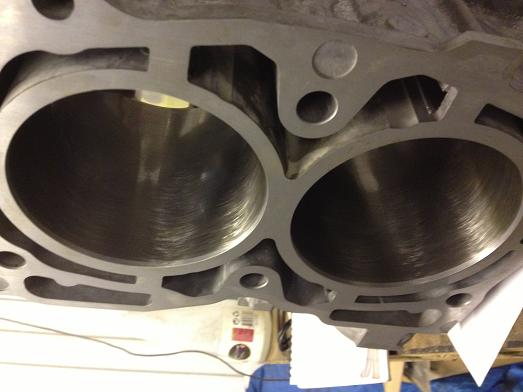
Block halves back from API after being honed, they have been done to 3.8thou piston clearance.

Here's the first supertech piston, I've gapped the rings to specs..
I'm quite enjoying this engine building lark, this is my first attempt!!
Final build will consist of 2.5 sti upgraded with forged pistons, V3/V4 sti heads which I will rebuild, upgrade one of my turbos to td05-20g, new bigger injectors, new oil modine, sump baffle plate and probably some other supporting mods being topped off with a remap on an ESL daughterboard, probably by Bob Rawle when he visits API.
The shortblock as I received it. With some thought I decided that I will always feel uneasy about the stock pistons as they haven't got a very good reputation. After a chat with David at API (well respeced Impreza engine builders only 5 miles away from my house!) I decided to go with some forged pistons. Supertechs have a good reputation for not being rattly like most and API have experience of them so that's the way I have gone. The stock rods are good for 450bhp ish as they are the latest spec ones. My goal is a good 400bhp.
Time to split the block as the cylinders needed honing to fit the pistons. It would also give me a good opportunity to inspect the 'rebuild'.
The big end bearings were supposedly new! I've replaced them with ACL bearings
Main bearing clearances checked with plastigage, they are all good, as are the bearings. Luckily this is the better nitrided crank too..
Block halves back from API after being honed, they have been done to 3.8thou piston clearance.
Here's the first supertech piston, I've gapped the rings to specs..
I'm quite enjoying this engine building lark, this is my first attempt!!
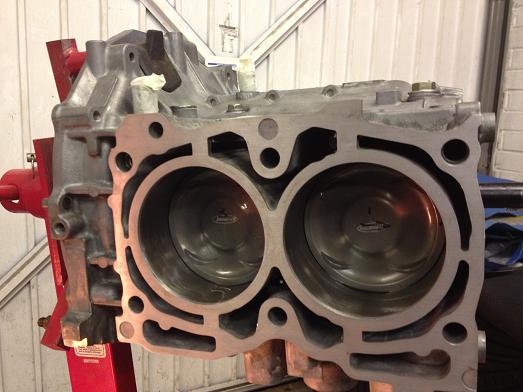
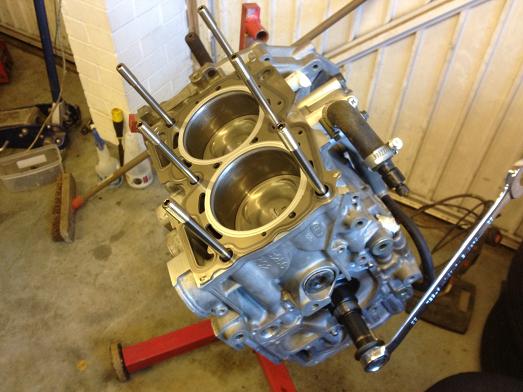
Block ready to go back together with new seals, note tape on rod little ends to avoid the risk of scratching the bores on assembly.
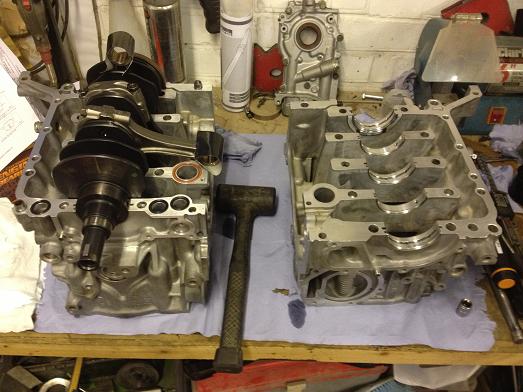
All torqued and sealed up..
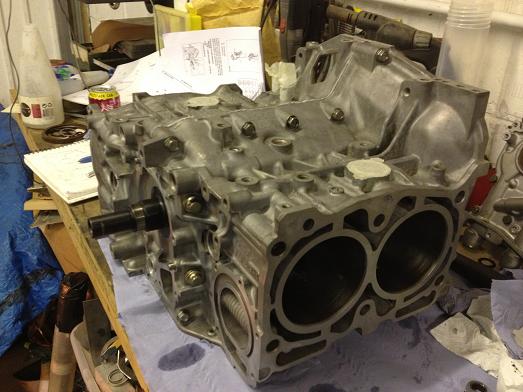
first piston going in...
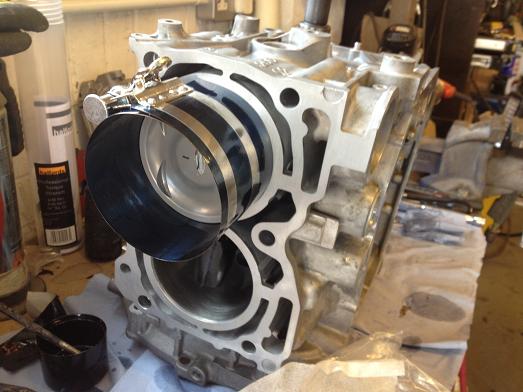
all pistons in, you have to make sure they are all orientated correctly as well as positioning the piston ring gaps too
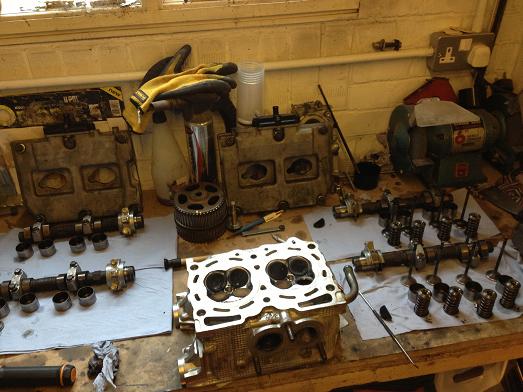
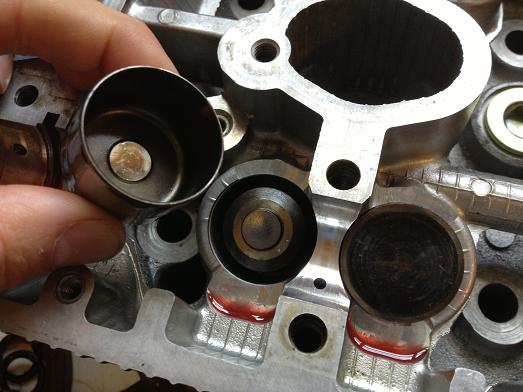
V4 STI cylinder heads stripped for refresh. All valves cleaned up, re-lapped in to the heads and then ready for first lash measurement. These heads use under-bucket solid shims which come in various different thicknesses and you change shims to get the correct clearances.
I knocked off any sharp edges in the combustion chamber to help avoid detonation, this can sometimes be an issue when fitting 2l heads on a 2.5 block due to the slight cylinder diameter mismatch
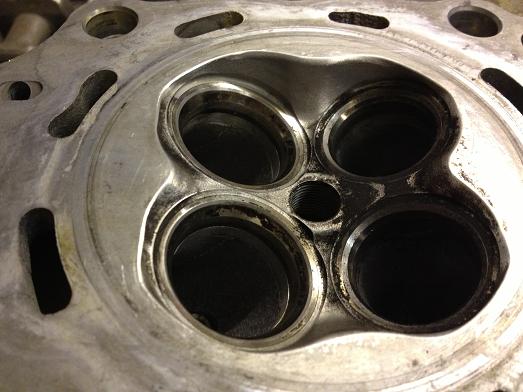
You can see one of the shims sitting on top of a valve.
Lots of measuring!
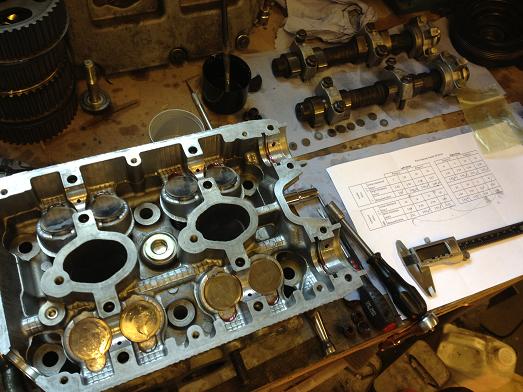
and measuring, then swapping shims
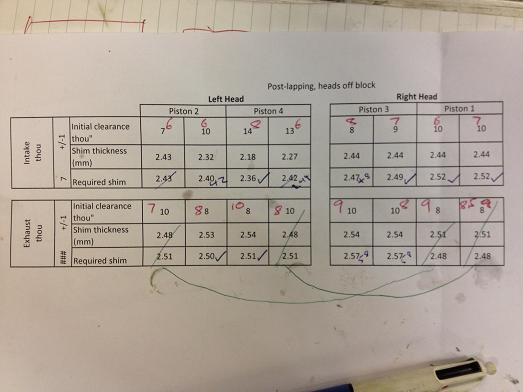
Ready to go on the engine!
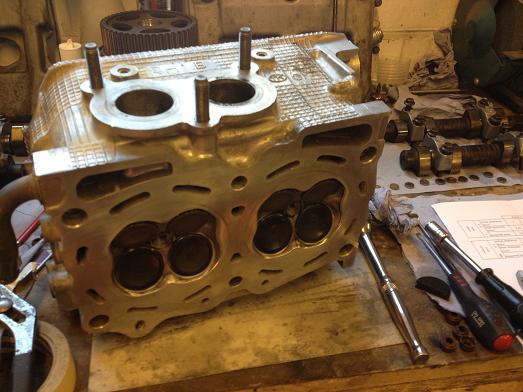
ARP head studs fitted to give better head gasket clamping under boost
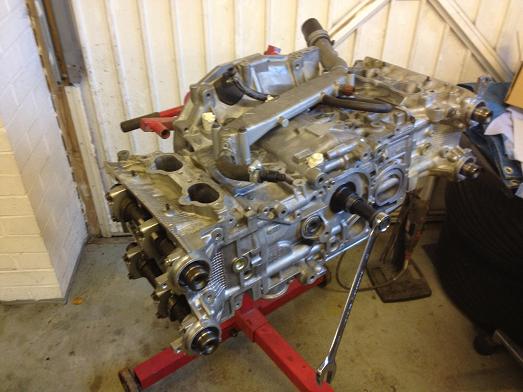
Back to a longblock! I had to fit the cambelt and re-check the valve clearances as the cam loading can change things. Luckily only one shim needed swapping after assembly.
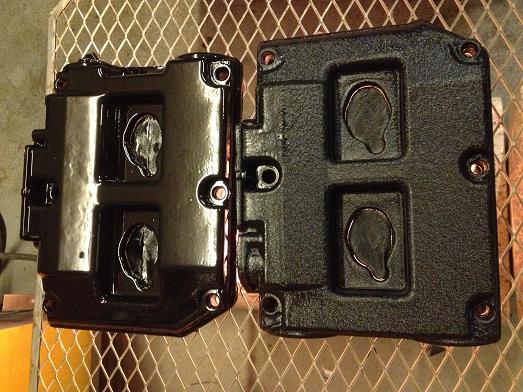
V3/4 cam covers were cleaned up and treated to some VHT wrinkle paint, note one on left hadn't had any heat applied ot get the wrinkle effect started yet.
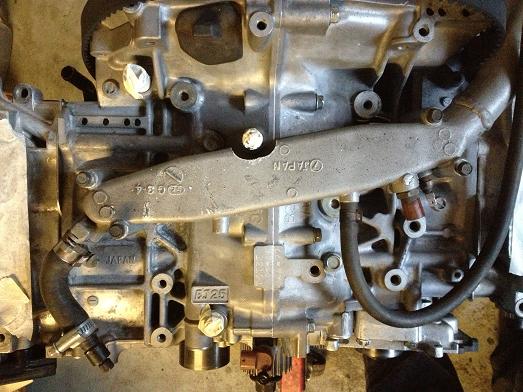
Coolant manifold needs modifying to clear the central 2.5l breather pipe.
Now I just have to decide what turbo and injectors to go with!
All torqued and sealed up..
first piston going in...
all pistons in, you have to make sure they are all orientated correctly as well as positioning the piston ring gaps too
V4 STI cylinder heads stripped for refresh. All valves cleaned up, re-lapped in to the heads and then ready for first lash measurement. These heads use under-bucket solid shims which come in various different thicknesses and you change shims to get the correct clearances.
I knocked off any sharp edges in the combustion chamber to help avoid detonation, this can sometimes be an issue when fitting 2l heads on a 2.5 block due to the slight cylinder diameter mismatch
You can see one of the shims sitting on top of a valve.
Lots of measuring!
and measuring, then swapping shims
Ready to go on the engine!
ARP head studs fitted to give better head gasket clamping under boost
Back to a longblock! I had to fit the cambelt and re-check the valve clearances as the cam loading can change things. Luckily only one shim needed swapping after assembly.
V3/4 cam covers were cleaned up and treated to some VHT wrinkle paint, note one on left hadn't had any heat applied ot get the wrinkle effect started yet.
Coolant manifold needs modifying to clear the central 2.5l breather pipe.
Now I just have to decide what turbo and injectors to go with!
Yes, it's coming on nicely, have to save some pennies for a new turbo though, I'm probably going to go with a scooby clinic SC46 now which is a garret ball bearing type and seems to give very good power at low boost levels which will make the most of my chargecooler system (might have to upgrade at some point). I'm also taking the opportunity to improve the sump and fuel tank baffling over the christmas break.
Appreciate the other comments! Have to admit as much as I dislike fiestas that is one very impressive build.. Other cars I've had people might have a go but this is too subtle for most when on the move, all it takes is a quick squirt and I've left them for dead anyway.
Regarding master cylinder, I'm using a twin cylinder set-up with balance bar so you can't compare directly with single twin circuit types. They are both 5/8" (0.625"), I might try even smaller at some point to reduce the pedal efforts a bit more.
Regarding master cylinder, I'm using a twin cylinder set-up with balance bar so you can't compare directly with single twin circuit types. They are both 5/8" (0.625"), I might try even smaller at some point to reduce the pedal efforts a bit more.
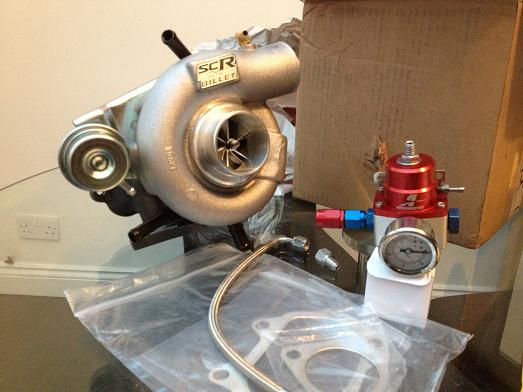
Shiney go-faster bits have arrived! Scooby Clinic SC46 billet turbo based on a Garrett ball bearing core, good for 460bhp on V-power and an Aeromotive fuel pressure regulator to go with an uprated fuel pump and parallel fuel rail conversion.
I've had to make a new intake to suit the front entry turbo, I could have gone under the inlet manifold but it would have lengthened the intake by a fair bit.
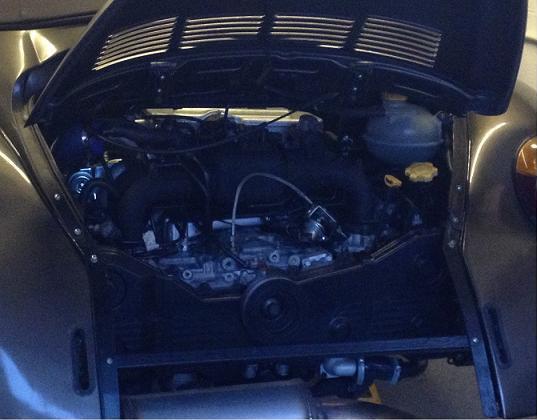
Engine back in the car and fired up for the first time, it sounds good! This is on the old map & injectors, mainly to get the oil system primed and make sure everything on the engine is good.
http://www.youtube.com/embed/rBhGtrmA_TE
More bits arriving soon are:
oil breather catch tank
inlet manifold thermal insulating spacers
HRC 310 lpm fuel pump
Then I'll be ready for the re-map!
I've had to make a new intake to suit the front entry turbo, I could have gone under the inlet manifold but it would have lengthened the intake by a fair bit.
Engine back in the car and fired up for the first time, it sounds good! This is on the old map & injectors, mainly to get the oil system primed and make sure everything on the engine is good.
http://www.youtube.com/embed/rBhGtrmA_TE
More bits arriving soon are:
oil breather catch tank
inlet manifold thermal insulating spacers
HRC 310 lpm fuel pump
Then I'll be ready for the re-map!
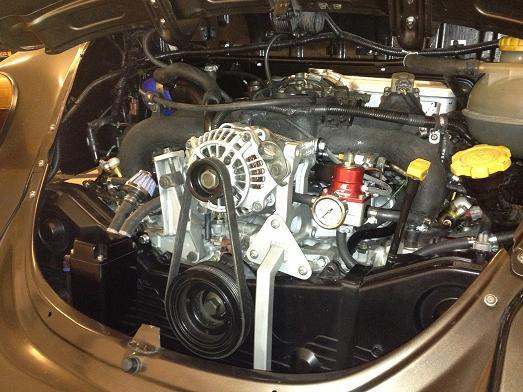
Oil breather tank hanging off the back, there wasn't much space anywhere else! I also made up a new bracket which supports both the oil pressure senders and the Aeromotive fuel pressure regulator
I was advised by my mapper that the old Legacy chargecooler would be limiting my performance so it was time to upgrade. I considered an air/air using enlarged ducts built into the rear wings but I don't really think I've got space for it. I eventually found a very good thread on using a frozenboost type 14 chargecooler. It is apparently good for 700 CFM / 600 BHP and one person reported that when running 22psi he sees a maximum of 10 degrees above ambiant but normally only about 5 degrees which is pretty efficient in my book!
2 weeks later and this arrived in the post:
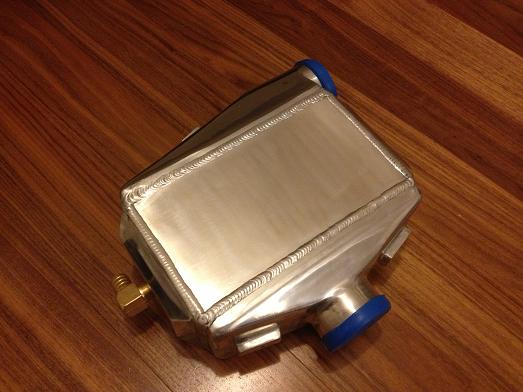
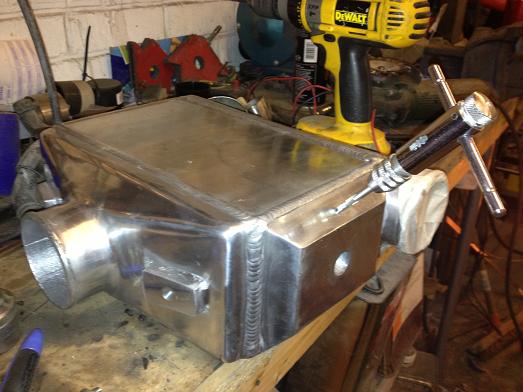
I wasn't satisfied that the system would be working well without trapping air so I decided to drill and tap a bleed point. I drilled on a tilted table on my pillar drill very cautiously as I didn't want to wreck the core! Turns out the end tank isn't completely solid as it looks but cast and it hollowed out a bit with extra clearance to the air core so wasn't too bad to do. A small M6 bolt with O-ring will serve as a manual bleed.
The turbo pipe I made up to join to the chargecooler inlet. 2" going up to 2 1/2" with a fitting for the reciculating dump valve. I had off-cuts of stainless lying around from old exhaust system build so I'm sure it will do the job fine. The 2 1/2" end joins to the chargecooler with a 3" to 2 1/2" silicone reducer elbow.

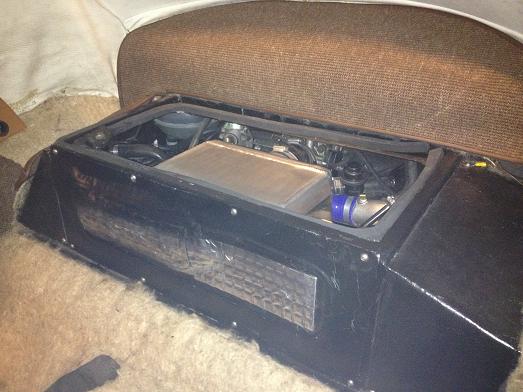
You can see a strap supporting the weight of the chargecooler off the frame above via some rubber washers to isolate it. Just in sight is a filler cap from a Suzuki motorbike which has the correct size fittings for the water pipes.
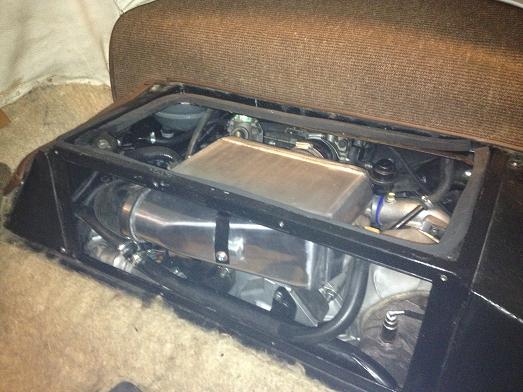
Finally I had to some some re-shaping of the bulkead panel to clear the end tank.
Now it's ready for the running in map on an ESL daughterboard, just hope the recent snow doesn't delay things...
I was advised by my mapper that the old Legacy chargecooler would be limiting my performance so it was time to upgrade. I considered an air/air using enlarged ducts built into the rear wings but I don't really think I've got space for it. I eventually found a very good thread on using a frozenboost type 14 chargecooler. It is apparently good for 700 CFM / 600 BHP and one person reported that when running 22psi he sees a maximum of 10 degrees above ambiant but normally only about 5 degrees which is pretty efficient in my book!
2 weeks later and this arrived in the post:
I wasn't satisfied that the system would be working well without trapping air so I decided to drill and tap a bleed point. I drilled on a tilted table on my pillar drill very cautiously as I didn't want to wreck the core! Turns out the end tank isn't completely solid as it looks but cast and it hollowed out a bit with extra clearance to the air core so wasn't too bad to do. A small M6 bolt with O-ring will serve as a manual bleed.
The turbo pipe I made up to join to the chargecooler inlet. 2" going up to 2 1/2" with a fitting for the reciculating dump valve. I had off-cuts of stainless lying around from old exhaust system build so I'm sure it will do the job fine. The 2 1/2" end joins to the chargecooler with a 3" to 2 1/2" silicone reducer elbow.
You can see a strap supporting the weight of the chargecooler off the frame above via some rubber washers to isolate it. Just in sight is a filler cap from a Suzuki motorbike which has the correct size fittings for the water pipes.
Finally I had to some some re-shaping of the bulkead panel to clear the end tank.
Now it's ready for the running in map on an ESL daughterboard, just hope the recent snow doesn't delay things...
Gassing Station | Readers' Cars | Top of Page | What's New | My Stuff