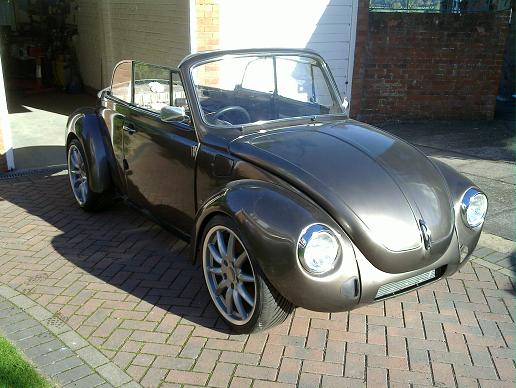
WRX RA powered VW 1303 beetle cabrio with a bit of Porsche
Discussion


Last concentrated burst of activity before I start my new job tomorrow.
I made up a couple of aluminium plates to stop the torsion bars sliding inside, also a small bracket for the 2 new fuel pipes (5/16" kinifer) which ended up clashing with the body so I'll have to redo that!
You can just make out the chargecooler pipes coming out through a new plate at the front of the chassis, I also ran new front and rear brake lines. Instead of the usual cheap rubber body gaskets, I bought a long length of foam gasket and made my own VW style one, didn't take too long, hole punching it as I went to line up with the body mount holes and then glued any ends together with sikaflex.
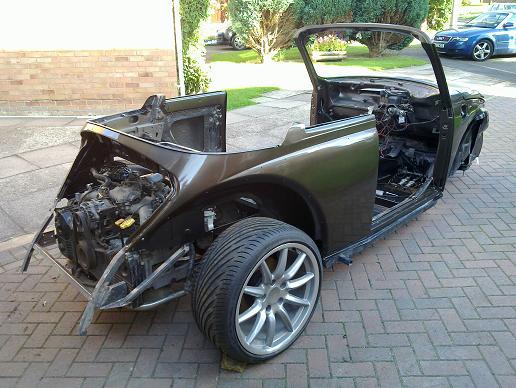
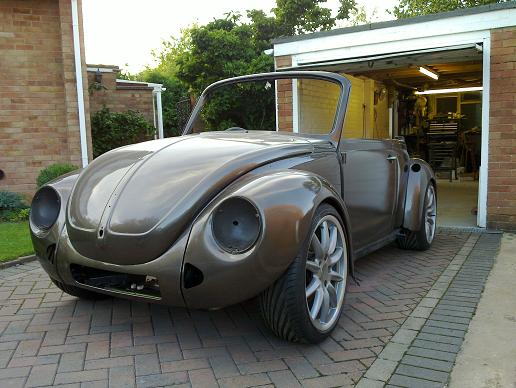
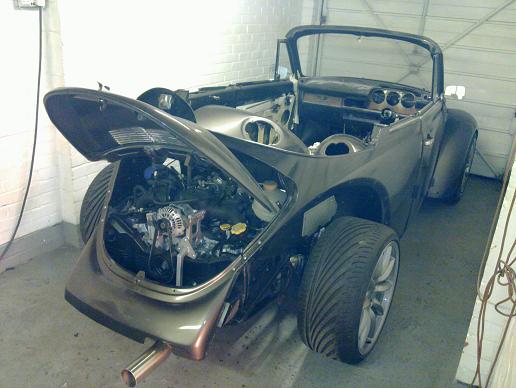
Body on! I also mounted the bonnet as it was taking up far too much space in my workshop.
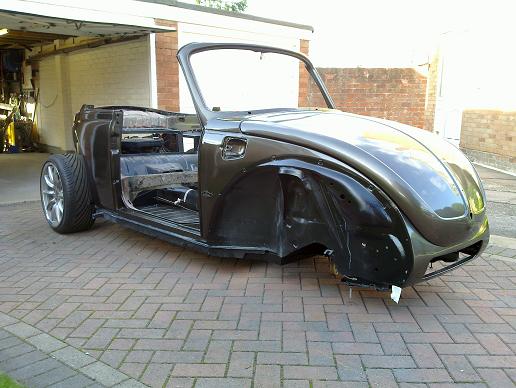
The rear frame will get stripped/painted, but that's for another time. it makes a very good carry handle when lifting the body about...
I made up a couple of aluminium plates to stop the torsion bars sliding inside, also a small bracket for the 2 new fuel pipes (5/16" kinifer) which ended up clashing with the body so I'll have to redo that!
You can just make out the chargecooler pipes coming out through a new plate at the front of the chassis, I also ran new front and rear brake lines. Instead of the usual cheap rubber body gaskets, I bought a long length of foam gasket and made my own VW style one, didn't take too long, hole punching it as I went to line up with the body mount holes and then glued any ends together with sikaflex.
Body on! I also mounted the bonnet as it was taking up far too much space in my workshop.
The rear frame will get stripped/painted, but that's for another time. it makes a very good carry handle when lifting the body about...
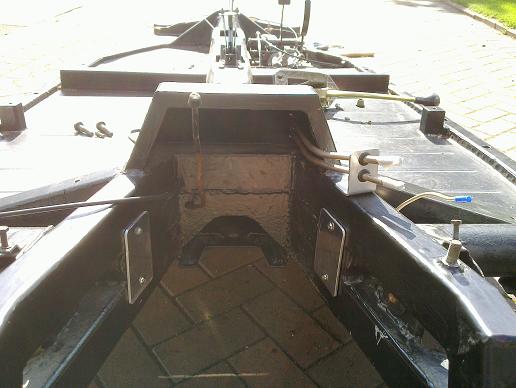
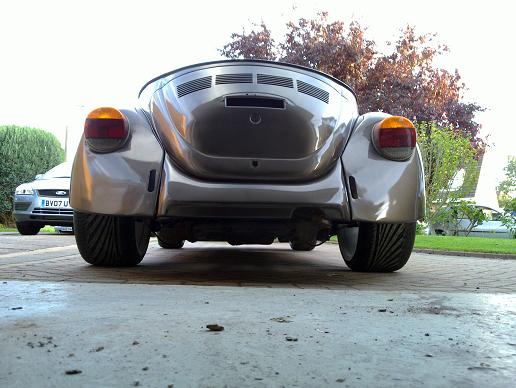
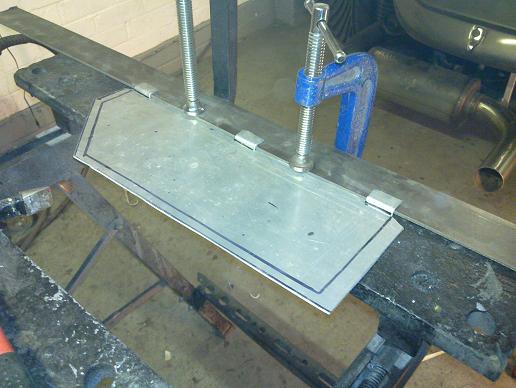
Rear valance panel needed extending at the top to meet what was left of the body neatly. It bolts in place at the top and is then clamped between the body and wings down each side.
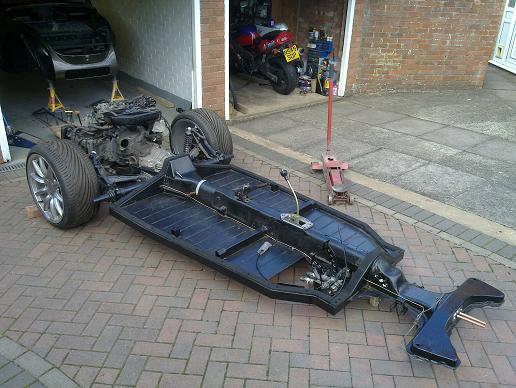
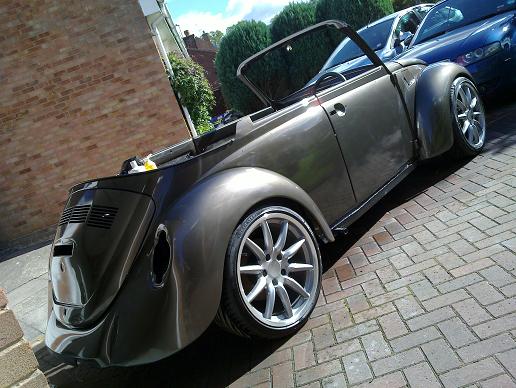
Plenty of ground clearance!
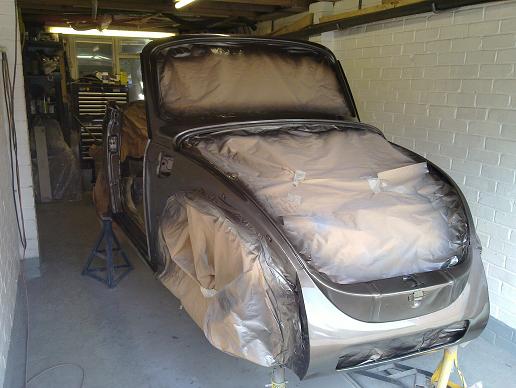
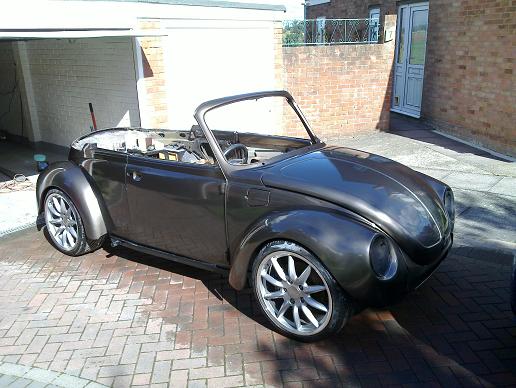
Body panels all 'thrown' on for the moment as my wife was sick of them spread out everywhere, lol!
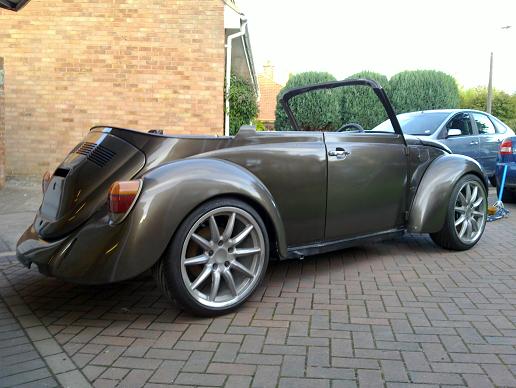
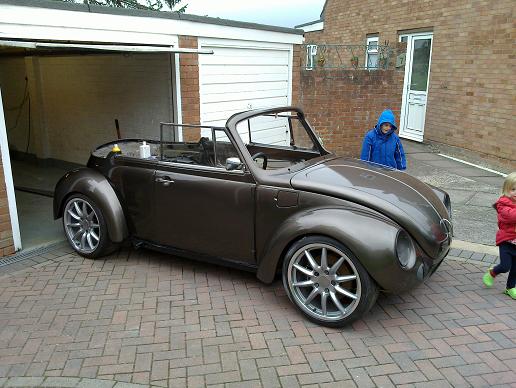
I'm happy with how it's all sitting...
Plenty of ground clearance!
Body panels all 'thrown' on for the moment as my wife was sick of them spread out everywhere, lol!
I'm happy with how it's all sitting...
If anybody else had a feeling that the doors didn't look quite right in the previous pictures I was having the same thoughts! In the end after repainting and then re-clearing they have come out right. I also wet-sanded and machine polished the whole car so I can start refitting brightwork and other fittings...
Much better!
Door windows in, it was like doing a 3D jigsaw puzzle that would only go together in a particular sequence!
I've put in all the door hinge screw not too and am really please with how the doors line up with the rear quarter panels, the swage line is perfect. I just need to pack up the rear body spacer a small amount to get the door gap parallel.
I've been doing loads of little jobs, mainly refurbishing parts before refitting them.
Definitely getting there! All glass now in after spending a small fortune on various rubber seals which were too far gone to re-use.
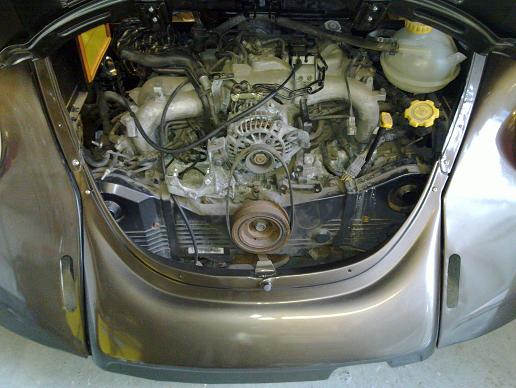
The G50 was a real pain to detail! Porsche use a really thick type of wax and liberally spray it on all over the underside. A 10mm wire brush was the best thing to get it out in the end. Lots of degreasers and finally etched and painted in alloy wheel silver should keep it looking much better and cleaner in the long run... You can also see the steel spacer under the front mount.
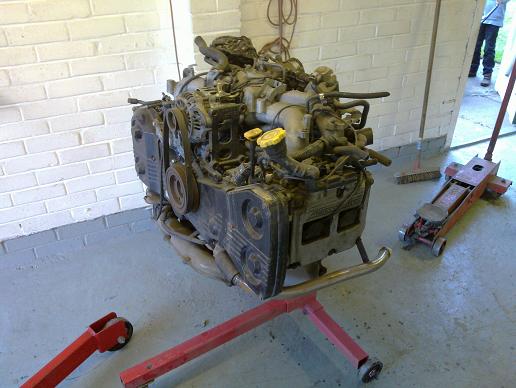
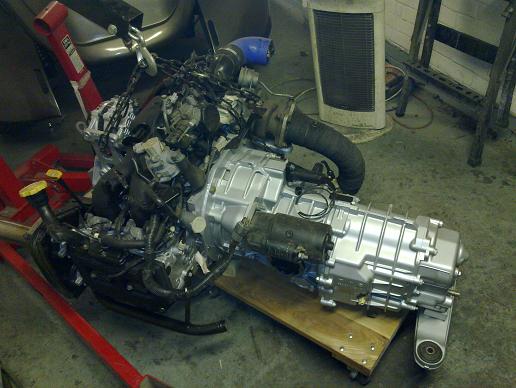
The engine's turn on the stand for some detailing... I'm probably going to go with black wrinckle paint for the alloy bits (cam covers and intake manifold).
Definitely getting there! All glass now in after spending a small fortune on various rubber seals which were too far gone to re-use.
The G50 was a real pain to detail! Porsche use a really thick type of wax and liberally spray it on all over the underside. A 10mm wire brush was the best thing to get it out in the end. Lots of degreasers and finally etched and painted in alloy wheel silver should keep it looking much better and cleaner in the long run... You can also see the steel spacer under the front mount.
The engine's turn on the stand for some detailing... I'm probably going to go with black wrinckle paint for the alloy bits (cam covers and intake manifold).
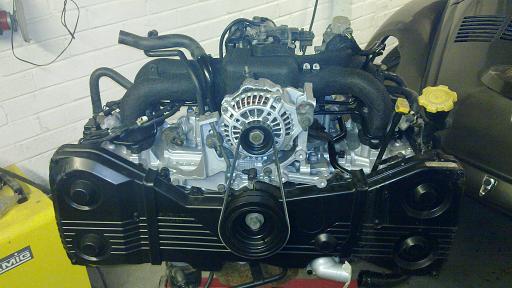
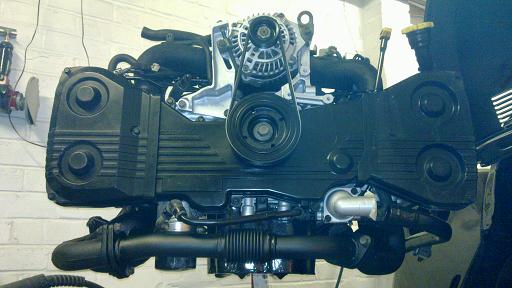
Engine stripped back to a bare longblock and painted in POR engine enamel..
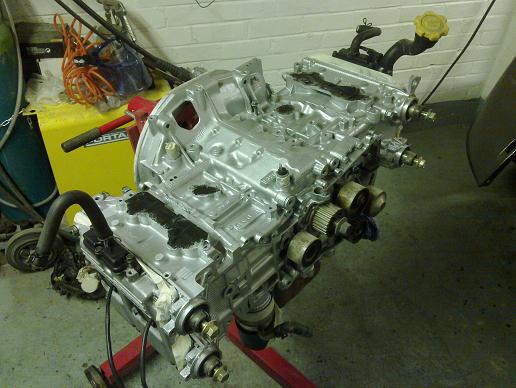
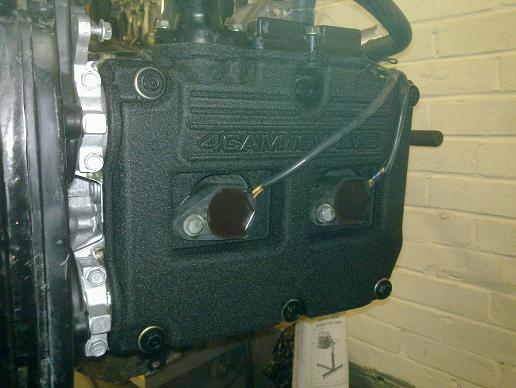
Cam covers were stripped back and treated to some VHT black wrinkle paint.
Coming back together, new cambelt hiding under there too...

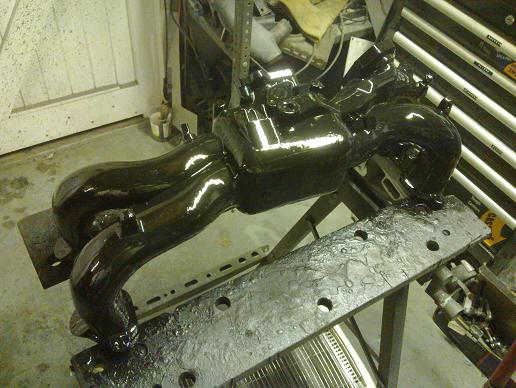
Lots of now redundant bosses were cut off and smoothed to give a cleaner look and the manifold also painted in wrinkle. This is how it looks straight away...
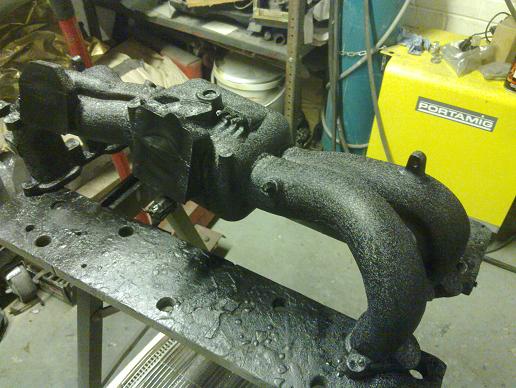
....and after a couple of hours!
Cam covers were stripped back and treated to some VHT black wrinkle paint.
Coming back together, new cambelt hiding under there too...
Lots of now redundant bosses were cut off and smoothed to give a cleaner look and the manifold also painted in wrinkle. This is how it looks straight away...
....and after a couple of hours!
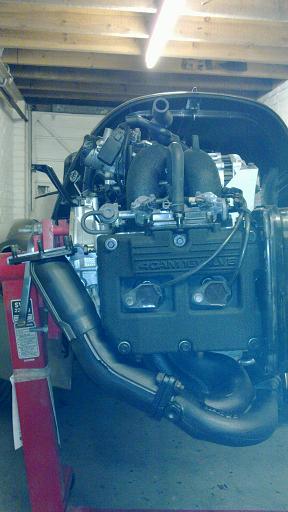
Engine just about ready to go back in the car...
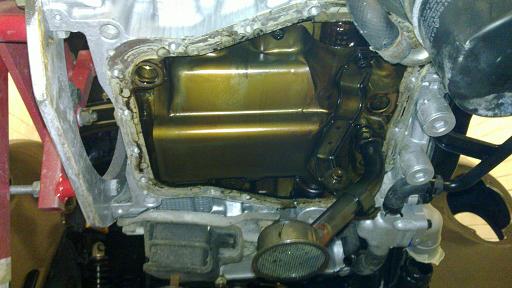
I decided to shorten the sump but only by an inch or so as that will just about bring it level with the exhaust manifold and oil filter and maximise ground clearance.
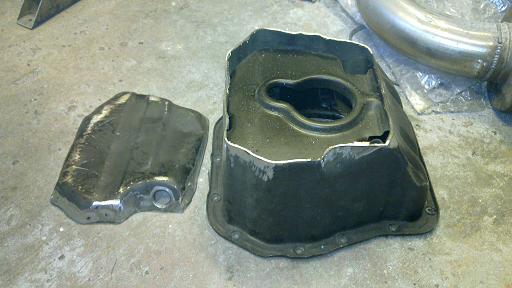
Cut up and new component parts. I filled in the slope at the front part to regain lost capacity and it turned out near enough identical to the original volume. I cut slots at the top and bottom of the additional triangular section so the old sloped wall acts like a baffle.
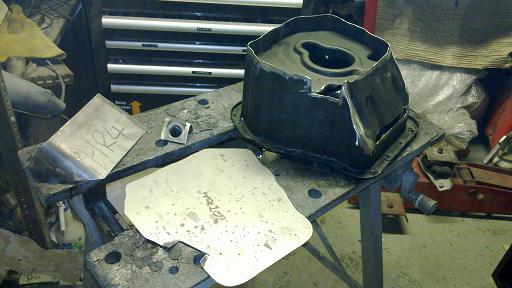
All welded up, just needs a clean and like of paint, then to shorten the pick-up tube. Note the drain plug is at the low point...
Looking and thinking about it now I might weld on some strengthening ribs on the bottom level with the drain plug to add some strength...
I decided to shorten the sump but only by an inch or so as that will just about bring it level with the exhaust manifold and oil filter and maximise ground clearance.
Cut up and new component parts. I filled in the slope at the front part to regain lost capacity and it turned out near enough identical to the original volume. I cut slots at the top and bottom of the additional triangular section so the old sloped wall acts like a baffle.
All welded up, just needs a clean and like of paint, then to shorten the pick-up tube. Note the drain plug is at the low point...
Looking and thinking about it now I might weld on some strengthening ribs on the bottom level with the drain plug to add some strength...
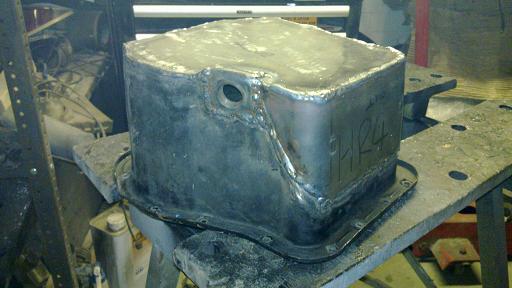
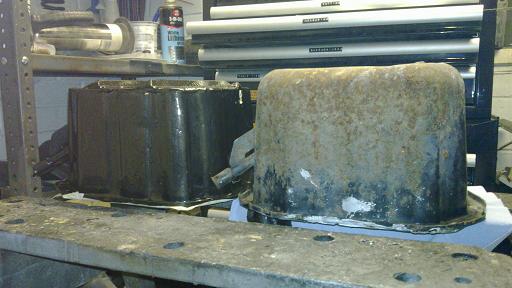
In the end I welded on some strengthening ribs which also serve as a flat bottom and stop the drain point getting damaged. Note that the old sump drain 'bulge' has already been flattened on the old sump so the gain is better than it looks here...
Stock pick-up pipe
shortened to suit the new sump. I also had to shorten the support piece. Normal clearance to the bottom is 16mm but I reduced this to both gain useful capacity and it was easier to just shorten the vertical section and braze it back together, I ended up with 9mm to the bottom. Apparently subaru rally cars are modified to only 6mm...
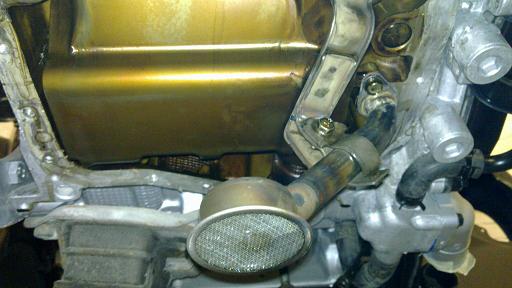
Finally fitted, the actual oil part of the sump is level with the bottom of the oil filter and I didn't want that to be the lowest point. All in I have gained about an inch ground clearance.
Stock pick-up pipe
shortened to suit the new sump. I also had to shorten the support piece. Normal clearance to the bottom is 16mm but I reduced this to both gain useful capacity and it was easier to just shorten the vertical section and braze it back together, I ended up with 9mm to the bottom. Apparently subaru rally cars are modified to only 6mm...
Finally fitted, the actual oil part of the sump is level with the bottom of the oil filter and I didn't want that to be the lowest point. All in I have gained about an inch ground clearance.
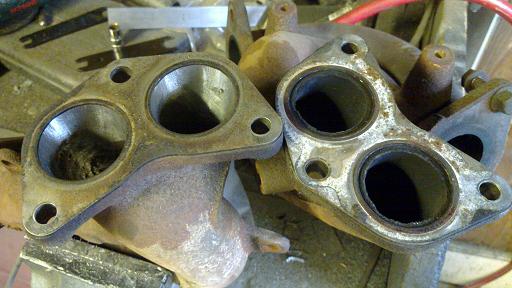
While the header was off and in pieces I took the opportunity to get the die grinder out and do some match porting, apparently this is good for a fair few bhp!
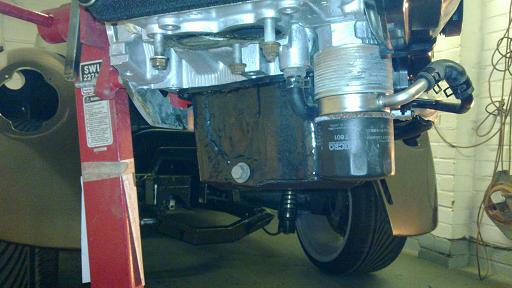
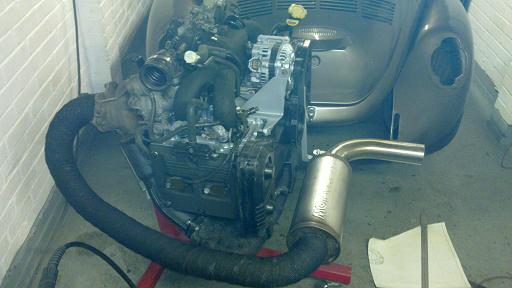
All painted in high temp paint and mocked up on the engine to check ground clearance. The aim was to make sure the oil filter wasn't going to be the lowest point and this looks about right to me...
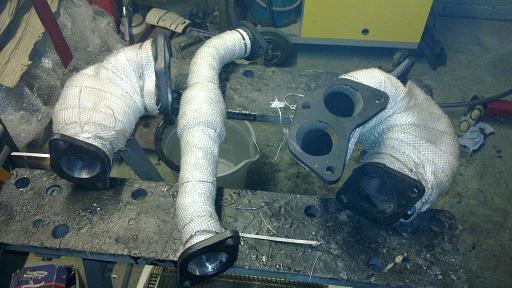
The original up-pipe lagging was savable so just painted but the rest will be wrapped and repainted.
Manifolds wrapped. I used the stainless ties that came with the wrap but found stainless MIG wire worked better, fitted every few inches.
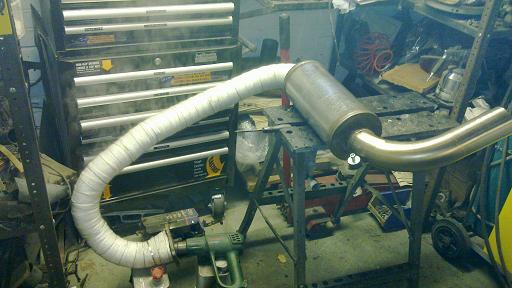
8m of 2" wrap went into the manifold and another 10m for the downpipe! The wrap was soaked in water first as it later shrinks to a tighter fit as it dries out. Due to the low temperatures at the moment it was taking forever to dry out so I improvised and left the hot air gun blowing down the inside of the exhaust and it worked great!
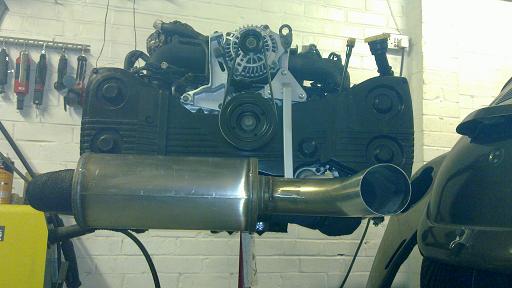
Additional support made up to support the muffler end of the exhaust. I managed to scrounge enough stainless bar to make a bracket on the exhaust and made up the support using a mini style exhaust rubber mount.
All fitted up. Note I also painted the wrap to stop it absorbing water, oil etc later on..
Quick check to confirm the muffler is not the lowest part..
All painted in high temp paint and mocked up on the engine to check ground clearance. The aim was to make sure the oil filter wasn't going to be the lowest point and this looks about right to me...
The original up-pipe lagging was savable so just painted but the rest will be wrapped and repainted.
Manifolds wrapped. I used the stainless ties that came with the wrap but found stainless MIG wire worked better, fitted every few inches.
8m of 2" wrap went into the manifold and another 10m for the downpipe! The wrap was soaked in water first as it later shrinks to a tighter fit as it dries out. Due to the low temperatures at the moment it was taking forever to dry out so I improvised and left the hot air gun blowing down the inside of the exhaust and it worked great!
Additional support made up to support the muffler end of the exhaust. I managed to scrounge enough stainless bar to make a bracket on the exhaust and made up the support using a mini style exhaust rubber mount.
All fitted up. Note I also painted the wrap to stop it absorbing water, oil etc later on..
Quick check to confirm the muffler is not the lowest part..
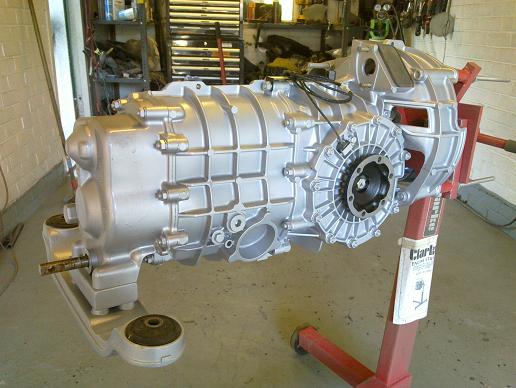
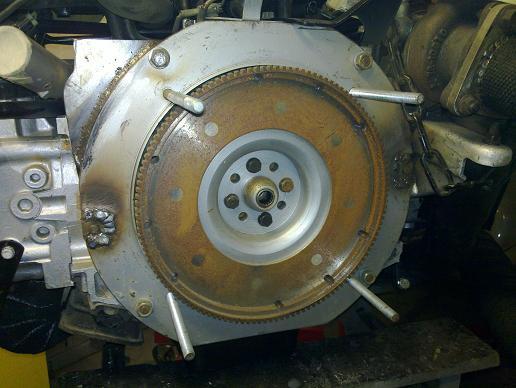
A while back I realised that the dowel alignment holes in the adapter plate were machined incorrectly and the supplier refused to fix it so I either had to buy a new one or sort it out myself! Previously I had filed out the holes to get the adapter plate to bolt on but it was not concentric to the crank centerline. I decided to cut the old holes out, then weld in new thick sections in the correct place. Here's one of the new sections before cutting into the plate.
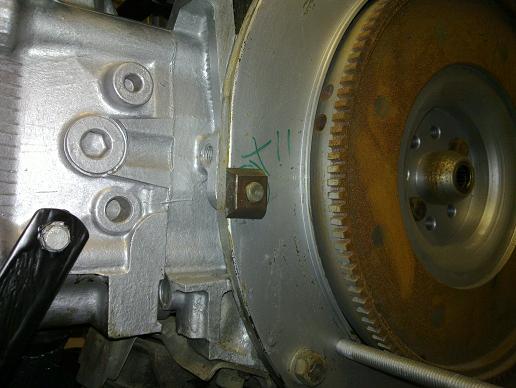
There are two alignment holes, one on each side, so I turned up the MIG and welded the new sections after making sure the plate was aligned correctly, this was done by using a depth gauge all around the trans locating ring up to the flywheel diameter and repeatedly tweaking things until it was all perfectly aligned. While I was at it, I also welded on a small plate on the upper left corner to cover up an opening.
All cleaned up and repainted before fitting to the nice and clean engine!
Stock 911 clutch all fitted up, the release arm needs to be attached to the release bearing before you mate the engine and trans, the pivot bar is then slid through it's centre through bosses in the bellhousing.
All together again for the last time before it goes into the car! I also made up a new clutch hose to mate to the slave cylinder.
There are two alignment holes, one on each side, so I turned up the MIG and welded the new sections after making sure the plate was aligned correctly, this was done by using a depth gauge all around the trans locating ring up to the flywheel diameter and repeatedly tweaking things until it was all perfectly aligned. While I was at it, I also welded on a small plate on the upper left corner to cover up an opening.
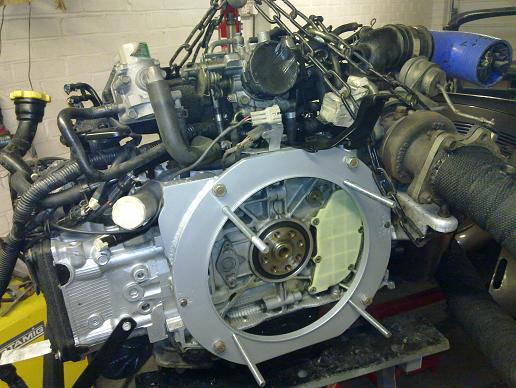
All cleaned up and repainted before fitting to the nice and clean engine!
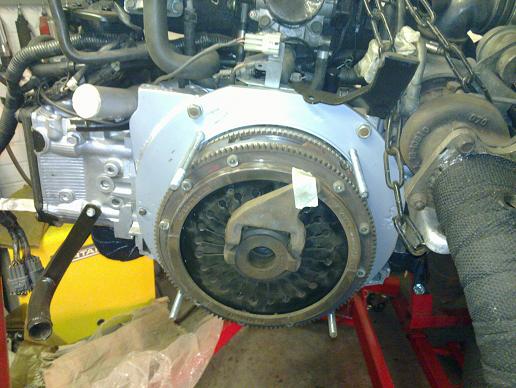
Stock 911 clutch all fitted up, the release arm needs to be attached to the release bearing before you mate the engine and trans, the pivot bar is then slid through it's centre through bosses in the bellhousing.
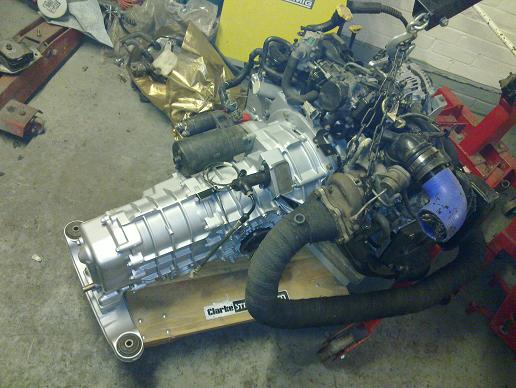
All together again for the last time before it goes into the car! I also made up a new clutch hose to mate to the slave cylinder.
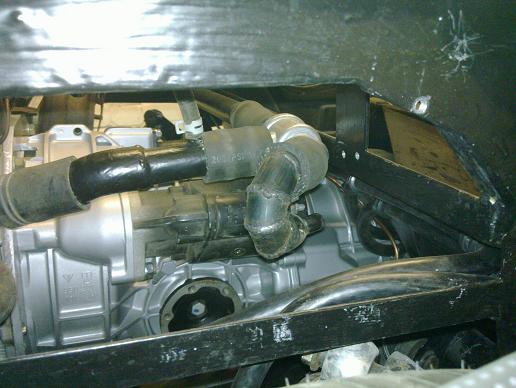
Making up an access panel for the offside rear inner wheel arch
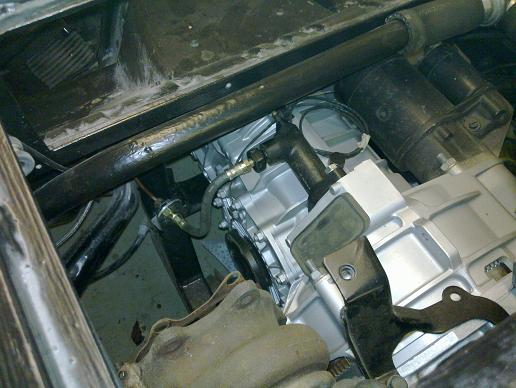
Engine and trans in! You can also see the inspection panel in place..
I welded up an adapter for the clutch slave pipe. It was an M14x1.50 thread and 8mm pipe which I thought was very big, I've decided to use normal brake pipe size so had to adapt down to M10x1.0 and used a spare brake flexi pipe I had.. It is all kinked over a bit to get extra clearance to the exhaust downpipe. If it turns out to be too restrictive I can easily go up a size later on.
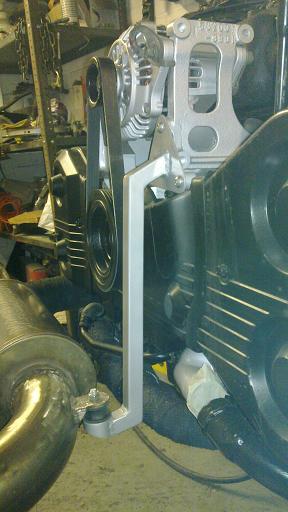
New turbo coolant pipe hardline was made up and bolted on to the top of the bulkhead to neaten things up a bit.
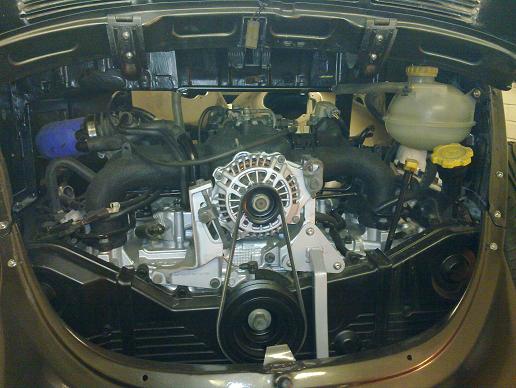
The thermostat bypass will be used as the heater supply in my installation so I made up this adapter to go down to the smaller pipe size.
It's just a long list of time consuming little jobs from now on! Gutted to hear that Le Bug Show at Spa Francorchamps isn't going to be on next year as that was going to be the debut, I guess I'll have to find something else...
Engine and trans in! You can also see the inspection panel in place..
I welded up an adapter for the clutch slave pipe. It was an M14x1.50 thread and 8mm pipe which I thought was very big, I've decided to use normal brake pipe size so had to adapt down to M10x1.0 and used a spare brake flexi pipe I had.. It is all kinked over a bit to get extra clearance to the exhaust downpipe. If it turns out to be too restrictive I can easily go up a size later on.
New turbo coolant pipe hardline was made up and bolted on to the top of the bulkhead to neaten things up a bit.
The thermostat bypass will be used as the heater supply in my installation so I made up this adapter to go down to the smaller pipe size.
It's just a long list of time consuming little jobs from now on! Gutted to hear that Le Bug Show at Spa Francorchamps isn't going to be on next year as that was going to be the debut, I guess I'll have to find something else...
genaccord said:
this is one of the best builds I have ever seen!
and to be able to say "I did all that" is Awesome.
That is one of the things drivign me to do as much as I possibly can myself. The only thing I won't have done is some of the trim work when it's all done..and to be able to say "I did all that" is Awesome.
The stainless is a bit of a pig to work with, it is also much better to do it all on the vehicle to make sure all clearances are good. Get a MIG and do it yourself
 much cheaper and satisfying in the end...
Yeah, I know the brick yard, subarus are quite popular swaps into those, you can get subaru specific bellhousings so use all stock flywheel, clutch etc on them. The flat 6 subarus are done too..
It's coming back together now but it's all in the details which take time but not particularly visible. I've mounted and made up the brake reservoir fittings/pipes, cleaned up, painted the back sides and fitted bumpers and also fitted new body trim and wing beading. I'm on a bit of a push as we are in the middle of a house sale/purchase so soon I'll have a double garage to play in but I need to get the car in a good state to transport it round there somehow..
Gassing Station | Readers' Cars | Top of Page | What's New | My Stuff