Craig's 328i Sport - e36 Track Car Build Thread
Discussion


Well I finally got round to replacing the passengers’ side wheel bearing, first things first though before any work could commence I needed a wheel bearing. Phone the dealers and got a few quotes, now the bearing comes as a complete unit; hub with the bearing pressed into it. This certainly would make the job faster, but at the same time five times more expensive.
I decided to look into other alternatives, one been pressing a new bearing into my current hub. Now fortunately for me, I remembered I still had the 328i Sport hubs sat in the garage and began cross referencing parts on the off chance they are the same... and they are, bonus!!
So before I even decided to get the car up in the air, I thought it would be best if I split down the 328i hub ready for fitting. The job in itself was simple enough if you have the right tools the main one been a 46mm socket to loosen off the centre hub.
Start with removing the brake callipers then the brake disc, next use a screw driver to prise round the outside edge of the centre hub cap. I resorted to tapping all the way round it with a hammer and screw driver to break the seal, and then with a simple twist of a large flat bladed screw driver it simply popped out. With the cap removed the next step is to loosen the hub nut which will require a breaker bar at the very least, you may even have to resort to Mr Scaffolding Pipe too if it’s not budging, don’t forget to also bend the metal locking tab back before loosening or you’ll be there all night.
With the centre hub loose the next step should be simple, slide the hub off the front upright. If it fails to move with ease you may need a slide hammer, the most effecting slide hammer for this job is fit your brake disc onto the hub backwards with the wheel bolts in by a few threads and simply ‘bang’ the disc back and forth between the hub and the wheel bolts.
You should now have the hub off, and all the following parts;
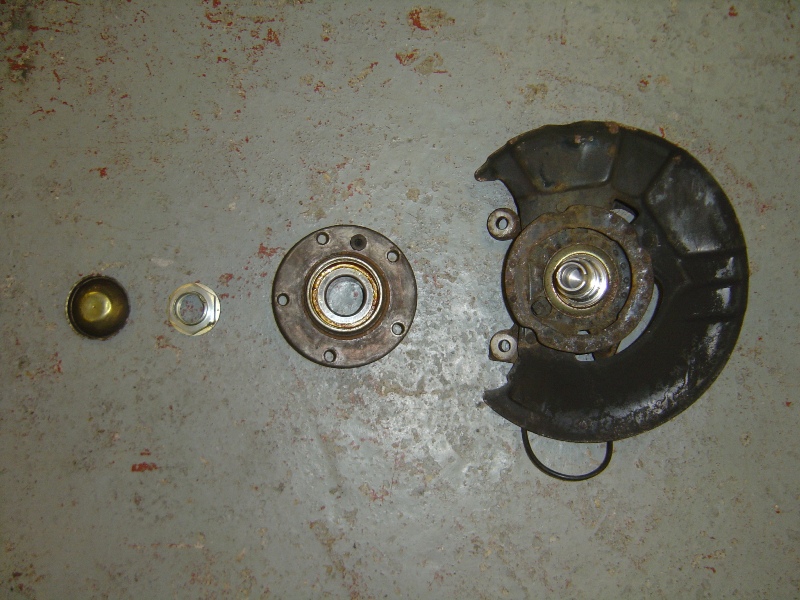
My 328i hub came off intact without any problems, so next step was to get the car up in the air and remove the same parts and slide on the new hub unit, simple, right!? No, when I attempted the task on the car which has the M3 Evo hubs I was left with the inner race off the wheel bearing firmly attached to the hub.
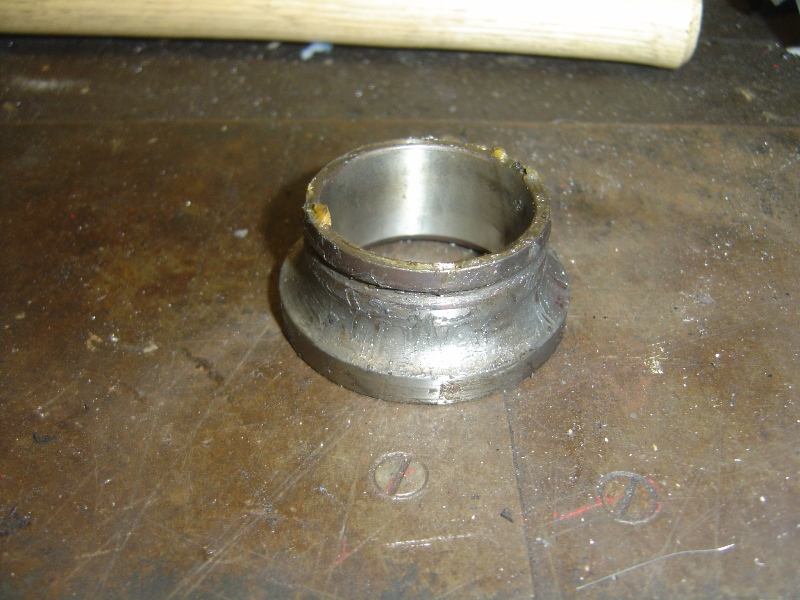
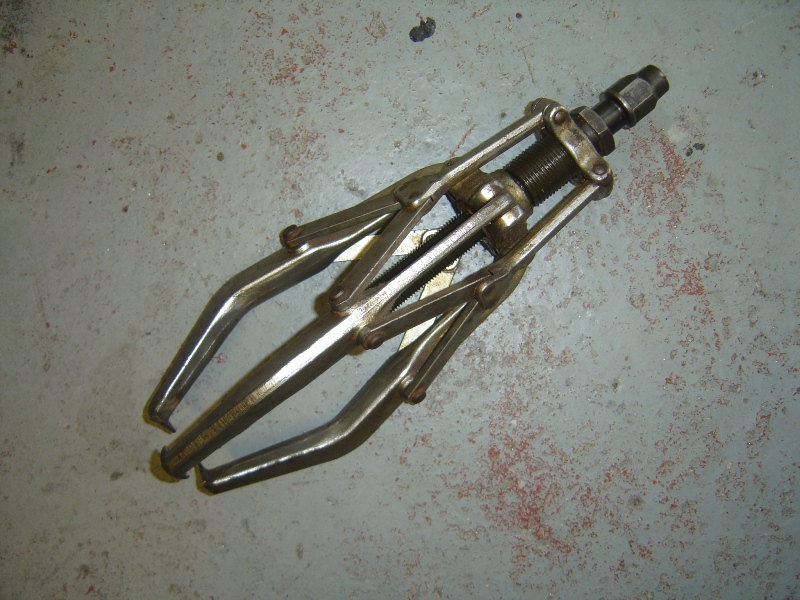
There is two ways in which this inner race could be removed, one was to cut a fine slot into the race with a dremel then simply split it with a chisel and a swift hammer blow the other method is to use a set of pullers with fine enough jaws to grab the machined lip on the inner race, you cannot get behind the race due to the brake dust shield been in the way. Believe it or not all my small pullers did not have fine enough jaws so I ended up resorting to this beastie which required two people (Thanks Dad!!);
I was now left with the old hub, inner race and seal off the car.
Now with the inner race off the car was ready for its new hub, I simply side the hub onto the upright, it required a few light hammer taps to get it sitting all the way on the shaft but jobs a good ‘un. Next was to fit the hub nut and torque it up to 300nM, refit the dust cap as well as the brake discs and callipers, fit the wheel and lower the car onto the ground and you’re done!
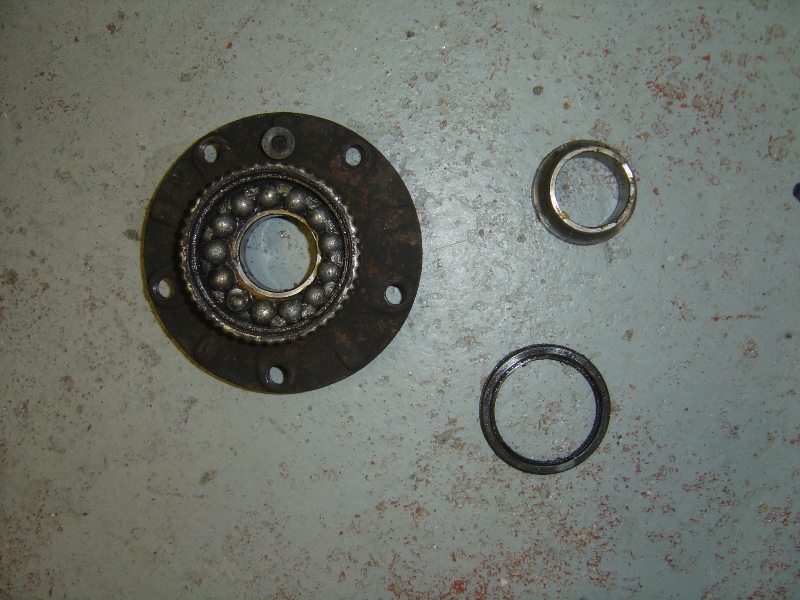
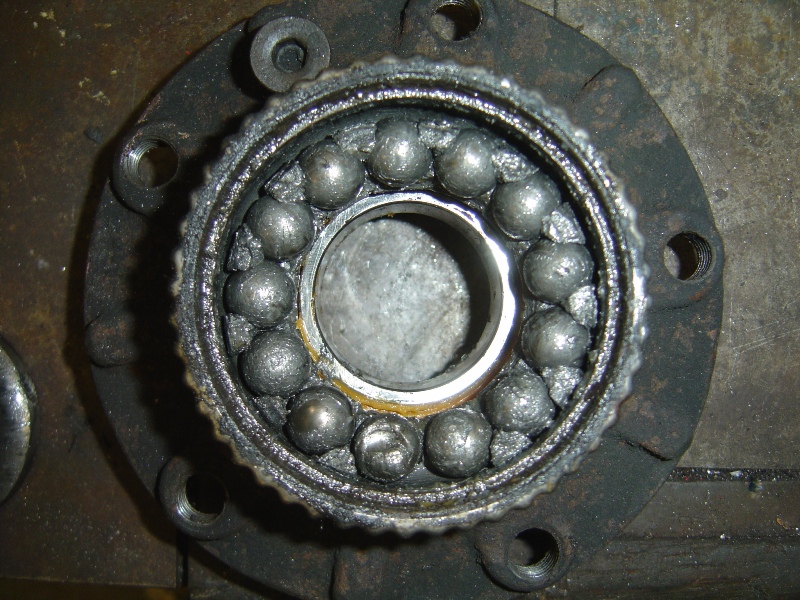
Here is my old bearing, you can see its shot inside just look at the ball bearing on the bottom of the picture. First sign of the problem came with a weird vibration which went away, jacked the car up and the bearing felt fine then it came back and got progressively worse. Upon the next check you could hear the difference between the sides, one bearing ran smooth, the other smooth but it had a grumble to it.
I also got round to one other minor task, on the way up the A19 after dropping off an e46 M3 CSL DSC unit to a guy who was in desperate need of one I lost a front kidney and the grill behind it, no idea how but fortunately I also had the old standard chrome ones which I took off.
First step was to wash it off the fairy liquid to remove all greases and grimes, next it was wet and dried down to give the surface a key and then I applied 3 coats of grey primer and 3 coats of gloss black paint. Unfortunately my camera died during this process so I only have the one picture.
Once again the car is back to 100%, apart from been used daily its next major outing is at RAF Barkston Heath for a sprint event, more on that later.
I decided to look into other alternatives, one been pressing a new bearing into my current hub. Now fortunately for me, I remembered I still had the 328i Sport hubs sat in the garage and began cross referencing parts on the off chance they are the same... and they are, bonus!!
So before I even decided to get the car up in the air, I thought it would be best if I split down the 328i hub ready for fitting. The job in itself was simple enough if you have the right tools the main one been a 46mm socket to loosen off the centre hub.
Start with removing the brake callipers then the brake disc, next use a screw driver to prise round the outside edge of the centre hub cap. I resorted to tapping all the way round it with a hammer and screw driver to break the seal, and then with a simple twist of a large flat bladed screw driver it simply popped out. With the cap removed the next step is to loosen the hub nut which will require a breaker bar at the very least, you may even have to resort to Mr Scaffolding Pipe too if it’s not budging, don’t forget to also bend the metal locking tab back before loosening or you’ll be there all night.
With the centre hub loose the next step should be simple, slide the hub off the front upright. If it fails to move with ease you may need a slide hammer, the most effecting slide hammer for this job is fit your brake disc onto the hub backwards with the wheel bolts in by a few threads and simply ‘bang’ the disc back and forth between the hub and the wheel bolts.
You should now have the hub off, and all the following parts;
My 328i hub came off intact without any problems, so next step was to get the car up in the air and remove the same parts and slide on the new hub unit, simple, right!? No, when I attempted the task on the car which has the M3 Evo hubs I was left with the inner race off the wheel bearing firmly attached to the hub.
There is two ways in which this inner race could be removed, one was to cut a fine slot into the race with a dremel then simply split it with a chisel and a swift hammer blow the other method is to use a set of pullers with fine enough jaws to grab the machined lip on the inner race, you cannot get behind the race due to the brake dust shield been in the way. Believe it or not all my small pullers did not have fine enough jaws so I ended up resorting to this beastie which required two people (Thanks Dad!!);
I was now left with the old hub, inner race and seal off the car.
Now with the inner race off the car was ready for its new hub, I simply side the hub onto the upright, it required a few light hammer taps to get it sitting all the way on the shaft but jobs a good ‘un. Next was to fit the hub nut and torque it up to 300nM, refit the dust cap as well as the brake discs and callipers, fit the wheel and lower the car onto the ground and you’re done!
Here is my old bearing, you can see its shot inside just look at the ball bearing on the bottom of the picture. First sign of the problem came with a weird vibration which went away, jacked the car up and the bearing felt fine then it came back and got progressively worse. Upon the next check you could hear the difference between the sides, one bearing ran smooth, the other smooth but it had a grumble to it.
I also got round to one other minor task, on the way up the A19 after dropping off an e46 M3 CSL DSC unit to a guy who was in desperate need of one I lost a front kidney and the grill behind it, no idea how but fortunately I also had the old standard chrome ones which I took off.
First step was to wash it off the fairy liquid to remove all greases and grimes, next it was wet and dried down to give the surface a key and then I applied 3 coats of grey primer and 3 coats of gloss black paint. Unfortunately my camera died during this process so I only have the one picture.
Once again the car is back to 100%, apart from been used daily its next major outing is at RAF Barkston Heath for a sprint event, more on that later.
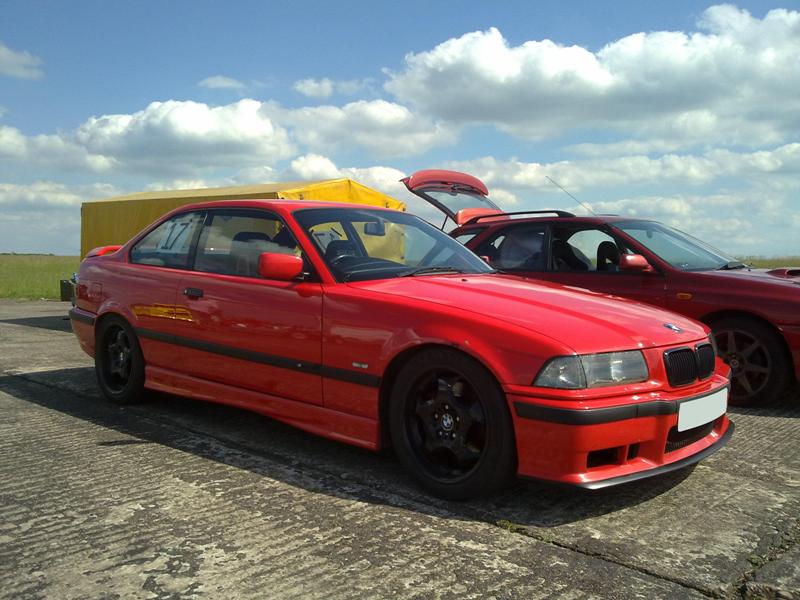
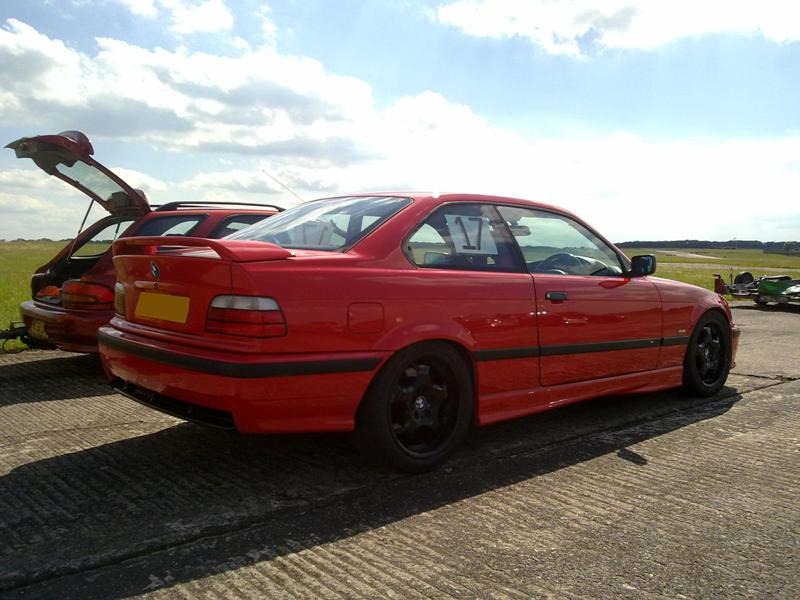
I mentioned last update that the cars next major outing was going to be at RAF Barkston Heath, well that’s been and gone which means an update is due. But where to start!?!
I’m rather new to sprint events, I really didn’t think it would take my fancy however a friend of mine put my name down for this event as one; it’d be a good weekend away with the lads and two; it was cheap, around £100.00 for two days on track and three; I think he wanted to see how I’d react in a competitive environment.
Fast forward onto Saturday, nice and early start set off at around 5:30am and arrived at Barkston Heath for around 8:00am. Pulled up at the gates and we were all escorted onto base, there was very few road car’s at this point everyone was towing a trailer with their pride and joy hidden undercover so I had no idea what the competition would be. Turned out that Saturday was a 16v Mini Owners Club track day followed by timed runs in the afternoon and Sunday was an RAF MSA event.
As everyone was unloading their Caterhams, Westfields and Mini’s with an array of engine conversions; Honda VTECs, Suzuki Hyabusas and Vauxhall Valvers I sat about wondering what the hell I had signed myself up for, and that feeling was even more pronounced when I saw the circuit... TIGHT is one of many words to describe it along with tactical, testing and challenging especially in a lardy road going BMW.
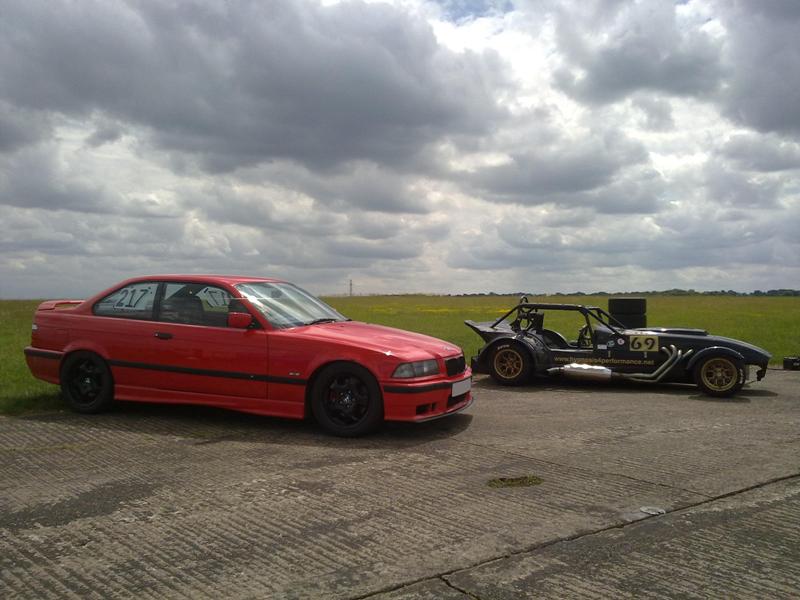
But this didn’t phase me, so I signed on and proceeded to number up the car;
First run out really did illustrate just how tight the circuit was, and the chicanes were so tight I had visions or me re-modelling them during the course of the day, in fact my first question to the clerk of the course was ‘are those white marker poles plastic or metal!?’ after all I didn’t want to risk serious body damage.
Fortunately for me they were plastic, as I proceeded to hit my first one. However the one I hit was on a small square base that wasn’t set level, so it ‘twanged’ up against the car making a neat white mark (which would later polish out) one thing it showed I was using as much as the track as physically possible, and I was consistent too as I hit it a second time *doh*.
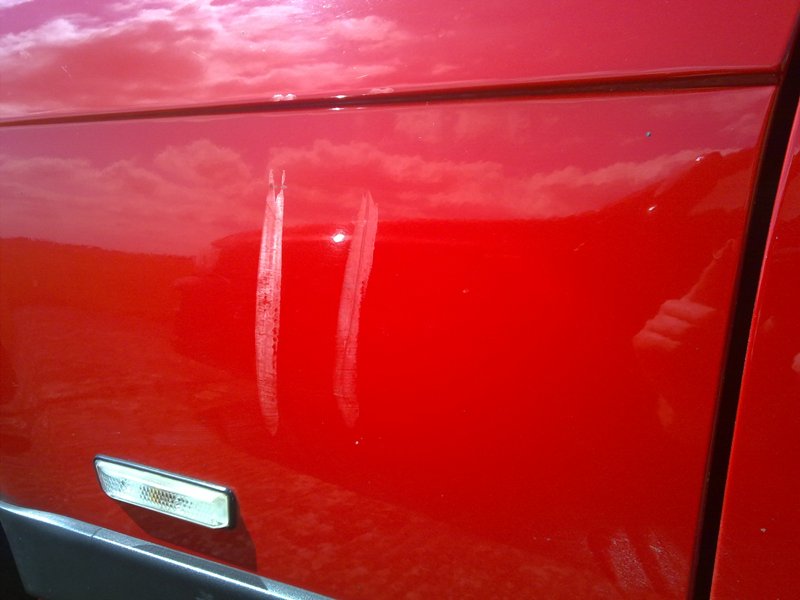
I was obviously getting faster as the day progressed as the white lines got further and further down the wing!!
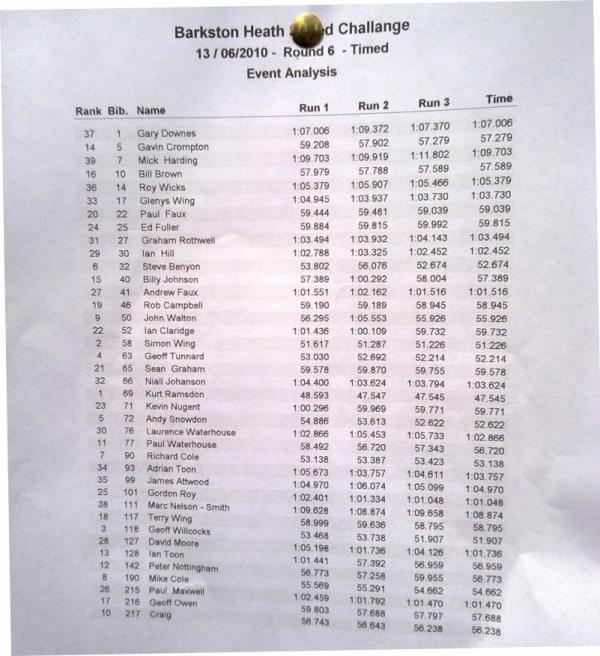
Afternoon came about and it was first of the timed runs, at first I didn’t pay much attention to the times and just used the runs as more track time and to play about with car control. However after I was informed the BMW wasn’t dead last, and in fact it was actually quiet far up front I started to take an interested and was hooked checking my times after each run, I had officially been bitted by the sprint bug.
Highlight of the day for me was also taking my friends purpose built V8 Westfield for a run, my god what a car!!
Sunday morning came thick and fast, and after a fantastic BBQ and evening with the 16v Mini Owners Club I was ready for the RAF MSA sprint. This was a whole different kettle of fish, most the cars from Saturday were competing but there was a lot more saloons and hatchbacks which made the competition a bit fairer but at the same time inside I didn’t want to be beaten. With the sign on and drivers briefing out of the way it was time to get down to business.
The course was slightly different for Sunday the last corner was a lot faster and this proved to be advantageous to me in the BMW as I could lay down some of its power. First few runs and it looked as if I had some stiff competition, I needed to switch my brain from track day mode into race day and stop worrying about getting the car home and just drive it properly. After a quick mental pep talk with myself I started to brake later and hold the power for longer and as the times showed this was paying off.
As the day came to rest and the final times were up and overall the BMW had come 10th out of 39 and in its class it was second only beaten by a really nicely prepared Subaru which looked far from standard, was I happy? You bet I was.
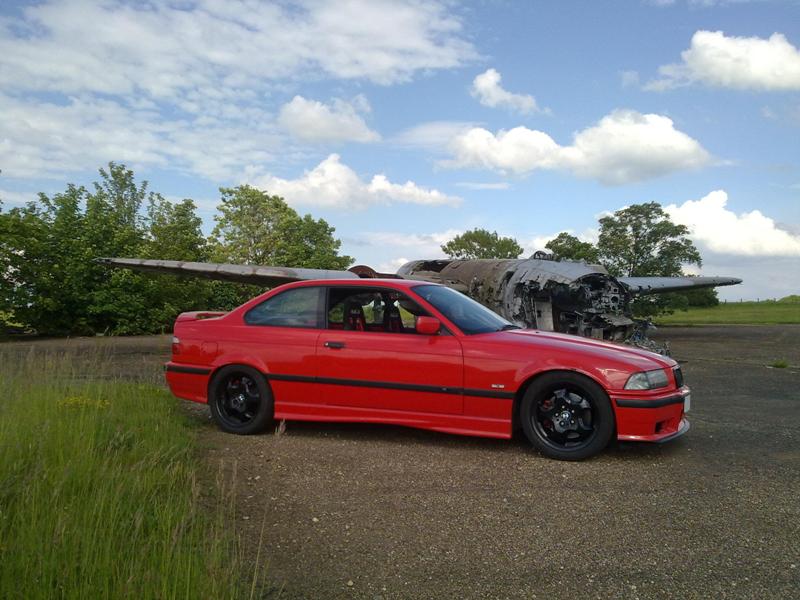
I also couldn’t resist getting this picture to, as it’s not often you get this kind of opportunity.
Sorry for the long post that really doesn’t have much about the build of the car, but after all its summer and this is the time where the car should be used. Next weekend it’s back out in Germany and then maybe after its return I’ll look at finishing off the interior and then planning the next moves.
I’m rather new to sprint events, I really didn’t think it would take my fancy however a friend of mine put my name down for this event as one; it’d be a good weekend away with the lads and two; it was cheap, around £100.00 for two days on track and three; I think he wanted to see how I’d react in a competitive environment.
Fast forward onto Saturday, nice and early start set off at around 5:30am and arrived at Barkston Heath for around 8:00am. Pulled up at the gates and we were all escorted onto base, there was very few road car’s at this point everyone was towing a trailer with their pride and joy hidden undercover so I had no idea what the competition would be. Turned out that Saturday was a 16v Mini Owners Club track day followed by timed runs in the afternoon and Sunday was an RAF MSA event.
As everyone was unloading their Caterhams, Westfields and Mini’s with an array of engine conversions; Honda VTECs, Suzuki Hyabusas and Vauxhall Valvers I sat about wondering what the hell I had signed myself up for, and that feeling was even more pronounced when I saw the circuit... TIGHT is one of many words to describe it along with tactical, testing and challenging especially in a lardy road going BMW.
But this didn’t phase me, so I signed on and proceeded to number up the car;
First run out really did illustrate just how tight the circuit was, and the chicanes were so tight I had visions or me re-modelling them during the course of the day, in fact my first question to the clerk of the course was ‘are those white marker poles plastic or metal!?’ after all I didn’t want to risk serious body damage.
Fortunately for me they were plastic, as I proceeded to hit my first one. However the one I hit was on a small square base that wasn’t set level, so it ‘twanged’ up against the car making a neat white mark (which would later polish out) one thing it showed I was using as much as the track as physically possible, and I was consistent too as I hit it a second time *doh*.
I was obviously getting faster as the day progressed as the white lines got further and further down the wing!!
Afternoon came about and it was first of the timed runs, at first I didn’t pay much attention to the times and just used the runs as more track time and to play about with car control. However after I was informed the BMW wasn’t dead last, and in fact it was actually quiet far up front I started to take an interested and was hooked checking my times after each run, I had officially been bitted by the sprint bug.
Highlight of the day for me was also taking my friends purpose built V8 Westfield for a run, my god what a car!!
Sunday morning came thick and fast, and after a fantastic BBQ and evening with the 16v Mini Owners Club I was ready for the RAF MSA sprint. This was a whole different kettle of fish, most the cars from Saturday were competing but there was a lot more saloons and hatchbacks which made the competition a bit fairer but at the same time inside I didn’t want to be beaten. With the sign on and drivers briefing out of the way it was time to get down to business.
The course was slightly different for Sunday the last corner was a lot faster and this proved to be advantageous to me in the BMW as I could lay down some of its power. First few runs and it looked as if I had some stiff competition, I needed to switch my brain from track day mode into race day and stop worrying about getting the car home and just drive it properly. After a quick mental pep talk with myself I started to brake later and hold the power for longer and as the times showed this was paying off.
As the day came to rest and the final times were up and overall the BMW had come 10th out of 39 and in its class it was second only beaten by a really nicely prepared Subaru which looked far from standard, was I happy? You bet I was.
I also couldn’t resist getting this picture to, as it’s not often you get this kind of opportunity.
Sorry for the long post that really doesn’t have much about the build of the car, but after all its summer and this is the time where the car should be used. Next weekend it’s back out in Germany and then maybe after its return I’ll look at finishing off the interior and then planning the next moves.
I'll hopefully be doing a few more events over the course of the year!
Here's a video from the sprint weekend; http://www.youtube.com/watch?v=sTuiVAy8Wu8
Also worth looking at the V8 Westfield video as that car is an animal!
Here's a video from the sprint weekend; http://www.youtube.com/watch?v=sTuiVAy8Wu8
Also worth looking at the V8 Westfield video as that car is an animal!
Edited by Craig! on Thursday 15th July 21:49
This thread is long overdue an update, although not too much has changed I’ve just spent the last few months enjoying the car and making the most of the Summer / Autumn months.
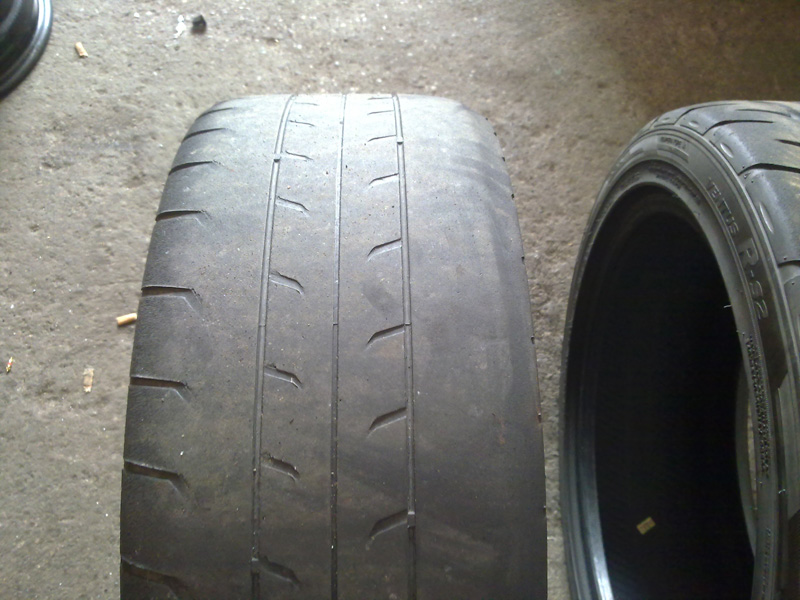
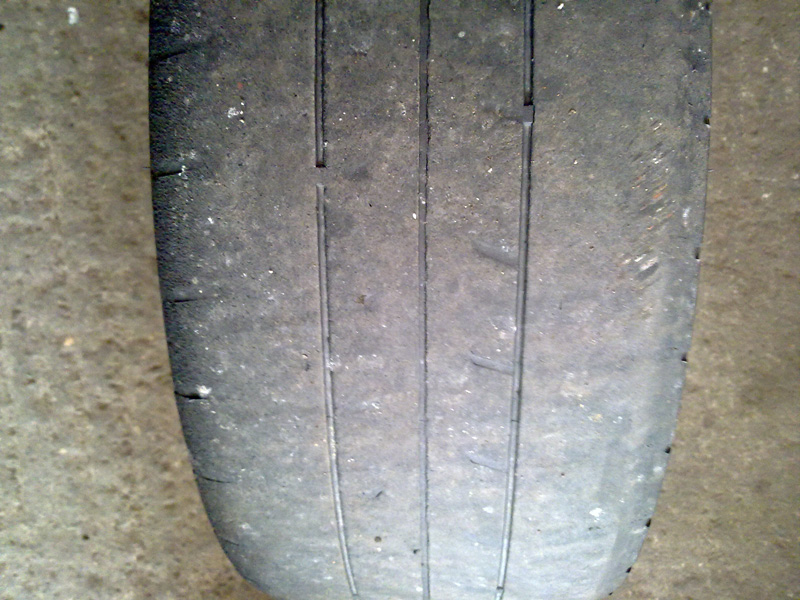
First up, the Kumho V70a’s... I managed to get 8,000 miles out of the front tyres, and 11,000 miles out of the rears which to me is pretty impressive given that their track day tyres. Not to mention the fact that the car is used on track on regularly and driven spiritedly on most outings. As you can see from the pictures below they wore pretty evenly too, a sign that the geometry is correct.
Would I use these tyres again, yes without a doubt!!
At this very moment in time though, now the bad weather is here, I have a full set of Falken 452’s fitted and I also rate these, exceptional wet grip and feedback and pretty good in the dry too. A great ‘all year’ tyre which again I’d recommend.
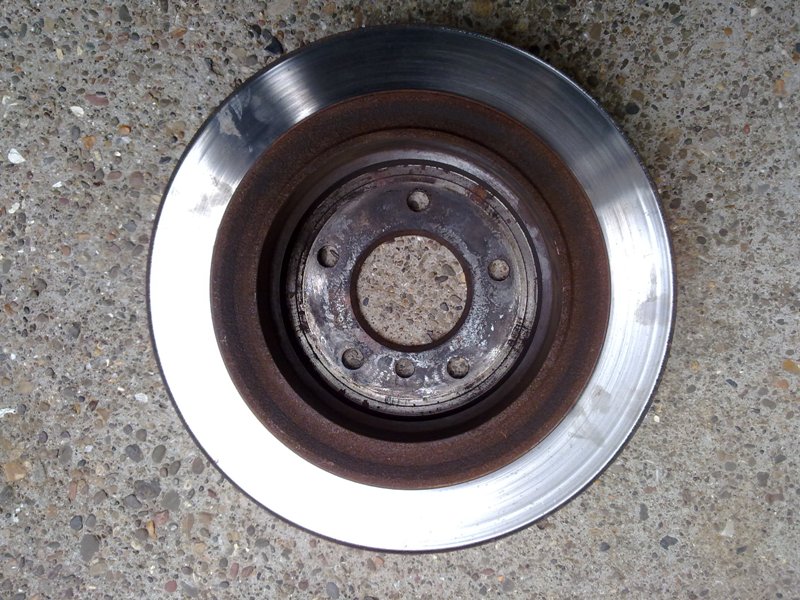
The rear brake pads were finally up for renewal, upon changing them I noticed some cracks in the rear discs however the camera hasn’t really captured them.
I managed to get outstanding mileage with the Mintex 1155 front and 1144 rear set up, the fronts far out lasted the rears and still had 50% life left, but I changed them anyway due to the fact the front discs needed replacing.
Other than that, the only other work the car has had is another oil and filter change its still going strong at 177,000 miles.
First up, the Kumho V70a’s... I managed to get 8,000 miles out of the front tyres, and 11,000 miles out of the rears which to me is pretty impressive given that their track day tyres. Not to mention the fact that the car is used on track on regularly and driven spiritedly on most outings. As you can see from the pictures below they wore pretty evenly too, a sign that the geometry is correct.
Would I use these tyres again, yes without a doubt!!
At this very moment in time though, now the bad weather is here, I have a full set of Falken 452’s fitted and I also rate these, exceptional wet grip and feedback and pretty good in the dry too. A great ‘all year’ tyre which again I’d recommend.
The rear brake pads were finally up for renewal, upon changing them I noticed some cracks in the rear discs however the camera hasn’t really captured them.
I managed to get outstanding mileage with the Mintex 1155 front and 1144 rear set up, the fronts far out lasted the rears and still had 50% life left, but I changed them anyway due to the fact the front discs needed replacing.
Other than that, the only other work the car has had is another oil and filter change its still going strong at 177,000 miles.
This next update is one not normally associated with a track car; paintwork restoration. I decided in August that the BMW was starting to look a little ropey for my liking due to all the tar, rubber and road grime so one weekend I set about cleaning it.
Now this won’t interest most but I started with washing the car, moved onto tar removing then the clay bar. Once these steps were done the paintwork was corrected with Meguires Polish #83 and Speedglaze #80 using a Kestrel DAS6 random orbital polisher with a mixture of Meguires, 3M and Lake County pads. The final steps were to treat all the black trims and give the car two coats of Dodo Juice – Purple Haze wax.
Below are the final results.
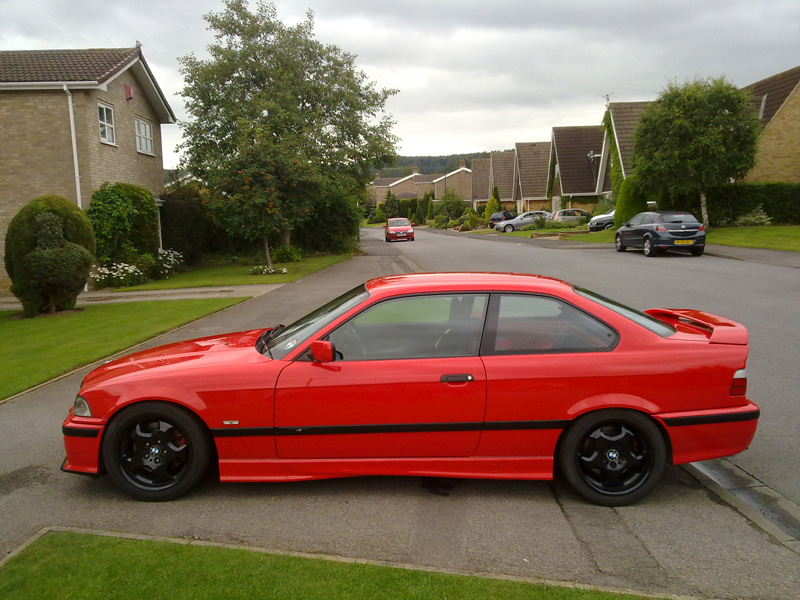
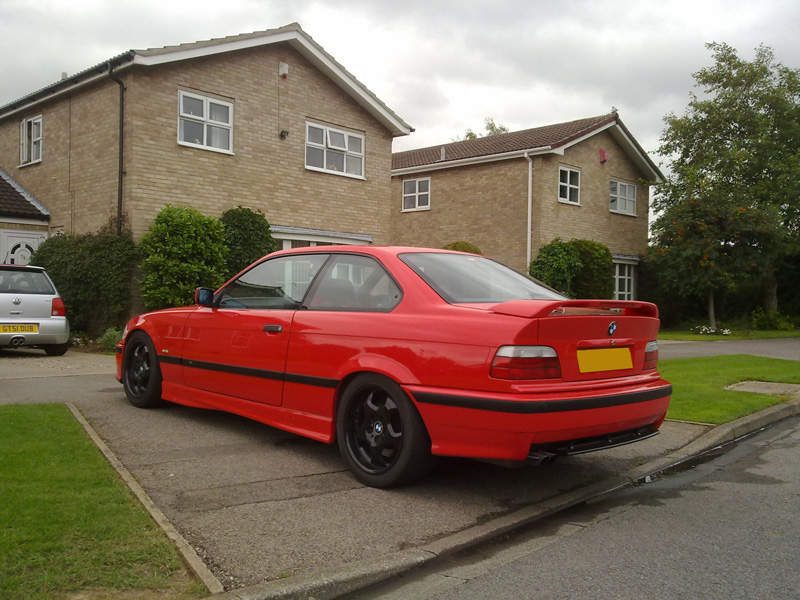
Couldn’t resist these two shots!!
Now this won’t interest most but I started with washing the car, moved onto tar removing then the clay bar. Once these steps were done the paintwork was corrected with Meguires Polish #83 and Speedglaze #80 using a Kestrel DAS6 random orbital polisher with a mixture of Meguires, 3M and Lake County pads. The final steps were to treat all the black trims and give the car two coats of Dodo Juice – Purple Haze wax.
Below are the final results.
Couldn’t resist these two shots!!
For awhile now I had planned to do track days at both the Nurburgring and Spa-Francorchamps, in April I was lucky enough to do the first Destination Nurburgring and now, after many visits to Spa as a passenger or additional driver I finally bit the bullet and booked for Monday 4th October through Circuit-Days.
The trip first involved a few days socialising at Nurburg, from the moment I left the house till the point we arrived in Germany it like been stuck in India during monsoon season! I feared that it was going to be a wet weekend, but the weather gods were on our side and as we rolled up at Adenau the weather was damp and foggy but the rain had eased up. The weekend just got better from there, on Saturday I was sat in a queue for fuel and the temperature gauge read 26.5 degrees in the baking sunshine!!!
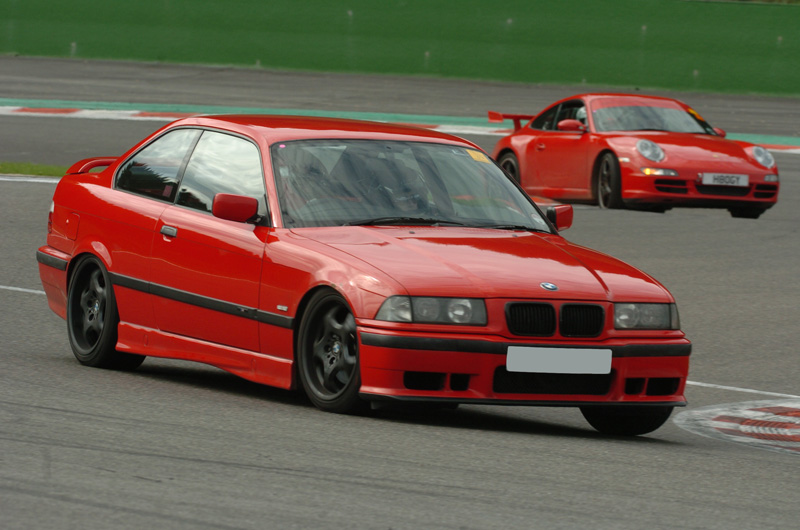
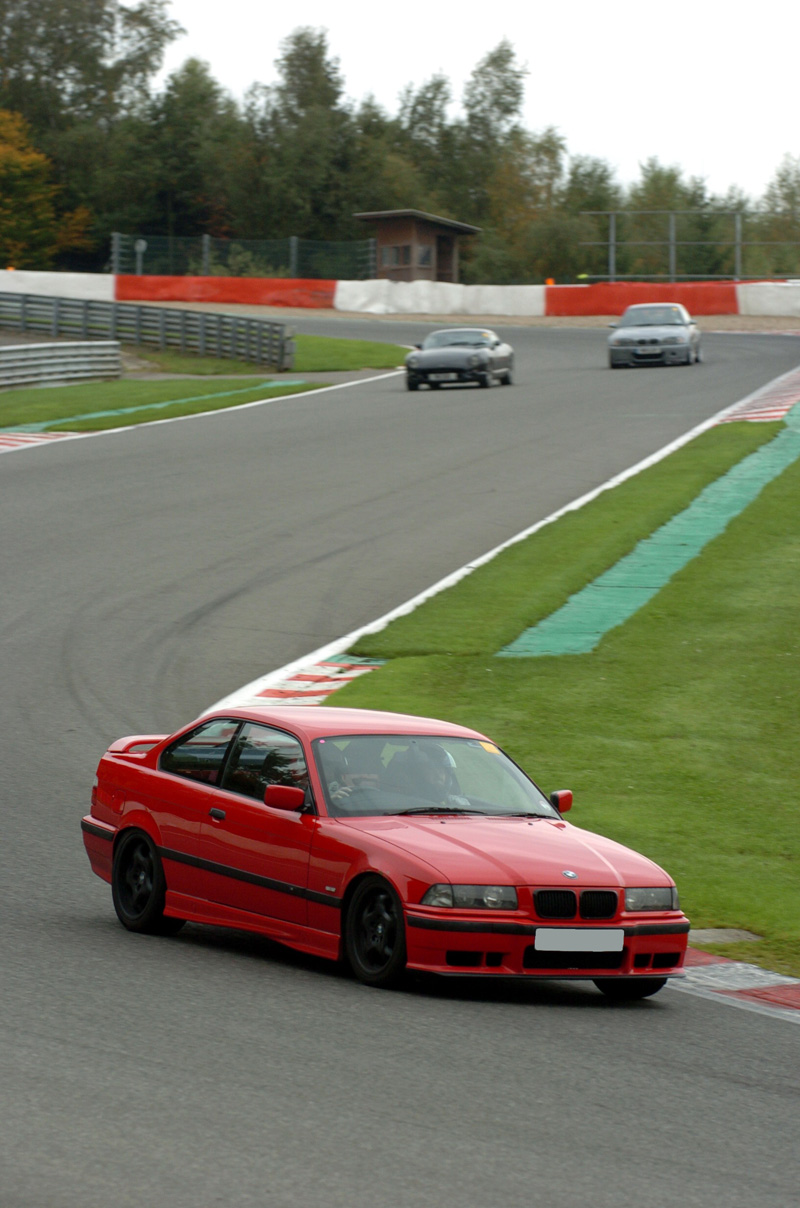
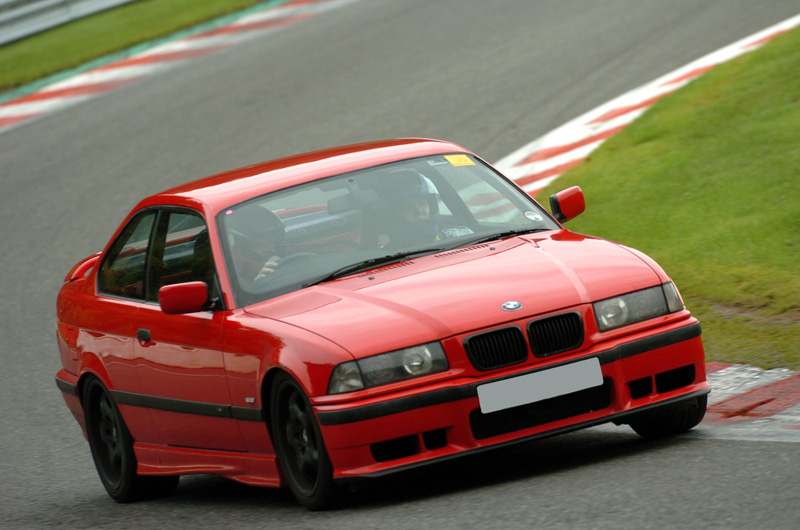
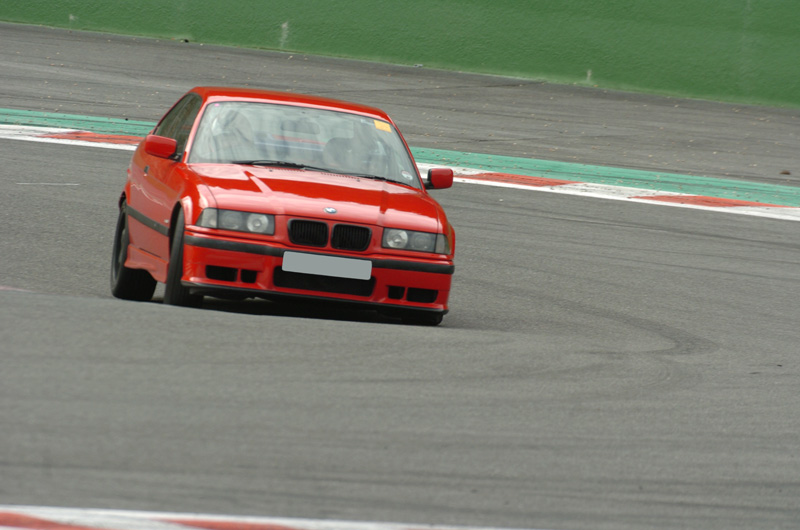
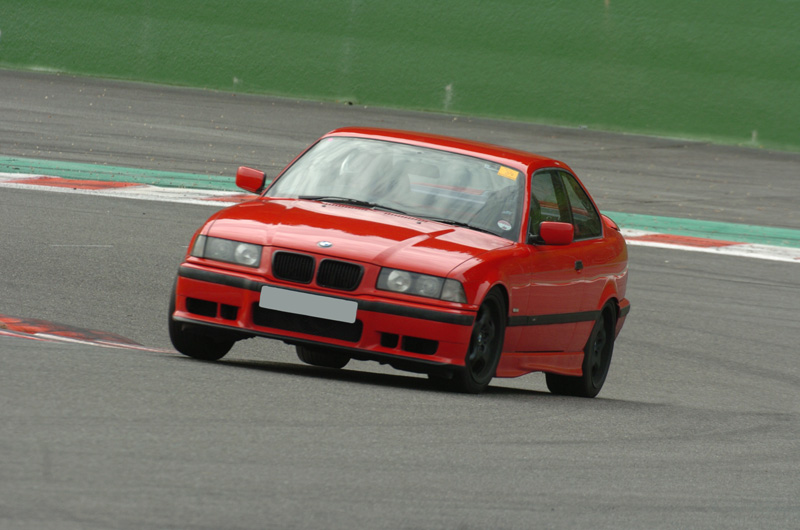
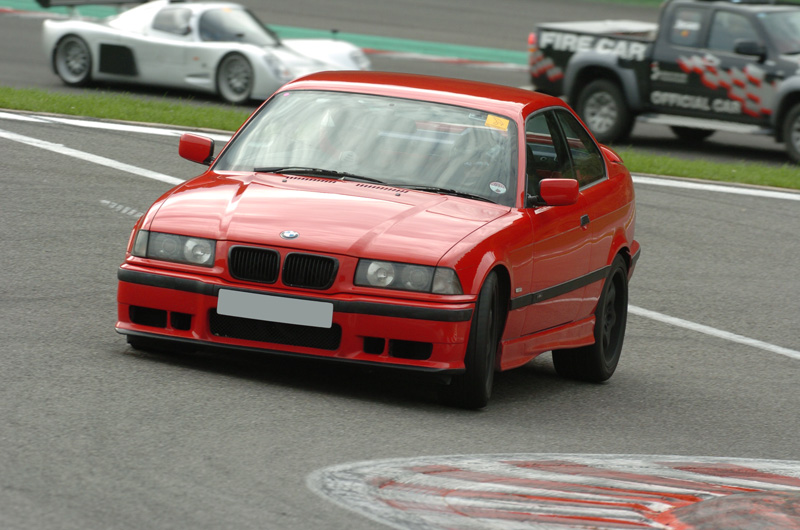
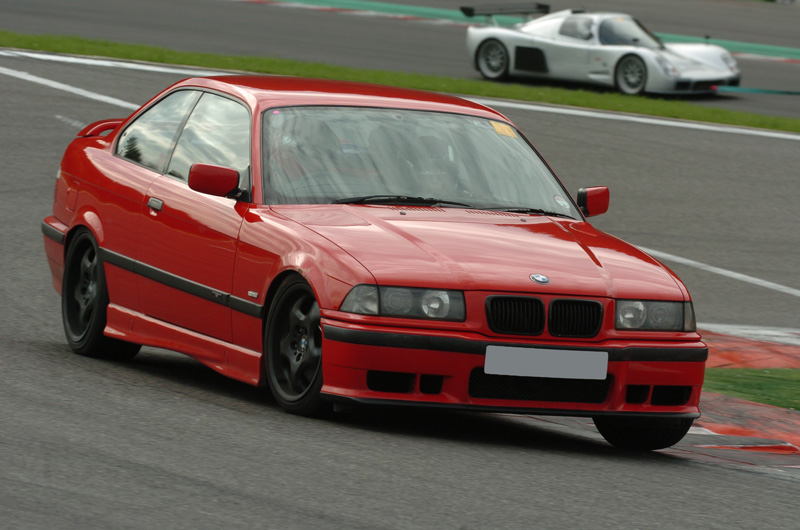
Monday came, and we made it to Spa just in time after a few minor detours. Signed on, completed the drivers briefing and then after a few sighting laps we were good to go... they say pictures speak a thousand words;
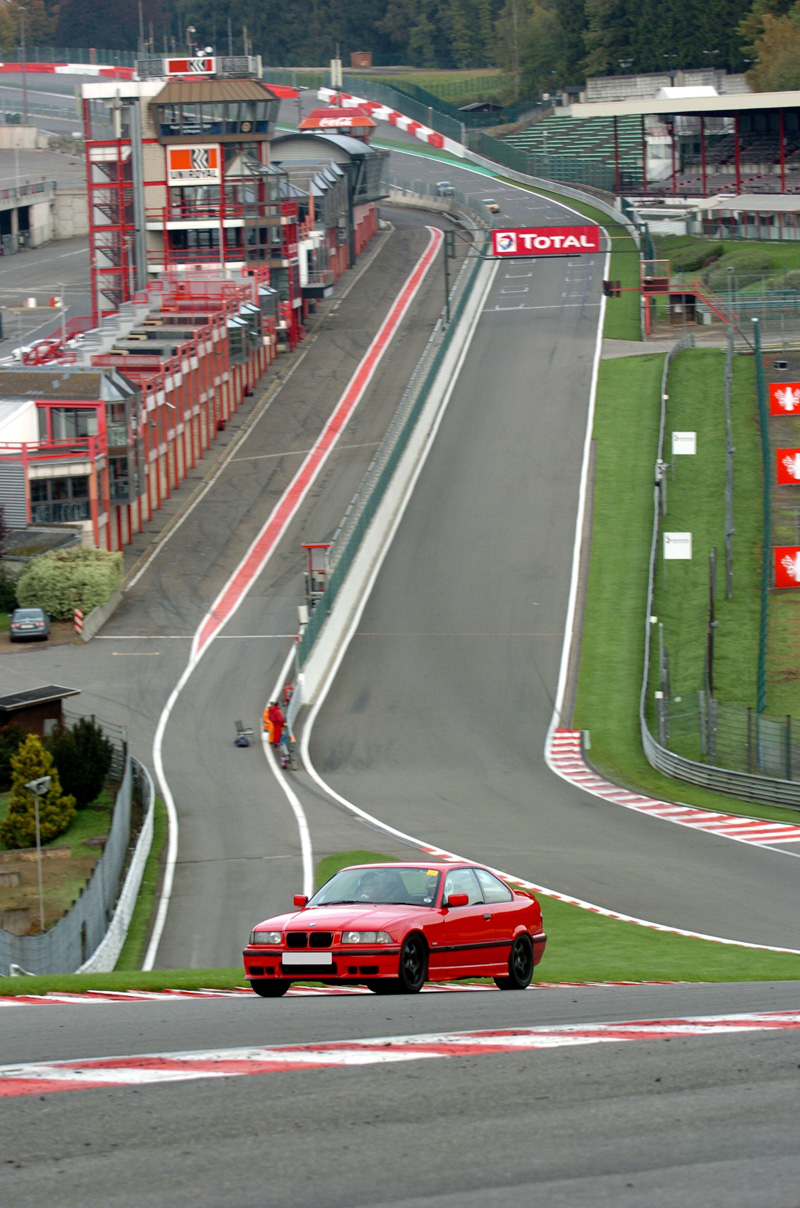
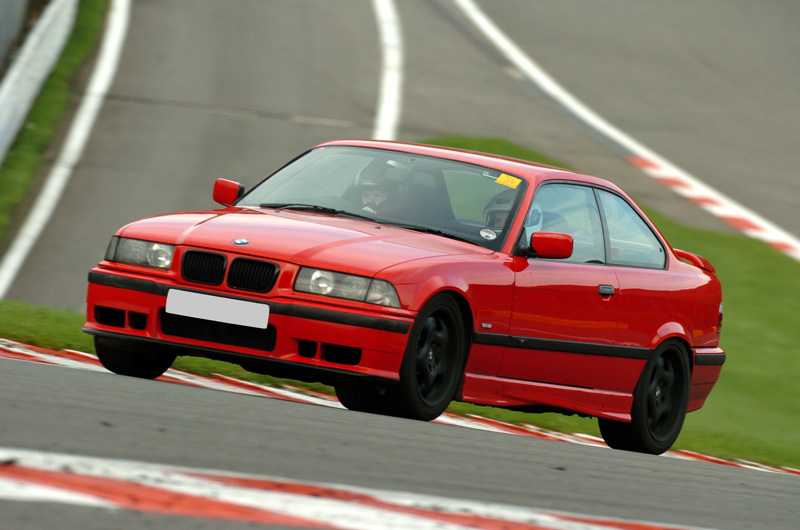
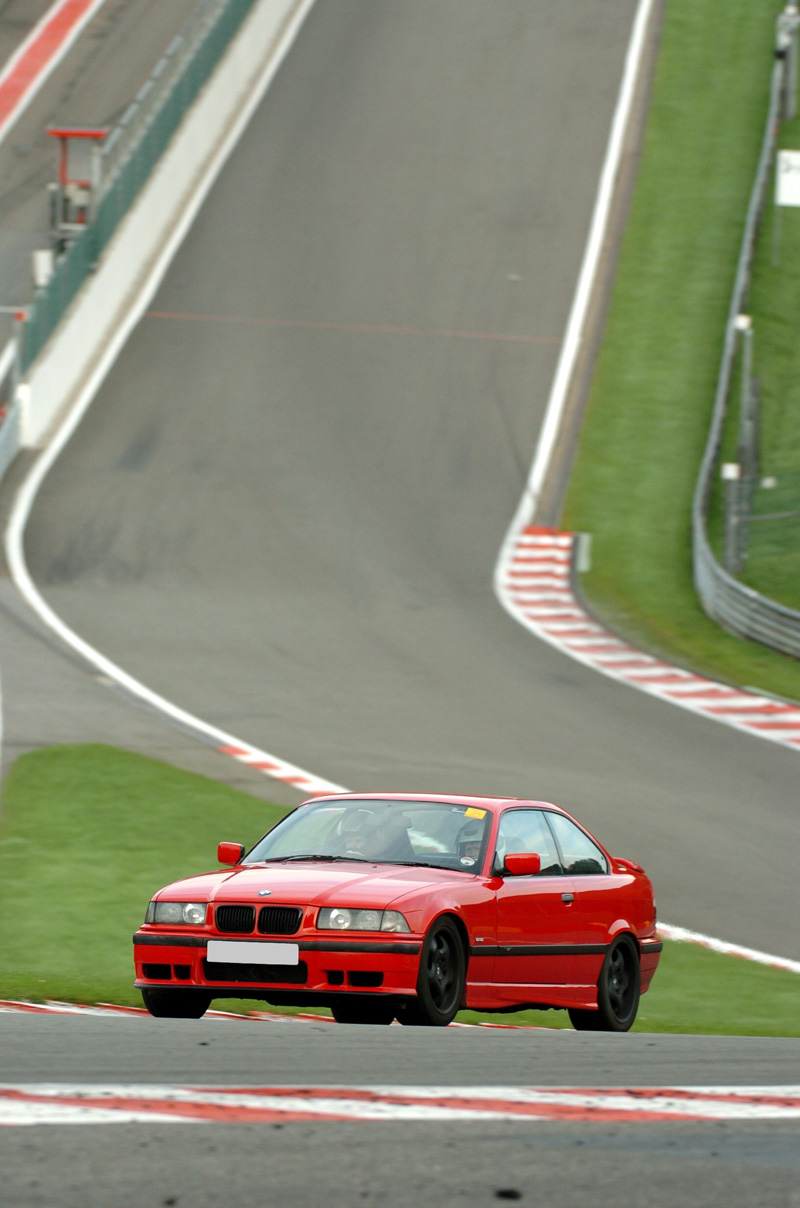
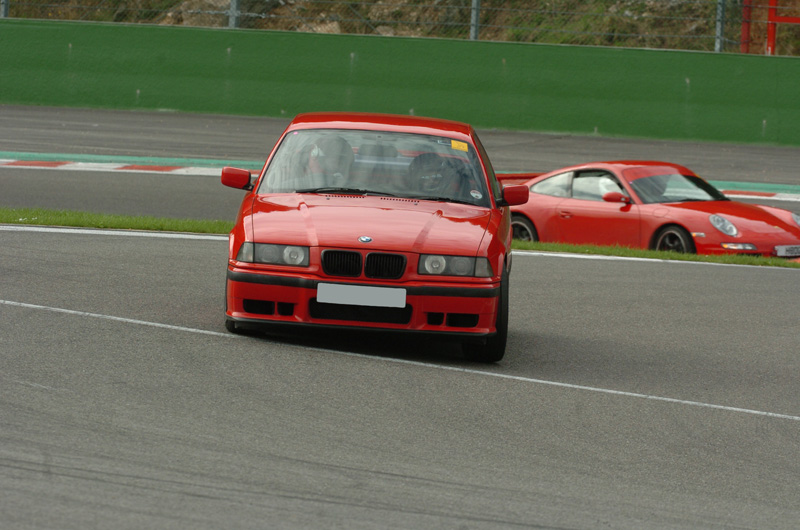
The day was not without drama, we decided that the latest we could leave for the ferry port was 15:30 in order to make it in good time. I decided at 15:10 to do one last session, famous last words I guess but at 15:24 I saw the coolant light creep and amongst a lot of swearing I pulled over to find that the car had burst a coolant hose!!!
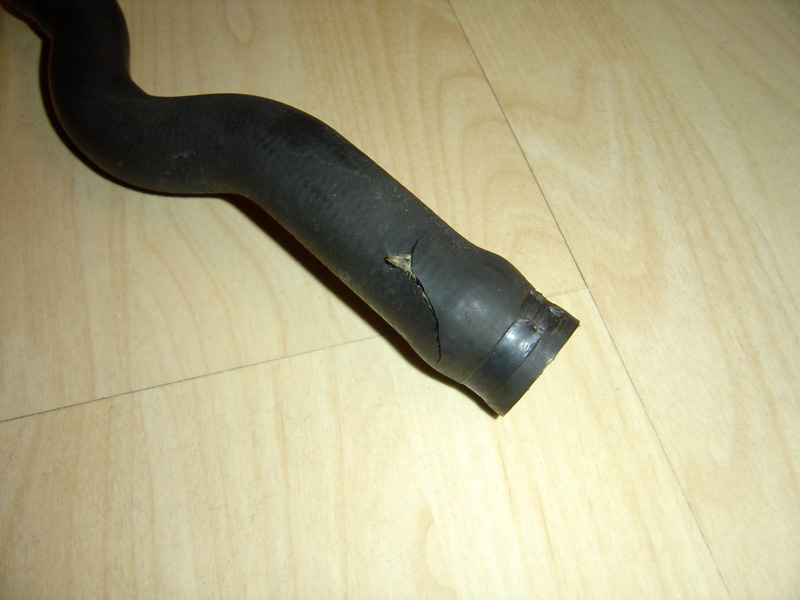
Panic set in, but fortunately the whole group chipped in and we managed to by-pass the hose that went from the block into the heater matrix valve using one of the existing pipes, this would leave the car without a heater but still least it would get us home. We had to make another sacrifice, the scuttle panel cover had to be cut off as we could not get the wipers to release, but this is easily replaced. Work complete the car was filled with coolant (read: tap water) and it was time to go, we left Spa at 15:57 and had some time to make up, but fortunately made the ferry with 6 minutes to spare!
All in all had a fantastic weekend, already planning to do some more days at Spa it’s a great circuit and gives a different ‘buzz’ to the ‘Ring, I’d happily drive both most weekend and not get bored!
The trip first involved a few days socialising at Nurburg, from the moment I left the house till the point we arrived in Germany it like been stuck in India during monsoon season! I feared that it was going to be a wet weekend, but the weather gods were on our side and as we rolled up at Adenau the weather was damp and foggy but the rain had eased up. The weekend just got better from there, on Saturday I was sat in a queue for fuel and the temperature gauge read 26.5 degrees in the baking sunshine!!!
Monday came, and we made it to Spa just in time after a few minor detours. Signed on, completed the drivers briefing and then after a few sighting laps we were good to go... they say pictures speak a thousand words;
The day was not without drama, we decided that the latest we could leave for the ferry port was 15:30 in order to make it in good time. I decided at 15:10 to do one last session, famous last words I guess but at 15:24 I saw the coolant light creep and amongst a lot of swearing I pulled over to find that the car had burst a coolant hose!!!
Panic set in, but fortunately the whole group chipped in and we managed to by-pass the hose that went from the block into the heater matrix valve using one of the existing pipes, this would leave the car without a heater but still least it would get us home. We had to make another sacrifice, the scuttle panel cover had to be cut off as we could not get the wipers to release, but this is easily replaced. Work complete the car was filled with coolant (read: tap water) and it was time to go, we left Spa at 15:57 and had some time to make up, but fortunately made the ferry with 6 minutes to spare!
All in all had a fantastic weekend, already planning to do some more days at Spa it’s a great circuit and gives a different ‘buzz’ to the ‘Ring, I’d happily drive both most weekend and not get bored!
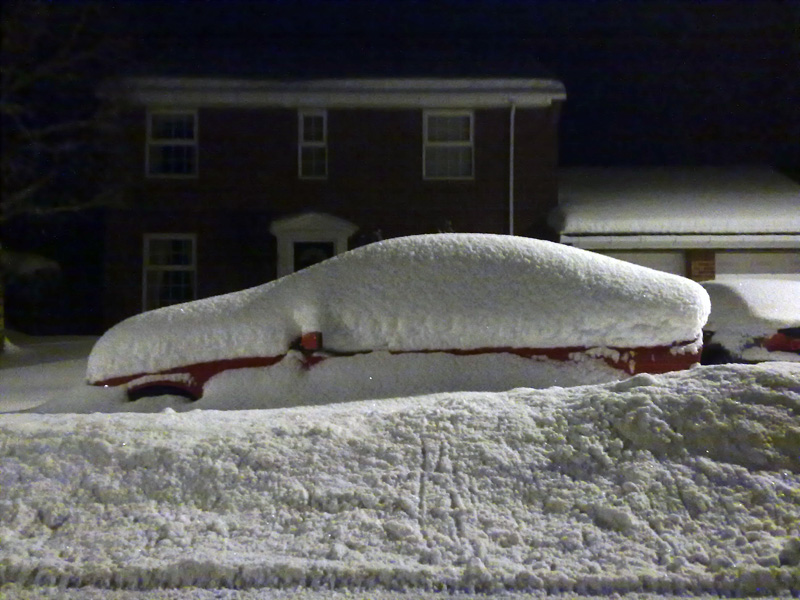
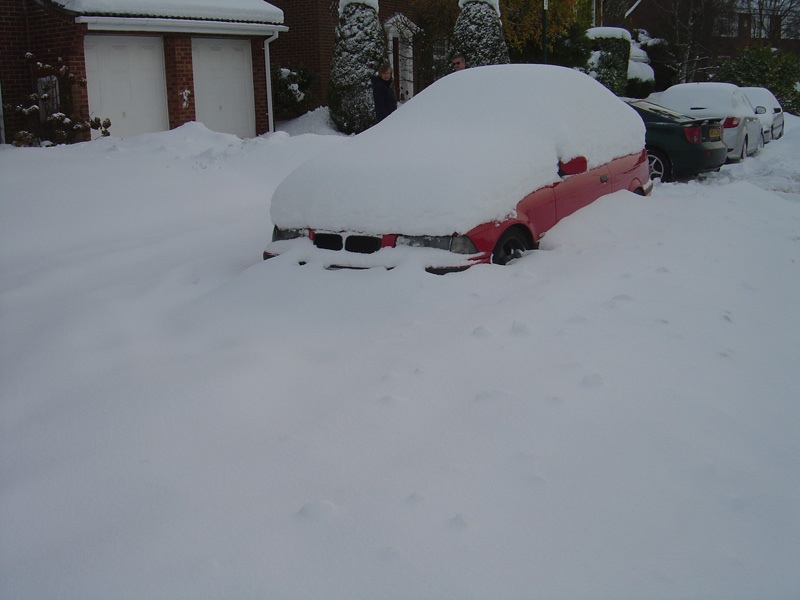
Well winters well and truly arrived, had a planned outing at Mallory Park booked for the 28th of November but that got cancelled due to the snow and the cars barely moved a wheel since then!
I managed to pick up a Rover 400 cheap, which very quickly got nicknamed Snover R400, to use through the snowy months... that is if it lasts that long, its verging on the edge of the dreaded head gasket failure and the massive mounds of snow I’ve rammed it through have started to pull its exhaust off at the flexi-pipe!
Anyway, less Rover talk; I now need to decide what to do with the BMW whilst it’s off the road. Do I leave it as it is, keep using it till it dies then let its soul rest in scrap heaven or do I spend some money on the old girl? To get the car exactly to how I want it to be, at the bare minimum would involve replacing the suspension (again!), fitting a roll-cage, fitting a different steering wheel, fitting a GT splitter and spoiler, replacing a rusty wing and maybe sort a few bodywork niggles out before the tin worm starts to spreads. This all costs money and that doesn’t take into account the worry that the car is now on 182,000 miles and could be due a clutch / gearbox / engine at any moment.
Decisions, decisions... What I do, like, no LOVE about this car is the fact that its stood for 4 weeks under a huge mound of snow and all I did was clear the snow, turn the key in the ignition and it fired straight into life as if it has only been run the day before!
Its moments like these that make me want to stick it out, keep the car and turn it into my vision of a perfect e36.
Think I'm slowly coming round to the idea of keeping it, I'll be in touch Rich about a few things as may need some parts and advice if I do keep it. You just leaving the silver 328i as it is for next year then?
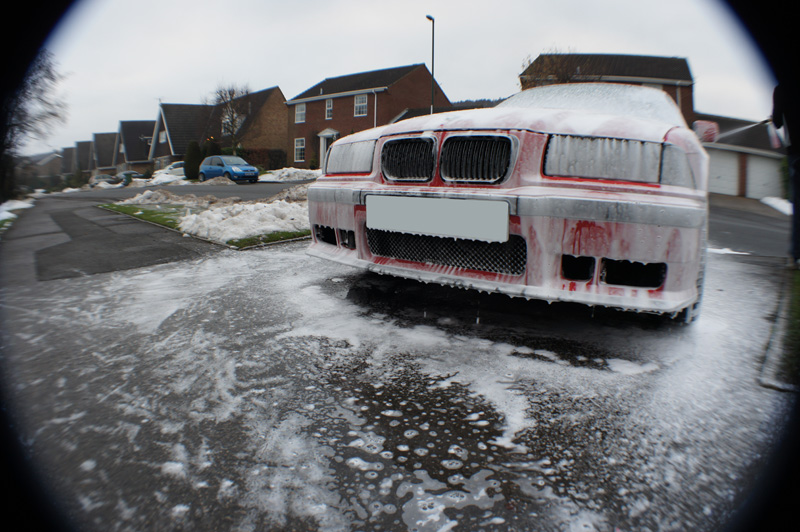
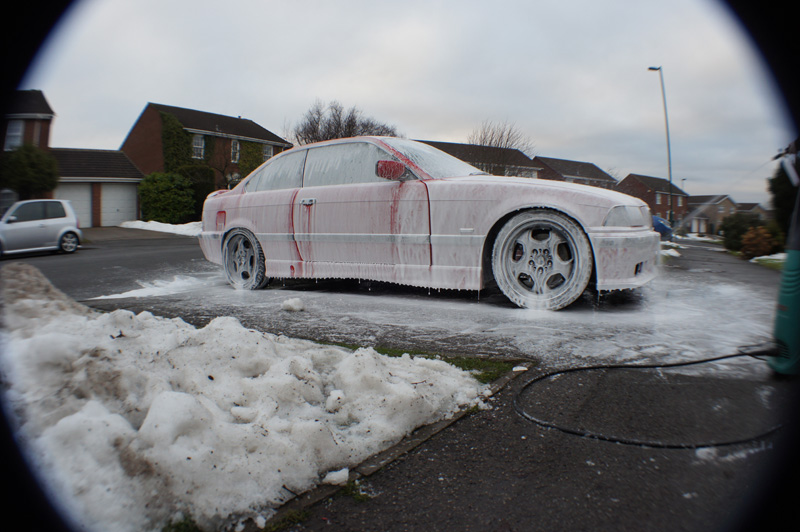
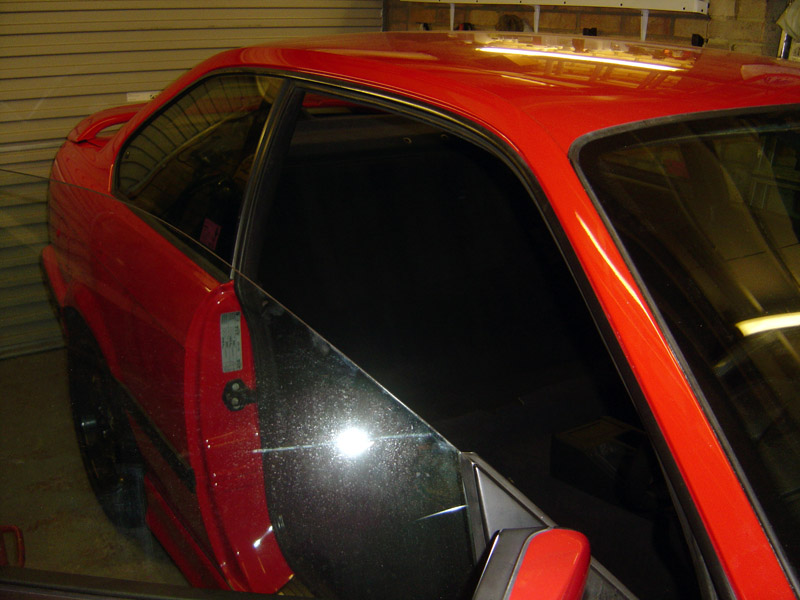
In a bid to motivate myself into finishing off the car properly I decided to give it a good winter once over to remove any of the salt that might have been sat feeding the tin worm. Not much of an update, just any excuse to post a picture I guess... ohh and my brother was dying to try out his new fish eye lens.
Cleaning the car also gave me the chance to see how the shell is standing up to the winter conditions, to be honest its fairing up well if I was to be fussy there’s two small chips on the doors that are slightly starting to bubble, and one of the rear arches looks like it’s getting a trace of bubbling on the inside edge. Driver wing is shot, but I knew about that as this was the only flaw with the car when I first bought it.
I think if I go ahead and finish the car off I’ll have to seriously consider either leaving the bodywork be (after all, it’s a track car!) or going the whole hog and getting it all sorted at once!
Well I guess it’s time for another update;
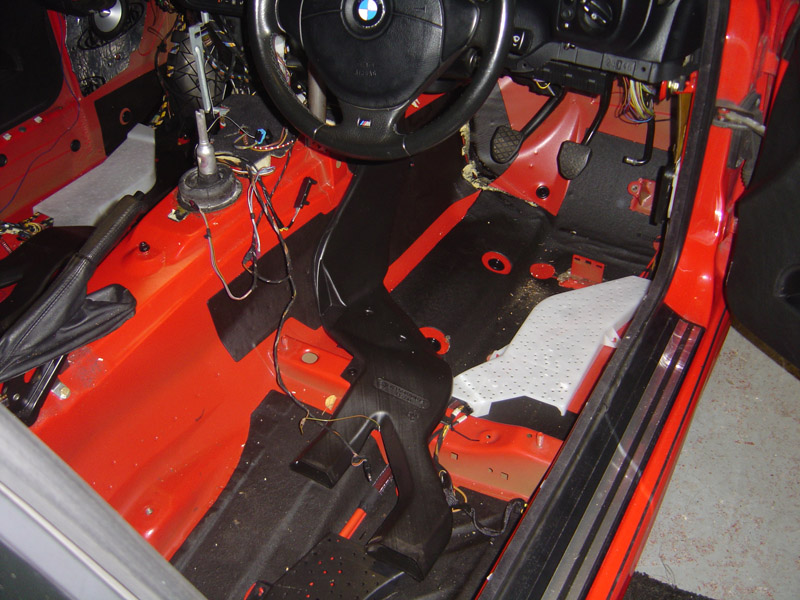
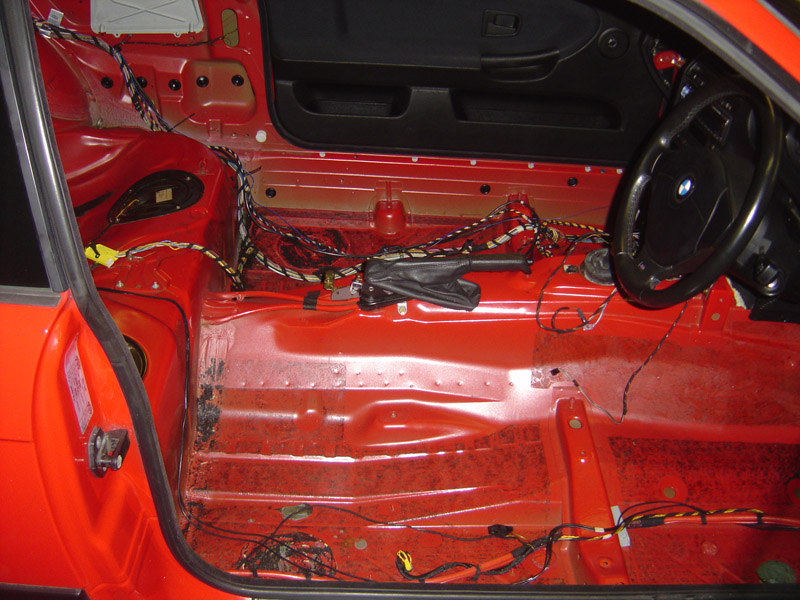
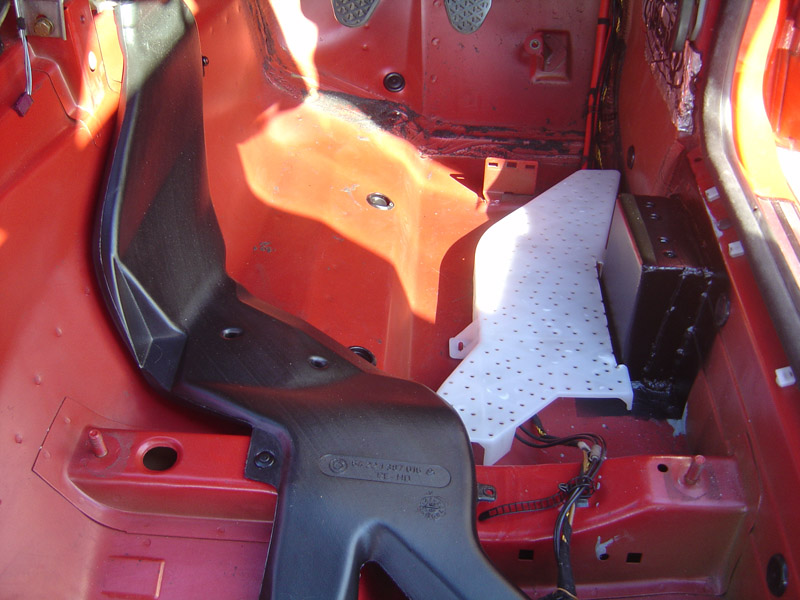
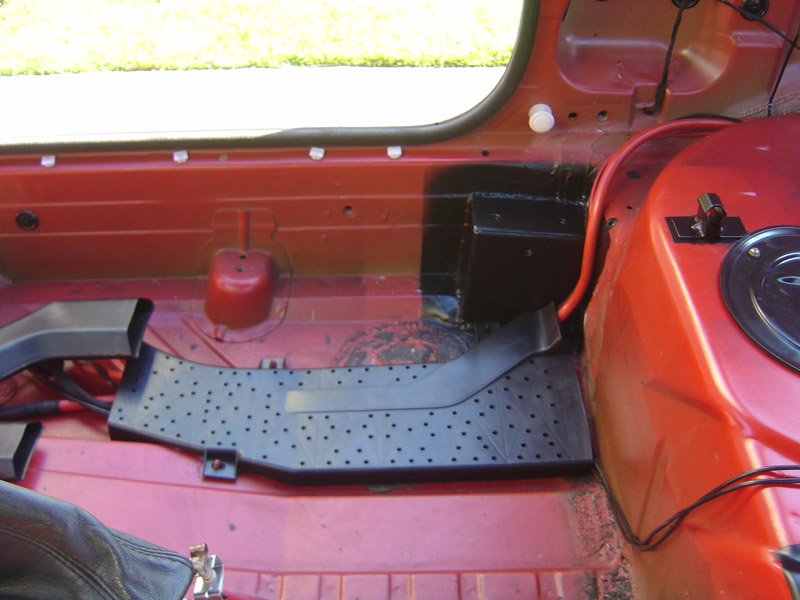
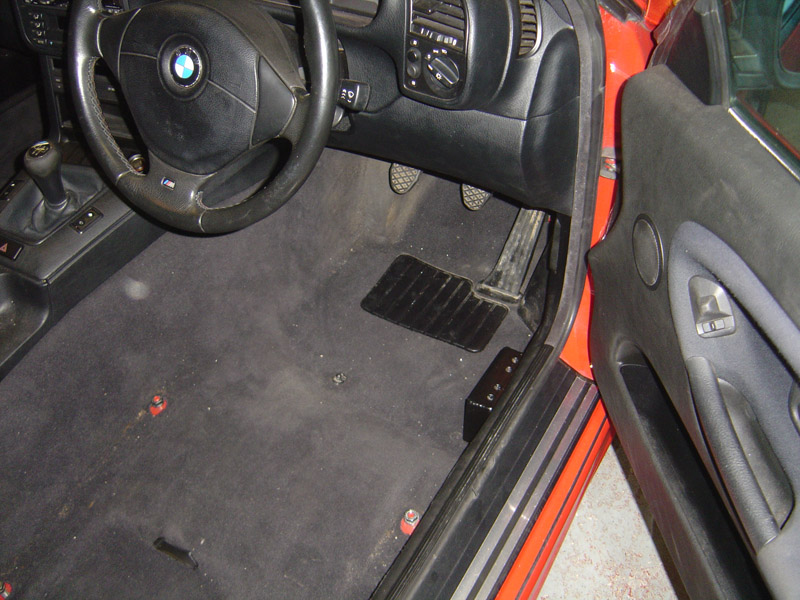
Got bored the other week, decided to go into the garage for a play... I’ve always hated the faded purple rear parcel shelf so decided I would remove it to re-black it, easier said than done with fixed bucket seats and harnesses as the only way to get in was to remove these first. Anyway, got the cabin clear and made my way into the back all that was needed to do was pop the lights out the C-Pillar, remove the covers from either side then the parcel shelf simply lifted (well, more jiggled) out.
It was at this point I noticed a load of fibre sound deadening as well as the usual stick on tar sound proofing, and decided to remove it whilst I had access to it.

Well, one thing lead to another and I decided since I had the heat gun out I should finally get round to removing all the tar sound deadening underneath the main carpet, after all I’ve been bleating on about doing it since April!!
First off was the centre console, shortly followed by the sill covers and front speaker covers. Then the driver’s side lower dash cover was removed along with the glove box and lower cowling, next came the on-board-computer and finally the centre of the lower dash. Once all this was removed the carpet could finally be lifted up, I was not going to take the heater matrix out to removed the front carpet so got some new Stanley and cut as closely and neatly round the heater as possible, this would make re-fitting the carpet easier too, and the centre console completely covers the cut / join lines.

Next up was removing the under floor heating channels, then it was onto the tar. With the promise of beer and pizza I had managed to lure in a few friends to help with the removal, this really did make life a lot less stressful it only took three people and hour or two to complete including larking around. All that was used was a heat gun and some plastic ice scrapers, I chose to use plastic scrapers so that the paint didn’t get damaged underneath.
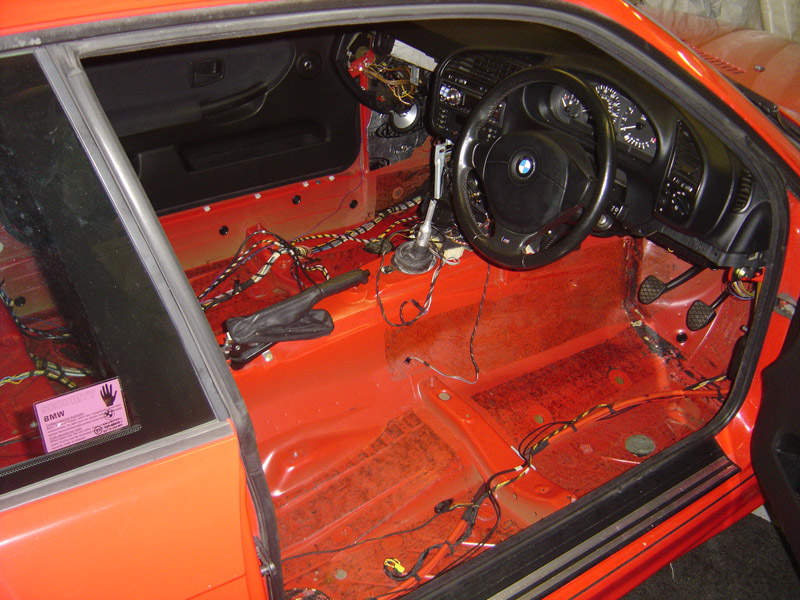
With the tar itself removed, all that was left was to get rid of the sticky residue. After trying all sorts of different techniques over the years, I have found using petrol soaked flannel (Sorry Mam!!) in a well ventilated area the best, a cut towel will suffice too. It would appear that flannel / towels work better than old t-shirts and rags due to the larger surface area caused by the plush bobbly bits, yes that is the correct scientific term for them too, ha!
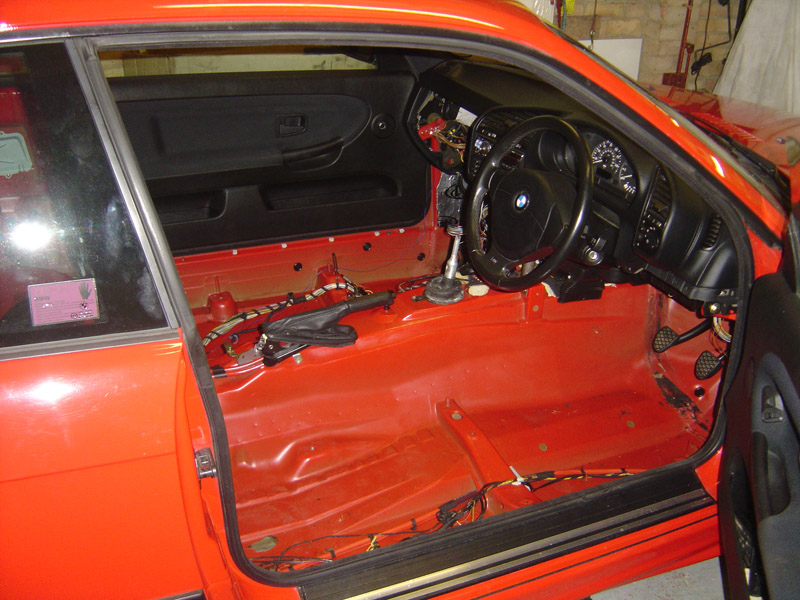
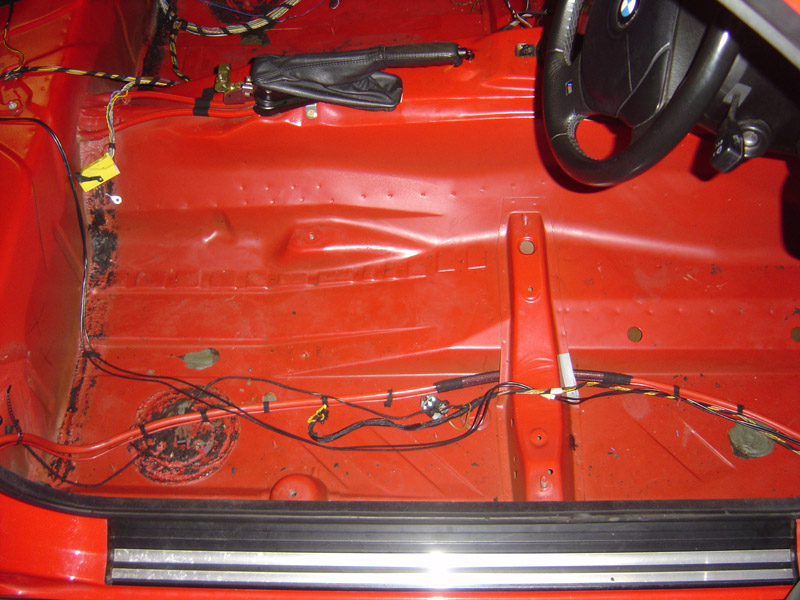
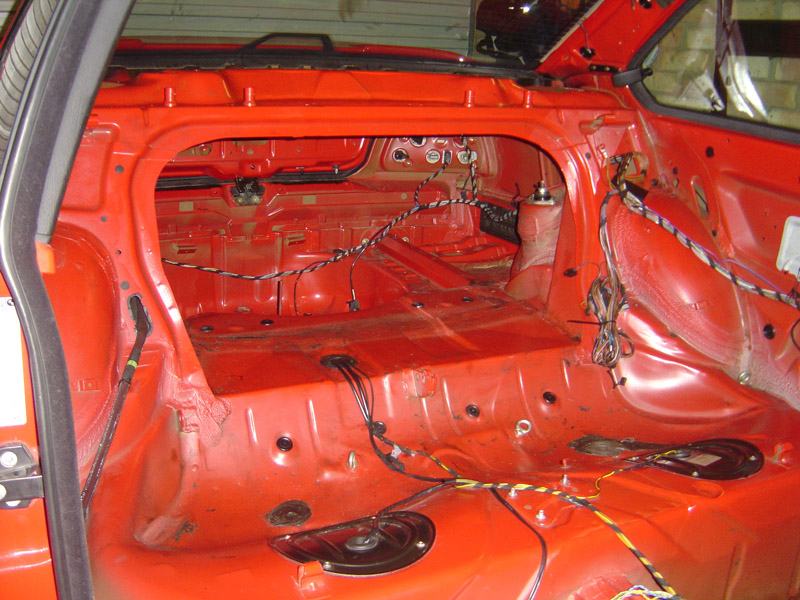
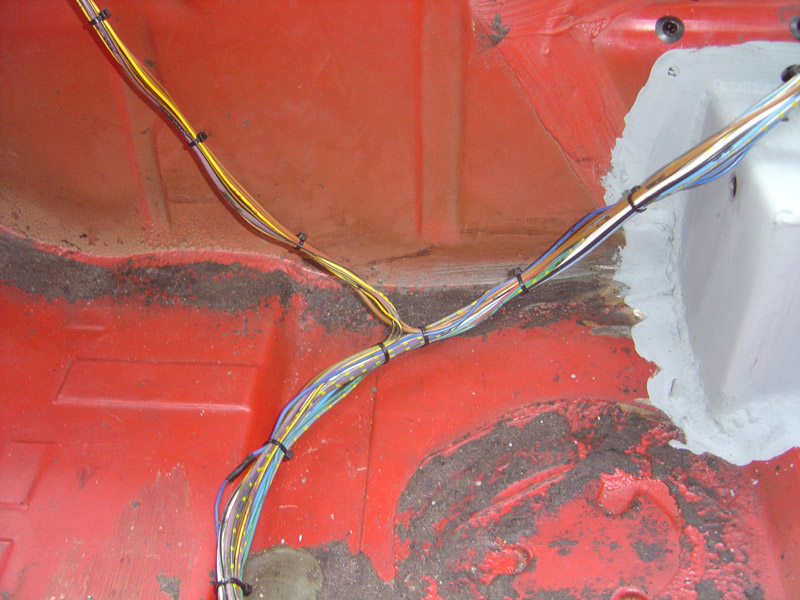
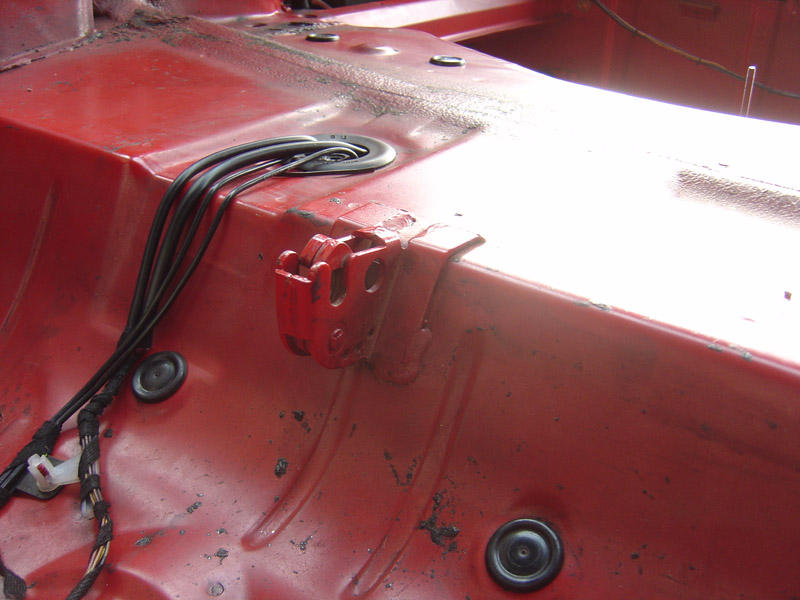
As you can see in the last picture I have pulled back all the un-needed rear wiring, I will eventually removed this, along with the air bag wiring at a later date. The aim is to just have the bare minimum amount of wiring, which is the rear lights, central locking filler cap and boot locking mechanism even the third brake light has been removed due to the spoiler that will eventually be fitted.
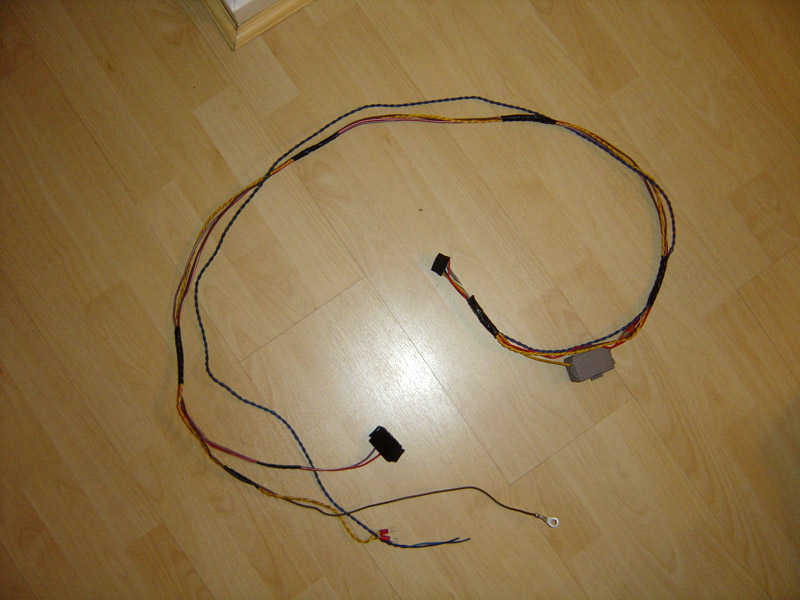
Not content with just removing the rear aerial wire, CD changer lead, rear speaker wiring and other optional extra wires that weren’t needed I decided the stereo loom was too cluttered too. So below as you can see is the standard stereo loom, now going the Club Sport route I decided that I would keep the main front speakers and door tweeters for those long road trips where a little music was required, so most of the wiring in the below loom could be hacked out.
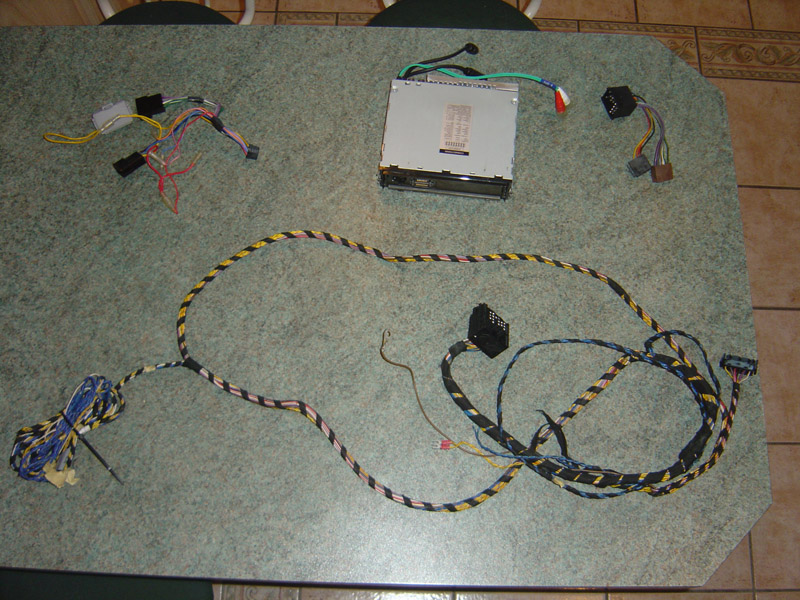
I didn’t like how the OEM loom went into an ISO lead, then into the Alpine power lead so decided to make a loom from scratch using all existing OEM/Alpine connectors. Below is all the wiring that has been removed from just the sound system in the car alone;
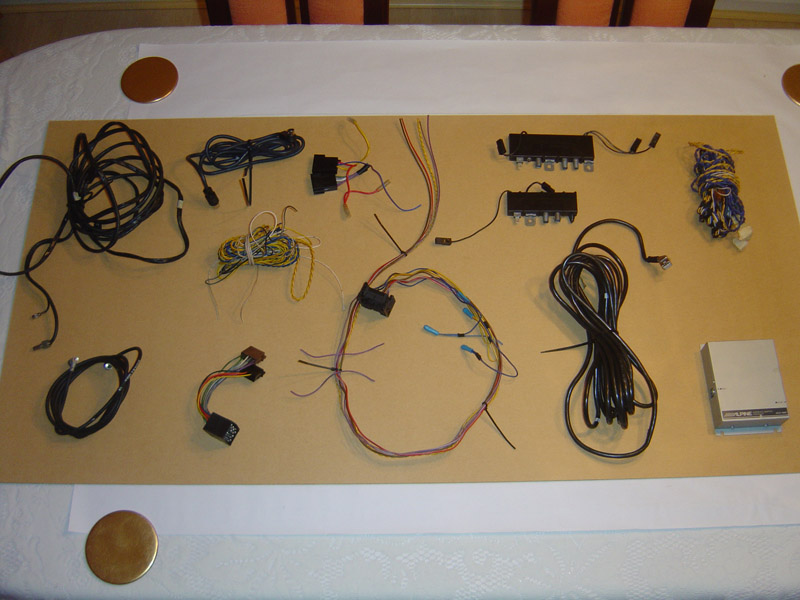
Now my new loom consists of the following;
- Live (Fused)
- Switched Live
- Neutral
- Front Right Speaker (+/-)
- Front Left Speaker (+/-)
I have utilised the OEM BMW power plug which connects under the carpet in the passenger’s side foot well and the Alpine head unit connector plug. The speaker leads run into some existing aftermarket cross over boxes which power both the door speaker and tweeters, after re-fitting and testing everything worked flawlessly. Here is my new lightweight no-frills loom;
As Porky Pig would say... “That’s all folks!” well for now!
Got bored the other week, decided to go into the garage for a play... I’ve always hated the faded purple rear parcel shelf so decided I would remove it to re-black it, easier said than done with fixed bucket seats and harnesses as the only way to get in was to remove these first. Anyway, got the cabin clear and made my way into the back all that was needed to do was pop the lights out the C-Pillar, remove the covers from either side then the parcel shelf simply lifted (well, more jiggled) out.
It was at this point I noticed a load of fibre sound deadening as well as the usual stick on tar sound proofing, and decided to remove it whilst I had access to it.
Well, one thing lead to another and I decided since I had the heat gun out I should finally get round to removing all the tar sound deadening underneath the main carpet, after all I’ve been bleating on about doing it since April!!
First off was the centre console, shortly followed by the sill covers and front speaker covers. Then the driver’s side lower dash cover was removed along with the glove box and lower cowling, next came the on-board-computer and finally the centre of the lower dash. Once all this was removed the carpet could finally be lifted up, I was not going to take the heater matrix out to removed the front carpet so got some new Stanley and cut as closely and neatly round the heater as possible, this would make re-fitting the carpet easier too, and the centre console completely covers the cut / join lines.
Next up was removing the under floor heating channels, then it was onto the tar. With the promise of beer and pizza I had managed to lure in a few friends to help with the removal, this really did make life a lot less stressful it only took three people and hour or two to complete including larking around. All that was used was a heat gun and some plastic ice scrapers, I chose to use plastic scrapers so that the paint didn’t get damaged underneath.
With the tar itself removed, all that was left was to get rid of the sticky residue. After trying all sorts of different techniques over the years, I have found using petrol soaked flannel (Sorry Mam!!) in a well ventilated area the best, a cut towel will suffice too. It would appear that flannel / towels work better than old t-shirts and rags due to the larger surface area caused by the plush bobbly bits, yes that is the correct scientific term for them too, ha!
As you can see in the last picture I have pulled back all the un-needed rear wiring, I will eventually removed this, along with the air bag wiring at a later date. The aim is to just have the bare minimum amount of wiring, which is the rear lights, central locking filler cap and boot locking mechanism even the third brake light has been removed due to the spoiler that will eventually be fitted.
Not content with just removing the rear aerial wire, CD changer lead, rear speaker wiring and other optional extra wires that weren’t needed I decided the stereo loom was too cluttered too. So below as you can see is the standard stereo loom, now going the Club Sport route I decided that I would keep the main front speakers and door tweeters for those long road trips where a little music was required, so most of the wiring in the below loom could be hacked out.
I didn’t like how the OEM loom went into an ISO lead, then into the Alpine power lead so decided to make a loom from scratch using all existing OEM/Alpine connectors. Below is all the wiring that has been removed from just the sound system in the car alone;
Now my new loom consists of the following;
- Live (Fused)
- Switched Live
- Neutral
- Front Right Speaker (+/-)
- Front Left Speaker (+/-)
I have utilised the OEM BMW power plug which connects under the carpet in the passenger’s side foot well and the Alpine head unit connector plug. The speaker leads run into some existing aftermarket cross over boxes which power both the door speaker and tweeters, after re-fitting and testing everything worked flawlessly. Here is my new lightweight no-frills loom;
As Porky Pig would say... “That’s all folks!” well for now!
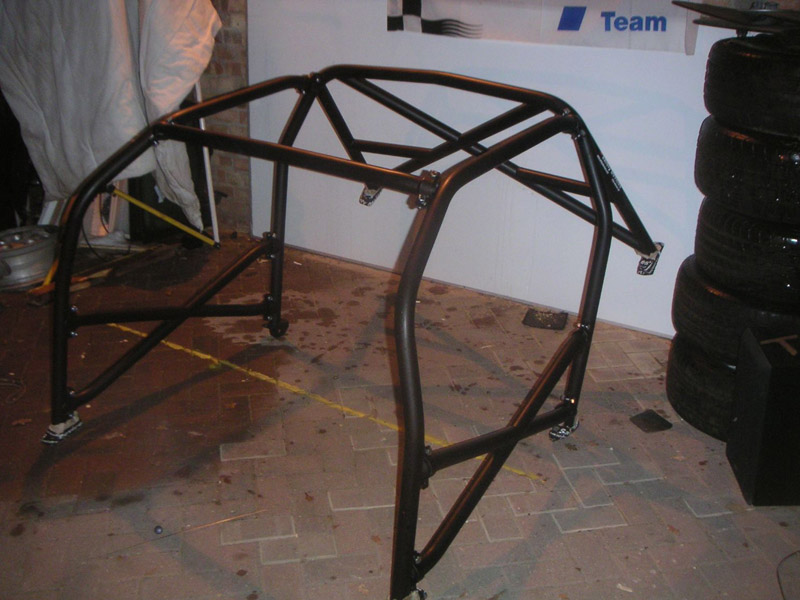
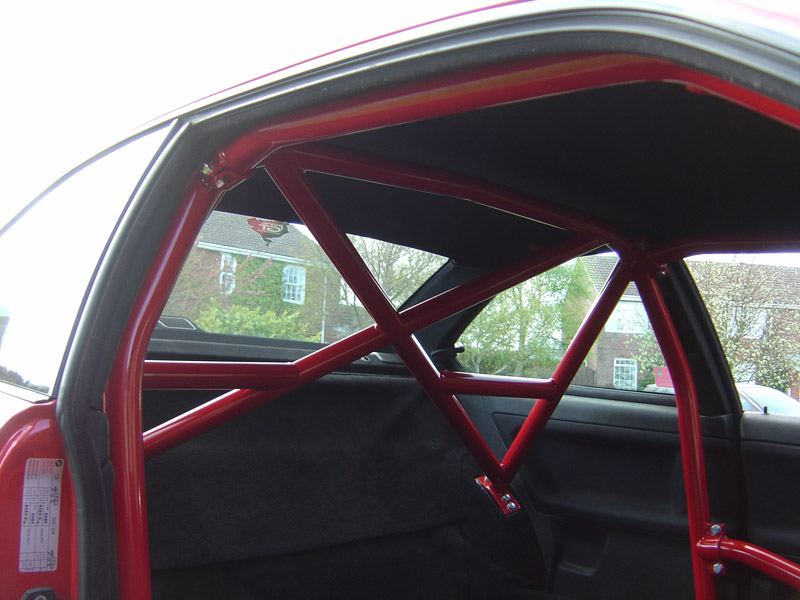
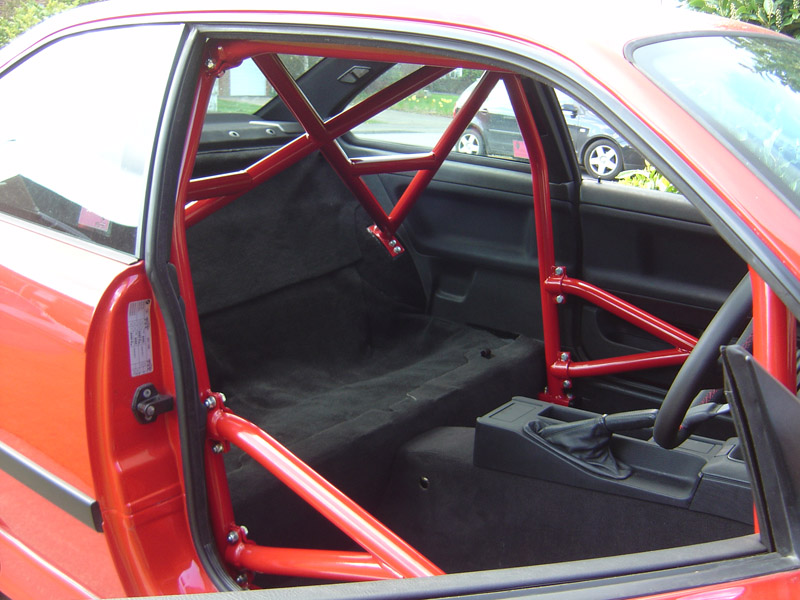
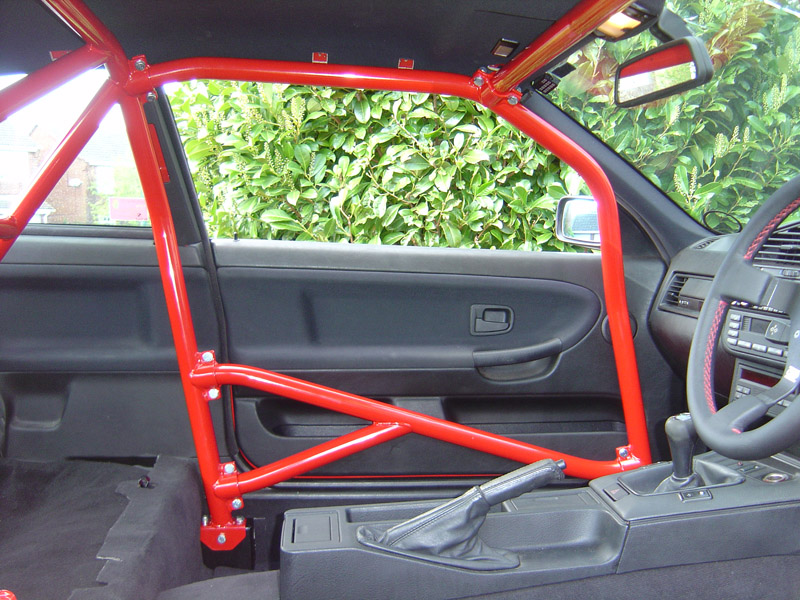
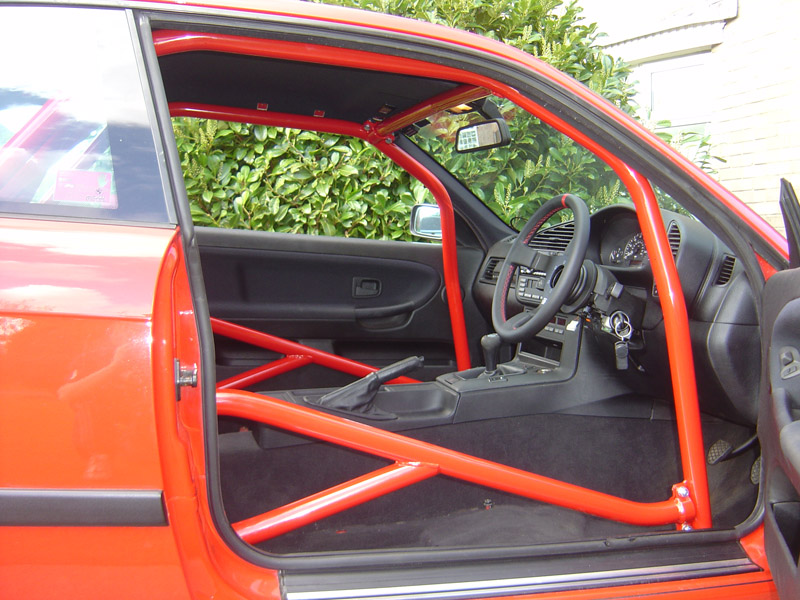
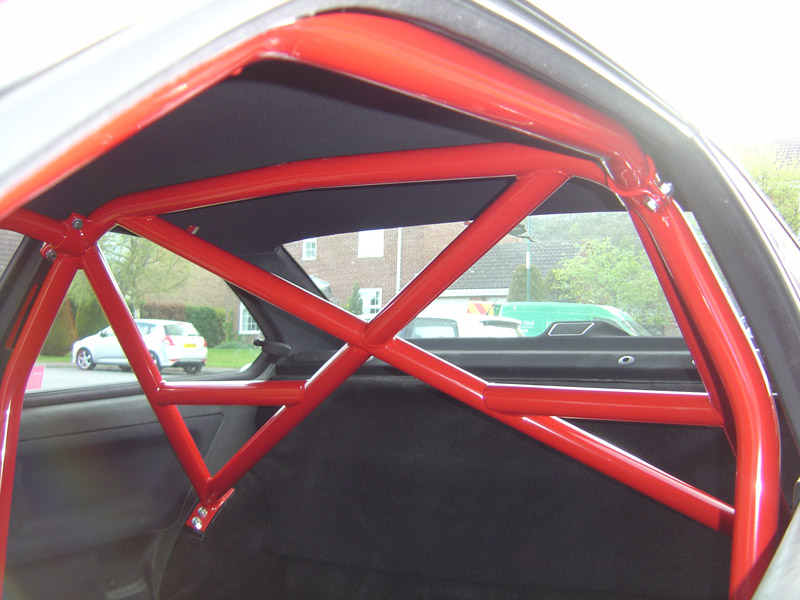
Hoping luck isn't required, put my money into the Safety Devices cage due to their impressive build quality and usually ease of fitment. I love full weld in FIA approved cages but really didn't want to start hacking the dash and going through bulk heads, especially since the car isn't a competition car.
I didn't do the wheel myself I'm afraid, I have done so in the past but find the stress and longetivity of a DIY job far outweighs the cost of paying a specialist to do it. You often find that home painted wheels only last a few months before they start looking like there due another refurb, I can pay someone £200.00 and the wheels will last 3 years, or I can do it myself at £40.00 odd a time but to keep them looking good they'll need doing another 4 times over those three few years.
I didn't do the wheel myself I'm afraid, I have done so in the past but find the stress and longetivity of a DIY job far outweighs the cost of paying a specialist to do it. You often find that home painted wheels only last a few months before they start looking like there due another refurb, I can pay someone £200.00 and the wheels will last 3 years, or I can do it myself at £40.00 odd a time but to keep them looking good they'll need doing another 4 times over those three few years.
Well it’s been a few weeks without an update, but here’s a big one so you’ll need a fast internet connection at the ready, several cups of coffee and a few pro-plus caffeine pills to keep your tiredness at bay!
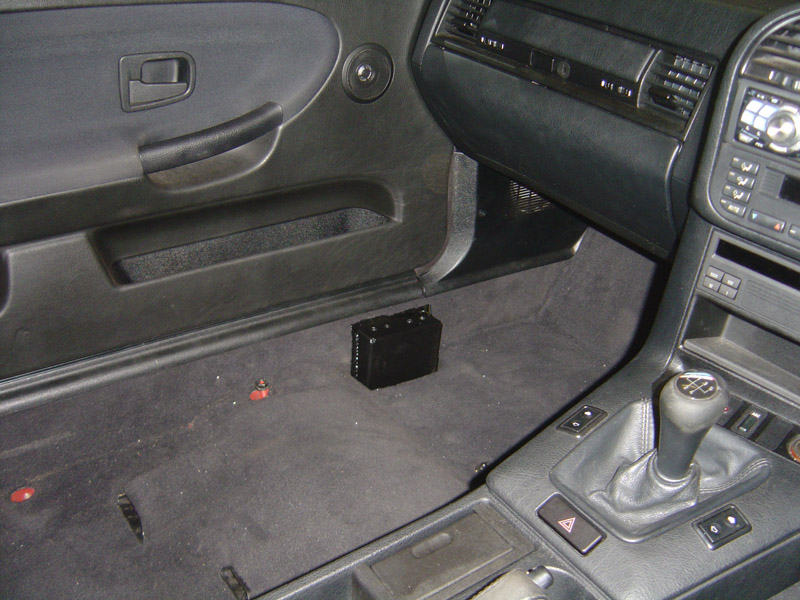
First up came a bit more wiring removal, mainly taking out the airbag wiring, several un-used connections and generally anything that wasn’t of great importance such as the vacuum line for the exhaust valve. All in all there was a fair bit more un-needed wiring removed since the last update.
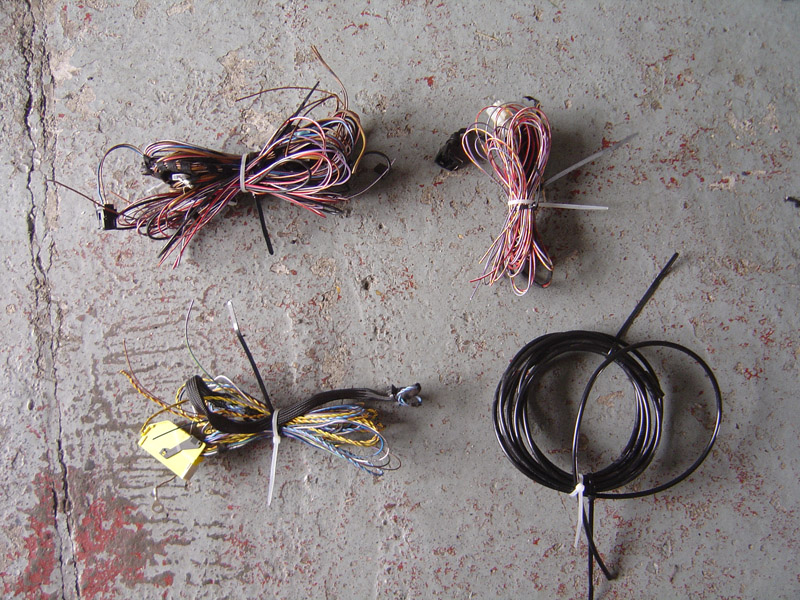
Car now sporting a light weight, no-frills interior wiring loom.
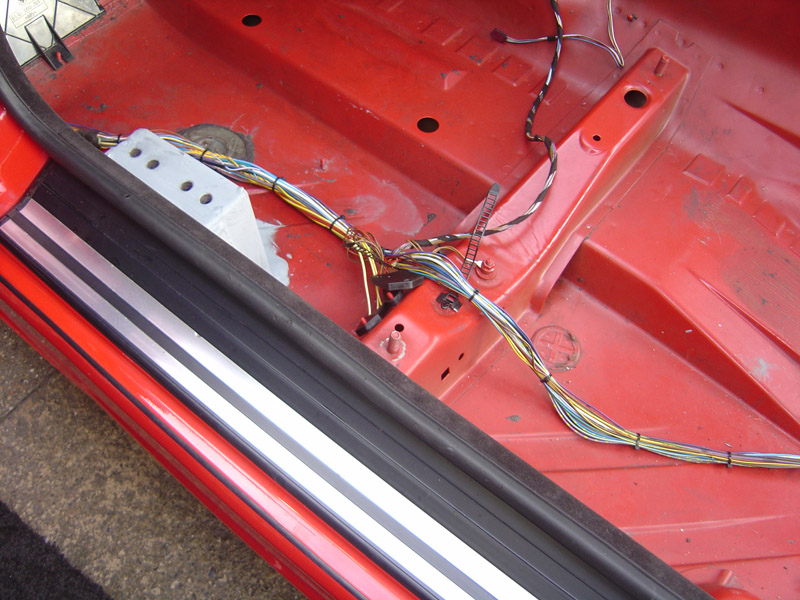
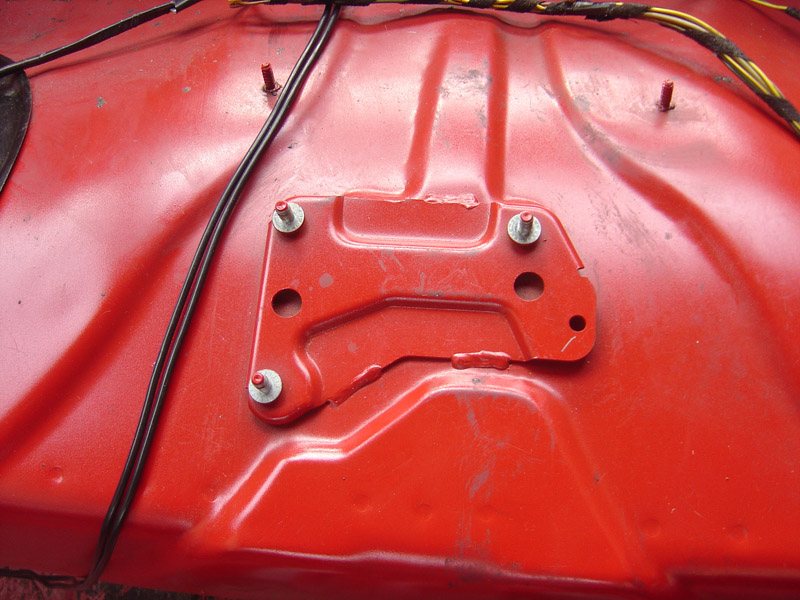
Now came a tiny bit of weight loss, since the car didn’t have any airbag electrics I figured I’d no longer need the airbag controller mounting plate and whilst the grinder was out decided the rear seats would never be re-fitted so that fixture could also be removed.
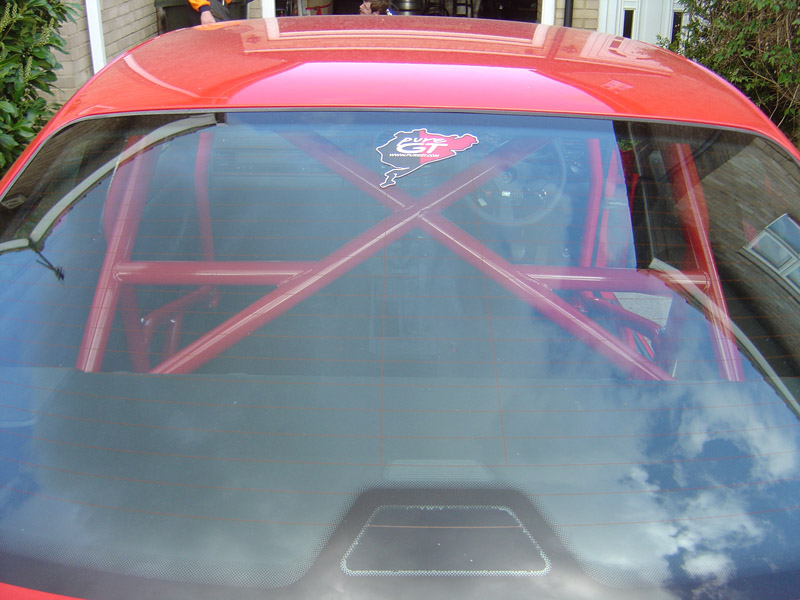
Now for the important bit; roll cage floor mount fitting. I hope people will understand the reasons there’s so few pictures, it’s a bad enough task for two people to undertake without having to stop every two minutes to take a photo.
First up the car was parked on flat level ground and the floor pan was marked where the floor plates were to be welded in, next the grinder and sanding disc was used to prepare the surface for welding.
Then with the floor plates loosely placed in position the cage was fitted into the car and tightened up to ensure the correct positioning of the plates. This all sounds easy, but trust me the cage was in and out of the car several times before this process was complete.
Next the floor plates were tacked into place and the cage, once again, removed. Now came the main welding, this needs to be done in a well ventilated area with one man on designated fire watch. The under body sealer will burn and it’s advisable to remove it before welding, or have someone scraping the warm sealer as the welding takes place.
Again, I must stress I’m making this all sound very easy but I enlisted the help of a friend who is very talented when it comes to building special conversion cars with cages, his current project is a Mk2 Escort with an LS1 V8 engine. I recommend either taking your car to a specialist for a job like this, or having someone with a similar set of skills help out, you don’t want to ruin your shell.
Now with the floor plates painted, they were coated with Galva-Zinc, a Zinc rich anti-corrosion paint. I applied three coats to both the floor plates and the underside of the car, allow several days for this paint to fully cure before painting on top of.
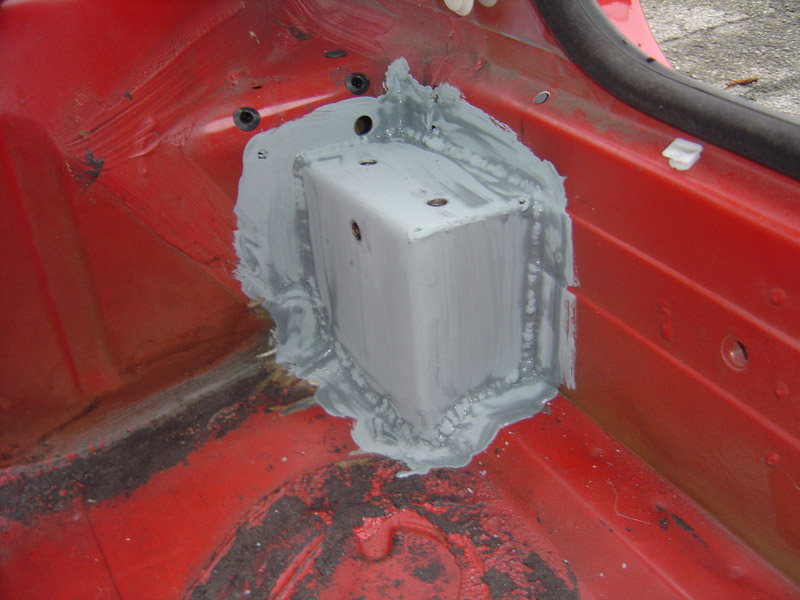
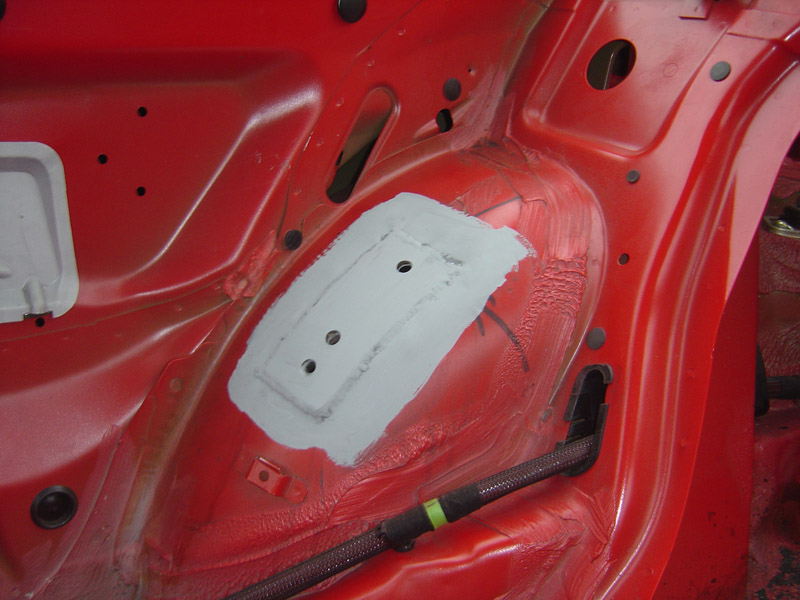
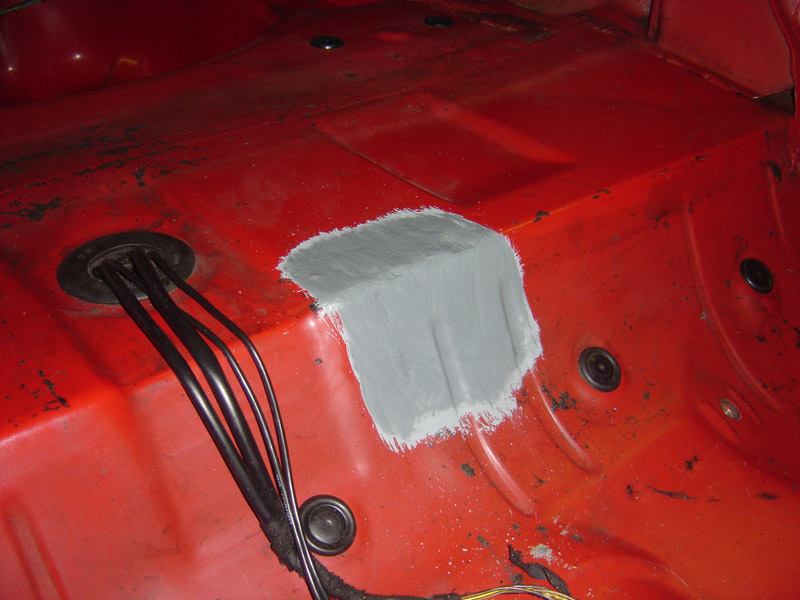
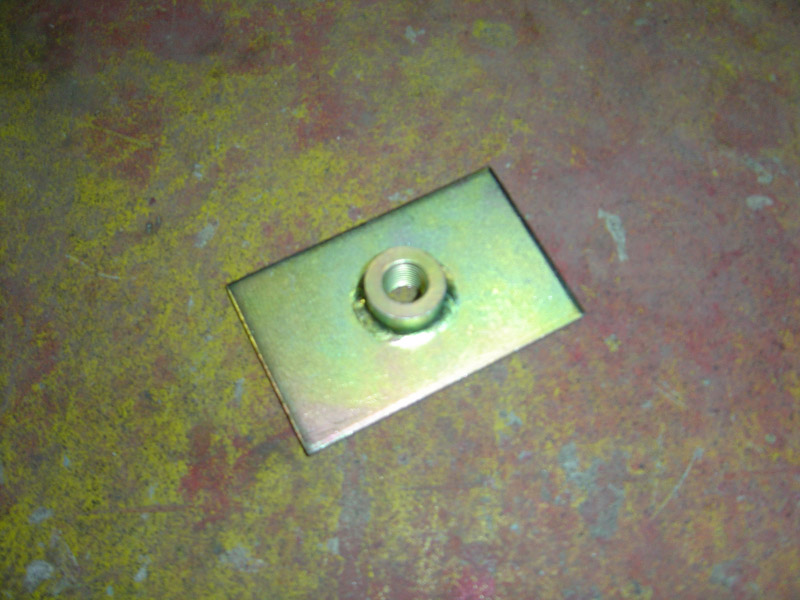
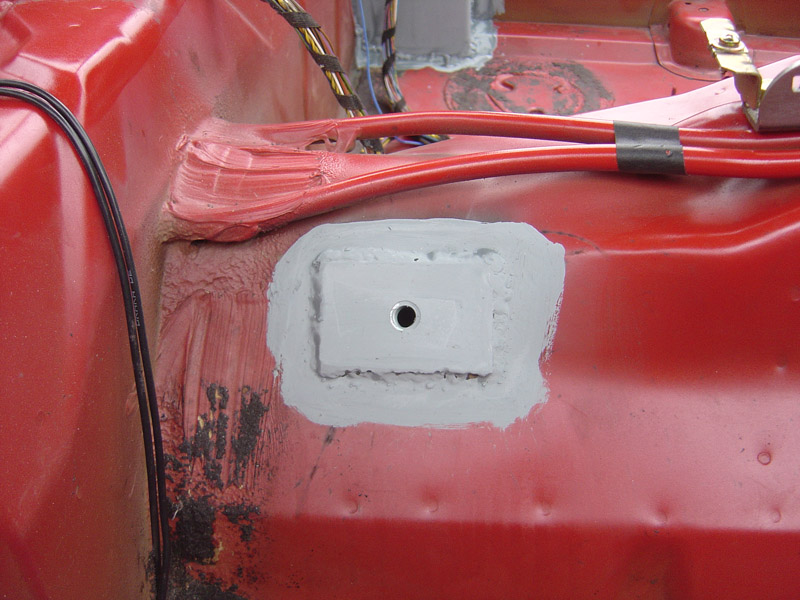
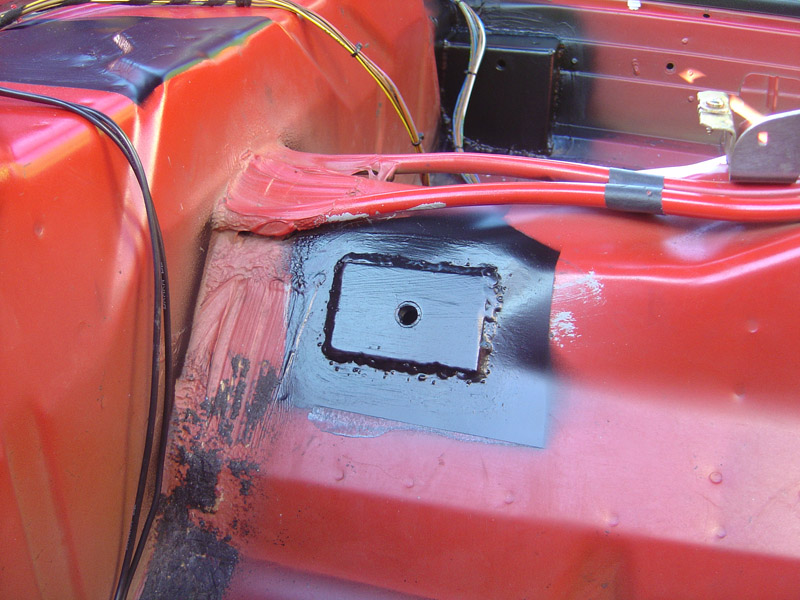
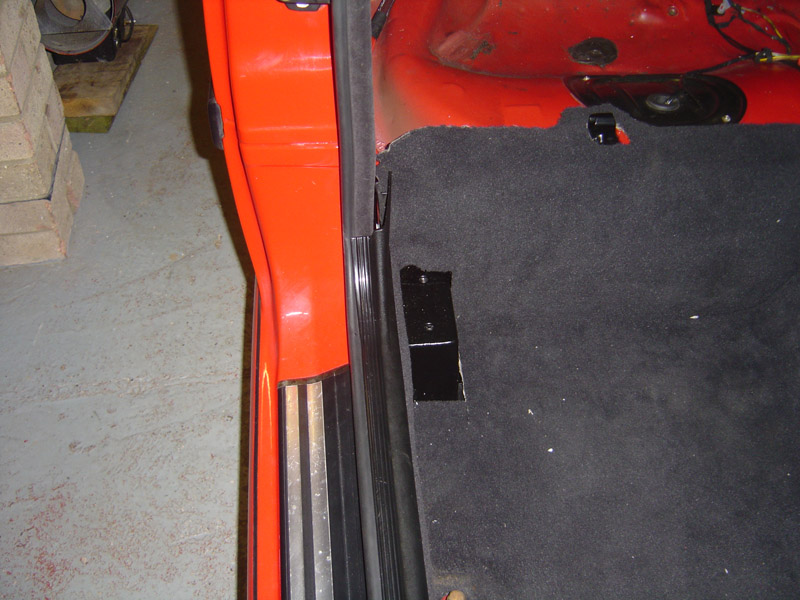
Again, killing two birds with one stone whilst the welder was out I decided to fit some harness spreader plates to the exhaust tunnel. I didn’t want to remove the exhaust, prop shaft and heat shields for this job so decided to get some FIA approved plates that could be fitted internally. As you can see from the picture the threaded lug is staggered so it cannot be easily broken away or pulled through the plate in the event of an accident.
Again more anti-corrosion paint was used.
Now as mentioned several times before, the carpet in this car is to be re-fitted so I needed to paint the floor plates black so that they wouldn’t look out of place when they protruded through the carpet. I simply used some satin black paint for this job, and used the anti-corrosion paint as a primer.
With the carpet going in the under floor heaving vents and wiring tracks were trimmed around the cage floor plates and re-fitted.
Next came the trimming of the carpet, this was a task I was dreading as I didn’t want to keep dragging the carpet in and out of the car, but at the same time wanted to get it right first time. I worked off the sill measurements and managed to get it relatively perfect, there was one mistake but using an off cut of the trimmed carpet this area could be patched and blended back into plate.
For cutting the carpet I’d suggest investing in some fresh Stanley knife blades, you’d be surprised how many you go through too.
Finally the carpet was re-fitted, along with the dash and all the other interior trim that was to go back into the car.
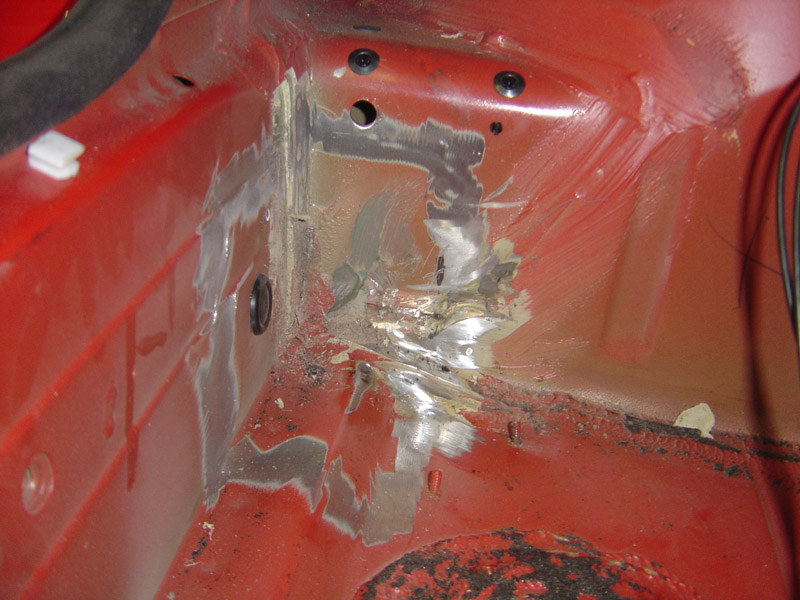
Now the rear of the car looked pretty bare, the red rear bench where the seats once were was exposed as well as a few wires. At first I thought I would just paint the rear bench black in hope to draw the attention away from it all but then decided to trim it, and make a proper job of it!
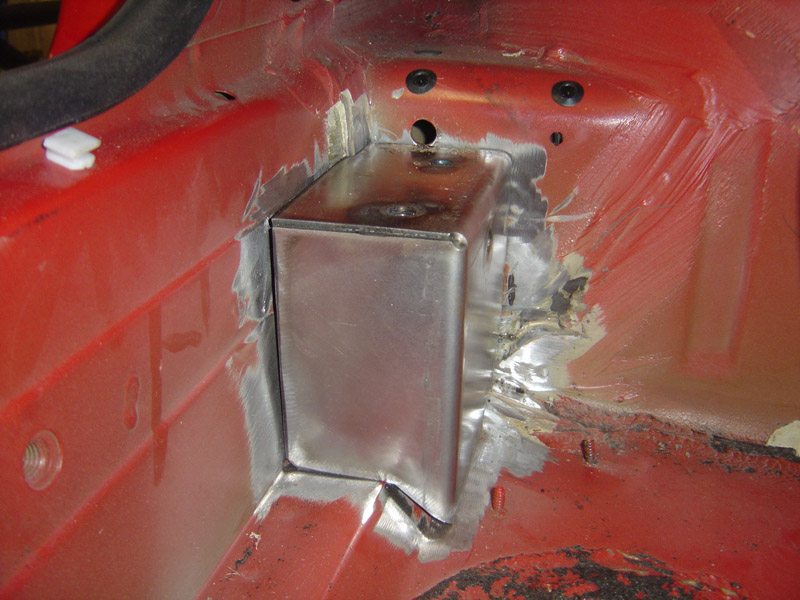
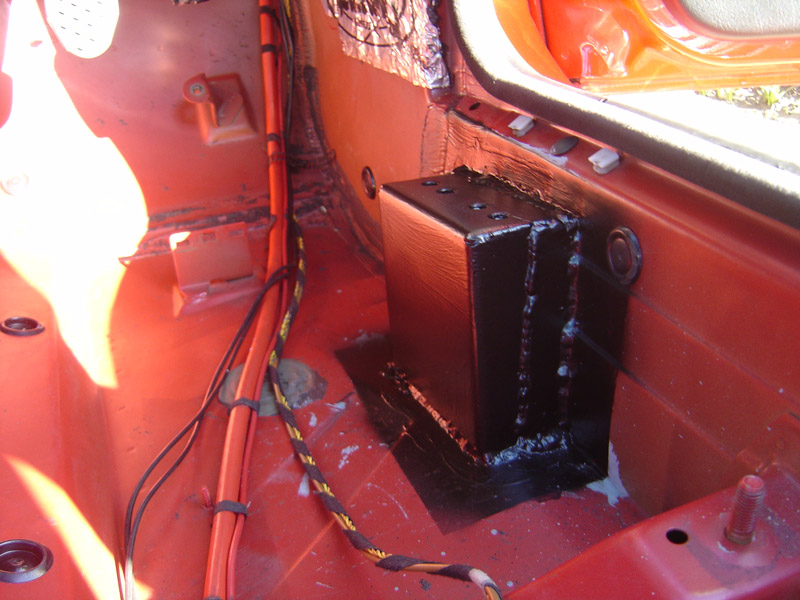
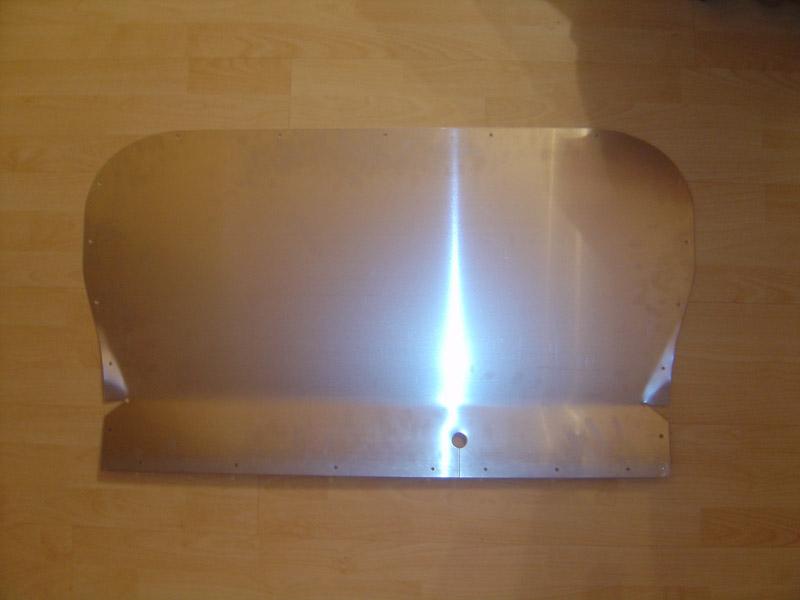
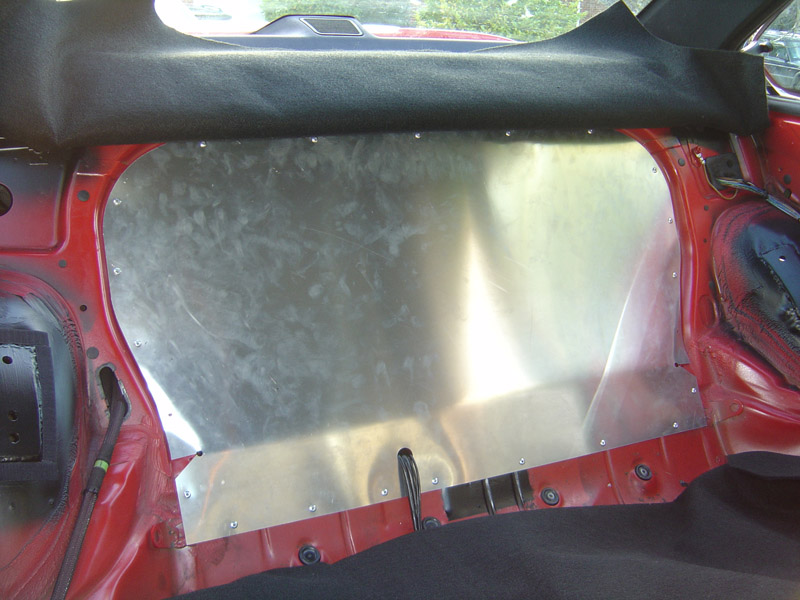
First things first, I needed a rear fire wall... for months I’ve had a CAD file that someone was kind enough to send me from when they did the job, after a bit of digging around I struck lucky and found a company who would cut it at reasonable cost. So the following week I picked up one alloy rear fire wall, added a few bands in it to match the curves of the car and I was left with this;
To fit, I simply used a drill and some pop rivets.
Finally, came the last stage of the interior; making a rear carpet, another task which I was dreading but been honest it went a lot better than planned.
After looking at several carpeting options I settled on using a thick acoustic carpet, this gave a good match to the existing carpet and was also quiet flexible and followed the contours of the rear bench nicely. The carpet was made in 4 parts; base, back and two arch sides, to affix the carpet I used the ‘hooked’ side of some heavy duty 45mm thick Velcro this seemed to work a treat!
Once the carpet was in the rear door cards were re-fitted too.
Here’s a few shoddy pictures of the job, I’ll try and get some better quality pictures up shortly. The camera flash makes the carpet look a total miss match but in natural light it’s as good as a match as I could find.
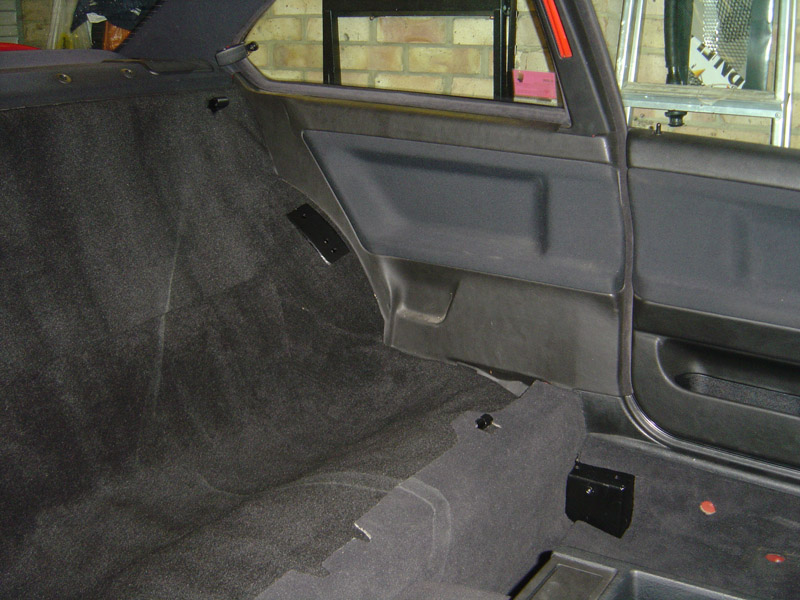
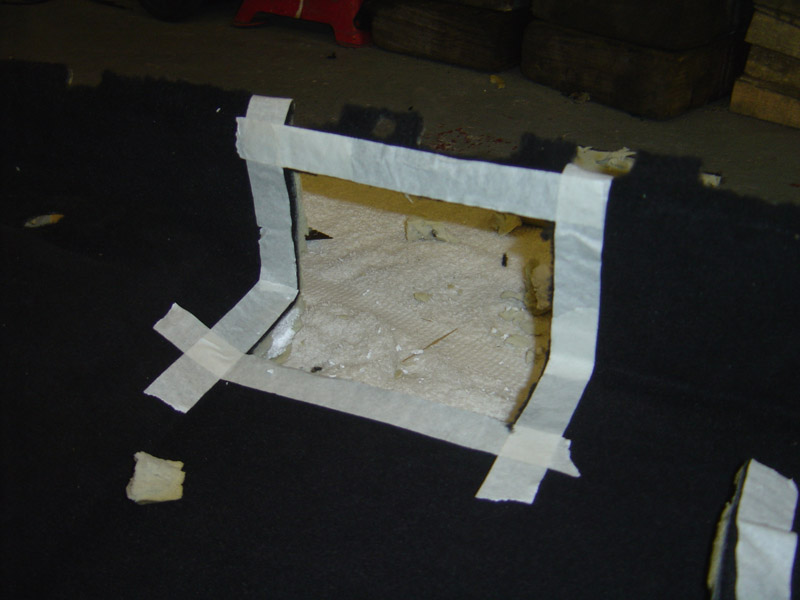
Two other interior touches were the rear parcel shelf was re-blacked using Autoglym Black Dye, in all honesty I’m not too happy with the job as its not totally black, but instead of been light sun-faded purple it’s now a deep shade of navy and the third brake light was removed and the space where the light would be was blacked off using black vinyl.
That’s all for this instalment of project infinity, more to come over the next week or two...
First up came a bit more wiring removal, mainly taking out the airbag wiring, several un-used connections and generally anything that wasn’t of great importance such as the vacuum line for the exhaust valve. All in all there was a fair bit more un-needed wiring removed since the last update.
Car now sporting a light weight, no-frills interior wiring loom.
Now came a tiny bit of weight loss, since the car didn’t have any airbag electrics I figured I’d no longer need the airbag controller mounting plate and whilst the grinder was out decided the rear seats would never be re-fitted so that fixture could also be removed.
Now for the important bit; roll cage floor mount fitting. I hope people will understand the reasons there’s so few pictures, it’s a bad enough task for two people to undertake without having to stop every two minutes to take a photo.
First up the car was parked on flat level ground and the floor pan was marked where the floor plates were to be welded in, next the grinder and sanding disc was used to prepare the surface for welding.
Then with the floor plates loosely placed in position the cage was fitted into the car and tightened up to ensure the correct positioning of the plates. This all sounds easy, but trust me the cage was in and out of the car several times before this process was complete.
Next the floor plates were tacked into place and the cage, once again, removed. Now came the main welding, this needs to be done in a well ventilated area with one man on designated fire watch. The under body sealer will burn and it’s advisable to remove it before welding, or have someone scraping the warm sealer as the welding takes place.
Again, I must stress I’m making this all sound very easy but I enlisted the help of a friend who is very talented when it comes to building special conversion cars with cages, his current project is a Mk2 Escort with an LS1 V8 engine. I recommend either taking your car to a specialist for a job like this, or having someone with a similar set of skills help out, you don’t want to ruin your shell.
Now with the floor plates painted, they were coated with Galva-Zinc, a Zinc rich anti-corrosion paint. I applied three coats to both the floor plates and the underside of the car, allow several days for this paint to fully cure before painting on top of.
Again, killing two birds with one stone whilst the welder was out I decided to fit some harness spreader plates to the exhaust tunnel. I didn’t want to remove the exhaust, prop shaft and heat shields for this job so decided to get some FIA approved plates that could be fitted internally. As you can see from the picture the threaded lug is staggered so it cannot be easily broken away or pulled through the plate in the event of an accident.
Again more anti-corrosion paint was used.
Now as mentioned several times before, the carpet in this car is to be re-fitted so I needed to paint the floor plates black so that they wouldn’t look out of place when they protruded through the carpet. I simply used some satin black paint for this job, and used the anti-corrosion paint as a primer.
With the carpet going in the under floor heaving vents and wiring tracks were trimmed around the cage floor plates and re-fitted.
Next came the trimming of the carpet, this was a task I was dreading as I didn’t want to keep dragging the carpet in and out of the car, but at the same time wanted to get it right first time. I worked off the sill measurements and managed to get it relatively perfect, there was one mistake but using an off cut of the trimmed carpet this area could be patched and blended back into plate.
For cutting the carpet I’d suggest investing in some fresh Stanley knife blades, you’d be surprised how many you go through too.
Finally the carpet was re-fitted, along with the dash and all the other interior trim that was to go back into the car.
Now the rear of the car looked pretty bare, the red rear bench where the seats once were was exposed as well as a few wires. At first I thought I would just paint the rear bench black in hope to draw the attention away from it all but then decided to trim it, and make a proper job of it!
First things first, I needed a rear fire wall... for months I’ve had a CAD file that someone was kind enough to send me from when they did the job, after a bit of digging around I struck lucky and found a company who would cut it at reasonable cost. So the following week I picked up one alloy rear fire wall, added a few bands in it to match the curves of the car and I was left with this;
To fit, I simply used a drill and some pop rivets.
Finally, came the last stage of the interior; making a rear carpet, another task which I was dreading but been honest it went a lot better than planned.
After looking at several carpeting options I settled on using a thick acoustic carpet, this gave a good match to the existing carpet and was also quiet flexible and followed the contours of the rear bench nicely. The carpet was made in 4 parts; base, back and two arch sides, to affix the carpet I used the ‘hooked’ side of some heavy duty 45mm thick Velcro this seemed to work a treat!
Once the carpet was in the rear door cards were re-fitted too.
Here’s a few shoddy pictures of the job, I’ll try and get some better quality pictures up shortly. The camera flash makes the carpet look a total miss match but in natural light it’s as good as a match as I could find.
Two other interior touches were the rear parcel shelf was re-blacked using Autoglym Black Dye, in all honesty I’m not too happy with the job as its not totally black, but instead of been light sun-faded purple it’s now a deep shade of navy and the third brake light was removed and the space where the light would be was blacked off using black vinyl.
That’s all for this instalment of project infinity, more to come over the next week or two...
Sorry, forgot to answer your previous post... left the tank in place, used sheet metal to protect it and also had a spray bottle of water that was misted as the welding took place. Ideal world, remove the tank but I was using a friends garage in which I had 24 hours to get the job done.
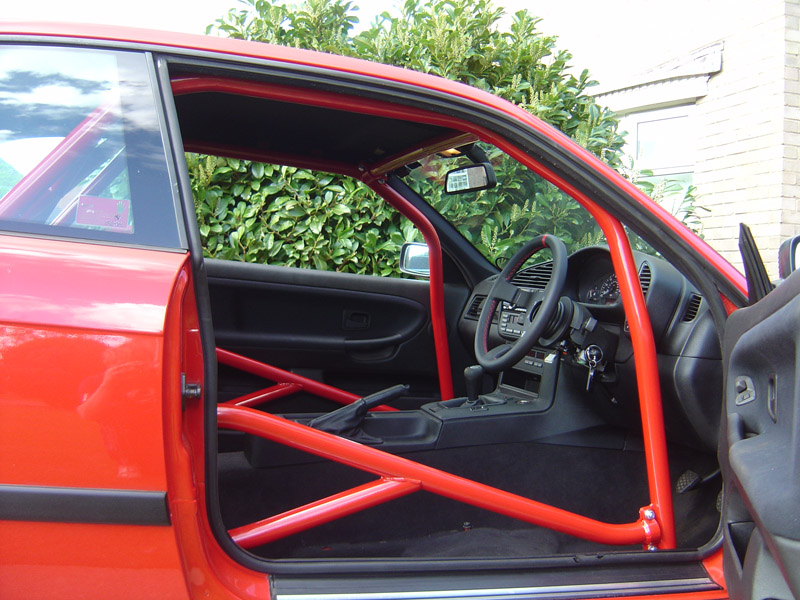
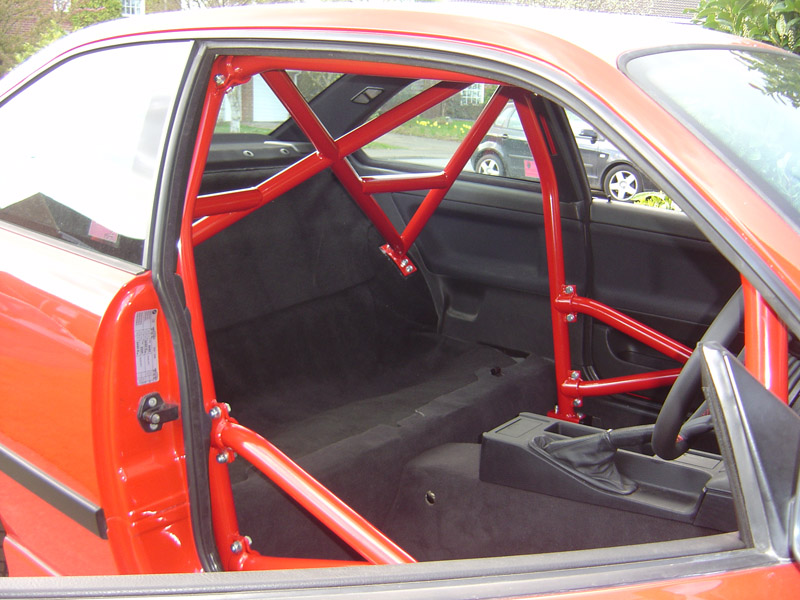
Thanks for the comments guys... at first I didn't think I'd need padding as my seats sit that low, however after doing a few seat test fits today if you're my height (6ft4) you've still got a big gap between head and gape, but theres still a chance there could be contact, so for peace of mind there will be some Safety Devices FIA approved padding going on there.
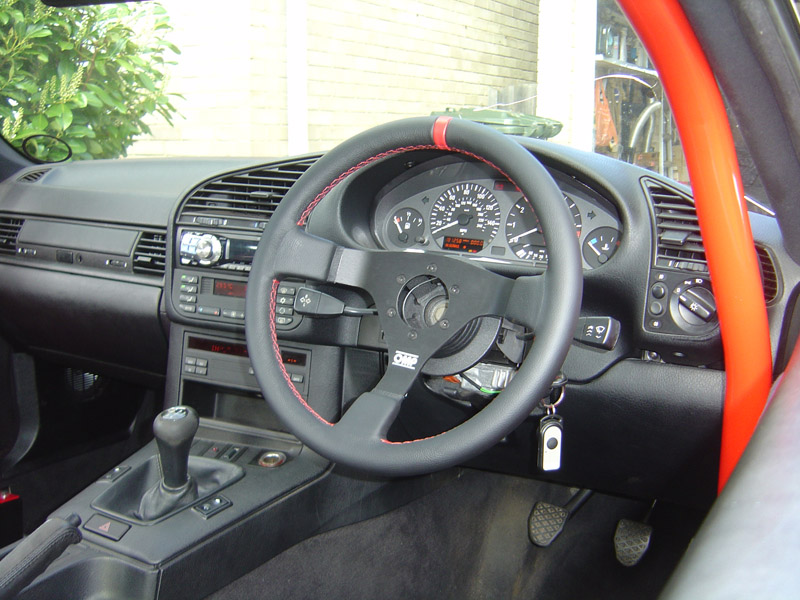
Thanks guys, the wheel is an OMP WRC with a 75mm dish which I requested to be trimmed in black perforated leather with the red strip and silver OMP detailing. I'll check the box to see if theres a product order code for it later.
AllLondon - Everythings for sale at the right price, I enjoy building cars so if someone was to offer me what it cost to build it I'd consider selling it. But I can't see that happening, so I'd stick to using it for the time being. Maybe in a years time it could be on the open market as the next project will be an e46 M3 or 996 C2 built in a similar way.
AllLondon - Everythings for sale at the right price, I enjoy building cars so if someone was to offer me what it cost to build it I'd consider selling it. But I can't see that happening, so I'd stick to using it for the time being. Maybe in a years time it could be on the open market as the next project will be an e46 M3 or 996 C2 built in a similar way.
Got my seat frames back fresh from the powder coaters the other day, so wasted no time in getting the seats in the car. I have modified the frames slightly so instead of using 10mm steel packers to get the correct height, it now sites on 40mm box section which reduced the weight a fair bit as well as making the seats easier to fit.

Here’s some pictures of the interior, it’s now 99% complete the only jobs left to carry out are;
- Fit the harness lap strap eye bolts.
- Adjust and correctly wrap the harnesses round the rear cage.
- Fit the ‘piece de resistance’ into the centre of the steering wheel.


As the boss kit used was for a non-airbag car the slip ring for the horn could not be re-used, so instead I’ve mounted a neat horn button on the side of the steering wheel cowling. For the MOT I’ll obviously label it up, however once through the label will be removed as I like the subtle ‘OEM’ look.

Next up, the car’s going for paint where there will be a mild cosmetic overhaul complete with a bit of overall body protection and of course replacing the nasty corroded front drivers’ side wing. Hoping to have another update within a week or two, then after that it’ll be back onto the final mechanical work before the car is complete.
Here’s some pictures of the interior, it’s now 99% complete the only jobs left to carry out are;
- Fit the harness lap strap eye bolts.
- Adjust and correctly wrap the harnesses round the rear cage.
- Fit the ‘piece de resistance’ into the centre of the steering wheel.
As the boss kit used was for a non-airbag car the slip ring for the horn could not be re-used, so instead I’ve mounted a neat horn button on the side of the steering wheel cowling. For the MOT I’ll obviously label it up, however once through the label will be removed as I like the subtle ‘OEM’ look.
Next up, the car’s going for paint where there will be a mild cosmetic overhaul complete with a bit of overall body protection and of course replacing the nasty corroded front drivers’ side wing. Hoping to have another update within a week or two, then after that it’ll be back onto the final mechanical work before the car is complete.
Not sure if you could squeeze the cage through into a touring, maybe possible if you remove a door mind?
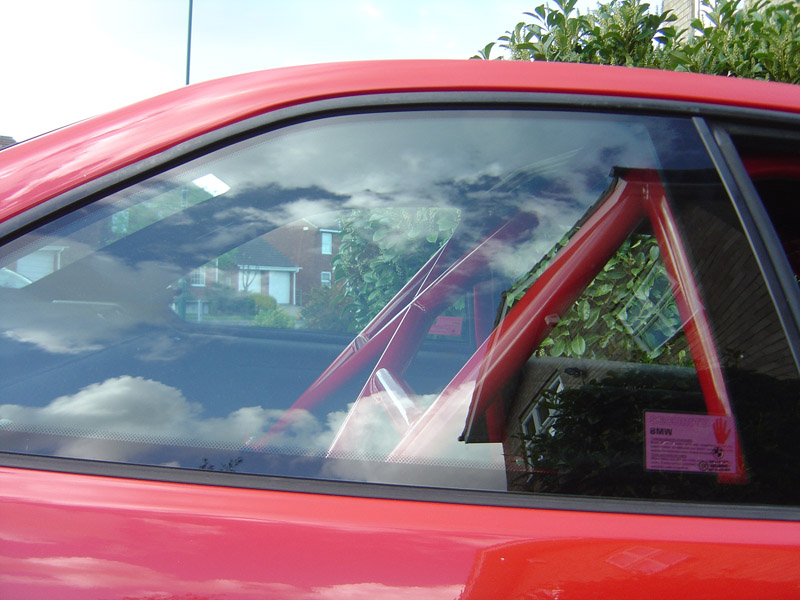
Well the tin worm finally chomped though enough of my drivers’ front wing that I decided to bite the bullet and get the car painted. Below is attached a picture of the front wing, it’s amazing how corroded it is compared to the rest of the shell is near on perfect.

I figured if you’re going to do a job, you might as well do it right so I decided that I’d get all the other body imperfections sorted at the same time. The list of work whilst the car is in the body shop is as follows;
- Replace front drivers’ side wing.
- Paint full front end to eradicate stone chips.
- Paint lower drivers’ side door, two stone chips were slowly bubbling the paint front underneath.
- Remove small dent from underneath the rear light.
- Remove scuff marks from rear bumper.
- Replace plastic wiper panel.
- Replace cracked wind screen.
- Protect rear arches; very small trace of bubbling on the inner arch lip which I may as well nip in the bud now before it spreads.
My only problem was finding a body shop who’d let me strip the car down, and oversee certain aspects of the work. Fortunately a guy who I work with has his own spray shop and came recommended, he was willing to take on the work and let me work alongside him too!
Here’s some pictures of the work so far;


Even Chris, the painter was surprised how strong the shell is; there are no signs of corrosion on the floor pan or behind the wings, even behind the rear bumper and lights was spotless! When we attacked the arches there was barely any corrosion, just light surface corrosion which had started to bubble the paint.
Hopefully will have more of a progress update in a week or two’s time.
Well the tin worm finally chomped though enough of my drivers’ front wing that I decided to bite the bullet and get the car painted. Below is attached a picture of the front wing, it’s amazing how corroded it is compared to the rest of the shell is near on perfect.
I figured if you’re going to do a job, you might as well do it right so I decided that I’d get all the other body imperfections sorted at the same time. The list of work whilst the car is in the body shop is as follows;
- Replace front drivers’ side wing.
- Paint full front end to eradicate stone chips.
- Paint lower drivers’ side door, two stone chips were slowly bubbling the paint front underneath.
- Remove small dent from underneath the rear light.
- Remove scuff marks from rear bumper.
- Replace plastic wiper panel.
- Replace cracked wind screen.
- Protect rear arches; very small trace of bubbling on the inner arch lip which I may as well nip in the bud now before it spreads.
My only problem was finding a body shop who’d let me strip the car down, and oversee certain aspects of the work. Fortunately a guy who I work with has his own spray shop and came recommended, he was willing to take on the work and let me work alongside him too!
Here’s some pictures of the work so far;
Even Chris, the painter was surprised how strong the shell is; there are no signs of corrosion on the floor pan or behind the wings, even behind the rear bumper and lights was spotless! When we attacked the arches there was barely any corrosion, just light surface corrosion which had started to bubble the paint.
Hopefully will have more of a progress update in a week or two’s time.
Quick update on what’s been happening the last few weeks;
A tin of this...

Plus a bit of skill and talent...

Equals a shiny, stone chip free, hellrot red BMW!!


As you can see the rotten wing has been replaced (Big thanks to RobBMW for the wing!), and the whole front end looks like new once again. I’m really happy with how the whole job has come out and the paint match is 100% perfect, which is pretty good considering it’s a thirteen year old solid coloured car on 182,000 miles!
There have been a few other little cosmetic add-ons that have been made, more on this within the next few weeks, but here’s a sneak peek;

The car is due to be photographed by Total BMW magazine on the 18th of June, once they have got their pictures I’ll release the final snaps I have of the car, all I can say for now is WOW... I am really impressed with the final outcome the whole car has come together over the last few weeks perfectly, I couldn’t have wished for a better result.
It was also that time of year where I check the whole car out and give it a good going over before I start hitting the track once more, first up on the planned maintenance was to remove all the arch liners, clean off all the road silt and give the wheels a good scrub too.


Next up is to fully strip and rebuild the brakes, run some fresh fluid through there and check all the bushes and ball joints, the suspension is also going to be replaced with a new set, once I’ve decided on what set to go for!!
As well as the above the car will be treated to new oil, filter, coolant, gearbox oil, differential oil and maybe even a viscous fan delete... the plan with the fan delete is to utilise BMW parts across the range i.e 316i lower temperature thermostat and fan switch plus the air conditioning electric fan, I don’t want to run any external non-OEM wiring or parts if I don’t have to.
I can’t wait to post the final pictures of the complete car, as soon as I’ve got some that I’m happy with I’ll get them posted.
A tin of this...
Plus a bit of skill and talent...
Equals a shiny, stone chip free, hellrot red BMW!!
As you can see the rotten wing has been replaced (Big thanks to RobBMW for the wing!), and the whole front end looks like new once again. I’m really happy with how the whole job has come out and the paint match is 100% perfect, which is pretty good considering it’s a thirteen year old solid coloured car on 182,000 miles!
There have been a few other little cosmetic add-ons that have been made, more on this within the next few weeks, but here’s a sneak peek;
The car is due to be photographed by Total BMW magazine on the 18th of June, once they have got their pictures I’ll release the final snaps I have of the car, all I can say for now is WOW... I am really impressed with the final outcome the whole car has come together over the last few weeks perfectly, I couldn’t have wished for a better result.
It was also that time of year where I check the whole car out and give it a good going over before I start hitting the track once more, first up on the planned maintenance was to remove all the arch liners, clean off all the road silt and give the wheels a good scrub too.
Next up is to fully strip and rebuild the brakes, run some fresh fluid through there and check all the bushes and ball joints, the suspension is also going to be replaced with a new set, once I’ve decided on what set to go for!!
As well as the above the car will be treated to new oil, filter, coolant, gearbox oil, differential oil and maybe even a viscous fan delete... the plan with the fan delete is to utilise BMW parts across the range i.e 316i lower temperature thermostat and fan switch plus the air conditioning electric fan, I don’t want to run any external non-OEM wiring or parts if I don’t have to.
I can’t wait to post the final pictures of the complete car, as soon as I’ve got some that I’m happy with I’ll get them posted.
The cleaning didn’t stop with the last update, next the brakes were fully stripped, cleaned and rebuilt along with the disc centres painted silver to tidy up the wheel area a little bit more.


Then various bits of trim were removed and all rubber seals taped up to stop polish residue tarnishing them.


Over the next few days the car was treated to the following processes;
- Pre-Cleaned with PH Neutral Snow Foam
- Cleaned with PH Neutral Shampoo
- Clayed with Sonus Green Clay & Meguiars Quick Detailer Spray
- Polished with Meguiars #83 Dual Action Polish & Red Meguiars Pad
- Finished with Meguiars #80 Speed Glaze & Yellow Meguiars Pad
- Waxed with two coats of Dodo Juice Purple Haze
Here are the final results...


Just need to treat and re-fit the black trim and the car is just about done, I’ll worry about sorting the service, viscous fan delete and new semi-slick tyres after the weekend!
Then various bits of trim were removed and all rubber seals taped up to stop polish residue tarnishing them.
Over the next few days the car was treated to the following processes;
- Pre-Cleaned with PH Neutral Snow Foam
- Cleaned with PH Neutral Shampoo
- Clayed with Sonus Green Clay & Meguiars Quick Detailer Spray
- Polished with Meguiars #83 Dual Action Polish & Red Meguiars Pad
- Finished with Meguiars #80 Speed Glaze & Yellow Meguiars Pad
- Waxed with two coats of Dodo Juice Purple Haze
Here are the final results...
Just need to treat and re-fit the black trim and the car is just about done, I’ll worry about sorting the service, viscous fan delete and new semi-slick tyres after the weekend!
Gassing Station | Readers' Cars | Top of Page | What's New | My Stuff