500+bhp Mk3 Fiesta Project
Discussion


 k sake.


mwstewart said:
AP Racing Caliper Inspection and Rebuild
Despite them looking reasonable I've stripped down both the front and rear calipers to ensure everything is ship shape. Nitromors was used to remove the original paint from the front CP5555s, and also the yellow 'AP Racing' logo on the rear CP7030s.
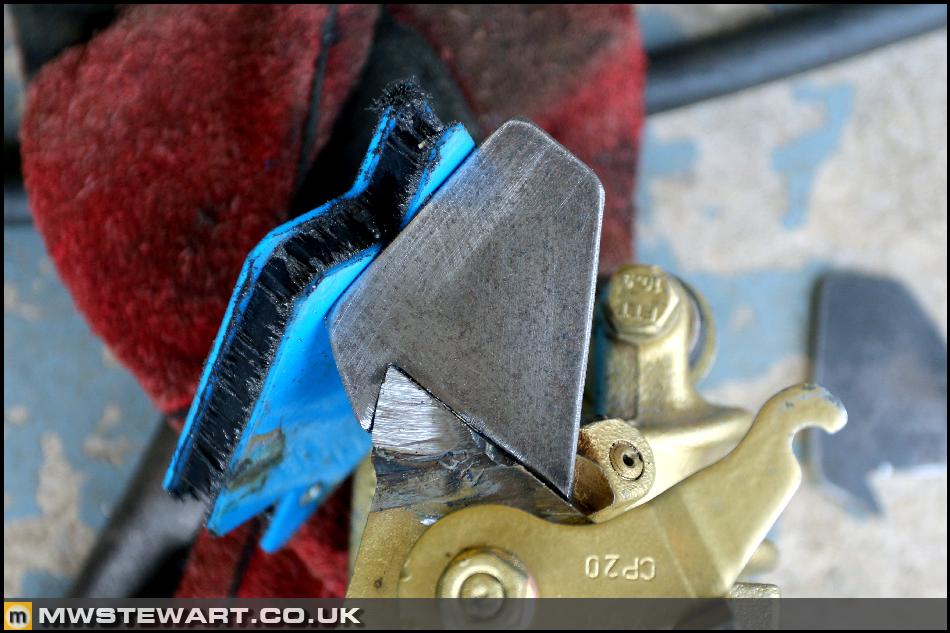
I hit problems with the CP5555 where the innermost of the two bridge bolts were rounded on both calipers. AP have used a low profile cap screw in this position to keep the bolt flush with the caliper face, but the trade-off for this cosmetic touch is reduced purchase when attempting to loosen the screw. In the end I welded on an old wheel bolt to aid removal.
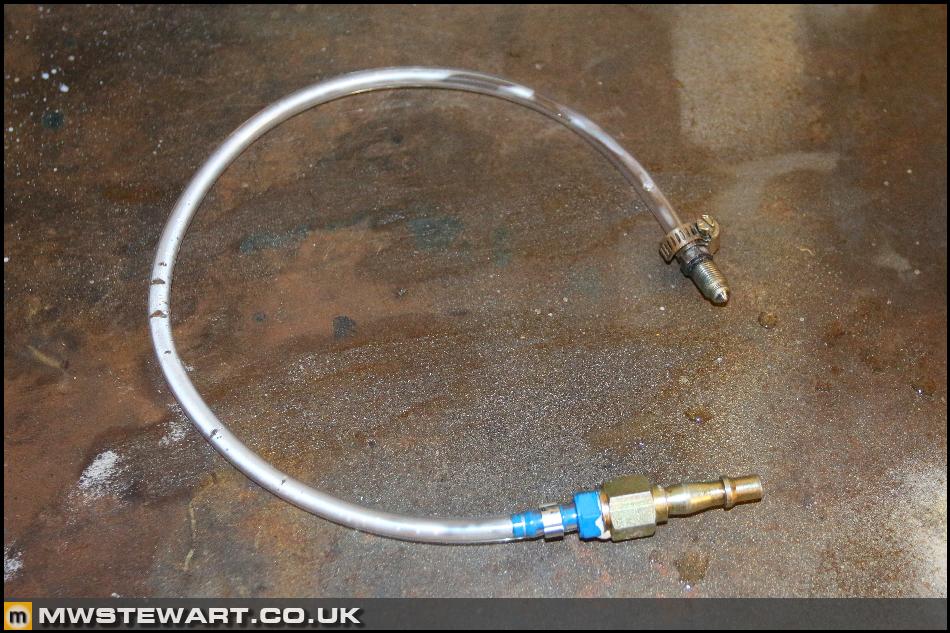
I made this tool winch connects one of my wall air outlets to the caliper bleed screw port and allows me to remove the pistons using compressed air.
Calipers stripped. I'm going to replace all bolts, wear plates, and seals as a matter of course, and the pistons on an 'as required' basis. One CP7030 and two CP5555 pistons will be replaced due due to minor scoring and corrosion pitting near the external seal line. Overall everything was in good condition; I'm being picky as I don't want to take any chances here.
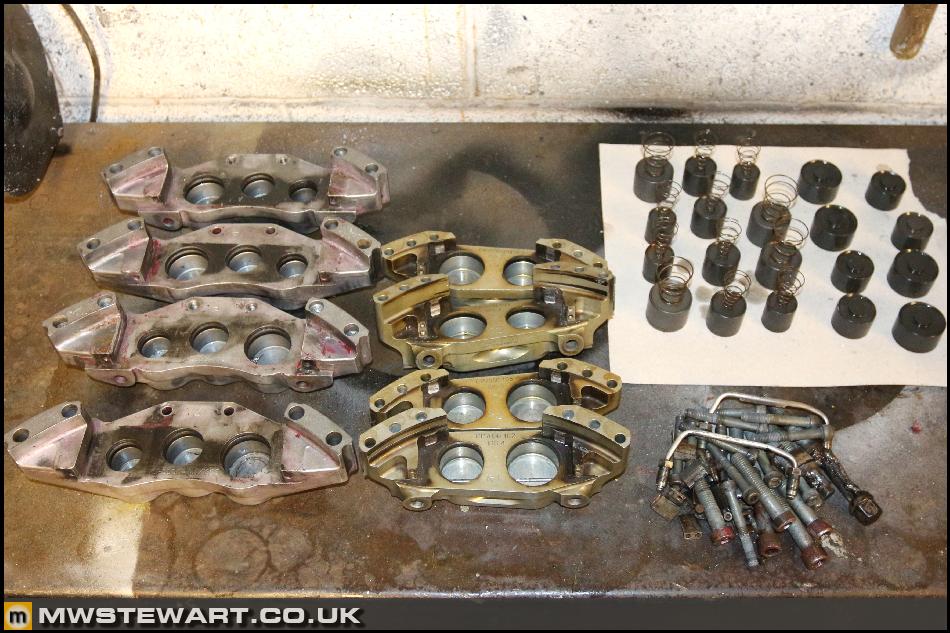
Only the CP5555 came with Anti-Knockback springs installed but I can easily retrofit to the CP7030 if required, although for now I will omit them and see how I get one in the first year of driving.
The following order is with AP and I'm informed it'll be ready for the end of Jan.
[u]Front - CP5555 (CP5555-814 to -817) Calipers[/u]
Piston Ø38.1 = CP2409-124 x 2
Seal Repair Kit = CP4519-CEJ
Pad Retainer Type = CP5555-126 x 4
Pad Retainer Bolt = CP3894-139 x 4
Wear Plates = CP5555-120 x 8
Fluid Pipe = CP5555-11 x 2
[u]Rear - CP7030 Calipers[/u]
Pad set = CP3345D38 x 1
Piston Ø34.9 = CP7030-108 x 2
Seal Repair Kit = CP4518-GK x 2
Wear Plates = CP7030-106 x 8
Fluid Pipe = CP7030-6 x 2
Bobbin Kit CP2494-595K12 x 2
RH Disc 278x16mm CP3770-1014CG4 x 1
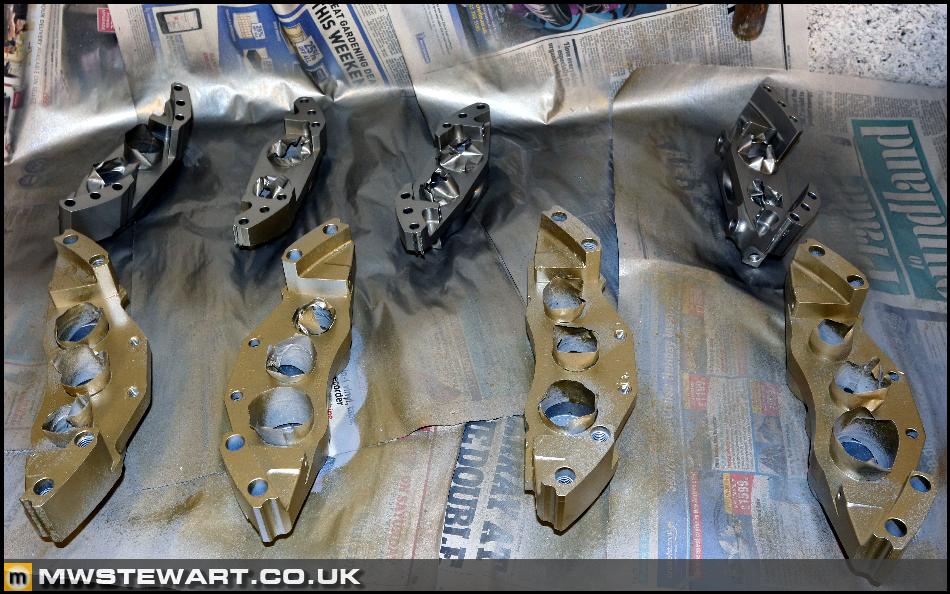
In the mean time I carried on with the refurbishment and with all seals removed the caliper sections were blown through with brake cleaner, degreased, washed at 70 degrees, and then Etch Primed.
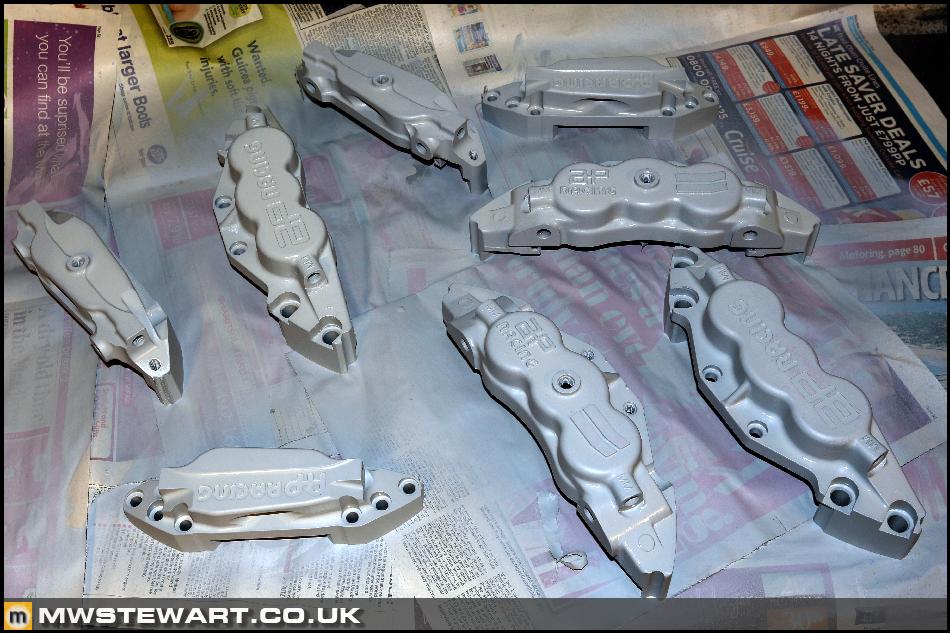
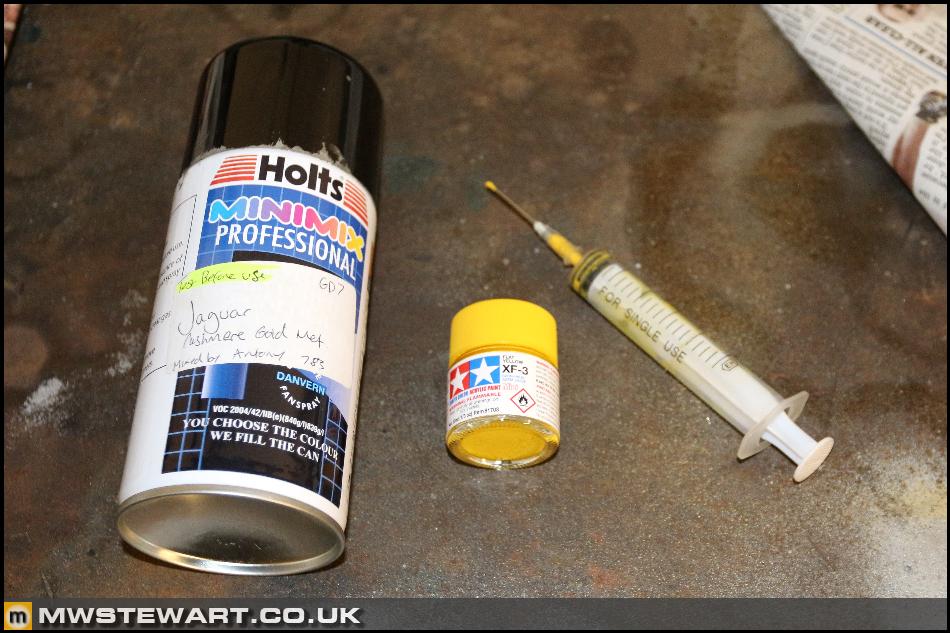
I experimented with a few colours before choosing something I was happy with. My intent was to match the grey anodising of the racing line of callipers (road calipers are usually black or red) and for that I used Ford Polar Grey, which was too light. I then decided I like the later green/gold AP used on the replacement for the CP5555 (same body but different construction bolts used) so I tried two of my favourite Jaguar colours from recent times; Winter Gold (foreground) which was too yellow, and then Cashmere Gold (background) which was perfect.
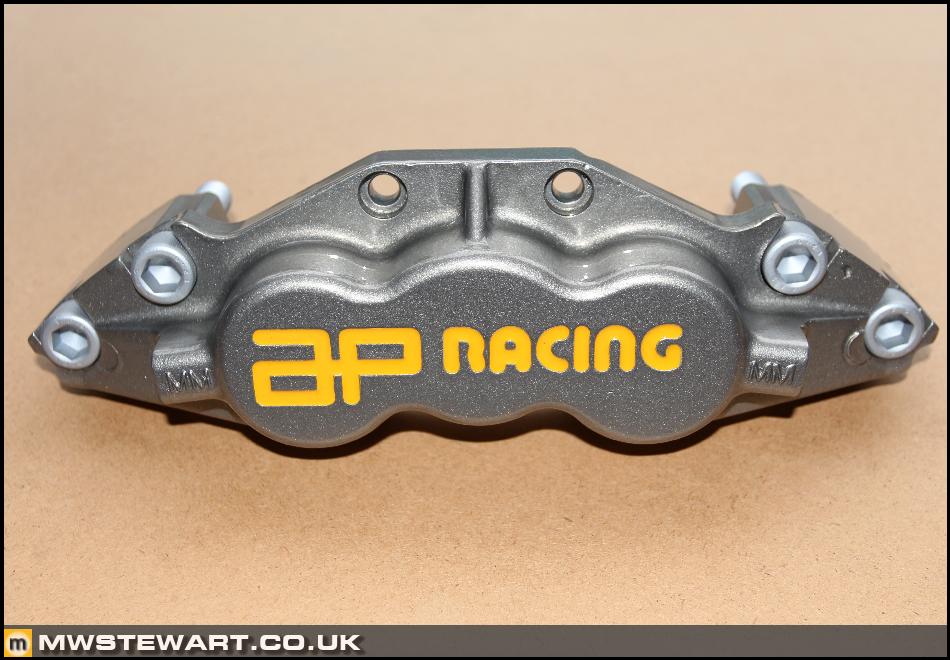
I've used the Halfords mixing service in the past and found the paint to be good, so that's what I've used here. For the 'AP Racing' recessed logos I'm using a model paint, and rather than use a brush which I figured would take too long, I purchased a set of syringes from a fishing tackle shop and my plan is to inject the paint to fill the recess.
My plan worked perfectly and the results are great. Here are the calipers in basecoat and with the logos infilled.
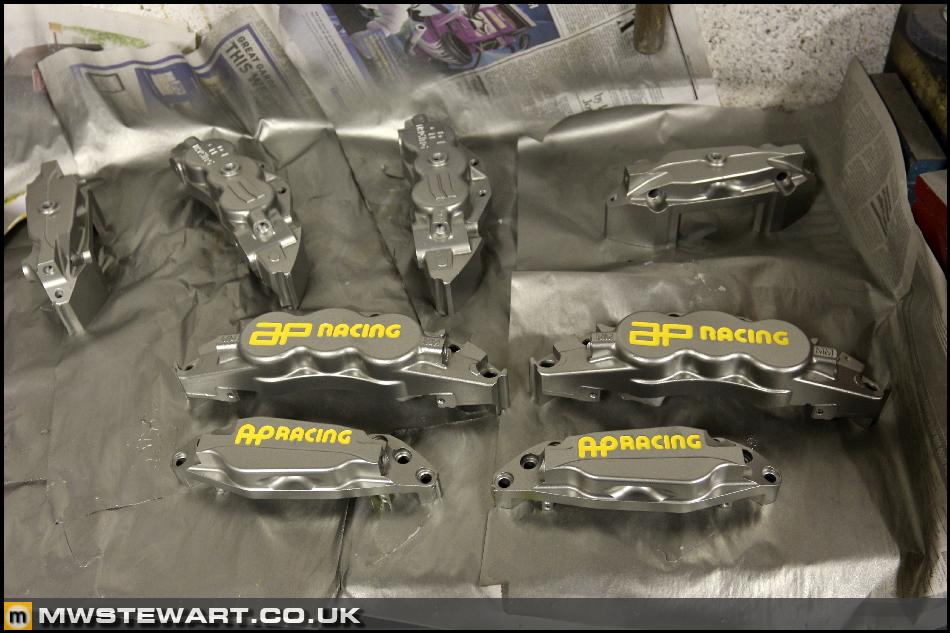
Cashmere Gold looks more like a grey here, but turns slightly gold once lacquer is applied.

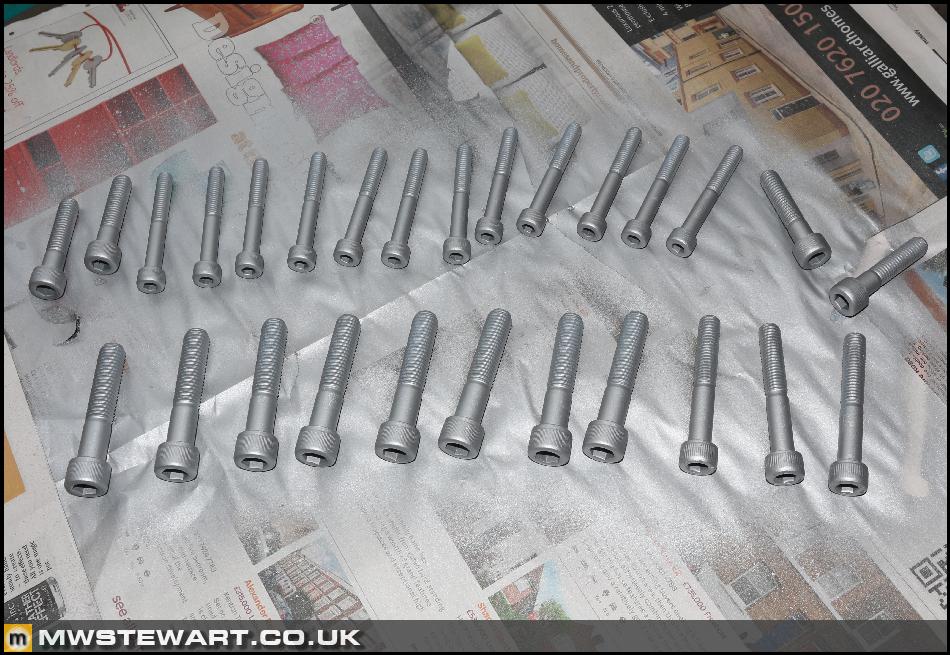
I purchased a complete set of new 12.9 Cap Screws to rebuild/mount the brakes with, and these were etch primed and then zinc primed.
I am very happy with the overall look.
I'm now waiting for my order to arrive from AP. Once it arrives I make a start on cleaning out all caliper threads with a tap, cleaning the mounting surfaces with a Scotch Brite pad, and finally I will rebuild with the new seals, bridge pipes etc.
Handbrake Caliper Modifications
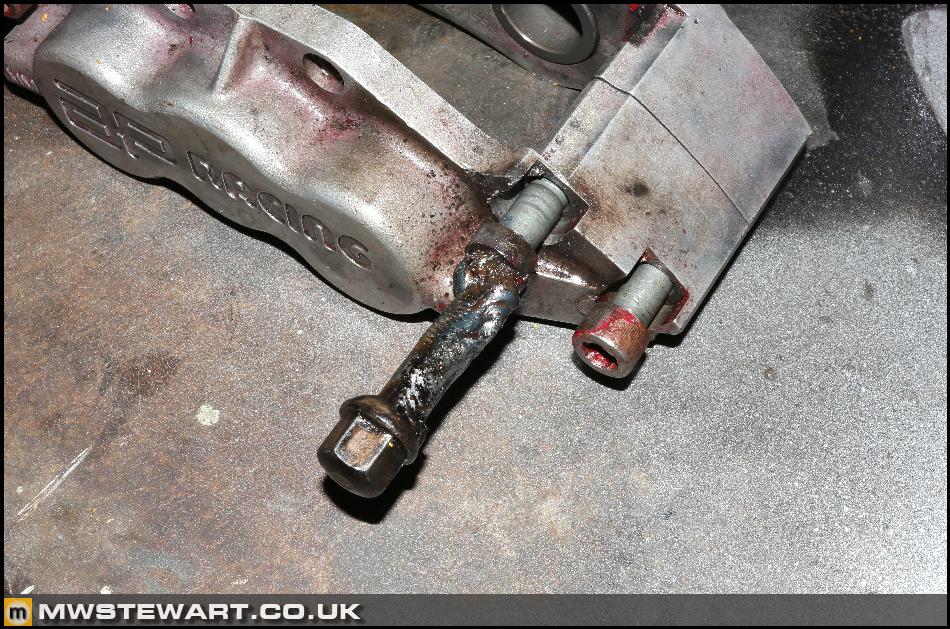
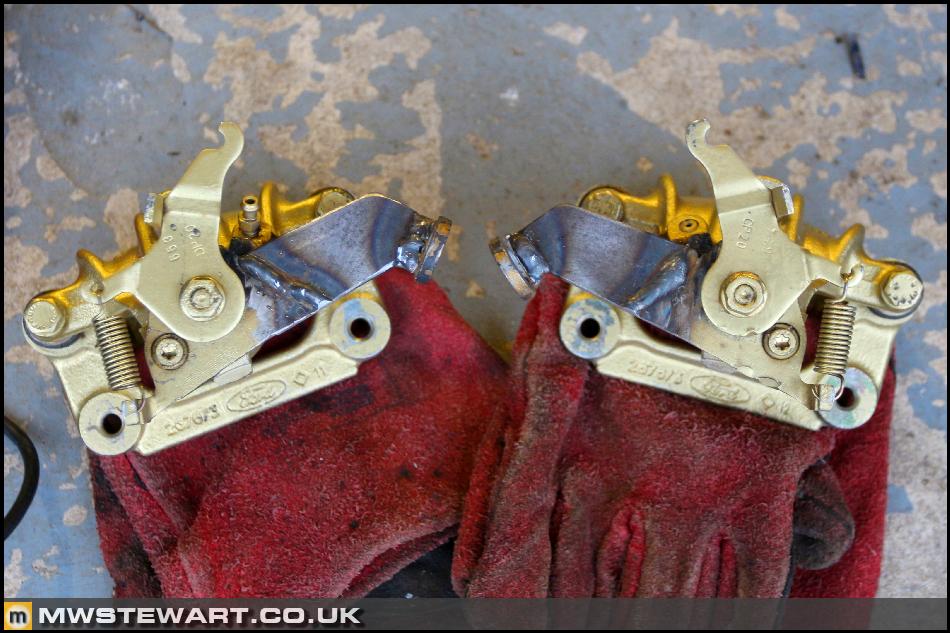
The Focus calipers are mounted further outboard on my car than they would be on a standard Focus, and that combined with the thicker KW struts means that the handbrake cable attachment point won't work. I cut off the original mount point and fabricated these extensions to move the attachment point to a new position whilst maintaining the same 85mm distance to the actuating lever.
To complete the job I welded the original attachment points to the end of the extensions.
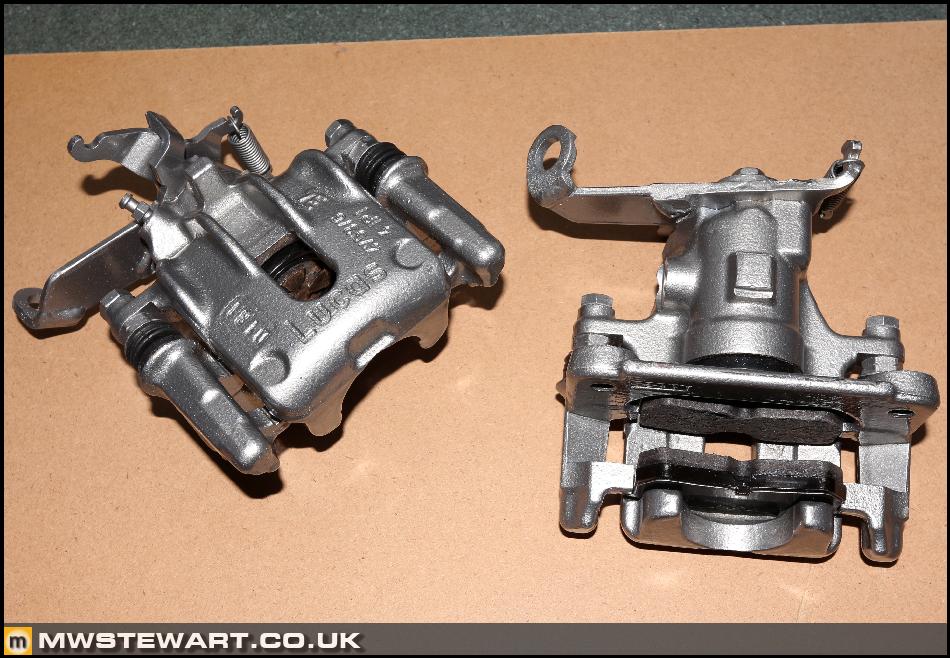
I then resprayed the calipers to match the AP's, as I wasn't happy with the amount of different colours behind the rear wheels.
Hi,I would like to say, wow what a awesome job. Hats off. I too have Ap racing calipers that I'm looking at painting. I have a few questions. Did you use etch primer then primer over the top before applying your base coat? How much paint did you use? And do you know what paint you used for the logos? Many thanks. Despite them looking reasonable I've stripped down both the front and rear calipers to ensure everything is ship shape. Nitromors was used to remove the original paint from the front CP5555s, and also the yellow 'AP Racing' logo on the rear CP7030s.
I hit problems with the CP5555 where the innermost of the two bridge bolts were rounded on both calipers. AP have used a low profile cap screw in this position to keep the bolt flush with the caliper face, but the trade-off for this cosmetic touch is reduced purchase when attempting to loosen the screw. In the end I welded on an old wheel bolt to aid removal.
I made this tool winch connects one of my wall air outlets to the caliper bleed screw port and allows me to remove the pistons using compressed air.
Calipers stripped. I'm going to replace all bolts, wear plates, and seals as a matter of course, and the pistons on an 'as required' basis. One CP7030 and two CP5555 pistons will be replaced due due to minor scoring and corrosion pitting near the external seal line. Overall everything was in good condition; I'm being picky as I don't want to take any chances here.
Only the CP5555 came with Anti-Knockback springs installed but I can easily retrofit to the CP7030 if required, although for now I will omit them and see how I get one in the first year of driving.
The following order is with AP and I'm informed it'll be ready for the end of Jan.
[u]Front - CP5555 (CP5555-814 to -817) Calipers[/u]
Piston Ø38.1 = CP2409-124 x 2
Seal Repair Kit = CP4519-CEJ
Pad Retainer Type = CP5555-126 x 4
Pad Retainer Bolt = CP3894-139 x 4
Wear Plates = CP5555-120 x 8
Fluid Pipe = CP5555-11 x 2
[u]Rear - CP7030 Calipers[/u]
Pad set = CP3345D38 x 1
Piston Ø34.9 = CP7030-108 x 2
Seal Repair Kit = CP4518-GK x 2
Wear Plates = CP7030-106 x 8
Fluid Pipe = CP7030-6 x 2
Bobbin Kit CP2494-595K12 x 2
RH Disc 278x16mm CP3770-1014CG4 x 1
In the mean time I carried on with the refurbishment and with all seals removed the caliper sections were blown through with brake cleaner, degreased, washed at 70 degrees, and then Etch Primed.
I experimented with a few colours before choosing something I was happy with. My intent was to match the grey anodising of the racing line of callipers (road calipers are usually black or red) and for that I used Ford Polar Grey, which was too light. I then decided I like the later green/gold AP used on the replacement for the CP5555 (same body but different construction bolts used) so I tried two of my favourite Jaguar colours from recent times; Winter Gold (foreground) which was too yellow, and then Cashmere Gold (background) which was perfect.
I've used the Halfords mixing service in the past and found the paint to be good, so that's what I've used here. For the 'AP Racing' recessed logos I'm using a model paint, and rather than use a brush which I figured would take too long, I purchased a set of syringes from a fishing tackle shop and my plan is to inject the paint to fill the recess.
My plan worked perfectly and the results are great. Here are the calipers in basecoat and with the logos infilled.
Cashmere Gold looks more like a grey here, but turns slightly gold once lacquer is applied.
I purchased a complete set of new 12.9 Cap Screws to rebuild/mount the brakes with, and these were etch primed and then zinc primed.
I am very happy with the overall look.
I'm now waiting for my order to arrive from AP. Once it arrives I make a start on cleaning out all caliper threads with a tap, cleaning the mounting surfaces with a Scotch Brite pad, and finally I will rebuild with the new seals, bridge pipes etc.
Handbrake Caliper Modifications
The Focus calipers are mounted further outboard on my car than they would be on a standard Focus, and that combined with the thicker KW struts means that the handbrake cable attachment point won't work. I cut off the original mount point and fabricated these extensions to move the attachment point to a new position whilst maintaining the same 85mm distance to the actuating lever.
To complete the job I welded the original attachment points to the end of the extensions.
I then resprayed the calipers to match the AP's, as I wasn't happy with the amount of different colours behind the rear wheels.
mwstewart said:
AP Racing Caliper Inspection and Rebuild
Despite them looking reasonable I've stripped down both the front and rear calipers to ensure everything is ship shape. Nitromors was used to remove the original paint from the front CP5555s, and also the yellow 'AP Racing' logo on the rear CP7030s.
I hit problems with the CP5555 where the innermost of the two bridge bolts were rounded on both calipers. AP have used a low profile cap screw in this position to keep the bolt flush with the caliper face, but the trade-off for this cosmetic touch is reduced purchase when attempting to loosen the screw. In the end I welded on an old wheel bolt to aid removal.
I made this tool winch connects one of my wall air outlets to the caliper bleed screw port and allows me to remove the pistons using compressed air.
Calipers stripped. I'm going to replace all bolts, wear plates, and seals as a matter of course, and the pistons on an 'as required' basis. One CP7030 and two CP5555 pistons will be replaced due due to minor scoring and corrosion pitting near the external seal line. Overall everything was in good condition; I'm being picky as I don't want to take any chances here.
Only the CP5555 came with Anti-Knockback springs installed but I can easily retrofit to the CP7030 if required, although for now I will omit them and see how I get one in the first year of driving.
The following order is with AP and I'm informed it'll be ready for the end of Jan.
[u]Front - CP5555 (CP5555-814 to -817) Calipers[/u]
Piston Ø38.1 = CP2409-124 x 2
Seal Repair Kit = CP4519-CEJ
Pad Retainer Type = CP5555-126 x 4
Pad Retainer Bolt = CP3894-139 x 4
Wear Plates = CP5555-120 x 8
Fluid Pipe = CP5555-11 x 2
[u]Rear - CP7030 Calipers[/u]
Pad set = CP3345D38 x 1
Piston Ø34.9 = CP7030-108 x 2
Seal Repair Kit = CP4518-GK x 2
Wear Plates = CP7030-106 x 8
Fluid Pipe = CP7030-6 x 2
Bobbin Kit CP2494-595K12 x 2
RH Disc 278x16mm CP3770-1014CG4 x 1
In the mean time I carried on with the refurbishment and with all seals removed the caliper sections were blown through with brake cleaner, degreased, washed at 70 degrees, and then Etch Primed.
I experimented with a few colours before choosing something I was happy with. My intent was to match the grey anodising of the racing line of callipers (road calipers are usually black or red) and for that I used Ford Polar Grey, which was too light. I then decided I like the later green/gold AP used on the replacement for the CP5555 (same body but different construction bolts used) so I tried two of my favourite Jaguar colours from recent times; Winter Gold (foreground) which was too yellow, and then Cashmere Gold (background) which was perfect.
I've used the Halfords mixing service in the past and found the paint to be good, so that's what I've used here. For the 'AP Racing' recessed logos I'm using a model paint, and rather than use a brush which I figured would take too long, I purchased a set of syringes from a fishing tackle shop and my plan is to inject the paint to fill the recess.
My plan worked perfectly and the results are great. Here are the calipers in basecoat and with the logos infilled.
Cashmere Gold looks more like a grey here, but turns slightly gold once lacquer is applied.
I purchased a complete set of new 12.9 Cap Screws to rebuild/mount the brakes with, and these were etch primed and then zinc primed.
I am very happy with the overall look.
I'm now waiting for my order to arrive from AP. Once it arrives I make a start on cleaning out all caliper threads with a tap, cleaning the mounting surfaces with a Scotch Brite pad, and finally I will rebuild with the new seals, bridge pipes etc.
Handbrake Caliper Modifications
The Focus calipers are mounted further outboard on my car than they would be on a standard Focus, and that combined with the thicker KW struts means that the handbrake cable attachment point won't work. I cut off the original mount point and fabricated these extensions to move the attachment point to a new position whilst maintaining the same 85mm distance to the actuating lever.
To complete the job I welded the original attachment points to the end of the extensions.
I then resprayed the calipers to match the AP's, as I wasn't happy with the amount of different colours behind the rear wheels.
Hi,I would like to say, wow what a awesome job. Hats off. I too have Ap racing calipers that I'm looking at painting. I have a few questions. Did you use etch primer then primer over the top before applying your base coat? How much paint did you use? And do you know what paint you used for the logos? Many thanks. Despite them looking reasonable I've stripped down both the front and rear calipers to ensure everything is ship shape. Nitromors was used to remove the original paint from the front CP5555s, and also the yellow 'AP Racing' logo on the rear CP7030s.
I hit problems with the CP5555 where the innermost of the two bridge bolts were rounded on both calipers. AP have used a low profile cap screw in this position to keep the bolt flush with the caliper face, but the trade-off for this cosmetic touch is reduced purchase when attempting to loosen the screw. In the end I welded on an old wheel bolt to aid removal.
I made this tool winch connects one of my wall air outlets to the caliper bleed screw port and allows me to remove the pistons using compressed air.
Calipers stripped. I'm going to replace all bolts, wear plates, and seals as a matter of course, and the pistons on an 'as required' basis. One CP7030 and two CP5555 pistons will be replaced due due to minor scoring and corrosion pitting near the external seal line. Overall everything was in good condition; I'm being picky as I don't want to take any chances here.
Only the CP5555 came with Anti-Knockback springs installed but I can easily retrofit to the CP7030 if required, although for now I will omit them and see how I get one in the first year of driving.
The following order is with AP and I'm informed it'll be ready for the end of Jan.
[u]Front - CP5555 (CP5555-814 to -817) Calipers[/u]
Piston Ø38.1 = CP2409-124 x 2
Seal Repair Kit = CP4519-CEJ
Pad Retainer Type = CP5555-126 x 4
Pad Retainer Bolt = CP3894-139 x 4
Wear Plates = CP5555-120 x 8
Fluid Pipe = CP5555-11 x 2
[u]Rear - CP7030 Calipers[/u]
Pad set = CP3345D38 x 1
Piston Ø34.9 = CP7030-108 x 2
Seal Repair Kit = CP4518-GK x 2
Wear Plates = CP7030-106 x 8
Fluid Pipe = CP7030-6 x 2
Bobbin Kit CP2494-595K12 x 2
RH Disc 278x16mm CP3770-1014CG4 x 1
In the mean time I carried on with the refurbishment and with all seals removed the caliper sections were blown through with brake cleaner, degreased, washed at 70 degrees, and then Etch Primed.
I experimented with a few colours before choosing something I was happy with. My intent was to match the grey anodising of the racing line of callipers (road calipers are usually black or red) and for that I used Ford Polar Grey, which was too light. I then decided I like the later green/gold AP used on the replacement for the CP5555 (same body but different construction bolts used) so I tried two of my favourite Jaguar colours from recent times; Winter Gold (foreground) which was too yellow, and then Cashmere Gold (background) which was perfect.
I've used the Halfords mixing service in the past and found the paint to be good, so that's what I've used here. For the 'AP Racing' recessed logos I'm using a model paint, and rather than use a brush which I figured would take too long, I purchased a set of syringes from a fishing tackle shop and my plan is to inject the paint to fill the recess.
My plan worked perfectly and the results are great. Here are the calipers in basecoat and with the logos infilled.
Cashmere Gold looks more like a grey here, but turns slightly gold once lacquer is applied.
I purchased a complete set of new 12.9 Cap Screws to rebuild/mount the brakes with, and these were etch primed and then zinc primed.
I am very happy with the overall look.
I'm now waiting for my order to arrive from AP. Once it arrives I make a start on cleaning out all caliper threads with a tap, cleaning the mounting surfaces with a Scotch Brite pad, and finally I will rebuild with the new seals, bridge pipes etc.
Handbrake Caliper Modifications
The Focus calipers are mounted further outboard on my car than they would be on a standard Focus, and that combined with the thicker KW struts means that the handbrake cable attachment point won't work. I cut off the original mount point and fabricated these extensions to move the attachment point to a new position whilst maintaining the same 85mm distance to the actuating lever.
To complete the job I welded the original attachment points to the end of the extensions.
I then resprayed the calipers to match the AP's, as I wasn't happy with the amount of different colours behind the rear wheels.
Gassing Station | Readers' Cars | Top of Page | What's New | My Stuff