500+bhp Mk3 Fiesta Project
Discussion


robsa said:
I SO want to hang with you and play twister. Who the hell buys their dad a new car interior for xmas?! What did you do for your mum? Drop a supercharged Chevy V8 into her Citroen Picasso?! I must admit I harbour a fervent and secret hope that once this is done you are going to turn your attentions to a 'super restore' of a Bertie (one of my top 5 most desirable cars ever)....
What is a Bertie? I feel I probably should know, but I don't.mwstewart said:
robsa said:
I SO want to hang with you and play twister. Who the hell buys their dad a new car interior for xmas?! What did you do for your mum? Drop a supercharged Chevy V8 into her Citroen Picasso?! I must admit I harbour a fervent and secret hope that once this is done you are going to turn your attentions to a 'super restore' of a Bertie (one of my top 5 most desirable cars ever)....
What is a Bertie? I feel I probably should know, but I don't.I wonder if robsa meant a Beetle but has been autocorrected to Bertie.
Doing a really good air cooled Beetle is just about the hardest job there is. Not because it's a complex car or parts being rare because they're not but because it's all been done before and to an incredibly high standard.
Doing a really good air cooled Beetle is just about the hardest job there is. Not because it's a complex car or parts being rare because they're not but because it's all been done before and to an incredibly high standard.
Clock spring
Having and tested built a successful prototype I could next modify a new clock spring to create a 'production' version.

Clock spring - Front Connection
To start I removed the ribbon cable from a second clock spring and added heat shrink to isolate the ribbon to cable joints at each end.

I dismantled the new spring and carefully 'doubled up' the terminals on each side of the body by adding the second ribbon. The I modified the exit to accommodate the second set of cables.

Given this is a safety critical part I mixed up some two part construction adhesive and used it to set the terminal blocks to ensure that no compromised connections could jeopardise the airbag system.

I then finished with heat shrink before the adhesive set.

Ribbons wound and taped ready for the next connection.

Clock spring - Rear Connection
The approach I was taking with the ribbons - winding both together - meant that one finished at a slightly different position on the clock body, so I could not double up the rear terminal. I created a new exit point by sawing a small slot in the body at a precise point, and folding the ribbon to exit through the slot.

I secured the ribbon to the body with Tiger Seal, and when the initial application had set I heaped another application on the exterior of the body to prevent damage to the ribbon if the cables are pulled/tugged etc..

Completed clock spring. The light blue arrows show the new terminals on each side of the spring. The green arrow points to the two-pin connectors I used: I scoured a scrap yard and found Audi use nice, small DIN pin size pin connectors for their sun visors, so I bought quote a lot of them to use on the project.

Cruise Control: Steering Wheel Controls
As well as the clock spring, I had also prototyped a cruise control equipped Fiesta steering wheel (cruise control was never fitted to a Fiesta prior to 2006). A new steering wheel complete with buttons was included with the kit, which I removed those use on the Fiesta.

I cut off the Focus mounting tabs - highlighted by the green arrows.

Using two part construction adhesive I bonded the switch units to the previous fabricated steering wheel bracket I.

The bracket with switches was bonded to the steering wheel, and I used some of those Audi connectors for the cable terminations; there is an extra connector required here to power the switches. I took power from the existing horn feed and colour coded the connectors with red heat shrink to indicate 12v.

The final step was to clear the airbag itself to clear the new switches. The completed wheel is on the right shown as a comparison to a standard Fiesta wheel on the left.

Instrument Cluster
Despite being nearly new and stored dry in the dark, the needles on the Ghia instrument cluster had yellowed over time. I ordered some model paint to spruce them up a bit: I tried Tamiya X-6 Orange and 'Mr Hobby' #C171 Fluorescent Red; neither did it for me.

I then had an idea to cannibalise one of the sport clusters I have and swap the needles to the Ghia cluster.

Nicely jazzed up.

Having and tested built a successful prototype I could next modify a new clock spring to create a 'production' version.
Clock spring - Front Connection
To start I removed the ribbon cable from a second clock spring and added heat shrink to isolate the ribbon to cable joints at each end.
I dismantled the new spring and carefully 'doubled up' the terminals on each side of the body by adding the second ribbon. The I modified the exit to accommodate the second set of cables.
Given this is a safety critical part I mixed up some two part construction adhesive and used it to set the terminal blocks to ensure that no compromised connections could jeopardise the airbag system.
I then finished with heat shrink before the adhesive set.
Ribbons wound and taped ready for the next connection.
Clock spring - Rear Connection
The approach I was taking with the ribbons - winding both together - meant that one finished at a slightly different position on the clock body, so I could not double up the rear terminal. I created a new exit point by sawing a small slot in the body at a precise point, and folding the ribbon to exit through the slot.
I secured the ribbon to the body with Tiger Seal, and when the initial application had set I heaped another application on the exterior of the body to prevent damage to the ribbon if the cables are pulled/tugged etc..
Completed clock spring. The light blue arrows show the new terminals on each side of the spring. The green arrow points to the two-pin connectors I used: I scoured a scrap yard and found Audi use nice, small DIN pin size pin connectors for their sun visors, so I bought quote a lot of them to use on the project.
Cruise Control: Steering Wheel Controls
As well as the clock spring, I had also prototyped a cruise control equipped Fiesta steering wheel (cruise control was never fitted to a Fiesta prior to 2006). A new steering wheel complete with buttons was included with the kit, which I removed those use on the Fiesta.
I cut off the Focus mounting tabs - highlighted by the green arrows.
Using two part construction adhesive I bonded the switch units to the previous fabricated steering wheel bracket I.
The bracket with switches was bonded to the steering wheel, and I used some of those Audi connectors for the cable terminations; there is an extra connector required here to power the switches. I took power from the existing horn feed and colour coded the connectors with red heat shrink to indicate 12v.
The final step was to clear the airbag itself to clear the new switches. The completed wheel is on the right shown as a comparison to a standard Fiesta wheel on the left.
Instrument Cluster
Despite being nearly new and stored dry in the dark, the needles on the Ghia instrument cluster had yellowed over time. I ordered some model paint to spruce them up a bit: I tried Tamiya X-6 Orange and 'Mr Hobby' #C171 Fluorescent Red; neither did it for me.
I then had an idea to cannibalise one of the sport clusters I have and swap the needles to the Ghia cluster.
Nicely jazzed up.
 tting myself driving it around due to the amount of work you've put in.
Thanks all. This isn't a car I will be leaving places overnight or using in, say, London for example, though it will be going to Tuscany and other places on the continent once complete.
Thanks guys. I have the love back for it at the moment
I've decided to teach myself TIG welding, so I've bought a nice Murex unit that fits on top of my Murex MIG. I figured that for what I would pay to have a bespoke exhaust made, I would prefer to spend the money on the equipment to make one myself i.e. a welder and metal chop saw.

I bought a new mirror trim for the N/S door, from http://www.tompeters-fordparts.co.uk

Dashboard Trim and Instrument Cluster
I bought a pair of hole punch pliers from a haberdashery outlet to punch holes in self adhesive felt pads; the plan is to use the pads on trim mounting positions to prevent noise/rattles. I have experimented with rubber O rings and washers in the past, which were OK for a time, but they eventually compress leaving trim loose thus causing the exact problem they were intended to solve.

Here is one of the punched pads stuck to an instrument cluster mount (screw) hole.

New column shroud trims. These are from a Puma as Ford only fitted 'Satin Black' to this year of Fiesta whereas the Puma got colour coded column trims. Puma/Fiesta trims are interchangeable.

I noticed on the old Fiesta trim I had that Ford had applied some reinforcement foam/plastic to two areas - see green arrows - which wasn't present on the new trims, however the alignment marks were.

I removed the material and bonded it to the new trims, and also lined them with Silent Coat Absorber 15.

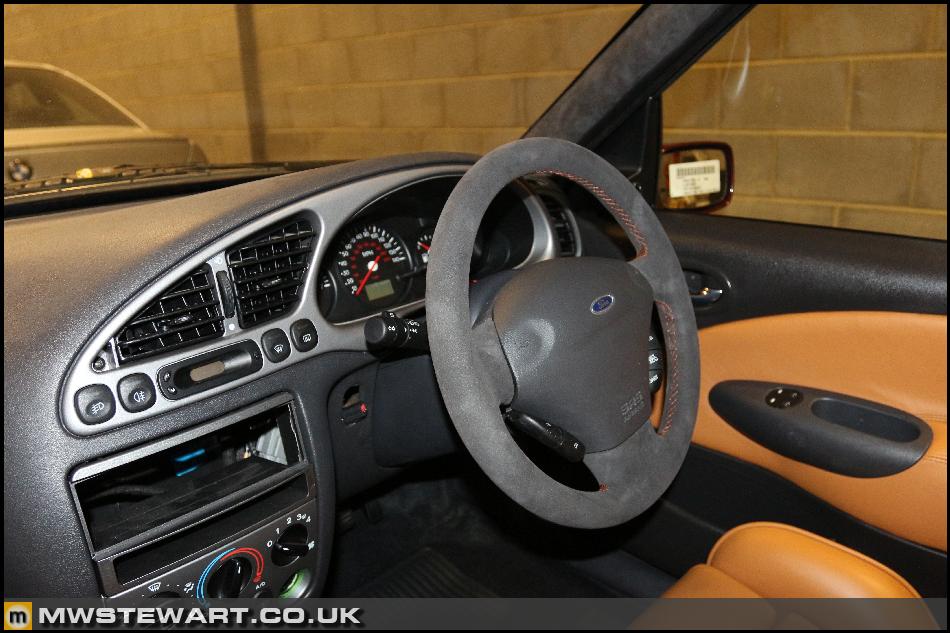
Here is the instrument cluster, bezel, switches, clock, steering wheel etc. fitted. I'm very pleased with how its come together.


Rear View Mirror & Light/Moisture Sensor Mount
My previous approach to hiding the auto-dim mirror & rain sensor mount was to use black vinyl. I found that the vinyl did not have sufficient shear resistance to allow multiple removals of the rear view mirror, so I looked for another solution. I found that Dinitrol produce a professional grade windscreen paint intended to be applied at the edge of screens prior to bonding, which is exactly what I would be doing here.

I masked up the screen using a card template.

The Dinitrol kit comes with an alcohol based degreaser/adhesion promoter which is applied first. To apply the actual paint I used some adhesive buds.

I left the paint drying this afternoon ready for the mirror button and light/moisture sensor frame to be bonded on once the paint is dry.

Thanks guys. I have the love back for it at the moment
I've decided to teach myself TIG welding, so I've bought a nice Murex unit that fits on top of my Murex MIG. I figured that for what I would pay to have a bespoke exhaust made, I would prefer to spend the money on the equipment to make one myself i.e. a welder and metal chop saw.
I bought a new mirror trim for the N/S door, from http://www.tompeters-fordparts.co.uk
Dashboard Trim and Instrument Cluster
I bought a pair of hole punch pliers from a haberdashery outlet to punch holes in self adhesive felt pads; the plan is to use the pads on trim mounting positions to prevent noise/rattles. I have experimented with rubber O rings and washers in the past, which were OK for a time, but they eventually compress leaving trim loose thus causing the exact problem they were intended to solve.
Here is one of the punched pads stuck to an instrument cluster mount (screw) hole.
New column shroud trims. These are from a Puma as Ford only fitted 'Satin Black' to this year of Fiesta whereas the Puma got colour coded column trims. Puma/Fiesta trims are interchangeable.
I noticed on the old Fiesta trim I had that Ford had applied some reinforcement foam/plastic to two areas - see green arrows - which wasn't present on the new trims, however the alignment marks were.
I removed the material and bonded it to the new trims, and also lined them with Silent Coat Absorber 15.
Here is the instrument cluster, bezel, switches, clock, steering wheel etc. fitted. I'm very pleased with how its come together.
Rear View Mirror & Light/Moisture Sensor Mount
My previous approach to hiding the auto-dim mirror & rain sensor mount was to use black vinyl. I found that the vinyl did not have sufficient shear resistance to allow multiple removals of the rear view mirror, so I looked for another solution. I found that Dinitrol produce a professional grade windscreen paint intended to be applied at the edge of screens prior to bonding, which is exactly what I would be doing here.
I masked up the screen using a card template.
The Dinitrol kit comes with an alcohol based degreaser/adhesion promoter which is applied first. To apply the actual paint I used some adhesive buds.
I left the paint drying this afternoon ready for the mirror button and light/moisture sensor frame to be bonded on once the paint is dry.
aspirated said:
This is just amazing. You must get a huge amount of satisfaction from modifying your cars (properly!)
Thank you. It is extremely satisfying 
carpetsoiler said:
What happens when you Vmax it above 140? Are you just going to remove the needle buffer and use GPS for the final 20mph or so?
This is looking so good. You've really worked wonders on it; nice to see the interior is looking more and more like a finished product.
Yes, that is the plan. The cluster is the only compromise I have taken so far on the project; the speedo range isn't matched to the cars' potential and it isn't backlit. I have pre-wired the car for a twisted pair between the ECU and the cluster so that I can revisit this area later on and install some CAN based clocks that do exactly what I want them to.This is looking so good. You've really worked wonders on it; nice to see the interior is looking more and more like a finished product.
k-ink said:
This keeps on getting better. It must be the best fiesta in the world.
When do you think it will be 100% finished?
Cheers When do you think it will be 100% finished?
My aim is to have everything completed this year - including the engine mapped on the dyno - aside from the front suspension and subframe. I'm still undecided about the front suspension at this point but there's still plenty to be getting on with aside from that.
I hope at some point Ford release a lightweight Revoknuckle on a new RS model
Thank you.
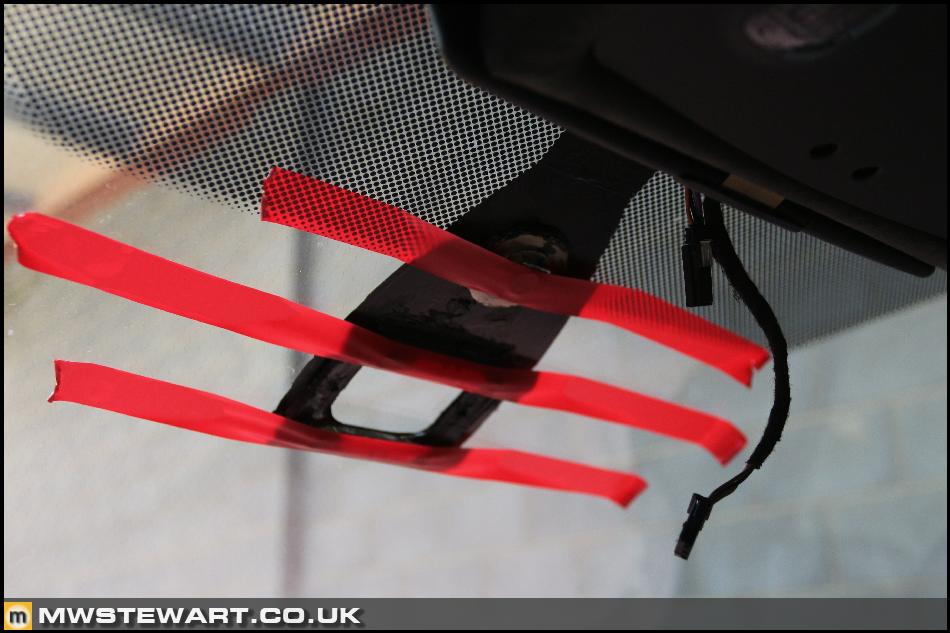
Rear View Mirror & Light/Moisture Sensor Mount - Completed
The glass paint had 'gone off' enough last night to allow bonding of the mirror and rain sensor mounts, so I left those taped up overnight. I removed the tape this morning and all was well.
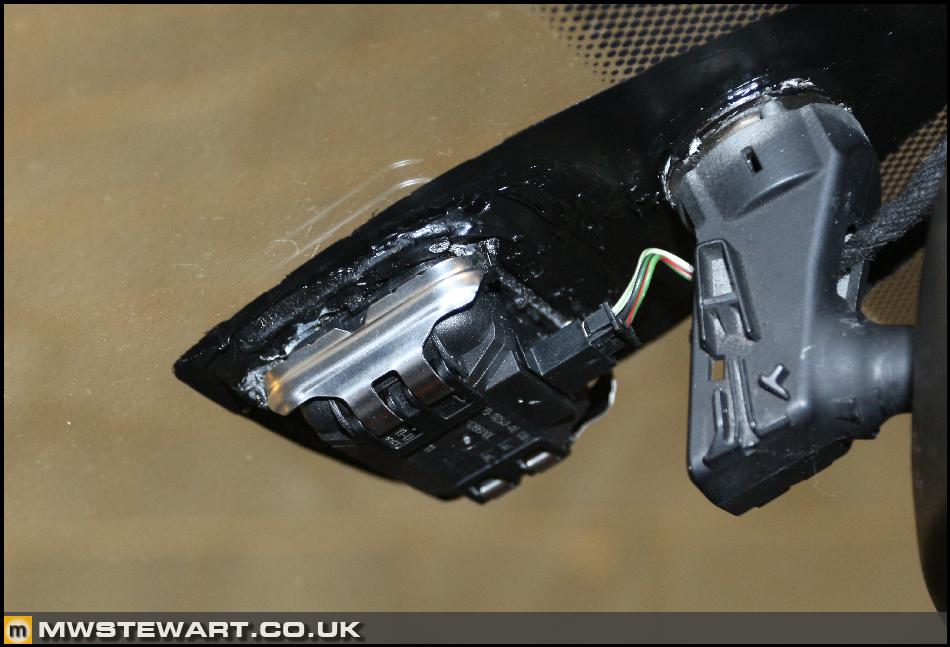
New Ford rain/light sensor for a Mk3 Mondeo, to match the auto lights and wiper system I have integrated.

Mirror and sensor installed. I was liberal with my application of Tiger Seal, so both are nice and secure this time!
There is not a fastening for the mirror and sensor connectors; they are just held in stasis by cable tension, I have lined the mirror trim with Silent Coat Absorber 15 to prevent undue movement of the cables and connectors.

Mk3 Mondeo Auto-dim mirror and shrouds installed - I'm happy.

Exterior view.

Rear View Mirror & Light/Moisture Sensor Mount - Completed
The glass paint had 'gone off' enough last night to allow bonding of the mirror and rain sensor mounts, so I left those taped up overnight. I removed the tape this morning and all was well.
New Ford rain/light sensor for a Mk3 Mondeo, to match the auto lights and wiper system I have integrated.
Mirror and sensor installed. I was liberal with my application of Tiger Seal, so both are nice and secure this time!
There is not a fastening for the mirror and sensor connectors; they are just held in stasis by cable tension, I have lined the mirror trim with Silent Coat Absorber 15 to prevent undue movement of the cables and connectors.
Mk3 Mondeo Auto-dim mirror and shrouds installed - I'm happy.
Exterior view.
Gassing Station | Readers' Cars | Top of Page | What's New | My Stuff