Guide to removing door mechanism
Discussion


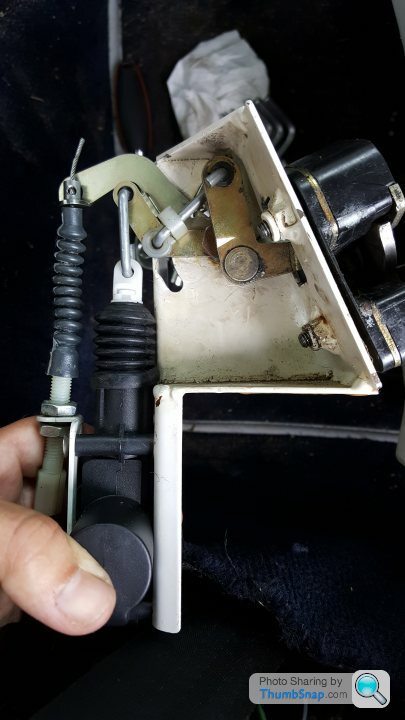
Having spent a bit time today figuring out how to remove and refit the Tuscan door mechanism, I thought I'd post a quick step-by-step guide in case it comes in handy for anyone else. It's pretty straightforward once you have it figured out, but some of it has to be done by feel as the mounting plate obscures the actual mechanism - I always find it helps to be able to picture in your mind what it is you're trying to achieve, so I'll start with a picture of the mechanism (normally hidden from view):
Step 1: Remove the trim panel which covers the B pillar (the one with the speaker mounted below the rear quarter window). Apparently in some cars this is secured with a single screw near the bottom, but mine is an early Tuscan and the panel is just a tight(ish) fit without any screws/bolts holding it in place. The front edge of the panel is tucked under the rubber seal around the door frame - pull the seal away from this area to release the trim panel, and then it should pull out easily.
Step 2: The actual latch mechanism itself has a brass arm (C) that is connected by a steel pin (B) to the L-shaped lever that is pulled by the solenoid. The photo below shows a close-up of the clip (sorry for the poor focus, this was cropped from a larger photo). Start by rotating the plastic clip (A) in the anticlockwise direction when viewed from inside the car (clockwise in the photo), to unclip (A) from the shaft of the steel pin (B). This part of the mechanism is hidden from view, so you need to feel for the plastic clip (A) and press down with a reasonable amount of force to pop it off the shaft of the pin (B).
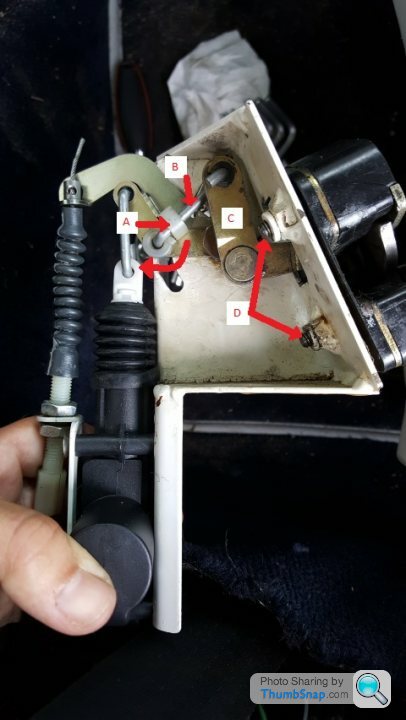
Step 3: Once the clip (A) has been disengaged, you can pull the pin (B) out of its hole in the brass arm. If you're standing inside the cabin while doing this, the pin will be moving away from you (i.e. towards the outside of the car). The door latch mechanism itself, which is mounted on the outside under a metal faceplate about halfway up the door sill, is now disconnected from the solenoid assembly - except for the two hex key bolts (D), which we will deal with next.
Step 4: Now remove the metal faceplate on the door sill that covers the door latch mechanism - this is held in place by three self-tappers.
Step 5: With the faceplate off, remove the two 4mm hex key bolts that hold the latch mechanism (outside) to the solenoid mounting bracket (inside). The ends of the bolts (D) can be seen protruding through the mounting holes in the bracket in the photo above. Apparently some cars have washers between the latch and the bracket (mine doesn't), so keep an eye out and be ready to catch them (if your car has them fitted).
Step 6: You should now be able to pull the latch mechanism (on the outside) and the mounting;) bracket (on the inside) away from each other. The hardest part is getting the large arm (C) out through the slot in the front of the mounting bracket, and through the hole in the fibreglass of the B pillar - this might take quite a bit of wriggling, but persevere and you'll get there in the end!
NB when maneuvering the latch mechanism in step 6, take care not to twist the delicate metal arm of the microswitch for the door sensor, which is mounted adjacent the latch mechanism. Luckily the arm is quite resilient, so if you do happen to bend it inadvertently it can be gently teased back into shape with a pair of needle nosed pliers
Step 7: With the latch mechanism removed, the mounting bracket inside the B pillar will just be hanging loose inside the B pillar. There should be enough slack in the wires to the solenoid and the emergency release cable to pull the whole solenoid/bracket assembly out and into the cabin, as shown in the photo above.
NB. You could actually do steps 4-5 before steps 1-3, but I found it easier to remove the fiddly plastic clip (A) whilst everything else was still securely fixed in place.
Overall it's a fairly straightforward process - probably takes around 5-10 mins once you know how to do it! I found step 6 to be the only really awkward bit.
As always, refitting is the reverse of removal
ETA warning about the microswitch at step 6
Step 1: Remove the trim panel which covers the B pillar (the one with the speaker mounted below the rear quarter window). Apparently in some cars this is secured with a single screw near the bottom, but mine is an early Tuscan and the panel is just a tight(ish) fit without any screws/bolts holding it in place. The front edge of the panel is tucked under the rubber seal around the door frame - pull the seal away from this area to release the trim panel, and then it should pull out easily.
Step 2: The actual latch mechanism itself has a brass arm (C) that is connected by a steel pin (B) to the L-shaped lever that is pulled by the solenoid. The photo below shows a close-up of the clip (sorry for the poor focus, this was cropped from a larger photo). Start by rotating the plastic clip (A) in the anticlockwise direction when viewed from inside the car (clockwise in the photo), to unclip (A) from the shaft of the steel pin (B). This part of the mechanism is hidden from view, so you need to feel for the plastic clip (A) and press down with a reasonable amount of force to pop it off the shaft of the pin (B).
Step 3: Once the clip (A) has been disengaged, you can pull the pin (B) out of its hole in the brass arm. If you're standing inside the cabin while doing this, the pin will be moving away from you (i.e. towards the outside of the car). The door latch mechanism itself, which is mounted on the outside under a metal faceplate about halfway up the door sill, is now disconnected from the solenoid assembly - except for the two hex key bolts (D), which we will deal with next.
Step 4: Now remove the metal faceplate on the door sill that covers the door latch mechanism - this is held in place by three self-tappers.
Step 5: With the faceplate off, remove the two 4mm hex key bolts that hold the latch mechanism (outside) to the solenoid mounting bracket (inside). The ends of the bolts (D) can be seen protruding through the mounting holes in the bracket in the photo above. Apparently some cars have washers between the latch and the bracket (mine doesn't), so keep an eye out and be ready to catch them (if your car has them fitted).
Step 6: You should now be able to pull the latch mechanism (on the outside) and the mounting;) bracket (on the inside) away from each other. The hardest part is getting the large arm (C) out through the slot in the front of the mounting bracket, and through the hole in the fibreglass of the B pillar - this might take quite a bit of wriggling, but persevere and you'll get there in the end!
NB when maneuvering the latch mechanism in step 6, take care not to twist the delicate metal arm of the microswitch for the door sensor, which is mounted adjacent the latch mechanism. Luckily the arm is quite resilient, so if you do happen to bend it inadvertently it can be gently teased back into shape with a pair of needle nosed pliers
Step 7: With the latch mechanism removed, the mounting bracket inside the B pillar will just be hanging loose inside the B pillar. There should be enough slack in the wires to the solenoid and the emergency release cable to pull the whole solenoid/bracket assembly out and into the cabin, as shown in the photo above.
NB. You could actually do steps 4-5 before steps 1-3, but I found it easier to remove the fiddly plastic clip (A) whilst everything else was still securely fixed in place.
Overall it's a fairly straightforward process - probably takes around 5-10 mins once you know how to do it! I found step 6 to be the only really awkward bit.
As always, refitting is the reverse of removal
ETA warning about the microswitch at step 6
Edited by 8ball_Rob on Monday 12th September 22:42
Edited by 8ball_Rob on Wednesday 6th October 19:41
Edited by 8ball_Rob on Wednesday 6th October 21:13

Nice write up
I've had my door stuff out a few times to get it working nicely.
Now a real challenge...the passenger door is stuck fast! Mechanism activates fine by button and cable pull...but I get only a kind of first disengagement..if push the door afterwards I get very faint click
Tried some brute force while pulling cable release...nothing
What next?
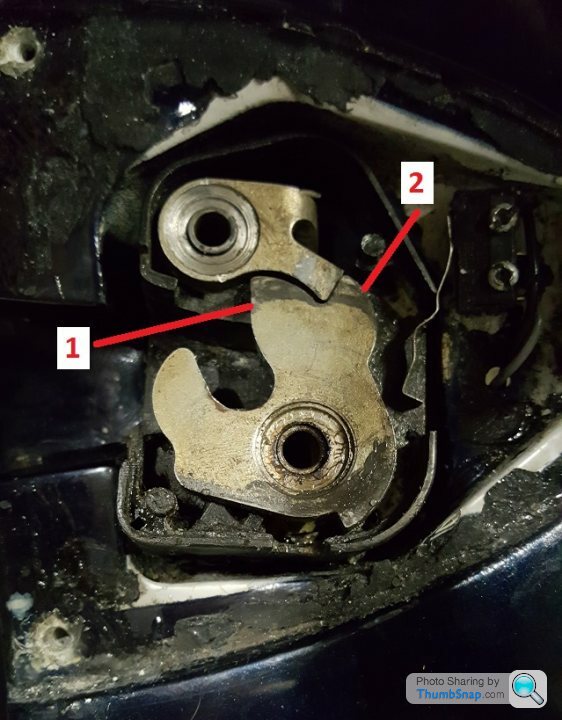
Hi Pete, could the mechanism be getting stuck in the intermediate 'locked' position (as shown in the pic below)? Sounds as though the cable release and solenoid might be lifting the pawl just enough to clear the first tooth on the claw ('1') but not the second ('2'). The click you're hearing when pushing the door afterwards could be the first tooth on the claw being pushed past the pawl, putting it back into the 'fully locked' state. If so, can you reach round and pull directly on the arm ('C' in the pic at the top of the page) to lift the pawl enough to clear the second tooth?
ETA: Apparently the two-stage release is a safety feature (see here).
ETA: Apparently the two-stage release is a safety feature (see here).
Edited by 8ball_Rob on Saturday 17th September 10:17
Edited by 8ball_Rob on Wednesday 6th October 21:13
As this thread is about Tuscan doors, I wonder if anyone can help, I went down a large pothole yesterday and the passenger door window came down to the open door position and door open registered on the dash and now the window will not close and door open is always on the dash at start up.
Can anyone help?
Thanks.
Can anyone help?
Thanks.
KSV said:
As this thread is about Tuscan doors, I wonder if anyone can help, I went down a large pothole yesterday and the passenger door window came down to the open door position and door open registered on the dash and now the window will not close and door open is always on the dash at start up.
Can anyone help?
Thanks.
I had exactly the same problem on my first day with the car, on the drive back from the dealership - see my previous thread:Can anyone help?
Thanks.
http://www.pistonheads.com/gassing/topic.asp?h=0&a...
In my case the retaining bolts for the microswitch had come loose. The body of the microswitch had shifted inwards and the arm was no longer depressing the switch when the door latch was closed, making the car think that the door was open. Easy enough fix, just remove the trim behind the B pillar and tighten the two nuts (M3 possibly, pretty damn small anyway). Just make sure the microswitch is nice and secure, and check that the arm depresses the switch when the latch is in the 'closed' position.

Thanks for asking...yes all sorted. I had to pull down on the arm *and* push up on the primary lever at the same time to get enough movement to pop the door. For some bizarre reason seems that 2016 is the year the mechanism (solenoid and emergency pull) decided to not provide enough throw...yet it moves nicely right to the end of its travel. Solution was to remove the upper piece as per your photo and bend the actuator arm down a little so that the lever which pushes it gets a head start. Now pops open with gusto.
Hi
Right here goes will try to explain.
Took the panel off from behind the b pillar there are two connectors one from the micro switch and one that operates the door solenoid to open it. Cleaned all connectors but no joy window still in door open position and door open on the LCD. Now the odd bit disconnected the micro switch connector and the window now closes using the console Knob, so closed the window and opened the door window dropped and door opened as it should, closed door window didn't close but door open now not showing on dash.

Help please
Right here goes will try to explain.
Took the panel off from behind the b pillar there are two connectors one from the micro switch and one that operates the door solenoid to open it. Cleaned all connectors but no joy window still in door open position and door open on the LCD. Now the odd bit disconnected the micro switch connector and the window now closes using the console Knob, so closed the window and opened the door window dropped and door opened as it should, closed door window didn't close but door open now not showing on dash.
Help please
8ball_Rob said:
Having spent a bit time today figuring out how to remove and refit the Tuscan door mechanism, I thought I'd post a quick step-by-step guide in case it comes in handy for anyone else. It's pretty straightforward once you have it figured out, but some of it has to be done by feel as the mounting plate obscures the actual mechanism - I always find it helps to be able to picture in your mind what it is you're trying to achieve, so I'll start with a picture of the mechanism (normally hidden from view):

Step 1: Remove the trim panel which covers the B pillar (the one with the speaker mounted below the rear quarter window). Apparently in some cars this is secured with a single screw near the bottom, but mine is an early Tuscan and the panel is just a tight(ish) fit without any screws/bolts holding it in place. The front edge of the panel is tucked under the rubber seal around the door frame - pull the seal away from this area to release the trim panel, and then it should pull out easily.
Step 2: The actual latch mechanism itself has a brass arm (C) that is connected by a steel pin (B) to the L-shaped lever that is pulled by the solenoid. The photo below shows a close-up of the clip (sorry for the poor focus, this was cropped from a larger photo). Start by rotating the plastic clip (A) in the anticlockwise direction when viewed from inside the car (clockwise in the photo), to unclip (A) from the shaft of the steel pin (B). This part of the mechanism is hidden from view, so you need to feel for the plastic clip (A) and press down with a reasonable amount of force to pop it off the shaft of the pin (B).

Step 3: Once the clip (A) has been disengaged, you can pull the pin (B) out of its hole in the brass arm. If you're standing inside the cabin while doing this, the pin will be moving away from you (i.e. towards the outside of the car). The door latch mechanism itself, which is mounted on the outside under a metal faceplate about halfway up the door sill, is now disconnected from the solenoid assembly - except for the two hex key bolts (D), which we will deal with next.
Step 4: Now remove the metal faceplate on the door sill that covers the door latch mechanism - this is held in place by three self-tappers.
Step 5: With the faceplate off, remove the two 4mm hex key bolts that hold the latch mechanism (outside) to the solenoid mounting bracket (inside). The ends of the bolts (D) can be seen protruding through the mounting holes in the bracket in the photo above. Apparently some cars have washers between the latch and the bracket (mine doesn't), so keep an eye out and be ready to catch them (if your car has them fitted).
Step 6: You should now be able to pull the latch mechanism (on the outside) and the mounting;) bracket (on the inside) away from each other. The hardest part is getting the large arm (C) out through the slot in the front of the mounting bracket, and through the hole in the fibreglass of the B pillar - this might take quite a bit of wriggling, but persevere and you'll get there in the end!
NB when maneuvering the latch mechanism in step 6, take care not to twist the delicate metal arm of the microswitch for the door sensor, which is mounted adjacent the latch mechanism. Luckily the arm is quite resilient, so if you do happen to bend it inadvertently it can be gently teased back into shape with a pair of needle nosed pliers
Step 7: With the latch mechanism removed, the mounting bracket inside the B pillar will just be hanging loose inside the B pillar. There should be enough slack in the wires to the solenoid and the emergency release cable to pull the whole solenoid/bracket assembly out and into the cabin, as shown in the photo above.
NB. You could actually do steps 4-5 before steps 1-3, but I found it easier to remove the fiddly plastic clip (A) whilst everything else was still securely fixed in place.
Overall it's a fairly straightforward process - probably takes around 5-10 mins once you know how to do it! I found step 6 to be the only really awkward bit.
As always, refitting is the reverse of removal
ETA warning about the microswitch at step 6
Hi Rob,Step 1: Remove the trim panel which covers the B pillar (the one with the speaker mounted below the rear quarter window). Apparently in some cars this is secured with a single screw near the bottom, but mine is an early Tuscan and the panel is just a tight(ish) fit without any screws/bolts holding it in place. The front edge of the panel is tucked under the rubber seal around the door frame - pull the seal away from this area to release the trim panel, and then it should pull out easily.
Step 2: The actual latch mechanism itself has a brass arm (C) that is connected by a steel pin (B) to the L-shaped lever that is pulled by the solenoid. The photo below shows a close-up of the clip (sorry for the poor focus, this was cropped from a larger photo). Start by rotating the plastic clip (A) in the anticlockwise direction when viewed from inside the car (clockwise in the photo), to unclip (A) from the shaft of the steel pin (B). This part of the mechanism is hidden from view, so you need to feel for the plastic clip (A) and press down with a reasonable amount of force to pop it off the shaft of the pin (B).
Step 3: Once the clip (A) has been disengaged, you can pull the pin (B) out of its hole in the brass arm. If you're standing inside the cabin while doing this, the pin will be moving away from you (i.e. towards the outside of the car). The door latch mechanism itself, which is mounted on the outside under a metal faceplate about halfway up the door sill, is now disconnected from the solenoid assembly - except for the two hex key bolts (D), which we will deal with next.
Step 4: Now remove the metal faceplate on the door sill that covers the door latch mechanism - this is held in place by three self-tappers.
Step 5: With the faceplate off, remove the two 4mm hex key bolts that hold the latch mechanism (outside) to the solenoid mounting bracket (inside). The ends of the bolts (D) can be seen protruding through the mounting holes in the bracket in the photo above. Apparently some cars have washers between the latch and the bracket (mine doesn't), so keep an eye out and be ready to catch them (if your car has them fitted).
Step 6: You should now be able to pull the latch mechanism (on the outside) and the mounting;) bracket (on the inside) away from each other. The hardest part is getting the large arm (C) out through the slot in the front of the mounting bracket, and through the hole in the fibreglass of the B pillar - this might take quite a bit of wriggling, but persevere and you'll get there in the end!
NB when maneuvering the latch mechanism in step 6, take care not to twist the delicate metal arm of the microswitch for the door sensor, which is mounted adjacent the latch mechanism. Luckily the arm is quite resilient, so if you do happen to bend it inadvertently it can be gently teased back into shape with a pair of needle nosed pliers
Step 7: With the latch mechanism removed, the mounting bracket inside the B pillar will just be hanging loose inside the B pillar. There should be enough slack in the wires to the solenoid and the emergency release cable to pull the whole solenoid/bracket assembly out and into the cabin, as shown in the photo above.
NB. You could actually do steps 4-5 before steps 1-3, but I found it easier to remove the fiddly plastic clip (A) whilst everything else was still securely fixed in place.
Overall it's a fairly straightforward process - probably takes around 5-10 mins once you know how to do it! I found step 6 to be the only really awkward bit.
As always, refitting is the reverse of removal
ETA warning about the microswitch at step 6
Edited by 8ball_Rob on Monday 12th September 22:42
Sorry I know this is an old thread revival, but any chance you could re-upload the photos for how you did this (if you still have them)?
Thanks
Andy
porterpainter said:
Hi Rob,
Sorry I know this is an old thread revival, but any chance you could re-upload the photos for how you did this (if you still have them)?
Thanks
Andy
Hi Andy,Sorry I know this is an old thread revival, but any chance you could re-upload the photos for how you did this (if you still have them)?
Thanks
Andy
Sorry for the delay, I only just saw your post - I've found the first photo and have re-uploaded it, will have a look on my computer later to see if I can find the annotated version (or just make a new one)


Gassing Station | Tuscan | Top of Page | What's New | My Stuff