For the love of Tuscan (project build)
Discussion


sct_w4 said:
If you need any pics I’ve currently got the body off my Mk2. Only lifted it a couple of weekends ago so it’s still relatively untouched, haven’t even had time to clean it down.
The chassis colour is a RAL number and has been asked a few times around the forums if you want a direct match.
Thanks mate, the colour I've mixed is a pretty good match but different enough that I can see where I've been, but my focus atm is bodywork/interior/electrical, chassis will be a summer job hopefully. If I need anything in the meantime I know where to comeThe chassis colour is a RAL number and has been asked a few times around the forums if you want a direct match.
Edited by Modrich on Tuesday 1st November 15:39
Edited by Modrich on Tuesday 1st November 15:40
nawarne said:
Modrich, hi!
The pedal box plate is a swine to really de-rust and then protect....as are the channels/'top-hat' for the seat bolts at the rear.
I requested Lloyds to replace both items with flat bar/plate - doing away with the rust traps that were the forward facing 'right-angles'. I would usually do a scrape/sand and high zinc primer, then top coat on these every winter but they succumbed to the tin worm in the end.
Nick
Thanks Nick, I did think the design could be better even a bolt-on section that could be removed for cleaning/maintenance etc would be an improvement.The pedal box plate is a swine to really de-rust and then protect....as are the channels/'top-hat' for the seat bolts at the rear.
I requested Lloyds to replace both items with flat bar/plate - doing away with the rust traps that were the forward facing 'right-angles'. I would usually do a scrape/sand and high zinc primer, then top coat on these every winter but they succumbed to the tin worm in the end.
Nick
so called said:
My Tuscan was finished in Bentley Sapphire Blue which, as you describe, a flat black with no sun, then a sparkling deep blue under the lights, great in the Spanish sun.
No hint of purple though.
Beautiful colour that but yes mine has purple in it like the Rolls Royce Sapphire PearlNo hint of purple though.
Edited by Modrich on Tuesday 1st November 15:39
Tuscan interior strip-out

So the next stage was to remove the seats and carpets. Over the last few years during lock down this didn't get used and probably sat in a damp garage so the interior was smelly and not a nice place to be. So it all had to come out...


Carpets and foam removed. The foam went straight in the bin and will be replaced with high density closed cell foam that doesn't absorb moisture and will help will NVH.


The body to chassis bolts were quite rusty but cleaned-up ok, they get the usual treatment with Kurust and Hammerite paint...

Generally though the seat leather is in pretty good condition considering their age, there's the usual damage to the drivers side bolster and the steel frames of the seat hoop are both snapped and on one side of the passenger seat. This is the passenger seat...

The seats will be getting a complete strip-down and damaged leather replaced/repaired, the carpets will be cleaned but not sure if I will re-use them or put fresh carpet back in...
So the next stage was to remove the seats and carpets. Over the last few years during lock down this didn't get used and probably sat in a damp garage so the interior was smelly and not a nice place to be. So it all had to come out...
Carpets and foam removed. The foam went straight in the bin and will be replaced with high density closed cell foam that doesn't absorb moisture and will help will NVH.
The body to chassis bolts were quite rusty but cleaned-up ok, they get the usual treatment with Kurust and Hammerite paint...
Generally though the seat leather is in pretty good condition considering their age, there's the usual damage to the drivers side bolster and the steel frames of the seat hoop are both snapped and on one side of the passenger seat. This is the passenger seat...
The seats will be getting a complete strip-down and damaged leather replaced/repaired, the carpets will be cleaned but not sure if I will re-use them or put fresh carpet back in...
Edited by Modrich on Sunday 31st March 19:51
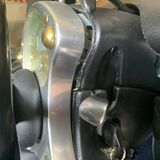
Next up, steering wheel & dash-pod removal...
The steering wheel, as with most parts I've come across so far is in pretty good shape, no damage, rips or tears but the dashpod and shroud are misaligned which seems a common issue and I noticed that the speedo needle was stuck and did a little stutter when turning on the ignition. I presume the needle should do a full sweep and return home..?

Steering wheel off...

The boss was a nightmare to remove but managed it with a 10mm socket and stubby allen key...


Dashpod next, held on at the top with 2 screws, and there's 3 screws underneath shared with the lower part of the shroud but I think only one screw was in place...


Next the column stalks, I will be replacing the switches with new ones to hopefully improve the quality as they feel quite clunky...


All stripped. I will be stripping the dashpod and checking for issues in a later post...

The steering wheel, as with most parts I've come across so far is in pretty good shape, no damage, rips or tears but the dashpod and shroud are misaligned which seems a common issue and I noticed that the speedo needle was stuck and did a little stutter when turning on the ignition. I presume the needle should do a full sweep and return home..?
Steering wheel off...
The boss was a nightmare to remove but managed it with a 10mm socket and stubby allen key...
Dashpod next, held on at the top with 2 screws, and there's 3 screws underneath shared with the lower part of the shroud but I think only one screw was in place...
Next the column stalks, I will be replacing the switches with new ones to hopefully improve the quality as they feel quite clunky...
All stripped. I will be stripping the dashpod and checking for issues in a later post...
Edited by Modrich on Sunday 31st March 19:57
Are you confident of finding a pair of indicator stalks that are less worn than yours, or are you able to track down which old Vauxhall part that the metal stalk attaches to, and is that part still available from Vauxhall after 20 years? It was probably from a Vauxhall that was obsolete 20 years ago.
Just noticed this thread and have seen your backend repair . You need to properly grind out those stress cracks and re-glass them .You have a lot more work before you go anywhere near a painter and I would recomend you use polyester for the repair rather than epoxy as it should be closer to the same expansion rate.
Modrich said:
Lucy less of the negative vibes please ;-) Stacks of choice on ebay, so much so that I was able to go with my favourite German manufacturer Meyle...
Not negative, just realistic. Why throw something away that works and replace it with an ebay pattern part? Have a search on the BMW forums and you will see the comments about Meyle parts being made in China, Turkey and Thailand! Some say they have never had a manufacturing plant in Europe, just a distribution centre!I've seen the comment from plasticman and the comment about the speedo needle. This sounds like a bodge job from a DIYer who has no idea, including what the speedo needle should do, or how the column stalks should feel.
The same person was going to learn how to fix indicators, and then charge for the solution, even though there are commercial businesses who know how to do it, and have been doing it for years, and offer a warranty.
plasticman said:
Just noticed this thread and have seen your backend repair . You need to properly grind out those stress cracks and re-glass them .You have a lot more work before you go anywhere near a painter and I would recomend you use polyester for the repair rather than epoxy as it should be closer to the same expansion rate.
Thanks plasticman exactly the sort of advice I was looking for, my initial priority was to get the damage structurally sound so I can progress other areas and get the car on the road then I can get advice from local bodyshops on how far I should take it before handing over to them.NCE 61 said:
“ I presume the needle should do a full sweep and return home..?”
There is no start up sweep on the MK1 Tuscan speedo (not on my 2000 MY) it uses a micro switch to check its on zero and otherwise gives a warning.
Good to know, on closer inspection it appears the 2 wires to the needle motor had been rubbing on the dashpod chassis and were shorting out causing the stutter when ignition was turned on. Hopefully nothing is permanently damaged... There is no start up sweep on the MK1 Tuscan speedo (not on my 2000 MY) it uses a micro switch to check its on zero and otherwise gives a warning.
LucyP said:
Modrich said:
Lucy less of the negative vibes please ;-) Stacks of choice on ebay, so much so that I was able to go with my favourite German manufacturer Meyle...
Not negative, just realistic. Why throw something away that works and replace it with an ebay pattern part? Have a search on the BMW forums and you will see the comments about Meyle parts being made in China, Turkey and Thailand! Some say they have never had a manufacturing plant in Europe, just a distribution centre!I've seen the comment from plasticman and the comment about the speedo needle. This sounds like a bodge job from a DIYer who has no idea, including what the speedo needle should do, or how the column stalks should feel.
The same person was going to learn how to fix indicators, and then charge for the solution, even though there are commercial businesses who know how to do it, and have been doing it for years, and offer a warranty.

I suspect you may be right BB but at £20ish for the pair it's worth a punt and if a new part vs a 20yr old part yields a slight improvement in feel then I'll put it down as a +result :-)
I'm coming from a car world of E46 M3s, B7 RS4s and a smattering of Scoobies, Golf GTis and Alfas, I'm well aware that in comparison TVR world is like chalk vs cheese with those but I'm confident that it will be worth my hassle in fixing this one up as nothing new these days floats my boat and even just sat on my drive in a state of disassembly I've had more +comments from passers-by than any of my previous cars have. Other cars are just invisible compared to TVRs it seems...
I'm coming from a car world of E46 M3s, B7 RS4s and a smattering of Scoobies, Golf GTis and Alfas, I'm well aware that in comparison TVR world is like chalk vs cheese with those but I'm confident that it will be worth my hassle in fixing this one up as nothing new these days floats my boat and even just sat on my drive in a state of disassembly I've had more +comments from passers-by than any of my previous cars have. Other cars are just invisible compared to TVRs it seems...
Dalamar said:
Great work so far.
Can you please mention what closed cell foam you’ll use under the carpet? Also the indicator stalk part number please. Always good to know.
I’m looking for ideas on how to reseat my pod. Can’t work out how to stop it popping out from the metal housing.
I had a similar issue with mine - if you take the top (and possibly bottom) shroud off, the next bit will be easier. I can't remember exactly what I did but I basically attached some thin string (I actually used waxed lacing cord!) to the pod bracket and the top shroud in a loop, then reattached the shroud with the string ends poking out of the stalk hole, then once it's all back together, pull the strings tight (which should pull the pod shroud into the ali face) and tie them off. If you ever need to remove the shroud, just remember to cut the strings and replace them once 'maintenance' activity has been done. I might even have tightened them from the back of the pod - can't remember but clearly quite fiddly however it is done.Can you please mention what closed cell foam you’ll use under the carpet? Also the indicator stalk part number please. Always good to know.
I’m looking for ideas on how to reseat my pod. Can’t work out how to stop it popping out from the metal housing.
Hi Dalamar/S6PNJ, it's this sort of thing I really want to nail as I've noticed even with supposedly well sorted £50k Tuscans that they still have issues in areas such as the Dashpod shrouds and if you look closely the steering column gaiter/stalk curtains all seem to be loose/ill fitting. Obviously specialists can't afford to spend time sorting these things so it's down to DIY owners.
Some of it might be down to missing screws on the dashpod brackets etc which I found and the bracket was also twisted, but there is no solid fixing between the Dashpod and the shroud, they are just pushed together. Now I've got everything apart I've got a good idea how it can go back together in a way that it won't fall apart at the next speed bump. When it comes to it I'm prepared to install/uninstall a few times to make up additional fixing points etc. I'll detail this when I get to it.
Closed cell polyethylene foam sheet, I chose 5mm white.
https://www.ebay.co.uk/itm/174998279933
Meyle Steering Column Switch 614 890 0000 (lights/indicators)
Meyle Steering Column Switch 614 890 0002 (wipers)
The wiper stalk has an extra function for rear wash/wipe which isn't used.

So next out was the pedal box.
First remove the 5 allen bolts holding the aluminium cover plate in place.

Then remove the various pins and clips that attach the pedals/pistons to the pivot arms, this allows the pedals to be folded forwards to give better access to the nuts holding the clutch master cylinder and brake servo to the back of the pedal box and the chassis bolts.

Remove the chassis allen bolts x6

Disconnect the wires from the brake pedal switch

Undo the 4 brake servo nuts (the bolts are captive so this is easy...). The throttle cable bracket shares 2 of these bolts, and the end of the cable needs to be unbolted from the secondary pivot arm of the throttle pedal.

Onto the fiddly bit, undoing the 2x clutch master cylinder nuts. The bolts are not captive so you need to get a spanner on the head of the bolt at the back, then undo the nut from the front. The top one isn't too bad...


I needed a flexi-head ratchet spanner to get round the LHS of the pedal box to get onto the lower bolt head and an electric screwdriver with long extension bars onto the nut at the front. Now it's a case of easing the pedal box towards you and separating it from the clutch master cylinder and brake servo.
Once removed I noticed a grommet was missing where the throttle cable passes through the bulkhead so this will need to be sourced and fitted...I'll be removing all the carpet from this area as well as it's damp and filthy...


This was the state of my pedal box. Obviously moisture/water ingress (water soaks into the carpet and travels under the pedal box...) have taken their toll over the years and this is going to need a complete stripdown and refurb (and water ingress fixed) before going back in...

First remove the 5 allen bolts holding the aluminium cover plate in place.
Then remove the various pins and clips that attach the pedals/pistons to the pivot arms, this allows the pedals to be folded forwards to give better access to the nuts holding the clutch master cylinder and brake servo to the back of the pedal box and the chassis bolts.
Remove the chassis allen bolts x6
Disconnect the wires from the brake pedal switch
Undo the 4 brake servo nuts (the bolts are captive so this is easy...). The throttle cable bracket shares 2 of these bolts, and the end of the cable needs to be unbolted from the secondary pivot arm of the throttle pedal.
Onto the fiddly bit, undoing the 2x clutch master cylinder nuts. The bolts are not captive so you need to get a spanner on the head of the bolt at the back, then undo the nut from the front. The top one isn't too bad...
I needed a flexi-head ratchet spanner to get round the LHS of the pedal box to get onto the lower bolt head and an electric screwdriver with long extension bars onto the nut at the front. Now it's a case of easing the pedal box towards you and separating it from the clutch master cylinder and brake servo.
Once removed I noticed a grommet was missing where the throttle cable passes through the bulkhead so this will need to be sourced and fitted...I'll be removing all the carpet from this area as well as it's damp and filthy...
This was the state of my pedal box. Obviously moisture/water ingress (water soaks into the carpet and travels under the pedal box...) have taken their toll over the years and this is going to need a complete stripdown and refurb (and water ingress fixed) before going back in...
Edited by Modrich on Sunday 31st March 20:08
Gassing Station | Tuscan | Top of Page | What's New | My Stuff