Renovo Soft Top Reviver - Dark Blue
Discussion


Hi Graham,
The car was detailed at the weekend (what a finish!) and so the roof is as clean as can be and ready for re-proofing right away. No further cleaning required. It's a little faded but generally in good nick, so I thought I'd colour it up again. A bit concerned how the 'dark blue reviver' turns out as I like the original (unfaded) shade. Don't want it too 'blue'.
The car was detailed at the weekend (what a finish!) and so the roof is as clean as can be and ready for re-proofing right away. No further cleaning required. It's a little faded but generally in good nick, so I thought I'd colour it up again. A bit concerned how the 'dark blue reviver' turns out as I like the original (unfaded) shade. Don't want it too 'blue'.
Yes, I used it on my wedge and it worked really well on the whole. The pre-cleaner is good and then you use the dark blue reviver solution to recolour the top - it goes on easily and dry's to a nice uniform finish. Certainly mine looked new once I'd done these two stages.
The only part I didn't think was great was the final waterproofing coat - it goes on OK and although it does actually stop water penetrating it doesn't make the water bead off like you'd hope. I've since discovered this and it's really really good http://www.theultimatefinish.co.uk/gtechniq/gtechn... . My recommendation would be to use the first two stages of the Renovo kit and then finish with this.
The only part I didn't think was great was the final waterproofing coat - it goes on OK and although it does actually stop water penetrating it doesn't make the water bead off like you'd hope. I've since discovered this and it's really really good http://www.theultimatefinish.co.uk/gtechniq/gtechn... . My recommendation would be to use the first two stages of the Renovo kit and then finish with this.

pb450 said:
Thanks Simon, how did the colour turn out?
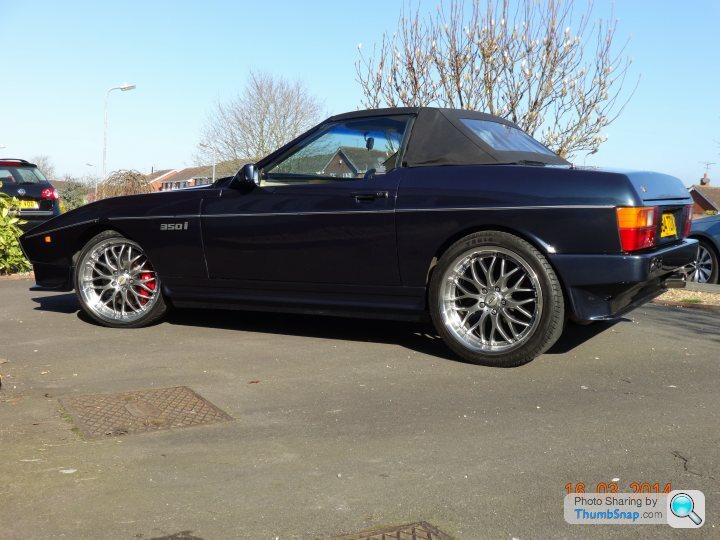
Colour turned out great, very close to the original from what I could tell. I'd also echo the point made by the previous poster in terms of masking surrounding areas (including the back window) off well - the dye is a barsteward to get off paintwork etc. once it's dry.Edited to add picture - not the best but the only one I've got with the top up;
Edited by simonwedge on Thursday 28th April 07:49
Thanks again Simon, nice wedge - good colour too. Blue, fastest, etc. 
Thanks to all for the feedback, should be going ahead this weekend. I've also ordered the Gtechniq (how do you pronounce that??) I1 Smart Fabric Coat proofer as it has very good reviews all round. Point taken on masking and protecting paint. It will be masked to death! Will try to post pics of finished results.
Thanks to all for the feedback, should be going ahead this weekend. I've also ordered the Gtechniq (how do you pronounce that??) I1 Smart Fabric Coat proofer as it has very good reviews all round. Point taken on masking and protecting paint. It will be masked to death!
Will try to post pics of finished results.Agree with the post above about it being nearer black than dark blue. Used it on my DB7 volante and it took the dark blue to black. While it went on okay and gave a uniform appearance the result was not as expected. I would try a small hidden area first or use it on something else to gauge the colour match. It looked dark blue in the container.
N7GTX said:
Agree with the post above about it being nearer black than dark blue. Used it on my DB7 volante and it took the dark blue to black. While it went on okay and gave a uniform appearance the result was not as expected. I would try a small hidden area first or use it on something else to gauge the colour match. It looked dark blue in the container.
Totally agree OK, so I coloured and proofed the roof over the weekend. Pretty good results - although I can't post pictures from my office PC. Can do so later if anyone is really interested. I did as much research as possible and concluded that the possibilities were, too light, too dark, too streaky, rubbish application, etc. Hmmm... so much for research.
First I would say the devil is in the detail. You need to remove ALL the old proofer to be able to get a good colour cover, otherwise it will be streaky and not soak in. I was lucky that this was already done by a thorough clean and scrub the previous week by Glossy Autos. (Thanks Adam, good job!)
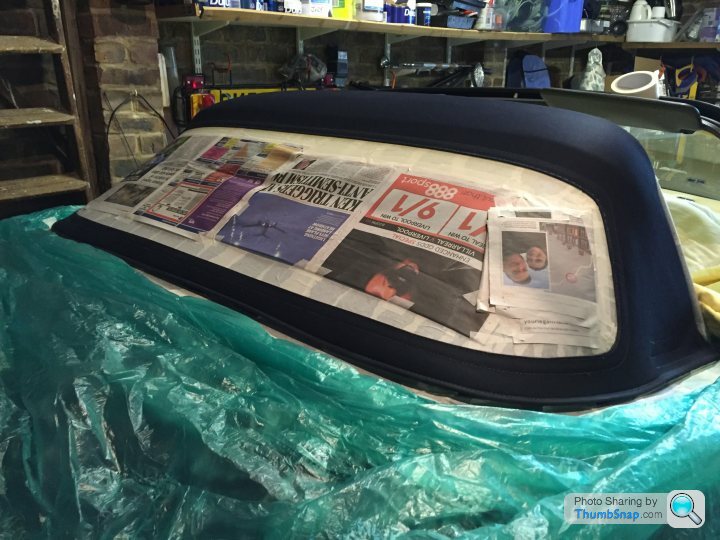
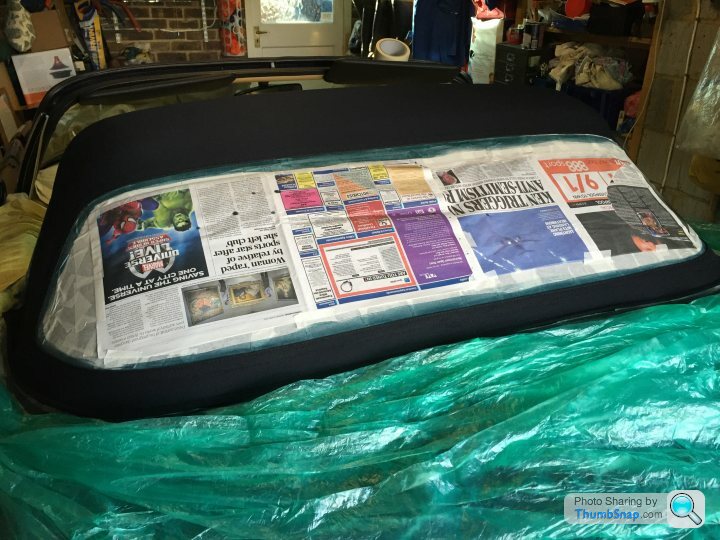
Roof panel off and mask up the rear section thoroughly. I went to town with masking tape, newspaper and dust sheets everywhere. With magnolia interior a blob in the wrong place could be a disaster. Preparation took around 45 minutes to do properly. The removeable panel took 2 minutes to apply a piece of masking tape to the rubber strips and to place it on the garden table!
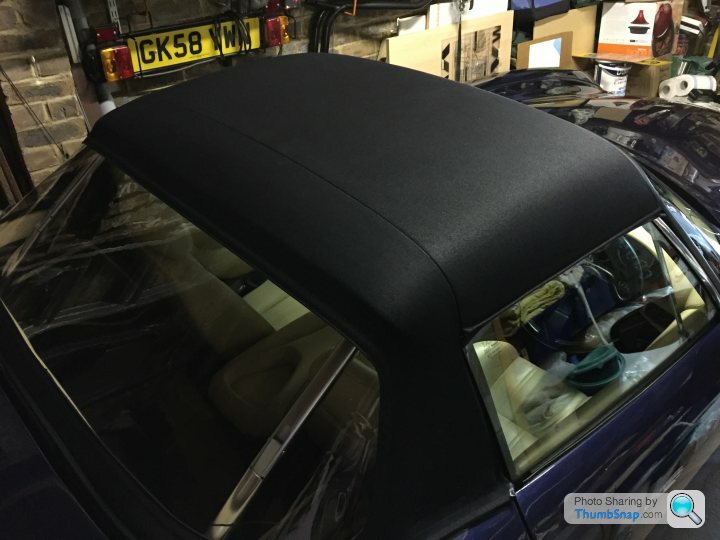
The 'Dark Blue' went on pretty well, working it into the fabric with a 1.5 inch brush in all directions, plus heavy stippling. No problem with brush direction, just work it in well. It dries off to a uniform finish, no matter how many brush strokes and directions you make. I applied two coats to both sections, simply because I had so much of the product and I wasnted to be sure of good coverage, leaving a couple of hours between coats to thoroughly dry. Colour wise, yes, it is slightly darker - but then the original finish had faded (after 18 years) so I reckon it's pretty much back to factory spec. It's darker, it's blue, it's deffinitely NOT black and it looks good!
Next came the proofing. I took the advice of simonwedge further up this thread and purchased a bottle of Gtechniq I1 Smart Fabric Coat from Amazon. With a squirty applicator it goes on quickly and easily. The instructions simply say 'soak fabric well'. So I did. It did find it's way under the masking tape in places so this was wiped away quickly during masking removal.
Don't do any of this in direct sunlight and allow plenty of time to dry. For me the car stayed in the garage. Job done! I haven't thrown a bucket of water at it but it does look pretty waterproof with a single large drop of water duely placed in the middle of the roof. The blob was still there half an hour later was was easily mopped away, leaving the roof bone dry. I've since been told that Thompsons water proofer is eaxactly the same but mush cheaper. Fair enough but for £16 for the Gtechniq product, I'm not complaining.
So in summary, I'm very pleased with the results and would recommend it to all. Top tips are to remove all traces of previous proofer by cleaning thoroughly and mask up carefully. Job done!
First I would say the devil is in the detail. You need to remove ALL the old proofer to be able to get a good colour cover, otherwise it will be streaky and not soak in. I was lucky that this was already done by a thorough clean and scrub the previous week by Glossy Autos. (Thanks Adam, good job!
)Roof panel off and mask up the rear section thoroughly. I went to town with masking tape, newspaper and dust sheets everywhere. With magnolia interior a blob in the wrong place could be a disaster. Preparation took around 45 minutes to do properly. The removeable panel took 2 minutes to apply a piece of masking tape to the rubber strips and to place it on the garden table!
The 'Dark Blue' went on pretty well, working it into the fabric with a 1.5 inch brush in all directions, plus heavy stippling. No problem with brush direction, just work it in well. It dries off to a uniform finish, no matter how many brush strokes and directions you make. I applied two coats to both sections, simply because I had so much of the product and I wasnted to be sure of good coverage, leaving a couple of hours between coats to thoroughly dry. Colour wise, yes, it is slightly darker - but then the original finish had faded (after 18 years) so I reckon it's pretty much back to factory spec. It's darker, it's blue, it's deffinitely NOT black and it looks good!
Next came the proofing. I took the advice of simonwedge further up this thread and purchased a bottle of Gtechniq I1 Smart Fabric Coat from Amazon. With a squirty applicator it goes on quickly and easily. The instructions simply say 'soak fabric well'. So I did. It did find it's way under the masking tape in places so this was wiped away quickly during masking removal.
Don't do any of this in direct sunlight and allow plenty of time to dry. For me the car stayed in the garage. Job done! I haven't thrown a bucket of water at it but it does look pretty waterproof with a single large drop of water duely placed in the middle of the roof. The blob was still there half an hour later was was easily mopped away, leaving the roof bone dry. I've since been told that Thompsons water proofer is eaxactly the same but mush cheaper. Fair enough but for £16 for the Gtechniq product, I'm not complaining.
So in summary, I'm very pleased with the results and would recommend it to all. Top tips are to remove all traces of previous proofer by cleaning thoroughly and mask up carefully. Job done!
Didn't buy the cleaner, although it's an essential part of the process. Here it is anyway:
https://www.amazon.co.uk/Renovo-International-RFC1...
Soft Top Reviver:
https://www.amazon.co.uk/Renovo-International-Soft...
Proofer:
https://www.amazon.co.uk/Gtechniq-Smart-Fabric-Coa...
https://www.amazon.co.uk/Renovo-International-RFC1...
Soft Top Reviver:
https://www.amazon.co.uk/Renovo-International-Soft...
Proofer:
https://www.amazon.co.uk/Gtechniq-Smart-Fabric-Coa...
Gassing Station | Chimaera | Top of Page | What's New | My Stuff