Discussion


Has been one of my longer-lasting rules of project management
Soooooooooooo
I'm gonna have a crack at setting the valve/cam clearences. Have had a look at the Manual and it mentions the following:-
1) Cam sprocket retaining tool
2) Tophat shims (of varying thicknesses)
3) Nulon / Suitable engine build lubricant
and I wondered if you guys have any idea of a TVR or Engineering source whom I could contact in order to acquire these bits before I start buggering everything up ?
Ta !
PJ
I use this stuff, it also makes fitting oil seals incredibly easy

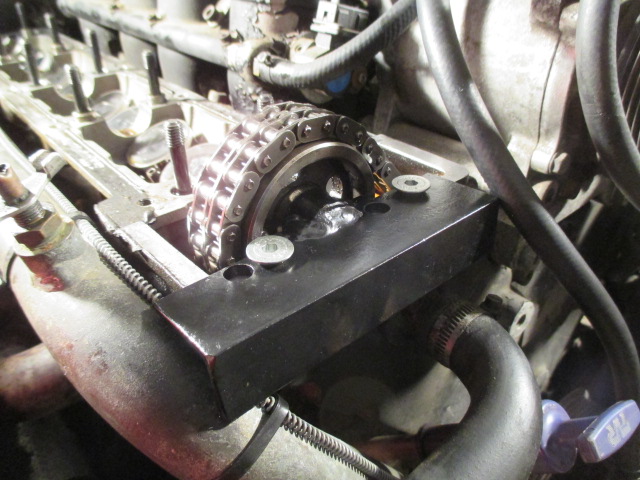
An accurate well made sprocket retainer makes a huge difference
Many thanks to the very generous PHer who has lent me one
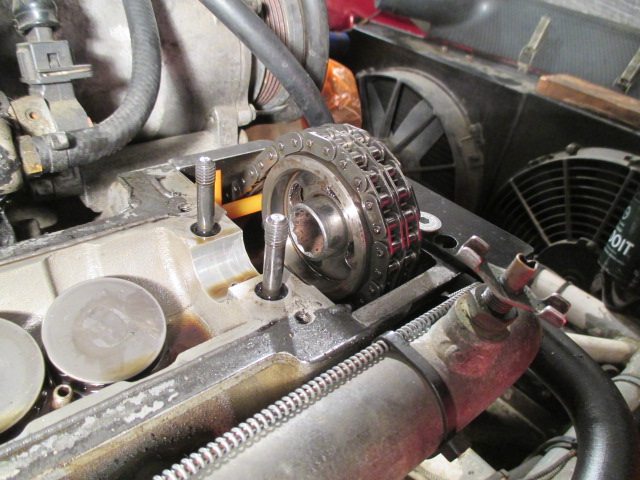
Do not underestimate the possibility of things going spectacularly wrong
The PO dropped a bolt down the front cover which resulted in this

Or it could have fallen out of a sprocket or chain guide, who knows
Threadlock and a proper torque wrench are not optional
An accurate well made sprocket retainer makes a huge difference
Many thanks to the very generous PHer who has lent me one
Do not underestimate the possibility of things going spectacularly wrong
The PO dropped a bolt down the front cover which resulted in this
Or it could have fallen out of a sprocket or chain guide, who knows
Threadlock and a proper torque wrench are not optional
Finally, I think you have put an impressive mileage on your car, that probably means your intake shims will be on the limit, and therefore that increases the possibility of them failing.
You can't easily prepare by purchasing a set of shims beforehand, because you won't know what sizes you'll need ahead of time.
Worse still you can only do one bank at a time, so unless you chose to do more work than necessary, you will end up with two different shim orders.
Chances are once you fit them and remeasure you will find that you need a couple of replacements anyway.
Whether you chose to purchase new shims, or sand/grind you old ones is another decision you will need to make.
You'll need one of these too

 )
)The clearance between the cam and the buckets normally gets smaller so my advice is to grind/sand down the shim that was in there by the amount of extra clearance you need. Using a replacement shim is a nightmare as the new one has never been seated to the valve and although it may measure to the right thickness, they never give the final clearance needed.
greenracing said:
The clearance between the cam and the buckets normally gets smaller so my advice is to grind/sand down the shim that was in there by the amount of extra clearance you need. Using a replacement shim is a nightmare as the new one has never been seated to the valve and although it may measure to the right thickness, they never give the final clearance needed.
That makes a lot of sense. But that also means you should avoid swapping shims between valves, even if it appears that would avoid having to sand a shim down.I always sand mine by hand, but I have swapped them and used a couple of replacements as well in order to avoid shaving a lot off. Perhaps that would explain why I've never managed to end up a with a really quiet valve train.
greenracing said:
The clearance between the cam and the buckets normally gets smaller so my advice is to grind/sand down the shim that was in there by the amount of extra clearance you need. Using a replacement shim is a nightmare as the new one has never been seated to the valve and although it may measure to the right thickness, they never give the final clearance needed.
Ryan,Thanks for your informative reply but I am quite shocked

It is true that I am a complete dullo
but
I thought that friction on moving parts created wear which, in this case, would increase the working gap between the rubbing parts (and, hence, produce the clatter that I can hear off at least one of my valves).
Is there some strange relationship between the angles on the AJP V8 that I haven't understood (Mine's a 2001 4.5 BTW)
Many thanks for any time that you can spend on a reply
plus
What time would you expect to spend adjusting my valve train
(I realise that is a total shot in the dark but ust a guess, based on your experience would be sufficient)
Thanks again
PJ
ukkid35 said:
That makes a lot of sense. But that also means you should avoid swapping shims between valves, even if it appears that would avoid having to sand a shim down.
I always sand mine by hand, but I have swapped them and used a couple of replacements as well in order to avoid shaving a lot off. Perhaps that would explain why I've never managed to end up a with a really quiet valve train.
Hi Paul,I always sand mine by hand, but I have swapped them and used a couple of replacements as well in order to avoid shaving a lot off. Perhaps that would explain why I've never managed to end up a with a really quiet valve train.
I am shocked again
I know that Clutch fingers are reportedly made from Chocolate but what on earth are the valve shims made of that they can be sanded by hand.
Please tell me that “sanded by hand” actually means that you have an industry-standard workshop with a horizontal surface plane grinder ?

Edited by Mr Cerbera on Saturday 18th February 11:00
Edited by Mr Cerbera on Saturday 18th February 11:01
Mr Cerbera said:
Hi Paul,
I am shocked again
I know that Clutch fingers are reportedly made from Chocolate but what on earth are the valve shims made of that they can be sanded by hand.
Please tell me that “sanded by hand” actually means that you have an industry-standard workshop with a horizontal surface plane grinder ?
I sit in front of a TV, and sand each one on a sheet of glass with wet&dry. Each one can take up to 20 minutes, but I do finish them with 1000 grade to a fine polish.I am shocked again
I know that Clutch fingers are reportedly made from Chocolate but what on earth are the valve shims made of that they can be sanded by hand.
Please tell me that “sanded by hand” actually means that you have an industry-standard workshop with a horizontal surface plane grinder ?
If you try to take off too much by hand there is the risk that they end up no longer flat, I've lost a couple that way.
ok, rather than getting to technical, the gap between the cam bucket (followers) tends to get smaller because the valve itself stretches over time and or the valve seat becomes worn or can recess further into the head. Basically the shim sits between the valve and cam bucket so that you can get an accurate cleanace between the cam and cam bucket.
Let's be clear though, I am not suggesting you should sand down a shim so that it's smaller than the smallest available size as I would think this would be the safe minimum allowed.
What I am saying is that I have found it's much more accurate to great md down the base of the shim using a figure 8 pattern on a flat surface rather than using a new shim that is supposedly the right thickness, because even if they measure up right they don't sit on the top of the valve the same as the old ones did as over time the shins have been paired to the valve. The above is based on my experience and whilst others may have a potentially different view, as long as you can grind/sand a flat piece of metal you will get the most accurate result.
My other advice is to make sure you have plenty of time and patience as finding tdc is a bit of an arse with no marks, removing the covers is a painful process in terms of removing and preparing the surfaces for re sealing without dropping old sealant into the oil wells and make sure you clean all bolt threads at least twice to make sure the nut lock works. More than happy if you want to pm me. Before starting the job I would remove the oil filler neck and check the chain tension is set correctly, if not get this set right first as the Shaun tension will alter the timing.
greenracing said:
My other advice is to make sure you have plenty of time and patience as finding tdc is a bit of an arse with no marks
Isn't it just.It's my contention that is 'should' be possible to find TDC accurately using the flywheel timing gaps. However I've yet to prove that is possible without removing the gearbox.
Mr Cerbera said:
What time would you expect to spend adjusting my valve train
(I realise that is a total shot in the dark but ust a guess, based on your experience would be sufficient)
Allow one whole day per bank for your first attempt at this, plus any time to source new parts (shims and/or buckets).(I realise that is a total shot in the dark but ust a guess, based on your experience would be sufficient)
Remember, although possible to shuffle between banks, it is much easier to complete one bank entirely before touching the other. Also there is no absolute need to do both banks at the same time, you could run the car quite happily in between.
ukkid35 said:
greenracing said:
My other advice is to make sure you have plenty of time and patience as finding tdc is a bit of an arse with no marks
Isn't it just.It's my contention that is 'should' be possible to find TDC accurately using the flywheel timing gaps. However I've yet to prove that is possible without removing the gearbox.
3 of the minutes is taking a spark plug out.
Tanguero said:
Finding TDC is a 5 minute job with a socket on a long lever, a bit of rubber tube and a bottle of kiddys bubble mix.
3 of the minutes is taking a spark plug out.
I get the theory, but surely there is quite a long arc at TDC over which nothing much happens? Not tried it so only guessing...3 of the minutes is taking a spark plug out.
I made up a tdc tool using an old spark plug as some washer pump hose, basically you keep watching for the bubbles to stop then for the hose to start sucking water up, tdc is in between the 2. Still an arse though compared to using manufacturer marks. Agree that just checking clearances doesn't need tdc to be confirmed but while you are checking clearances, you may as well check timing is spot on too.
Tanguero said:
Finding TDC is a 5 minute job with a socket on a long lever, a bit of rubber tube and a bottle of kiddys bubble mix.
3 of the minutes is taking a spark plug out.
Hi Tanguero, 3 of the minutes is taking a spark plug out.

He of little imagination asks:
”Does the rubber tube have an interference fit in the spark plug thread and TDC is achieved when the air-emptied cylinder stops blowing bubbles through the liquid" ?
Or should I book an appointment at the colonic irrigation clinic ?
Just use a bit of fuel hose that is big enough to screw into the plug socket on the engine. You don't blow bubbles through the liquid (or suck anything up!!!) but rather dip the end of the tube in the mix and take it out so that as you turn the crank it forms a bubble. When you get to TDC is it very obvious when the piston reverses direction as you can see the bubble suddenly stop growing and start to shrink.
There isn't a "flat spot" where the bubble size is static because of the volume difference between the cylinder and the bubble. When you get near to TDC you can re-dip the tube to get a smaller bubble. In comparison (not on an AJP but on a rover v8) the bubble tube was as accurate as the timing marks on the crank pulley and more accurate than one of the feeler gauge type gadgets that screw into the plug hole.
There isn't a "flat spot" where the bubble size is static because of the volume difference between the cylinder and the bubble. When you get near to TDC you can re-dip the tube to get a smaller bubble. In comparison (not on an AJP but on a rover v8) the bubble tube was as accurate as the timing marks on the crank pulley and more accurate than one of the feeler gauge type gadgets that screw into the plug hole.
Gassing Station | Cerbera | Top of Page | What's New | My Stuff