Please controll my work
Discussion


camelotr said:
By the was how could oil go INTO the combustion chamber from the exhaut port? I can imagine smoking from the exhaust port by hot, hi speed gas sucking in some oil, but how on earth could it go bact to the cylinder (and thurder into the sump to make the oil change brown)?
Oil can't get into the chamber from the exhaust guides and that was not the point of putting stem seals on them. It was simply to reduce any further unnecessary oil consumption or smoking as with any other modern engine. It has absolutely nothing to do with the main problem.Soo Gentlemen, You are allowed to cry out laughing at me... I must be in the way of an angry pagan god.
Yesterday I was informed that the parts supplier have sent wrong type of bearings, soo I cannot take the engine. Even worst, that the parts shop will close down for a longer holiday. Only chance to go personaly and immediatly. Soo I decided to go and collect the parts myself today.
The workshop (the 3rd place dealing with my engines) told me what to buy. I have made a nice 800kms trip to Austria to collect the things.
All went fine. I gathered the parts and delivered to the workshop. There some "unfortunate" things unveiled:
- they cannot find a piston ring - they forgot to tell me.
- they wanted me to get +0.003 oversize thrust bearings. We have measured the gap with the extrasize thrusts: 0.45mms! Holly God! The max axial flow is 0.08!!!!!!
No matter, I decided to take the thing as the gasoline is much more expensive than the shim material, I will do the shimming myself.
I have carried the engine home. After 800kms driving since 4'clock, I was a bit tired, but could not wait measuring the thing a bit.
SHOCK just at the first bore!
Piston-bore clearance 0.08-0.09mms!!!!!
The other 3 were 0.025 smaller giving 0.05-0.07mms.
The first bore (the biggest one) even carried the boring marks, soo it is clear that they have overbored the first cylinder, honed it a bit, then went slightly under the size - no matter: junk work.
Factory recommended value: 0.03mms...

I dont know if it is even worth assembling... I dont thinks soo...
Am I cursed?...
Yesterday I was informed that the parts supplier have sent wrong type of bearings, soo I cannot take the engine. Even worst, that the parts shop will close down for a longer holiday. Only chance to go personaly and immediatly. Soo I decided to go and collect the parts myself today.
The workshop (the 3rd place dealing with my engines) told me what to buy. I have made a nice 800kms trip to Austria to collect the things.
All went fine. I gathered the parts and delivered to the workshop. There some "unfortunate" things unveiled:
- they cannot find a piston ring - they forgot to tell me.
- they wanted me to get +0.003 oversize thrust bearings. We have measured the gap with the extrasize thrusts: 0.45mms! Holly God! The max axial flow is 0.08!!!!!!
No matter, I decided to take the thing as the gasoline is much more expensive than the shim material, I will do the shimming myself.
I have carried the engine home. After 800kms driving since 4'clock, I was a bit tired, but could not wait measuring the thing a bit.
SHOCK just at the first bore!
Piston-bore clearance 0.08-0.09mms!!!!!
The other 3 were 0.025 smaller giving 0.05-0.07mms.
The first bore (the biggest one) even carried the boring marks, soo it is clear that they have overbored the first cylinder, honed it a bit, then went slightly under the size - no matter: junk work.
Factory recommended value: 0.03mms...
I dont know if it is even worth assembling... I dont thinks soo...
Am I cursed?...
Edited by camelotr on Wednesday 7th July 21:00
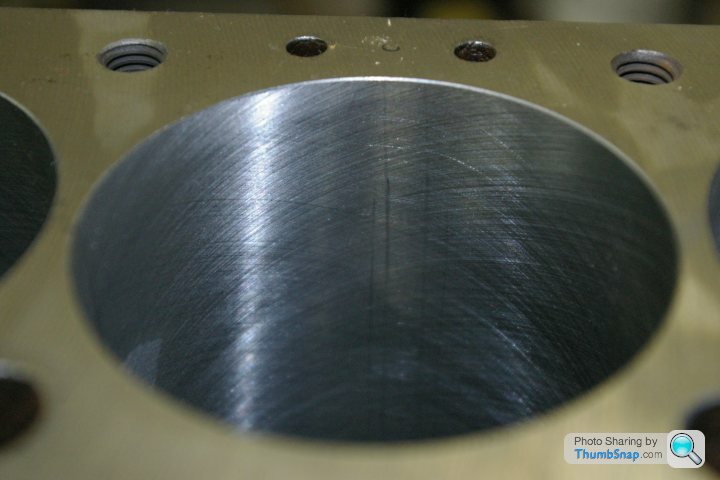
Here's one I did earlier. I just remembered a customer took some pics of a Saab block I'd decked and honed for him a few years ago. It wasn't a rebore, just a rehone of a worn block to get it ready for new rings and skim to raise the compression ratio. Anyway see what you think.

BTW, although you might think the block was decked with a surface grinder it wasn't. That finish was put on by my milling machine with my ultra rigid flycutting tool and a single point carbide cutter. It just looks like surface grinding.
BTW, although you might think the block was decked with a surface grinder it wasn't. That finish was put on by my milling machine with my ultra rigid flycutting tool and a single point carbide cutter. It just looks like surface grinding.
Edited by Pumaracing on Thursday 8th July 15:42
Ick. You're really not having too much luck are you. Tell you what. Get another block, all the bits to build it, come over here for a week and stay with me. I'll do the machining free of charge. It won't be a free ride, I can find plenty for you to do while I'm fixing your engine which will pay for my time but clearly you're a hard worker so it'll be a fair trade. Might get you away from the wife and kids for a bit too 
Edited by Pumaracing on Thursday 8th July 16:16
The machine worksop was only 160kms away (soo would have only meant 320kms), but the closest minishop in austria, who have sent the bearings for the job, have sent bearings for a 998ccm engine  . And thuis we have our big mini meating this week, if I have not travelled to austria for the parts, I could have only got them about a week from now.
That does the 800kms trip - it was lon, exhausting, at least good for nothing.
. And thuis we have our big mini meating this week, if I have not travelled to austria for the parts, I could have only got them about a week from now.That does the 800kms trip - it was lon, exhausting, at least good for nothing
.Normally we engine builders measure the valve guide internal diameter with valve seat cutting pilots which are made in 0.01mm or half thou increments in size. Then just deduct the valve stem diameter. If you have a lathe or a local machine shop you could get a couple of old bits of bar turned down to say 1 thou bigger and 1.5 thou bigger than the inlet valve stem and see if either of those go down the guide.
The alternative is to position a dial gauge as close to the end of the valve guide as possible and see how far the valve stem rocks.
Ideally clearance should be about 1 thou on the inlet valve and a bit more, maybe 1.5 thou on the exhaust but in nearly all engines the exhaust valve stem is made a bit smaller than the inlet valve stem so you get the correct clearance on both with guides that are all one size. If you check your valve stems with a micrometer I'm sure you will see this.
camelotr said:
This offer is more than generous Sir. I would be the happiest man to do...
Unfortunatly enough in my present situation, even buying a new block would be hard to do, not to menshion covering the distance.
Anyway, thanks a lot for the offer.
To be honest I doubt if the extra piston clearance will hurt you much. The piston ring gaps will obviously be about 6 thou too large which is not so much really and the pistons will be a bit loose and maybe make slightly more noise than otherwise but I've seen plenty of race engines using standard cast pistons built very much on the loose side and they run just fine. Maybe they breathe a bit heavier (more blowby of gases past the rings) but the power doesn't seem to suffer.Unfortunatly enough in my present situation, even buying a new block would be hard to do, not to menshion covering the distance.
Anyway, thanks a lot for the offer.
It's not how I do things but engines are very forgiving of such faults and provided the honing is good and the ring seal is good I think it'll run ok. Probably best to swallow it and just accept things if the machinist is going to be an arse about it.
There is a formula for calculating the clearance of a rod in a bushing (valve in a guide) where one end of the rod sticks out from the bushing by any distance and you measure the rock at that end of the rod. Simple diagram below.
G = Length of the valve guide
V = Length from the end of the valve where you measure the rock to the opposite end of the guide.
R = Amount of rock
C = Clearance between valve and guide
C=(R*G)/(2V-G)
As you can see if you measure the rock exactly at the end of the valve guide then G = V and the formula simplifies to C = R which is fairly obvious.
==G==
=====V===
==G==
G = Length of the valve guide
V = Length from the end of the valve where you measure the rock to the opposite end of the guide.
R = Amount of rock
C = Clearance between valve and guide
C=(R*G)/(2V-G)
As you can see if you measure the rock exactly at the end of the valve guide then G = V and the formula simplifies to C = R which is fairly obvious.
Edited by Pumaracing on Monday 12th July 14:36
Despite my quite diappointing measurements, I have assembled the engine. Did all the modifications You have suggested before - except the oil pressure. Yet.
The engine has fired up just after yesterday lunchtime. It ran smooth, though with much crancase gas - something quite not unexpected. But from the very first startup, if had no visible smoke. After about 5 minutes, I have stoped it and removed the plugs. They were black, but dry all except no 1, which was very lightly oily - this is the cylinder with the bigger clearance.
I have let it cool a bit, then restarted. After reaching OP temp, I have opened up the throttle a few times and "loaded" the engine. With the throttle wide open, the engine gave a bit of smoke. A bigger load when the throttle opened, and a few while letting it settle to idle. To be more correct, the first cloud of smoke was genereted just when the throttle was opened, and while the engine reves were lowering, the engine gave smaller amount but constant smoke. Just before setting to idle, cleares.
Nothing else. Good oil pressure, no overheating. This engine behaves completely different though not perfect in all way, but something has changed drasticaly.
Whats You opinion?
Edited by camelotr on Saturday 10th July 08:17
It will probably be any traces of the original boring marks in the biggest cylinder causing the poor ring sealing and smoke as with the previous engines. Properly run in and after some mileage I think you'll be ok. Obviously the service life of the engine will be reduced compared to if it had been machined to the correct tolerances but if you get 50,000 miles out of it you can build a better one later.
Maybe one day I'll use you as an excuse to have a holiday in Hungary and bring my boring and honing equipment with me. Then we can build a proper one. Get the spare bedroom ready - lol.
Maybe one day I'll use you as an excuse to have a holiday in Hungary and bring my boring and honing equipment with me. Then we can build a proper one. Get the spare bedroom ready - lol.
Pumaracing said:
There is a formula for calculating the clearance of a rod in a bushing (valve in a guide) where one end of the rod sticks out from the bushing by any distance and you measure the rock at that end of the rod.
G = Length of the valve guide
V = Length from the end of the valve where you measure the rock to the other end of the guide.
R = Amount of rock
C = Clearance between valve and guide
C=(R*G)/(2V-G)
As you can see if you measure the rock exactly at the end of the valve guide then G = V and the formula simplifies to C = R which is fairly obvious.
Great. This formula is written in my workshop logbook already (about 2 mins ago G = Length of the valve guide
V = Length from the end of the valve where you measure the rock to the other end of the guide.
R = Amount of rock
C = Clearance between valve and guide
C=(R*G)/(2V-G)
As you can see if you measure the rock exactly at the end of the valve guide then G = V and the formula simplifies to C = R which is fairly obvious.
Edited by Pumaracing on Saturday 10th July 08:02
).Yesterday I have experimented a bit with measuring, and I have finaly found a position for the dial gauge. I used a distance piece to connect the gauge and the valve stem, which made things a bit tricky, but after a few dozens of measurings, I have got something like a constant reading. It seems that my valve-stem clearance is 0.06mms at each valves.
Gassing Station | Engines & Drivetrain | Top of Page | What's New | My Stuff