Dashboard Panel Removal
Discussion


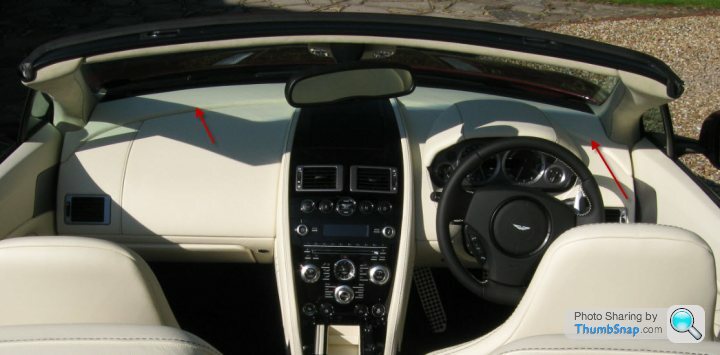
Does anyone know if the two small dash panels near the windscreen (as indicated in the pic) are easily removed and if so, how ?
I coped with one summer of near whiteouts from the reflection in the windscreen but want to have them re-trimmed in black leather ready for this summer.
Also, if anyone can recommend a good trimmer in the Surrey / Berks area would be good too.
I coped with one summer of near whiteouts from the reflection in the windscreen but want to have them re-trimmed in black leather ready for this summer.
Also, if anyone can recommend a good trimmer in the Surrey / Berks area would be good too.
Yes.
Pretty easy depending on how you are with tools. The drivers side is considerably easier - the passenger side however means taking the glovebox, airbag cover and half the dash off. But again, it's not difficult, just time consuming.
I'm in work at the minute but if you can wait until i'm home this evening i'll type you up a full step by step guide. I've done it about a dozen times now to fix various rattles and apply sound proofing to the dash area.

 Maverick - your thread has arrived!
  Even if you haen't done it, you know you want to, along with posting step by step pictures
Ok doke... Here we go. I'll keep it short and sweet however please feel free to ask any questions as it's probably hard to follow until you are actually doing it.

Drivers Side Panel
- Instrument cluster leather cover is the first thing to come off (panel 1 in the photo). Put your hands under either front end corner (closest to the steering wheel) and pull up. Might take bit of force however either corner is only held on with small clips and they do simply just pop out...so persevere (there is a picture of these clips below in the glove box section). These will be the hardest two to come out in the entire dash so you'll get the feel of it if that makes sense! Once they are out move your hands towards each other, still under the leather cover, and pull up. There are two middle clips that will also pop up just the same. Now run your hands to the back of the panel and there are three more clips to pop out (closest to the window). These should pop out quite easily now. Once all out you will see a leather strap holding the cover to the cluster. One cross screw at the base and it's off.
- Now, the leather panel to the right of the cluster which has the air vent in it (panel 2 in the photo). Easiest thing ever. Wedge your fingers under the panel in the gap that joins it to the leather panel facing your feet (beneath the vent). You'll need the door open to do this - but also wedge your fingers in the same gap at the side. Pull up and panel will simply pop out. Only three clips on this panel and will come out as one piece nice and easy just like the cluster cover above but with a lot less force. The heater vent comes out with the panel so no need to touch it.
- Repeat on panel to the left of the instrument cluster (panel 3 in the photo). This only has two clips on it and you'll have the hang of it by now. It's the easiest panel and will unclip extremely easy.
- Now the top panel in question (panel 4 in the photo). You will now be able to see all the screws that you will need to remove to get this panel out. A simple cross head screwdriver (with not too long a handle so it doesn't hit the window) will remove these easy enough. They screw into C clips in the dash so nothing to worry about underneath them just keep them safe for going back in. There are three on this side. Once they are removed the panel will still need to be unclipped. Much like the panels noted above. There are four clips across the top - the problem with these are that you need to take them out at the same time (if that makes sense - i.e. keeping the panel flat as to not bend it) and they take a bit of force to remove. Best thing you can do is just gently wedge your hands under them and take your time edging the panel up bit by bit all the way along to loosen it off. Put a towel over the top so you don't hit the window with the panel when you eventually do feel it's ready to yank up.
All the panels should be out now. If you have a rattle on this side the best thing you can do is pad the underside of the panels before you put them back in. To put them back in, just repeat the above in reverse order. It's a lot easier as you are clipping everything in rather than pulling them out.
Passenger Side Panel
- First step is to remove the glove box surround (panel 5 in the photo). This is the leather part where the glove box open switch is. It just pops out, no screws attach so nice and easy. Much the same process as popping the panels out above - start from the bottom pulling around the whole panel. Once it's off you will see the clip holding the glove box open switch. CLICK THE SWITCH to open the glove box. Then either unclip it and take the panel away or leave the panel in place (it's a pain to work around in place but easier as you don't have to do the following.....)... if you unclip it form the switch, either gently hold or tape the glove box lid back up for the time being but don't clip it shut as it needs to be open.
- Now to remove the glove box (panel 6 in the photo). First off - you will be able to see a few screws around the surround (i.e. sitting in behind where the leather panel was). Now the tough bit.....there are three screws underneath the glovebox that need to come off (green arrows in picture below). They go into a metal bracket which is located right behind the plastic beam that holds the tyre pressure centre. It's located about an inch up into the underside of the dash so you will need to get on your knees with the door open and turn your head upside down to see them. Be very careful here, once the glove box is out there is a cable that attaches on the side. Do not disconnect this just let the whole glove box hang down onto the floor. It should look like this once it's all apart:

- Airbag cover next (panel 7 in the photo). Once the glove box is out go back on your knees and look up under the dash where there is a metal bracket with 3 8mm head bolts. Remove these and watch which way the metal braket comes out that is behind them (as it goes back in - and when it does make sure these bolts are tight). The bracket will just drop out easy. Now run your hands back up to the big leather panel covering the airbag. There are two plastic velcro clips at the front. Simply put your fingers under the panel at the front and pop it up (AT THE FRONT ONLY). Once you see/feel the velcro unstick, run your hands under either side, right to the back of the panel (the side which touches the panel in question) and pull up. Another three of those clips you have seen on the other panels holding this bit in and should pop up easily enough. Try and keep the entire panel flat when you do this or you will crease the leather!! Now lift the entire panel right out straight. You'll see the metal panel you just unbolted in the paragraph above pull out with it. See this picture of what it will look like coming out:

No need to disconnect the airbag you don't even touch it.
- Once the airbag cover is out you can remove the 2 screws for thr side air vent to the left (panel 8 in the photo). It will then pop out much like the vent on the other side.
- You will now be able to see all the screws that hold the upper panel in (panel 9 in the photo). Much like the panel on the other side it has clips running along the top at the back as well and therefore will take a bit of pull to remove once the screws are out. Start left to right and edge up. It's easier that way. And again, put a towel on the top of it just in case you yank it too hard and hit the window). Again, you will need a short cross head screw driver or the handle will hit the window.
Every panel should be out now. Again, simply follow in reverse order to put it back together. All the screws in the glovebox are a pain but just take your time and don't put your back out trying to see what you are doing and you'll be fine.
And I think that's you. The whole process shouldn't take any longer than an hour which is split 20/40 following the above. It's really easy once you know where everything goes - just remember where you put all the screws!!
Any questions feel free to ask.
Thanks
Lewis
Drivers Side Panel
- Instrument cluster leather cover is the first thing to come off (panel 1 in the photo). Put your hands under either front end corner (closest to the steering wheel) and pull up. Might take bit of force however either corner is only held on with small clips and they do simply just pop out...so persevere (there is a picture of these clips below in the glove box section). These will be the hardest two to come out in the entire dash so you'll get the feel of it if that makes sense! Once they are out move your hands towards each other, still under the leather cover, and pull up. There are two middle clips that will also pop up just the same. Now run your hands to the back of the panel and there are three more clips to pop out (closest to the window). These should pop out quite easily now. Once all out you will see a leather strap holding the cover to the cluster. One cross screw at the base and it's off.
- Now, the leather panel to the right of the cluster which has the air vent in it (panel 2 in the photo). Easiest thing ever. Wedge your fingers under the panel in the gap that joins it to the leather panel facing your feet (beneath the vent). You'll need the door open to do this - but also wedge your fingers in the same gap at the side. Pull up and panel will simply pop out. Only three clips on this panel and will come out as one piece nice and easy just like the cluster cover above but with a lot less force. The heater vent comes out with the panel so no need to touch it.
- Repeat on panel to the left of the instrument cluster (panel 3 in the photo). This only has two clips on it and you'll have the hang of it by now. It's the easiest panel and will unclip extremely easy.
- Now the top panel in question (panel 4 in the photo). You will now be able to see all the screws that you will need to remove to get this panel out. A simple cross head screwdriver (with not too long a handle so it doesn't hit the window) will remove these easy enough. They screw into C clips in the dash so nothing to worry about underneath them just keep them safe for going back in. There are three on this side. Once they are removed the panel will still need to be unclipped. Much like the panels noted above. There are four clips across the top - the problem with these are that you need to take them out at the same time (if that makes sense - i.e. keeping the panel flat as to not bend it) and they take a bit of force to remove. Best thing you can do is just gently wedge your hands under them and take your time edging the panel up bit by bit all the way along to loosen it off. Put a towel over the top so you don't hit the window with the panel when you eventually do feel it's ready to yank up.
All the panels should be out now. If you have a rattle on this side the best thing you can do is pad the underside of the panels before you put them back in. To put them back in, just repeat the above in reverse order. It's a lot easier as you are clipping everything in rather than pulling them out.
Passenger Side Panel
- First step is to remove the glove box surround (panel 5 in the photo). This is the leather part where the glove box open switch is. It just pops out, no screws attach so nice and easy. Much the same process as popping the panels out above - start from the bottom pulling around the whole panel. Once it's off you will see the clip holding the glove box open switch. CLICK THE SWITCH to open the glove box. Then either unclip it and take the panel away or leave the panel in place (it's a pain to work around in place but easier as you don't have to do the following.....)... if you unclip it form the switch, either gently hold or tape the glove box lid back up for the time being but don't clip it shut as it needs to be open.
- Now to remove the glove box (panel 6 in the photo). First off - you will be able to see a few screws around the surround (i.e. sitting in behind where the leather panel was). Now the tough bit.....there are three screws underneath the glovebox that need to come off (green arrows in picture below). They go into a metal bracket which is located right behind the plastic beam that holds the tyre pressure centre. It's located about an inch up into the underside of the dash so you will need to get on your knees with the door open and turn your head upside down to see them. Be very careful here, once the glove box is out there is a cable that attaches on the side. Do not disconnect this just let the whole glove box hang down onto the floor. It should look like this once it's all apart:
- Airbag cover next (panel 7 in the photo). Once the glove box is out go back on your knees and look up under the dash where there is a metal bracket with 3 8mm head bolts. Remove these and watch which way the metal braket comes out that is behind them (as it goes back in - and when it does make sure these bolts are tight). The bracket will just drop out easy. Now run your hands back up to the big leather panel covering the airbag. There are two plastic velcro clips at the front. Simply put your fingers under the panel at the front and pop it up (AT THE FRONT ONLY). Once you see/feel the velcro unstick, run your hands under either side, right to the back of the panel (the side which touches the panel in question) and pull up. Another three of those clips you have seen on the other panels holding this bit in and should pop up easily enough. Try and keep the entire panel flat when you do this or you will crease the leather!! Now lift the entire panel right out straight. You'll see the metal panel you just unbolted in the paragraph above pull out with it. See this picture of what it will look like coming out:
No need to disconnect the airbag you don't even touch it.
- Once the airbag cover is out you can remove the 2 screws for thr side air vent to the left (panel 8 in the photo). It will then pop out much like the vent on the other side.
- You will now be able to see all the screws that hold the upper panel in (panel 9 in the photo). Much like the panel on the other side it has clips running along the top at the back as well and therefore will take a bit of pull to remove once the screws are out. Start left to right and edge up. It's easier that way. And again, put a towel on the top of it just in case you yank it too hard and hit the window). Again, you will need a short cross head screw driver or the handle will hit the window.
Every panel should be out now. Again, simply follow in reverse order to put it back together. All the screws in the glovebox are a pain but just take your time and don't put your back out trying to see what you are doing and you'll be fine.
And I think that's you. The whole process shouldn't take any longer than an hour which is split 20/40 following the above. It's really easy once you know where everything goes - just remember where you put all the screws!!
Any questions feel free to ask.
Thanks
Lewis
jeremydb9 said:
Whilst not removing the panels .... I have the same on my boat and the solution was Polaroid Sunglasses. The reflection will vanish.
At about £20 this may prove more economical!
Exactly what I did when I had the same problem with the kestral interior in my v8v... Pro lem solved. At about £20 this may prove more economical!
Boy, did I come late to this party ........ bugger. 
Very good description Lewis, taken mine apart as well, but I think your detailed description would trump anything I would have written. I know of a good trimmer regarding this type of stuff, but he's down in the SW, a bit far to drive I guess.
Good detailed description, I'm jealous .....
Very good description Lewis, taken mine apart as well, but I think your detailed description would trump anything I would have written. I know of a good trimmer regarding this type of stuff, but he's down in the SW, a bit far to drive I guess.
Good detailed description, I'm jealous .....

Thanks guys - not a problem and happy to answer any PM's if you get stuck.
The reason I actually removed mine was to sound proof the entire underside to stop rattles - as 90% of the rattles from the Aston come from the dash. For anyone thinking of doing it, self adhesive sound system proofing is the best idea, however cover it with something soft before you re-fit the panels (like self adhesive felt) or the proofing will rub/squaek on the underside of the leather panels when the cabin gets hot (i.e. a sunny day). I found out the hard way!!
mikey k said:
Most Excellent
I can now chase down any squeaks and rattle myself
I guess the DB is similar?
Defo needs to go in the FAQ!
Mikey: yes, same for all Vantage and DB varients.I can now chase down any squeaks and rattle myself
I guess the DB is similar?
Defo needs to go in the FAQ!
The reason I actually removed mine was to sound proof the entire underside to stop rattles - as 90% of the rattles from the Aston come from the dash. For anyone thinking of doing it, self adhesive sound system proofing is the best idea, however cover it with something soft before you re-fit the panels (like self adhesive felt) or the proofing will rub/squaek on the underside of the leather panels when the cabin gets hot (i.e. a sunny day). I found out the hard way!!
X7LDA said:
Mikey: yes, same for all Vantage and DB varients.
The reason I actually removed mine was to sound proof the entire underside to stop rattles - as 90% of the rattles from the Aston come from the dash. For anyone thinking of doing it, self adhesive sound system proofing is the best idea, however cover it with something soft before you re-fit the panels (like self adhesive felt) or the proofing will rub/squaek on the underside of the leather panels when the cabin gets hot (i.e. a sunny day). I found out the hard way!!
Yep - as many of you know mine has been in and out of the dealer for rattles & squeaks which have mainly been the dash.The reason I actually removed mine was to sound proof the entire underside to stop rattles - as 90% of the rattles from the Aston come from the dash. For anyone thinking of doing it, self adhesive sound system proofing is the best idea, however cover it with something soft before you re-fit the panels (like self adhesive felt) or the proofing will rub/squaek on the underside of the leather panels when the cabin gets hot (i.e. a sunny day). I found out the hard way!!
Hey there X7LDA,
I had the issue where the leather was peeling back on my DB9 - the panel behind the binnacle. I ordered the part from Aston Martin bits and used your guide. I read it a couple of times and tackled it in about 10 minutes!
Really appreciate you taking the time to go through and write it up.
Next I have to replace the side lights - the little blue bulbs at the front of the front light cluster... they look hard to get to!
I took apart a section of the dash on the glovebox side. I then had to repair some leather, that took ages, and I've forgotten how the glovebox goes back! Now when I press the gloebox open button the whole thing just drops. I can't work out how the hinge if the glove box reconnects? I put the two screws back in, but maybe I've screwed into nothing? Any advice appreciated.
Do you mean the glove box drops out completely ie hinge not attached or that it drops to quickly as if the damper (14) has not been connected?
There are two tags that stick up at the back of the glove box (circled red) which hit the roof of the glove box (12) to stop it from opening to far.
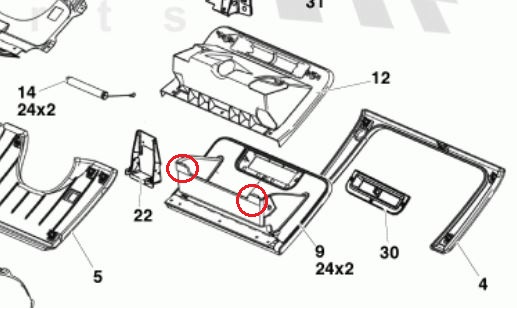
There are two tags that stick up at the back of the glove box (circled red) which hit the roof of the glove box (12) to stop it from opening to far.
Gassing Station | Aston Martin | Top of Page | What's New | My Stuff