Easy way to change a rear light on a DB9
Hi all,
Firstly I would like to thank so many of you that I have met on here that have helped me and provided great advice with my DB9.
During the last weekend I needed to change a rear light on my 2004 DB9 due to one of many electronic failures/faults these cars seem to pick up. This was the first time changing a light on this type of car but it was very easy to do and owners should not be intimidated about doing something like this themselves, especially after seeing what AM charge for such a straight forward job. Please note you can use this same process to change/upgrade your lights to new clear ones as well. Same principle, however you just need a software update from AM when you next visit to update the sensor firmware.
In order to change a light (based on this particular car/year) you will need a 17mm spanner (I actually found the best solution to be a standard 17mm wheel nut remover), a small flat head screwdriver and some good old WD40. Length of time on this job is a very comfortable 30mins per light (including a coffee in between)
Step 1: Get yourself a replacement light(s). Note the 3 screw threads on the back.

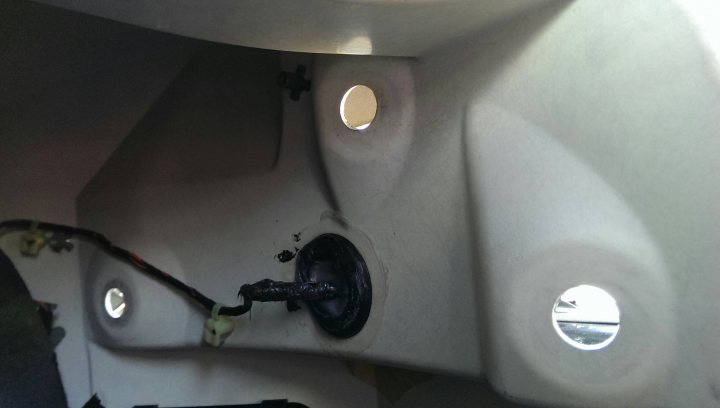
Step 2: Open the boot of the car and carefully pull the protective cover from the seals and away into the boot that will allow you to gain access to the 3 nuts that secure the lights into position:
 |http://thumbsnap.com/skoKBQuu[/url]
Step 3: Undo the nuts and stack them to one side, taking note of the order they go on:

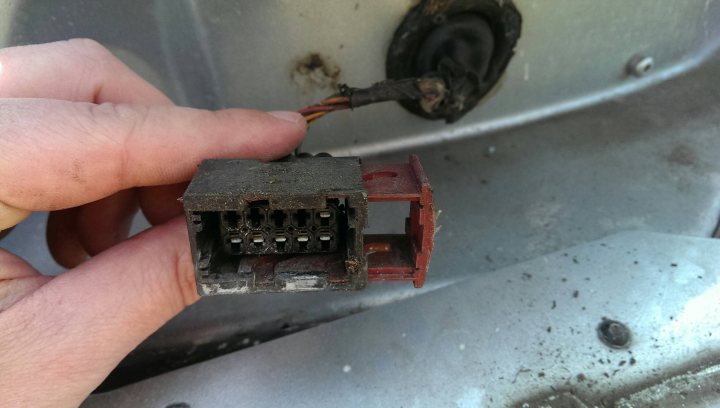
Step 4: You should now be able to release and slide the light out of position gently. The last remaining connector will be the electronic connector. Using your small flat head screwdriver, place it in the relatively obvious gap and use it to slide open the plastic that secures the connection. You will see in the image below the red bit of plastic is the section you are sliding out:
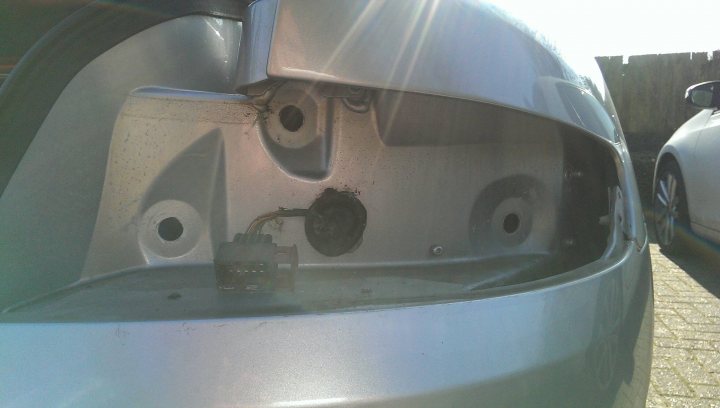
Step 5: Remove the light from the clip and you should now have a big gap in the back of your car:
Step 6: When I spoke to Aston Martin and asked them 'why' this job came with a relatively large fitting fee, they said it could be quite challenging to line up the lights and get them level with the body panels etc... well... My father always told me that a little common sense goes a long way... and here is the trick to making this job easy. Now that you have removed your non-functioning or old light, you will see that you still have the washers and nuts mounted on the screw thread which gauges the depth of the light and the alignment. DO NOT TOUCH these nuts/washers until you have counted the number of threads between the light and the nut.
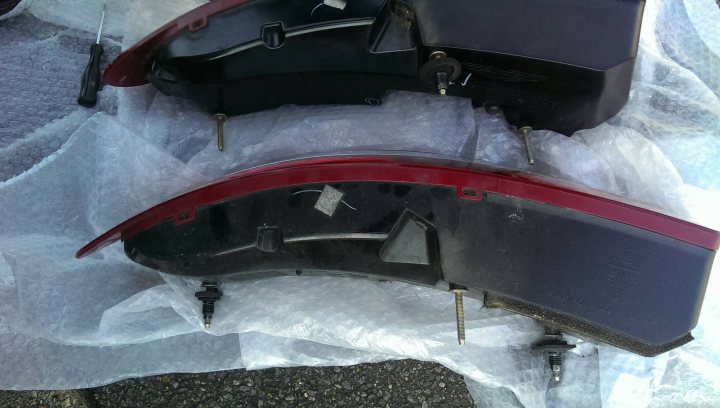
Taking one nut/washer at a time, remove both nut and washer from the old light and tighten onto the new light down to the SAME depth as the other one. I found simply placing the lights on some protective bubble-wrap next to one another other makes the job very easy.
Step 7: Once the nuts/washers are on and in place, lift the light back into position (Be careful with the screw threads that are sticking out) VERY careful not to scratch or damage your car when doing so. Connect the electric connector by pressing firmly and sliding the red plastic piece back in. Test it to make sure the connection is sound.
Step 8: At this point, I would advise resting the light in position and testing it before securing, just to make sure there are no problems.
Step 9: Tighten bolts back onto the threads from the inside (height and adjustment should be fine if you counted the threads earlier) and push back the cover on the inside and you are done !
I hope that this helps anyone reading this perform this operation... in all honesty I quite enjoyed it... was much easier and more fun that changing brake pads thats for sure. Please don't hesitate to ping me a message if you have any questions or if there is anything I haven't covered here that you might be unsure about.
A couple of updates for the V8V coupe. Firstly, I found that the bolts holding the lights in were 19mm, not 17mm. Also, there is no requirement to remove the trim from the rear of the boot to remove the lights. Once you unscrew the black, semi-circular bolt covers, you can access the bolts directly.
I found that the biggest hassle was accessing the high level brake light. This requires you to lower the trim from the boot lid. This involved removing approximately 10 plastic, mushroom shaped trim holders. I found that the easiest method was to use a small screwdriver to pry away an edge and then to get a pair of pliers in as far as possible to hold the 'cap' of the 'mushroom'. Then pull it downwards. The trim itself doesn't have to be removed completely but obviously it has to be lowered enough to give you access to the brake light. This was secured with 7mm bolts. Unplug the electrical terminal by removing the metal U-piece first. Then bolt everything back together again.
I have found that the new light clusters are working just fine without having to return the car to the dealer to get any software updated.
Firstly I would like to thank so many of you that I have met on here that have helped me and provided great advice with my DB9.
During the last weekend I needed to change a rear light on my 2004 DB9 due to one of many electronic failures/faults these cars seem to pick up. This was the first time changing a light on this type of car but it was very easy to do and owners should not be intimidated about doing something like this themselves, especially after seeing what AM charge for such a straight forward job. Please note you can use this same process to change/upgrade your lights to new clear ones as well. Same principle, however you just need a software update from AM when you next visit to update the sensor firmware.
In order to change a light (based on this particular car/year) you will need a 17mm spanner (I actually found the best solution to be a standard 17mm wheel nut remover), a small flat head screwdriver and some good old WD40. Length of time on this job is a very comfortable 30mins per light (including a coffee in between)
Step 1: Get yourself a replacement light(s). Note the 3 screw threads on the back.
Step 2: Open the boot of the car and carefully pull the protective cover from the seals and away into the boot that will allow you to gain access to the 3 nuts that secure the lights into position:
|http://thumbsnap.com/skoKBQuu[/url]Step 3: Undo the nuts and stack them to one side, taking note of the order they go on:
Step 4: You should now be able to release and slide the light out of position gently. The last remaining connector will be the electronic connector. Using your small flat head screwdriver, place it in the relatively obvious gap and use it to slide open the plastic that secures the connection. You will see in the image below the red bit of plastic is the section you are sliding out:
Step 5: Remove the light from the clip and you should now have a big gap in the back of your car:
Step 6: When I spoke to Aston Martin and asked them 'why' this job came with a relatively large fitting fee, they said it could be quite challenging to line up the lights and get them level with the body panels etc... well... My father always told me that a little common sense goes a long way... and here is the trick to making this job easy. Now that you have removed your non-functioning or old light, you will see that you still have the washers and nuts mounted on the screw thread which gauges the depth of the light and the alignment. DO NOT TOUCH these nuts/washers until you have counted the number of threads between the light and the nut.
Taking one nut/washer at a time, remove both nut and washer from the old light and tighten onto the new light down to the SAME depth as the other one. I found simply placing the lights on some protective bubble-wrap next to one another other makes the job very easy.
Step 7: Once the nuts/washers are on and in place, lift the light back into position (Be careful with the screw threads that are sticking out) VERY careful not to scratch or damage your car when doing so. Connect the electric connector by pressing firmly and sliding the red plastic piece back in. Test it to make sure the connection is sound.
Step 8: At this point, I would advise resting the light in position and testing it before securing, just to make sure there are no problems.
Step 9: Tighten bolts back onto the threads from the inside (height and adjustment should be fine if you counted the threads earlier) and push back the cover on the inside and you are done !
I hope that this helps anyone reading this perform this operation... in all honesty I quite enjoyed it... was much easier and more fun that changing brake pads thats for sure. Please don't hesitate to ping me a message if you have any questions or if there is anything I haven't covered here that you might be unsure about.
- **UPDATE FOR V8V Coupe****
A couple of updates for the V8V coupe. Firstly, I found that the bolts holding the lights in were 19mm, not 17mm. Also, there is no requirement to remove the trim from the rear of the boot to remove the lights. Once you unscrew the black, semi-circular bolt covers, you can access the bolts directly.
I found that the biggest hassle was accessing the high level brake light. This requires you to lower the trim from the boot lid. This involved removing approximately 10 plastic, mushroom shaped trim holders. I found that the easiest method was to use a small screwdriver to pry away an edge and then to get a pair of pliers in as far as possible to hold the 'cap' of the 'mushroom'. Then pull it downwards. The trim itself doesn't have to be removed completely but obviously it has to be lowered enough to give you access to the brake light. This was secured with 7mm bolts. Unplug the electrical terminal by removing the metal U-piece first. Then bolt everything back together again.
I have found that the new light clusters are working just fine without having to return the car to the dealer to get any software updated.