Replacing headlight unit, easy job ?
Discussion


X7LDA said:
You would have the exact same problem if you just replaced the full unit on one side not the other... Never had any colour match issues. I'm talking about using Astonbits and getting OEM replacement strips. They will probably even match the year if you are worried that one side will be stronger.
Anyway, tried and tested. Do that for a few hundred quid or buy a new / used unit. Owners choice
And looks very similar to this http://www.clickdesign.co.uk/supradupra/Dip-Dim_PC...
Thanks for the link, although if it looks anything like that pic then I'll revise my cost estimate of £2 downwards Anyway, tried and tested. Do that for a few hundred quid or buy a new / used unit. Owners choice
And looks very similar to this http://www.clickdesign.co.uk/supradupra/Dip-Dim_PC...
if it's a single sided board then that's nothing more than a few diodes, transistors and resistors. Here is a photo of the PCB that supplies the LED side and indicator lights:
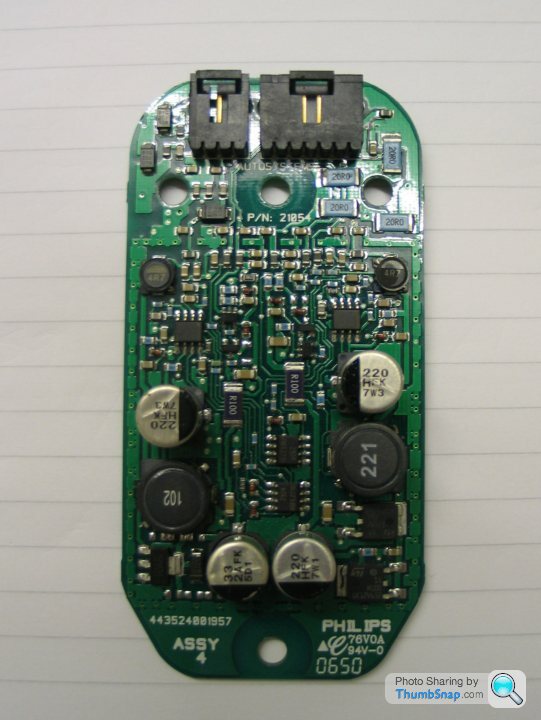
As you can see it is a bit more complicated than one might have expected; probably not an easy DIY fix!
My RHS headlight failed back in September, and once over the usual 'should this really happen on five year old premium product' question, I found the following solutions:
1) Replace entire headlight: quoted around £1050 + VAT for part, plus labour if done at dealer (didn't ask how much this was at the time because I was still recovering from the shock of the price of the part!) Pros: easier if you can't get headlight out and apart. Cons: expensive and could end up with mismatch of LED colour, which would really play on your OCD. Warranty: I believe the new unit would be covered by 12 month warranty (again didn't ask due to shock)
2) Purchase replacement board from AstonMartinBits: quoted around £200 + VAT. Pros: cheaper, could match LEDs with existing colour by buying roughly same age of lights. Cons: have to get unit apart. Warranty: offered 3 months
3) Repaired by IER Ltd: quoted around £250 + VAT. Pros: again cheaper than replacement unit, retain existing colour (assuming not LED itself that had failed). Cons: have to get unit apart. Warranty: offered 2 years
Getting the unit out of the car is relatively straight forward (as already described by others) and took about me about twenty minutes. I decided to remove the entire wheel arch liner to give me better access, plus I decided to also change the bubbling chrome side strake (another gripe) at the same time. I did not need to remove the front undertray but this depends upon how brave you are bending the wheel arch liner and front bumper cover.
I figured that the unit was already broken so what damage can be done (to the car) by trying to take it apart so I tried this next.
Getting the unit apart was quite a job and took a good hour of heating, levering, swearing, ... (repeat as necessary) to get the clear lens off. Making a hole and going in through another route is not an option, the board is too big, and screwed in from the top. I gather some units are better bonded together than others, with some not even being bonded at all. Mine was bonded with some very tough black firm setting mastic like material and I needed a hot air paint stripper to get enough heat in to soften it up, although do this very carefully so as not to melt the lens. I started at the rear inbound corner because here the lens covers a relatively large area of the headlight not exposed on the outside of the vehicle, so you can get some practise in not knackering the lens edge without it being seen. Once you have managed to lever the edge up to the point where you can get something right underneath the lens lip, then work round the lens, prizing it off gently. As well as the mastic there are some lugs that lock together but these should be ok to lever off gently. Once the lens is off the rest is relatively straightforward, with various screws, etc., to remove first the LEDs then the PCB.
I opted to have the PCB repaird via IER because they offered a two year warranty. The process went well, collecting the board on the Monday and returning it by the Friday of the same week. I know it has been suggested that it is water damage but I could see no evidence for this on the board, plus in my case the unit failed as I used the car after two months in heated storage (moving house) and so the unit internals must have been relatively dry. That said, when the board came back from IER I could see no evidence of replaced parts but then again my soldering is not the neatest and they probably know how to do it properly. So I am afraid I can shed no light on the cause of the repeated failures. Perhaps it did only need a clean and I may try that first next time but the two year warranty gives some comfort. The chap from IER said they repair quite a few PCBs for cars, mainly Bentleys but some AM, and often for dealers who didn't want the cost of repairing the whole unit for a vehicle up for sale. Perhaps they now know where to look hence the quick turn around time.
I true Haynes manual style, reverse removal process for refitting, taking car to make sure there is no dust, etc., in the unit prior to putting the lens back on. Take care with the lens because the inside scratches really easily even if you are just removing dust. I stuck my lens back on with blact RTV mastic to make sure it is fairly watertight but easy enough to get apart again. I did not bother with the headlight alignment process because I made sure I did not move the adjustment screw on the car and it was deemed to be aligned ok at the MOT test a few weeks later.
Apologies for the essay but I hope it helps other owners with a similar failure.

Good point Lewis,
I forgot to mention that I sent both the LEDs and PCB to IER for testing. Presumably the price charged reflected the testing of both and the fixing of the relevant broken parts, whether one, or other, or both parts. They didn't clarify which was repaired and which was covered by warranty.
Also, price from AstonMartinBits was for PCB and LEDs. I believe they will sell you the bits separately but unless you know which is broken it is difficult to fix the problem in a timely manner buying in a piecemeal fashion.
Also, forgot fourth option, which was to buy a used headlight unit. There are a few on Ebay from £300 upwards; presumably there is no warranty going this route.
avinalarf said:
Excellent post,thank you.
Can you please tell me who and where are IER. Ltd ?
See above (from last Saturday):Can you please tell me who and where are IER. Ltd ?
Edited by avinalarf on Wednesday 26th November 11:20
SlartiF430 said:
Try these guys. They might be able to repair them for you at a reasonable price.
http://www.ieruk.com
http://www.ieruk.com
Bouldermobile said:
Here is a photo of the PCB that supplies the LED side and indicator lights:
[url]
Apologies for the essay but I hope it helps other owners with a similar failure.
Indeed top post, very helpful.[url]
Apologies for the essay but I hope it helps other owners with a similar failure.
Does the board have any components on the back?
I'd agree here that DIY repair will be beyond the scope of most, but with the correct tools it's all doable.
When you get these sidelight failures does the indicator function die as well?

Just to confirm there are no components on the back. I can post a photo if this is likely to help?
In my case the indicator continued to work ok.
Unfortunately I didn't have a working and broken set of PCB and LEDs at the same time so I could not compare readings from the two sets to try and find a probable cause of the failure. If somebody has some expertise in this field then I would be willing to try and work with them to find the cause, assuming we could find working/broken parts to compare.
Edited by Bouldermobile on Wednesday 26th November 14:45
8Tech said:
Am I the only one who thinks that having a circuit like that to replace an earth and a live to each circuit (grand total of 5) is excessive!!!
No wonder the bloody things are getting so unreliable.
Nope you aren't alone. I am astonished that they have introduced such complexity and guaranteed failure into a sidelight. They have replaced a 50p 5 watt bulb with a host of complex circuit and electronics. No wonder the bloody things are getting so unreliable.
WTF they need to go to LED is beyond me, and if they absolutely MUST go to LED surely they can design it so the PCB is external to the unit for easy replacement!
They do that with the HID ballast, why not the PCB?

Bouldermobile said:
Just to confirm there are no components on the back. I can post a photo if this is likely to help?
In my case the indicator continued to work ok.
Unfortunately I didn't have a working and broken set of PCB and LEDs at the same time so I could not compare readings from the two sets to try and find a probable cause of the failure. If somebody has some expertise in this field then I would be willing to try and work with them to find the cause, assuming we could find working/broken parts to compare.
I'm also willing to help if I can, do you know if a wiring diagram exists?In my case the indicator continued to work ok.
Unfortunately I didn't have a working and broken set of PCB and LEDs at the same time so I could not compare readings from the two sets to try and find a probable cause of the failure. If somebody has some expertise in this field then I would be willing to try and work with them to find the cause, assuming we could find working/broken parts to compare.
Edited by Bouldermobile on Wednesday 26th November 14:45
Replacing the components would be no problem, it's just identifying what wrong.
8Tech said:
Am I the only one who thinks that having a circuit like that to replace an earth and a live to each circuit (grand total of 5) is excessive!!!
No wonder the bloody things are getting so unreliable.
Electronics in cars has a long way to go yet, a CEO of a prominent supply company to the Automotive Industry recently said, "cars of the future will be PCB's with wheels on". Lets just hope that they're more reliable than our side light unit No wonder the bloody things are getting so unreliable.
I believe the wiring diagram ends at the connection with the headlight unit and presumably only the board manufacturer has a wiring diagram.
I am also surprised how complicated the board is. Presumably the board controls the flashing for the indicator and the supply to the side lights; can't remember if there is an interaction between the two, i.e. side lights go off when indicator flashing. At the time I wondered if this couldn't all be acheived with a much simpler set of components given that it is doing something that cars have featured for a good thirty years. I did also wonder if the wiring couldn't be modified to include DRLs that dim slightly when headlight and/or indicator in operation, etc., but as I am not a real fan of DRLs I did not explore this further. Personally I think they are good for covering up the front of an ugly car when switched on but the Vantage is to good looking to hide!
I am also surprised how complicated the board is. Presumably the board controls the flashing for the indicator and the supply to the side lights; can't remember if there is an interaction between the two, i.e. side lights go off when indicator flashing. At the time I wondered if this couldn't all be acheived with a much simpler set of components given that it is doing something that cars have featured for a good thirty years. I did also wonder if the wiring couldn't be modified to include DRLs that dim slightly when headlight and/or indicator in operation, etc., but as I am not a real fan of DRLs I did not explore this further. Personally I think they are good for covering up the front of an ugly car when switched on but the Vantage is to good looking to hide!
Bouldermobile said:
I believe the wiring diagram ends at the connection with the headlight unit and presumably only the board manufacturer has a wiring diagram.
I am also surprised how complicated the board is. Presumably the board controls the flashing for the indicator and the supply to the side lights; can't remember if there is an interaction between the two, i.e. side lights go off when indicator flashing. At the time I wondered if this couldn't all be acheived with a much simpler set of components given that it is doing something that cars have featured for a good thirty years. I did also wonder if the wiring couldn't be modified to include DRLs that dim slightly when headlight and/or indicator in operation, etc., but as I am not a real fan of DRLs I did not explore this further. Personally I think they are good for covering up the front of an ugly car when switched on but the Vantage is to good looking to hide!
Indicators are LED's stacked on the side lights (AM don't do DRL's)I am also surprised how complicated the board is. Presumably the board controls the flashing for the indicator and the supply to the side lights; can't remember if there is an interaction between the two, i.e. side lights go off when indicator flashing. At the time I wondered if this couldn't all be acheived with a much simpler set of components given that it is doing something that cars have featured for a good thirty years. I did also wonder if the wiring couldn't be modified to include DRLs that dim slightly when headlight and/or indicator in operation, etc., but as I am not a real fan of DRLs I did not explore this further. Personally I think they are good for covering up the front of an ugly car when switched on but the Vantage is to good looking to hide!
Side lights go off when indicators are on
That board is a Philips unit with a part number on it


Bouldermobile said:
I believe the wiring diagram ends at the connection with the headlight unit and presumably only the board manufacturer has a wiring diagram.
Wiring diagram up to the light would still be useful to establish what the connections do. Presumably one connector supplies the power and the other the control lines.Gassing Station | Aston Martin | Top of Page | What's New | My Stuff