How-to separate and reseal your rear lights
Discussion


I've had a lot of experience of replacing and fixing the rear lights, owned my vantage for 12 years and in that time been through any number of sets!
Firstly you will find lights on e bay second hand. I'd avoid. Ive bought these and they all developed the same problem. Seems it was a design flaw that Aston only sorted in the last few years.
I had a go at drying out a set which worked but the moisture came back. Seems its not always the seal around the light. It can seep in through the lense itself. You have to be very careful when you refit that you dont overtighten the bolts that hold it in place. That can stress them and let in moisture.
I also had a go on an old set of sticking them in the oven to open. Made a total arse of it. Thats not to say it cant be done, plenty of owners have.
So options,
1. Buy a new set from Aston. North of £1,000. Thats what I did eventually and they have been fine. I guess they finally got the bugs out.
2. Divinatech will take the existing rears and totally rebuild including a new module that give a sequential effect, bit like Audis. Cost also circa £1,000
3. Have a go yourself...
4. Try Aston Installations. I was in recently for an apple carplay upgrade and James tells me they are moving into offering this service but at a lot less than the existing alternatives.
They had three cars in for audio work and two had rear lights full of condensation so no brainer for them to offer the service. On which point a big thanks to James & Lenny. They fitted carplay a couple of years back. I was having a few issues with it so they ripped out the exisitng setup & replaced it with the newest version, no cost!
I'm taking mine to a local electronics shop today to see if they can do a fix. I've stripped the light further - drilled out the two rivets holding the 'board' into the reflector unit. The diffuser for the orange leds was fixed on and will need to be bonded back in place after. It's all been fairly straightforward to strip down.
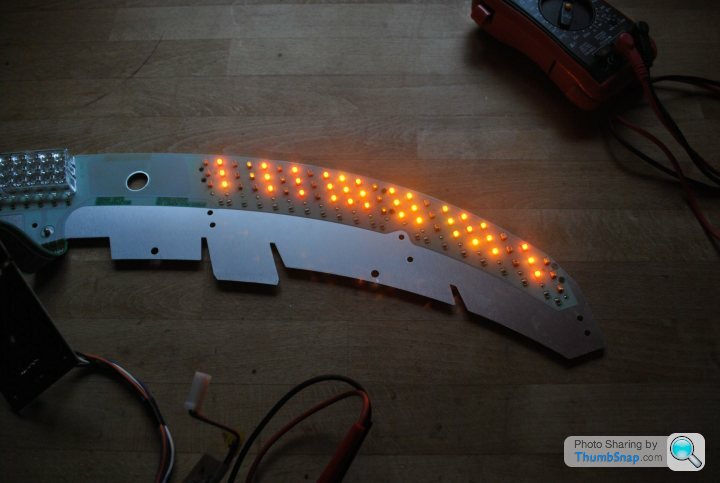
To me it looks like this might just be some dry solder joints and possibly a few failed LEDS. I'll let you know the outcome and cost.
Eric
To me it looks like this might just be some dry solder joints and possibly a few failed LEDS. I'll let you know the outcome and cost.
Eric

I forgot I owed an update to the thread. I took the board to Greasley Electronics (they're near Coalville in Leicestershire) and they replaced the orange LEDs. The other light strips and the driver board were fine.
A bonus discovery is that the boss John has a DB9 - but hasn't had to do this to his car.
The cost for the electronics was very reasonable at about 80 quid and bags of satisfaction for tackling this fix.
Reassembly of the unit was straightforward (as described further up the thread) with new butyl tape (do warm the unit in the oven to get the tape soft enough to close everything up neatly). A wipe of PU sealant along the finished joint and a bit of care getting the adjuster screws set correctly so the unit sits correctly in alcove and it's as good as new.
Great write up OP.
Some advice to anyone trying this. Be careful with the screwdriver as you chase the original seal along. Mine slid out and stabbed me...
The light’s still in pieces but initial investigations show that the electronics are still not working correctly. I’ll dry overnight and try agin tomorrow. Fingers crossed.
Thanks again. A really useful post.
Update: quite a few of the LEDs were shot. I sent the light off to Greasley Electronics and they fixed them for £150 plus VAT and postage. There were quite a few that needed to be replaced. Just resealed the light and will be refitting on the car this evening.
I have a fair bit of the sealant (this stuff https://www.psasolutions.uk.com/product/butyl-seal... left if anyone wants some
Edited by Chopdogs on Wednesday 1st July 19:22

Yamaha YL1 said:
DO NOT EVER PUT AN ASTON MARTIN LIGHT IN THE OVEN.
THE LENS WILL DEFORM UPON REMOVAL AND YOU WILL NEVER RE-SEAL IT PROPERLY.
PLUS YOUR SUNDAY ROAST WILL SMELL OF MOLTEN PLASTIC.
I’m afraid that’s wrong. A lot of people have been very successful doing this. Those who get deformed lenses clearly have the oven too hot, or leave the lens in too long.THE LENS WILL DEFORM UPON REMOVAL AND YOU WILL NEVER RE-SEAL IT PROPERLY.
PLUS YOUR SUNDAY ROAST WILL SMELL OF MOLTEN PLASTIC.
Mind you, it’s the same with cakes. Put them in at the wrong temperature or for too long and they’ll be ruined.
No one ever said don’t bake a cake because you’ll burn it…
JonnyCJ said:
I’m afraid that’s wrong. A lot of people have been very successful doing this. Those who get deformed lenses clearly have the oven too hot, or leave the lens in too long.
Mind you, it’s the same with cakes. Put them in at the wrong temperature or for too long and they’ll be ruined.
No one ever said don’t bake a cake because you’ll burn it…
This.Mind you, it’s the same with cakes. Put them in at the wrong temperature or for too long and they’ll be ruined.
No one ever said don’t bake a cake because you’ll burn it…
Sorry you've warped your lights a bit but I've done 3 now without issue. The old oven technique for lights has been around way before this thread.
I opened up my near side light yesterday. I used a heat gun and it was very easy. However, it appears there was a previous fix done. To be fair, the repair is spot on but the reseal was poor. There was lots of moisture on the lens. Luckily I could only find it on the lens, not the electrics and all is working fine.
I used bathroom sealant to seal it up. I’ve used it before and it works perfectly. I also installed a 25g absorbent bag, with double sided tape to hold it in place.…..Just in case, lol.
John
I used bathroom sealant to seal it up. I’ve used it before and it works perfectly. I also installed a 25g absorbent bag, with double sided tape to hold it in place.…..Just in case, lol.
John
Gassing Station | Aston Martin | Top of Page | What's New | My Stuff