Cheap Ducati 748, what could possibly go wrong
Discussion


final_edition said:
Is the horiz belt tensioner adjusted the right way?
My screen isn't too good to see the detail clearly but it looks like it is rotated from underneath, rather than over the top, allowing the belt faces to run close to eack other.
my apologies if not, good work
Yes you're right I spotted that after i took the picture and turned it the other way, although in the end it hardly made any difference to the distances between the belt teeth My screen isn't too good to see the detail clearly but it looks like it is rotated from underneath, rather than over the top, allowing the belt faces to run close to eack other.
my apologies if not, good work

AceOfHearts said:
996 sps said:
A O H, how much do you charge for a belt service on an SPS mate? And would the bike/engine be stored in the dining room or living room?
Joking asiide if you ever did want to give the service a go yourself you are more than welcome to bring the bike over and I will go through it with you. Parts and fluids came to about £200 on mine, and its always good having a play with bikes 


996 sps said:
Mate that would be superb, I see your in Beds i'm in Northants most wends so may hold you to that if its okay......This is a pic of mine last Xmas, it needed an engine re-build, obviously not me doing it:
Yer definately, just give me a shot on here (i'm on here pretty much daily) when the time comes. What happened to the engine?final_edition said:
Is the horiz belt tensioner adjusted the right way?
My screen isn't too good to see the detail clearly but it looks like it is rotated from underneath, rather than over the top, allowing the belt faces to run close to eack other.
my apologies if not, good work
Can't see how else the belts would go ?My screen isn't too good to see the detail clearly but it looks like it is rotated from underneath, rather than over the top, allowing the belt faces to run close to eack other.
my apologies if not, good work
bimsb6 said:
final_edition said:
Is the horiz belt tensioner adjusted the right way?
My screen isn't too good to see the detail clearly but it looks like it is rotated from underneath, rather than over the top, allowing the belt faces to run close to eack other.
my apologies if not, good work
Can't see how else the belts would go ?My screen isn't too good to see the detail clearly but it looks like it is rotated from underneath, rather than over the top, allowing the belt faces to run close to eack other.
my apologies if not, good work
AceOfHearts said:
bimsb6 said:
final_edition said:
Is the horiz belt tensioner adjusted the right way?
My screen isn't too good to see the detail clearly but it looks like it is rotated from underneath, rather than over the top, allowing the belt faces to run close to eack other.
my apologies if not, good work
Can't see how else the belts would go ?My screen isn't too good to see the detail clearly but it looks like it is rotated from underneath, rather than over the top, allowing the belt faces to run close to eack other.
my apologies if not, good work
Did you have a special locking tool to keep everything in place during the change?
3doorPete said:
AceOfHearts said:
bimsb6 said:
final_edition said:
Is the horiz belt tensioner adjusted the right way?
My screen isn't too good to see the detail clearly but it looks like it is rotated from underneath, rather than over the top, allowing the belt faces to run close to eack other.
my apologies if not, good work
Can't see how else the belts would go ?My screen isn't too good to see the detail clearly but it looks like it is rotated from underneath, rather than over the top, allowing the belt faces to run close to eack other.
my apologies if not, good work
Did you have a special locking tool to keep everything in place during the change?
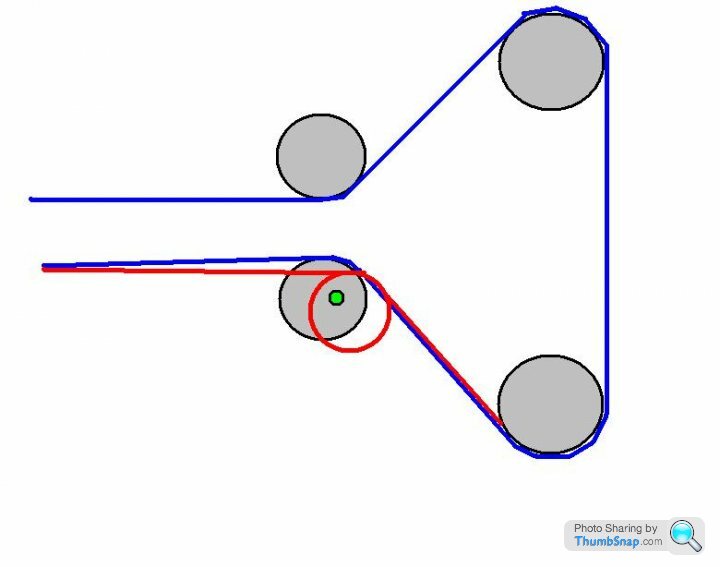
The tensioner in the picture of my bike is set up as the black outlined tensioner in the drawing. If you imagine the offset stud in the tensioner (green) stays in the same throughout you can rotate the tensioner anticlockwise to put in in the red position, hence creating a bit more space between the belt edges.
In practice though i don't think it would make any difference as the belts won't be flailing about anyways and i don't think it even mentions the fact in the Haynes manual
ETA
No i didn't have a locking device for the belt change, just turned the engine over until all the timing marks lined up, got the belts on and just kept checking that the marks stayed put. Took a bit of wrestling but was not too bad.
Edited by AceOfHearts on Saturday 14th July 00:11
To correctly tension the belts there's a test unit that detects the frequency of the belt when you 'ping' it. It clips onto the belt in a specific position and you tighten or loosen the belt to achieve the correct tension frequency.
Not sure how you can correctly tension the belts to the factory standard without. Perhaps there's a deflection dimension instead.?
There's also a cam holding tool that slips over the cam wheels to hold them in the correct position as you set the crank angle.
And whilst i know it costs, i can thoroughly recommend a crank angle dial and a dial gauge so you can confirm you inlet and exhaust opening angles when rebuilding.
I started watching my mech build my motors and now i do it at his place using his Ducati factory tools!!! Not easy motors to build but quite satisfying when you get it done right.
And get yourself on ebay and look for a powercommander 3 use for these bikes. Well worth it as the standard fuelling is a bit iffy.
Steve
bass gt3 said:
To correctly tension the belts there's a test unit that detects the frequency of the belt when you 'ping' it. It clips onto the belt in a specific position and you tighten or loosen the belt to achieve the correct tension frequency.
Not sure how you can correctly tension the belts to the factory standard without. Perhaps there's a deflection dimension instead.?
There's also a cam holding tool that slips over the cam wheels to hold them in the correct position as you set the crank angle.
And whilst i know it costs, i can thoroughly recommend a crank angle dial and a dial gauge so you can confirm you inlet and exhaust opening angles when rebuilding.
I started watching my mech build my motors and now i do it at his place using his Ducati factory tools!!! Not easy motors to build but quite satisfying when you get it done right.
And get yourself on ebay and look for a powercommander 3 use for these bikes. Well worth it as the standard fuelling is a bit iffy.
Steve
I read that for the first few years (before the dealers started using the frequency method of tensioning the belts) they used a deflection of 5mm between the two cams. I have also heard that a guitar tuner can be used to the same effect but I have not explored this method. When I pull it all apart again to do the valve clearances I will give it a go and report back Not sure how you can correctly tension the belts to the factory standard without. Perhaps there's a deflection dimension instead.?
There's also a cam holding tool that slips over the cam wheels to hold them in the correct position as you set the crank angle.
And whilst i know it costs, i can thoroughly recommend a crank angle dial and a dial gauge so you can confirm you inlet and exhaust opening angles when rebuilding.
I started watching my mech build my motors and now i do it at his place using his Ducati factory tools!!! Not easy motors to build but quite satisfying when you get it done right.
And get yourself on ebay and look for a powercommander 3 use for these bikes. Well worth it as the standard fuelling is a bit iffy.
Steve

AceOfHearts said:
I read that for the first few years (before the dealers started using the frequency method of tensioning the belts) they used a deflection of 5mm between the two cams. I have also heard that a guitar tuner can be used to the same effect but I have not explored this method. When I pull it all apart again to do the valve clearances I will give it a go and report back
There's also a dial gauge that fits to the belt and displayes the tension. Basically has 3 prongs that straddle the belt and as you tighten the belt the gauge moves. Very handy little thing if you can get it.And as for your fuel connectors, just replace with another standard type and enjoy. They are robust little things as long as you lube them up. The they don't jam and can swivel nicely and not pinch the O ring. These are what cause the elbows to break. Rough handling and dry connector.
bass gt3 said:
There's also a dial gauge that fits to the belt and displayes the tension. Basically has 3 prongs that straddle the belt and as you tighten the belt the gauge moves. Very handy little thing if you can get it.
And as for your fuel connectors, just replace with another standard type and enjoy. They are robust little things as long as you lube them up. The they don't jam and can swivel nicely and not pinch the O ring. These are what cause the elbows to break. Rough handling and dry connector.
I have not seen any standard plastic ones for sale? I wish I could as i begrudge spending £50 on two connectors :/And as for your fuel connectors, just replace with another standard type and enjoy. They are robust little things as long as you lube them up. The they don't jam and can swivel nicely and not pinch the O ring. These are what cause the elbows to break. Rough handling and dry connector.
AceOfHearts said:
3doorPete said:
AceOfHearts said:
bimsb6 said:
final_edition said:
Is the horiz belt tensioner adjusted the right way?
My screen isn't too good to see the detail clearly but it looks like it is rotated from underneath, rather than over the top, allowing the belt faces to run close to eack other.
my apologies if not, good work
Can't see how else the belts would go ?My screen isn't too good to see the detail clearly but it looks like it is rotated from underneath, rather than over the top, allowing the belt faces to run close to eack other.
my apologies if not, good work
Did you have a special locking tool to keep everything in place during the change?
The tensioner in the picture of my bike is set up as the black outlined tensioner in the drawing. If you imagine the offset stud in the tensioner (green) stays in the same throughout you can rotate the tensioner anticlockwise to put in in the red position, hence creating a bit more space between the belt edges.
In practice though i don't think it would make any difference as the belts won't be flailing about anyways and i don't think it even mentions the fact in the Haynes manual
ETA
No i didn't have a locking device for the belt change, just turned the engine over until all the timing marks lined up, got the belts on and just kept checking that the marks stayed put. Took a bit of wrestling but was not too bad.
Edited by AceOfHearts on Saturday 14th July 00:11
Well, looks like i have landed on my feet 
Today I checked the valve clearances as I am still waiting on my fuel connectors. Access is an absolute pain and i'm glad i bought some angled feeler gauges for the job. Took about 3 hours in the end and took the opportunity whilst the throttle bodies were off to replace the fuel lines which i can make a bit longer for easier tank removal in the future.
Now on to the really good news! All of the valve clearances were in spec so coupled with the clean oil strainer i think i landed myself a good bike
Just a couple of bits left to do for the service to be complete (checking chain and wheels bearings etc.) and then once the fuel fittings are here it will be ready to go
Very happy chappy now and just hoping the weather holds out!
996 sps said:
Good news.....reckon you'll be done by Sunday for breakfast run from MK?
Wish i was but i am at Aberdare Park all weekend to watch the Supermono and Vintage racing One of my friends dads has a Supermono team and builds bikes (GP1 Lung featured in MCN a couple of weeks ago) so we spend the weekend with them. I will make sure i get some pics!
Gassing Station | Biker Banter | Top of Page | What's New | My Stuff