Moto Guzzi Cali Cafe Racer Build thread
Discussion


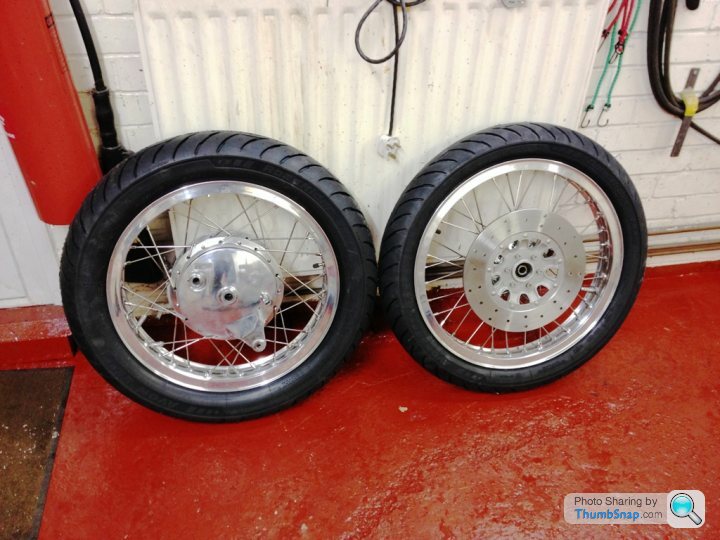
I had a ring around a few months ago when I needed a couple of wheels built and tried Central Wheel... they were £150 dearer than the company I ended up using....for the same thing. They were very very good, did them on time, to the agreed cost and I could not believe how accurately they spun up!
this is the company I used
http://mi6712.wix.com/blackcatwheels

this is the company I used
http://mi6712.wix.com/blackcatwheels


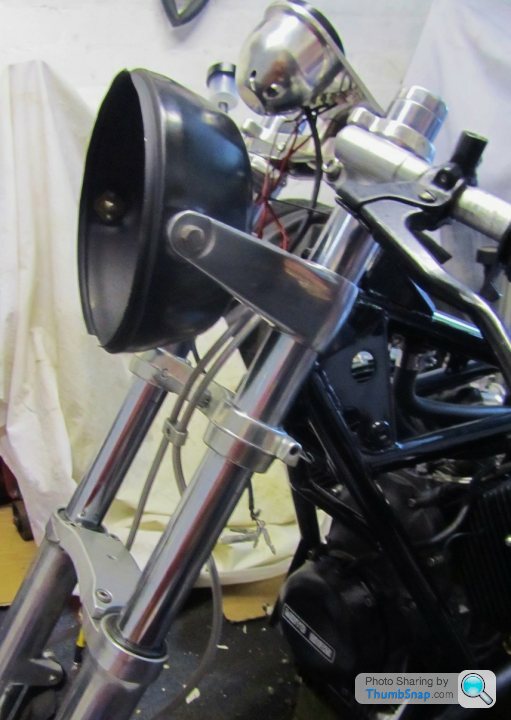
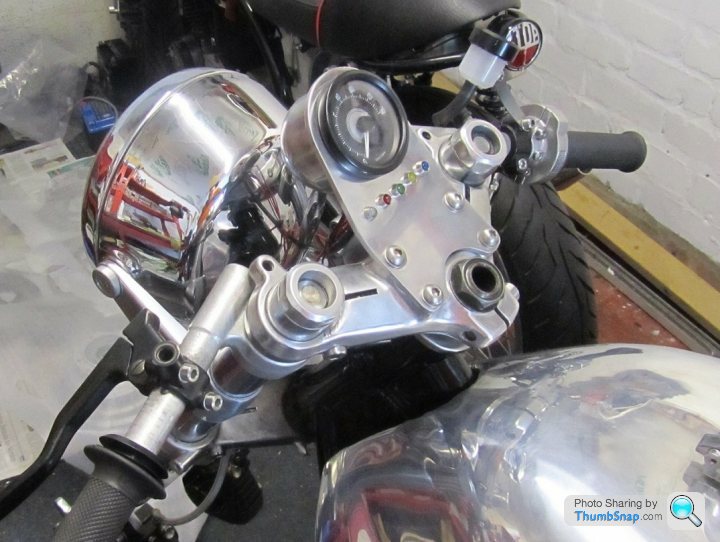
Next the original headlamp brackets didn't look quite right, so they've been replaced with a pair that look more café racer-ish. Fitting the front forks on the frame, confirmed that the headlamp shell definitely needs to be chromed, which I took to Niphos in Crewe this week. I was told they'd be ready for collection in 4 weeks, and a bit more expensive than I expected. While I was there another customer was collecting his newly chromed parts from a KH500, and I have to say they did look good. Also bought a 50mm thick disc of billet alloy, which will be used to make (a hopefully) cool part for the engine...
The discs have been cleaned up on the lathe, the front two discs look good, but the corrosion on the rear disc is pretty bad in places where the pads don't touch, but we did the best we could. I'll probably end up fitting replacement discs all round from EBC at some point, but at £140 each, that can wait.
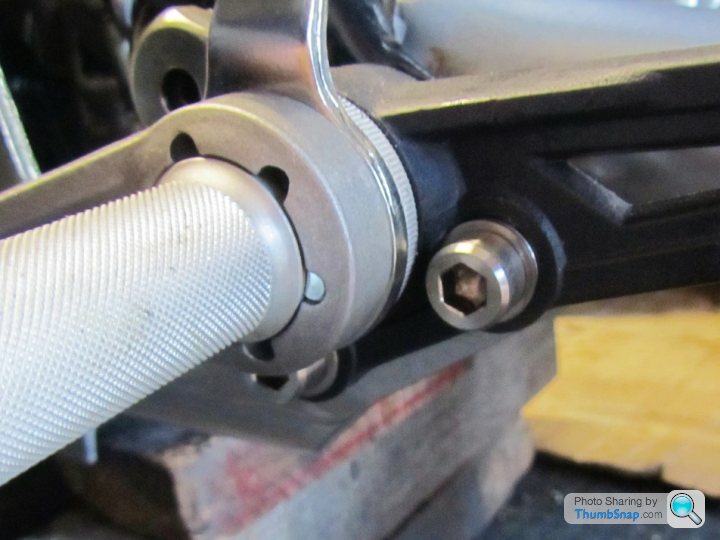
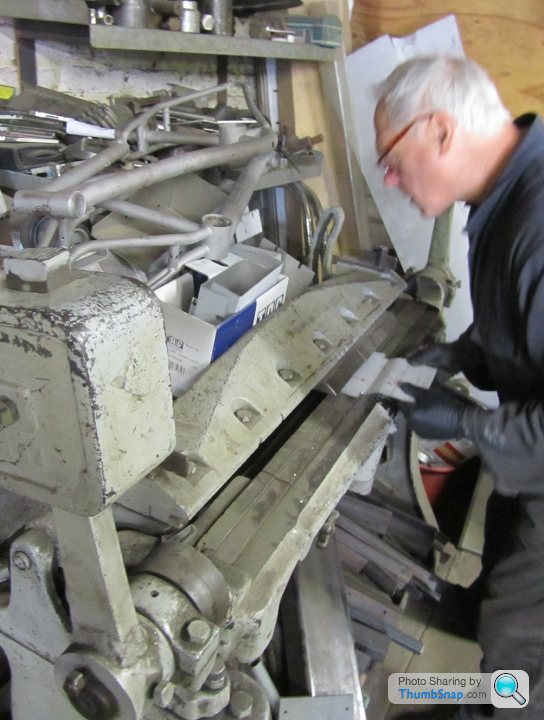
That done, I machined a few more stainless bolt heads before they went back on the bike, and cut a small bevel on the socket heads, just because they look better that way..
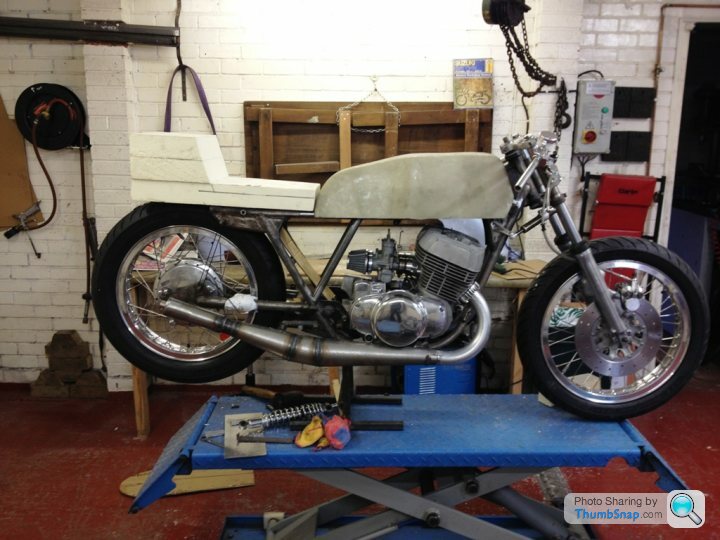
I'd been holding off refitting the swing arm, while I waited until the wheels were rebuilt, as the whole back end would be needed when a new billet mount was made to hold the modern Brembo caliper I recently bought. I changed my mind, so for now I'll be using the original mount and caliper, which meant I could go ahead and refit the swing arm at last.

The discs have been cleaned up on the lathe, the front two discs look good, but the corrosion on the rear disc is pretty bad in places where the pads don't touch, but we did the best we could. I'll probably end up fitting replacement discs all round from EBC at some point, but at £140 each, that can wait.
That done, I machined a few more stainless bolt heads before they went back on the bike, and cut a small bevel on the socket heads, just because they look better that way..
I'd been holding off refitting the swing arm, while I waited until the wheels were rebuilt, as the whole back end would be needed when a new billet mount was made to hold the modern Brembo caliper I recently bought. I changed my mind, so for now I'll be using the original mount and caliper, which meant I could go ahead and refit the swing arm at last.


a big day today, a parcel arrived.... like a kid on Christmas morning, it didn't take long to open it and see its contents 
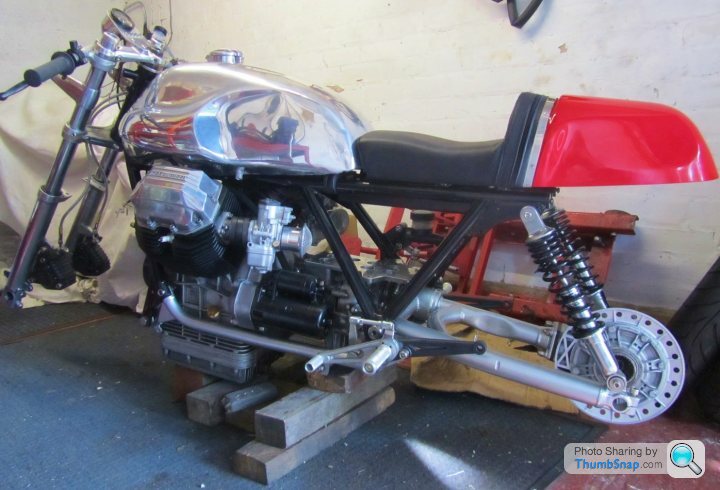
My Endurance racing alloy tank had arrived from TABII in Wales..


Fitted the frame no problem, just need to sort out a rubber strap for the rear mount.. very pleased with it..
Shall I paint it, or leave it polished? decisions, decisions...


My Endurance racing alloy tank had arrived from TABII in Wales..
Fitted the frame no problem, just need to sort out a rubber strap for the rear mount.. very pleased with it..
Shall I paint it, or leave it polished? decisions, decisions...
Also have to decide on what style of seat to go for, its a tricky decision as there are half a dozen options I'm considering. One complication is that the seat rails of the Guzzi Tonti frame are very low, so any seat unit will have to sit an inch or more above the seat rails. It wont be easy to get right, without it looking awkward, or resorting to a thick foam seat, which may be comfy, but not look the part ..
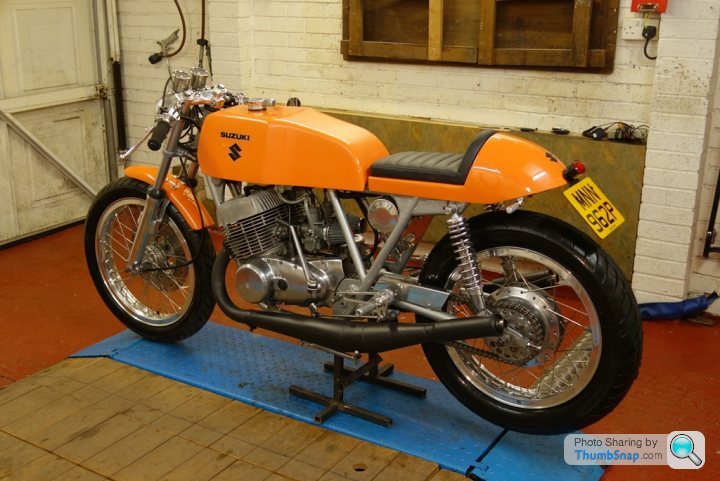
See how these race bikes all have their seat units mount way above the frame..


See how these race bikes all have their seat units mount way above the frame..
Merch131 said:
I don't think my fibreglassing skills could match yours, whenever I've worked with that stuff it never turns out as well as I'd hoped. Though, I may end up having to modify a seat unit I like, as the Guzzi frame rails are a bit wider than the bike the seat came from.
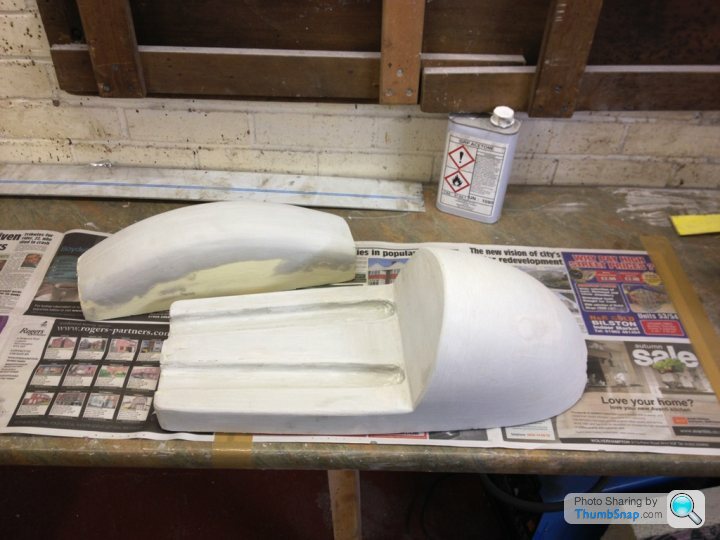
Looking at what you achieve, I would say you would be OK doing it. the tank and seat on my Suzuki was my first ever attempt. It really was easy... remember you are making a male mould, which you only use once and destroy...I did the tank first, and did learn a few things from doing that... main thing was not to be too picky on the mould, as its a "one off" and gets destroyed. Also, I found using woven cloth rather than strand mat made it easier to do, and get a better finish.
To do it I got some insulation foam (kingspan) and cut it with a hand saw roughly to shape. It cuts like butter... use spray glue to stick the pieces together.
Then I continued to cut it until I had the basic outline, Then, using some 80 grit production paper on a piece of wood, I sanded it to the exact shape. This is easier than it looks, you just have to be careful you dont go too far as it sands SO easily! took me 10 mins in total to get a shape I wanted. to get the sides the same, just use a cardboard template.
Then I covered the whole thing in some cheap body filler, and sanded that to shape. (some people even use duct tape for this!) With the tank, this took a while as I tried to get it perfect, which I did... but wasted a lot of time in doing so! with the seat I was not quite so critical... no point.
when it was to shape, I gave it a coat of resin, and covered it with some pre cut cloth, which as its soft, and drapes over the shape. Wet the cloth out with more resin with a brush, and a small disc roller (a couple of £ from the glass supplier) just keep doing this and add layers until you have the desired thickness. Make sure the mixing ratio of resin to hardener is exactly right by weight (mine was 2- 4% by weight, so for every 100 grams of resin, I added 2 grams of hardener to give me as much working time as I could.)
Once its gone off, cut the foam out and roughly sand the inside. To finish the outside, give it a quick rub down, followed by a skim of quality filler, and finally sand to shape!
On the seat, I added some ridges so I could mount it on the bike, and also mount the seat pad, this made it very strong as well. I simply sanded these into the mould...
buzzer said:
I did the tank first, and did learn a few things from doing that... main thing was not to be too picky on the mould, as its a "one off" and gets destroyed. Also, I found using woven cloth rather than strand mat made it easier to do, and get a better finish.
To do it I got some insulation foam (kingspan) and cut it with a hand saw roughly to shape. It cuts like butter... use spray glue to stick the pieces together.
Then I continued to cut it until I had the basic outline, Then, using some 80 grit production paper on a piece of wood, I sanded it to the exact shape. This is easier than it looks, you just have to be careful you dont go too far as it sands SO easily! took me 10 mins in total to get a shape I wanted. to get the sides the same, just use a cardboard template.
Then I covered the whole thing in some cheap body filler, and sanded that to shape. (some people even use duct tape for this!) With the tank, this took a while as I tried to get it perfect, which I did... but wasted a lot of time in doing so! with the seat I was not quite so critical... no point.
when it was to shape, I gave it a coat of resin, and covered it with some pre cut cloth, which as its soft, and drapes over the shape. Wet the cloth out with more resin with a brush, and a small disc roller (a couple of £ from the glass supplier) just keep doing this and add layers until you have the desired thickness. Make sure the mixing ratio of resin to hardener is exactly right by weight (mine was 2- 4% by weight, so for every 100 grams of resin, I added 2 grams of hardener to give me as much working time as I could.)
Once its gone off, cut the foam out and roughly sand the inside.
Very tempted myself to have a go at making a tank for my Triton, what did you do with regard the tank base? Did you have to make the base seperatly?? To do it I got some insulation foam (kingspan) and cut it with a hand saw roughly to shape. It cuts like butter... use spray glue to stick the pieces together.
Then I continued to cut it until I had the basic outline, Then, using some 80 grit production paper on a piece of wood, I sanded it to the exact shape. This is easier than it looks, you just have to be careful you dont go too far as it sands SO easily! took me 10 mins in total to get a shape I wanted. to get the sides the same, just use a cardboard template.
Then I covered the whole thing in some cheap body filler, and sanded that to shape. (some people even use duct tape for this!) With the tank, this took a while as I tried to get it perfect, which I did... but wasted a lot of time in doing so! with the seat I was not quite so critical... no point.
when it was to shape, I gave it a coat of resin, and covered it with some pre cut cloth, which as its soft, and drapes over the shape. Wet the cloth out with more resin with a brush, and a small disc roller (a couple of £ from the glass supplier) just keep doing this and add layers until you have the desired thickness. Make sure the mixing ratio of resin to hardener is exactly right by weight (mine was 2- 4% by weight, so for every 100 grams of resin, I added 2 grams of hardener to give me as much working time as I could.)
Once its gone off, cut the foam out and roughly sand the inside.
doogalman said:
Very tempted myself to have a go at making a tank for my Triton, what did you do with regard the tank base? Did you have to make the base seperatly??
with all the problems with modern fuel in glass tanks i didn't want to go that route, so on my bike the tank actually was underneath, and was made of alloy. Have a look on my blog for details. My engineering skills cant match the OP of this thread though!https://jtccc.wordpress.com/our-motorbikes/suzuki-...
SteelerSE said:
That tank is a thing of beauty. It looks amazing as is but it gives you a problem when it comes to seat unit and mudguard colours. What do you match it to? Black?
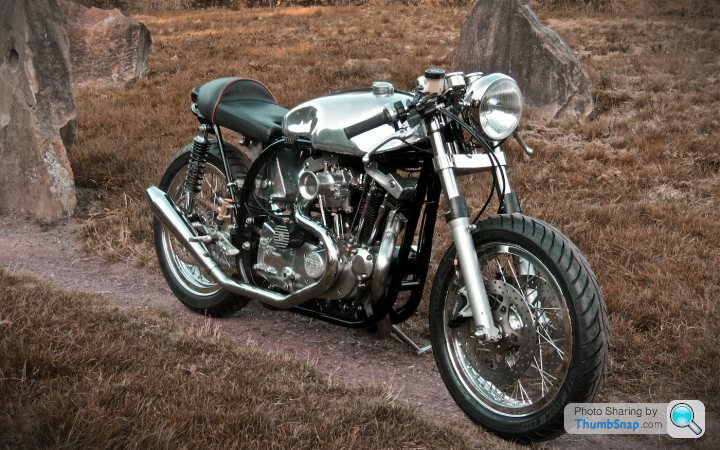
That's the problem with polished alloy tanks, they only look right on monochrome bikes, ie like the classic 60's Tritons, and like my own Norley. I don't want to end up with two bikes that look almost identical... they also have a 1000cc pushrod V twin motor in common too. The Guzzi is definitely being painted, its going to be red, very red. I may leave the knee cut outs in the tank unpainted. It would be good to have the cut outs clear lacquered, but I've heard conflicting advice on how well the paint would stick to polished alloy.
My Monochrome Norley.. a work in progress..
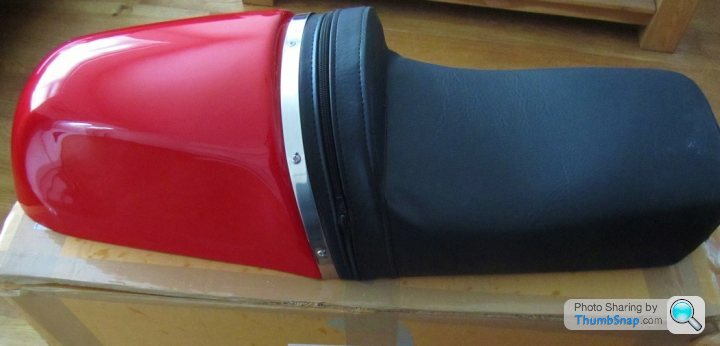
After much indecision, finally ordered a new seat from Mead Speed, which arrived today. I knew it would be 20mm or so too narrow to fit over the seat rails of the Guzzi, but I think it will look ok if I mount it to sit on top of the frame. I did make a simple copy in cardboard from the dimensions found on the internet, which I find helpful. It will be an expensive mistake if it doesn't look right, at least its the right colour..
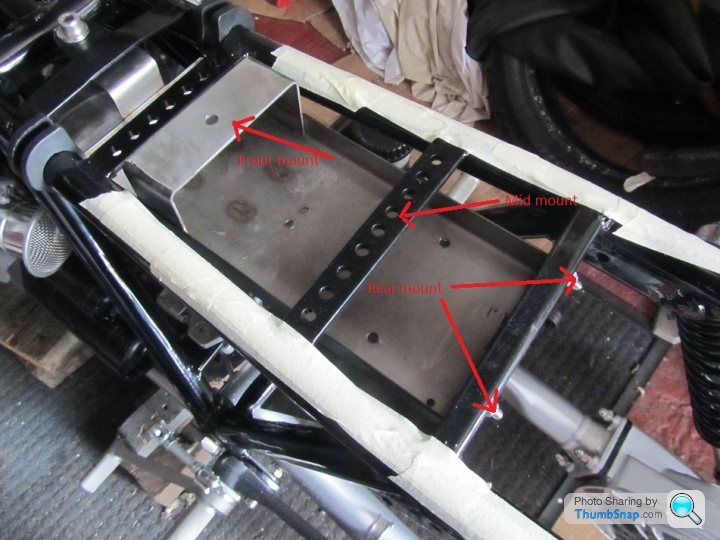
Been thinking about various options on how to mount the new seat. The mounts need to be adjustable (up and down and backwards and forwards) so I can get the height just right. The seat needs to sit above the frame rails, not touching, but as close as possible to look ok. The problem is that I cant drill the seat base and use nuts and bolts where I want as the seat cover sits above it, so what to do? I did consider using Eboxy resin to glue some kind of mount to the underside of the seat base, but in the end I decided to forego the eboxy option, and stick with old fashioned nuts and bolts.
First I had to sort out the front mount (of three.. front, middle and back), these needed to consist of two rods which would slot into the two tubes already fixed to the base of the seat. Its made from two stainless rods and a thick stainless base plate, so no need to worry about paint or corrosion...

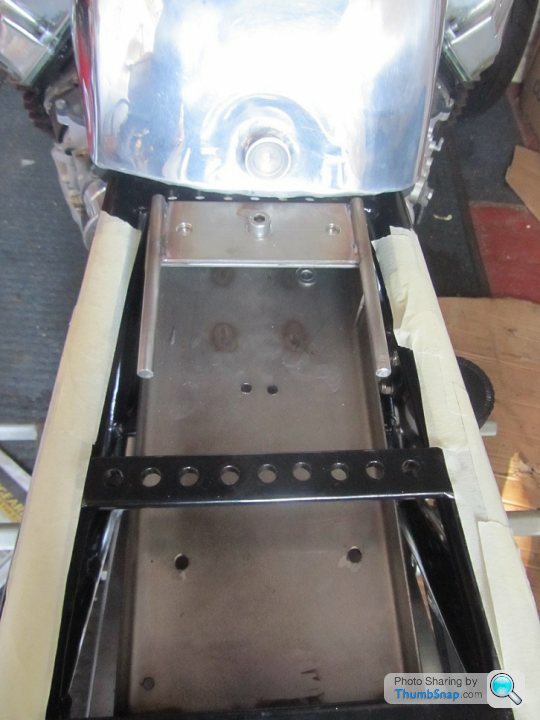
While the middle mount, is just a support, it doesn't need to be fixed to the seat, which makes life much easier. I haven't finished it yet, it consists of two simple alloy spacers and an alloy plate on top which will be bolted down to the middle frame bracket with a couple of countersunk bolts. I just need to add a washer or two to raise the support plate as needed.. well that's the plan, oh and I'll stick some neoprene to the alloy plate to cushion the fibreglass base too.
First I had to sort out the front mount (of three.. front, middle and back), these needed to consist of two rods which would slot into the two tubes already fixed to the base of the seat. Its made from two stainless rods and a thick stainless base plate, so no need to worry about paint or corrosion...
While the middle mount, is just a support, it doesn't need to be fixed to the seat, which makes life much easier. I haven't finished it yet, it consists of two simple alloy spacers and an alloy plate on top which will be bolted down to the middle frame bracket with a couple of countersunk bolts. I just need to add a washer or two to raise the support plate as needed.. well that's the plan, oh and I'll stick some neoprene to the alloy plate to cushion the fibreglass base too.
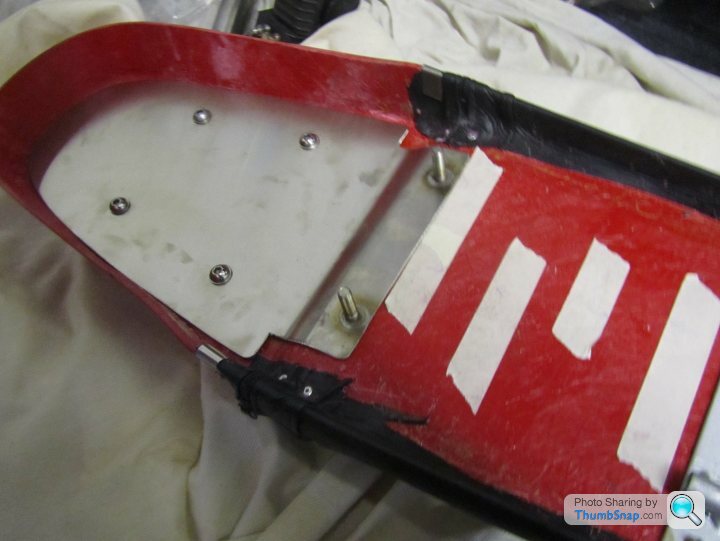
Finally to the rear mount, which is the main support for the seat, the only mounting point for which is two bolts which are just off vertical and currently hold the top of the splash guard to the frame, while I need to make sure I don't put too much stress in one point of the seat, don't want it cracking or failing...
This is the solution I came up with, along with help from Geoff The Welder... who did all the hard work..
Cut and shape a piece of stainless plate...
Then bend it to follow the contours of the seat base, before welding in two M8 threaded bars.
Then drilled four holes through both the plate and the seat base, below the seat hump, which I can access via the zipped seat back, and so get a spanner in there to bolt everything up nicely.
This leaves me to make one more piece, which will connect the two threaded bars to the frame mount. That had to wait until everything else is made and I can measure what's needed accurately.
The seat is finally fitted, it could've been a mm or two lower to the frame rails, but its already too low for comfort with the rearsets, so for now its as low as I dare make it. It'll be easy enough to raise it if needed when I finally get to test ride it.
The parts I took for chroming should be ready next week, if the 4 week lead time they gave me is accurate, while there are a couple of parts I designed that are waiting to be machined, they probably wont be done for another few weeks. I was promised my stainless spindles would be finished next week too, (I laced up a Harley wheel in exchange), for now just got to wait.
The next big expenses will be the new alloy rims and spokes, along with Lemans replica silencers, and finally the paintwork, which will also have to wait, at least it gives me plenty of time to decide on the design of the paintwork.
Filmed a walk around the Guzzi the other week, probably missed a few details, but here it is anyway...
https://youtu.be/AaYPYpQhGE4
Coming up to date, I collected my chrome parts from Niphos in Crewe yesterday, which finally allowed me to fit the downpipes and headlight. I wasn't 100% sure about having the black headlight shell chromed, but now its done and on the bike, I think it was the right decision. In the meantime work started on a couple of billet parts for the Guzzi. There's a couple of short videos of progress on youtube too.
Gassing Station | Biker Banter | Top of Page | What's New | My Stuff