Moto Guzzi Cali Cafe Racer Build thread
Discussion


I didnt get very far with lacing the front wheel today, so on the basis that the only stupid question is the one you dont ask, I popped around the corner to see Bill who soon pointed out my beginners error. When I unpacked the spokes, the rear spokes were in two seperate bags. I did check to see if there were any differences but they were the same length and had the same angle of bend. So without further thought I got stuck in. Bill pointed out that I had two diferent spoke sets, one of which had a slightly longer bend, these should be used when a spoke crosses on top of another at the hub. Mystery solved, he kindly offered to finish the wheel for me and true it up, in the meantime I admired the last of the three 1920s Sunbeams he'd restored, from being piles of rust dug up out of ground of a old scrap yard. Not to mention his Velo and Vincent and a couple of specials.. I must remember to take my camera when I collect the wheel in a day or so.
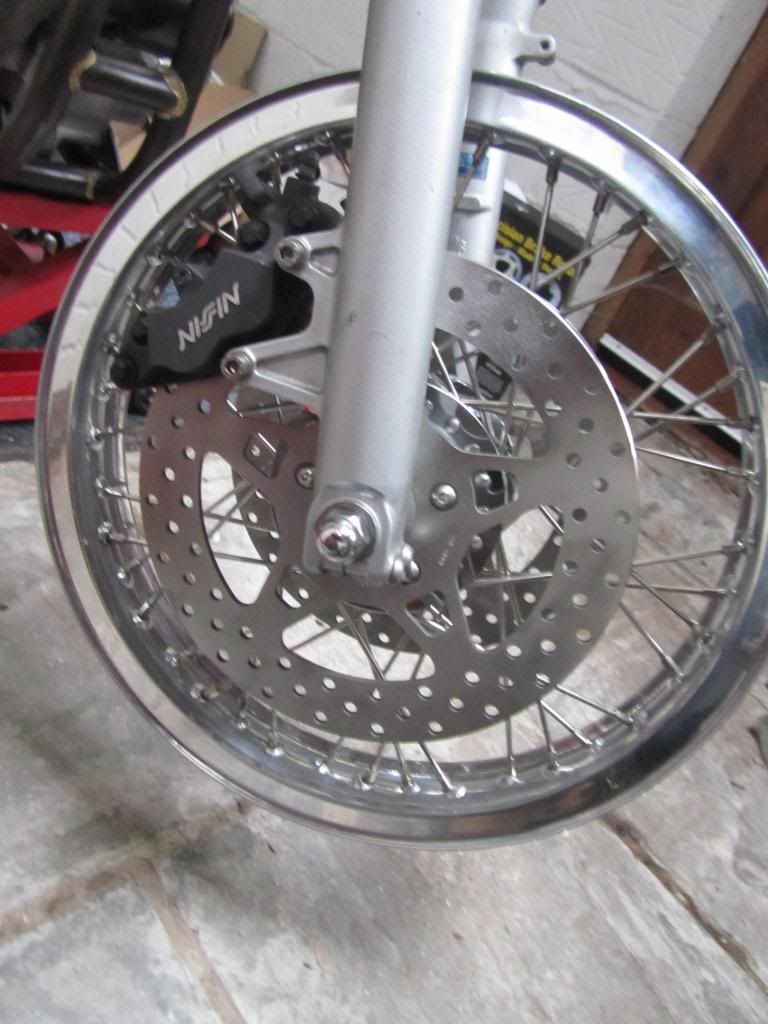
The wheels are done now at last, and I managed to reuse the front disc spacers from the original bike on the new hub, with some machining to fit the EBC discs. Unfortunately, I didnt realise that the underside of the spacers would also need a bit of work, so the the front discs will have to wait till I can sort out their spacers.
The rear disc mounting holes also had to be widened (as HD hubs use bigger bolts on the back than the front) and disc manufacturers dont seem to bother drilling the correct size holes. I need to find a rear Nissin caliper then I can make a caliper mount and wheel spacers fo rthe back wheel.
Here's a blurry vid I just took of progress to date, you can see I dont have a lot of room, as I'm working in the conversatory, as the garage is full up. By the end of the month I hope to have it on its wheels, then I can start on the engine, first task, is to make an exhaust system then a one off Hydraulic clutch conversion, so I can use a matching pair of brembo hand controls. May not work, but I want to try.
http://youtu.be/MeqE9wE2gTY
I'd always say have a go, if you get in a mess, you can always take it to a wheel builder. I've just got my wheel stand home, very pleased with it, pity I dont have any wheels to lace now lol..
The front disc spacers are finally done, I took them off the original mag wheels, and luckily they were about the correct thickness for the new forks and calipers. I had to reduce the diameter by 10mm and widen the hole a bit for the stainless wheel spacers, still thats a lot less work than making them from scratch. It was asking a bit too much to expect the spacers to be spot on in the new front end, and sure enough I had to use a washer to space the calipers out to get them centred on the disc, they were about 2mm out. I wont leave it like that as using washers is a big no no, I'll machine some little spacers later.
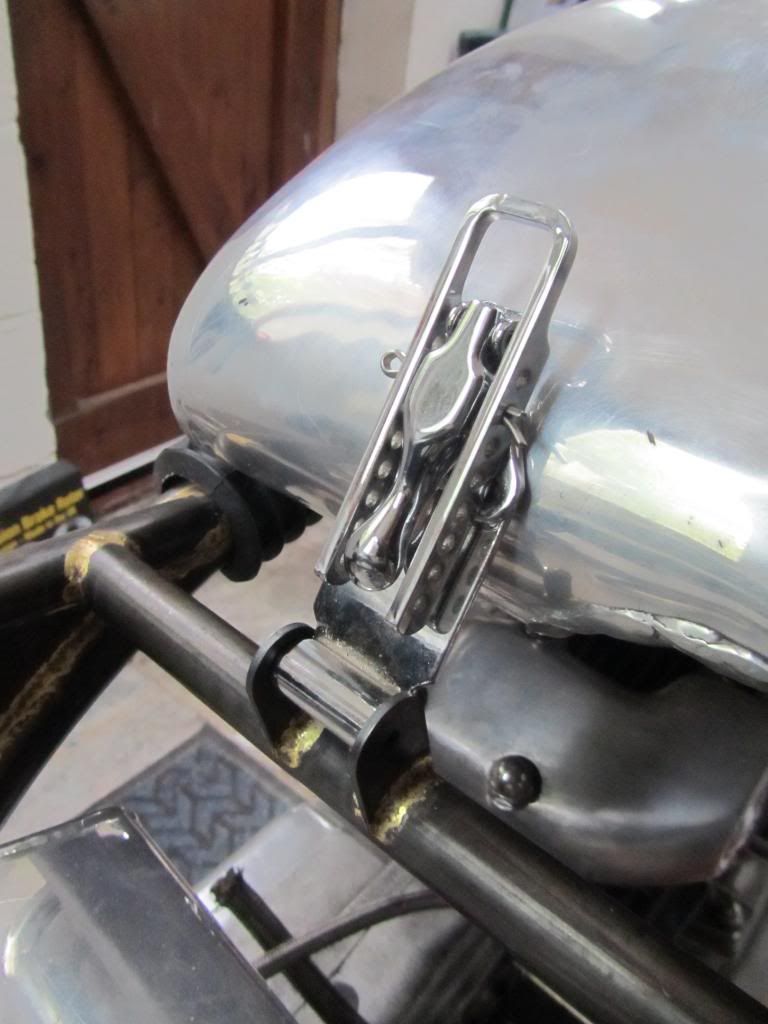
One of the favourite parts I've bought so far is this toggle for the tank strap, lovely bit of kit. The tank strap has to be sized and a hook pop rivetted onto the strap, but need to make the buckle at the other end yet.
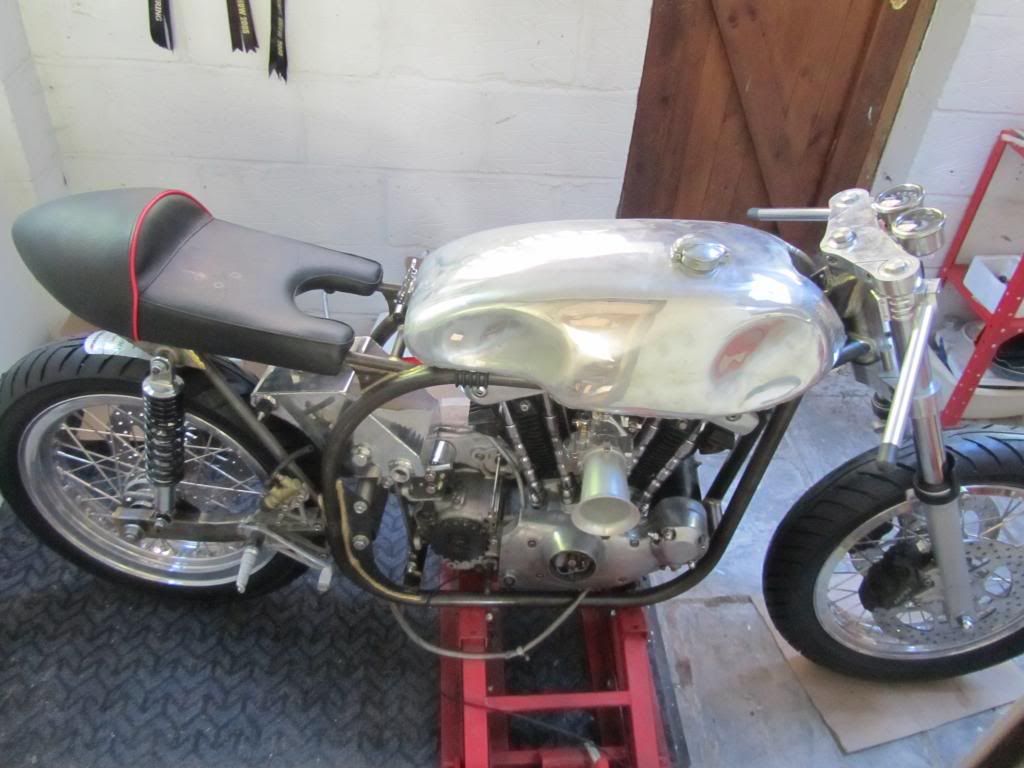
Its almost on its wheels now, the tyres turned up today (Avon AM26s) but I'm still waiting on the inner tubes and rim tape.
My plan for a hydraulic clutch conversion are starting to come together, as I'm swapping an old roll of roofing felt for a mint Brembo clutch slave cylinder


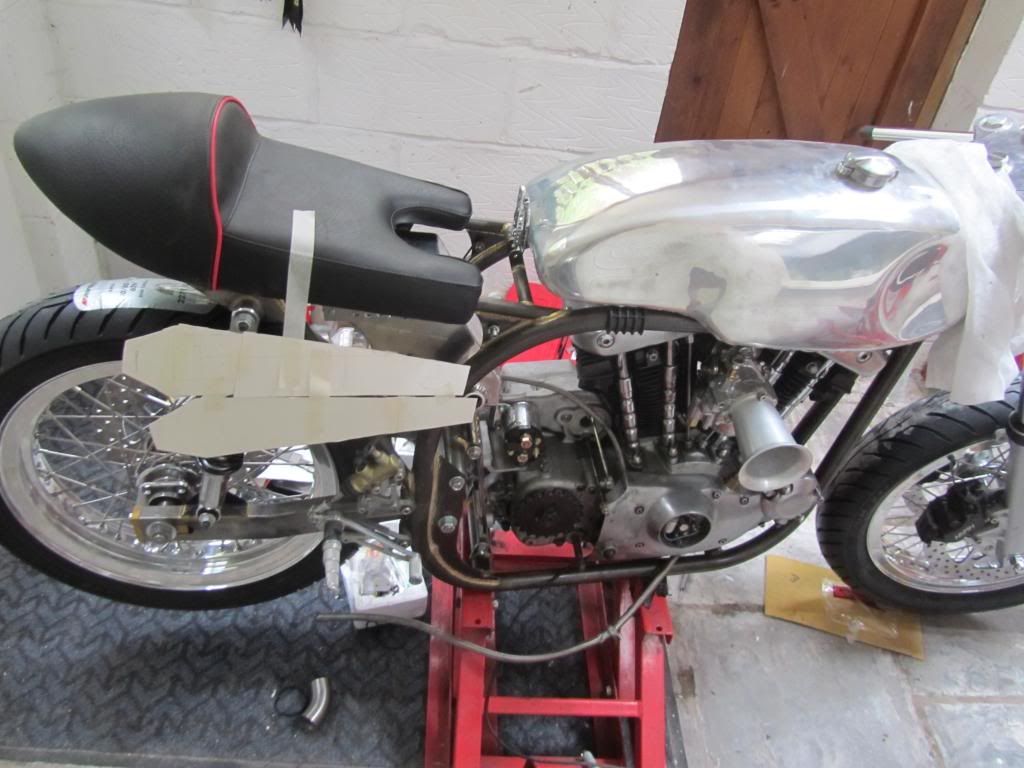
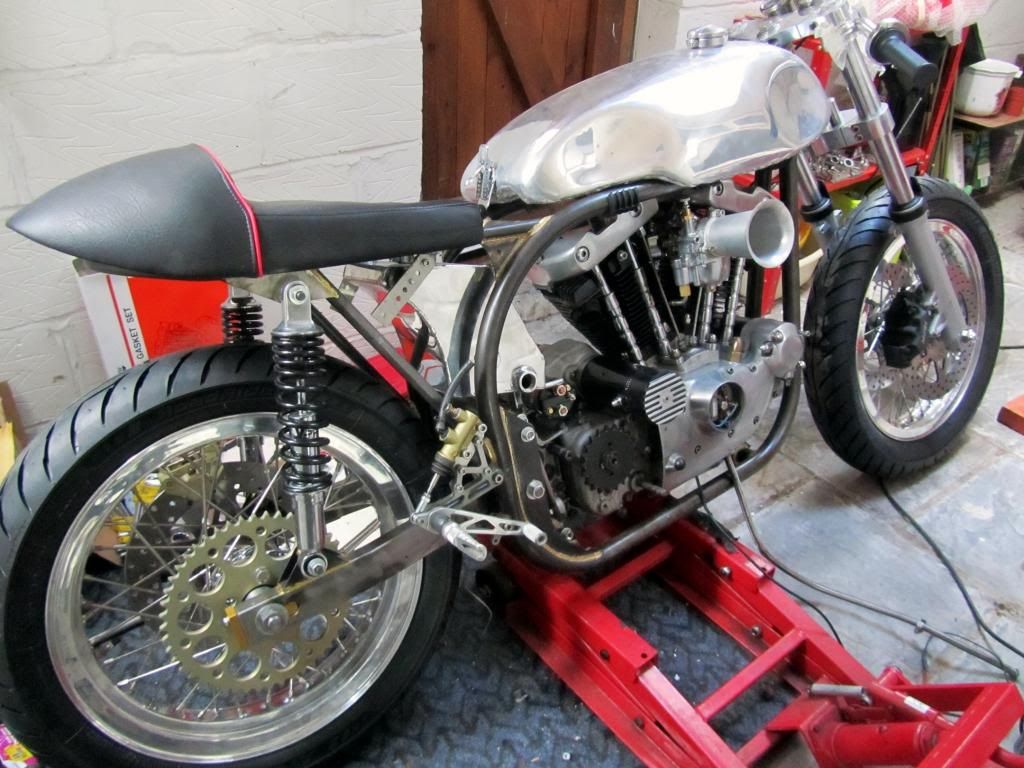
Well today it finally sat on its own wheels, still need to sort out the wheel spacers and a brake caliper for the rear wheel, but bodged a couple of spare spacers I had for now. Then I had one of those strange incidents that leave me baffled.. I knelt down to fit the front wheel, trying to line up the spindle with the first spacer, and the spacer fell to the floor.. need three hands for this job.. I fished around for the spacer, couldnt find it. I stood up, had a look around my feet, no spacer. I had a good hunt around, no spacer, I moved everything in the blooming room, no spacer.. god knows where its gone, it only fell a foot, so it could hardly have bounced off somewhere.. must have a black hole in there, its the only explanation. I'll have make another, in the meantime another spare spacer (a bit too narrow) would make do.
At least I didnt lose this cool replacement choke 'enrichener'.. since I wont be using a std teardrop S&S air filter with its choke lever, this little gizmo takes its place..
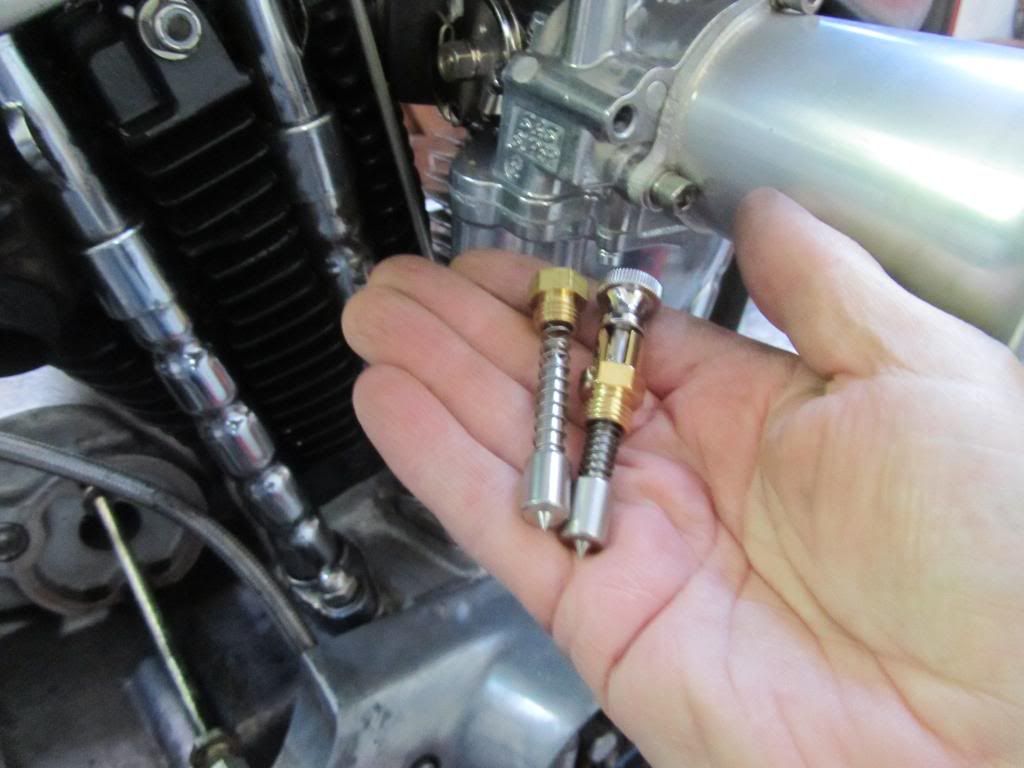

At least I didnt lose this cool replacement choke 'enrichener'.. since I wont be using a std teardrop S&S air filter with its choke lever, this little gizmo takes its place..


$2000 sounds about right for a low milage Ironhead, assuming of course that its in good condition. Prices are going up here for older HDs, will be worth about £2500 or maybe a little more in the UK. Dont know the costs involved in importing a bike from the States, and the risk if you havent seen the bike yourself.
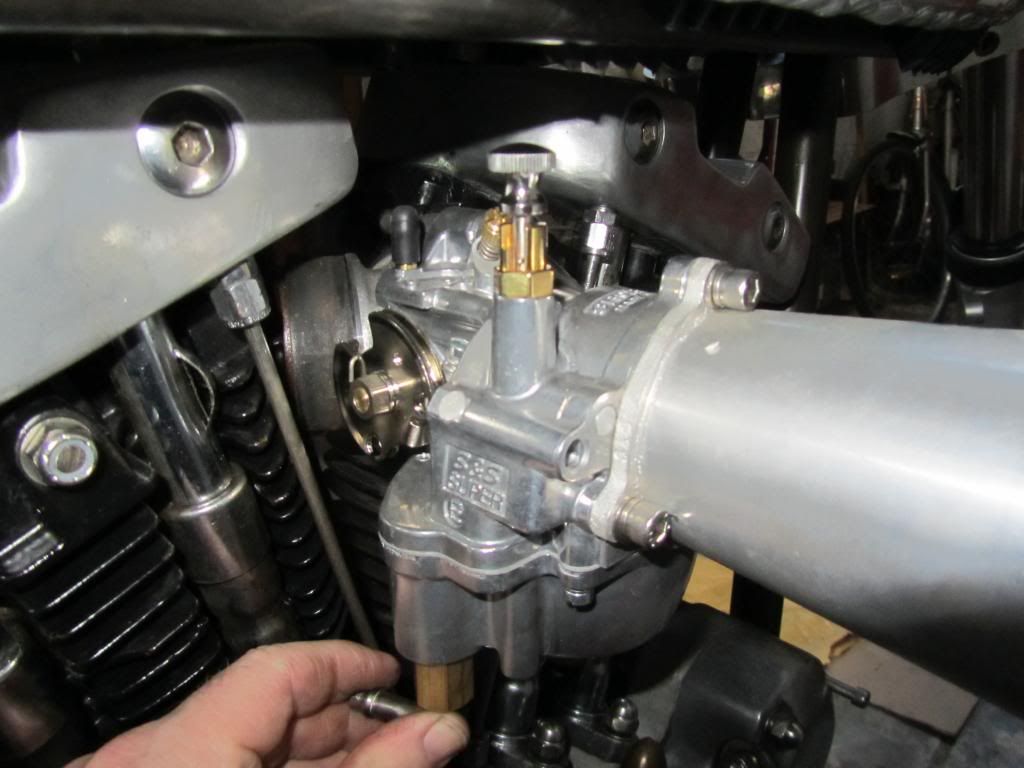
The carb is an aftermarket S&S Super E.
The Guzzi is still in the garage waiting for me to finish it. I put it on hold once I got the Ironhead, as I cant afford to do both at the same time. I've got a couple of other bike projects on the go too, so I'm not running out of things to do just yet.
The carb is an aftermarket S&S Super E.
The Guzzi is still in the garage waiting for me to finish it. I put it on hold once I got the Ironhead, as I cant afford to do both at the same time. I've got a couple of other bike projects on the go too, so I'm not running out of things to do just yet.
Yes I've seen the Kaffee Machine bikes, very nice, I think they sell for something like 20,000 Euros or more.
Well, this morning I've been to a local engineering company who are going to cut me a big imperial thread on a cylinder of 7050 alloy. Once thats done, I'll take the lump of alloy to Jeffs workshop and we'll machine it to make a new slave cylinder for the hydraulic clutch conversion. Its all getting a bit more involved than I expected, buts that ok, I like doing this stuff.
Talking of which, when I get around to working on the Guzzi again, I think I'm going be a little more adventurous with the changes I want to make.. I've been offered a brand new Eaton supercharger, just the right size and its cheap, so maybe sdomething like this may be possible..

Thats a V7 Racer, a 750 I think.
I cant do much this weekend on the bike, as I'm waiting on a couple of parts to be machined next week. While I dont want to order any more parts until I know how much the tuning work on my 888 is going to cost, which is also being done this week. So in best Blue Peter fashion I cut out the shape of the reverse cone megas I'm thinking of buying (16 inches long, 3 3/4 wide), just to see how they might look.. I need to decide between high level XR750 style or traditional low level, one either side style????
HIGH
Or LOW
I cant do much this weekend on the bike, as I'm waiting on a couple of parts to be machined next week. While I dont want to order any more parts until I know how much the tuning work on my 888 is going to cost, which is also being done this week. So in best Blue Peter fashion I cut out the shape of the reverse cone megas I'm thinking of buying (16 inches long, 3 3/4 wide), just to see how they might look.. I need to decide between high level XR750 style or traditional low level, one either side style????
HIGH

Or LOW

I guess I wont know till I try if the high level option will toast my leg or not. The good news is that the megas I'm thinking of getting arent handed, so they could be used for both options. When my 888 is back home and the work paid for, I'll order the megas and a few more parts such as a headlamp from the same place.
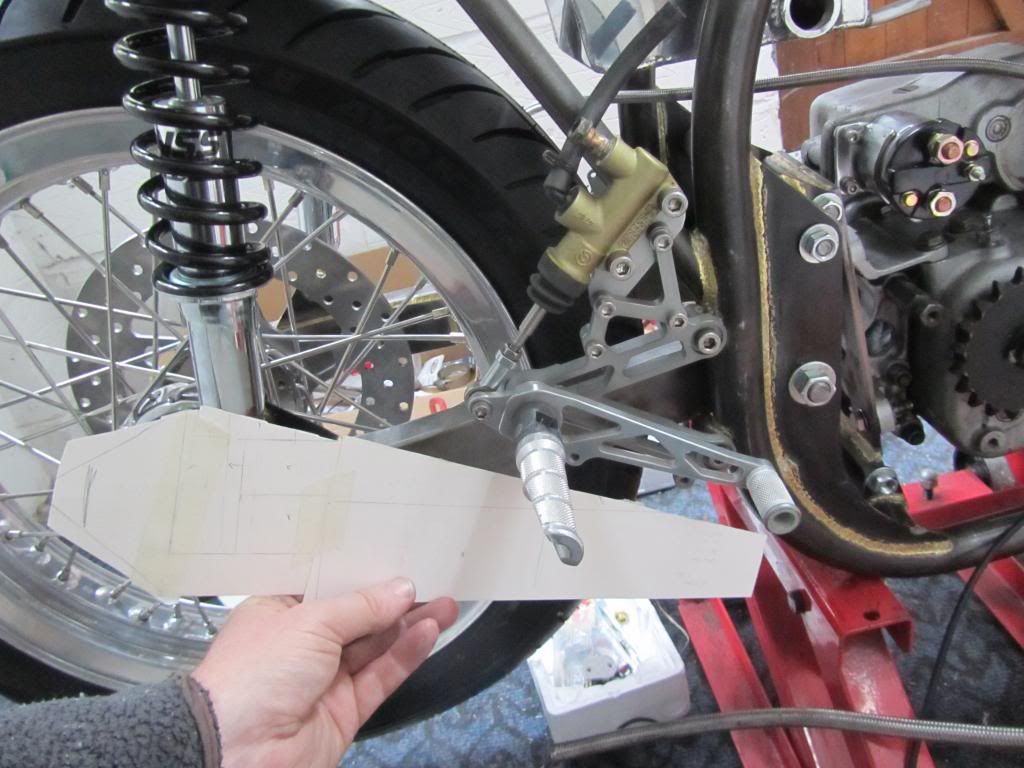
One easy job was to make an undertray to sit beneath the seat hump, as thats where most of the electrics will be going. So in best Blue Peter style, I cut up a cereal box to make a simple template..
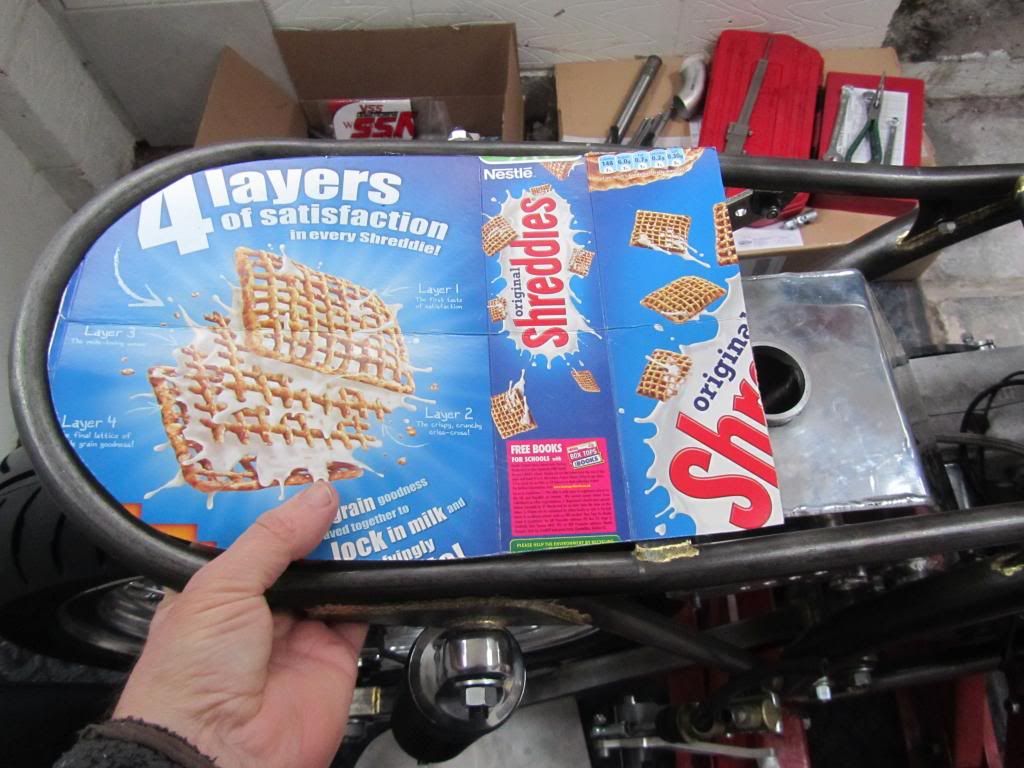
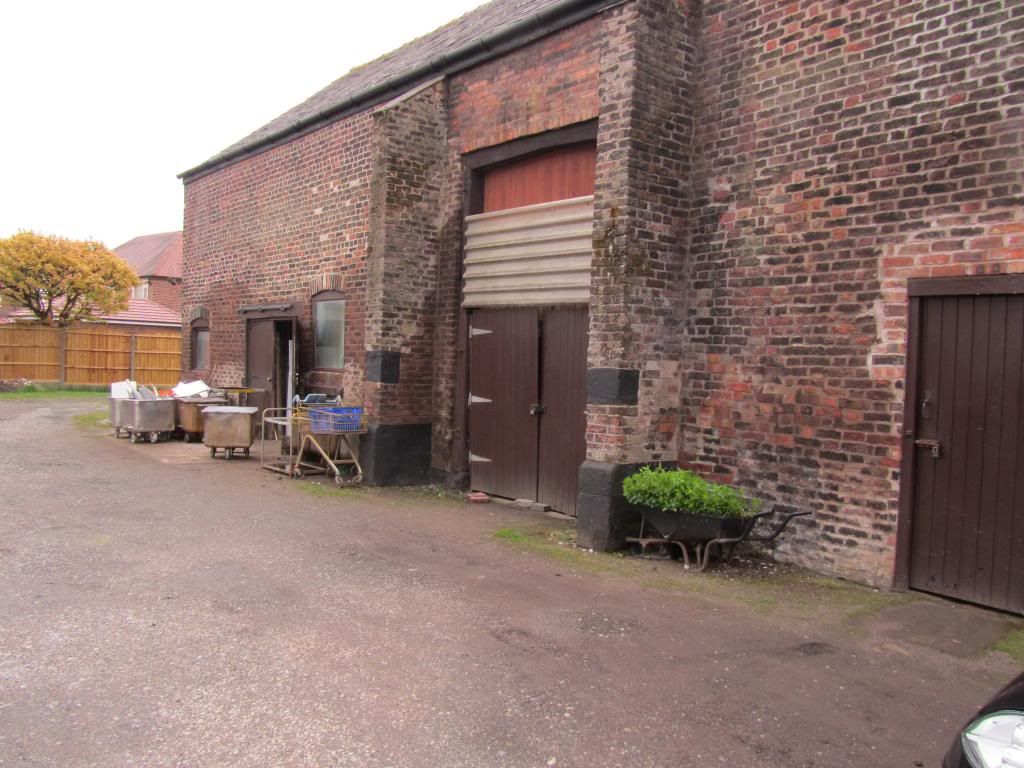
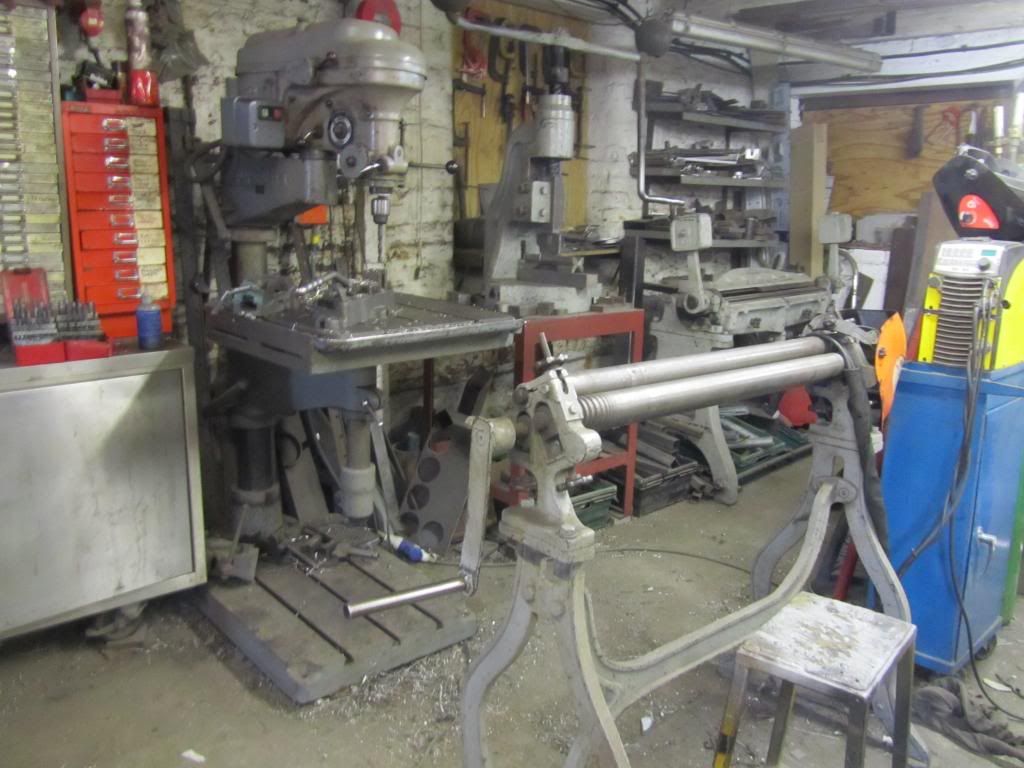
I made it longer than expected, so I can use it to mount the seat a little further forward if needed, I can always cut it back a little to look neater. Then to save myself a lot of hassle, I went over to a local fabrication workshop (best welder in town) who is happy to make stuff for me for a few quid cash in hand. When he isnt on site working at places like Kellogs and Heinz, he works out of a small place in an old converted barn..
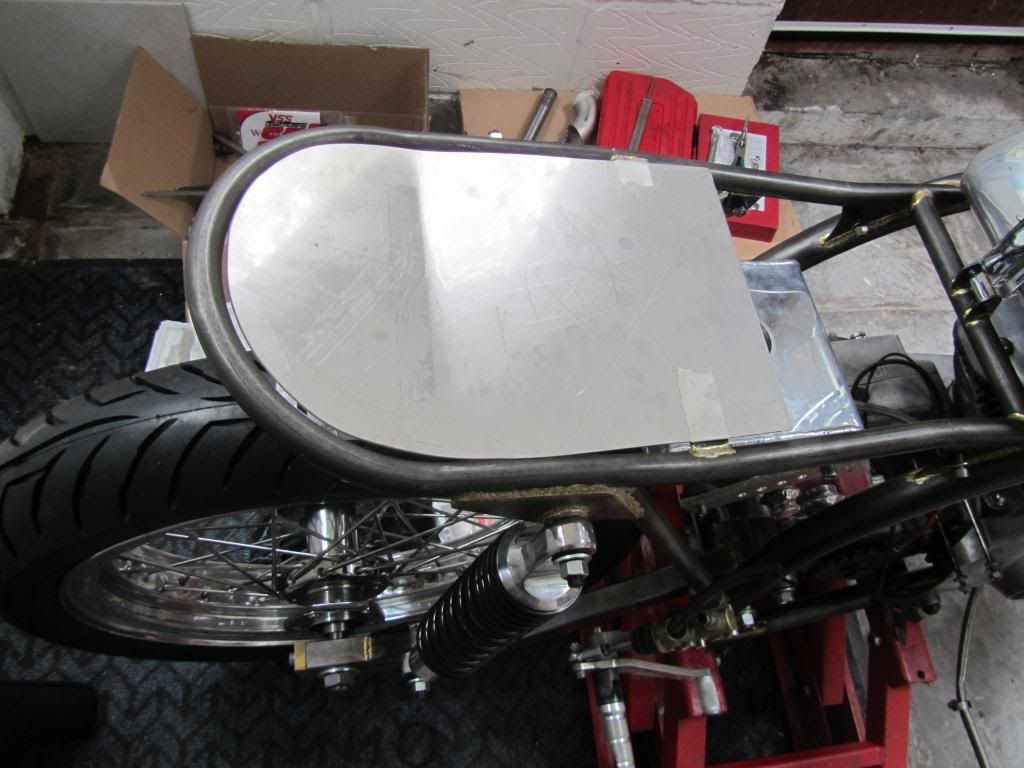
Where he soon made me the tray in 1.5mm stainless plate, all I had to do was bend it slightly to follow the lines of the seat loop when I got home. Just need to drill a few mounting holes and sort out some kind of P clips to support it at the back. I dont want to weld any tabs onto this frame, its too nice to mess up.

I made it longer than expected, so I can use it to mount the seat a little further forward if needed, I can always cut it back a little to look neater. Then to save myself a lot of hassle, I went over to a local fabrication workshop (best welder in town) who is happy to make stuff for me for a few quid cash in hand. When he isnt on site working at places like Kellogs and Heinz, he works out of a small place in an old converted barn..


Where he soon made me the tray in 1.5mm stainless plate, all I had to do was bend it slightly to follow the lines of the seat loop when I got home. Just need to drill a few mounting holes and sort out some kind of P clips to support it at the back. I dont want to weld any tabs onto this frame, its too nice to mess up.

Edited by Merch131 on Friday 24th May 16:17
I dont do 'easy' lol.. there are lots of different options, apart from making sure the headers are the correct length, pretty much anything is possible. I need to sit down with a pencil and paper and sketch a few designs. The exhaust will probably be the last big job I do on the bike, so got a few weeks yet to think about it.
dmulally said:
Furry muff.
My ironhead will be shipping on the 6th of June. I'll be going for a Japanese Brat Style with thick tyres and stripped of everything I don't need. Plus I want to use the webber as the carby is s t.
t.
Anyway, crack on.
That would suite the Brat style better than my CR. I would add that when I first built my Merch 131, it had 16 x 160 front tyre and a 16x200 rear tyre, which looked great. The handling wasnt too bad, bit heavy and ponderous at slow speeds, but the faster you go the worse it gets. The worst part of having a phat front tyre is braking into a turn, the bike wants to stand up, and it became a fight to keep the damn thing on the road. Wasnt long before I swapped to std sportsbike 17inch wheel/tyre sizes.. not as hip maybe but a 1000 times better to ride. My ironhead will be shipping on the 6th of June. I'll be going for a Japanese Brat Style with thick tyres and stripped of everything I don't need. Plus I want to use the webber as the carby is s
t. Anyway, crack on.
I sat down the other evening and listed all the jobs and parts I still needed to finish the bike.. it came to 3 pages of A4 .. oh well, best keep going then.
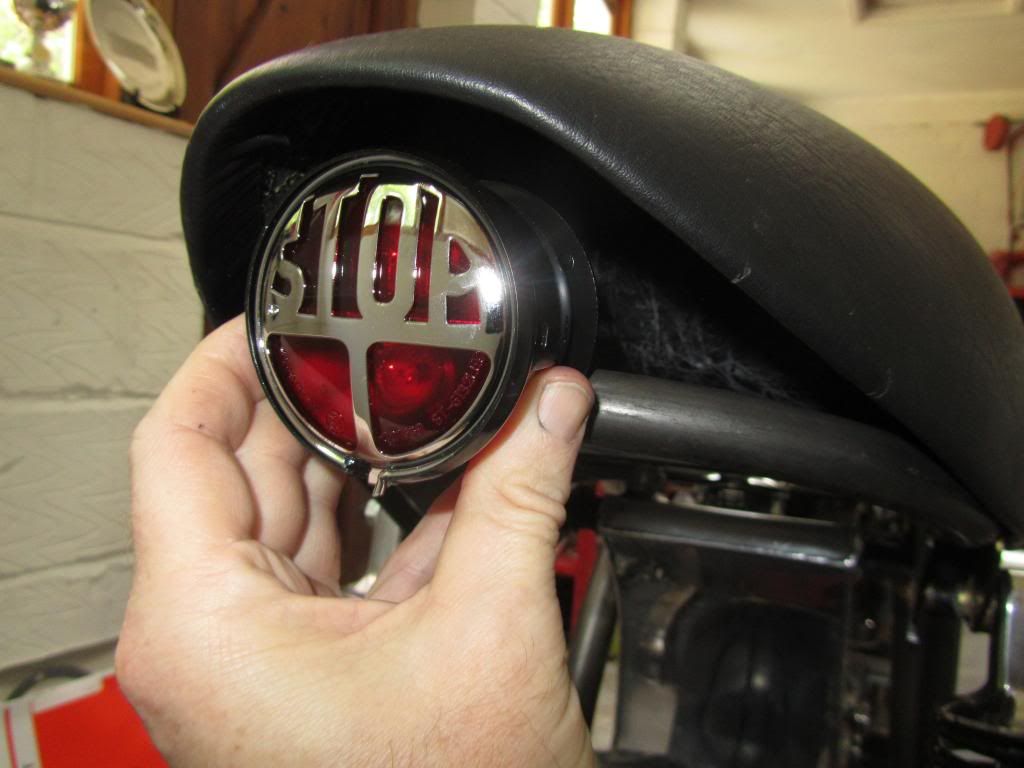
I ordered a few more parts this week, headlamp, ignition barrel, tail light etc. The tail light arrived today, a bit of a cliche perhaps, but I like it. Need to make a mount for it now and for the number plate too.. Ill add it to the list.
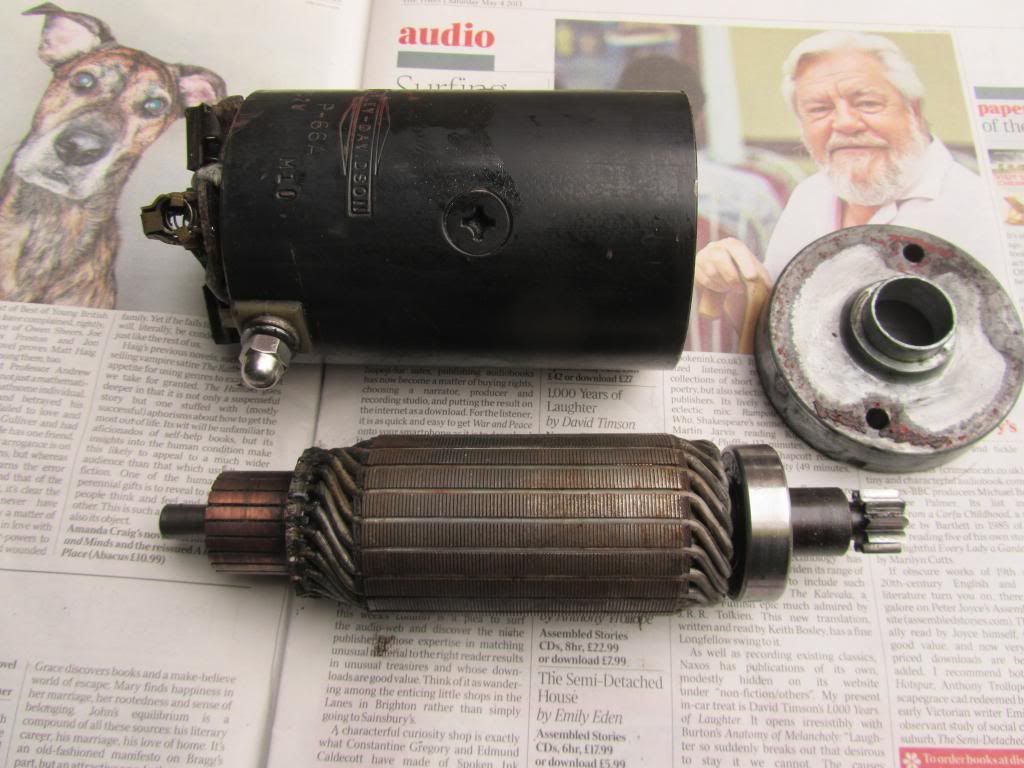
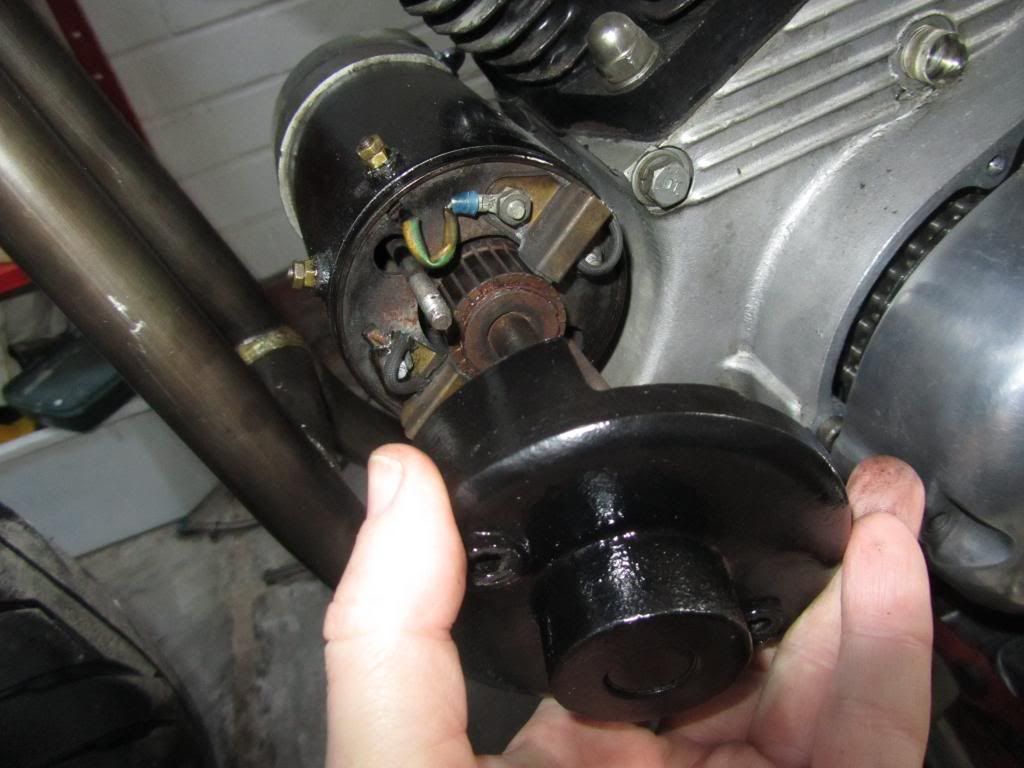
I've also taken the starter apart, painted the case and polished the alloy end cap which sits against the engine case. Putting it back together wasnt so easy, keeping all the spings and bushes in place is very fiddly. The ridged end cap normally has a chrome cover, which wont look right on the bike, so I intend to make a billet one instead.. I'll add it to the list..
When I refitted the starter motor, it needed a new gasket, not a problem as I'd bought a full gasket set ages ago. One of the best things about older Harleys is the availablity and cost of spares, the full gasket kit cost me about £50, and it arrived within two days of making the order. Its a quality product, not a cheap Chinese knockoff, not bad for an engine that went out of production nearly 30 years ago.

I ordered a few more parts this week, headlamp, ignition barrel, tail light etc. The tail light arrived today, a bit of a cliche perhaps, but I like it. Need to make a mount for it now and for the number plate too.. Ill add it to the list.

I've also taken the starter apart, painted the case and polished the alloy end cap which sits against the engine case. Putting it back together wasnt so easy, keeping all the spings and bushes in place is very fiddly. The ridged end cap normally has a chrome cover, which wont look right on the bike, so I intend to make a billet one instead.. I'll add it to the list..
When I refitted the starter motor, it needed a new gasket, not a problem as I'd bought a full gasket set ages ago. One of the best things about older Harleys is the availablity and cost of spares, the full gasket kit cost me about £50, and it arrived within two days of making the order. Its a quality product, not a cheap Chinese knockoff, not bad for an engine that went out of production nearly 30 years ago.


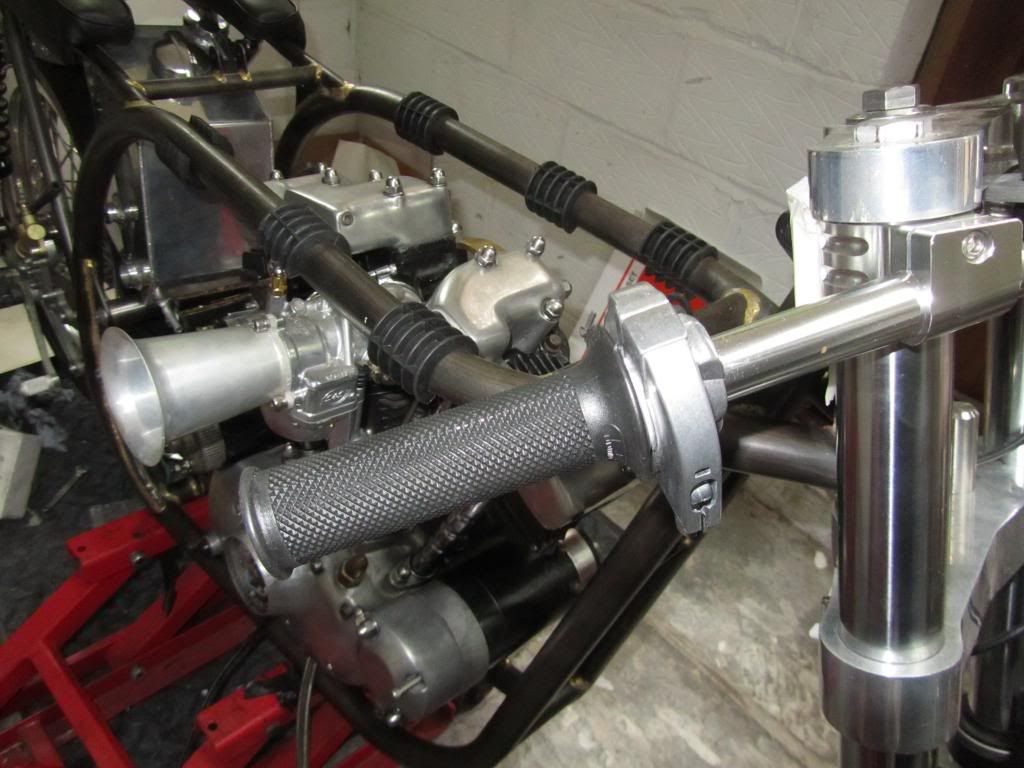
A couple more tasks ticked off the endless 'to-do' list.. First fitted a Tomaselli throttle and grips, it will need a one off cable to work with the S&S carb, that can wait for now..
Next the hydraulic clutch conversion is going ok, had to use a Banjo bolt with a built in bleed nibble for the slave cylinder. It sticks out a fair bit from the case and looks as if it'll need some kind of protection in case its gets knocked or the bike falls over (fingers crossed it never will). I need to work out how long a new clutch rod needs to be to work with the slave cylinder.. another item on the to do list..
Old Bembo slave cyinder on the left, we used its piston and seal in the new one..
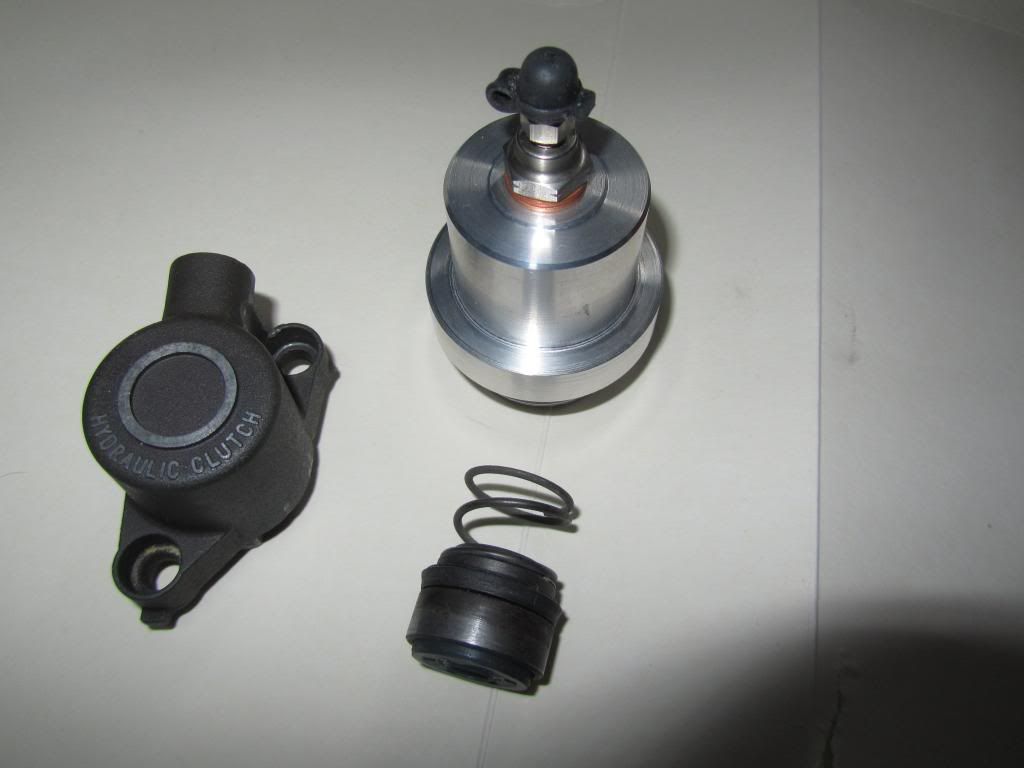
The one off slave replaces the clutch inspection cap in the Primary cover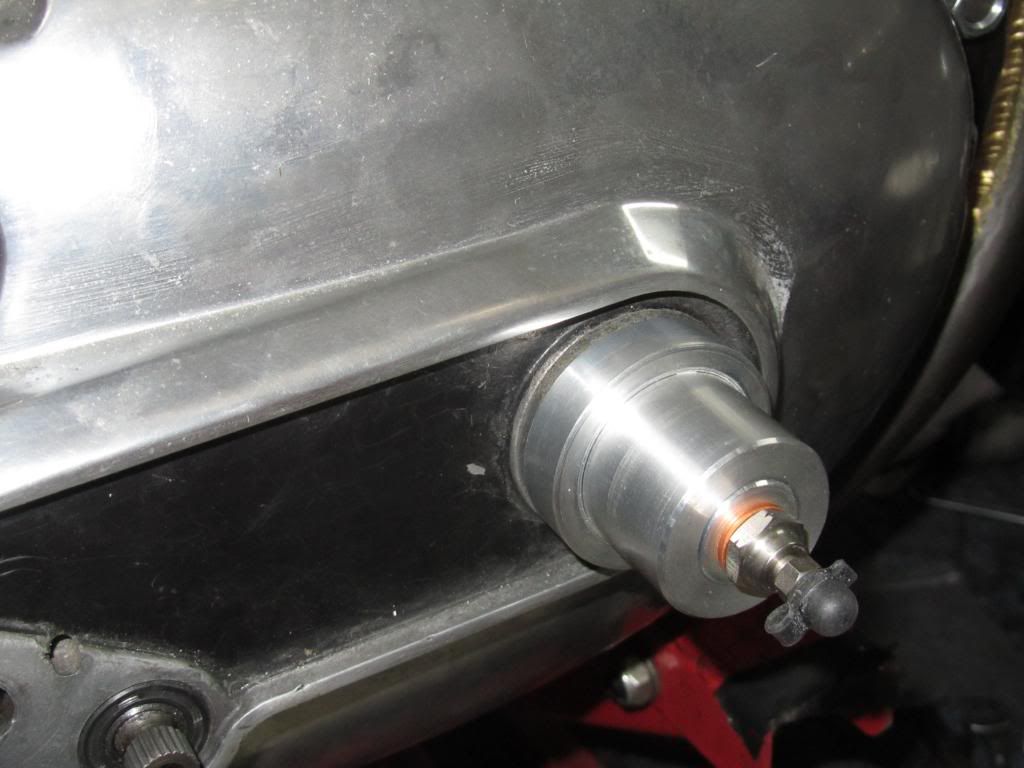
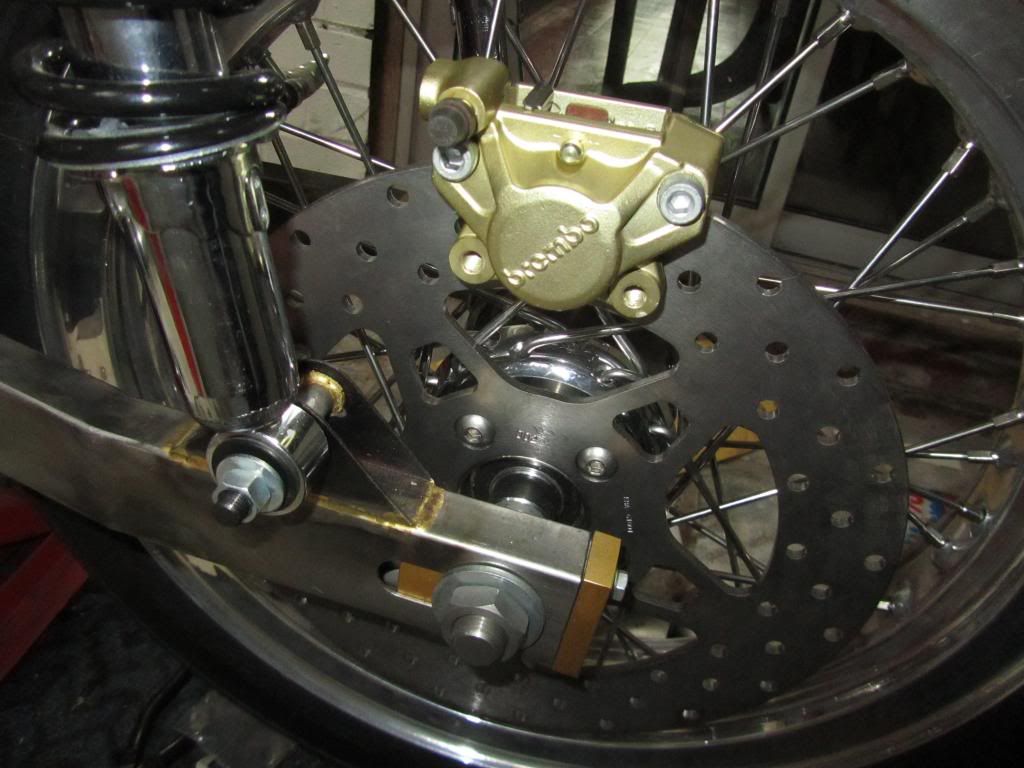
Finally, I tried a few calipers I had, all Brembos, a couple from a 916 and one from a CB500. None really worked how I wanted, so I ended up buying a new rear caliper at a very good price. I'll take the swingarm and wheel to my mates workshop later this week and make the wheel spacers and a caliper mount. It means the bike will have two black front calipers and a gold rear, which bothered me a little, till I noticed that a BMW 1000RR has gold front Brembos and sa black rear, so if its good enough for BMW its ok for me..
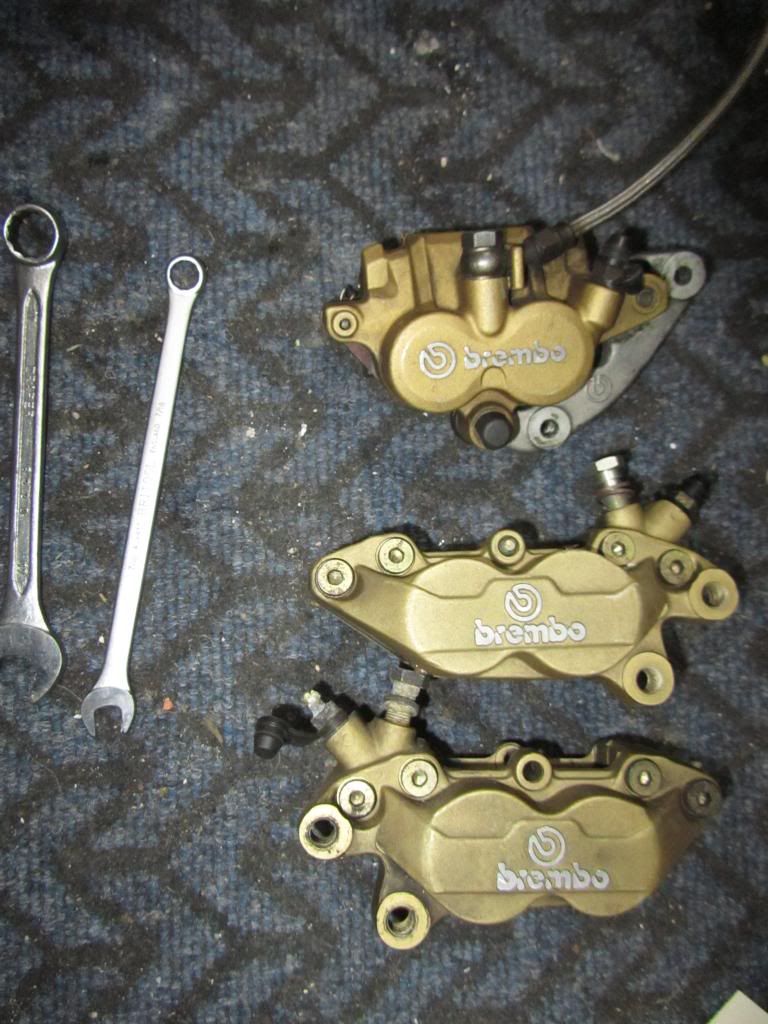
Shiny new caliper.. need to make a mount, torque arm and wheel spacers next..

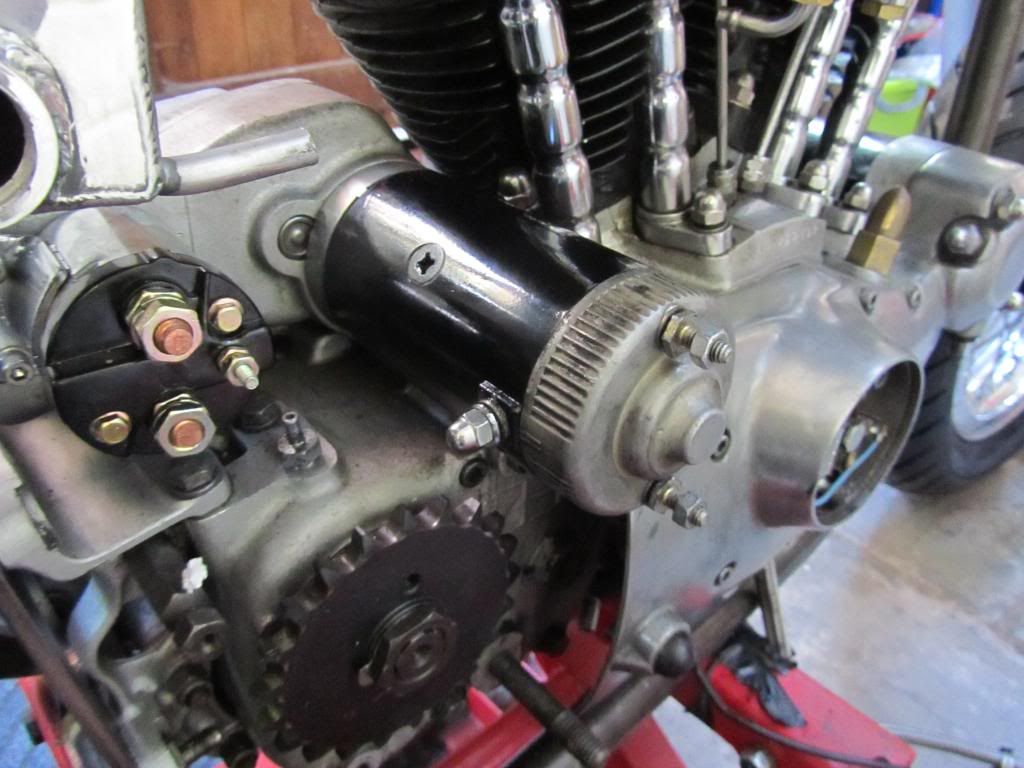
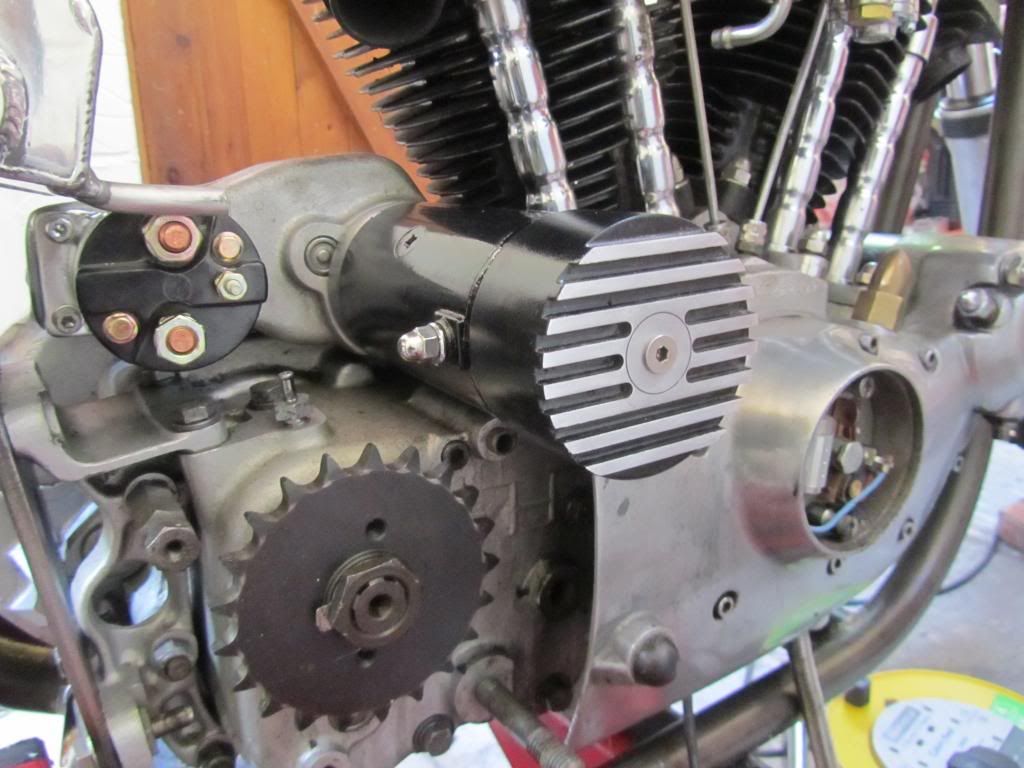
A little more progress today, first I replaced the generator end cover with an aftermarket one which is also a rectifier. This cleans up the wiring and looks a bit better I think..
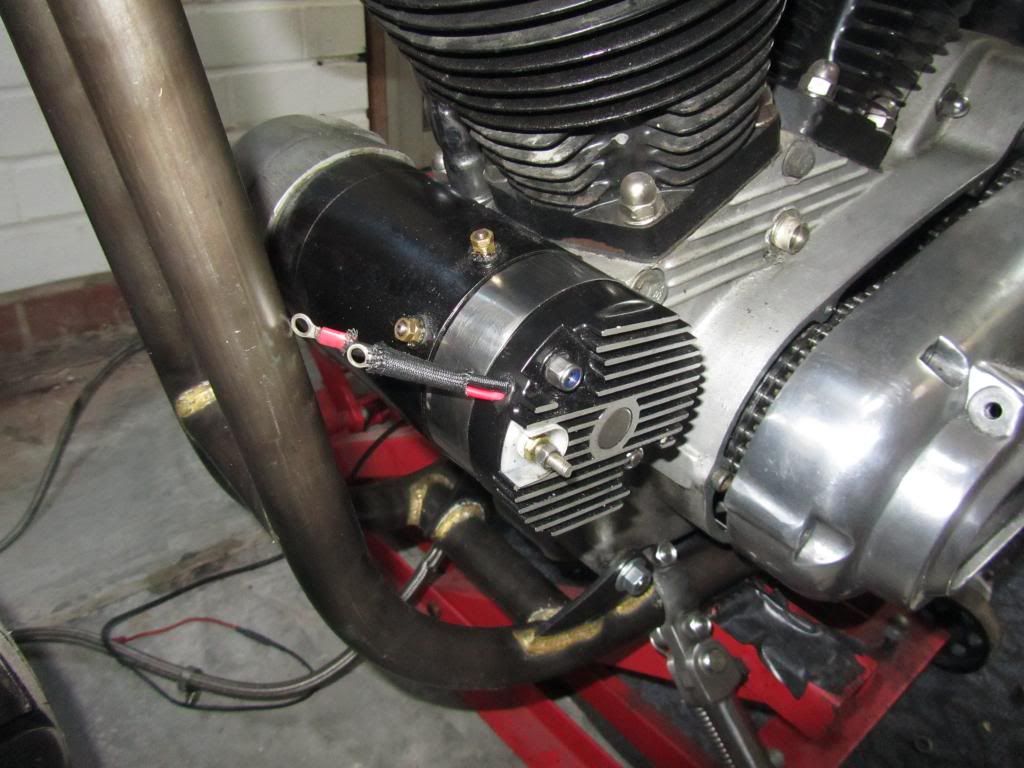
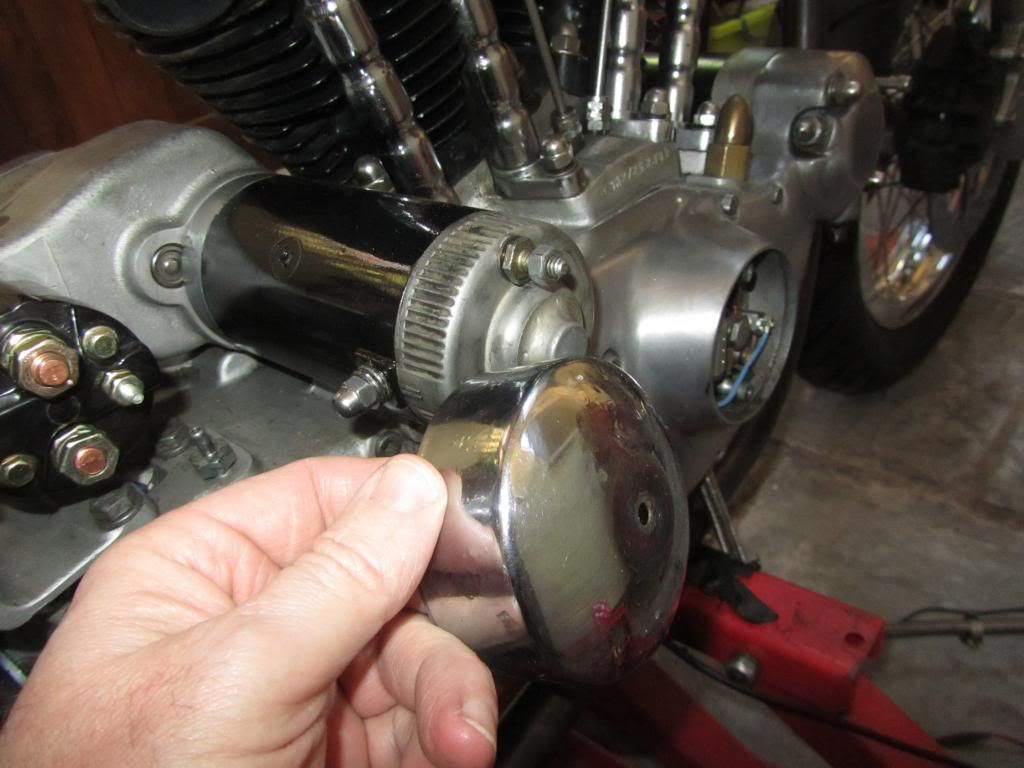
I didn't like the chrome covers that normally get fitted to the end of the generator and starter motor, so with the former sorted, we made a billet cover for the starter which mimics to style of the new generator cover. Not sure if I'll paint it black with the fins highlighted, or just leave it as is..
Just need to make a new mount to sit it a little further over the starter..
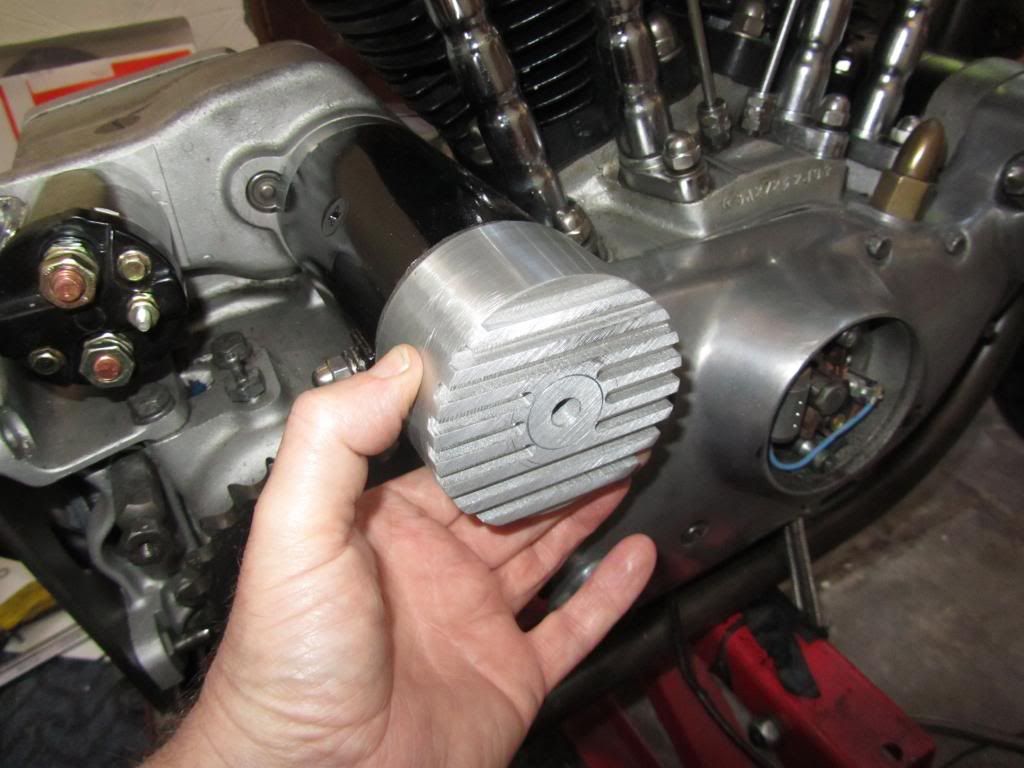


I didn't like the chrome covers that normally get fitted to the end of the generator and starter motor, so with the former sorted, we made a billet cover for the starter which mimics to style of the new generator cover. Not sure if I'll paint it black with the fins highlighted, or just leave it as is..

Just need to make a new mount to sit it a little further over the starter..

Bit more progress..
Painted the starter cover to match the regulator, I should've made it a few mm deeper, but got away with the mistake by making a new mounting bracket which you cant see..
The rear wheel spacers are done now, along with the brake caliper mount and alloy torque arm (with stainless clevis joints). Jeff wouldn't let me 'borrow' some of his precious stock of Ti for the wheel spacers, so we used stainless instead and lost a bit of weight by cross drilling them..

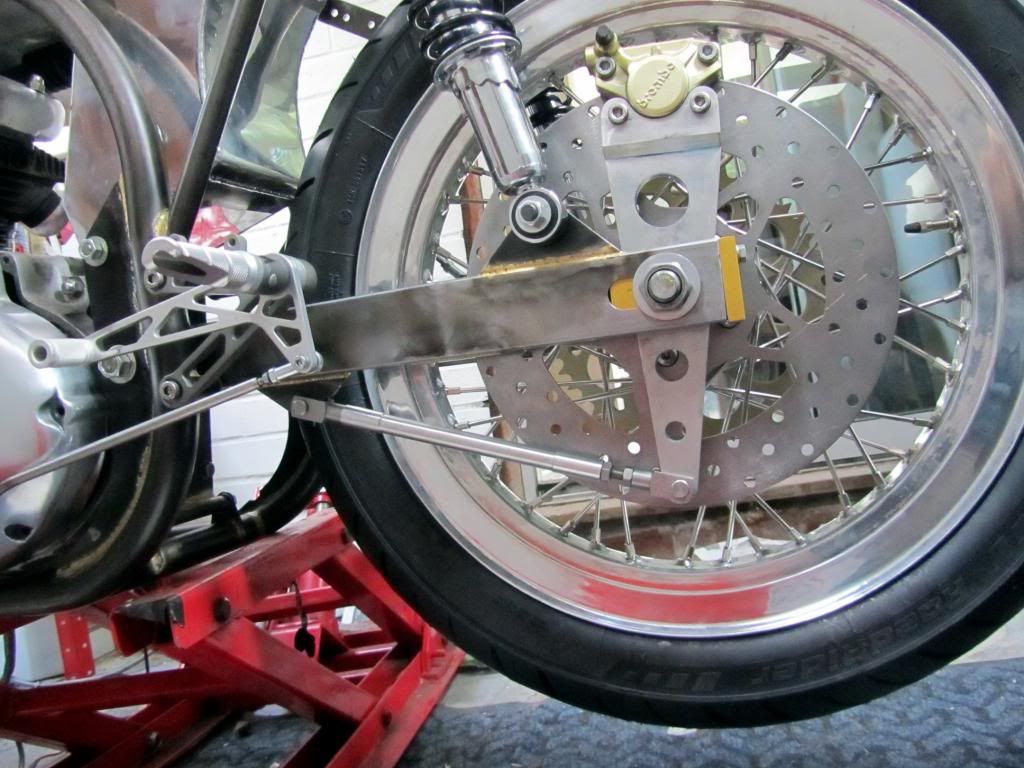
Also fitted a hard anodised alloy sprocket, had to be specially ordered from Renthal as it isn't a std part..
Painted the starter cover to match the regulator, I should've made it a few mm deeper, but got away with the mistake by making a new mounting bracket which you cant see..

The rear wheel spacers are done now, along with the brake caliper mount and alloy torque arm (with stainless clevis joints). Jeff wouldn't let me 'borrow' some of his precious stock of Ti for the wheel spacers, so we used stainless instead and lost a bit of weight by cross drilling them..


Also fitted a hard anodised alloy sprocket, had to be specially ordered from Renthal as it isn't a std part..

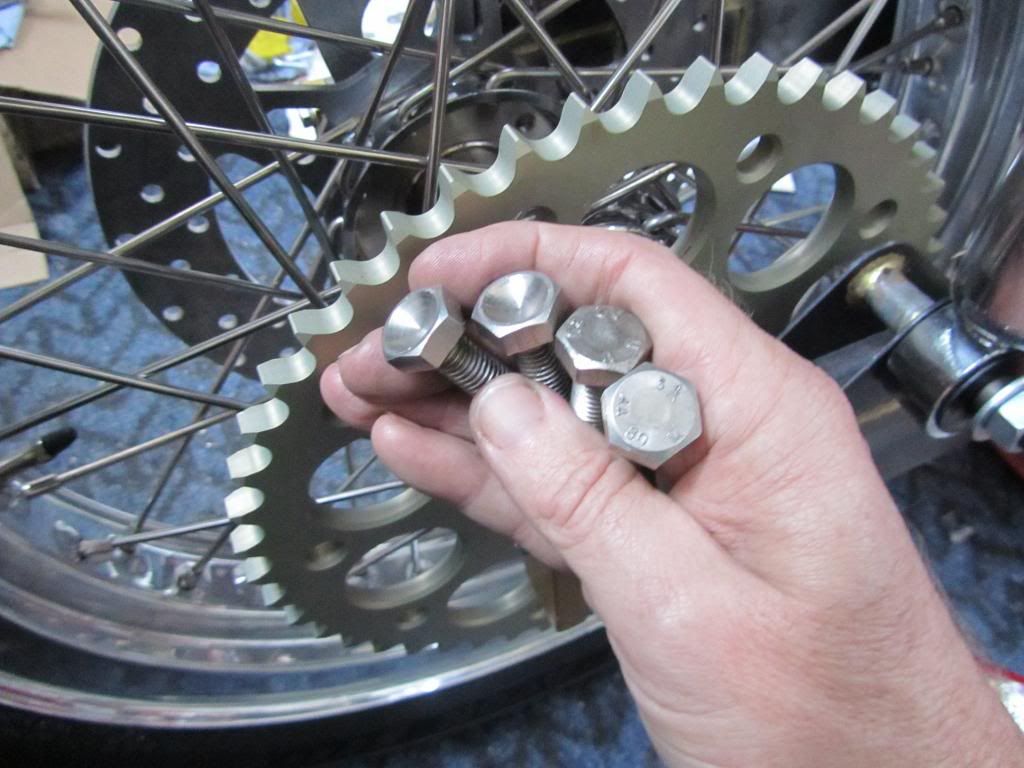
Thanks for the comments, the next task is to make an exhaust system, but that has to wait until mid July when I have the spare cash to buy the stainless tubing it'll need. In the meantime, there are lots of small jobs to do, like losing some weight.. a whole 6 grams per sprocket bolt from machining the bolt heads

Gassing Station | Biker Banter | Top of Page | What's New | My Stuff