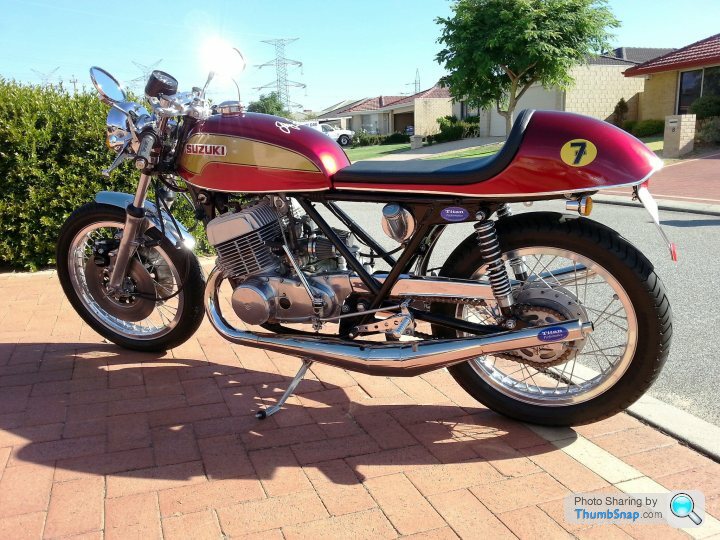
Suzuki 500 2 stroke Cafe Racer
Discussion


podman said:
Look forward to seeing the end result mate, I had a look around your website, the Jota was a stunner..I bet you still miss that.
To be honest i dont miss the Jota. I bought it around 1980 and sold it 27 years later... Bought as a poor condition bike and built it up over the years... I sort of out grew it and stopped riding it. One of my better buys though as it sold for £10 Kbuzzer said:
Hi Tricky, I have placed an order with the Dutch guy... Is there any other supplier you use, or do you have any other links to share, those were very useful!
WotcherIn the UK I use discountbikespares.co.uk where possible and have used robinsonsfoundry.co.uk as well. Another source is Crooks, but service in the past has been poor for me so now they are last resort.
Marcel was there for second hand parts (for example a first gear cog not available in the UK at the time)
However, phone Pete at http://www.tr500.co.uk/ a very helpful gent, for useful info and a cheap piston, rings etc in my case
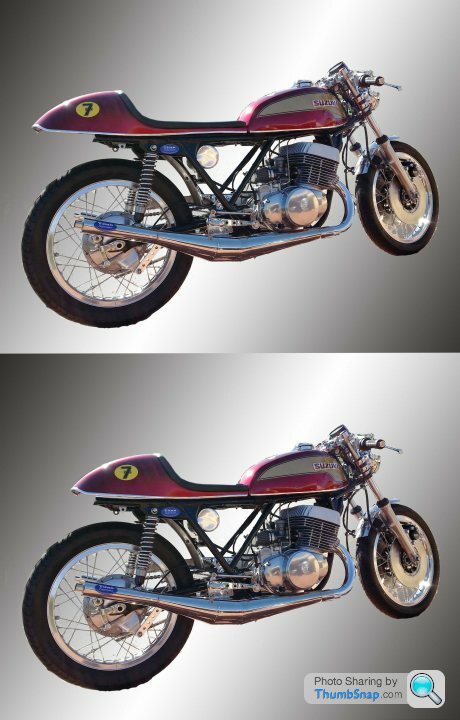
That definitely has potential. The problem, or at least the expense, in making that into a cafe racer will be the tank. To look good (in my not-so-humble opinion  ) it needs a long tank and a short seat, and an alloy tank won't be cheap.
There was a decent looking drum brake T500 for sale recently for £1800. Can't remember where I saw it, but if memory serves it was in the north east of England, the ad said it had been restored using NOS parts, and it was missing the silencers and had pod filters on the carbs. Might be worth a bit of Google time if anybody wants one.
) it needs a long tank and a short seat, and an alloy tank won't be cheap. There was a decent looking drum brake T500 for sale recently for £1800. Can't remember where I saw it, but if memory serves it was in the north east of England, the ad said it had been restored using NOS parts, and it was missing the silencers and had pod filters on the carbs. Might be worth a bit of Google time if anybody wants one.
buzzer said:
podman said:
Look forward to seeing the end result mate, I had a look around your website, the Jota was a stunner..I bet you still miss that.
To be honest i dont miss the Jota. I bought it around 1980 and sold it 27 years later... Bought as a poor condition bike and built it up over the years... I sort of out grew it and stopped riding it. One of my better buys though as it sold for £10 Kgareth_r said:
That definitely has potential. The problem, or at least the expense, in making that into a cafe racer will be the tank. To look good (in my not-so-humble opinion ) it needs a long tank and a short seat, and an alloy tank won't be cheap.
There was a decent looking drum brake T500 for sale recently for £1800. Can't remember where I saw it, but if memory serves it was in the north east of England, the ad said it had been restored using NOS parts, and it was missing the silencers and had pod filters on the carbs. Might be worth a bit of Google time if anybody wants one.
I know what you mean about the tank... I can get a new race fibre glass on for £250, and maybe recover around a third of that off the old tank. However, I have to say I like the look of this, and I can get the seat for around £70...) it needs a long tank and a short seat, and an alloy tank won't be cheap. There was a decent looking drum brake T500 for sale recently for £1800. Can't remember where I saw it, but if memory serves it was in the north east of England, the ad said it had been restored using NOS parts, and it was missing the silencers and had pod filters on the carbs. Might be worth a bit of Google time if anybody wants one.

buzzer said:
I know what you mean about the tank... I can get a new race fibre glass one for £250, and maybe recover around a third of that off the old tank. However, I have to say I like the look of this, and I can get the seat for around £70...
I'm not a big fan of fibreglass tanks, unless they've improved a lot in the last 40 years (slimline Norton 88, clip-ons, a gale, and the usual dodgy Featherbed centre stand = going home on the bus ). Plus you need to be sure that the GRP is ethanol-proof.gareth_r said:
'm not a big fan of fibreglass tanks, unless they've improved a lot in the last 40 years (slimline Norton 88, clip-ons, a gale, and the usual dodgy Featherbed centre stand = going home on the bus ). Plus you need to be sure that the GRP is ethanol-proof.
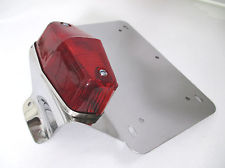
Yes, I know what you mean... These are coated inside I believe. Looking favourite for the look above at the moment though!). Plus you need to be sure that the GRP is ethanol-proof.I think it would look better with the seat shortened to bring the bum-stop forward, and a rear mudguard with a tail light/number plate bracket like this (I've bought these in the past, but I can't find a UK stockist now).
Like the alloy oil tank and the see-through frame.
But aesthetics are just a matter of opinion.
Like the alloy oil tank and the see-through frame.
But aesthetics are just a matter of opinion.
Edited by gareth_r on Wednesday 25th November 15:22
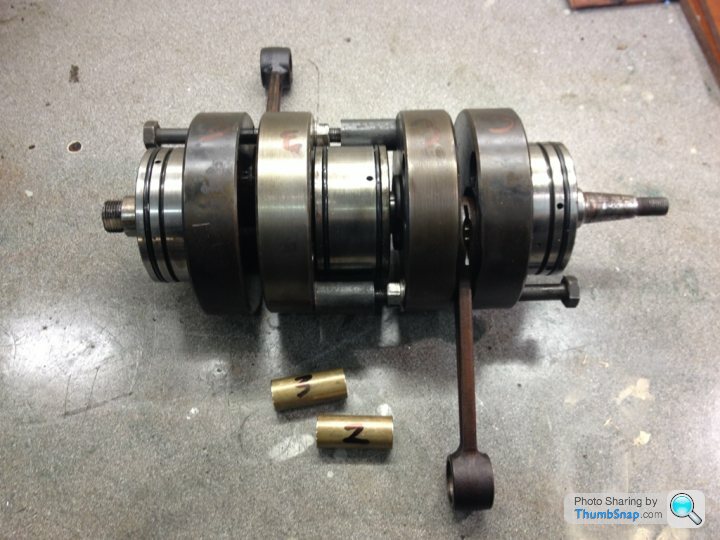
A little more progress on the build... I have decided to replace the centre crank seals as they are 40 years old... I have split the crank after carefully marking it to make sure it goes back the same way, but I will check the run-out before its installed. It came apart reasonably easy with the two bolt method. I have managed to get some pipe that I can use to support the webs when I press it back together. The brass bars have been turned so they were a snug fit in the gap, so I can be sure the crank goes back as it was.
the gearbox is fine, I have stripped, cleaned and rebuilt it, it just needs seals. I have bead blasted the cases as well.

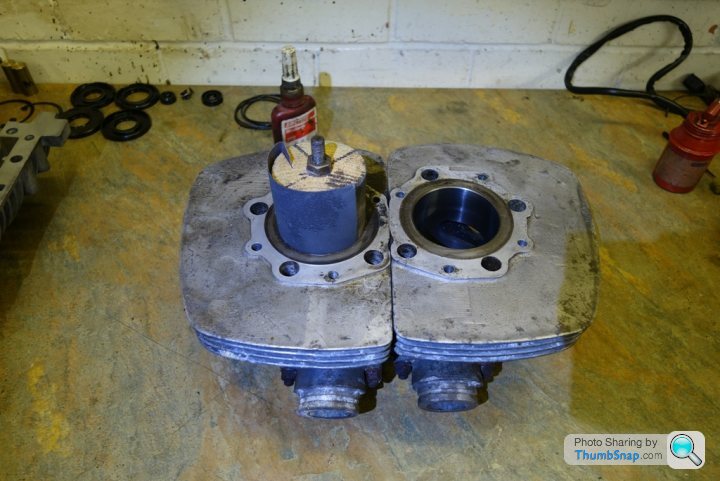
The bores are surprisingly good, and its still standard! I wanted to hone it for the new rings but I am always wary about using a three leg hone in a 2 stroke due to the ports... so I turned up a block of wood and used that with a bit of emery paper. it did the job a treat. I will bead blast the heads and barrels next, after masking off the bores.
the gearbox is fine, I have stripped, cleaned and rebuilt it, it just needs seals. I have bead blasted the cases as well.
The bores are surprisingly good, and its still standard! I wanted to hone it for the new rings but I am always wary about using a three leg hone in a 2 stroke due to the ports... so I turned up a block of wood and used that with a bit of emery paper. it did the job a treat. I will bead blast the heads and barrels next, after masking off the bores.
buzzer said:
gareth_r said:
That definitely has potential. The problem, or at least the expense, in making that into a cafe racer will be the tank. To look good (in my not-so-humble opinion ) it needs a long tank and a short seat, and an alloy tank won't be cheap.
There was a decent looking drum brake T500 for sale recently for £1800. Can't remember where I saw it, but if memory serves it was in the north east of England, the ad said it had been restored using NOS parts, and it was missing the silencers and had pod filters on the carbs. Might be worth a bit of Google time if anybody wants one.
I know what you mean about the tank... I can get a new race fibre glass on for £250, and maybe recover around a third of that off the old tank. However, I have to say I like the look of this, and I can get the seat for around £70...) it needs a long tank and a short seat, and an alloy tank won't be cheap. There was a decent looking drum brake T500 for sale recently for £1800. Can't remember where I saw it, but if memory serves it was in the north east of England, the ad said it had been restored using NOS parts, and it was missing the silencers and had pod filters on the carbs. Might be worth a bit of Google time if anybody wants one.
The plate and light bracket is a good idea because that would add a bit more length at the back so the hump doesn't look too far forward of the wheel. If that makes sense..
Yazza54 said:
That to me illustrates Gareth's point perfectly, that seat is far too long and the tank a tad too short - in my eyes anyway, it just looks wrong. Good find on the seat because it's that long it can be cut down to whatever size you want but IMO it doesn't work with that tank, unless you could take a few inches out the seat and still get away with it in relation to the rear wheel.
The plate and light bracket is a good idea because that would add a bit more length at the back so the hump doesn't look too far forward of the wheel. If that makes sense..
I agree, the seat is too long, they do sell a shorter one as well. I have plenty of time to see if any seat and tank units come up on Ebay... In the mean time I will be doing a "dry build" to make sure everything fits well and works, before painting anything. I like the idea of the seat hump to house the battery with the bigger hump seats. The plate and light bracket is a good idea because that would add a bit more length at the back so the hump doesn't look too far forward of the wheel. If that makes sense..
I really like the minimalist look and will be trying to achieve that. I was in the fabrication shop today and picked up some nice thin wall alloy tube to make the round oil tank... I am going to have a go at spinning some alloy ends, to dome them, which I have never done before!
Well the rebuild continues... I am waiting for some engine seals and gaskets to finish the engine, so while I wait I turned my attention to the front and rear hubs as I will be taking the wheels to have them rebuilt next week.
I spent a pleasurable couple of hours turning the hubs on the late, although I did have to visit my mate as my own lathe is not big enough! I will be polishing the outer surfaces later, but leaving the inside ribs a nice bead blasted matt finish.


I spent a pleasurable couple of hours turning the hubs on the late, although I did have to visit my mate as my own lathe is not big enough! I will be polishing the outer surfaces later, but leaving the inside ribs a nice bead blasted matt finish.
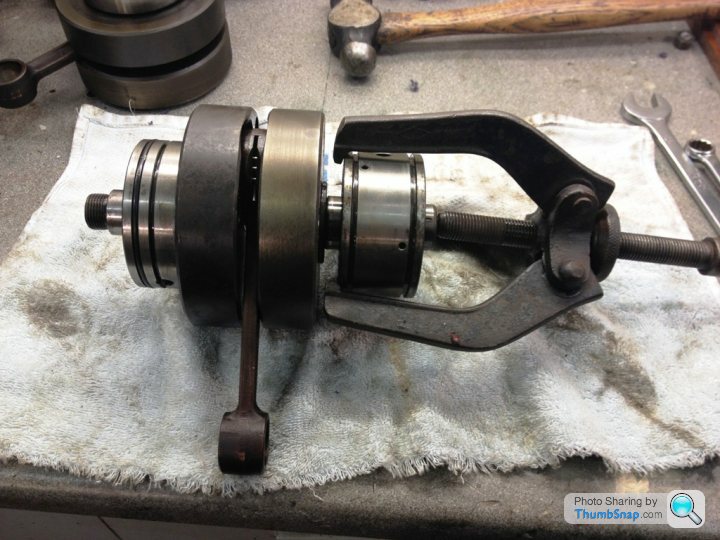
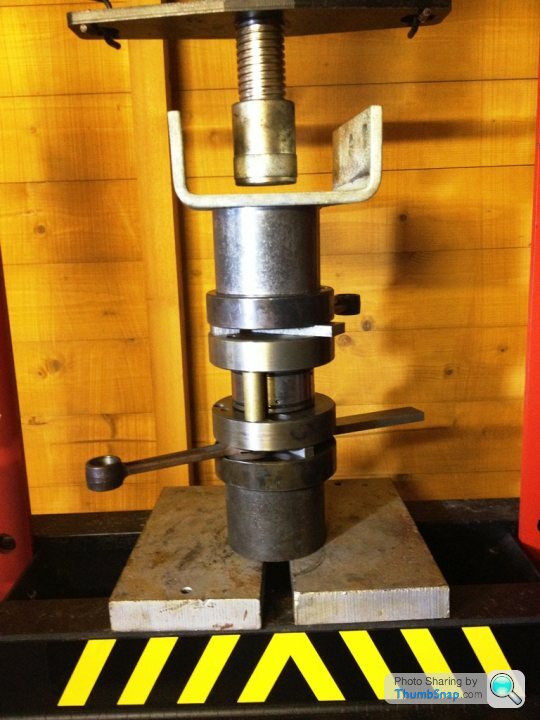
I took the crank to a mate today and used his 30 ton press to put the crank back together with the new seals on the inner bearing. It pressed together quite easily. To ensure it went back in exactly the same position I had carefully marked it with a centre punch mark. I did this by using a 9mm piece of silver steel which I turned down to a point and then hardened the tip. By passing this through the holes in two webs and tapping it to make a mark in the third web, it was very easy to accurately align the crank to where it was originally. I had a backup of a scribed line on the webs as well!
The brass spacers were used to ensure the crank went back to where it was. Tight fitting spacers were also used in between the crank webs to ensure the crank pins were not stressed during pressing.
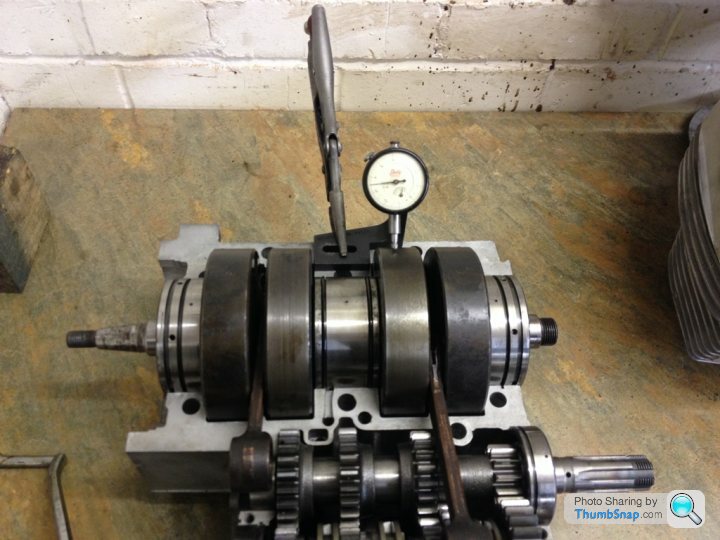
Just to be sure, the crank was checked with a dial gauge. What is not evident from the picture is that the crank is supported by the end two bearings only in the crankcase. To facilitate this, two pieces of 1mm silver steel were used to support the bearing at each end, effectively replicating support on two V blocks. Thankfully it was well within tolerance!
The brass spacers were used to ensure the crank went back to where it was. Tight fitting spacers were also used in between the crank webs to ensure the crank pins were not stressed during pressing.
Just to be sure, the crank was checked with a dial gauge. What is not evident from the picture is that the crank is supported by the end two bearings only in the crankcase. To facilitate this, two pieces of 1mm silver steel were used to support the bearing at each end, effectively replicating support on two V blocks. Thankfully it was well within tolerance!
Gassing Station | Biker Banter | Top of Page | What's New | My Stuff