What did you do in the garage yesterday?
Discussion


Yesterday I removed my brake servo and master cylinder,nightmare of a job! Silly me I thought it can't be as bad as they say!The new servo arrives sometime tomorrow but I managed to buy a new master cylinder today from a TVR tax free zone for £43.52 + vat.Brakes International Rochdale part number BMC 4230.
So all I've got to do now is put it all back together that should be easy shouldn't it?
So all I've got to do now is put it all back together that should be easy shouldn't it?
johnh8 said:
Yesterday I removed my brake servo and master cylinder,nightmare of a job! Silly me I thought it can't be as bad as they say!The new servo arrives sometime tomorrow but I managed to buy a new master cylinder today from a TVR tax free zone for £43.52 + vat.Brakes International Rochdale part number BMC 4230.
So all I've got to do now is put it all back together that should be easy shouldn't it?
Of course it will. After all "what could possibly go wrong".So all I've got to do now is put it all back together that should be easy shouldn't it?
NB: I have often said this when starting a job in the morning, only to be found later that day at nightfall, a broken man, huddled in a corner crying
over_the_hill said:
Of course it will. After all "what could possibly go wrong".
NB: I have often said this when starting a job in the morning, only to be found later that day at nightfall, a broken man, huddled in a corner crying
Its all back together now apart from the accelerator pedal and the bleeding.The servo didn't arrive until 3pm and I gave it until 10pm. At several points I was close to tears its a difficult job on your own,my mate was supposed to be coming to help but was brought down by a severe bout of the squits he said it had nothing to do with having to do some work (he's a polisher).NB: I have often said this when starting a job in the morning, only to be found later that day at nightfall, a broken man, huddled in a corner crying
Whilst waiting for the servo I had a tidy up picked up the old servo which was badly corroded and it fell in half! Now there's food for thought.

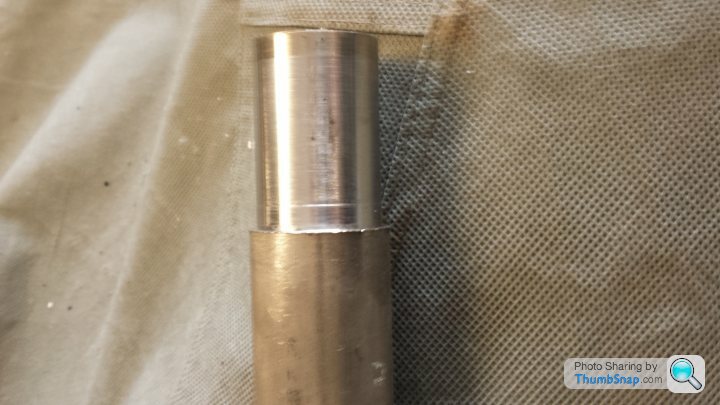
After finding a lot of play in the offside driveshaft, decided to replace all the CV joints. Driveshafts dismantled, joints and boots binned and cleaned up.
New Prolinx race CV joints fitted, lubed with Bel Ray grease, Bailcast DBC800 stretchy neoprene boots (2 year warranty) and new high tensile socket head bolts from a local supplier (£6.40 for 24 - dealer £1.40 each). The diff bolts were M10 and the hub end were 7/16th UNF which I didn't realise to begin with! Doh...
A very messy job so a box of nitrile or latex gloves essential.


LongBaz said:
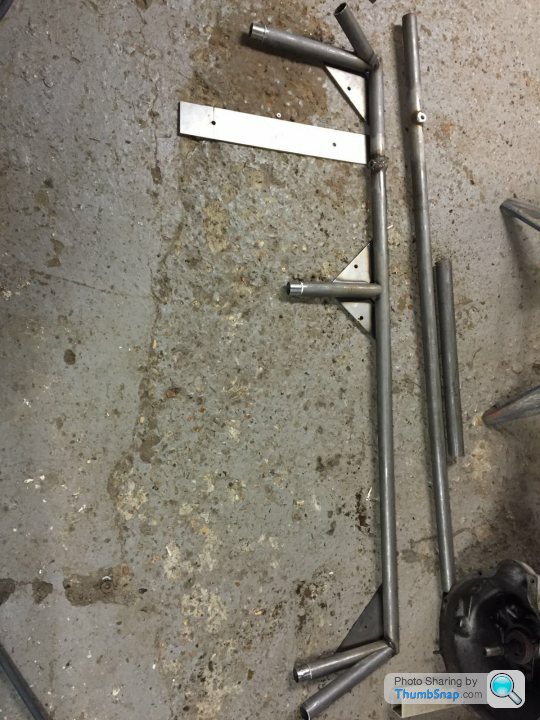
Today has been busy at Insane Creations cutting the tubing to size for the replacement outriggers. Buying the 3mm tubing offers the ability to turn down the tubing on the lathe therefore no need for seperate inner sleeving. 
I really like the idea of this, have you got any pictures of the fibreglass access panel you've cut? I didn't think there was enough room due to the diagonal bars angle. Or are you welding the main 'E' shape on the car. Mine need doing soon so I'm gathering ideas.The only hole that needs cutting is fo the centre bar. I think it could have been a little smaller but not a problem it will be glassed back in stronger than before.  as you can see it all holds together with no welding at this stage.
Will also be putting in a brace bar for the seat mountings, this will also be glassed over. As you can see from the picture the outriggers will have to come back out for painting. A nice snug fit, you can just about see the join from where I have rubbed back the paint on the original tube. Also not going with the 45° join on the ends they will be fitted like the centre tube then have caps fitted.
Both ends will be tacked then removed for complete welding. The corner plates have been welded in place from underneath whilst the seatbelt bolts were screwed in and the three parts of the E were slotted in but not yet welded
IYSWIM
as you can see it all holds together with no welding at this stage.Will also be putting in a brace bar for the seat mountings, this will also be glassed over. As you can see from the picture the outriggers will have to come back out for painting. A nice snug fit, you can just about see the join from where I have rubbed back the paint on the original tube. Also not going with the 45° join on the ends they will be fitted like the centre tube then have caps fitted.
Both ends will be tacked then removed for complete welding. The corner plates have been welded in place from underneath whilst the seatbelt bolts were screwed in and the three parts of the E were slotted in but not yet welded
IYSWIM
Edited by LongBaz on Monday 16th May 15:02
Edited by LongBaz on Monday 16th May 15:58
Edited by LongBaz on Monday 16th May 16:00
 |http://thumbsnap.com/U5mOLZDm[/url
Diagonals being held in place so the bottom can be welded to the E frame. All the gunk to the left of the devise holding the diagonal on will be cleaned off and painted. Looks like layers of underseal. 
These will the be completely welded when the outriggers are taken back out for painting. The two diagonals will then be butt welded. There is plenty of room to weld all the way round.
Will post some pics of this when it is done. Thanks to Ron at Insane Creations for his work, this really is not a job to do in an integeral garage.
Edited by LongBaz on Monday 16th May 19:18
Edited by LongBaz on Monday 16th May 19:24

Think I must have been out in the sun too long. Decided to renew all the bushes on the suspension front and rear. Opted for the Powerflex Black ones.
Got the car up on stands, front passenger wheel off and thought, this is a doddle. First bolt was one of the top ball joint ones and it was seized solid. Heat wouldn't move it so sheared it off. Ended up taking the whole hub off then dismantling it. New ball joint on order and reassembled the arms with nice new bushes. A lot easier to install than remove although 2 original bushes fell apart in the press.
Carefully examined the arms for corrosion and damage and so far all in great condition. Took the opportunity to examine the outriggers with all the suspension out of the way. Used a micro camera taped to a long piece of wire and ran it along the top of the outriggers. All in excellent condition (phew).
Just 3 more corners to do now....
So rebuilt the nearside front except for the upper ball joint which is on order. Got 2 for less than a TVR dealer wants for one.
Decided to strip down the offside front and exactly the same problem, the ball joint outer bolt was seized solid. The joint had some play too so glad I found it. 2 bushes well past their best. Will make use of my mate's 20 tonne press on Monday to strip them down.
Decided to strip down the offside front and exactly the same problem, the ball joint outer bolt was seized solid. The joint had some play too so glad I found it. 2 bushes well past their best. Will make use of my mate's 20 tonne press on Monday to strip them down.
Decided to Renovo my roof.
All went well. Left it to dry for 18 hours.
This morning I decided to wash the car, and whilst rinsing the screen a little water hit the front edge of the roof - navy blue dye running everywhere!!!
About to go out on an organised run.......rain forecast
So hosed the roof panel for 10 minutes until all the wet dye had run out of it.
Put soaking wet roof on the car and drove to the start.
Arrived there 90 minutes later.....roof bone dry.
What's that about?
And how come dye in the right place doesn't dry in 18 hours, but get some on the bathroom wall and it's dry in five seconds?
LongBaz said:
Today has been busy at Insane Creations cutting the tubing to size for the replacement outriggers. Buying the 3mm tubing offers the ability to turn down the tubing on the lathe therefore no need for seperate inner sleeving.
Thanks for the vote of confidence mate. It's my pleasure to help you back on the road Last Friday I arranged for the Chimaera to be picked up to go for a respray next Saturday (28th). 07:00 this morning I got a call from the chap doing the respray saying "Sorry I'm running late Ged, I'll be with you in 10 minutes". After pointing out the fact that he was actually a week early, he indeed arrived 10 minutes later and took the car away.
I have yet to decide on a colour but I've got a little while yet to make that decision.
It will be blue though.
I have yet to decide on a colour but I've got a little while yet to make that decision.
It will be blue though.
Gassing Station | Chimaera | Top of Page | What's New | My Stuff