The Chim is in bits because the old bolts are too long!
Discussion


I'm half way through a radiator replacement and I cannot safely bolt the fans to the new radiator.
I removed the fans/cowls and 8 fixing bolts off the old radiator and when I went to attach the fans/cowls to the new radiator discovered the bolts are too long!
They'll make contact with the internals of the new radiator if I screw them in all the way.
Does anyone know what size thread the bolts are? I simply need some shorter ones (or a bucket of washers!)
TIA!

Sorted!
New rad is in and filled. Over a some progressively longer/hotter, start/stop/cool down/check levels cycles I'm happy that it's job done.
Now I find one of the two rad fans is not working. I shorted the otter switch and one fan came on. I swapped fan connectors on the Y piece of the wiring loom and retested. The same fan came on so I'm happy it's not the loom.
As far as I can see replacing a radiator fan is a radiator out job.
Bassfiend229hp said:
You really need to take the rad out to get to the lower fan mounting bolts ... It's not hard, just a pain. 
Phil
Phil's quite right. I only changed the rad and kept the existing fans and cowls. With the rad in place you can see two bolts per cowl fixing the cowls to the top of the rad. There are four similar bolts on the bottom of the rad which also have to be removed.Phil
IF you can remove these four lower bolts there's probably space for the cowls to come off. Given the restricted access and visibility quite how you'd replace the four lower bolts afterwards I'm not sure!
Removing the rad was a bit of a chore but it's not a technically complex task. I did use a deep 13mm socket and a UJ to remove the two rad top bolts but that was the only exotic (!) tooling I used. Access to the passenger side top rad bolt is restricted by the air intake pipe which can be moved (unbolt the AFM and disconnect the pipe first) at bit while access to the driver side top rad bolt is restricted by the expansion tank which I also removed.
It hasn't been said, but it must be blindingly obvious that you need to remove the bonnet to make this job easier - a 2 person job.
If either of you is scraping around for the right tools, rather than going and buying bits and bobs at expensive prices, can I recommend this kit?
http://www.halfords.com/motoring-travel/tools-diy/...
There's a 200 piece set for £25 more. The ratchet ended spanners alone cost about £70 if bought separately. Lovely quality too.
It has all the deep sockets, 6 sided sockets (for stuck bolts), universal joints, allen key drive bits, star drive bits etc etc that you will ever need - makes every job just so much easier. I have always had the correct tool for every job I have done since buying it.....bar 2.
The two are removing the sump plug - you really need a large open ended or adjustable spanner - and removing the otter switch - it's a deep 27-30 mm socket (cannot remember the exact size), and the 170 piece set doesn't go quite that large....the 200 piece set does, however.
QBee said:
It hasn't been said, but it must be blindingly obvious that you need to remove the bonnet to make this job easier - a 2 person job.
I did consider removing the bonnet but as I was a one man team decided not do. While a drained rad with fans attached it quite heavy it was not too bad to lift out and back in. I did protect the front of the chassis, exhaust and engine so I could remove and replace the rad in stages and rest between![quote]
If either of you is scraping around for the right tools, rather than going and buying bits and bobs at expensive prices, can I recommend this kit?
http://www.halfords.com/motoring-travel/tools-diy/...
There's a 200 piece set for £25 more. The ratchet ended spanners alone cost about £70 if bought separately. Lovely quality too.
It has all the deep sockets, 6 sided sockets (for stuck bolts), universal joints, allen key drive bits, star drive bits etc etc that you will ever need - makes every job just so much easier. I have always had the correct tool for every job I have done since buying it.....bar 2.
The two are removing the sump plug - you really need a large open ended or adjustable spanner - and removing the otter switch - it's a deep 27-30 mm socket (cannot remember the exact size), and the 170 piece set doesn't go quite that large....the 200 piece set does, however.
QBee said:
It hasn't been said, but it must be blindingly obvious that you need to remove the bonnet to make this job easier - a 2 person job.
.....
QBee, it is a 1 person job if you are working inside......
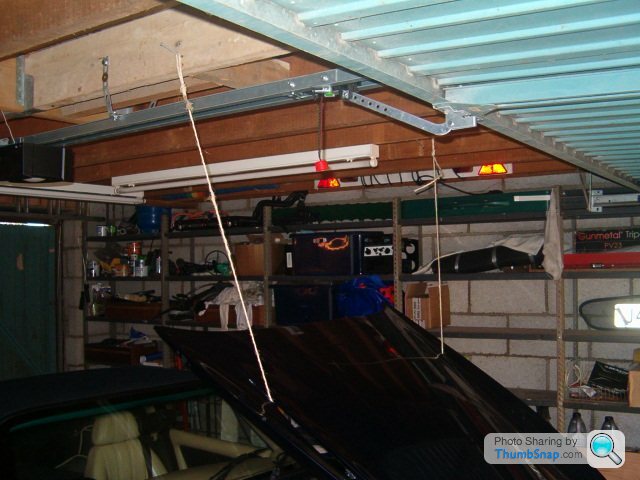
String the rear of the bonnet up as per the pic.
Mark the hinge positions for when you come to refit the bonnet.
Undo the hinge bolts, (when strung up at the angle in the pic) the front of the bonnet will rest in situ.
Either roll the car back whilst holding the front of the bonnet or support the bonnet whilst removing the string.

bsdnazz said:
As far as I can see replacing a radiator fan is a radiator out job.
Thankfully I spent some extra time this afternoon fiddling with the fan connectors and both fans are running properly. Fault diagnosed as a poor connection and no need to remove the radiator again.Once I had the two fans running ( I bypassed the otter switch to fiddle & test ) I ran the engine up to temperature to make sure the otter switch would activate the fans. It did so all is well.
Using my IR thermometer (Fluke 62 MAX Infrared Thermometer) it was interesting to see the temperature rise on various parts of the engine and cooling system. What surprised me the temperature difference between the top of the swirl pot (140c) and the bottom (90C). I assumed that the coolant level must be low but when I checked later the system was brim full.
Anyway, the TVR is all set for the second heatwave of the summer now.
Gassing Station | Chimaera | Top of Page | What's New | My Stuff