Porting & polishing heads?
Discussion


Has anyone done this to their Rover V8? Are there any gains to be seen? Or are the heads pretty good as standard?
I only ask as I have the engine out at the moment and in the process of cleaning it up prior to painting. I noticed some casting detritus inside a few of the intake runners, also the exhaust runners.
I understand you should not polish the intakes, nor remove any significant material in the inlets as this unbalances the volumes. Seeing as that's not what I'm looking to do anyway, it's not an issue. Just looking to smooth the lumps out of the rough castings and make it flow a bit better. May polish the exhaust ports.
Any tips, info or advice on this is appreciated.
Cad
The step on the stock heads between the inlet ports and the manifold is pretty bad, so gasket matching removes this step more than the issue of port enlargement, and is a nice easy thing to do for the DIY 'er. Polishing exhaust ports makes me laugh- spend hours getting a mirror finish for it only to fill with rough old carbon once you start using the engine...

Bobby Shaftoe said:
Yeah i've done loads, gains really depend on how good the heads are in the first place. The standard of TVR porting varies from excellent to non-existant depending on year, puported spec, whether they had any decent heads knocking about at that particular moment, if it was friday and they couldn't be arsed etc 
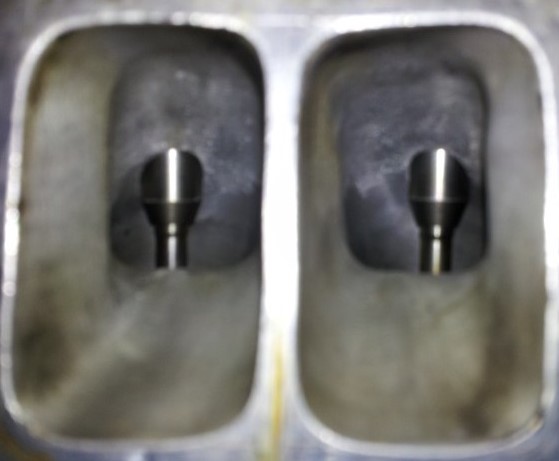
Most Chim 400 heads i've seen have no, or very very minimal porting, but the larger engined variants tended to be better. Post a few pics or some specs and i'll tell you more, important areas are valve sizes, valve seat and throat area, pushrod pinch point, having a massive port dimension at the manifold face (that then tapers in massively) is not, contrary to popular belief, i.e gasket matching.
This ^ the throat area and seat mismatch step all need addressing even on stock valved sized heads IMO even if your on the cheap, but any thing more serious you at least want to be updating to the intermediate BV sized intake and exhaust valves their not much bigger but a superior shaped valve and along with cleaning up the throats etc will give nice worthwhile gains Most Chim 400 heads i've seen have no, or very very minimal porting, but the larger engined variants tended to be better. Post a few pics or some specs and i'll tell you more, important areas are valve sizes, valve seat and throat area, pushrod pinch point, having a massive port dimension at the manifold face (that then tapers in massively) is not, contrary to popular belief, i.e gasket matching.
 these are examples stock and modded intakes (neither belong to me))
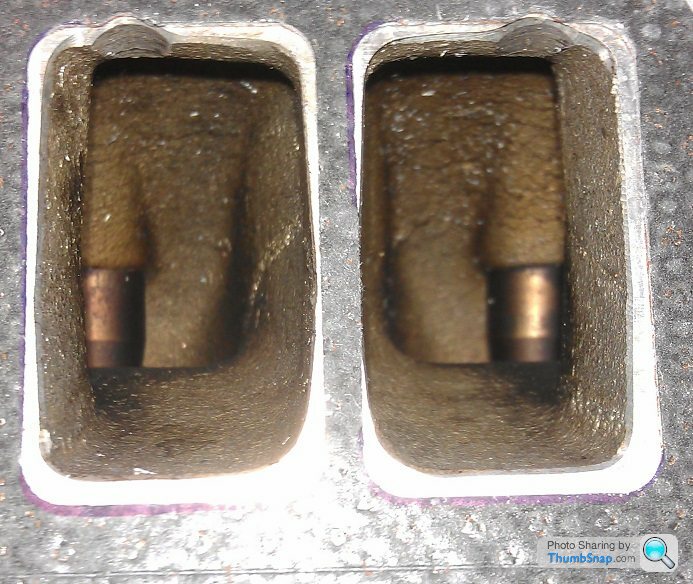 ..
.. 
Edited by Sardonicus on Wednesday 27th January 11:35
Thanks for the replies so far chaps.
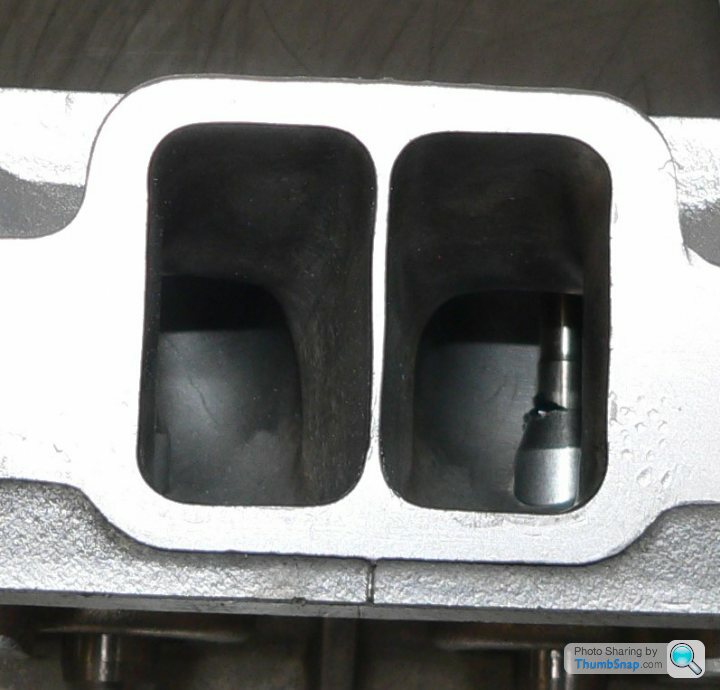
Here are a few pics taken this morning:


The last picture of the cam shows some discolouration on some of the cam lobes. Is this normal heat discolouration, or signs of excessive wear?
I haven't had a look at the inlet manifold in terms of how well the ports alignyet, as it's buried in the shed somewhere. But will dig it out today.
Here are a few pics taken this morning:
The last picture of the cam shows some discolouration on some of the cam lobes. Is this normal heat discolouration, or signs of excessive wear?
I haven't had a look at the inlet manifold in terms of how well the ports alignyet, as it's buried in the shed somewhere. But will dig it out today.
One other thing - when I do remove the heads, is there anything majorly difficult about removing the double valve springs? I have only ever removed valves & springs from an old XR2 head many years ago, and still have the valve spring compressing tool. Is removal any different for double springs?
Cheers
Cheers
caduceus said:
The last picture of the cam shows some discolouration on some of the cam lobes. Is this normal heat discolouration, or signs of excessive wear?
The cam lobe wear line pattern is not uniform, this is due to lifter alignment/rotation, and is quite normal. If a cam is suspect what you're looking for is worn or rounded cam lobe points.davep said:
The cam lobe wear line pattern is not uniform, this is due to lifter alignment/rotation, and is quite normal. If a cam is suspect what you're looking for is worn or rounded cam lobe points.
Not really suspecting cam wear. Only a visible marker after seeing this. But it's making 263bhp and 299lbft, so not too shabby already. If the porting releases a few more torques and ponies, and/or better throttle response, I'll be happy.
caduceus said:
One other thing - when I do remove the heads, is there anything majorly difficult about removing the double valve springs? I have only ever removed valves & springs from an old XR2 head many years ago, and still have the valve spring compressing tool. Is removal any different for double springs?
Cheers
No, its just the same. You only need some bigger muscles to compress them.Cheers
Bobby Shaftoe said:
Cad, they look stock heads, but post a pic of the valve seat/throat area when you get the valves removed as this is the first area for improvement
Didn't get round to removing the valves tonight, but did get the heads off. To find this:


The water in the last one may be from where it was sitting in the back garden for a couple of months, in all weathers. Albeit covered in a tarp.
I assume the crusty black deposits are way too excessive? Running too rich? Or something more?
Boosted LS1 said:
The water is probably from the head because you didn't drain the block. Don't panic he he. Yes, rich and oily. How are the inlet valve stems and the valve seals looking?
Not got them out yet. Will be on that job tomorrow. Along with painting wishbones and uprights... :|So the valves are out. One exhaust valve had to be tapped out quite firmly with a hammer  It wasn't the valve at fault, as the same happened with a different one. Fook knows what's caused that...


On the whole, they all look very grubby. A lap in job is necessary at least. Not too sure how to proceed at this point, apart from cleaning up and lapping valves, porting any rough casting in the head. The fact that single valve had to be hammered out is a little worrying. Also the amount of carbon and crud in the combustion chamber looks excessive.
I assume it's prudent to renew the valve stem seals and the little round springs that fit over them?
Will have another read through Bobby's posts as I seem to remember him mentioning upgrading something.
Any other advice appreciated.
It wasn't the valve at fault, as the same happened with a different one. Fook knows what's caused that...On the whole, they all look very grubby. A lap in job is necessary at least. Not too sure how to proceed at this point, apart from cleaning up and lapping valves, porting any rough casting in the head. The fact that single valve had to be hammered out is a little worrying. Also the amount of carbon and crud in the combustion chamber looks excessive.
I assume it's prudent to renew the valve stem seals and the little round springs that fit over them?
Will have another read through Bobby's posts as I seem to remember him mentioning upgrading something.
Any other advice appreciated.

It may have previously shed a rocker pad in the past this mushrooms the top of the valve stem I would never have forced the valve through the guide because if my previous is correct then chances are you have just damaged or scored a serviceable valve guide  (do check) stem seals come with the little springs already but just be careful you fit them with a suitable tool hollow drift (easily damaged) making sure to fit the valves 1st followed by the stem seal with some insulation tape or similar over the collet grooves so you dont damage the delicate stem seal lip
I would never have forced the valve through the guide because if my previous is correct then chances are you have just damaged or scored a serviceable valve guide (do check) stem seals come with the little springs already but just be careful you fit them with a suitable tool hollow drift (easily damaged) making sure to fit the valves 1st followed by the stem seal with some insulation tape or similar over the collet grooves so you dont damage the delicate stem seal lip Edited by Sardonicus on Thursday 28th January 16:07
Sardonicus said:
It may have previously shed a rocker pad in the past this mushrooms the top of the valve stem I would never have forced the valve through the guide because if my previous is correct then chances are you have just damaged or scored a serviceable valve guide (do check)
I understand your concern and duly noted. But that same valve does go through a different exhaust valve. For some reason the dodgey valve guide seems too small or warped I would never have forced the valve through the guide because if my previous is correct then chances are you have just damaged or scored a serviceable valve guide (do check) 

jamienshelly said:
Well said Simon, I use the corner of a carrier bag and oil the seal, However, it will cost another 40 pence to fit them at 5p a bag
That too  Caduceus may be worth getting those tight guides reamed then stock Rover guides tend to be very durable generally (well their long enough)
Edited by Sardonicus on Friday 29th January 09:15
Sardonicus said:
hat too Caduceus may be worth getting those tight guides reamed then
I've already had a look into buying a new valves/springs/followers/stem seals kit from RPi. The chap I spoke to was happy to spend over half an hour on the phone talking about issues and things to check. Caduceus may be worth getting those tight guides reamed thenThe followers appear to have the 'halo' signs on the face, showing early signs of wear. But from what I can see of the cam, the lobes still look pretty egg shaped to me. I'm sure there is a more technical term than 'egg shaped' but you catch my drift. Although I'm happy to be corrected on the integrity of a 42k mile cam being due a change. Just saying what I see...
The valves themselves aren't looking too clever. I left them soaking in 'Gunk' and a few in carb & intake cleaner overnight and it doesn't appear to have broken down any of the s**t stuck to them. The exhaust valves are particularly pitted.
RPi also do an upgraded ignition and ecu chip kit to correct the over fuelling. Mine IS over fueling quite badly, as shown from the pics of crust in the chamber/valves and pistonheads.
So, I'm slowly gathering info to help me make an informed decision as to where I should spend my hard earned wedge.

caduceus said:
I've already had a look into buying a new valves/springs/followers/stem seals kit from RPi. The chap I spoke to was happy to spend over half an hour on the phone talking about issues and things to check.
The followers appear to have the 'halo' signs on the face, showing early signs of wear. But from what I can see of the cam, the lobes still look pretty egg shaped to me. I'm sure there is a more technical term than 'egg shaped' but you catch my drift. Although I'm happy to be corrected on the integrity of a 42k mile cam being due a change. Just saying what I see...
The valves themselves aren't looking too clever. I left them soaking in 'Gunk' and a few in carb & intake cleaner overnight and it doesn't appear to have broken down any of the s**t stuck to them. The exhaust valves are particularly pitted.
RPi also do an upgraded ignition and ecu chip kit to correct the over fuelling. Mine IS over fueling quite badly, as shown from the pics of crust in the chamber/valves and pistonheads.
So, I'm slowly gathering info to help me make an informed decision as to where I should spend my hard earned wedge.
Whos going to tell him? .... chip for over-fueling cure (news to me) and the little ignition upgrade box? Upgrade.. yeh right The followers appear to have the 'halo' signs on the face, showing early signs of wear. But from what I can see of the cam, the lobes still look pretty egg shaped to me. I'm sure there is a more technical term than 'egg shaped' but you catch my drift. Although I'm happy to be corrected on the integrity of a 42k mile cam being due a change. Just saying what I see...
The valves themselves aren't looking too clever. I left them soaking in 'Gunk' and a few in carb & intake cleaner overnight and it doesn't appear to have broken down any of the s**t stuck to them. The exhaust valves are particularly pitted.
RPi also do an upgraded ignition and ecu chip kit to correct the over fuelling. Mine IS over fueling quite badly, as shown from the pics of crust in the chamber/valves and pistonheads.
So, I'm slowly gathering info to help me make an informed decision as to where I should spend my hard earned wedge.
 should of spoke to Realsteel concerning valves and guides
 Gassing Station | Chimaera | Top of Page | What's New | My Stuff