Lupo Headlights
Discussion


phazed said:
No way will you fit the unit without trimming the bezel.
Don't worry about it, trimming the bezel is the easiest part!
Thanks Phazed, I was looking for a little reassurance that I was on the right track! Don't worry about it, trimming the bezel is the easiest part!
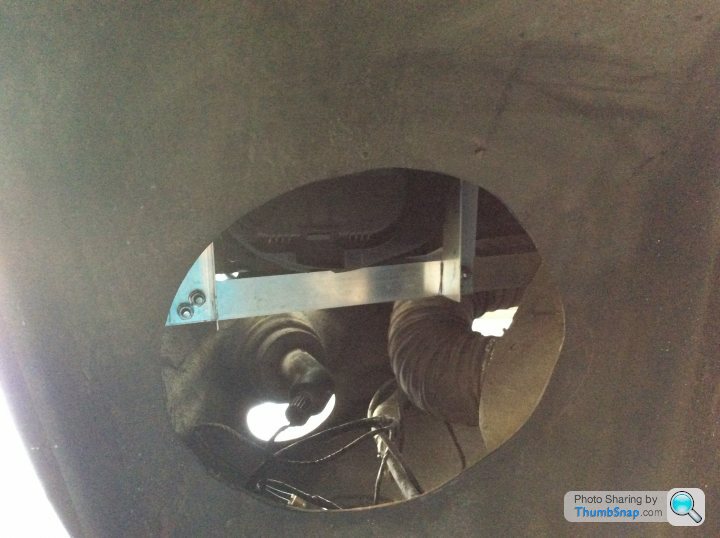
I've got the existing area all cut out and I can get the lamp pretty much where I want it but not with the bezel anywhere close.
At least the other side should be a little easier as I can cut with confidence.
Once again thanks.

Not a job for the feint hearted this one is it?
That's two days of my life I'm never getting back and I haven't finished yet.
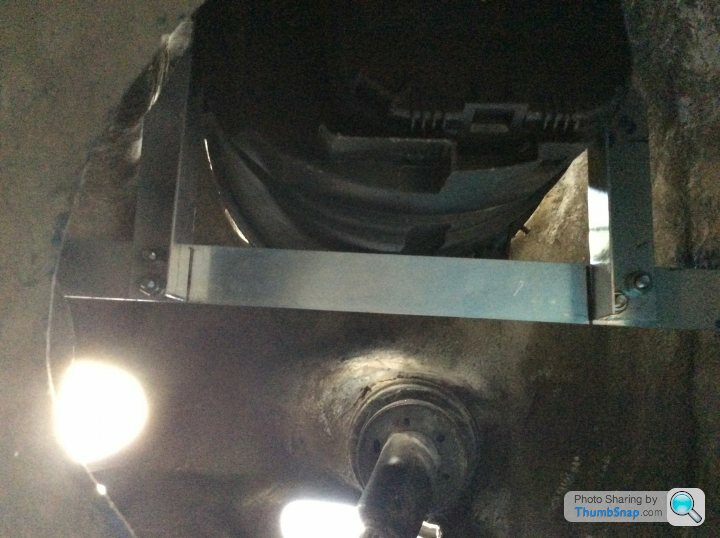
At least the lamps are in and the brackets made are supporting them to some degree in the correct position.
A few more brackets to make and fix and then I can look to reshape the bezels which scares me a bit.
I hope it's all worth it in the end, after you've started cutting the old lamps away you do begin to wonder!
looks like you have almost completed the hardest part, enlarging the original hole to receive the Lupo unit, and manufacturing a support bracket to hold it securely in place. As mentioned the bezel is simple to do, and once you have done one side you have a mirrored pattern for the other-side, it is surprising how much is filed off to make them fit.
If you have trouble getting them to fit perfectly flush to the body at the top of the light, I filed a small amount off the top of the light see picture as mine had a slight radius at the top of the light which was preventing them to fit perfectly flush, with no body gaps.
My Lupos were also bolted to the body using a Ali bracket
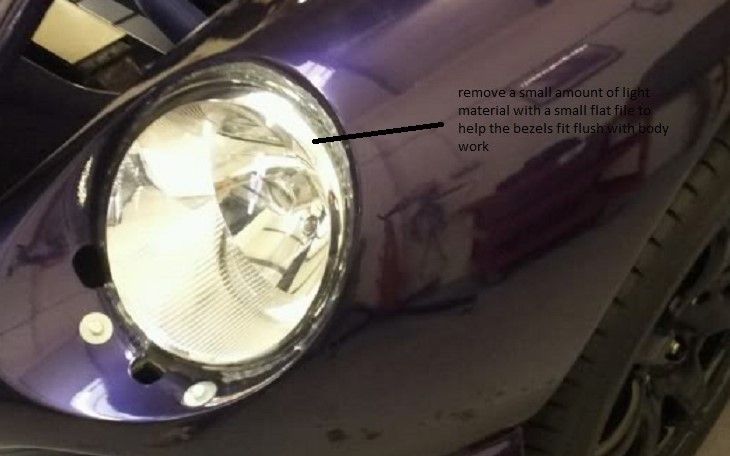

portzi said:
looks like you have almost completed the hardest part, enlarging the original hole to receive the Lupo unit, and manufacturing a support bracket to hold it securely in place. As mentioned the bezel is simple to do, and once you have done one side you have a mirrored pattern for the other-side, it is surprising how much is filed off to make them fit.
If you have trouble getting them to fit perfectly flush to the body at the top of the light, I filed a small amount off the top of the light see picture as mine had a slight radius at the top of the light which was preventing them to fit perfectly flush, with no body gaps.
My Lupos were also bolted to the body using a Ali bracket
Thanks for the info, much appreciated.
How did you do the bezels? I thought I might mark the outline of the new lamps and then remove them, offer up the bezels and try and get some measurements to cut to?
It looks like there will be plenty to cut off the bottom edge! Slightly scary but so is the whole task.
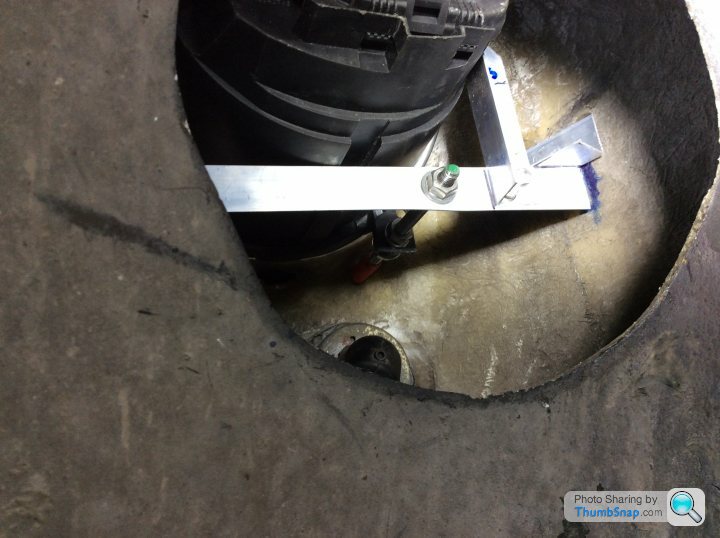
Do the bolts in your picture attach to some of the brackets fabricated to support the headlight base?
If you have trouble getting them to fit perfectly flush to the body at the top of the light, I filed a small amount off the top of the light see picture as mine had a slight radius at the top of the light which was preventing them to fit perfectly flush, with no body gaps.
My Lupos were also bolted to the body using a Ali bracket
Thanks for the info, much appreciated.
How did you do the bezels? I thought I might mark the outline of the new lamps and then remove them, offer up the bezels and try and get some measurements to cut to?
It looks like there will be plenty to cut off the bottom edge! Slightly scary but so is the whole task.
Do the bolts in your picture attach to some of the brackets fabricated to support the headlight base?
Q1. Thanks for the info, much appreciated.
How did you do the bezels? I thought I might mark the outline of the new lamps and then remove them, offer up the bezels and try and get some measurements to cut to?
Yes your correct,I cut a template using cardboard of the the light circumference and offered it up to the bezel, then as you said marked out the bezel to give a guide to work too.
Q2. Do the bolts in your picture attach to some of the brackets fabricated to support the headlight base?
Yes they are part of the support bracket for the light.
portzi said:
Q1. Thanks for the info, much appreciated.
How did you do the bezels? I thought I might mark the outline of the new lamps and then remove them, offer up the bezels and try and get some measurements to cut to?
Yes your correct,I cut a template using cardboard of the the light circumference and offered it up to the bezel, then as you said marked out the bezel to give a guide to work too.
Q2. Do the bolts in your picture attach to some of the brackets fabricated to support the headlight base?
Yes they are part of the support bracket for the light.
CheersHow did you do the bezels? I thought I might mark the outline of the new lamps and then remove them, offer up the bezels and try and get some measurements to cut to?
Yes your correct,I cut a template using cardboard of the the light circumference and offered it up to the bezel, then as you said marked out the bezel to give a guide to work too.
Q2. Do the bolts in your picture attach to some of the brackets fabricated to support the headlight base?
Yes they are part of the support bracket for the light.

caduceus said:
CHIMV8 500 said:
caduceus said:
portzi said:
Yo have a keen eye sir, yes 
Looks very nice
. This was the rebuild thread started some 4 1/2 years ago, it took about 10 months to fully complete.
http://www.pistonheads.com/gassing/topic.asp?h=0&a...
I am getting withdrawal symptoms at the moment as I have not seen my car for 2 months let alone driven it
 .
.Edited by portzi on Friday 26th August 06:56

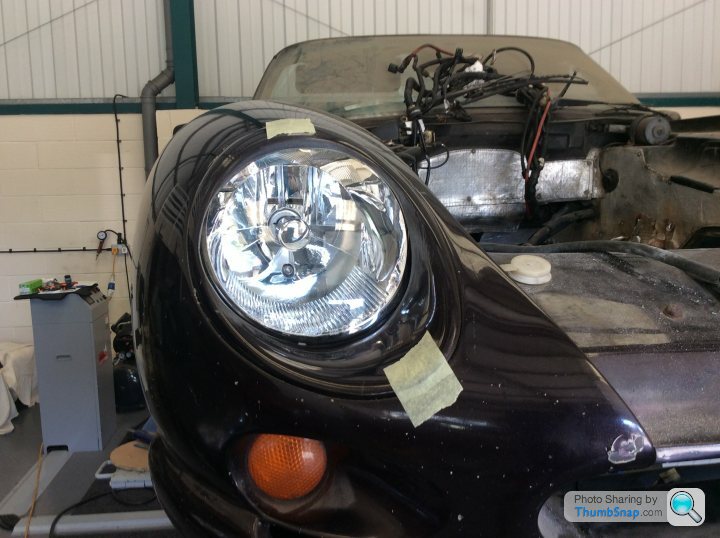

Bezels cut ( I made a much better job of the second one)brackets finally bolted in. A little sikaflex will be needed at the front around the headlamp for final fix but will wait to see what the beam pattern looks like first.
A great tip from Portzi regarding filing the headlamp at the top, don't think you could bet the bezel to fit nicely without doing it.
Not sure if my bracket system is the best way of doing the job but they are sturdily fixed and time will tell.
If anyone is looking at this for reference in the future then the following may help.
1, It's unlikely that you will complete this quickly, it needs some thought and lots of tea while you stare at what you are going to do next.
2, Dont worry about the bezels, your first job is to get the new headlamps in the hole looking straight and level.
3, You will have to cut a lot out to get the lamps in position.
4, I cut two of the existing headlamp mounts off.
5. Make a template in cardboard of the enlarged access hole for the inner wheel arch, test that the new headlamp will go through it before cutting it out. Again this will be quite a large hole.
6,Consider how you can temporarily support the new lamp in place whilst making brackets etc. I found the alloy cross bar stopped it falling out whilst fabricating.
7, Clamp up the brackets as you go, looking and lining up the front is messy.
8, Be careful how far through you bring the lamps, the top edge is a difficult fit behind the bezel.Re Portzi's filing tip.
9, I used the remaining headlamp mount for for and aft support with a threaded bar(see photo) this may be a bit of overkill but is easy and worked for me.
10. I glued the support bracket to the inner wing.
11, I decided not to use the headlamp multi plug for the wiring. I notched out the bulb cover to let the existing wiring through. The headlamp connection is the same and a couple of terminals will take care of the sidelight.
Not an easy job, but looks nice when done and a sense of achievement when completed.
On to the next job of which there are many!
Thanks to everyone who offered excellent advice along the way.
portzi said:
fantastic work Adrian,lights looking great. Is that your finished position for the Lupos? As it maybe a trick of the light of the camera angle, but maybe the lupo could sit afew mm's lower? Keep the pictures coming please.
Thanks, trick of the light I think. It looks like there is a gap at the bottom of the light/bezel but there isn't it's pretty tight. Edited by portzi on Friday 26th August 13:37
I'll try and post a better photo
ProjectChimaera said:
Thanks, trick of the light I think. It looks like there is a gap at the bottom of the light/bezel but there isn't it's pretty tight.
I'll try and post a better photo
Cool, l thought that was the case , they really brighten up the front end and do what they are supposed to give fantastic road light without any HID or LED upgrades. I'll try and post a better photo

Gassing Station | Chimaera | Top of Page | What's New | My Stuff