Clutch lightening Servo - BEWARE
Discussion


No it was not straightforward. As stated I had to re-orientate the servo as per installation instructions. I initially inclined the servo as per instructions, but had the air inlet facing up. I had trouble bleeding and so re-modified my bracket and mounted servo so the air filter inlet was facing down, as per instructions (ie. less chance of capturing air in fluid).
The original post on here showed an installation with the air up and so I did not worry too much initially. Suggest you abide by instructions.
The original post on here showed an installation with the air up and so I did not worry too much initially. Suggest you abide by instructions.
After taking the radiator off and everything else in the nose, I managed to fit the servo and ran two flexible 3/16 pipes from underneath the car, connecting to the slave cylinder and the pipe that runs up to the master cylinder.
Using the grommet in the inner front wing under the expansion tank that the pipe to the removed carbon canister passed through, I managed to place the servo in the space where the canister once was and by positioning the long nose of the servo backwards towards the wheel arch, also managed to get the right installation angle as per instructions, and also the white disc vent facing down, again as per instructions.
Now although it is reasonably wedged in there I would like to get a better fixing to stop it rocking around and for the life of me can't work out how to do it. Long cable ties although easy do not give me a sense of long term security so I am kind of stumped.
Any ideas what to use?
Also do I now open up the filler cap, pour in the more clutch fluid, pump the pedal a few times, then bleed the system from the bleed nipple with an ez bleed?
Does the car need to be running to bleed the system property as a lot of it is still in bits.
Assuming you have the Lockheed type in this link, either 1:65 or 1:9, then the kit should have 2 fixing brackets. You can see the large plate bracket bottom left. The second bracket is partly in front of the fitting instructions.
http://mgbhive.co.uk/product/mgb/mgb-mechanical/mg...
There is a large plate that bolts to the servo unit then you can modify it and drill holes to suit the location. There should also be another bracket that fits to the front of the unit to steady it. It is a thin piece of flat bar moulded to fit around the casting and the other end is pre-drilled so you cab bolt it down.
The dotted lines in this pic show where they fit. Then just a case of bolting them down.
That's the kit I bought and it did not come with any of those extra parts. And I paid that price.
I will get on to them immediately to find out why I paid for the full kit and only received the servo.
It's really tight though in that space if you are going to get it in far enough so that the water bottle can also go back to its original location. Mine is the 1.65 and I understand that the 1.9 is even bigger. The only way it fit as I said was with the nose pointing backwards towards the wheel arch with the pipe on the end going into that recess in the inside corner.
Getting those brackets in there as well and getting a hand in to do up the bolts means having fingers that are at least a foot long.

The installation instructions are here:-
http://tr4a.weebly.com/uploads/2/1/9/8/21980360/re...
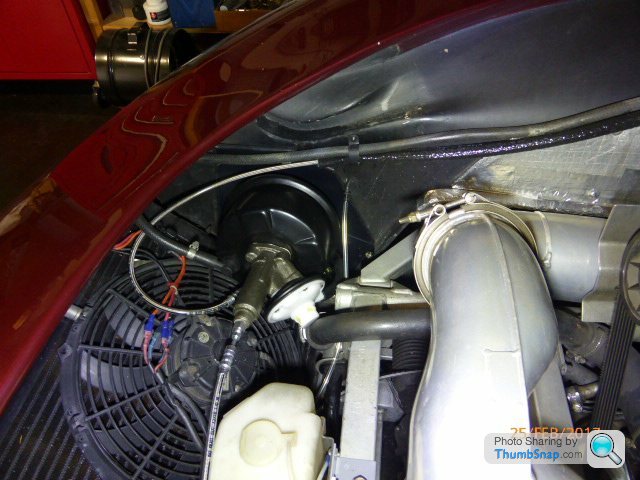
Here is a picture of the placement in my Griff.
http://tr4a.weebly.com/uploads/2/1/9/8/21980360/re...
Here is a picture of the placement in my Griff.


jazzdude said:
So that's in the driver's side where the carbon canister used to be and the pointy bit of the servo is facing towards the centre of the car by the looks of it.
The pointy bit is facing pretty well straight backwards as far as I can see. The front of the servo seems to be tilted downwards. I was facing up and inwards to take the photo
Gassing Station | Chimaera | Top of Page | What's New | My Stuff