Started the refurb on the Chimaera seats....
Discussion


Here is a more step by step "photo diary" of the passenger side seat.
Now obviously the passenger seat has nowhere near as much wear on it as the drivers side....but the results are still never the less outstanding!
So these photos were taken after rubbing down with the scotchbrite pad and leather prep (actually used standard thinners as I had run out of the leather prep supplied in the kit)


So then onto the application of the basecoat....this is done with some of the colour on a sponge...its not meant to cover fully its just meant to start filling in the cracks and creases with some base colour.


So then after 2 coats of colour airbrushed on....


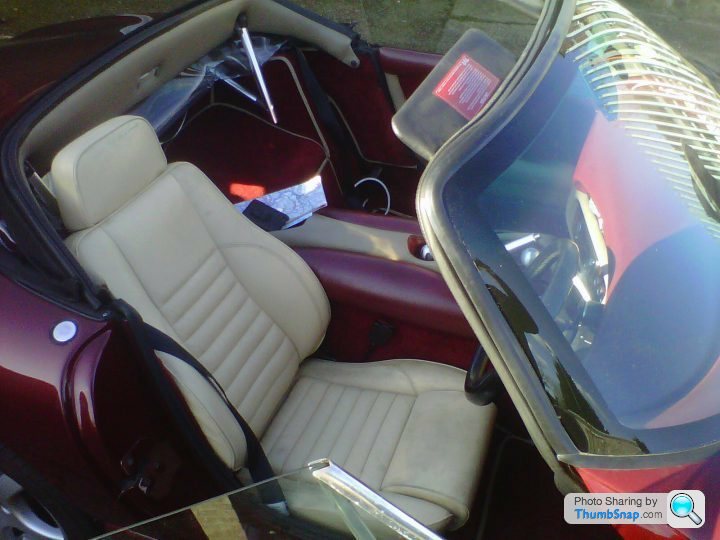
And finally after 2 coats of super seal and then 2 further coats of satin finish....Tadaaaaaa!


Chuffed you bet your socks I am...its taken a tired and worn interior and given it a new lease of life, and while its not 100% perfect its a damn sight cheaper than a re-trim!
All in all took me 2 evenings to do this seat
Now obviously the passenger seat has nowhere near as much wear on it as the drivers side....but the results are still never the less outstanding!
So these photos were taken after rubbing down with the scotchbrite pad and leather prep (actually used standard thinners as I had run out of the leather prep supplied in the kit)


So then onto the application of the basecoat....this is done with some of the colour on a sponge...its not meant to cover fully its just meant to start filling in the cracks and creases with some base colour.


So then after 2 coats of colour airbrushed on....


And finally after 2 coats of super seal and then 2 further coats of satin finish....Tadaaaaaa!


Chuffed you bet your socks I am...its taken a tired and worn interior and given it a new lease of life, and while its not 100% perfect its a damn sight cheaper than a re-trim!
All in all took me 2 evenings to do this seat

That looks great, i need to do mine now, as well as the seats i need to do the central part of the centre console as well as the door arm rests, do you think the medium kit is enough for that or would you recommend the next size up?
You said that you used an air brush, as i dont have one of these what comes with the kit?
Paul
You said that you used an air brush, as i dont have one of these what comes with the kit?
Paul
Paulprior said:
That looks great, i need to do mine now, as well as the seats i need to do the central part of the centre console as well as the door arm rests, do you think the medium kit is enough for that or would you recommend the next size up?
You said that you used an air brush, as i dont have one of these what comes with the kit?
Paul
What comes with the kit (IIRC) is a little spray gun, complete with pin (on a piece of card) to clear the nozzle of any dried gunk after use. Pipe is also included. What doesn't come with the kit is an aerosol of propellant. (Or maybe it came with a single can, I can't recall now.) These can be bought separately from Furniture Clinic and aren't expensive. One propellant can will probably be sufficient for one seat but I'd play safe and have a spare to hand, as you don't want to run out before you've finished. You said that you used an air brush, as i dont have one of these what comes with the kit?
Paul
The spray gun is surprisingly good and performed perfectly when I did mine. Keep the propellant can in warm water between uses to keep the pressure up as the can empties.
ChimpOnGas said:
Stunning results, and an excellent super informative thread 
This post will really help me with my upcoming Jag XJS seat restoration project.
Thanks, Dave.
No problem its good to share these things...some might be put off and think its too complicated to have a go at...i am fairly practical but I think as long as you follow the instructions to the letter you should be fine...just dont rush.This post will really help me with my upcoming Jag XJS seat restoration project.
Thanks, Dave.
Would offer to help if you want but think you are a fair way from me in Surrey

Paulprior said:
That looks great, i need to do mine now, as well as the seats i need to do the central part of the centre console as well as the door arm rests, do you think the medium kit is enough for that or would you recommend the next size up?
You said that you used an air brush, as i dont have one of these what comes with the kit?
Paul
Absolutely I think I only used about half of the 1L bottle...I will say the airbrush supplied in the kit seems to be a good bit more thirsty than my Silverline one (bought off Amazon for not a lot)...but that being said it really does depend on how bad the seats are in the first place....2 coats covered really well on my seats and every worn bit was covered fully.You said that you used an air brush, as i dont have one of these what comes with the kit?
Paul
I think I said it before but I used my 50L 3HP compressor to run it...I think it would be a faff using the cans of propellant to power the airbrush....I believe that you can hire a small compressor from Furniture Clinic too so probably worth investigating that....failing that I can be hired with mine for a very reasonable fee

nick_mcuk said:
ChimpOnGas said:
Stunning results, and an excellent super informative thread
This post will really help me with my upcoming Jag XJS seat restoration project.
Thanks, Dave.
No problem its good to share these things...some might be put off and think its too complicated to have a go at...i am fairly practical but I think as long as you follow the instructions to the letter you should be fine...just dont rush.This post will really help me with my upcoming Jag XJS seat restoration project.
Thanks, Dave.
Would offer to help if you want but think you are a fair way from me in Surrey
I've got compressor and a small gun, the type used by smart repairers to blow in small areas of paint damage, I'm confident it'll work out to be a good combination for the job, I just hope the Furniture Clinic kit doesn't have a shelf life

Thanks for sharing your project, the results really are superb!
Here's what I'm working with, which probably represents the slowest progressing project in world of PistonHeads... ever

http://www.pistonheads.com/gassing/topic.asp?t=120...
But I'm confident this will be the summer of XJS seats
A great job indeed, I did mine with the same products 4 years ago, two things to note, make sure you give the seats a fair few coats with the clear coat sealer, probably, 4 or 5 coats, mine began to wear off after 5000 miles and the seats went sticky, it turned out the clear coat had worn off.
Also linked to the above, be careful on what you use to clean the seats.

Also linked to the above, be careful on what you use to clean the seats.

So more progress on the interior refurb, whilst the carpets are in good order they were suffering from uneven discolouration thanks to the sun.
So when I bought the Leather Colourant and was discussing the carpets with Duncan he recommended their "FabriCoat Upholstery Kit" and they had already got a TVR Biscuit colour on file but couldn't guarantee that it would be a perfect match as they matched it on the verbal description from another TVR owner.
I went with it and it is a different colour to my carpets original colour I gave it a test on the carpet under where the seat....I actually liked it better.
The dye is water-based and you can add some IPA to it to make it penetrate into stubborn surfaces...I did try this but I found it thinned the colour down too much so gave it a bash neat and its perfect...I also use my airbrush hooked to the compressor again to apply the product just a whole heap easier to do!
So a couple of before pics.....


Now the after pics...100% better and the colour is now even...still got about 500ml left...When you apply the colour does obviously sit on the surface but i found that using the included tampico brush to work the colour in makes it all go a lot further, and true to the info on the website the carpets are not all solid and stiff.....


trev4 said:
Looking really good, do you think that my seat is to far gone for this treatment, there is a small hole in the leather. 
I dont know I do know Furniture Clinic also offer repair kits....probably best you giev them a call and send them some photos so they can advise. Ask for Duncan as he really knows his stuff.
nick_mcuk said:
trev4 said:
Looking really good, do you think that my seat is to far gone for this treatment, there is a small hole in the leather.
I dont know I do know Furniture Clinic also offer repair kits....probably best you giev them a call and send them some photos so they can advise. Ask for Duncan as he really knows his stuff.
I used "The Leather Clinic" kit off eBay. A similar idea to the Furniture Clinic, but doesn't come with the spray gun and can of propellant. I have a compressor and a decent full size spray gun ( as you would use for panel spraying) so didn't need the air brush. I sent a colour sample off and they matched it. Works out cheaper than The Furniture Clinic and the results were great!
chris212 said:
I used "The Leather Clinic" kit off eBay. A similar idea to the Furniture Clinic, but doesn't come with the spray gun and can of propellant. I have a compressor and a decent full size spray gun ( as you would use for panel spraying) so didn't need the air brush. I sent a colour sample off and they matched it. Works out cheaper than The Furniture Clinic and the results were great!
I didn't mind paying a bit more for the kit as I have been bitten by eBay "s**t kits" before.Besides the advice and backup (if needed) was worth the extra.
I too have a proper spray gun but its far more accurate to use a airbrush to get into the creases and seams and build up the colour and topcoats with out applying too much product.
nick_mcuk said:
I didn't mind paying a bit more for the kit as I have been bitten by eBay "s**t kits" before.
Besides the advice and backup (if needed) was worth the extra.
I too have a proper spray gun but its far more accurate to use a airbrush to get into the creases and seams and build up the colour and topcoats with out applying too much product.
Not a s**t kit, or I wouldn't recommend it. I just thought I would share my experience. Sure its worth paying extra if you don't have a gun that you can adjust the spray pattern and flow to suit. The results i achieved are great, and excellent colour match by them.Besides the advice and backup (if needed) was worth the extra.
I too have a proper spray gun but its far more accurate to use a airbrush to get into the creases and seams and build up the colour and topcoats with out applying too much product.
chris212 said:
Not a s**t kit, or I wouldn't recommend it. I just thought I would share my experience. Sure its worth paying extra if you don't have a gun that you can adjust the spray pattern and flow to suit. The results i achieved are great, and excellent colour match by them.
No what I mean is there is tonnes of s**t on eBay not to mention faked or diluted products....I just wont buy anything like this from there.I do have a proper HVLP spray gun but for me using the airbrush is far more accurate in the tight spaces...certainly less cumbersome.
Matt99man said:
OP - does this kit keep the breathability of the leather? My chim had the driver's seat restored previously but it's more like vinyl and very sticky when warm.
I dont know mine were clearly done before too, so cant comment. its certainly nice and flexible and not sticky. TBH I have never fond leather seats particualrly comfy in hot weather.In my research too unless you have super dooper mega expensive leather nearly all furniture and automotive leather is coated/coloured in a similar fashion to what the Furniture Clinic kit does....infact that most cars now actually have fake leather which harks back to the vinyl interiors of the 70's & 80's....BMW, Merc and Audi/VW all have posh names for it though
So today was the day of finishing the interior off...
This consisted of a really deep clean of the various magnolia and biscuit trim, thankfully Ron has the "Half/Half" interior option which means that the faces of the seats are leather but the rest of the trim is vinyl, meaning you can really go to town and scrub the bejesus out of the vinyl to get it really clean.
So a mixture of a magic sponge, brushes and AutoGlym Trade Super Interior Cleaner.
Here are some WIP pics....also worth noting that I did give the interior a clean when i got the car back in July!


Pics of the freshly cleaned trim....


Then the really exciting bit (well for me anyhow) putting the seats back in!
Passenger side first ...


Then the drivers side....


Then it was time to dress it all off...I used AutoGlym Silicone Pumpasol...its a fantastic silicone based dressing that works so well on older trim but doesn't leave that oil slick look.
Over all the interior actually looks brand new now....so chuffed with the way the seats came out...the carpet recolour has really evened the sun bleached parts out and the whole interior is lovely and fresh/new looking.
Here are some final finished pics.....


This consisted of a really deep clean of the various magnolia and biscuit trim, thankfully Ron has the "Half/Half" interior option which means that the faces of the seats are leather but the rest of the trim is vinyl, meaning you can really go to town and scrub the bejesus out of the vinyl to get it really clean
.So a mixture of a magic sponge, brushes and AutoGlym Trade Super Interior Cleaner.
Here are some WIP pics....also worth noting that I did give the interior a clean when i got the car back in July!


Pics of the freshly cleaned trim....


Then the really exciting bit (well for me anyhow) putting the seats back in!
Passenger side first ...


Then the drivers side....


Then it was time to dress it all off...I used AutoGlym Silicone Pumpasol...its a fantastic silicone based dressing that works so well on older trim but doesn't leave that oil slick look.
Over all the interior actually looks brand new now....so chuffed with the way the seats came out...the carpet recolour has really evened the sun bleached parts out and the whole interior is lovely and fresh/new looking.
Here are some final finished pics.....


Gassing Station | Chimaera | Top of Page | What's New | My Stuff