Power Steering Pump Drive Shield
Discussion


TwinKam said:
Found the cause of my recent instantaneous oil pressure loss.
Wanted to share it as a warning so that this befalls no one else; go check your airbox screws now!

Yep, that's an OS airbox screw, I noted one was missing when I started the strip down.
Think I might install a shield over the exposed PAS drive when it goes back together (oh if only that drive flange was round not triangular).
Now to investigate the collateral damage...
If you (or anyone else) decides to make any shields, I will definitely buy one off of you.Wanted to share it as a warning so that this befalls no one else; go check your airbox screws now!
Yep, that's an OS airbox screw, I noted one was missing when I started the strip down.
Think I might install a shield over the exposed PAS drive when it goes back together (oh if only that drive flange was round not triangular).
Now to investigate the collateral damage...
Seems you're in a much better position to design and make them while the engine is out, and I'm sure you're fabrication skills are much better than mine.


Here it is fitted in situ
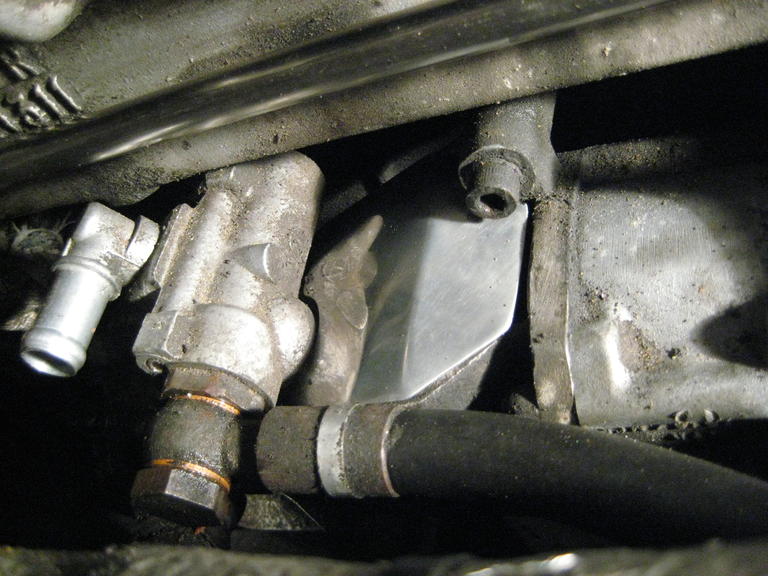
It is a work of art
And more importantly it is a potential engine saver
I have already had debris fall in to the PAS drive after an off at Zolder, fortunately it didn't cause the same level of devastation that TwinKam suffered, but it was still very inconvenient.
There was also the issue that when I eventually fixed the broken Woodruff key, I also managed to do £400 worth of bodywork damage (but that's another story).
We are very lucky to have other Cerb owners as resourceful and generous as TwinKam
Incognegro said:
Beautiful!! what went into the making and more importantly positioning/securing... then we can talk about price of one? although not even sure if i would require one now Ive gone electric and my pump is positioned by the rad 
Presumably the original PAS has been removed, if not then yes you could suffer the same type of failure.I fitted the shield with the exhaust manifold removed, but I am fairly confident I could have done so with it in place, but it would not have been easy.
You definitely need to remove the hex bolt (and refit afterwards) and you would need to work from underneath.
It is a perfect spring fit, there is no possibility of it rattling, let alone coming off.
Glad you're pleased with the Mk II version, Paul, my MkIII is the same, just shinier!
It's simply a matter of taking a piece of card and trimming away a bit at a time until you're happy with the shape. Trace around the card onto a bit of ally and cut it out. It then needs folding to follow the profile of the sides and finally 'doming' (over a rubber mallet) to gain clearance for the flanges. Anyone with basic hand tools & skills could make it, there's no special tools involved, just a pair of tin snips, some files, two bits of wood (to form the folds) and that rubber mallet, hand pressure only. It just takes time and patience. I could've left it raw but 5 mins with some Solvol leaves it with a protective coating as well as making it pretty.
I'm not intending to make any more (I have a car to finish!) but happy to post out copies of my template if anyone wants one.
Gassing Station | Cerbera | Top of Page | What's New | My Stuff