MGB V8 Conversion
Discussion


100 IAN said:
What size tyres have you chosen to fit?
With the Hoyle front suspension kit can you adjust the ride height?
Being a '77 rubber bumpered shell have you kept the higher ride-height or dropped it down to that of the chrome bumpered cars?
Tyres 195/65VR15. The Hoyle suspension is ride height adjustable + other adjustable settings. The final ride height will be a proprietary set-up i.e. mine. I have retained the rubber bumper front cross member but have included some JWR kingpins. These combined, together with adjustable ride height and 195/65VR15's will give me a ride height very near to a CB car and with slightly better compliance and no bumpsteer. The design is to have a correctly working suspension set-up/geometry without having to rely on excessively large grippy tyres...this, of course, is limited by the rear wheel arch inner lip. I want the car to handle correctly without being over tyre'd. There are many conversions out there that look good but don't handle as well as they could/should. With the Hoyle front suspension kit can you adjust the ride height?
Being a '77 rubber bumpered shell have you kept the higher ride-height or dropped it down to that of the chrome bumpered cars?
Looking at your profile you too have a V8 Roadster. Let's see some pics/tech-specs...
Church of Noise said:
With pleasure:
Splendid. Had a surprise the other day. A neighbour's friend arrived who lives in France. He arrived, parking up in front of my garage, in a very very original white GTV8 with only 66,494 miles from new. It was originally his father's car and sounded perfectly 'on song'. But the best surprise was the paintwork and interior; everything was original. I've never seen such a clean headlining and the paintwork...it had that sharp crisp cleanness that only original well cared for paint can have...you know, when the paint's near flawless, part flat but with a deep shine from many years of polishing. Marvelous!Hi Alex, yes read with interest your engine swap dilemma and sounds like a jolly expensive distributor! I have PM'd you with my view...that is, just go for it. Of course, in changing the engine you'll find loads of other jobs to do whilst your there and the engine changeover will take three times as long.
Q1 If you're going for a bigger engine, what gearbox are you planning on using?
Note, which I hope will help, lining up the clutch to gearbox can be very difficult with an MGB V8; simply, there's no room to grab hold of the engine. If suitable, it's far, far easier to install the gearbox to engine and then install the two together. If you have an engine hoist with leveller/stabiliser bar this will help enormously. Any Q?'s feel free to ask...
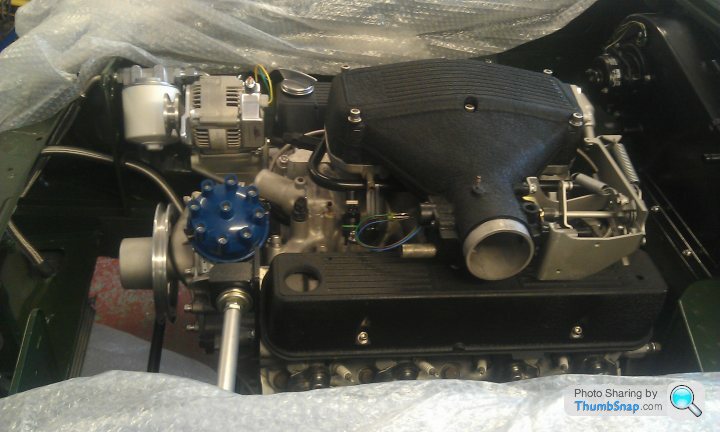
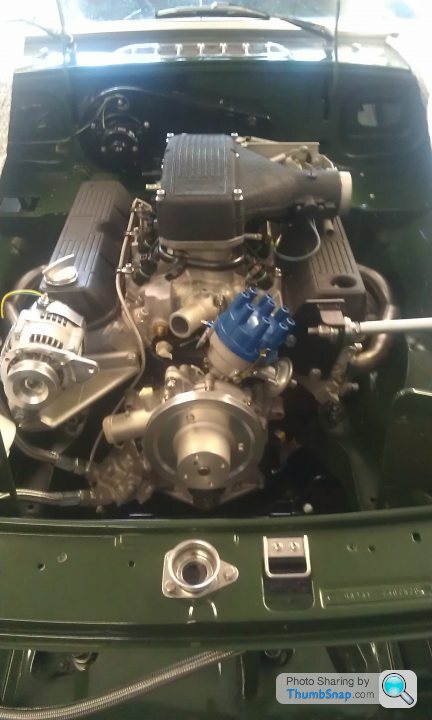
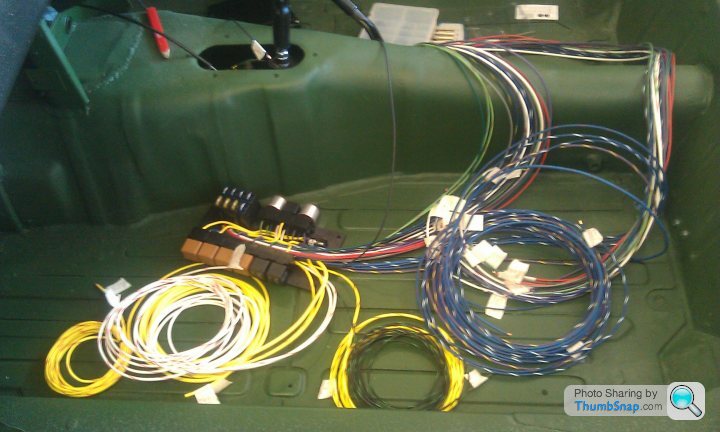
Here's a little update for you all...have had to remove engine and gearbox as had an issue with the clutch fork not sitting correctly. This is now re-fitted with engine & gearbox re-installed. The following pics don't appear to show much progress but there's been a mass of small fiddly work done, plus, remote oil mounting & cooler fitted, heater unit & motor completely refurbished and looking like new, inlet base & plenum modified, carbon trumpets modified & installed, throttle linkage modified and installed, alternator mounting modified and installed, fuel pump and filter installed, gear lever and extension modified and installed...the list goes on and I'd like to think the to do list is getting shorter...but in reality it always gets longer as the little tasks add up. Have now installed the wiring distribution/relay panel and started routing the new wiring looms...
Edited by v8250 on Monday 22 September 19:08
Arcnewal said:
Just spent the last hour reading through this thread and I must say the work you're doing is fantastic, the engine bay looks terrific.
Thank you, "the engine bay looks terrific"...and so does the rest of the car  I'm perhaps a little overdue with a PH update so current state of play is as follows:
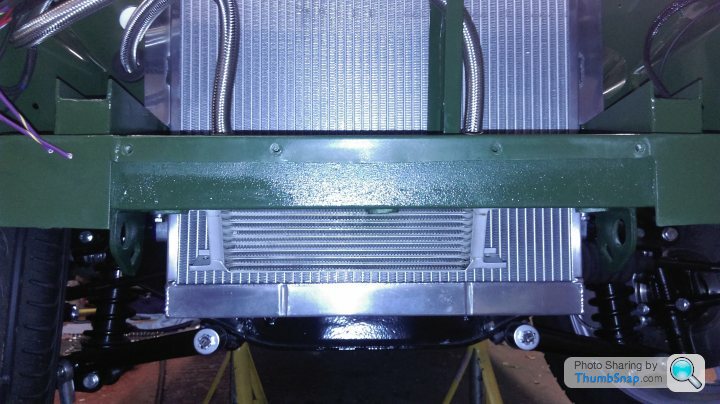
Collect modified radiator from local fabricators tomorrow. The is an oversized alloy MGB V8 unit c/o Peter Mulberry at Mulfab. These radiators are beautifully made and used in many V8 racers...400bhp John Eales engined cars. Will be drilling out correct mounting holes this weekend.
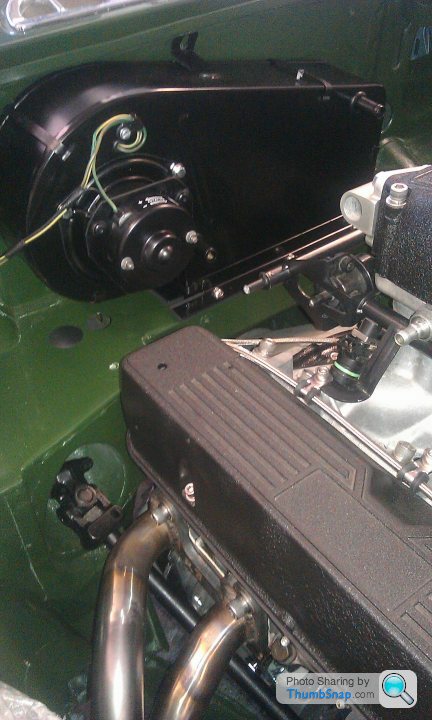
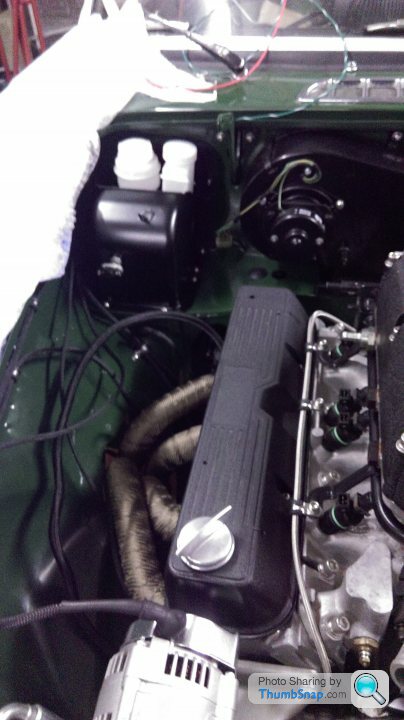
Have spent a lot of time recently re-designing the air filter, MAF and oil catch tank location. Fabricated a special mounting plate for these together with a heatshield box for the MAF.
Continuing with exhaust and engine temperature management, have finished exhaust wrapping the manifolds with Thermal Velocity's 'Magma Wrap'. This material is bloomin' marvelous...I've never had exhaust wrap that's made from Volcanic Lava before; seriously...volcanic lava!! Magma Wrap has thermal resistance of 980degC [direct] & 1370degC [radiant]. This together with the overall cooling control design will keep the engine bay at sensible temperatures. My objective behind this was to keep the air intake -to- plenum and air trumpet inlets as cool as possible and therefore the smallest air molecule size. This, combined with separate oil ventilation not fed back into the plenum, will give the cleanest air fuel ratio possible :. cleaner, greater combustive output per bang

Currently up to armpits with the new wiring looms...about 80% complete.
Have rebuilt/refurbished the brake cylinder housing and modified the servo mountings today.
Also, have had to remove the back-end, again, as the diff' cover is not sealing correctly. The plan is to drain oil, fit a helicoil drain plug to the rear cover plate and hand make a correct gasket from Klingersil. Why the Ford Cosworth diffs' didn't do this originally, I don't know. Once done, back-end back in and very carefully align the rear end.
Will post some pics' when I get some time...
AC43 said:
...so is that an IRS set up there?
It most certainly is It's the very well designed John Hoyle IRS system. It's available to take both 7" and 7.5" Ford Sierra, Granada, Scorpio type differentials. Available in multiple spring and damper ratings depending upon your preferred driving style/application. Coil and dampers are fully adjustable. I've installed the viscous LSD on mine, though for most this isn't necessary. Easy to install and align/set up. If you want more info' just ask.http://www.hoyle-suspension.co.uk/index.html
task said:
That back end is almost pornographic, more than a little jealous! Perhaps one day, if I keep my car...Keep up the great work and keep the photos coming 
Thanks Task...and what do you mean, if you keep your car? There are plenty of fellows who've installed Hoyle Suspension on their GTV8's. You see, the beauty of this design is that it fits with no modifications to the existing body meaning should an original GTV8 owner ever want to return the car back to original front and rear live axle...well, off you go.All, pls excuse slowness in adding some more
Below, the new Mulfab V8 alloy radiator...you can also see MAF location and refurbished brake servo and brake/clutch master cylinders and housing. All completed 'a la main'
This shows the extended depth of the radiator. Overall it's 4" longer than a standard unit and will provide first rate cooling whilst retaining perfect ground clearance.
Below is the home brewed mounting plate for the MAF, K&N, oil catch tank...and if you look closely you'll see the Blue Peter Production of a twin walled heat deflection plate + to the rear the n/s Magma Wrap'ed st/st manifold

Here, a better shot of the Magma Wrap...and it's as lovely to install/look at as it looks on their website...
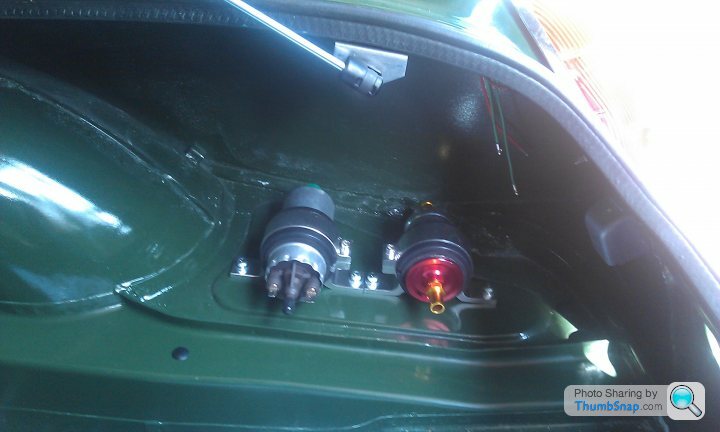
The following two pics show the injection/swirl pot fuel tank installed. You'll also notice the homemade alloy exhaust mounting brackets, and at just how close the rear baffled exhaust pipes are to the fuel tank. Here, I wanted to reflect any radiant heat away from the tank so have covered with Thermo Velocity's heatshield material; good for 90% radiant heat reflection...even though new, I've repainted the fuel tank with two coats of chassis black and two coats of stone chip for good measure...
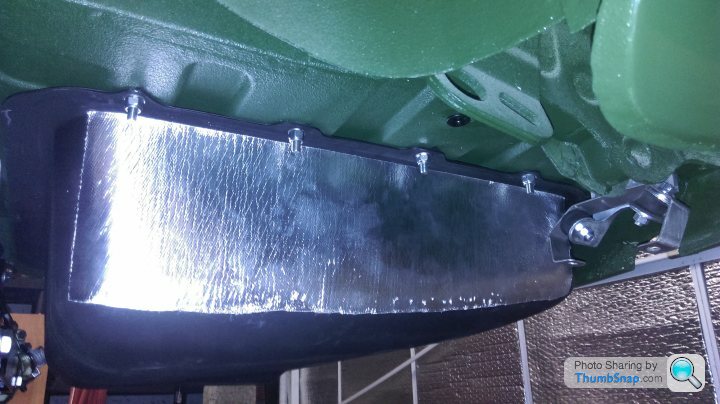
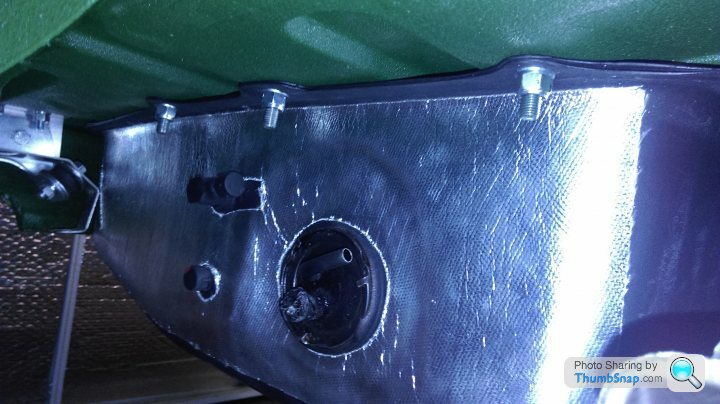
Edited by v8250 on Thursday 6th November 20:18
task said:
I have too many cars really! I'm thinking about selling my MGB GT V8 once it's on the road...
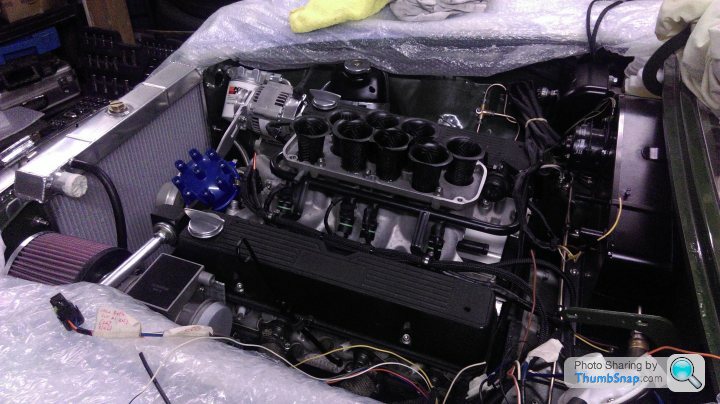
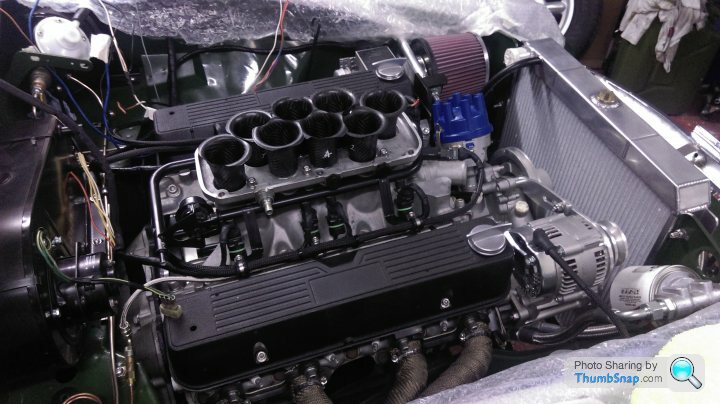
That engine's looking great, is the braided pipe running up the side of the O/S rocker cover for the oil pressure gauge? If so, where did that come from?
If selling the V8 you'll have plenty of folk wanting to buy. There are always folk looking for good V8's. Re' braided pipe, bought this from Clive Wheatley with the remote oil cooler kit, it's much longer than the originals so the capillary joint needs to be relocated or why not get one made up by a hydraulic Co'...it's a simple st/st braided pipe. Or may be run this on the lower side of the engine and it will fit to original capillary joint.That engine's looking great, is the braided pipe running up the side of the O/S rocker cover for the oil pressure gauge? If so, where did that come from?
see http://mgv8.homestead.com/v8con.html
Church of Noise said:
Andrew,
Remember that, when looking for another distributor, I accidentally bought an engine?
Well, that 's the one I'm picking up next week.
Rebuilt Land Rover Discovery 3.5 engine, increased compression, flowed heads, EFI cam, Edelbrock 1403 on JWR manifold, new distributor with RPI ARP Amplifier, ARP mains studs and a Cloyes roller timing chain set. The engine has about 10.000 miles on it, so should be nicely run in.
Result: 186hp at 4800 rpm (flywheel, 143 at the wheels) when the carb and timing were tweaked at Airey Tuning. Assumption is that more hp can be released with another cam but I'll just enjoy the oozes of torque as it is for now.
Can't wait really
Mind you, I assume the engine in your MG will be leagues ahead in power delivery...
That will be a very nice, solid, engine. RPI amplifier, ARP studs, Cloyes et al is the way to go and without it being too powerful it will be a great all-rounder which, with original suspension set up, will be very nice to drive.Remember that, when looking for another distributor, I accidentally bought an engine?
Well, that 's the one I'm picking up next week.
Rebuilt Land Rover Discovery 3.5 engine, increased compression, flowed heads, EFI cam, Edelbrock 1403 on JWR manifold, new distributor with RPI ARP Amplifier, ARP mains studs and a Cloyes roller timing chain set. The engine has about 10.000 miles on it, so should be nicely run in.
Result: 186hp at 4800 rpm (flywheel, 143 at the wheels) when the carb and timing were tweaked at Airey Tuning. Assumption is that more hp can be released with another cam but I'll just enjoy the oozes of torque as it is for now.
Can't wait really
Mind you, I assume the engine in your MG will be leagues ahead in power delivery...
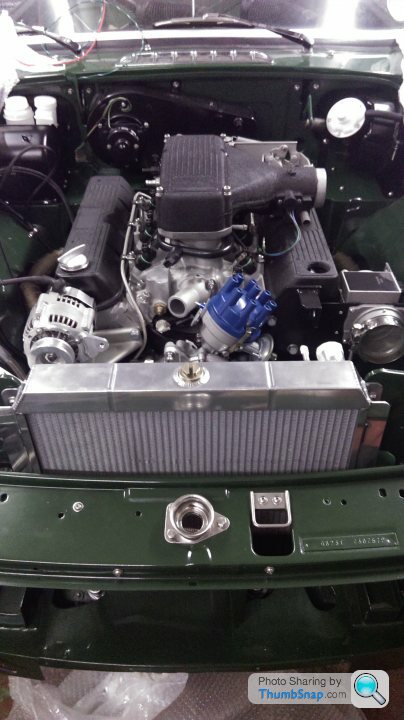
The TVR engine I've fitted is not an all-out fire breathing unit. TVR quoted 250bhp which, frankly, was just marketing hype. Realistically, they produced 225bhp on a good day. I've completed some simple redesign/mods which will take it up to 245-250bhp and having had other period cars with this much grunt will be more than enough.
If you're anywhere near West Berks next week feel free to pop in for a cuppa'.
Here's a quick project update and the first of 2015; so Happy New Year to All!
Since last posting it seems like a mass of small fiddly bits have been taking up too much time...brake and clutch lines are now all in, the wiring is nearly finished...famous last words[!], dynamat is installed and the body mods and load spreader plates for the roll hoop are done.
Have had some major hand mod'ing to the so-called SuperSports exhaust system 90deg down pipes as their near final fit was bloody awful...here I needed to use the Japanese technique of over sleeving the pipe, out with the MAP gas, heat the downpipe until glowing orange[!!] and gently ease the pipe using my my body weight to reshape...I don't have a hydraulic mandrel bender and was desperate not to get any creases within the pipe...here's the Old Yoshimura technique to show you what I got up to...https://www.youtube.com/watch?v=v8mMQbEkr8w Go slowly and it works beautifully
Today, have been installing the ECU under dash and rewired the injection system and the majority of ECU sensors...
NBTBRV8 said:
Why did you lag your exhaust manifolds and not ceramic coat them? It isn't good for the steel.
Also have you run then down the side of the motor rather than through the inner guards, RV8 style?
You're absolutely right...but as they're high quality and thick stainless I'm not concerned. I've carefully selected an exhaust wrap material that does not cause the inherent problems seen with older style fibre glass type exhaust wrapping. As per previous post the manifolds exit through the inner wings as per RV8's.Also have you run then down the side of the motor rather than through the inner guards, RV8 style?
Re' ceramic coating. There's ceramic coating, and there's ceramic coating. In the UK there's really only one company that knows how to ceramic coat correctly and with proper ceramic mix. This would cost £800 to do my two manifolds. £800 better off spent elsewhere on the project...like 2 full sets of tyres...as I know I'm going to need them

SPT28 said:
I'm keen to get as good a finish as you have re the raptor, what did you use to clean all the underside and what primer did you use? The results look superb in the pictures. Ta
You need to be a brave man to do this job. Completely strip the car's underside, then carefully use a combination of heat gun and scraper, and white spirit and industrial tissue to wipe off. The trick is to not rush this job. Take your time knowing it will takes months to do it properly. Also, unless taking back to bare metal, you don't want to damage the original Abingdon primer.Once all the waxoyl, stone ship et al was removed I let the underside breath for a good week to remove any traces of white spirit. In fact, I used the heat gun around the seems and box sections to ensure zero white spirit left. Next, Hydrate80...this wasn't exactly necessary...but I wanted something to penetrate the original primer and provide a tough layer for the new primer; hand painted the whole underside with Hydrate80.
Next up, two 'light' coats of BiltHamber's highbuild primer. This is very easy to apply and get excellent coverage. You don't want too thick a coating with a highbuild, keep the primer moving and work methodically. There's no need to flatten back as the top coat is Raptor.
Next, Raptor. I have to say this really is a superb product both in application and finish. However, if you are completing this yourself you must think very carefully as to your PPE and full flow ventilation. It contains isocyanates which will kill you if not used properly; seriously. That means full PPE on even before you open the tins for mixing. For spraying I bought an Apollo 1200 HVLP system, they're great little systems and can be bought ready to go from a number suppliers; eBay's your friend...
Good luck on the project.
PS how are you going to raise and rotate your B? I'm selling my rotisserie, as it's done its job superbly. PM me if interested
Edited by v8250 on Wednesday 4th February 07:16
Crikey SPT, that's some serious, and good, work going on there. Looks like a classic BGT project. Are you going to keep the four pot or convert to V8 whilst car's at this stage of project? It'd be very easy to drop in a 3.5 on carbs at this stage...even if an earlier car...you've even screwed the gearbox cross-member screws into the two most rearward captive nuts in prep' for a V8 handling gearbox Definitely start your own rebuild thread...they're great for others to see, get ideas from et al.
Definitely start your own rebuild thread...they're great for others to see, get ideas from et al.Hi-jack all you like...converting to a V8 can be very easy...or do what I've done and it's a long project. For good bed time reading buy this book, it covers all the basics.
http://www.veloce.co.uk/shop/products/productDetai...
A carb'd engine 150-200bhp is relatively straight forward, and EFi unit 200bhp+ is less so and requires some very careful spec'ing.
http://www.veloce.co.uk/shop/products/productDetai...
A carb'd engine 150-200bhp is relatively straight forward, and EFi unit 200bhp+ is less so and requires some very careful spec'ing.
SPT28 said:
Not helping!
I think if I do go down this route it'll be as per this thread, an accumulation before the jump. I already have a contact for prospective engine supplier so may investigate that first.
You'd be better off with SU's. Don't put Solex carbs on the V8, they're a much poorer cousin and are far less effective/tuneable. In fact, if you choose carbs go with an Edelbrock or Holley; there's one for every occasion.I think if I do go down this route it'll be as per this thread, an accumulation before the jump. I already have a contact for prospective engine supplier so may investigate that first.
SPT28 said:
Bit of a thread resurrection...
Andrew, did you ever find that bonnet you were after? how is the car?
Following on from your sage advice above and stumbling across a 3.9 V8 with all ancillaries for a sensible sum... I've taken the plunge. So you may now get plagued by a few questions
As a couple of starters while I'm still on body restoration - how have you routed your headers? are they through the wings or tight to the block? If the former do you have the templates of where to cut the holes?
Will get round to starting a build thread at some point as things are now progressing again after a busy year.
cheers
Sam
Hi Sam..."how's the car?" coming along sloooooooooooooooooooooooooooooooooooooooooowly, but getting there. I've fallen foul of being an old fart with the project and changing/tweaking too many things and each takes an age to complete; but it is getting there. Managed to find a very good original steel MGC bonnet, if you can do the same the fit will be right and save a lot of time faffing around with GRP bonnets.Andrew, did you ever find that bonnet you were after? how is the car?
Following on from your sage advice above and stumbling across a 3.9 V8 with all ancillaries for a sensible sum... I've taken the plunge. So you may now get plagued by a few questions
As a couple of starters while I'm still on body restoration - how have you routed your headers? are they through the wings or tight to the block? If the former do you have the templates of where to cut the holes?
Will get round to starting a build thread at some point as things are now progressing again after a busy year.
cheers
Sam
Do not use block hugger manifolds as they kill engine performance. Talk to Chris at BMH Witney and he'll arrange to send proper wing strengtheners to you + there's no need for templates, simply use the wing strengthener to mark out where the holes need to be cut. Then, you need to decide if you want single or twin exhaust pipes. If twin, there's a lot more work to do on 1. re-positioning the tank, 2. choosing the right exhaust system as one does not exist off the shelf, unless keeping a live back end and then it's the MGOC kit which sounds bloody awful unless fitted with a proprietary balance bar..., 3. I've fitted a flexible st/st balance bar on mine for a 'balanced' sound, 4. you'll need to re-think the routing of wiring and fuel lines and the exhaust system mounting locations + hanging system if going for a twin + rework of the O/S rear valence exit point to match the N/S +++
You're in Kent, I'm in West Berks...you're very welcome to pay a visit sometime...feel free to pm me. A+
Edited by v8250 on Friday 20th November 14:49
I used the MGOC SuperSports st/st exhaust system complete. This is designed for live back axle so will install off the shelf if your keeping a live back end; though you'll need to think what type of tank you'll use. MGOC has an alloy tank ready made for this application. Or use an RV8 tank from BMH.
If going IRS the SuperSports system can be used but you'll have to redesign the last 1/3rd of the exhaust pipe routing to fit. I have a Hoyle Suspension with Cosworth LSD, have remodelled the pipework to fit tight to Hoyle frame ensuring max' ground clearance and then retained/shortened the baffled st/st tail pipes...it's not easy, and have seen a number that sit too low to the ground which is impractical.
The shopping list can be endless with this type of project and the cost can spiral if not kept in check. Have you a project.xls? [component, price and supplier listing?] If not, pm me your email address and I'll forward my working copy...it's very handy to have. Plus, keep all your spare parts to sell on when ready...I've just had a major clearout of MG, V8 and TVR parts. It's netted a very tidy sum with parts ending up all over Europe and even the US.
Gassing Station | MG | Top of Page | What's New | My Stuff